The burning sign and the turquoise safe
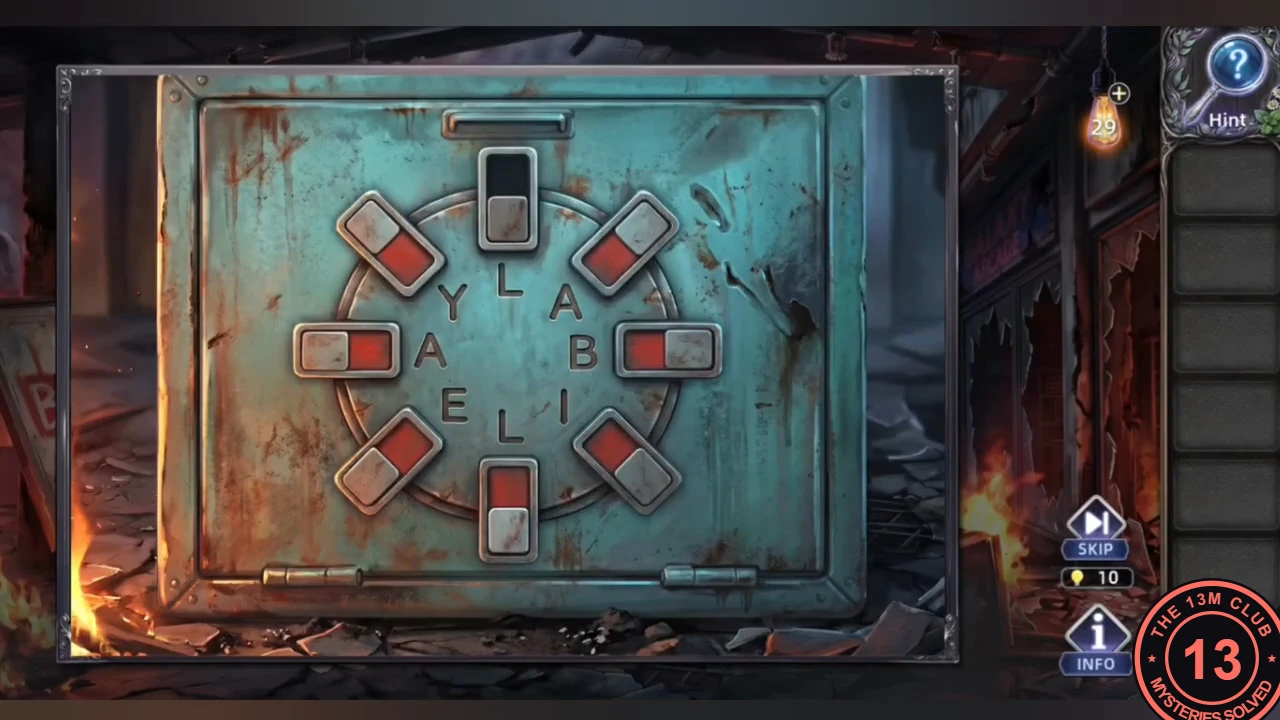
Chapter 8 opens before the burning mall. The painted sign above it sets the turquoise safe.
- The sign above the burning mall is painted: B red, A black, I red, L black, E red, Y black. Each of the safe's eight switches sits beside a letter and shows red or black, depending on which end its grey slider covers. Set each switch to its letter's colour on the sign. Clockwise from the top, the letters L, A, B, I, L, E, A, Y need black, black, red, red, black, red, black, black. Both A switches and both L switches are black. Take the Damp Handkerchief from the opened safe (a winged-tapir collectible is drawn on its back wall). Back in the burning street in front of the mall, a Crowbar lies in the pile of burning debris in the middle of the ground. Use the Damp Handkerchief on that burning pile, then take the Crowbar. The dream portal then opens.
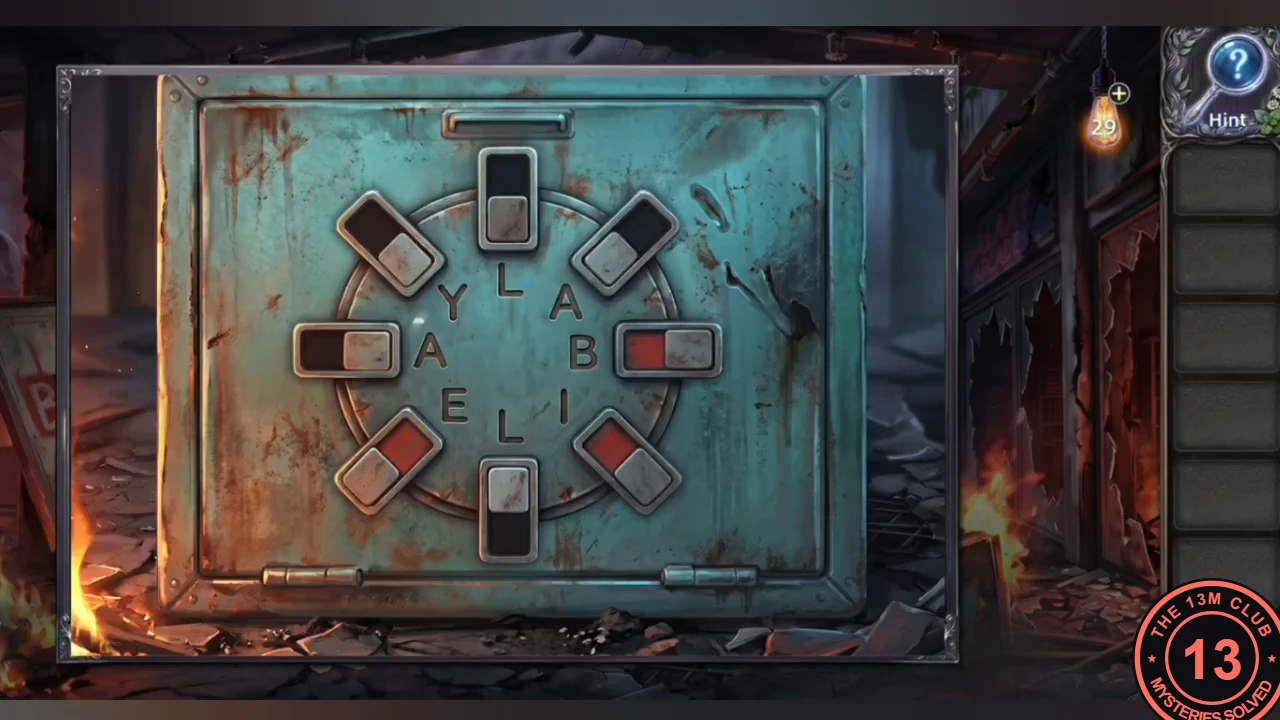
The safe switches in the position that opens it.
Ruth's dream entry
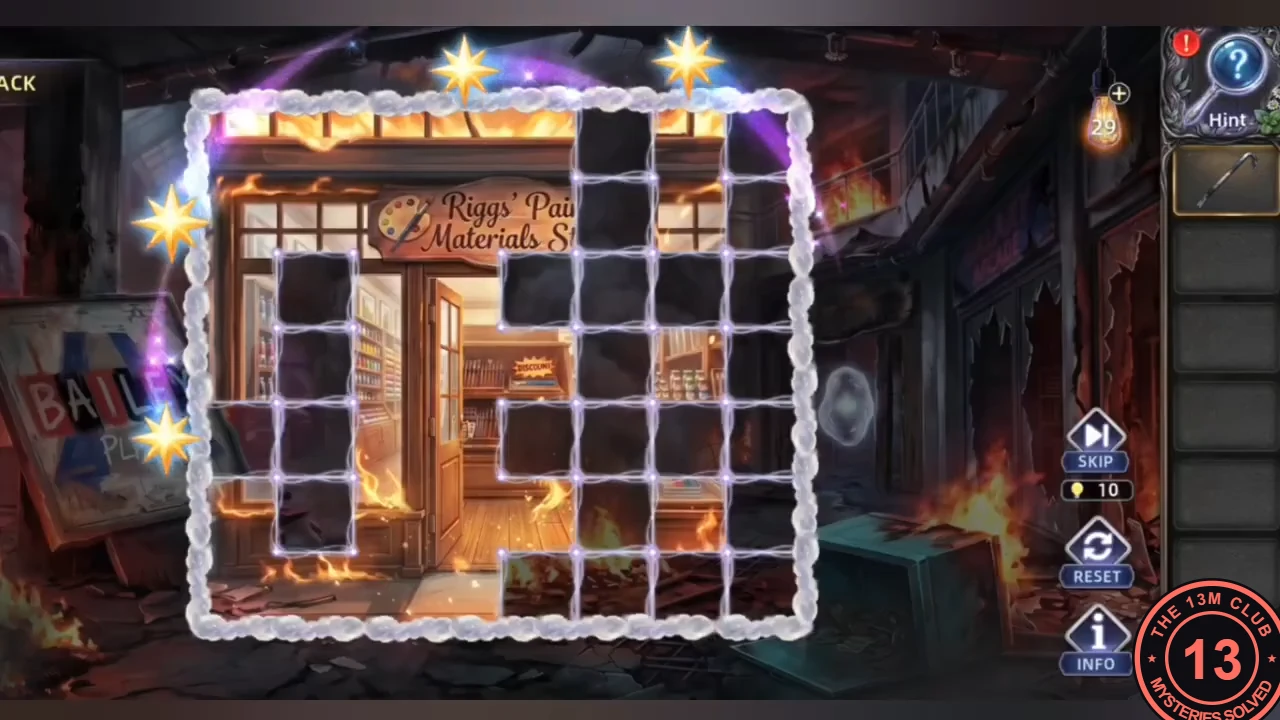
Open Ruth's dream with an 8 x 7 light grid.
- Solve the dream-entry light grid. Tapping a dark tile lights it, and the light runs along its row and column in all four directions until it reaches a tile that is already lit or the edge of the board. Light every tile before the move counter runs out; if you go wrong, press RESET. Count rows from the top and columns from the left. This board has 8 columns and 7 rows. Tap row 2 column 4, row 7 column 3, row 5 column 2, row 5 column 8, row 3 column 6, then row 7 column 6.
Lilith Clinic: the basket lock
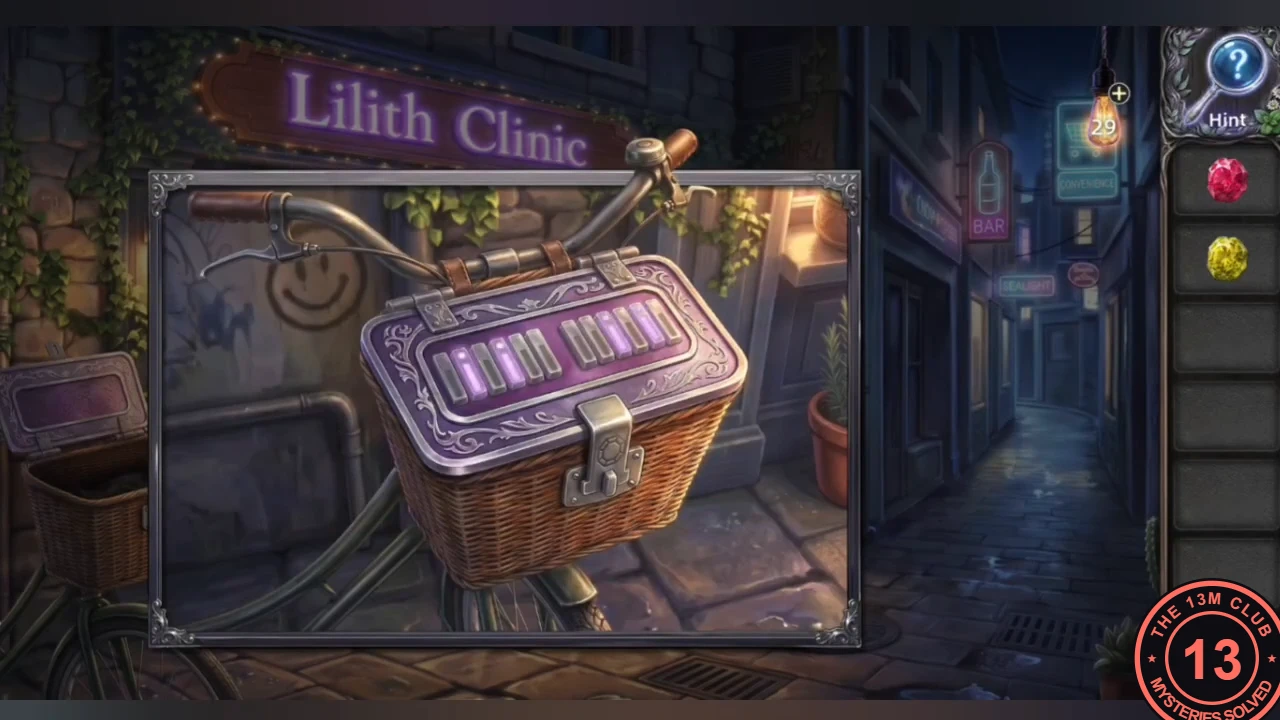
At Lilith Clinic, find two gems in the street and open the basket lock with the letters of LILITH and CLINIC.
- In the street outside Lilith Clinic, tap the round drain cover on the pavement in front of the door to take the Ruby, and tap the blue flowers in the pot to the right of the door to find the Yellow Gem. The bicycle basket lock has two groups of six sliders, one per letter of LILITH and CLINIC: raise the sliders under each I (left group 2 and 4, right group 3 and 5). Take the Sapphire from the opened basket.CODELeft 2, 4 · Right 3, 5
The clinic gem door
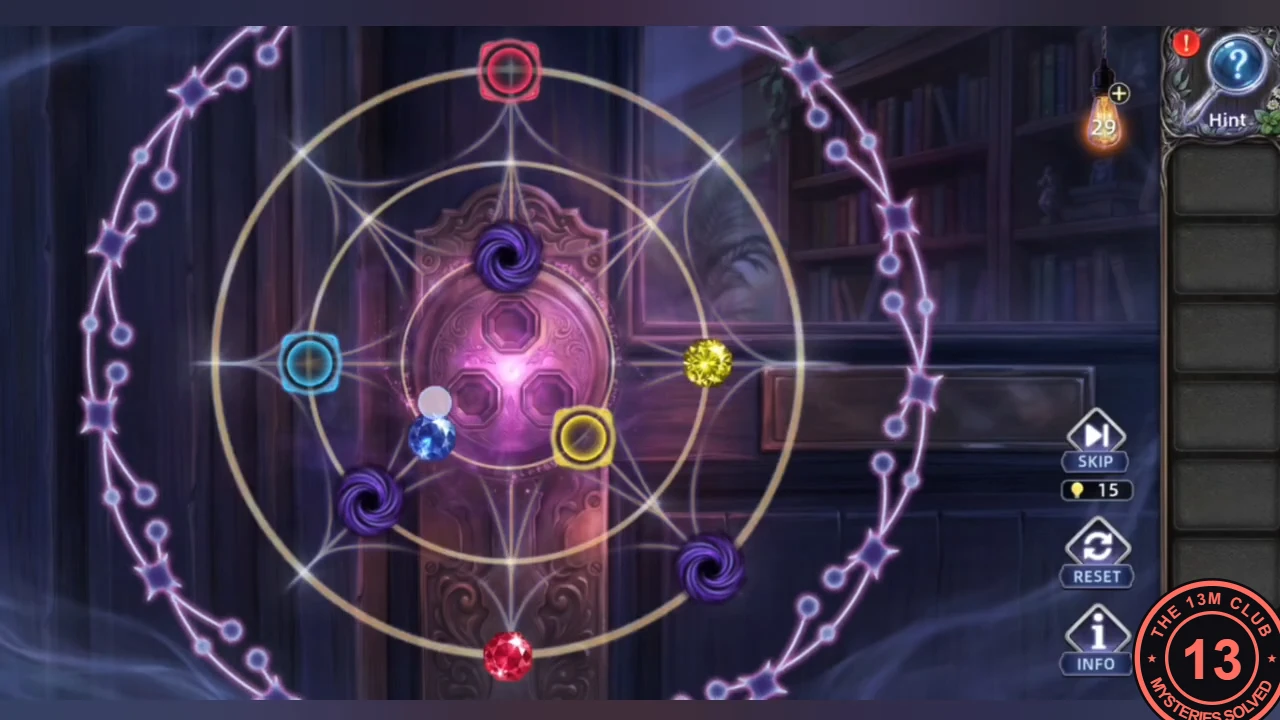
Set the three gems on the clinic door and move each to its own coloured ring.
- Put the three gems in the door lock. Move each gem along the lines to the ring of its own colour (red at the top, blue on the left, yellow lower right); the purple vortexes block the way.
The burning mall: firefighter grid
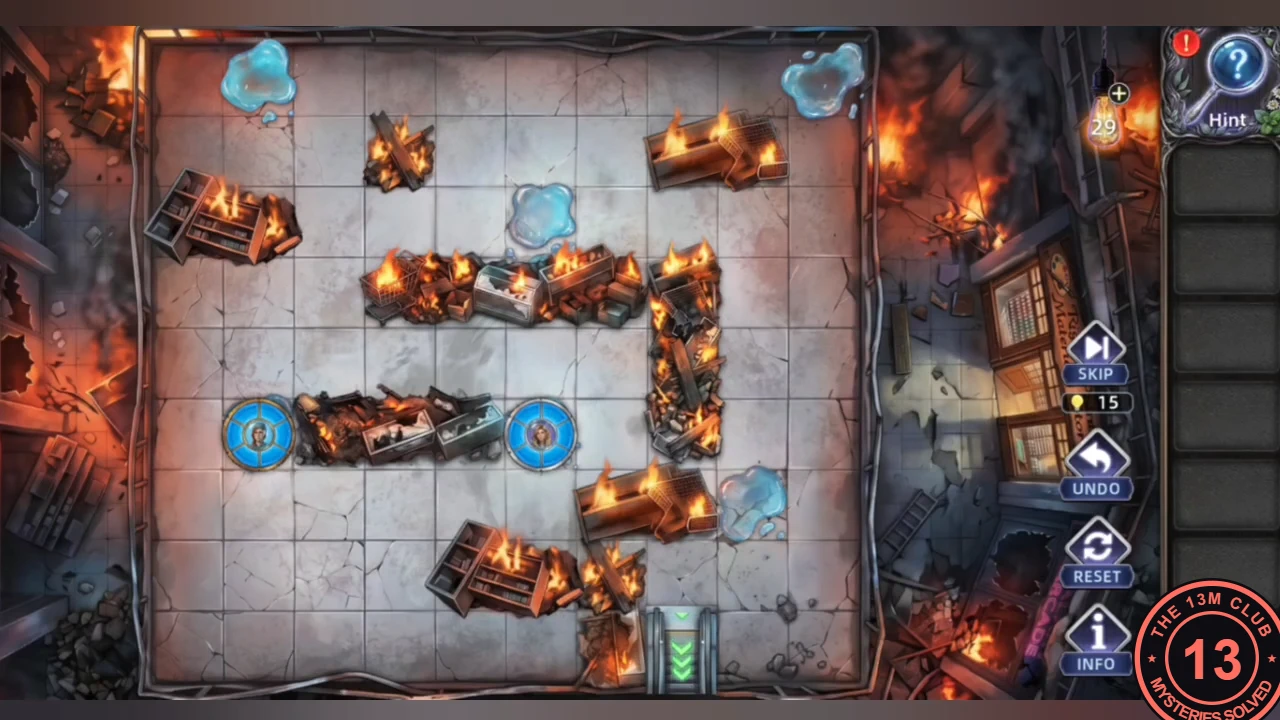
Back in the smoky mall, uncover the fire-suppression pipes and lead the firefighters out.
- Back in the smoky mall, open the art-supply store counter and take the Carving Knife. The drawer below is stuck: pry it open with the Crowbar and take the Paint Stripper. Spray the Bailey Plaza sign to strip the paint. Underneath is the mall's fire-suppression pipe diagram, and its pipes are not connected. Use the Carving Knife on the diagram.
- The firefighter board: "Drag a character toward the exit. Each move consumes one unit of water. Refill at the spray points, and don't let the water run out." Each firefighter's ring is their water gauge, and a drag moves one square. Burning debris blocks the way, and stepping onto one of the six blue spray points refills the gauge. Both firefighters start in the bottom row and must leave through the green exit in the bottom row, right of centre. That exit is walled off by debris, so the route goes all the way round the board. Move the two firefighters in turns and keep each within reach of the next spray point. The route that worked: 1) Head left along the bottom, then up the left side to the spray point at the left end of the lower debris row. The other firefighter can refill at the spray point at the right end of that row. 2) Go up through the gap between the burning shelf on the left and the small burning pile near the top. Refill at the top-left spray point. 3) Cross right, just below the top row, to the spray point in the middle, directly above the long burning row. 4) Continue up to the top row and along it to the top-right spray point. 5) Go down the right edge, then one square left onto the spray point beside the burning crate on the lower right. 6) Step down, then left, onto the exit. Bring the second firefighter out the same way. When both have left, the puzzle is solved. RESET and UNDO are on the right if a firefighter runs dry.
The basement fuse box
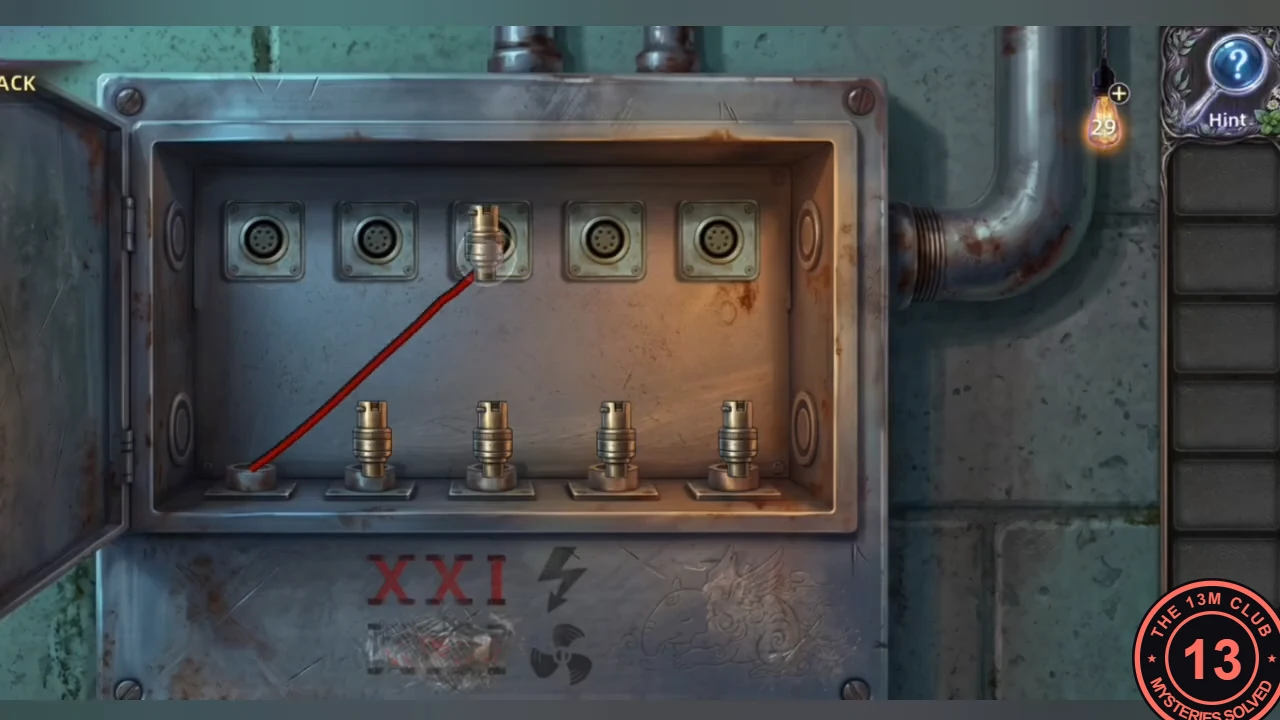
In the basement, wire the fuse box to match the paint below it.
- Wire the fuse box so the cables read XXI, like the paint below it: top 1 to bottom 2 and top 2 to bottom 1, top 3 to bottom 4 and top 4 to bottom 3, and top 5 straight down.CODEX X I
The ladder buckles
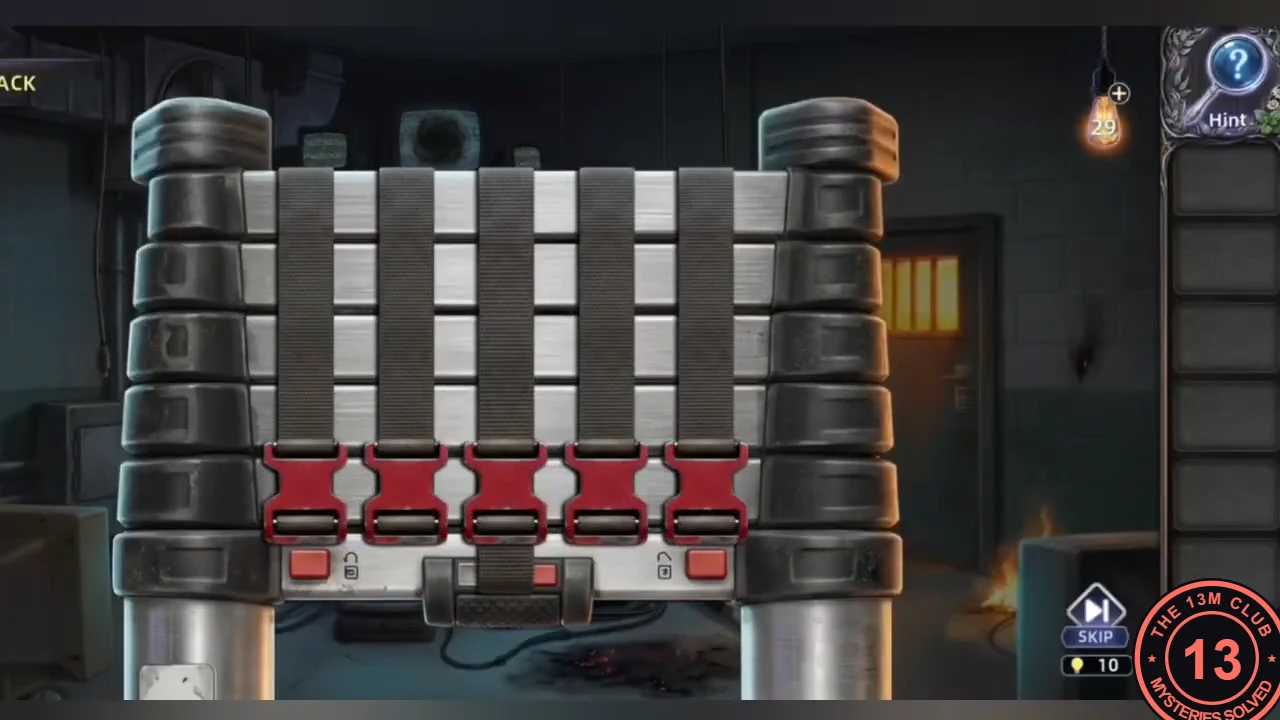
The handprint on the TV sets the ladder buckles.
- The TV shows a handprint. Slide the ladder's five buckles to the fingertip heights: counting rungs from the top, left to right on rungs 2, 1, 2, 3 and 5. Take the Ladder.
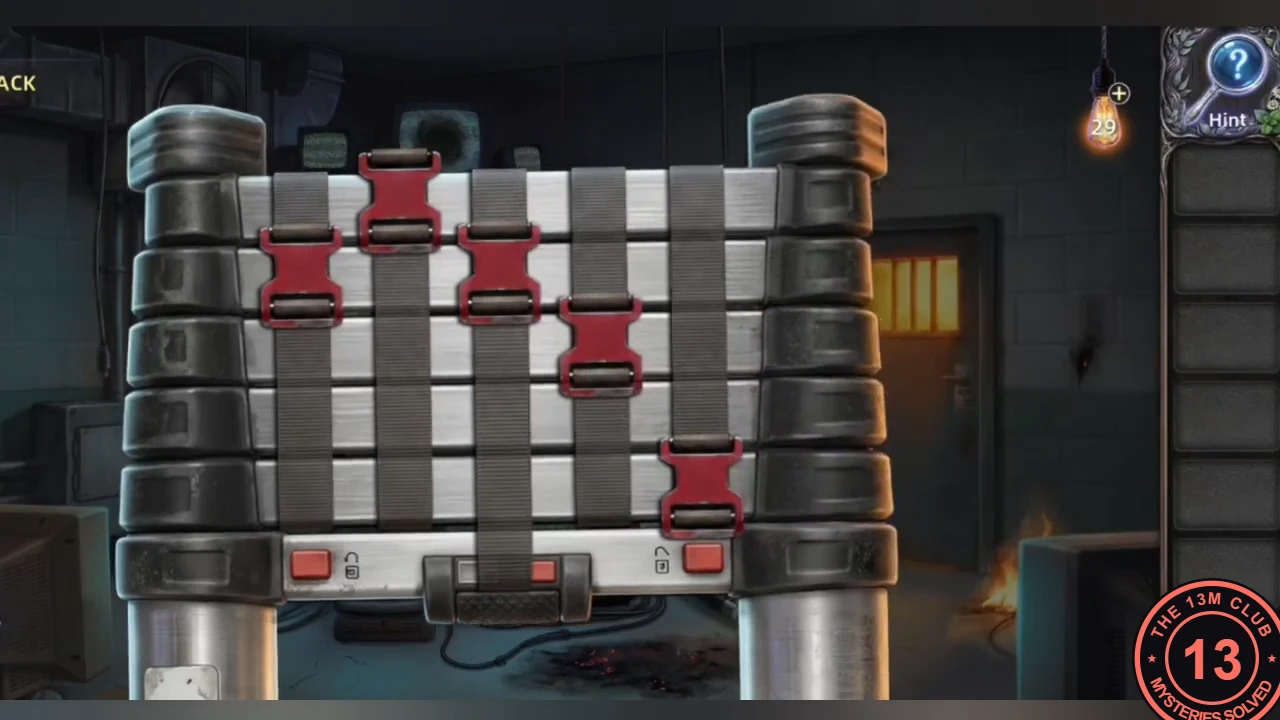
Completed ladder: from left to right the buckles sit on rungs 2, 1, 2, 3 and 5 counted from the top, matching the fingertips of the handprint.
The surveillance suite keypad
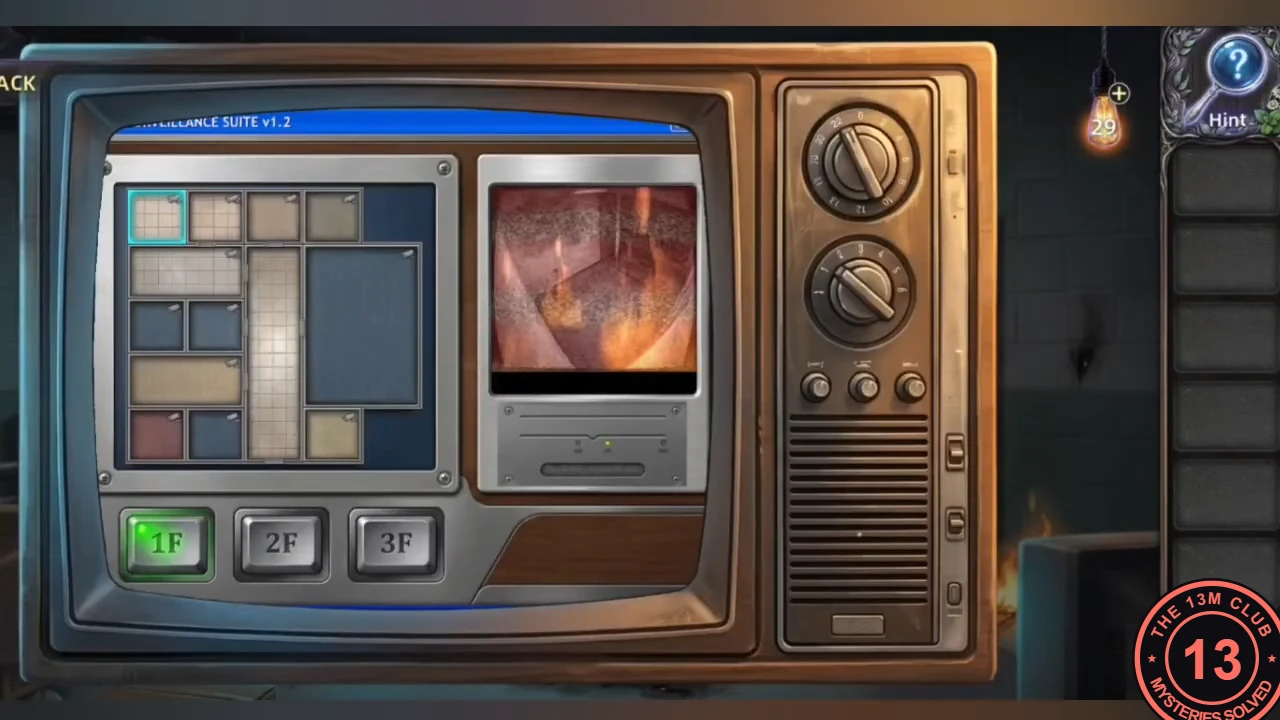
Check the surveillance cameras on each floor for the keypad code.
- Use the Ladder on the stack of TVs to reach the surveillance suite. On 1F, 2F and 3F, the camera rooms showing fire trace one digit per floor. Enter 726 on the keypad.CODE726
Arcadia & Co.: the colour-digit lock
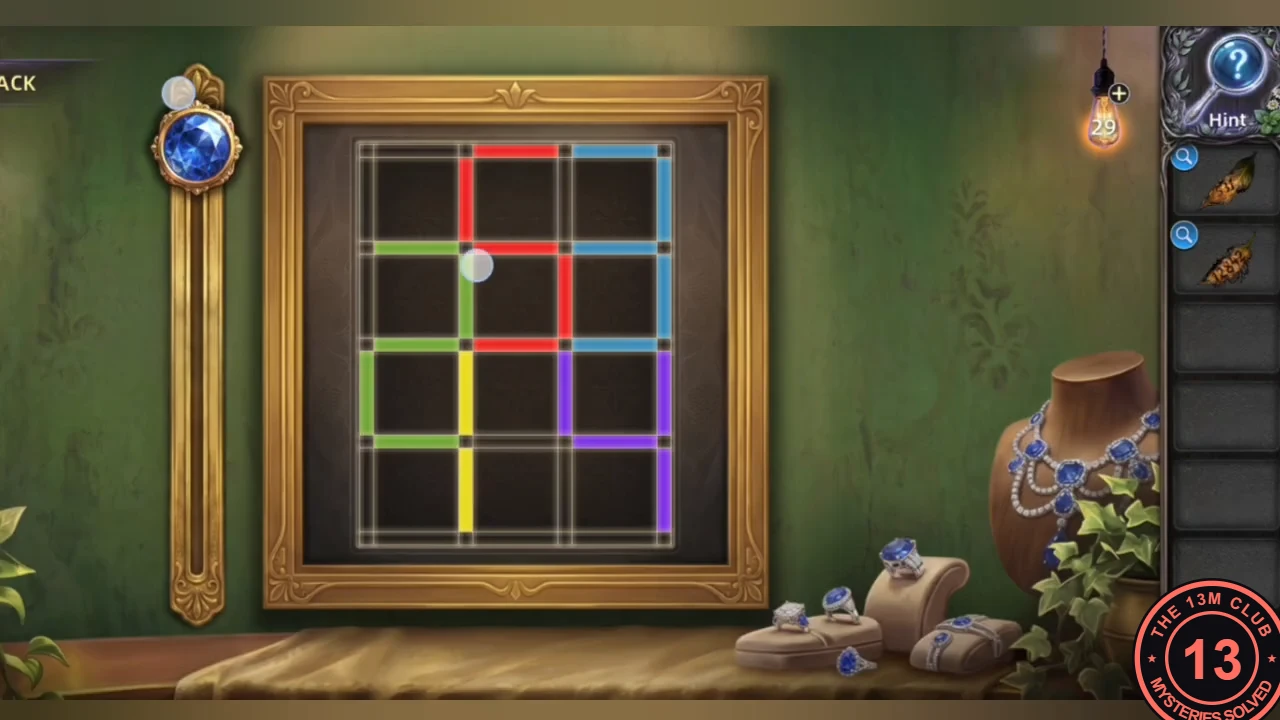
At Arcadia & Co., the burnt leaf and the window colours open the first diamond lock.
- Take Another Burnt Leaf and the Scraper by the candle and the Gem Handle from the plant pot. Scrape the damaged door panel to reveal a three-diamond lock and a Burnt Leaf reading 531.
- Put the Gem Handle in the window's slider. Each colour of line forms a digit: red 5, blue 3, green 2, purple 4, yellow 1. Set the diamonds to red, blue, yellow. Take the Shovel that the opened lock releases.CODERed, Blue, Yellow
- Dig the cracked floor medallion with the Shovel. Ruth and Lilith recognise the round hollow, and a crystal orb holding a yellow umbrella settles into it by itself (nothing to place). A voice says "It's a shame you won't remember any of this when you wake up", and the shop turns mirrored, split by a beam of light. Take the Long Pole lying on the floor at the foot of the door, use it on the upper right of the door frame to knock down a Key and take it. Use the Long Pole again on the upper left of the door frame: the second Key falls to the floor left of the medallion; take it. Put both Keys into the door's keyholes.
The mirrored diamond lock
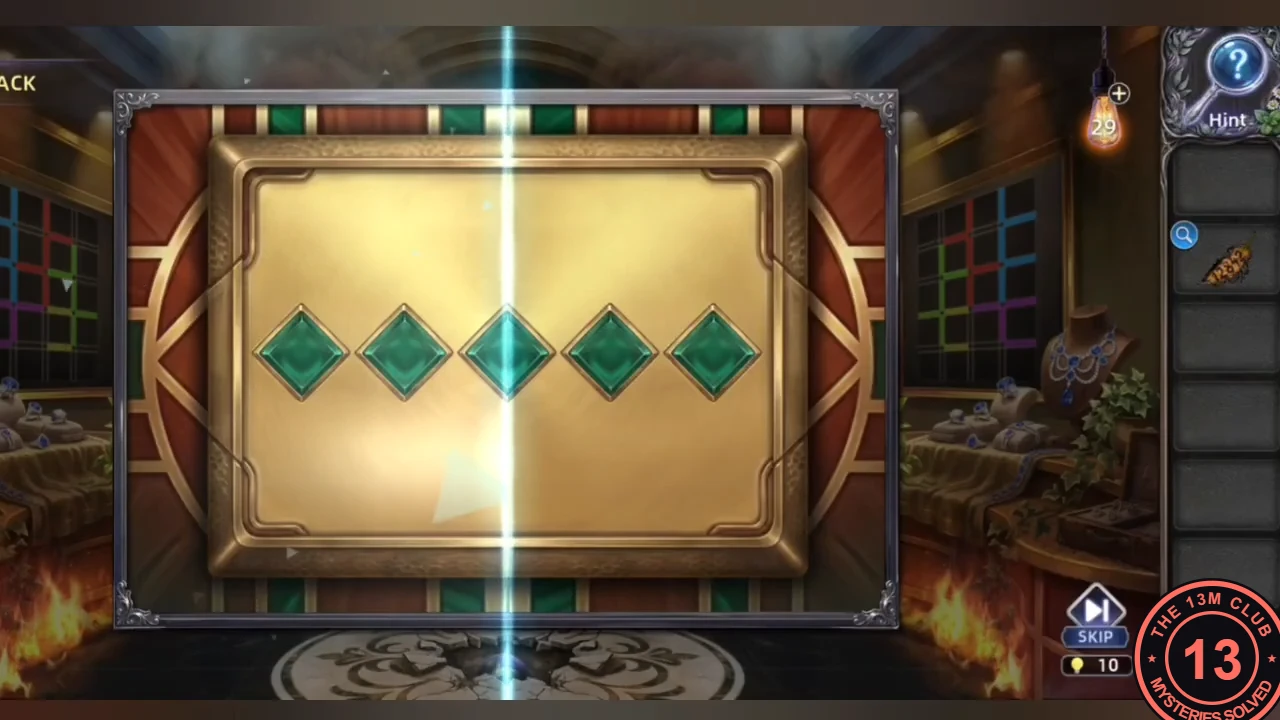
The mirrored shop gives a second burnt leaf; read it through the beam.
- The beam works as a mirror. The 8 on the leaf sits on the beam, so it is blue's 3 doubled by its reflection. Digits left of the beam are read mirrored, so the 2 there is red (a mirrored 5). Using the window colours (red 5, blue 3, green 2, purple 4, yellow 1), set the diamonds to yellow, red, blue, purple, green.CODEYellow, Red, Blue, Purple, Green
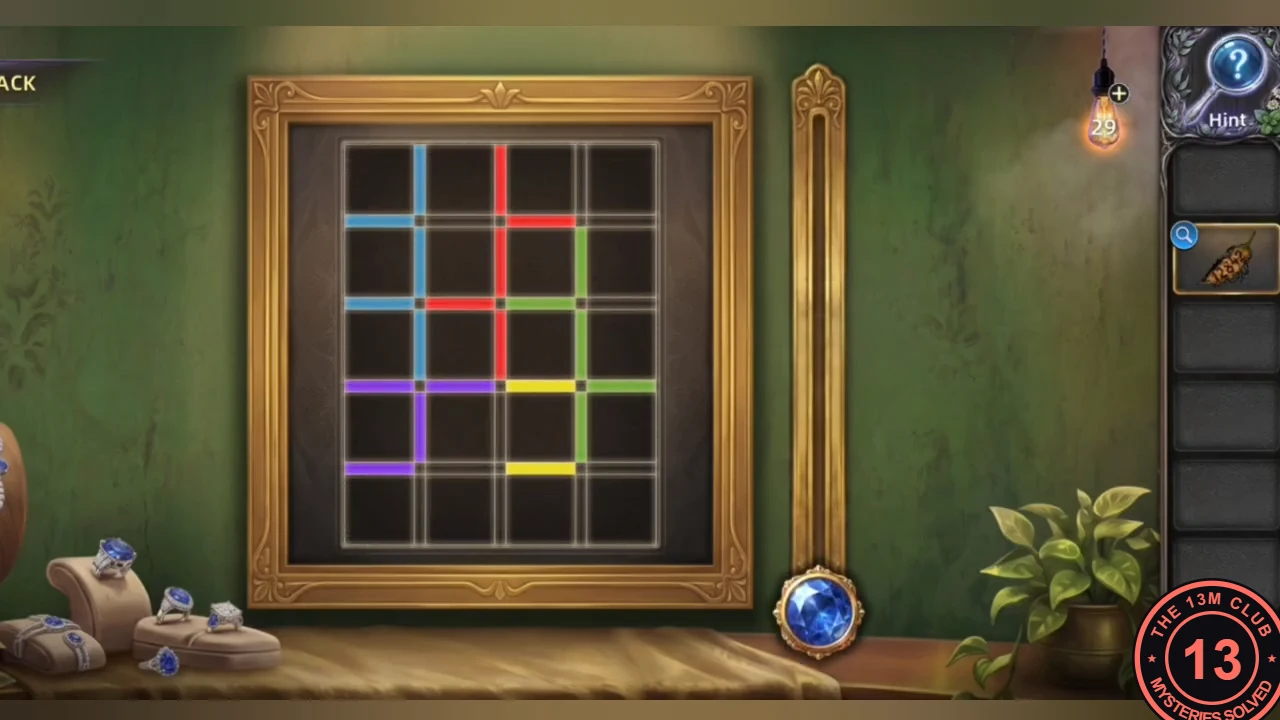
The window clue: coloured line segments that form one digit per colour. The gem slider beside the frame changes the view. 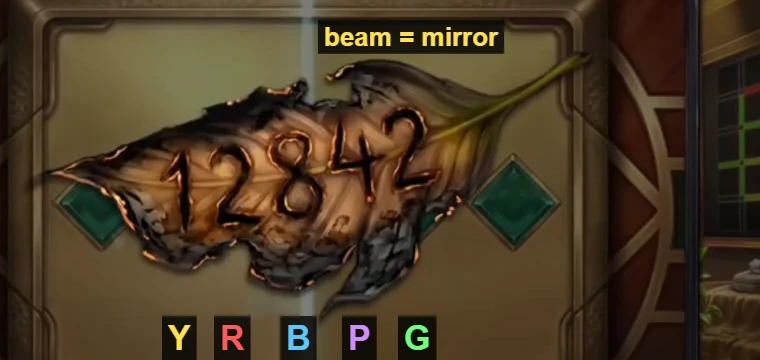
The leaf over the lock: 1 = yellow, the mirrored 2 = red (5), the 8 on the beam = blue (3 doubled), 4 = purple, 2 = green.
The chained exit and the fire cabinet
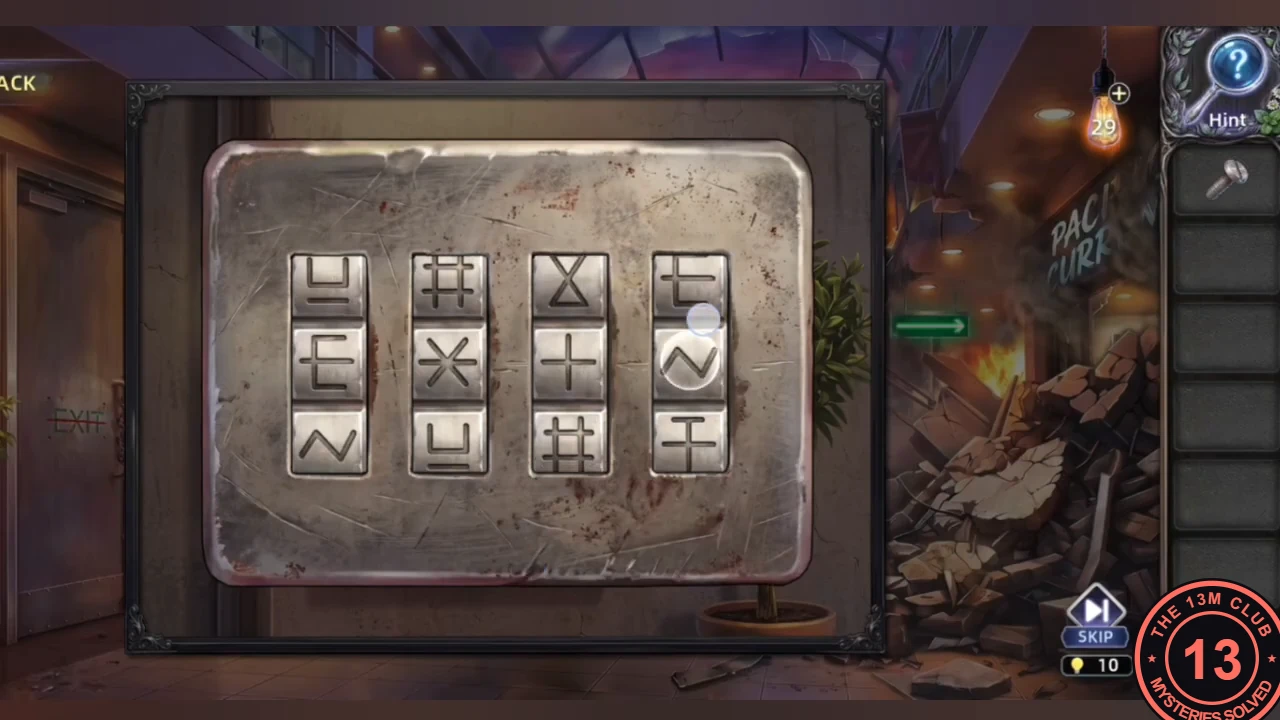
The fire-equipment cabinet by the exit is chained. The EXIT sign holds the padlock word.
- The fire-equipment cabinet is chained. Take the Flathead Screwdriver lying on top of the red fire-equipment cabinet and unscrew the EXIT sign on the chained door to reveal the scratched letters EXIT.
- Turn the four symbol columns of the cabinet padlock until the middle row reads E, X, I, T. Take the Bolt Cutters and cut the chains on the exit door.CODEE X I T
Final escape and ending
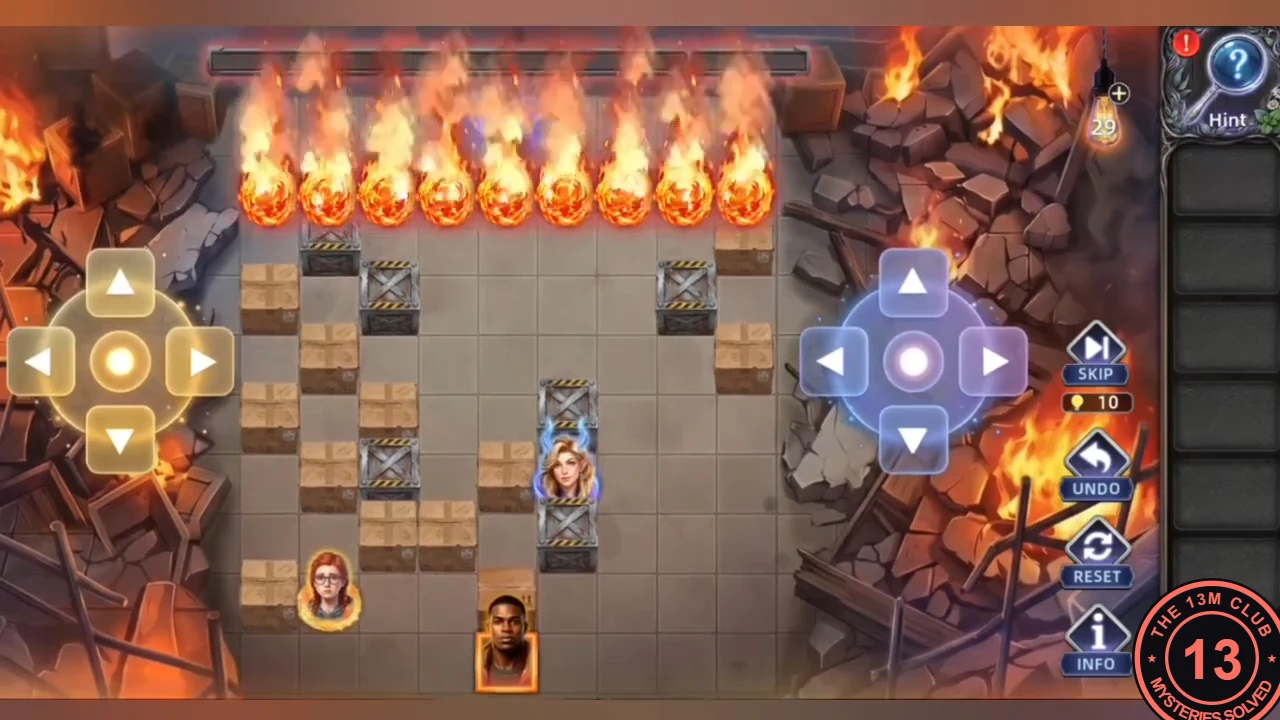
The final escape from Carl's nightmare, followed by the ending.
- In the basement memory, young Ruth hides as a burning firefighter reaches for her. Giant Carl then blocks the way.
- The final escape board: "Drag a character to move or push a wooden crate. After every 5 moves, a row of fireballs falls onto the field. Use the wooden crates to block the fireballs and protect everyone. Guide Lilith safely to the goal to clear the stage!" Ruth stands at the bottom left, a trapped man at the bottom centre and Lilith at the bottom right. The goal is the portal at the top, left of centre. Move Ruth with the gold arrow pad on the left and Lilith with the purple pad on the right, or drag them. Each press moves one square, and walking into a wooden crate pushes it. The grey metal crates with hazard stripes stay put. The bar at the top counts the five moves before each fireball row. A falling fireball stops at the first crate in its column; a wooden crate it hits burns away. So before every fifth move, check that each person has a crate above them in their own column. The man never moves, so his column needs cover each time. The approach that worked: take Lilith up the right side and left into the shelter between two metal crates. Walk Ruth up the left side between the crates. After the third fireball row, move Lilith into the man's column under a wooden crate, which shields them both. When the fourth row has fallen, walk Lilith straight up the cleared column into the portal.
- Ending: Lilith defeats Carl, Ruth helps rescue everyone from the clinic fire, Carl is tried three months later, and the story closes at Ruth's café. There is no ending choice; this is the only ending.