Echoes: the barricaded cabin and the first locker panel
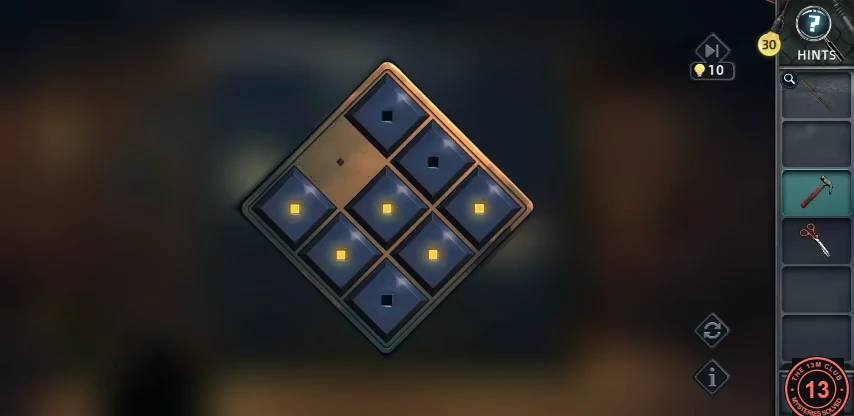
Chapter 4 (Echoes): silver men chase the detectives into a cabin. Barricade the window, then solve the light panel on the left locker.
- Silver men chase the detectives into a cabin. Take the Wooden stick leaning against the left wall beside the toolbox and the Planks of wood lying on the floor at the right, in front of the desk. From the toolbox take the Hammer, Scissors and Nails, then nail the planks across the window.
- The left locker has a diamond-shaped 3x3 light panel. Below, the tiles are named by where they sit in the diamond: top, upper-left, upper-right, left, centre, right, lower-left, lower-right and bottom. Tapping a tile switches it and every tile that shares an edge with it (on or off). The paper on the locker door shows the target: a plus of five squares with a ring through the four outer ones. On the diamond, that means the four tiles touching the centre (upper-left, upper-right, lower-left, lower-right) must be lit, with the centre and the four points dark. The panel starts fully dark. Tap upper-left, upper-right, lower-left and lower-right once each, in any order. Tapping a tile twice cancels it, so if you tap a wrong tile, tap it again. Take the Key and the note: "If book says the same as the whisper, go left; otherwise, go right."
The second locker panel and the rune door
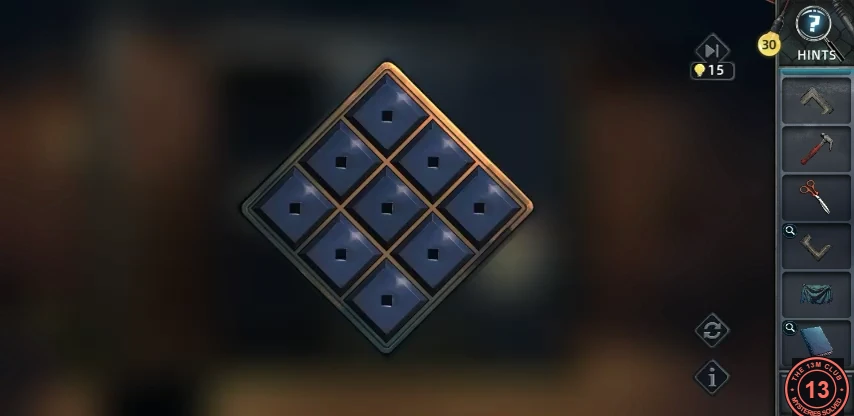
The torn paper on the right locker needs the half note from the back room. The second panel holds the Glue and Fuel for the Glowing stone and the torch.
- Use the Key from the first locker on the locked door at the right of the cabin to go through to the back room. In the back room with the glowing rune door, break the vase with the Hammer and take both Stone shards that fall out. Cut the curtain with the Scissors for Fabric. Read the book ("Words manifest and change when needed") and take the Half a note tucked inside it. Back at the lockers, add the half note to the torn paper on the right-hand locker. The joined paper shows the target for the second light panel: three squares lit along the upper-left edge and one at the lower right. On the panel, that means top, upper-left, left and lower-right lit, with everything else dark. It also starts fully dark and uses the same tap rule. Tap top, upper-left, upper-right, left, lower-left and lower-right once each. Take the Glue and the Fuel from the opened locker.
- In your inventory, use the Glue on one Stone shard and join the second shard to it: the two V-shaped halves form the diamond Glowing stone. Wrap the Fabric round the Wooden stick (Stick with fabric), soak it with the Fuel, and light the torch at the candle on the pedestal in front of the rune door. Set the Glowing stone into the diamond socket on that pedestal to open the door.
The whispering corridor
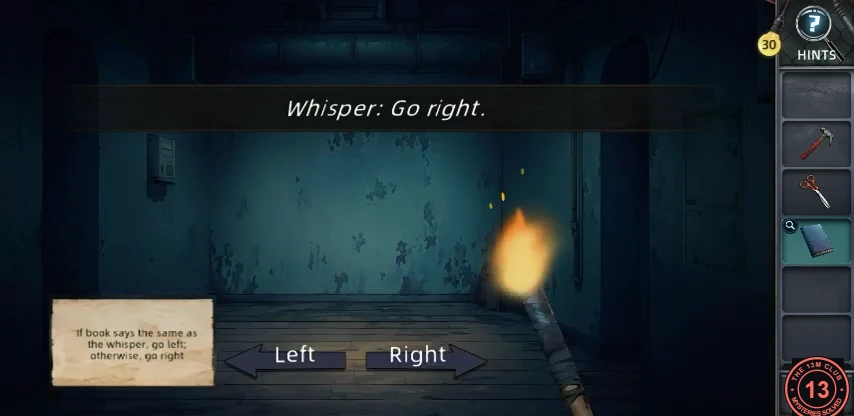
In the whispering corridor, each junction tests whether the whisper agrees with the book.
- Read the note: "If book says the same as the whisper, go left; otherwise, go right." At each junction, compare the whisper at the top of the screen with the page of the book. If the book agrees with the whisper, press Left; if it says something different, press Right. This applies to whispers without a direction too. The recording had seven junctions: Go left / GO RIGHT – Right; Go right / GO LEFT – Right; Go left / GO LEFT – Left; "…Repeat." / GO RIGHT – Right; Go right / GO RIGHT – Left; "Don't trust that book." / GO LEFT – Right; "You'll be trapped here forever." / "YES YOU WILL" – Left, which leads to the real exit. The book text may change between plays, so always compare your own whisper and page.
The exit hall wall safe
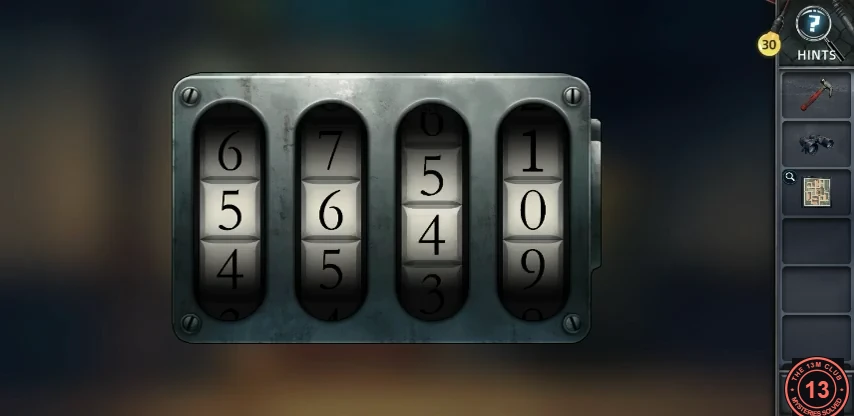
In the exit hall, the paper on the cabinet shelf gives the wall safe code.
- Take the Binoculars from the middle shelf of the cabinet; you need them upstairs. Look at the paper on the cabinet shelf. It shows four digital digits side by side that share their vertical segments, drawn in dark, grey and faint shades. The shade tells you how many digits use that segment: dark = both neighbouring digits, grey = one digit, faint = none. Reading it this way gives 5 6 4 6 (tapping a segment outlines it, which helps you check each digit). Set the wall safe's middle row to 5 6 4 6. Take both the Key and the Pass card from the open safe; you need the Key later for the double door. Use the Pass card on the card reader on the wall left of the double door, and a ladder drops down at the left so you can climb upstairs.CODE5646
The binoculars and the getaway route
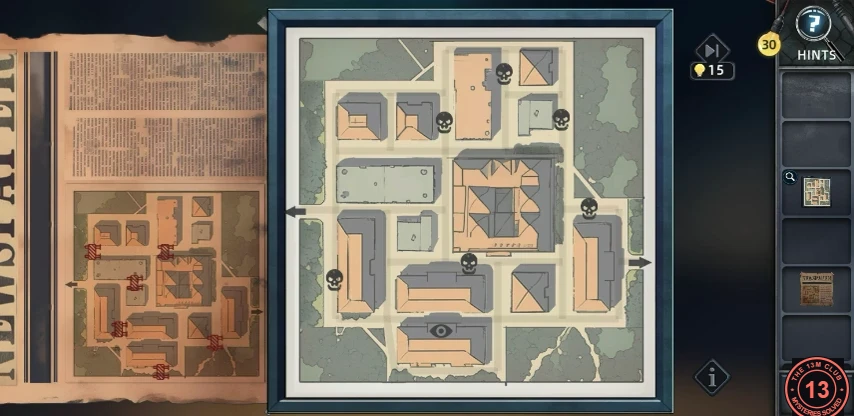
Upstairs, spot the silver men and find the car, then plan the getaway route.
- Upstairs, take the Newspaper from the wall noticeboard. Break the window on the left with the Hammer and take the Car key from the broken window. Use the Binoculars (from the downstairs cabinet) to look out: you spot the silver men in the streets and a car parked right downstairs, and Martin marks all the silver men on the route map.
- Unlock the double door with the Key from the wall safe; the car is parked behind it, but "We need carkey": use the Car key on the car. On the route map, drag a line from the eye mark through the streets to the exit, avoiding every skull and barrier.
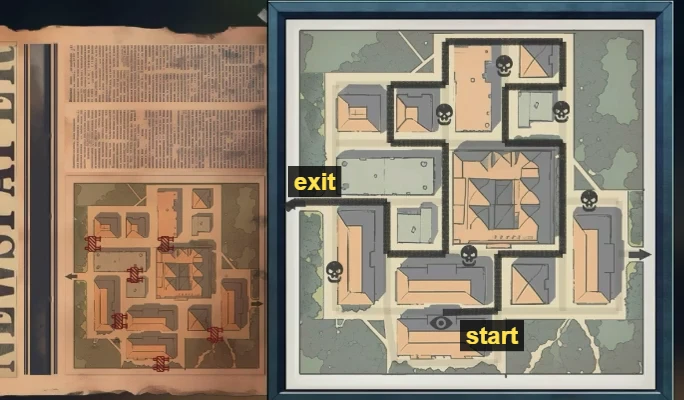
A working route: from the eye mark (start) up and around the blocks, avoiding every skull, to the left edge (exit). The level is solved as the line reaches the exit.
The sealed gate: payphone and booth keypad
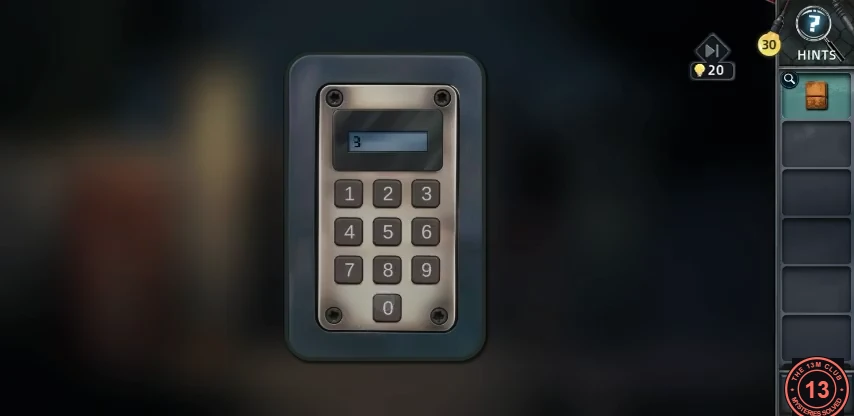
At the sealed gate, Amy's notebook points to the payphone. The phone's green light gives the code for the security booth.
- At the gate, take the silver coin by the phone and read Amy's notebook: the silver man guarding the gate is Albert, and you should call 139 for the security office password. Put the coin in the payphone and dial 139.CODE139
- The call gives only noise, but the green light on the payphone blinks a code: long-short, long, long. The booklet beside the phone lists a dot-dash code for each digit (0 = one long flash, 9 = long-short), so the blinks read 9 0 0. Tap the light to replay it if you miss it. Enter 900 on the keypad by the security booth door.CODE900
The POLICE lock and the backpack
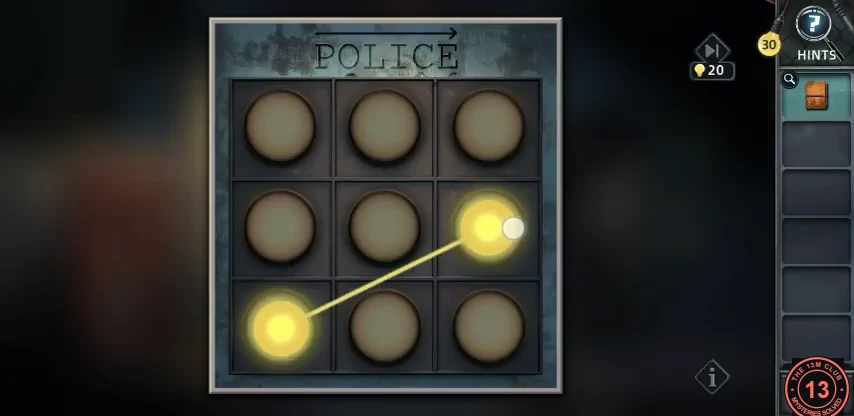
Inside the booth, the POLICE pattern lock opens the cabinet. The backpack by the mailbox holds Amy's diary with the next number to call.
- Open the POLICE pattern lock on the cabinet under the booth desk. Spell POLICE with the letters of a phone keypad (P 7, O 6, L 5, I 4, C 2, E 3) and treat the 3x3 grid as keys 1 to 9: draw one stroke through bottom-left (7), middle-right (6), middle-centre (5), middle-left (4), top-centre (2) and top-right (3). In the booth, take the Lubricant (oil can), a Silver coin and the first Runestone. Back at the gate, use the Lubricant on the backpack on the ground at the foot of the red mailbox post to open it, then take the Diary and the second Runestone from inside. In the Diary, Amy says the number is related to Albert's birth year; turn the hidden page upside down to read "call 096". Put the Silver coin in the payphone and dial 096.CODE096
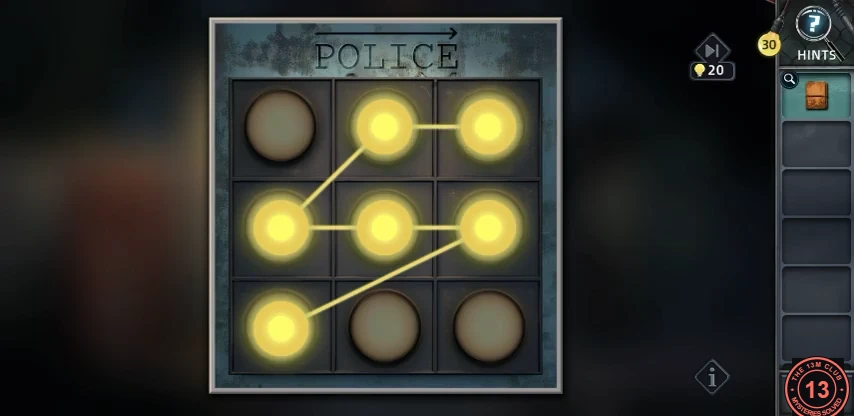
The complete POLICE pattern: one stroke from bottom-left through middle-right, centre, middle-left and top-centre to top-right (keys 7-6-5-4-2-3).
The security computer questions
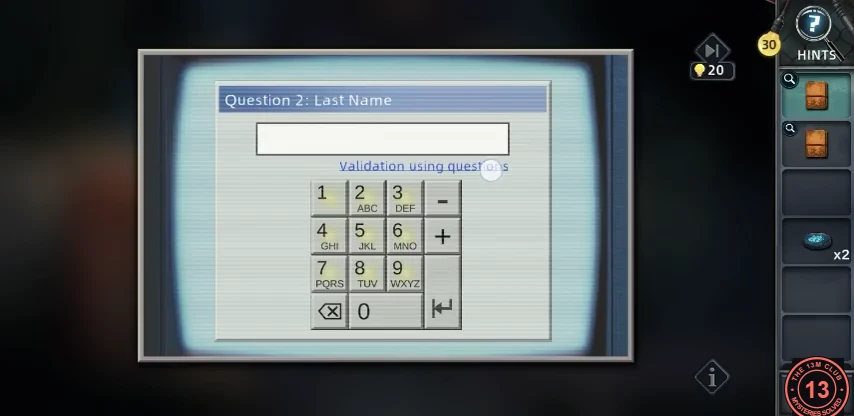
The security computer asks three questions about Albert Wilson.
- Answer the security computer questions with the phone-keypad digits for each letter: First Name ALBERT = 252378, Last Name WILSON (on the mailbox) = 945766, Year of Birth 1821. When it unlocks, take the Glass toy (a glass teddy bear) from the computer, then the new Silver coin in the booth.CODE252378, 945766, 1821
The second light code and Wilson's mailbox
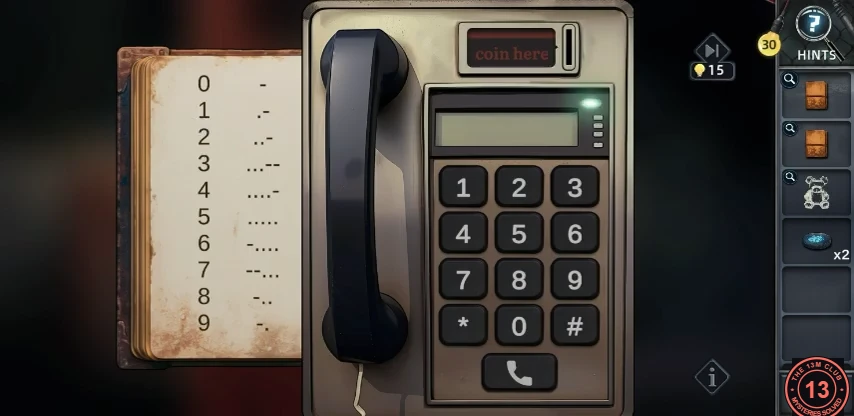
The computer's gift code 528 makes the payphone light flash a second code. Its loud buzz frees the key to Wilson's mailbox.
- Put the Silver coin in the payphone and dial 528. Only a harsh buzz comes through, but the small green light at the top right of the keypad display flashes a code again. It repeats one digit until you dial it, then moves on to the next digit. Read the short and long flashes with the table in the booklet on the left: 1 = short-long, 8 = long-short-short, 6 = long then four short, 7 = two long then three short. Tap the light to replay it. Dial 1 8 6 7. The much louder buzz shatters the Glass toy, leaving a glass Key. Use the Key on Wilson's red mailbox and take the third Runestone and the Note ("My final research is done…") with its star diagram.CODE528, 1867
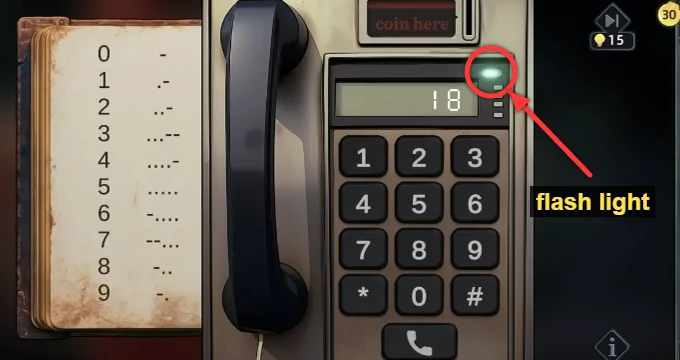
The flash light (circled) is at the top right of the display. Read its flashes with the booklet table on the left.
The sealed gate rune lock
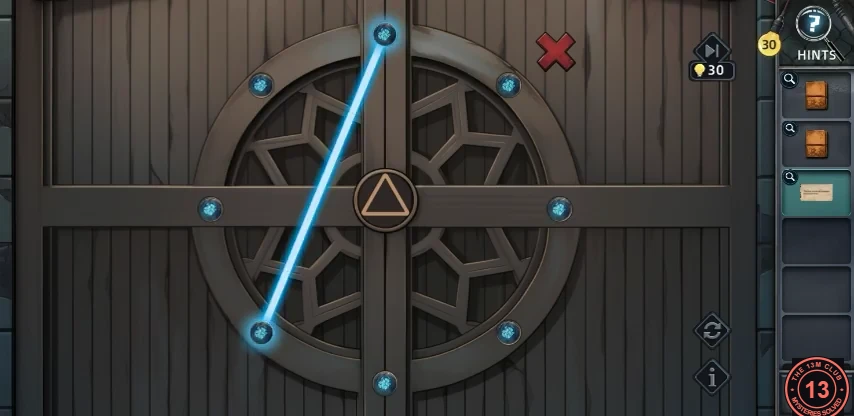
Place the three Runestones in the gate lock and copy the star from Wilson's note.
- Place the three Runestones (from the booth, the backpack and the mailbox) in the gate lock and draw the star from the Note in one continuous line through the eight nodes.
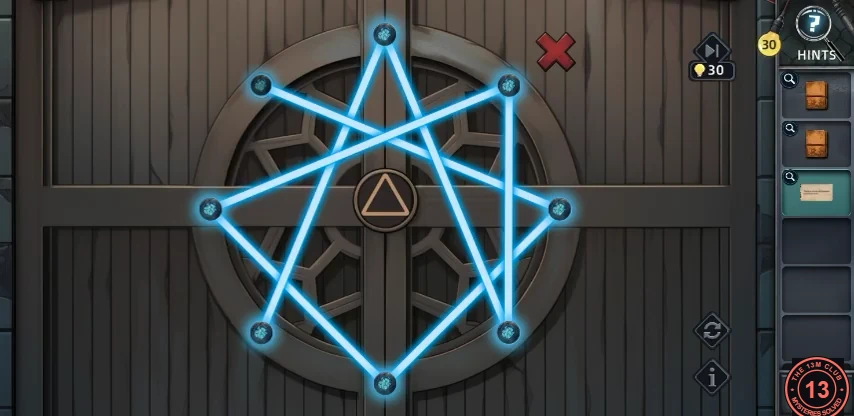
The completed star on the gate rune lock.
Hunter and the ending
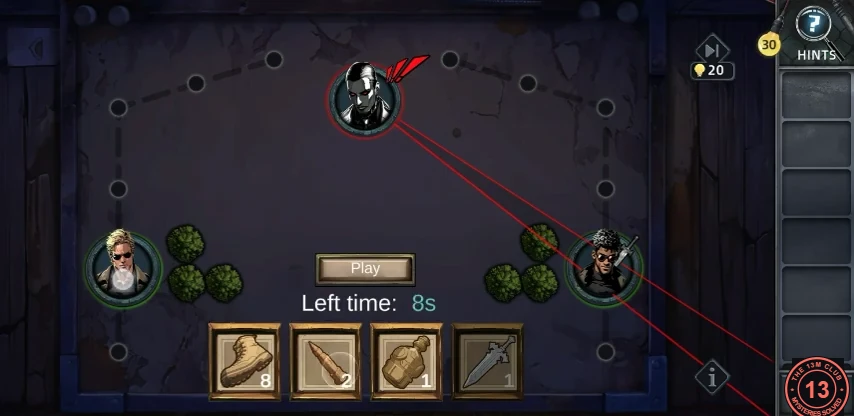
The final board against Hunter, followed by the ending.
- Final board against Hunter: Martin and James stand on a ring of nodes, and Hunter watches from the top with a turning vision cone. Each turn, choose your cards and press Play before the timer runs out (it starts at 20 seconds). You have Boots (10, one node per move), Bullets (2), one Flask and the Silver Sword. Bullets do no damage ("A normal gun can't do damage"). Creep up both sides, using the bushes as cover and staying out of the cone. The Flask does not act at once: in the recording it was thrown at Hunter and exploded a couple of turns later, stunning him (a swirl appears above his head). Use that time to bring a detective onto a node next to Hunter, outside his cone, and strike with the Silver Sword.
- Watch the ending: the silver sword strike, the epilogue at the EJS Agency and the credits. There is one ending.