Porch and Water Pump
After talking with Porsha, go back outside to the front of the Brightons' country house.
- Open the broken boards under the porch steps. Bind the splintered planks with the Construction Tape Piece and take the Water Pump Handle from the gap.
- Open the water pump. Fit the Water Pump Handle, set the Empty Watering Can under the spout and pump. A valve puzzle starts.
Pump Valves
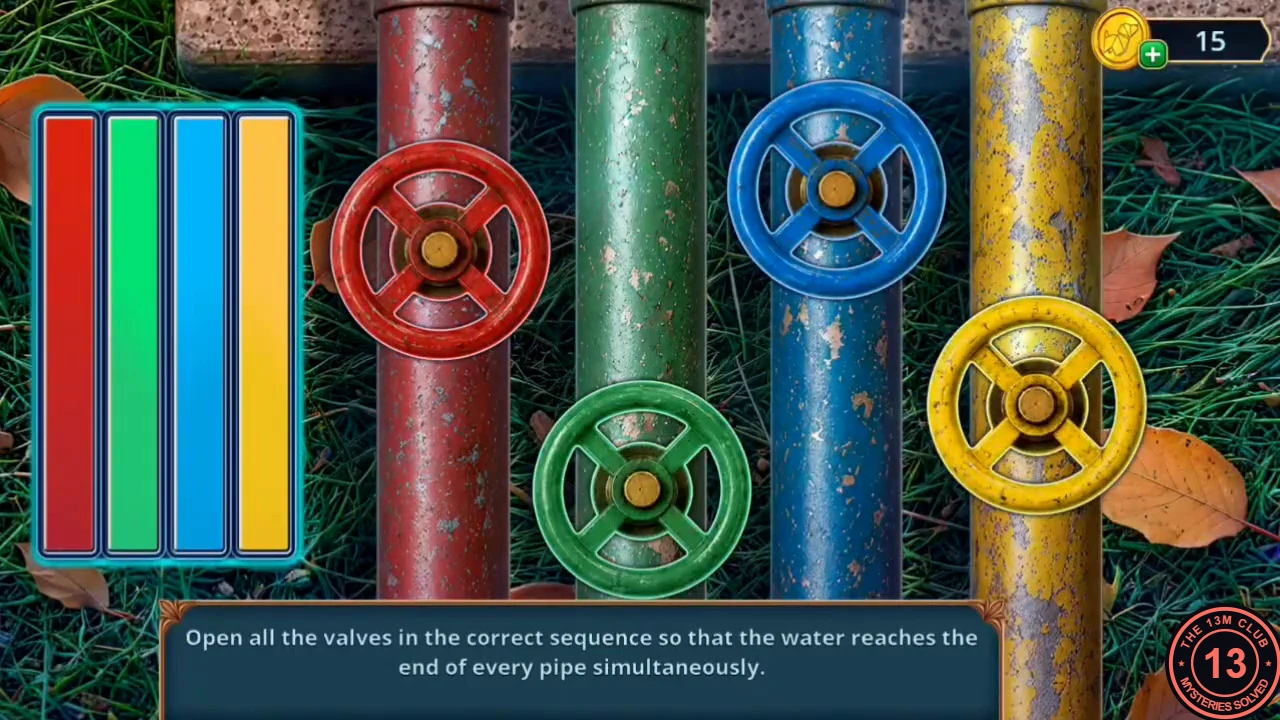
The instruction reads: open all the valves in the correct sequence so that the water reaches the end of every pipe at the same time. The four bars on the left show how much each coloured pipe still has to fill — the longer the bar, the earlier that valve must be opened.
- Open the valves from the longest bar to the shortest, opening each one as the bars already running drain down to its level: yellow first, then blue, then red, then green. All four pipes finish together and the watering can fills, giving you the Full Watering Can.
- Open the nettle patch by the fence. Water the cracked mound with the Full Watering Can, then take the Handle (a red, slingshot-shaped frame) and the New Piston that come to the surface.
Fixing the Police Car
Return to Mountain Road. Victor knows a bit about cars and can see the problem; he just needs the parts.
- Open the police car's engine and put the New Piston into the empty cylinder slot.
- Open the electrical cabinet where you left the Dead Battery. Clip the Metal Clamps between the sparking wires and the battery; when the battery's light turns green, take the Charged Battery.
- Put the Charged Battery into the car's battery tray, then open the engine again. A spark-plug puzzle starts.
Spark Plugs
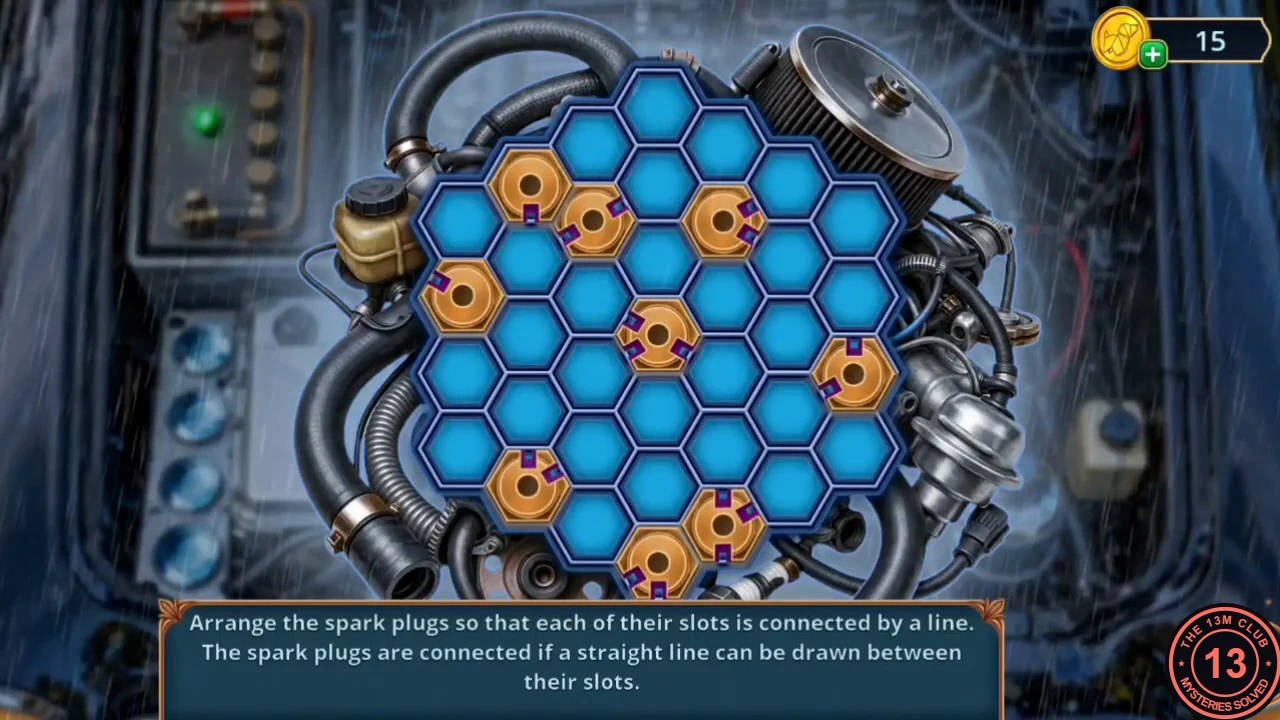
The instruction reads: arrange the spark plugs so that each of their slots is connected by a line; two plugs are connected if a straight line can be drawn between their slots. Nine plugs sit on a hexagonal board with seven columns. Drag a plug to an empty cell; plugs keep the direction they face. A link appears when two slots face each other along a straight line of cells, even across empty cells.
- Count the columns 1–7 from the left and the rows from the top of each column. Place the plugs like this: column 4, rows 1, 3 and 6; column 5, rows 2 and 4; column 6, rows 1, 3 and 4; column 7, row 4. This creates the links 4/1–4/3, 4/3–4/6, 4/3–5/2, 5/2–6/1, 6/1–6/3, 6/3–5/4, 5/4–6/4, 6/4–7/4 and 6/4–4/6. When every slot is linked, the engine starts.
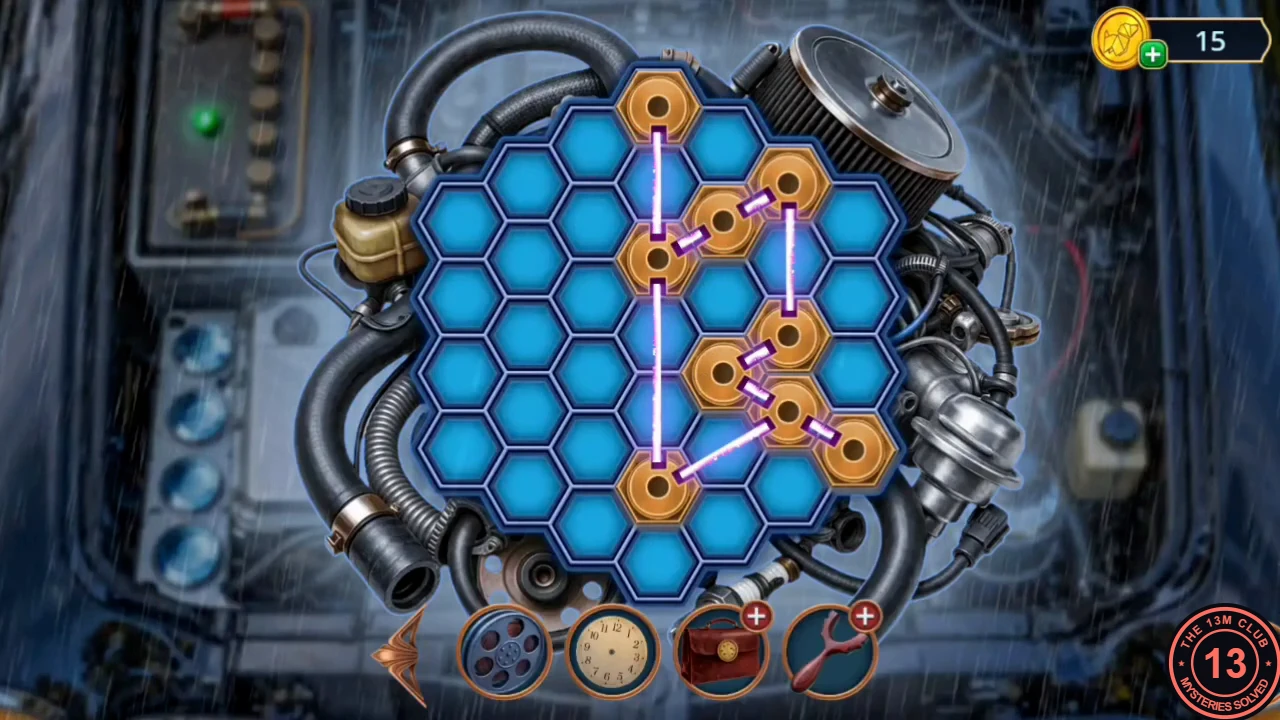
Solved: every plug slot is linked, matching the placements in the step.
Outside the Curiosity Shop
With the car running, drive to the street with the Curiosity Shop. The shop door is shut and nobody hears you knock.
- Open the fallen tree trunk to the right of the café tables and take the Toy Barrel Organ. Something is hidden under the moss; you need a tool to scrape it off.
- Open the red forklift beside the shop and take the Glue from it. The forklift will not start — it needs a strong electric jolt — so touch the Electrical Whip to its wiring. The forklift drives off and uncovers a side doorstep.
- Open the doorstep and take the Peony and the Shell Decoration. Someone is in the lit upstairs room but cannot hear the knocking, so you need to attract attention at the second-floor window.
- Go back to the tree trunk, scrape off the moss with the Shell Decoration and take the Acorns from the hollow.
- Open the Handle in your inventory. Fit the Hairband as the band and load the Acorns to make the Slingshot. Use the Slingshot on the upstairs window. A beam puzzle starts.
Slingshot Beams
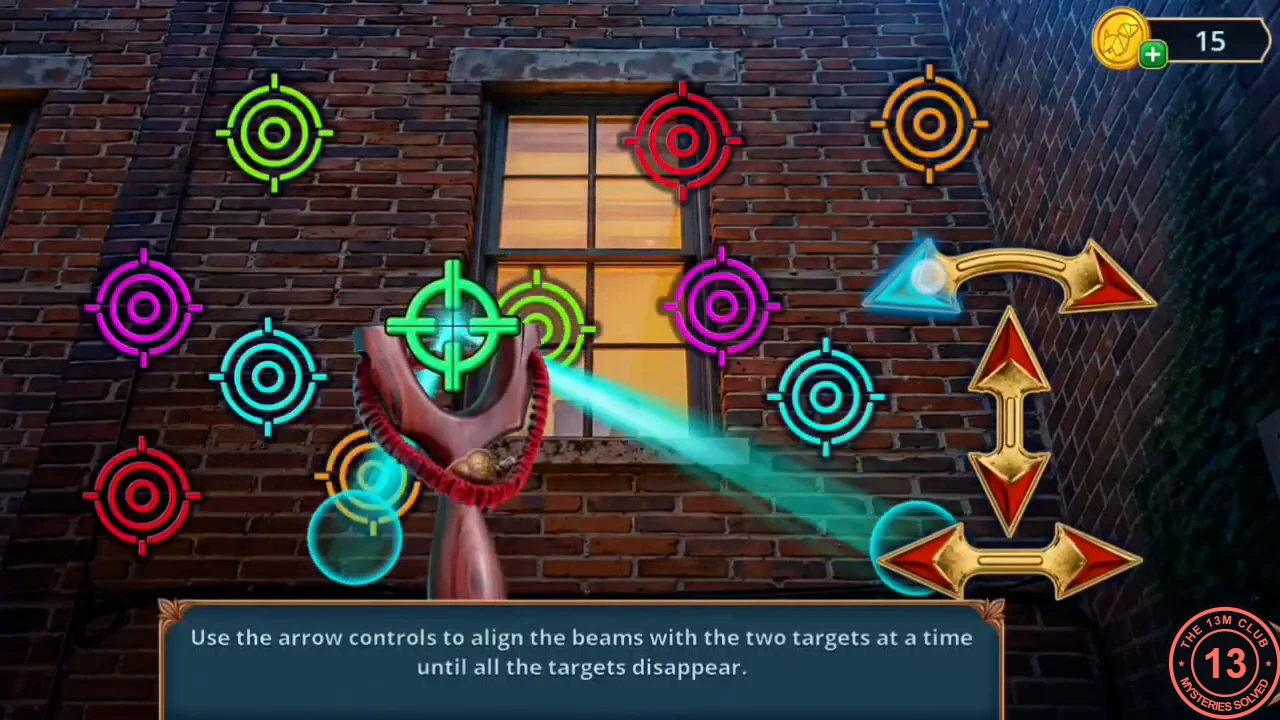
The instruction reads: use the arrow controls to align the beams with two targets at a time until all the targets disappear. Two beams come out of the slingshot's crosshair. The straight arrows move the crosshair up, down, left and right; the curved arrow swings the beams round. The ten targets form five same-coloured pairs (red, cyan, green, orange and magenta). A pair disappears when one beam ends on each target of that colour.
- Clear one colour at a time. Move the crosshair to a point roughly halfway between the two targets of one colour, then swing the beams until each end rests on one of them. A workable order is red, cyan, green, orange and finally magenta. When the last pair disappears, a figure appears at the window.
- Enter the shop and meet Sebille Spellman. Decision: 'Explain the case in detail.' costs 60 coins and gives +2 points; 'Ask bluntly about Tarot.' is free and gives 0. This completes the task of discussing the cards.
Inside the Curiosity Shop
Your new task is to call Sam. Read the recipe book beside the cauldron: a growth potion needs something priceless, time that has stood still, a beauty's weapon and the eye of a blind man, mixed in the cauldron and boiled three times. The cauldron has four ingredient slots, and the grinder beside it can grind something later. The shop cat sits in front of a damaged scratching post.
- Open the bonsai by the right-hand window. Collect the Tarot card on the window blinds (top left), then take the Old Banknote and the Gum. The bonsai is almost dead; you will revive it later.
- Hang the Pearl Necklace on the blinds to pull them up and take the Liquid Nitrogen Canister from the sill. The desk below has two holes for a two-pronged object: press the Taurus Pendant's bull horns into them and take the Scratching Post Part from the compartment that opens.
- Open the cat and its scratching post. Spread the Glue on the bare post, then wrap the Scratching Post Part around it. The cat moves to its repaired post and the cat tree opens for a search.
Cat Tree
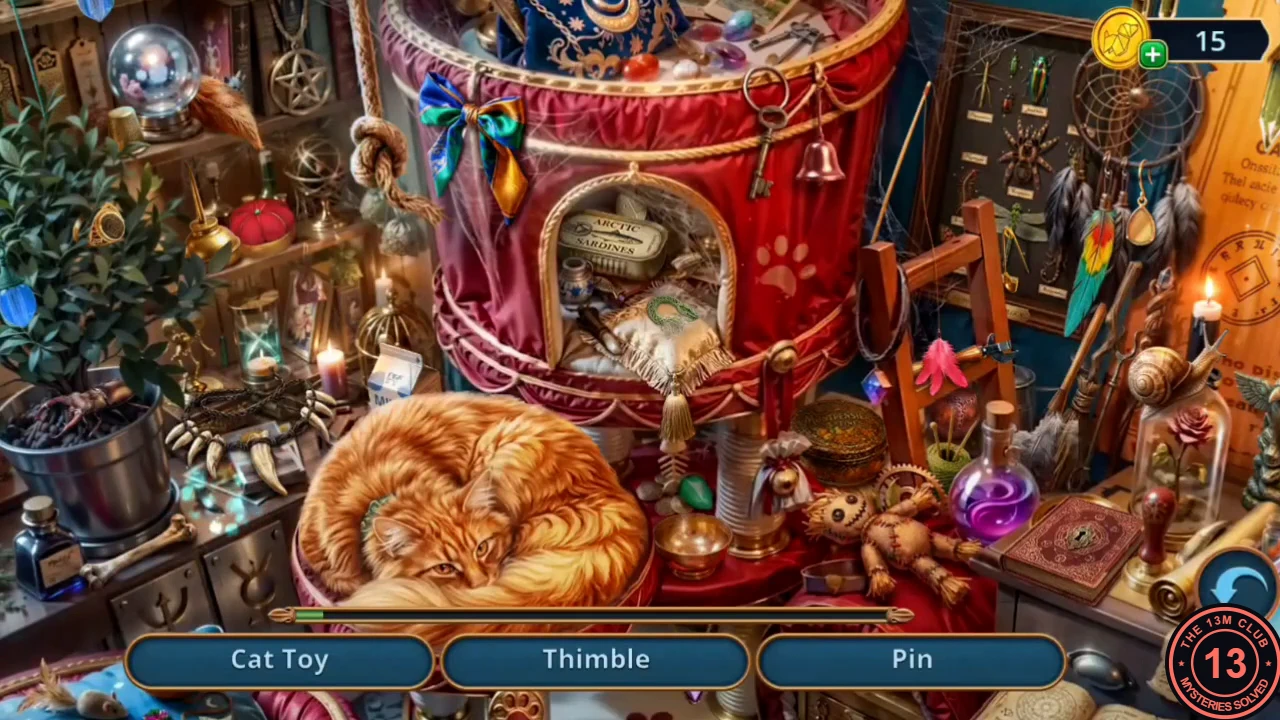
A list search with three names shown at a time. The scene scrolls slightly sideways, and two entries need an extra action before you can tap them. The reward is a Hairband.
- Cone = the pinecone by the metal bucket (lower left). Thimble = on the top-left shelf by the plant. Cat Toy = the teal feather wand hanging to the right of the cat house. Candy = the wrapped sweets on the brass bowl beside the tin can. Snail = the snail shell on the right, by the chair. Bell = the little bell hanging from the cat-house rim (right). Jade Earring = the green earring among the feathers on the far right. Ring = at the top left by the plant. Tassel = the gold tassel under the cat-house doorway. Snake: the cushion in the cat-house doorway shows an unfinished snake; drag the green thread spool (behind the pincushion near the potion bottle) onto the cushion, then tap the snake. Bowl of Milk: the brass bowl right of the sleeping cat is empty; drag the milk carton (left, by the hourglass) onto it, then tap the full bowl. Pin = stuck in the right side of the cat house beside the rainbow feather (the view zooms in). You receive a Hairband.
Phone Booth and Street Musician
Go back out to the street.
- Open the yellow phone booth. Clear the broken glass with the Hairband and take the Broken Toy Soldier and the Neckerchief from inside. The phone's wire has been cut by vandals and must be fixed later.
- Open the steaming café table with the automaton musician. Tie the Neckerchief around the leaking pipe and seal it with the Gum. When the steam clears, take the Lily from the musician's hand and the Lens from the table. Then set the Toy Barrel Organ on the stand in front of the musician.
- Open the Craft Paper in your inventory; it has four flower slots. Add the Peony and the Lily now — two flowers are still missing.
Projector Film Scene
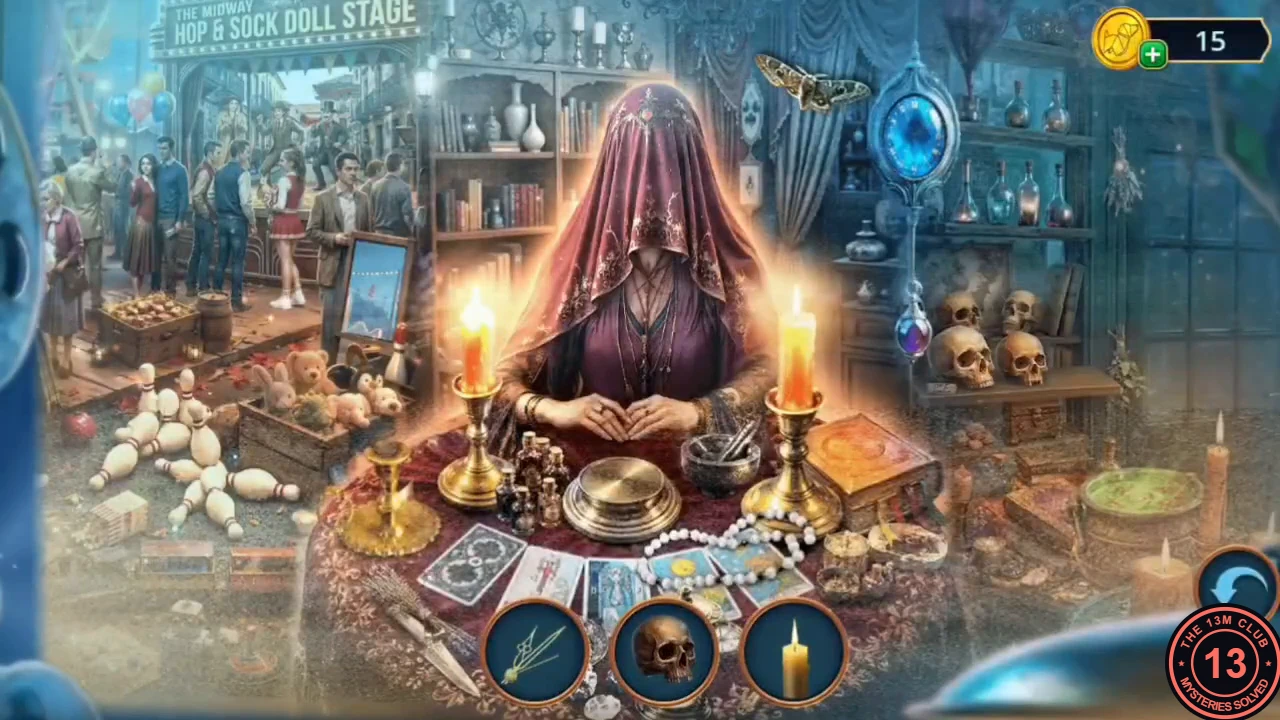
In the Victim's Study, the film projector plays a fortune-teller scene that works as a placement search. The tray at the bottom shows three objects at a time; in this scene every tray object must be dragged to its place in the film picture, and a new object appears in the tray each time one is placed.
- Go to the Victim's Study and open the film projector. Fit the Lens into its front and screw the Projector Bulb into the lens. The projector lights up and the scene starts.
- Place the twelve objects in the order they appear in the tray: Skull = onto the shelf of skulls on the right. Candle = into the small empty candlestick at the far left of the table. Clock hands = onto the blue oval frame hanging at the top right, which turns into a clock. Wind chime = hang it at the top right, beside the blue clock. Small clock tower = drag it up to the fairground background at the upper left, near the HOP & SOCK DOLL STAGE sign. Green gem = onto the pearl necklace at the right front of the table. Bundle of dried herbs = hang it on the right wall above the green bowl. Red balloon = up to the bunch of balloons at the top-left corner. Crystal ball = onto the brass dish in front of the fortune teller. Firework spark = onto the framed picture on the stand left of the fortune teller. Ladle = into the green bowl at the lower right. Dark card with a gold circle = onto the Tarot cards at the lower left of the table. The scene then freezes on an ornate book in a wall recess: take the Ornated Book.
Lionel's Workshop (Second Visit)
Shelve the book in the study, then return to Lionel's Workshop with the Liquid Nitrogen Canister.
- In the Victim's Study, open the bookcase and put the Ornated Book in the gap. Open The Tarot of Marseille and take the Dried Rose from the Moon page.
- In Lionel's Workshop, open the shelf with the padlocked red toolbox. Spray the padlock with the Liquid Nitrogen Canister, then strike the frozen lock with the small gold horse figurine from Lionel's shelf; the lock shatters. Take the Typewriter Keys (2 of 3) and the Vise Handle from the toolbox.
- Open the vise, fit the Vise Handle and turn it to straighten the Bent Figurine. Take the Groom Figurine.
- Open the window sill. Add the Dried Rose to the Craft Paper (three flowers now). Then stand the Groom Figurine beside the bride on the red music box; the lid opens. Take the Corkscrew.