Police Archives: Heater, Coat and Globe
Continue the Police Archives task of finding mentions of the cards in previous cases.
- In the Police Archives, open the ThermoBlaster 500 heater and fit the Fan Part into it. The heater starts running; take the Seam Ripper that appears beside its right wheel.
- In the County Morgue, open the cabinet beside the skeleton. Cut open the stitched pocket of the blood-stained coat with the Seam Ripper and take the Dividers.
- Back in the Police Archives, open the globe desk and set the Dividers on the globe. The globe opens; take the Large Shelf Valve.
- Open the metal archive shelving, which is missing one of its wheels, and fit the Large Shelf Valve. A symbol lock appears.
Archive Shelf Symbol Lock
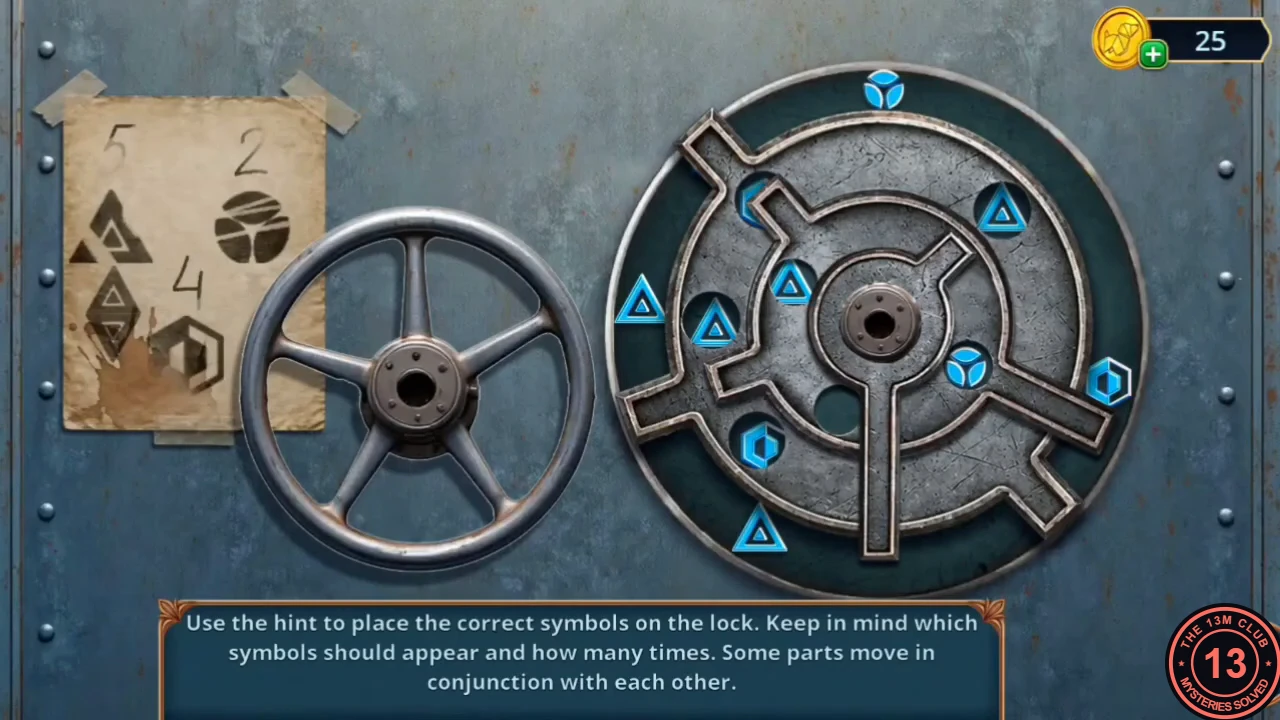
The instruction reads: use the hint to place the correct symbols on the lock, keeping in mind which symbols should appear and how many times; some parts move together. The hint note asks for 5 triangles, 2 three-part circles and 4 hexagonal cubes.
- Turn the rotating parts of the lock. Because some parts move together, check all the windows after each turn. Stop when the open windows show exactly 5 triangles, 2 three-part circles and 4 cubes, with no empty hole visible. The shelving opens; read the Archival Report Update, which mentions Chariot, Strength and Star cards found with deaths 60 years ago. This completes the task of finding mentions of the cards in previous cases.
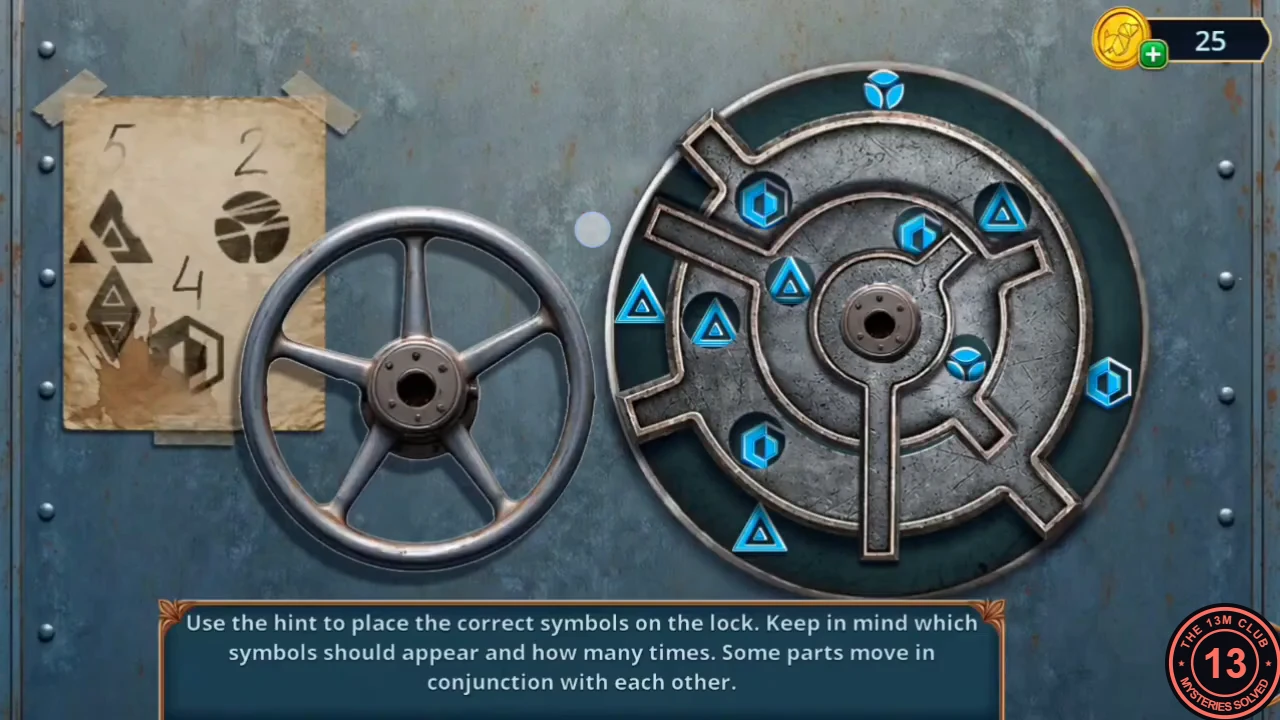
Solved: the windows show 5 triangles, 2 three-part circles and 4 cubes, matching the note.
The Frozen Lantern
Free the lantern frozen in the morgue sink and light it at Madame Zosta's shop.
- In the County Morgue, open the sink. A lantern is frozen in ice, and the hot-water tap has no handle. Use the Caliper, the Nut and the Waterproof Gasket on the tap: the Nut and Gasket go on the bare tap stem, the red handle is fitted on top and the Caliper tightens it. Run the hot water to melt the ice and take the Empty Lantern.
- In Madame Zosta's shop, open the star-frame shelf and put the Empty Lantern on it. A candle puzzle starts.
Candle Light Grid
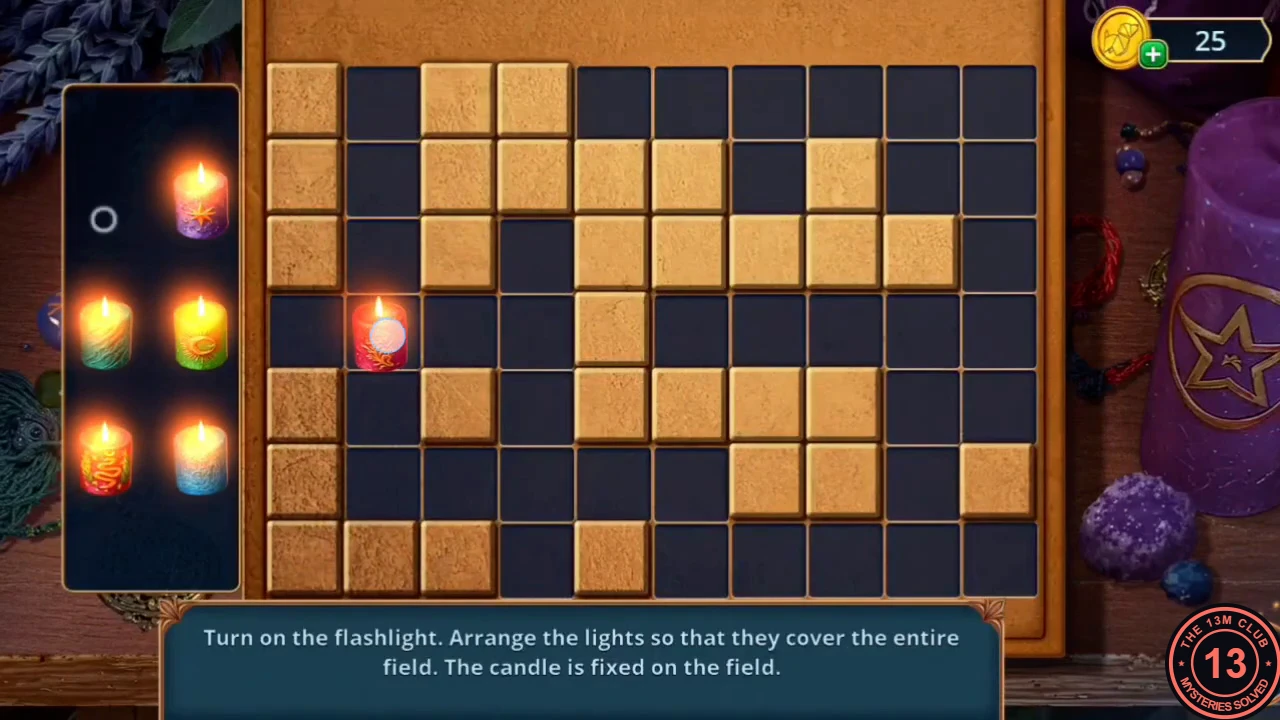
The instruction reads: turn on the flashlight, arrange the lights so that they cover the entire field; the candle is fixed on the field. Each light shines along its row and column until a raised tile blocks it, and every dark square must end up lit.
- Counting columns 1–10 from the left and rows 1–7 from the top, place the lights as follows: red at column 2, row 4; green at column 4, row 6; red at column 7, row 1; purple at column 9, row 2; teal at column 10, row 4; blue at column 9, row 7. When the whole field is lit, take the Lantern with Candle.
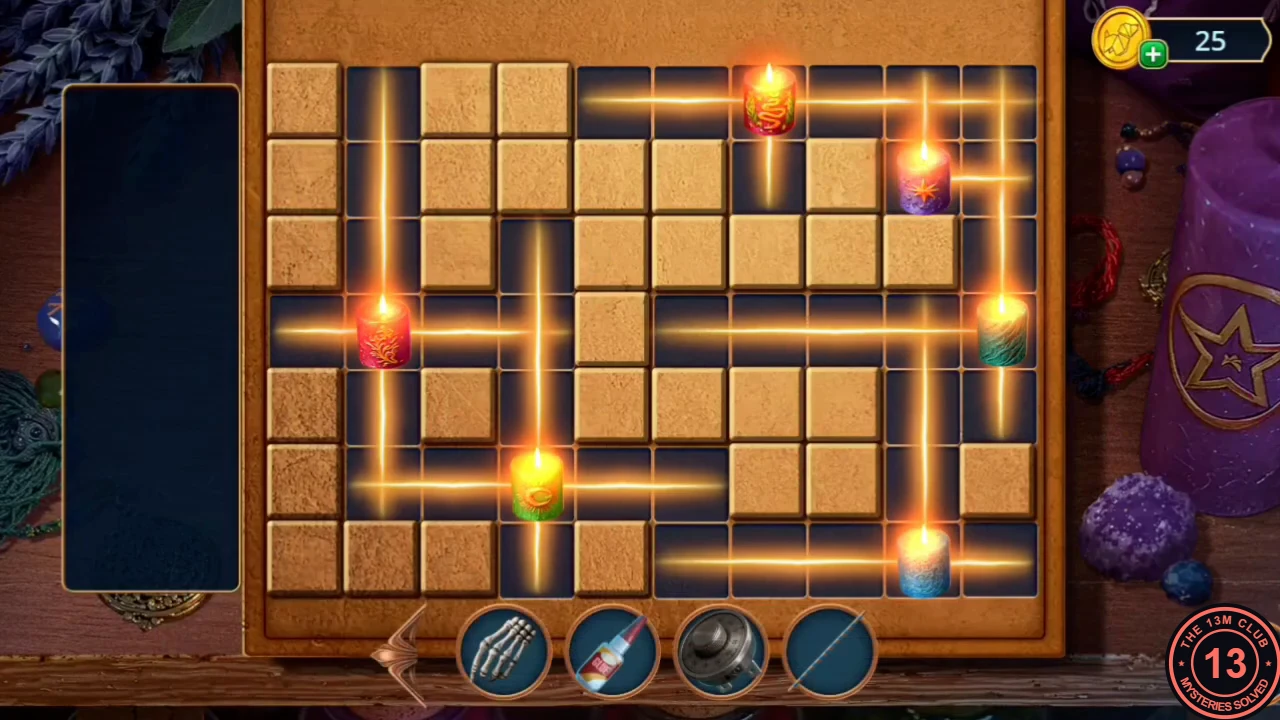
Solved: every dark cell is lit with the candles in the positions listed in the step.
Feather Boa Duster and Extra Bullets
Make a duster from the Fluffy Boa, sweep Zosta's counter and load the shooting gallery rifle at the fair.
- In Madame Zosta's shop, open the dark side table with the zodiac top and set the Lantern with Candle on it. Take the Toolbox and the Fluffy Boa.
- Open the Featherless Duster in your inventory and add the Fluffy Boa and the Glue to make the Feather Boa Duster.
- Open the golden-figurine counter, sweep away the broken glass with the Feather Boa Duster and take the Extra Bullets.
- At the City Fair, open the Free Play shooting gallery and load the Extra Bullets into the rifle. A riddle search starts.
Shooting Gallery: Riddles
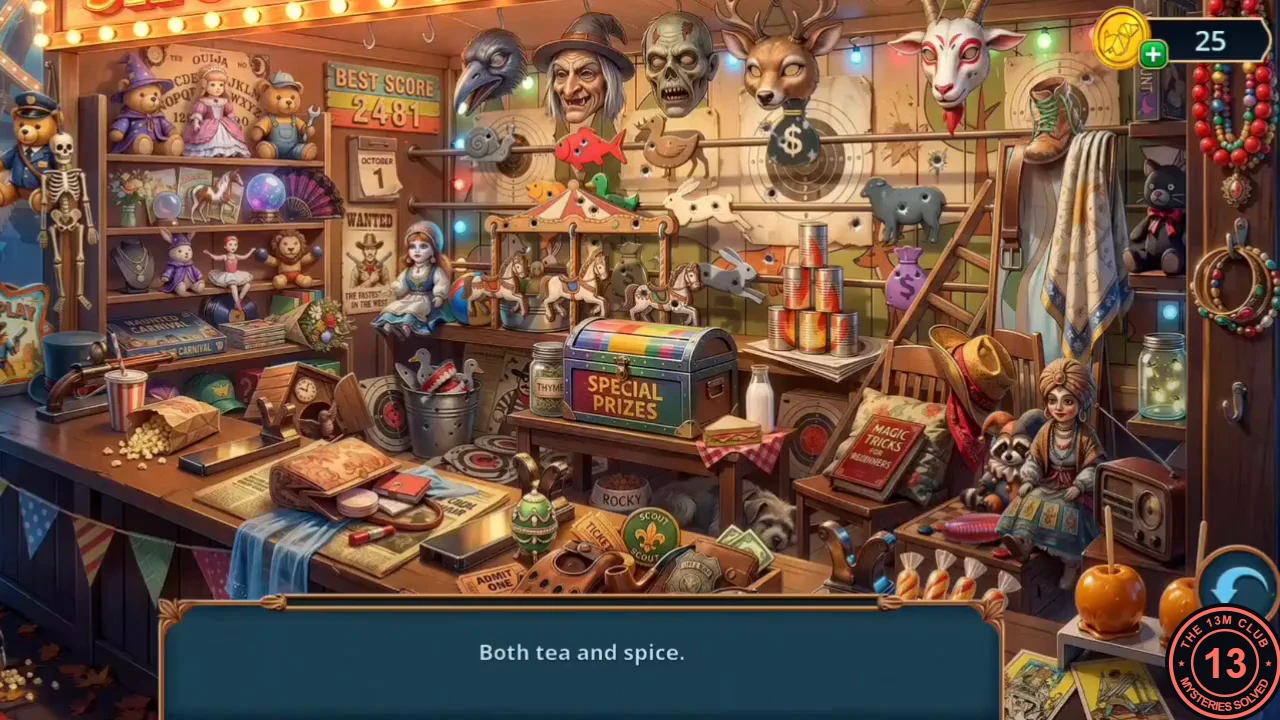
One riddle is shown at a time; tap the object it describes. The answers below are in the order the riddles appeared.
- Both tea and spice = jar labelled THYME (left of the Special Prizes chest). A very funny animal = raccoon in a jester hat (lower right, beside the fortune-teller doll). A gentleman's headdress = top hat (left counter, by the toy pistol). The grandfather of August and grandson of December = tear-off calendar (shelf right of the teddy bear). An enemy of the ice = stack of flame-painted cans (centre). A lover of retreating into oneself = snail target (top rail beside the Best Score sign). A person gets this three times = wind-up chattering teeth (in the bucket left of the chest). A precious thing that makes a nice breakfast = jewelled green egg (front counter, left of the ROCKY bowl). A plane, a horse and a car going round and round = carousel (shelf above the chest). Sometimes it stands still and sometimes it runs out = cuckoo clock (left counter, beside the target). Climb it to get high in life and work = ladder (behind the chair with the cowboy hat). Good for storing things in the car but even better for walking = boot (hanging top right above the cloth). Finally, find the Toy Screwdriver by its silhouette: the pink-handled screwdriver on the checkerboard in front of the fortune-teller doll. You receive the Toy Screwdriver.
Cotton Candy Machine and the Skeleton
The cotton candy machine gives the Joint for the morgue skeleton, which leads to the locker puzzle.
- At the City Fair, open the cotton candy machine and unscrew the blue part in its bowl with the Toy Screwdriver. Take the Joint. The machine still has no power; that is fixed later.
- In the County Morgue, open the skeleton cabinet. Fit the Joint to the skeleton's wrist, then attach the Bone Hand. The skeleton opens the leather briefcase; take the Ball and the Victims' Files.
- Open the cold-storage locker door on the left side of the morgue and pin the Victims' Files to its notice board. The locker puzzle starts.
Evidence Lockers Chain
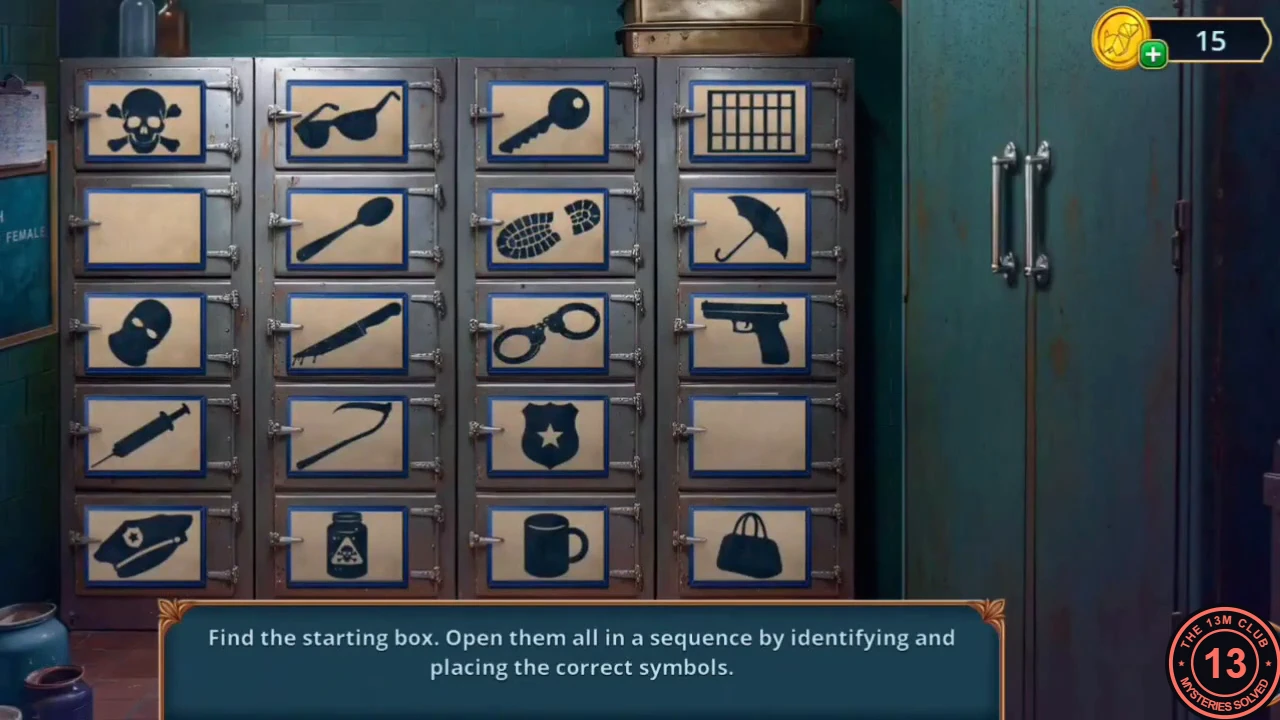
The instruction reads: find the starting box, then open them all in a sequence by identifying and placing the correct symbols. Each opened box holds a symbol card; drop that card on the closed box showing the same symbol to open it. The grid has 4 columns and 5 rows, counted from the top-left; some boxes are decoys and stay closed.
- Start with the blank box in row 4, column 4. Then follow the cards in this order: skull → box at row 1, column 1; bars → row 1, column 4; police cap → row 5, column 1; pistol → row 3, column 4; knife → row 3, column 2; balaclava → row 3, column 1; shoe print → row 2, column 3; poison bottle → row 5, column 2; badge → row 4, column 3; hook → row 4, column 2; handcuffs → row 3, column 3. The last box holds the Stamp.
New Safe Code
Stamp the case board to reveal the new safe code and open the pneumatic-mail safe in Sam's office.
- In Sam's office, open the case board and press the Stamp on the blank Notebook sheet you pinned over the encrypted clue. The sheet now shows the New Safe Code: 3891.
- Open the pneumatic-mail safe to the left of Sam, fit the Safe Dial and enter 3891. Read the case file inside — a Tower card was found with a man who fell from a telecommunications tower — and take the Bottle of Champagne, the Cards from Previous Crimes and the Electrical Whip.CODE3891
Powering the Cotton Candy Machine
Power the cotton candy machine at the fair with the Electrical Whip.
- At the City Fair, open the cotton candy machine and plug the Electrical Whip into the socket on its front. A control-panel puzzle starts. You keep the Electrical Whip for later.
Cotton Candy Dial
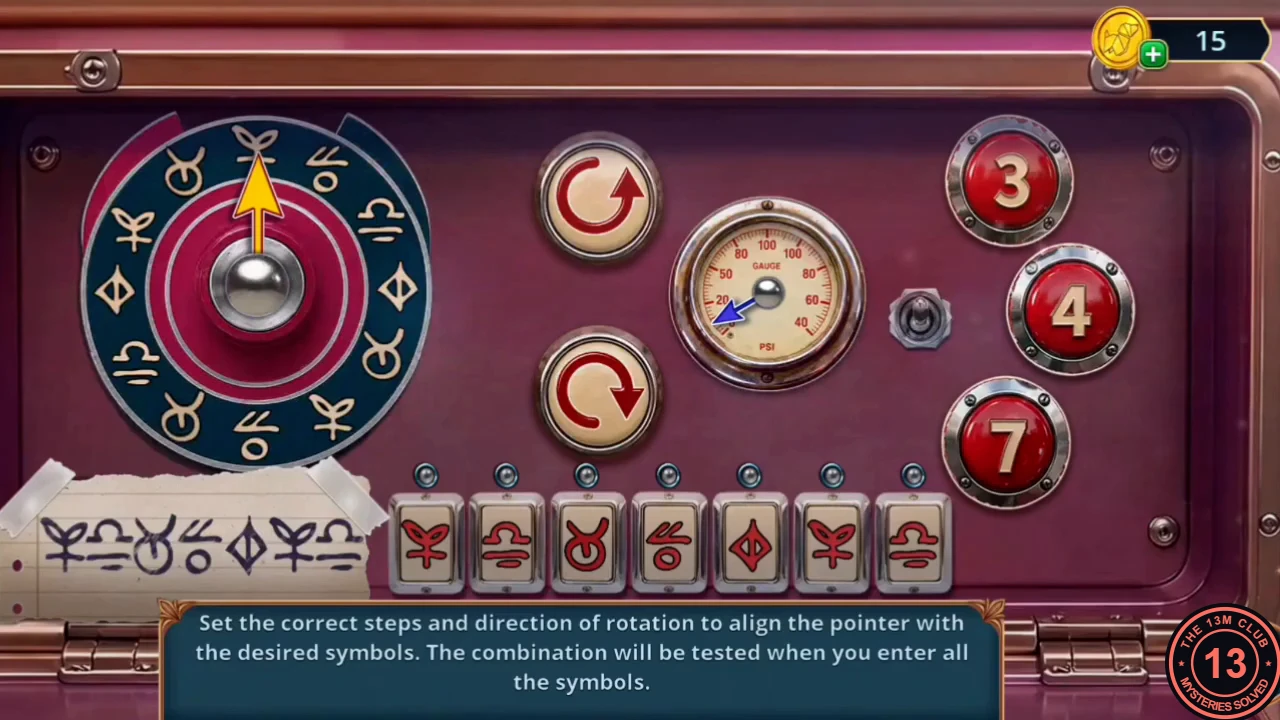
The instruction reads: set the correct steps and direction of rotation to align the pointer with the desired symbols; the combination is tested once all symbols are entered. For each of the seven slots, choose a step count (3, 4 or 7) and then one of the two rotation arrows. The paper strip shows the target symbols in order.
- Enter these seven moves in order (upper = the upper rotation arrow, lower = the lower rotation arrow): 7 + upper; 3 + lower; 3 + lower; 7 + lower; 3 + lower; 4 + upper; 3 + lower. When all seven slots are filled, the machine checks the combination and makes cotton candy. Take the Cotton Candy.CODE7 up, 3 down, 3 down, 7 down, 3 down, 4 up, 3 down
Repair Instructions
Find the repair instructions by the TV shop and use them on the Ferris wheel control panel.
- On the street, open the flower pot beside the TV shop window and hold out the Cotton Candy. The insects leave the folded paper; take the Repair Instructions for the Ferris wheel.
- At the City Fair, open the control panel in the Ferris wheel gondola and use the Repair Instructions on it. A stick puzzle starts.
Ferris Wheel Control Panel
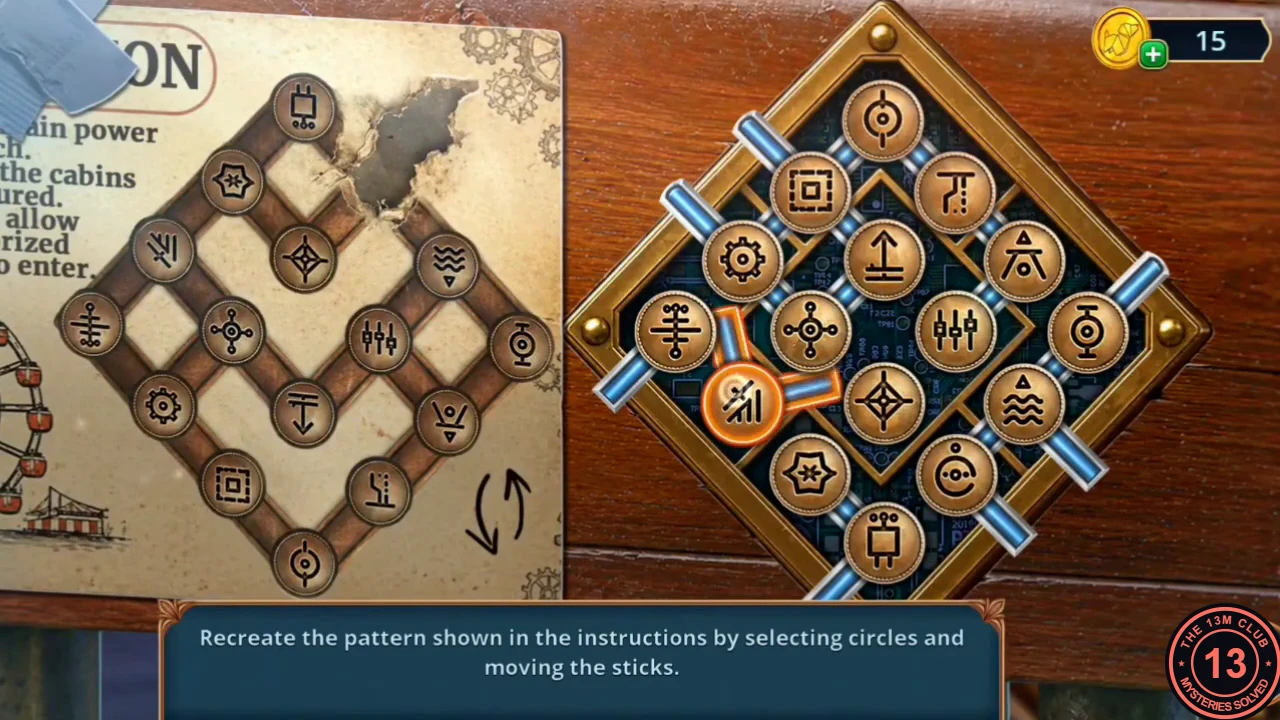
The instruction reads: recreate the pattern shown in the instructions by selecting circles and moving the sticks. The 16 symbol circles stay where they are; select a circle, then slide the sticks beside it to link it with its neighbours. The card is drawn flipped top to bottom compared with the panel: the plug symbol at the top of the card is the plug at the bottom of the panel, and the card's down-arrow is the panel's up-arrow (the curved arrows on the card hint at this). This guide gives the target and a working approach rather than every move.
- Flip the card's pattern top to bottom in your head and link the panel circles the same way: every strip drawn between two symbols on the card must become a stick between the same two symbols on the panel. The puzzle completes when the last link is in place. Take the Staple Remover from the gondola.
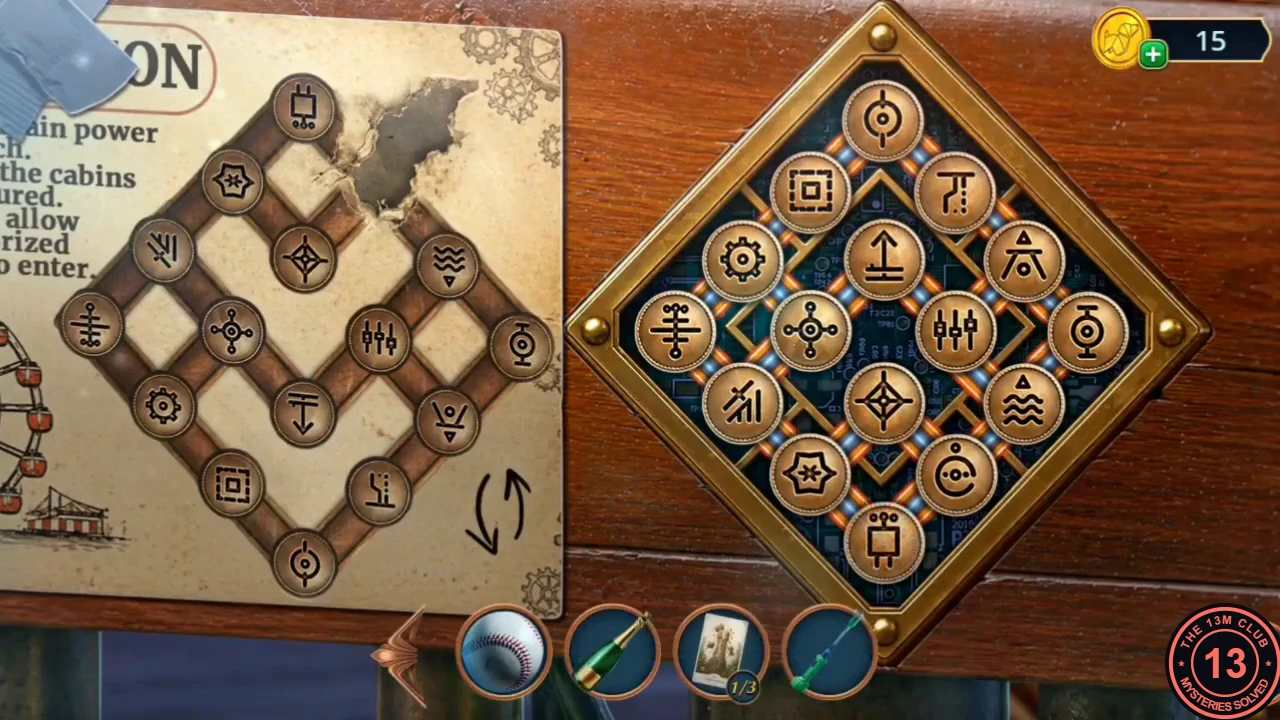
Solved: the glowing links copy the card's pattern flipped top to bottom.