Mountain Road: Knife and Pet Brush
Travel to Mountain Road, where the police car crashed.
- Open the blue generator box beside the tree, where a red and a blue hose hang loose. Fit the Rubber Squeaker onto the hoses; a Knife is released. Take it.
- Open the bronze children on the bench. Cut the rope coiled on the bench with the Knife and take the red-and-blue Pet Brush underneath.
- Travel to Sebille and Dakota's shop and open the ginger cat by the scratching post. Brush it with the Pet Brush; the contented cat lets you search the cat tree again.
Cat Tree: Second Search
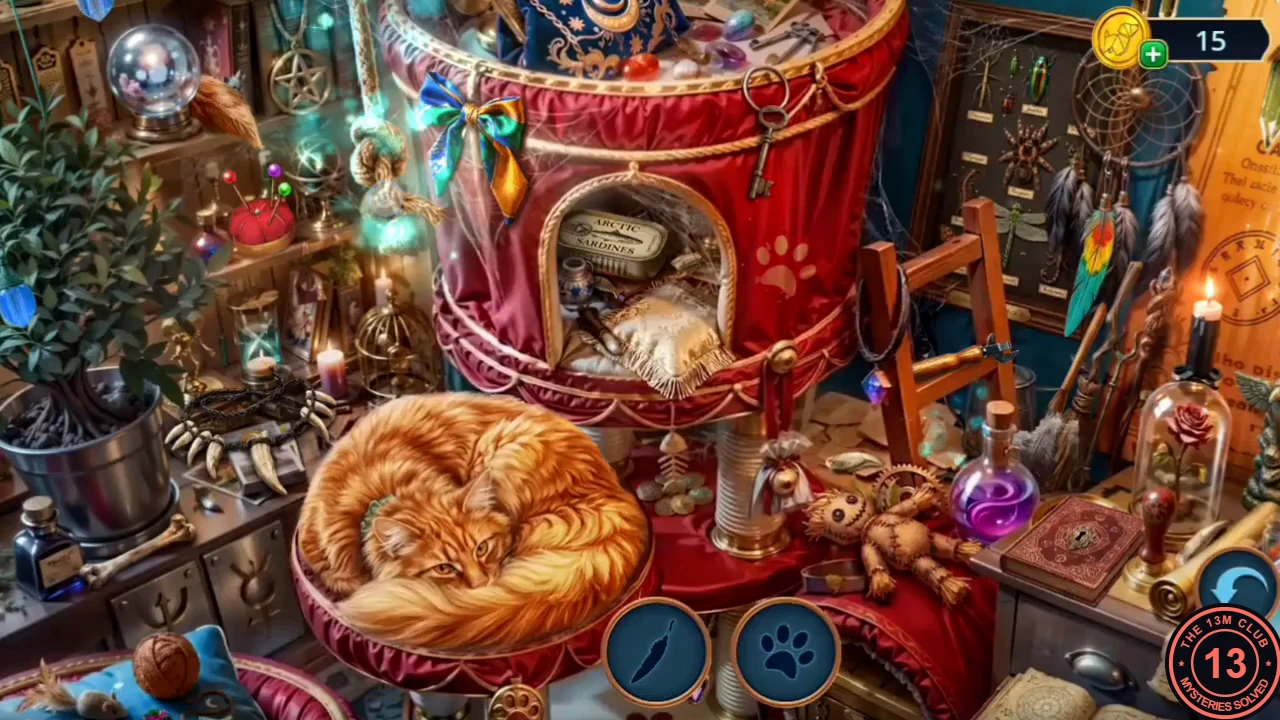
A silhouette search around the sleeping cat, with three shapes shown at a time. Shapes outlined in yellow need an extra action first. The reward is the Nitrate Stone.
- Plain silhouettes: insect = on the metal bucket at the lower left; ball = beside the purple potion bottle at the right; looped hanging item = top left of the cat house by the blue ribbon; paw = the paw print on the right side of the cat house; bone = at the far lower left; bow = the blue ribbon bow at the top left of the cat house; feather = among the dark feathers of the dreamcatcher at the top right. Yellow-outlined shapes: Butterfly — drag the small key from the ring on the cat house onto the locked red book beside the potion; the book opens on a butterfly, so tap it. Voodoo doll — drag the red pincushion (top left, by the plant) onto the stitched doll on the right; once the pins are in, tap the doll. Sardines — drag the can opener hanging on the chair onto the 'Arctic Sardines' tin in the cat-house doorway, then tap the opened tin. Brush — the bare brush leaning by the chair needs feathers; drag the orange feather from beside the crystal ball (top left) onto it, then tap it. Claw necklace — the necklace by the bucket (lower left) is missing some claws; tap the sleeping cat's tail to make the claws appear, then tap the necklace. Finally a stone appears in the cat-house doorway: tap it to get the Nitrate Stone.
Sunlight the Cat and the Fireworks
After the second cat-tree search, the shop cat, Sunlight, speaks to Victor and says someone who looks very much like him never leaves his side.
- Decision: 'Ask why the cat is talking.' costs 60 coins and gives +2 points; 'Get scared of the cat.' is free and gives 0.
- Open the coffee grinder by the recipe book and put the Nitrate Stone in it. Take the Nitrate Powder from the grinder's drawer.
- Open the Fireworks in your inventory (an empty red shell with two slots). Add the Wick and the Nitrate Powder. The fuse puzzle starts.
Fireworks Fuse
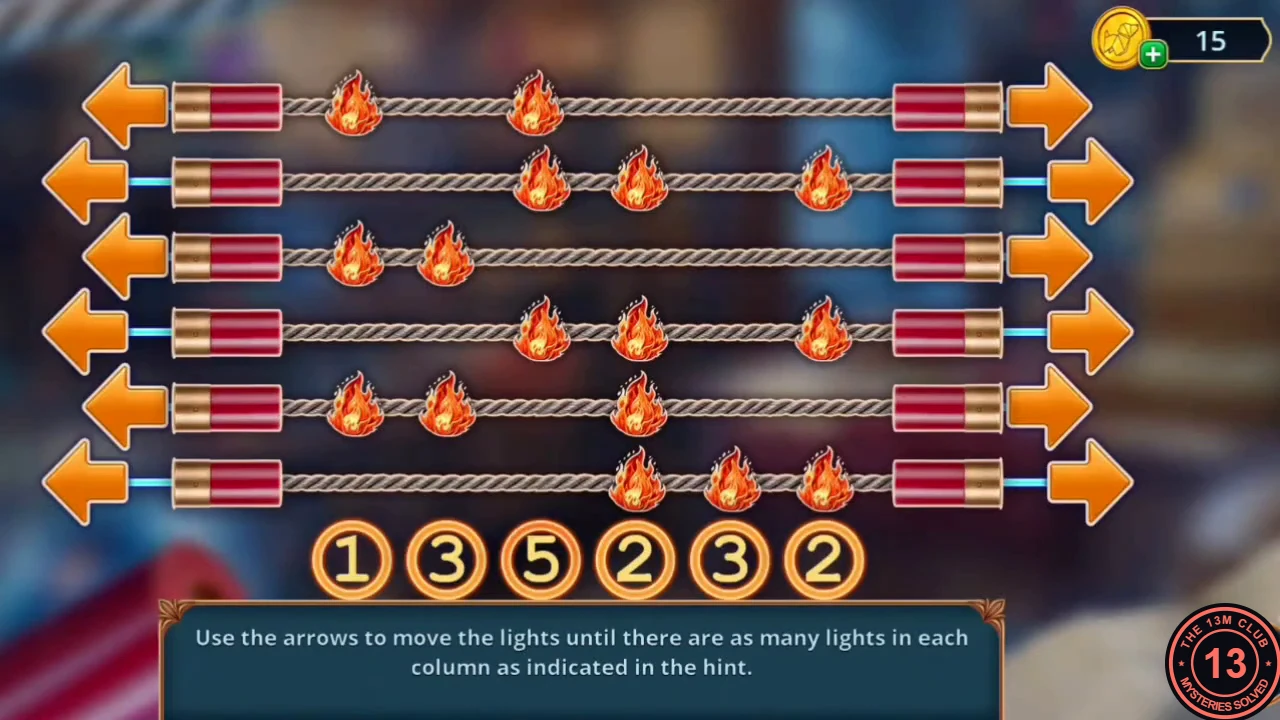
The instruction reads: use the arrows to move the lights until each column has as many lights as the hint shows. There are six fuses, each with a fixed pattern of flames; the arrows at either end slide a whole fuse one column left or right. The hint numbers under the six columns are 1, 3, 5, 2, 3, 2, and a number turns green when its column is correct.
- Counting columns 1–6 from the left, the target layout is: fuse 1 with flames in columns 1 and 3; fuse 2 in columns 2, 3 and 5; fuse 3 in columns 2 and 3; fuse 4 in columns 3, 4 and 6; fuse 5 in columns 2, 3 and 5; fuse 6 in columns 4, 5 and 6. From the starting layout shown in this section's overview, three moves are enough: fuse 2 one step left, fuse 3 one step right and fuse 5 one step right. The fuse is fitted into the shell and the Fireworks are ready.
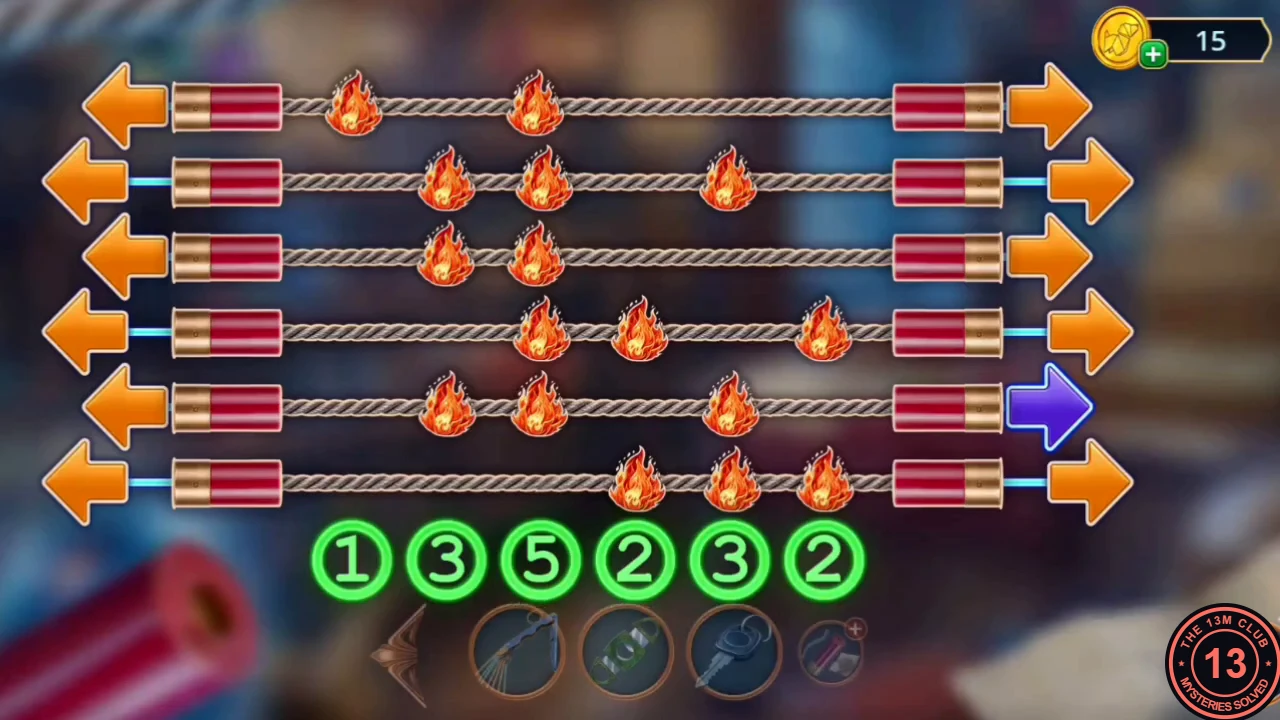
Solved: every column matches its hint number.
Fireworks Over the Fair
Launch the fireworks at the fair to draw the crowd away from Madame Zosta's door.
- Travel to the City Fair and open the ACME Pyro-Display box. Put the Fireworks in the launcher and light them with the Lighter. The rockets go up and the crowd moves away from Madame Zosta's door (an achievement for the fireworks pops up).
Lionel's Workshop: The Typewriter
Finish Lionel's Workshop before you open Madame Zosta's door, because the door ends the chapter. You need the Corkscrew from the workshop music box.
- At the City Fair, after the fireworks have been launched, open the ACME Pyro-Display box again. Screw the Corkscrew into the small hole in the floorboard in front of the red chest and pull the board up. Take the last Typewriter Keys (3 of 3) and the Gear hidden underneath.
- Travel to Lionel's Workshop and open the puzzle box beside the vise on the workbench (the one with a missing piece). Fit the Gear into its mechanism; a drawer slides open. Take the Typewriter Roller.
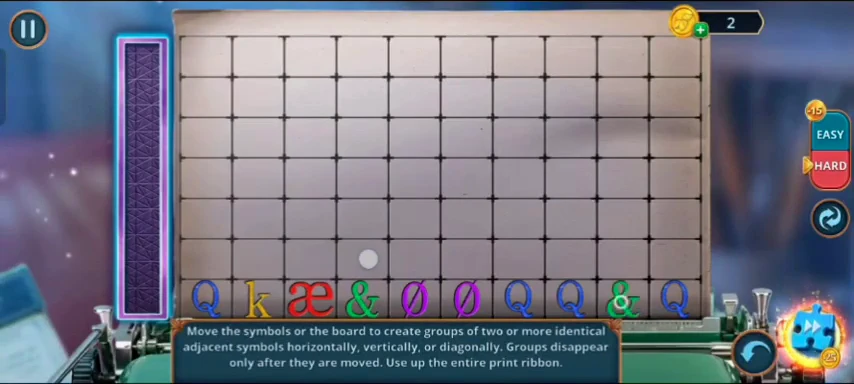
- Open the typewriter beside the teddy bear. Fit the Typewriter Roller, then add the Typewriter Keys (3 of 3) to the gap in the keyboard. A typing puzzle starts.
- The instruction reads: move the symbols or the board to create groups of two or more identical adjacent symbols horizontally, vertically or diagonally; groups disappear only after they are moved; use up the entire print ribbon. Symbols are typed into the bottom rows of the sheet, and the gauge on the left fills as you clear groups. Move a symbol so it touches an identical one (side by side, one above the other or diagonally); the pair or group vanishes once the move is made. Keep clearing groups as new symbols arrive until the gauge is completely full. The symbols are dealt during play, so there is no fixed move list; EASY and HARD modes are offered at the right. When the ribbon is used up, Lionel's typed note appears: Madame Zosta last came to town 60 years ago, when people died wherever a Tarot card appeared, and now she is back. This completes the task of finding out what Lionel found.
Madame Zosta's Lock Pins
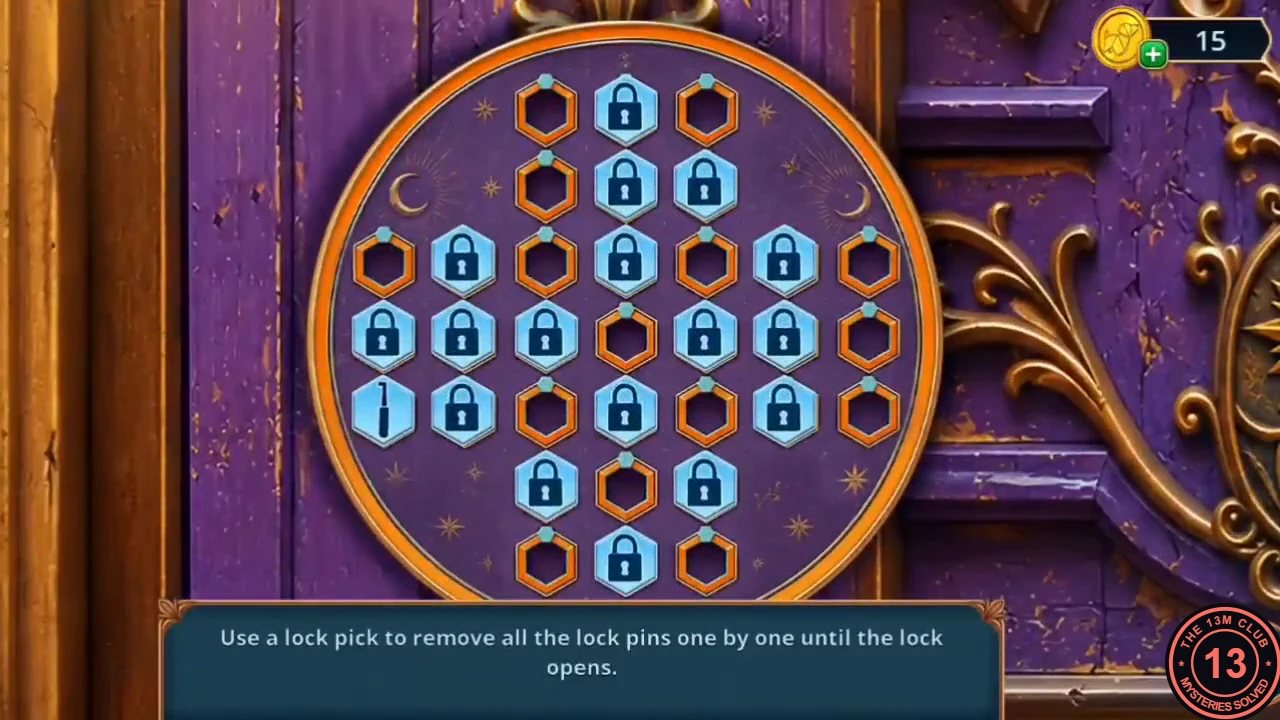
The instruction reads: use a lock pick to remove all the lock pins one by one until the lock opens. The holes form a cross of 7 columns and 7 rows, with the top and bottom arms only three holes wide (columns 3–5). Only the lock pick moves: tap it, then tap a green hole. The pick jumps over one neighbouring pin (straight or diagonal) into the empty hole behind it, and the pin it jumped over is removed. All 17 pins must go.
- Open Madame Zosta's door. It is dark inside, but Sam said he was heading here. Using the Lock Pick Set on this door ends the chapter, and the game warns that you will not be able to return to earlier locations to find remaining items. Before answering YES, collect any Tarot cards you have missed in Chapter 2 (see the collectibles part of this guide) and make sure Lionel's Workshop is finished. Then use the Lock Pick Set on the keyhole.
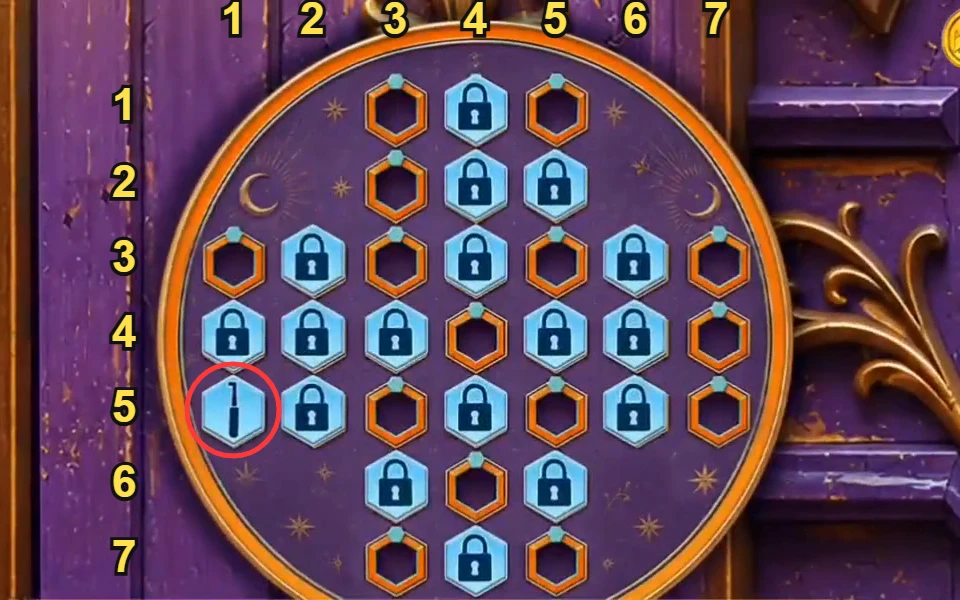
Column and row numbers used in the move list. The pick starts at the circled hole. - Counting columns 1–7 from the left and rows 1–7 from the top, the pick starts at column 1, row 5. Jump it to these holes in order: column 1 row 3; column 3 row 3; column 3 row 5; column 1 row 5; column 3 row 3; column 5 row 3; column 5 row 1; column 3 row 1; column 5 row 3; column 5 row 5; column 3 row 5; column 3 row 7; column 5 row 7; column 5 row 5; column 7 row 5; column 5 row 3; column 7 row 3. The last pin disappears and the door unlocks.
Chapter 2 Decisions
When the lock opens, the chapter's Decision Points panel appears. Its pictures unlock at 0, 4 and 10 points, out of a maximum of 13.
- Points per decision: Refuse 0 / Visit the workshop 1 (Porsha's offer, which also opens Lionel's Workshop); Be skeptical 0 / Believe in the cards 2; Clarify the facts 0 / Tell in detail 2 (talking to Sebille); Yell 0 / Try to stop Sam 2 / Warn Sam 6 (the phone call); Get scared of Sunlight 0 / Question Sunlight 2 (the talking cat). Close the panel to start Chapter 3.