Confessional Rune Dominoes
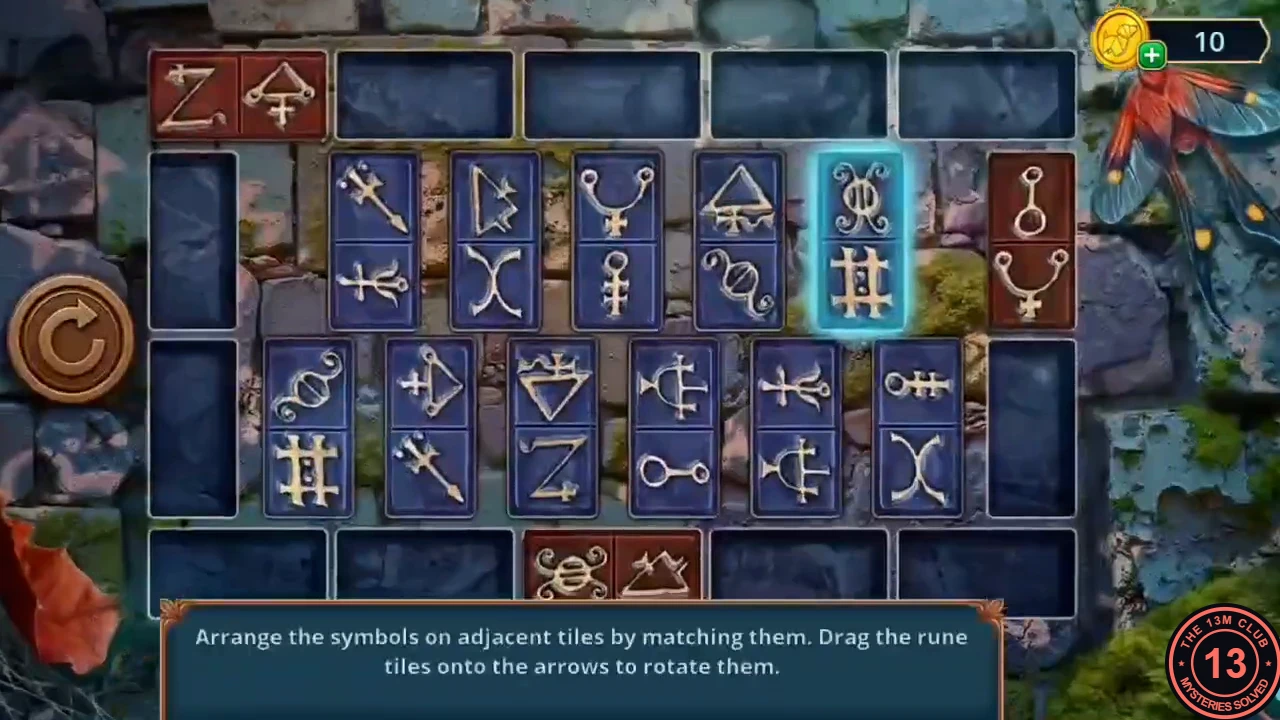
The instruction reads: arrange the symbols on adjacent tiles by matching them, and drag the rune tiles onto the arrows to rotate them. Fourteen two-symbol tiles must form a closed ring around the edge of the wall, and wherever two tiles touch their symbols must match. Dragging a tile onto one of the rotate arrows flips it end to end.
- Build the ring clockwise from the top-left corner so that the symbols run: Z, pyramid with a cross, arrow, trident, horned cup, ring with a loop, Y-shaped cup, ankh-like cross, X (crossed curves), mountain, beetle, double hash (#), spiral, triangle with an eye, and back to Z. Tile by tile: top row, left to right — Z|pyramid-cross, pyramid-cross|arrow, arrow|trident, trident|horned cup, horned cup|ring. Right column, top to bottom — ring|Y-cup, Y-cup|ankh. Bottom row, right to left — ankh|X, X|mountain, mountain|beetle, beetle|hash, hash|spiral. Left column, bottom to top — spiral|eye-triangle, eye-triangle|Z. When every join glows green, the secret passage opens.
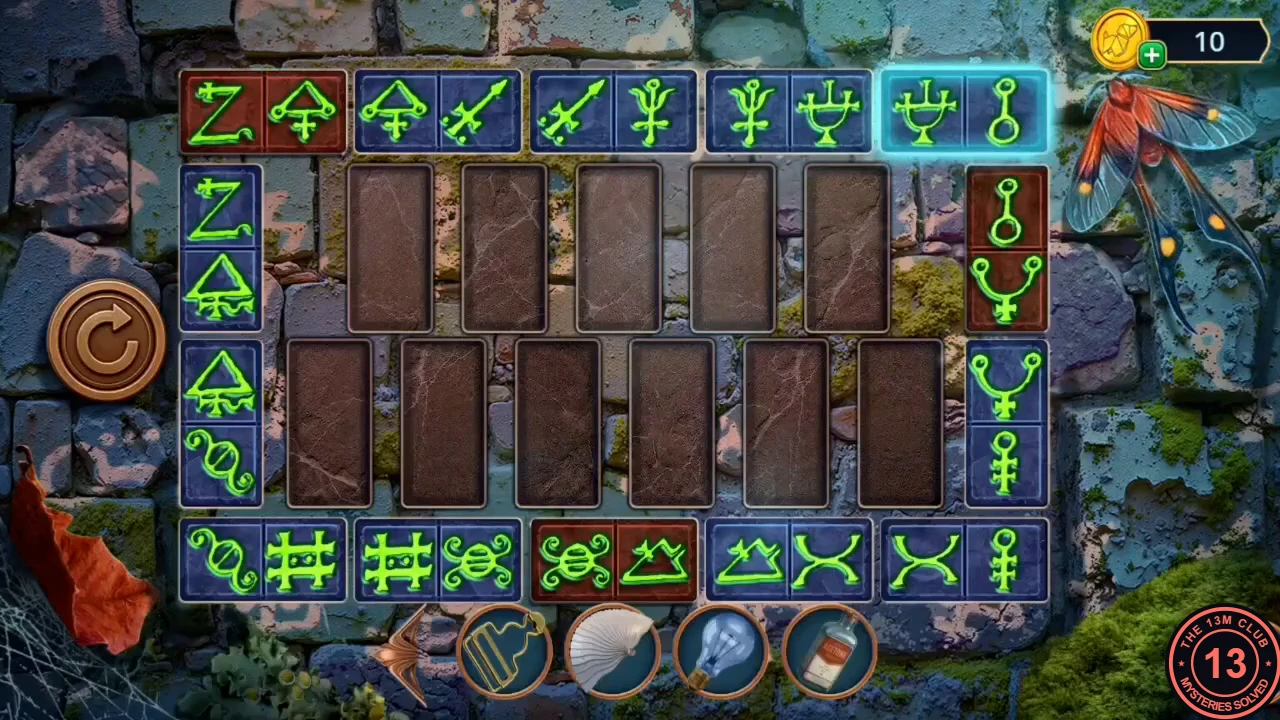
Solved: the finished ring, matching the clockwise order in the step.
Secret Passageway
The passage under the church is dark, and a 0/4 counter appears for the candles.
- Light the four candles with the Lighter: on the left by the angel, in the centre by the relief, on the right by the gargoyle, and at the broken cross on the right. 'That's better! But I should still find some other light sources.'
- Open the torch bracket on the chained pillar ('How can I ignite it?') and light it with the Lighter.
- Water is pouring through the wall ('So much water! Can I block it?'). Open the relief of the sleeping woman, spread the Thick Resin over the cracked round shield to patch it, and take the Old Shield.
- Put the Old Shield into the waterfall to block it. The flood drains away and leaves a pile of debris to search.
Flood Debris: Silhouettes
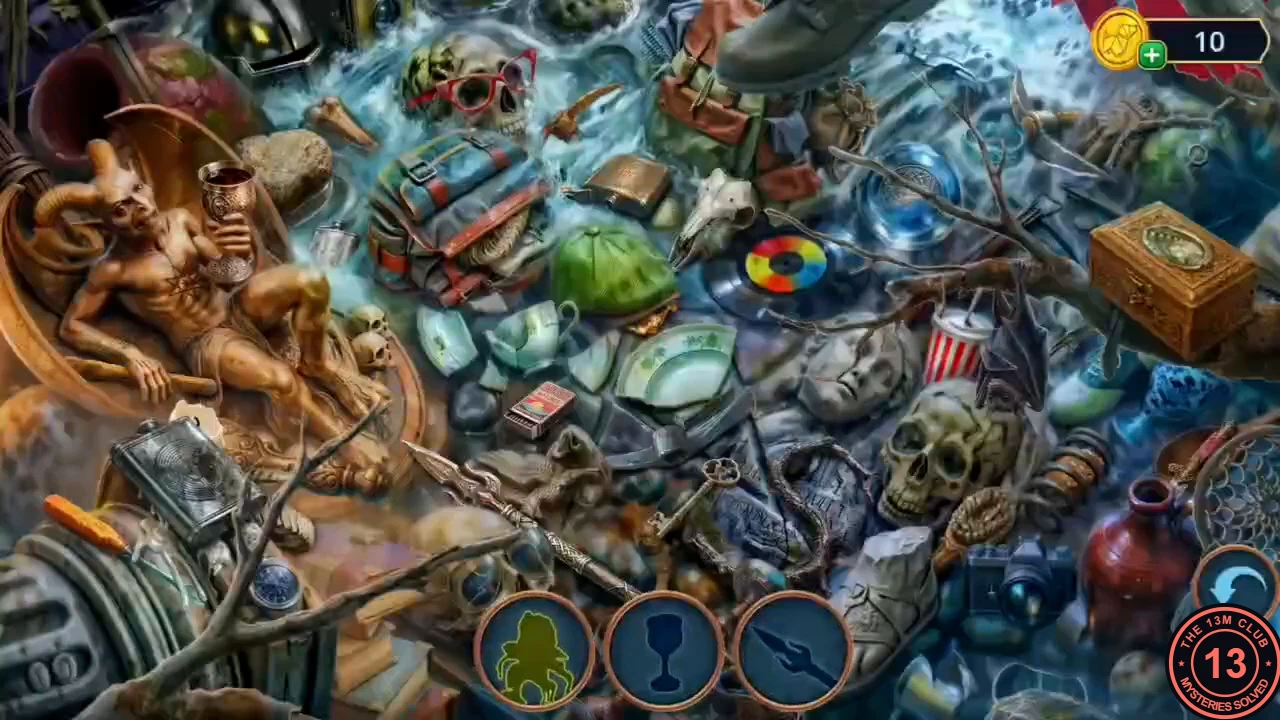
A silhouette search, three shapes at a time; each found object is replaced by a new shape. Four of the objects need an action in the scene first (the lighter, the ram skull, the carved box and the stone face). The reward is the Sickle.
- Goblet = in the hand of the horned demon statue on the left. Spearhead = lying across the debris in the lower centre. Seven-pointed star = carved on the demon's chest. Scroll case = at the top left, by the rock above the demon's head. Bat = hanging upside down from the branch, centre right, beside the striped cup. Glasses = the twisted wire-rimmed spectacles lying between the old key and the big skull, lower centre (the red glasses on the skull at the top are not the answer). Small demon = tap the large metal lighter at the lower left, below the statue's hand (Victor: 'Let's light this up!'); once its flame burns, the small demon by the statue's knee is collected. Ram skull with horns = tapping the ram skull at the top centre only gives 'Where are your horns, buddy?'; tap the curled horn lying on the backpack to the left of it, the horn fits onto the skull, then tap the complete ram skull. Orb = the blue glass orb at the top centre, right of the ram skull. Gourd flask = tap the carved wooden box on the right to open it and take the green gourd flask inside. Dagger = at the right edge, just left of the dreamcatcher. Crescent blade = it is stuck in the crack of the grey stone face in the centre (Victor: 'I need to make this gap wider.'): take the orange-handled screwdriver from the bottom-left corner and drag it into the crack; the face splits, then tap the blade. It becomes the Sickle.
The Coil Battery
Cut the Coil Battery free in the Secret Passageway and fit it into the coil machine in Zosta's shop.
- In the Secret Passageway, cut the thorny vines over the right-hand arch with the Sickle and take the Coil Battery.
- Travel to Madame Zosta's Magic Shop. Put the Coil Battery into the top of the coil machine on the back counter, then tap its shape panel.
Coil Values
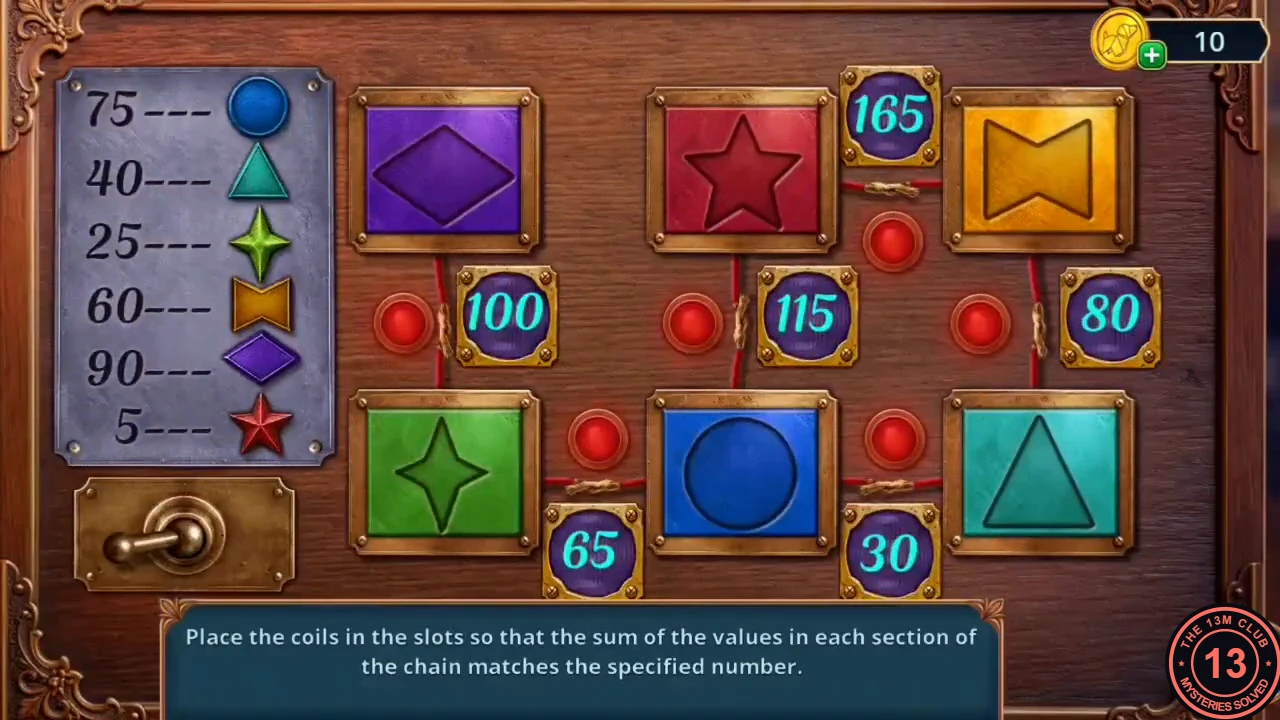
The instruction reads: place the coils in the slots so that the values in each section of the chain add up to the number shown. The values are: blue circle 75, teal triangle 40, green four-point star 25, yellow bow 60, purple diamond 90, red star 5.
- Swap the tiles into this layout. Top row, left to right: yellow bow (60), purple diamond (90), blue circle (75). Bottom row, left to right: teal triangle (40), green star (25), red star (5). The section sums are then 60 + 40 = 100, 90 + 75 = 165, 90 + 25 = 115, 75 + 5 = 80, 40 + 25 = 65 and 25 + 5 = 30. All lights turn green and the switch works.
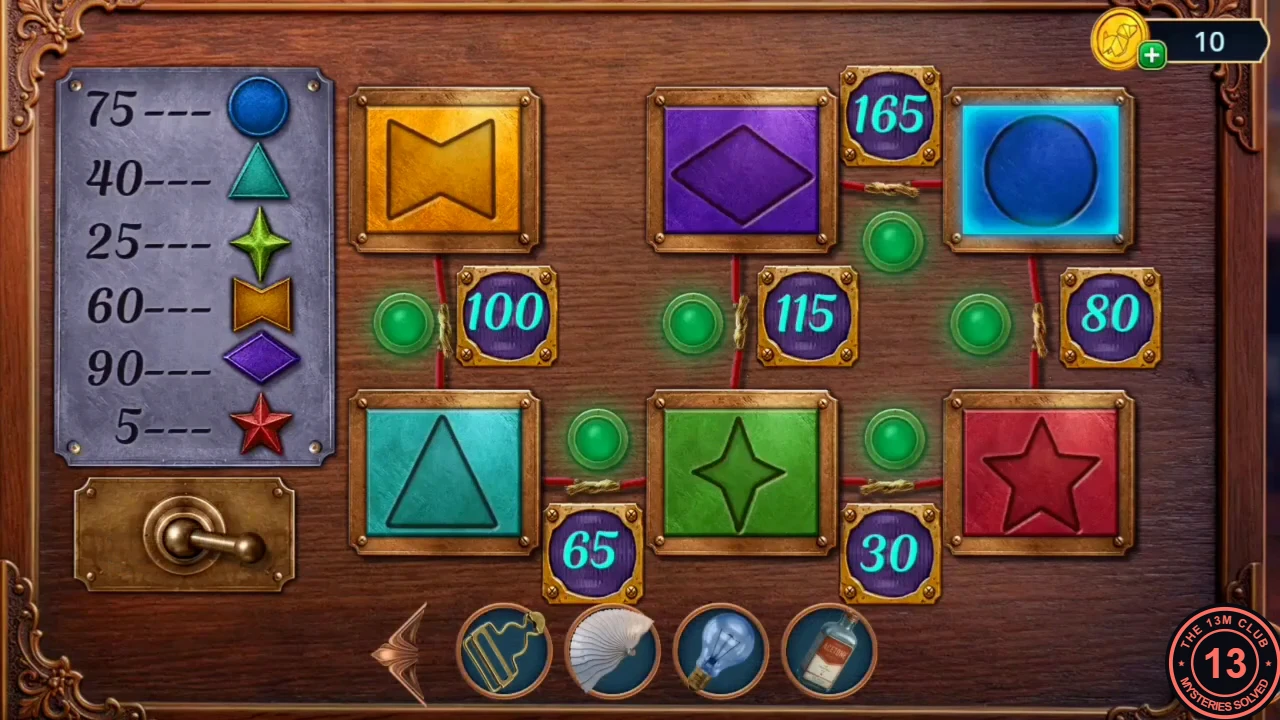
Solved: all section lights are green. - The machine opens: take the Black Candles (1/3) and the Lamp Button.
- At Zosta's round table, screw the Light Bulb into the globe lamp and fit the Lamp Button onto its cord switch. The lamp lights up: take the Key.
- Open Zosta's Box in your inventory and unlock it with the Key. Read the note about the red monocle, then take the Telephone Capsule and the Monocle. The Monocle becomes a tool you can look through.
- Through the archway, open the table with the lantern and the mirror frame and look through the Monocle. The room turns red and a search scene opens.
Through the Red Monocle
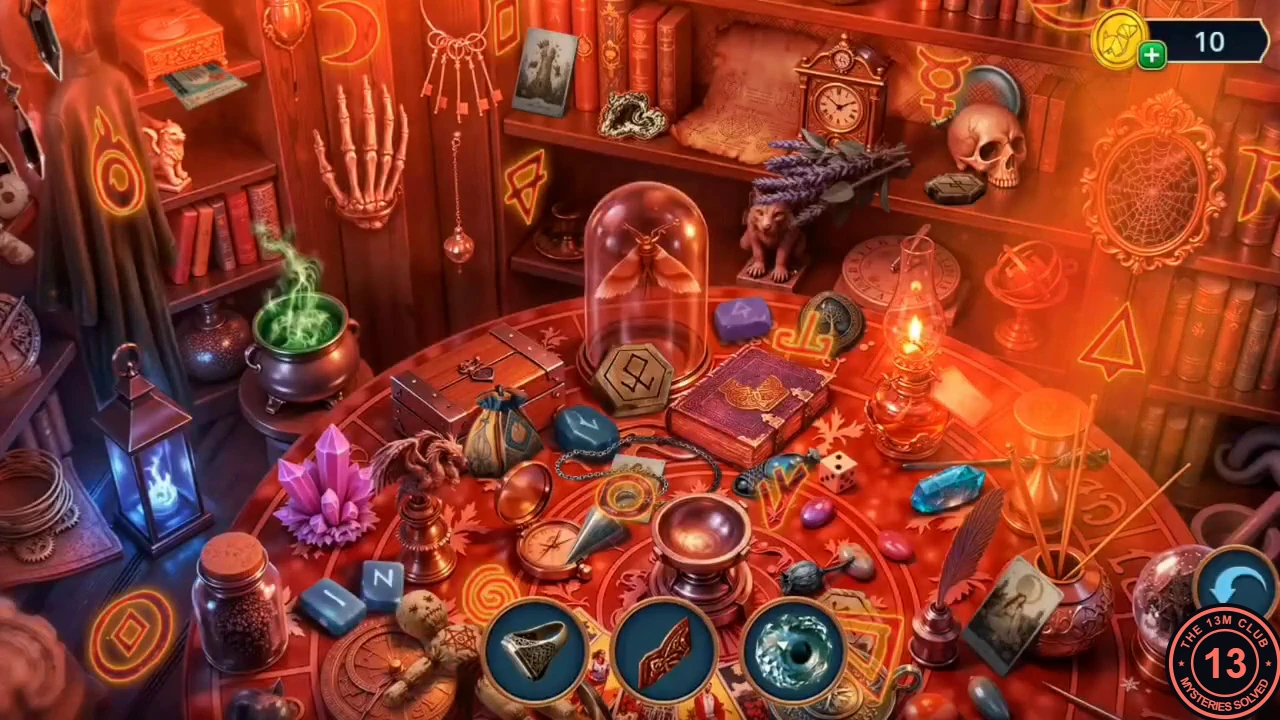
Through the red monocle the shop becomes a placement scene. The tray shows three objects at a time; drag each one onto the spot in the room where it belongs, and a new object takes its place in the tray. A wrong drop just sends the object back to the tray. The reward is the Glove.
- Place the twelve objects: Ring = onto a finger of the skeleton hand hanging on the left wall. Red wing charm = into the gold emblem on the purple book in front of the bell jar. Eye orb = into the empty eye socket of the skull on the top shelf at the right. Spider = onto the web inside the round mirror frame at the top right. Orange candle = into the empty candlestick on the shelf just left of the bell jar (tapping it says 'Something is missing here.'). Blue oil bottle = onto the blue lantern at the far left. Dark feather bundle = onto the hooded cloak hanging at the upper left, over its glowing eye symbol. Ladle = into the green bubbling cauldron on the left. Red orb = onto the empty brass stand at the front centre of the table, where it becomes a glowing crystal ball. Red feathers = onto the lion figurine beside the bell jar, giving it wings. Round pentacle plaque = onto the parchment on the top shelf, left of the mantel clock. Purple crystal = onto the tip of the wand lying right of the hourglass on the table. When the last object is placed, take the Glove.
The Raven Mosaic
Clear the raven mosaic in the church, open the lectern drawer and take the Diadem to the sleeping woman relief.
- In the church, put on the Glove and clear the glass shards off the broken raven mosaic on the floor. Take the Glasses that were underneath.
- Put the Glasses into the spectacles-shaped slot on the lectern drawer. The drawer opens: take the Jammed Camera, the Stencil and the Diadem.
- In the Secret Passageway, put the Diadem on the head of the sleeping woman relief. The stone-swap puzzle starts.