The Cable Car Station
Pry open the electrical box, search the rubble and get the station's control cabinet working.
- At the cable car station, open the electrical box with the lightning sign. Take the green Canister beside it. There is no crowbar ('I can't find a crowbar here... Maybe something else will help?'), so pry the box door open with the Blunt Knife and take the Fuse from inside.
- Open the rubble by the rail cart and take the Tarot card and the Empty Bottle.
- Open the rusty control cabinet by the station. Take the Rubber Patch and put the Fuse into the empty fuse holder ('Fuses. It's always about the fuses.'). Two things at the rail cart must wait: 'The jack is missing a handle.', and the dirty metal tool chest beside the cart stays shut ('This lid needs to be cleaned or I won't touch it.').
- Go back to the rubble by the rail cart, dig in the dirt with the Cracked Bowl and take the Lever (the bowl stays in your inventory). Fit the Lever onto the jack in the control cabinet as its handle. A wiring panel opens.
The Wiring Panel
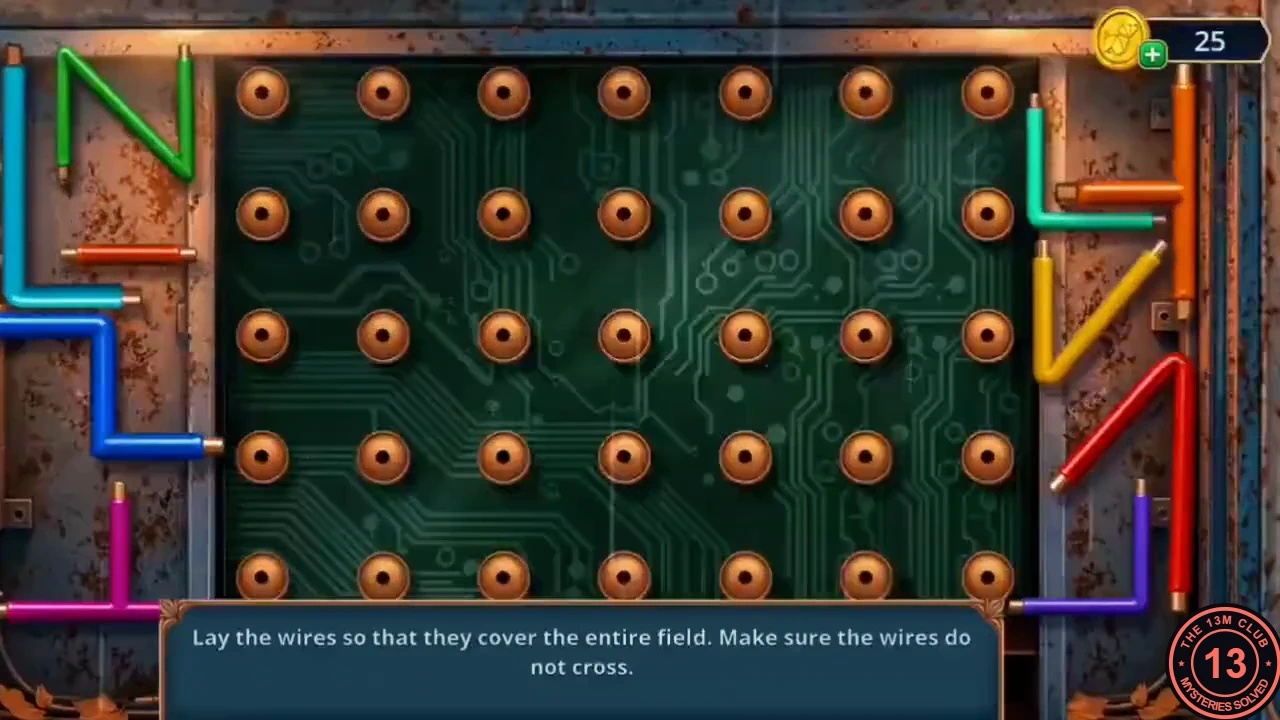
The instruction reads: lay the wires so that they cover the entire field, without the wires crossing. Drag the ten shaped wires from the sides onto the grid of pegs (7 columns by 5 rows).
- Counting columns 1–7 from the left and rows 1–5 from the top (r = row, c = column), place the wires like this. Teal corner: r1c1, r2c1, r2c2. Blue zigzag: r1c2, r1c3, r2c3, r2c4. Short orange: r1c4, r1c5. Yellow V: r1c6, r2c6, r1c7. Red: r3c4, r2c5, then down to r4c5. Light-blue T: down column 7 from r2 to r4, with its arm on r3c6. Cyan L: down column 1 from r3 to r5, then r5c2. Green N: r4c2, r3c2, r4c3, r3c3. Purple: r4c4, r5c4, r5c3. Magenta T: along row 5 from c5 to c7, with its arm on r4c6. The power comes back on and the Gas Station sign lights up down the road.
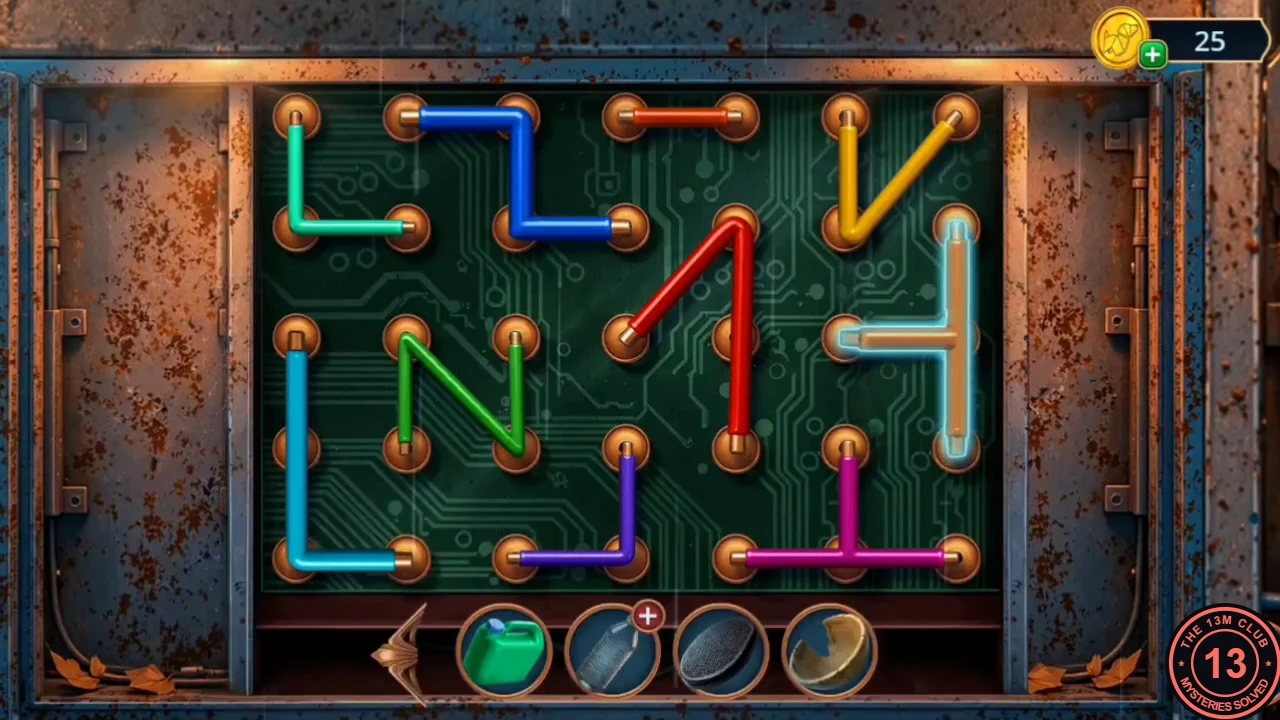
Solved: every peg covered.
The Gas Station
The Abandoned Gas Station is marked on the Chapter 4 map as the chapter's Bonus Location (gold frame). Here it is also needed to refuel the police car, so the story cannot continue without it.
- Follow the lit sign to the Gas Station. Open the red fuel pump: take the Tarot card and set the green Canister down beside the pump. Victor sees what is missing: 'There's no gun, the panel's disassembled... and there's no hose. That's where I'll start.'
- Open the generator by the pumps and take the Scissors, the first wooden plank piece (1/2) and the Metal Lock from its top.
- Open the Empty Bottle in your inventory and cut it with the Scissors to make the Funnel.
The Gas Station Kiosk
Unscrew the 'CLOSED' sign to open the gas station kiosk.
- Open the 'CLOSED' sign on the kiosk shutter and undo its screw with the Keychain Screwdriver (you keep the screwdriver). The shutter rolls up and the cashier counter opens as a search scene.
The Cashier Counter
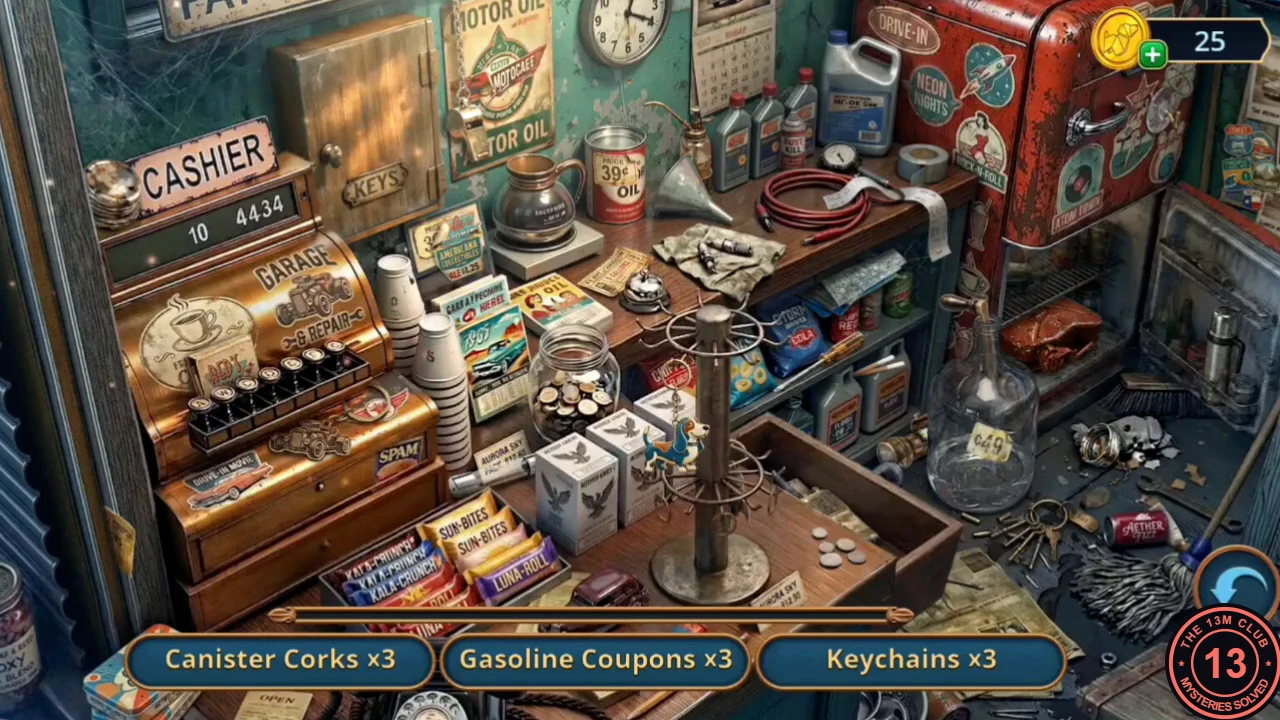
A sets search: find three of each listed kind. When a set is complete, Price Tags takes its place on the list. The scene scrolls left and right. The reward is the Key.
- Keychains: one hangs on the rotating stand in the middle and one is on the front of the cash register below the keys. The last one is stuck on the base of the rotating stand ('Everything is rusty...'): drag the small red-and-white oil can from the lower shelf on the right onto the stand's base, then take the keychain.
- The cash register drawer is stuck ('Stuck... Where is the lever?'). Take the silver crank lever from the shelf edge above the big glass jug on the right and fit it onto the side of the register; the drawer slides open. Take the first Canister Cork from its left compartment.
- Gasoline Coupons: one is at the far left edge of the scene beside the register, one is among the postcards on top of the register, and the third lies in the right compartment of the open drawer under a clear cover. Tapping that coupon directly only gives 'How can I get this ticket?', so tap the clear cover first to slide it aside, then take the coupon.
- Canister Corks (the remaining two): one lies on the floor right of the big glass jug among the broken glass, and the other is on the left wall beside the 'CASHIER' sign (scroll left).
- Price Tags: the '39¢' label on the red oil can at the back of the counter, the '$49' tag on the big glass jug, and the 'Americana Collectibles $1.25' sale card at the top of the register.
- With every set found, a note from the gas station owner appears, warning about the woman with the cards and mentioning the missing worker Lewis. You receive the Key (silver, with a red gas-pump fob).
The Bicycle Bag
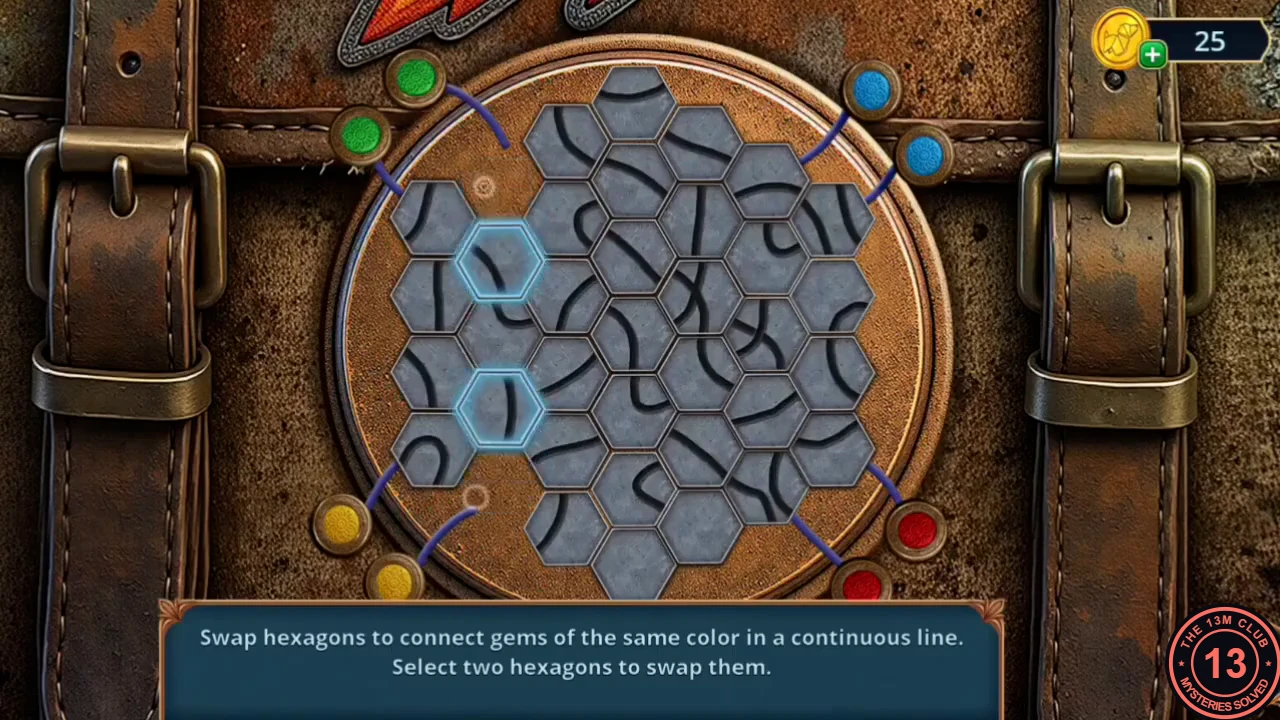
Open the locked bicycle bag beside the stray dog. This guide gives the target and a working approach rather than every move.
- Open the bicycle beside the dog. Take the papers (an item you can inspect) and the Bicycle Pedal from the handlebar, and the Tarot card from the paper on the ground at the top left. The bag is locked ('The bag is locked.'): place the Metal Lock (a disc with a hexagon pattern) into the round socket on the bag's front.
- Lock puzzle: select two hexagons to swap them, and keep swapping until each pair of same-coloured gems is joined by one continuous line — green (top left), blue (top right), yellow (bottom left) and red-pink (bottom right). The solved layout is shown in this section's screenshot.
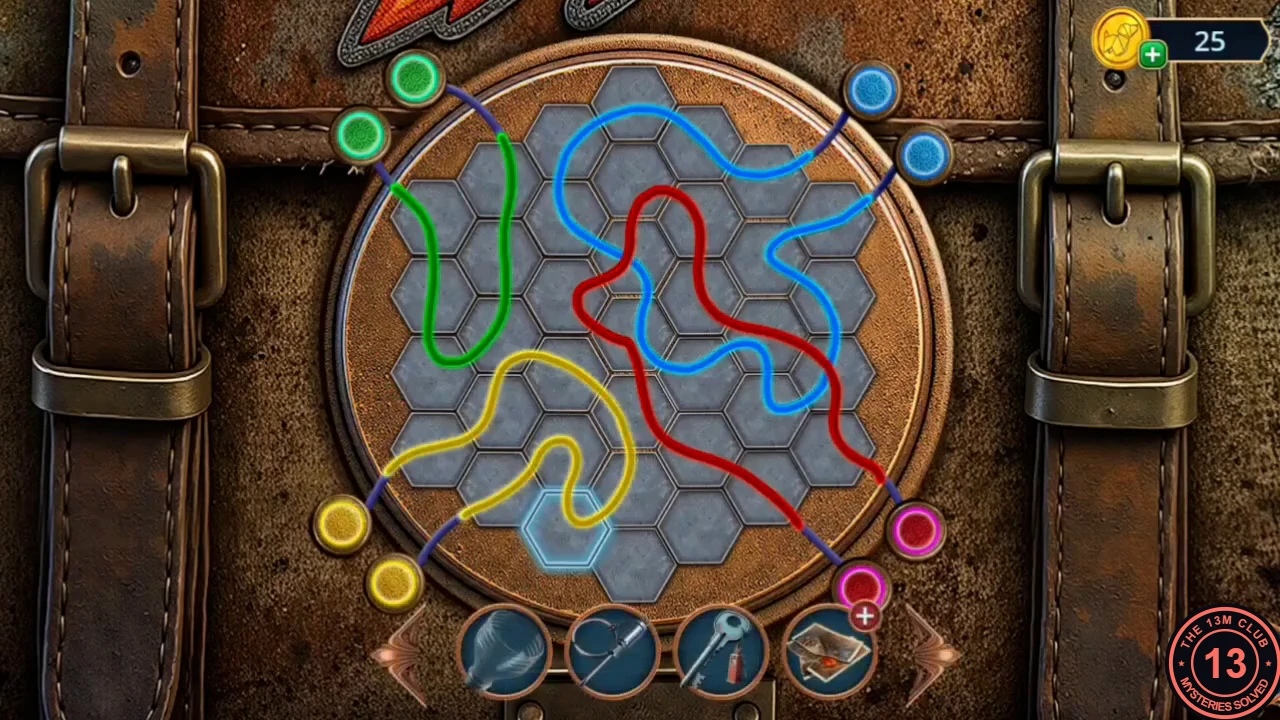
Solved: each gem pair joined by one line. - Take everything from the open bag: a bone (an item you can inspect), the Rope and the Tape (a red roll).
Fuel for the Police Car
Repair the hose, fill the canister at the pump and drive the police car to the river.
- Open the generator by the kiosk ('High voltage... Okay, I need a glove and... a screwdriver?') and place the Keychain Screwdriver on it. It stays there until you have a glove.
- Open the red fuel pump and unlock its small door with the Key. The pump's inner mechanism is exposed.
- Go back to the police car on the mountain road. Open the tree above it and take the Damaged Hose hanging on a branch near the nest.
- Open the Damaged Hose in your inventory. Put the Tape in the top slot and the Rubber Patch in the bottom slot to seal the tear, and take the repaired hose.
- At the open fuel pump, attach the repaired hose. Its nozzle reaches the green Canister you left beside the pump and fills it: take the Gas Canister.
- Back at the police car, open the fuel cap, put the Funnel in the filler neck and pour in the Gas Canister. Tap the car to drive off. The task to get to the river is complete and a new task begins.