The Lake Below the Islands
The crystal's roots lie at the bottom of the new lake. A beaver living on a houseboat knows a potion for breathing underwater.
- Ride the turtle down to the ruined city. A cutscene with the beaver on the houseboat follows, and you receive the Underwater potion recipe: fill the dragon vessel with 1 Purple seaweed, 2 Lemon juice, 3 Lava flower juice and 4 Murmuri berry juice, then scoop water from the magical spring and pour it over yourself.
- Zoom into the submerged steps with the railing to the right of the centre and take the Purple seaweed from the water.
Gathering the Potion Ingredients
The other ingredients are spread across the Plains, the Academy and Fugo Island. Use the fast-travel map.
- In Maaron's hut, zoom into the stained-glass window and take the Lava flower juice from the bowl of glowing petals on the sill.
- In the Academy greenhouse, zoom into the small potted lemon tree on the left and take the Lemon.
- On the first floating island, zoom into the orange tree and take the Murmuri berry.
- The recipe needs a dragon vessel. In Maaron's hut, zoom into the clock above the fireplace: there are no numbers on its dial.
- Go back to the submerged steps in the ruined city and take the Box with numbers from the water.
Maaron's Clock
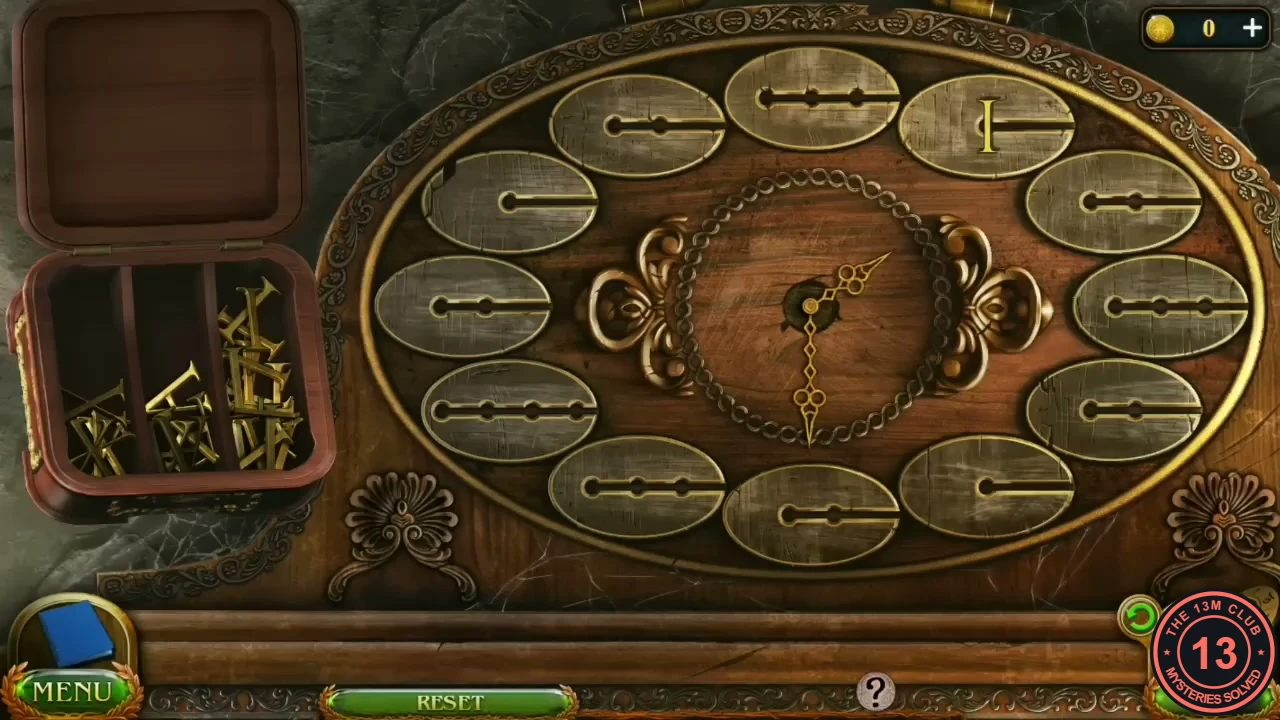
Rebuild the Roman numerals on the empty clock dial from the loose I, V and X strokes in the box.
- Zoom into the clock in Maaron's hut and place the Box with numbers on it.
- Drag the strokes onto the twelve plates so they read I to XII clockwise, with XII at the top and I just to its right. Build each numeral from left to right, stroke by stroke: for IV put the I first and then the V; for IX the I and then the X. Press Reset if a stroke lands in the wrong order.
- Look into the cupboard and take the Dragon vessel from the lower shelf.
Brewing the Underwater Potion
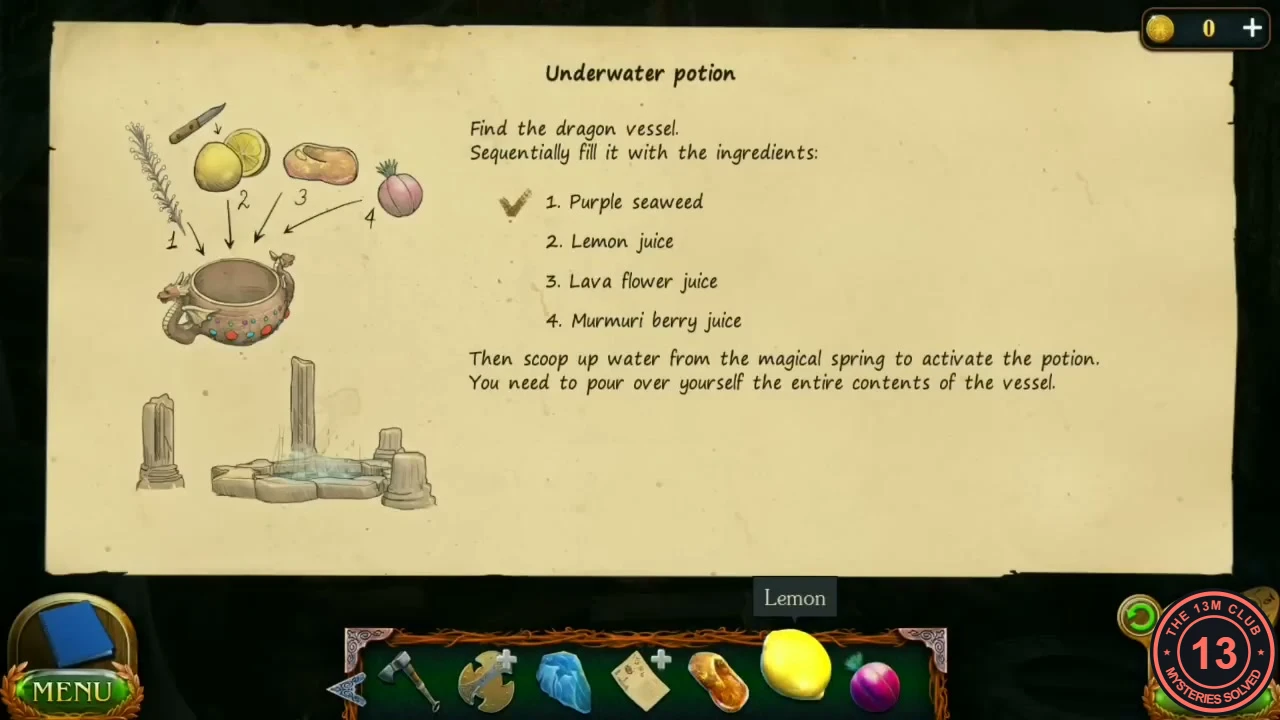
Prepare the potion in the recipe, then activate it at the spring in the ruined city.
- Open the Underwater potion recipe from the inventory. Place the Dragon vessel on it, then add in order the Purple seaweed, the Lemon (cut it with the Knife so its juice drips in), the Lava flower juice and the Murmuri berry. Take the Underwater potion ingredients.
- Travel to the ruined city and zoom into the octagonal spring in the centre. Scoop its water with the Underwater potion ingredients. Susan pours the potion over herself and dives into the lake, where she finds only a large shard of crystal, like the one in the temple.
The Way to the Ritual Hall
The Academy library has a book about the island crystal, and the goblin caretaker knows where the ritual hall is.
- Travel to the Academy library. The list of departments on the lectern shows the crystal symbol for the Department of Crystals and Artifacts. In the hallway, go to the arch with that symbol, read the ticked scroll and open the book on the ticked shelf. The Crystal Unio article explains that crystal powder poured into the well of the ritual hall lets you work the island's hologram. The task Lower the island is added.
- In the Academy courtyard, talk to the goblin caretaker. He says the entrance to the ritual hall is the floor mosaic in the entrance hall and gives you a Carabiner.
- In the entrance hall, zoom into the wheel box on the right. Hook the Carabiner onto the chain and turn the handle. A shutter opens and coloured light falls on the floor mosaic.
The Coat of Arms Mosaic
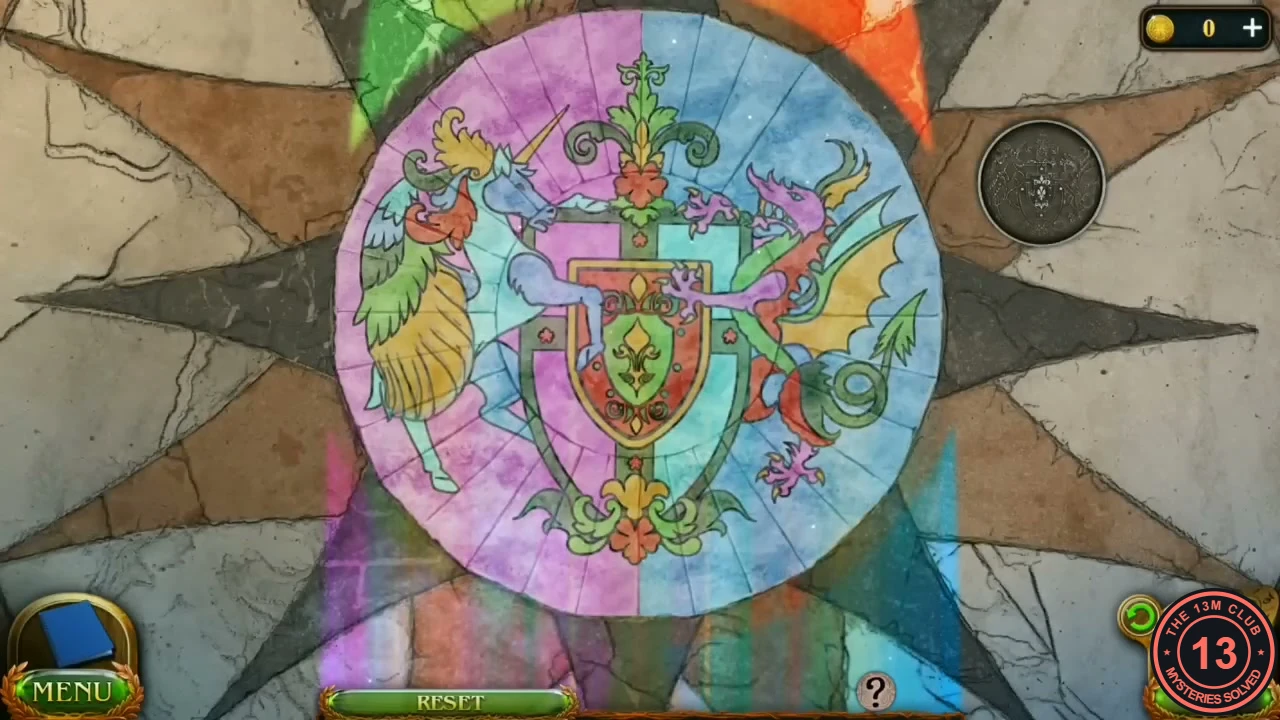
Compare the lit floor mosaic with the engraving on the round Emblem from Maaron's trapdoor and click every part of the floor that differs.
- Zoom into the lit mosaic and place the Emblem on it. Click the small round button at the right to show or hide the Emblem engraving.
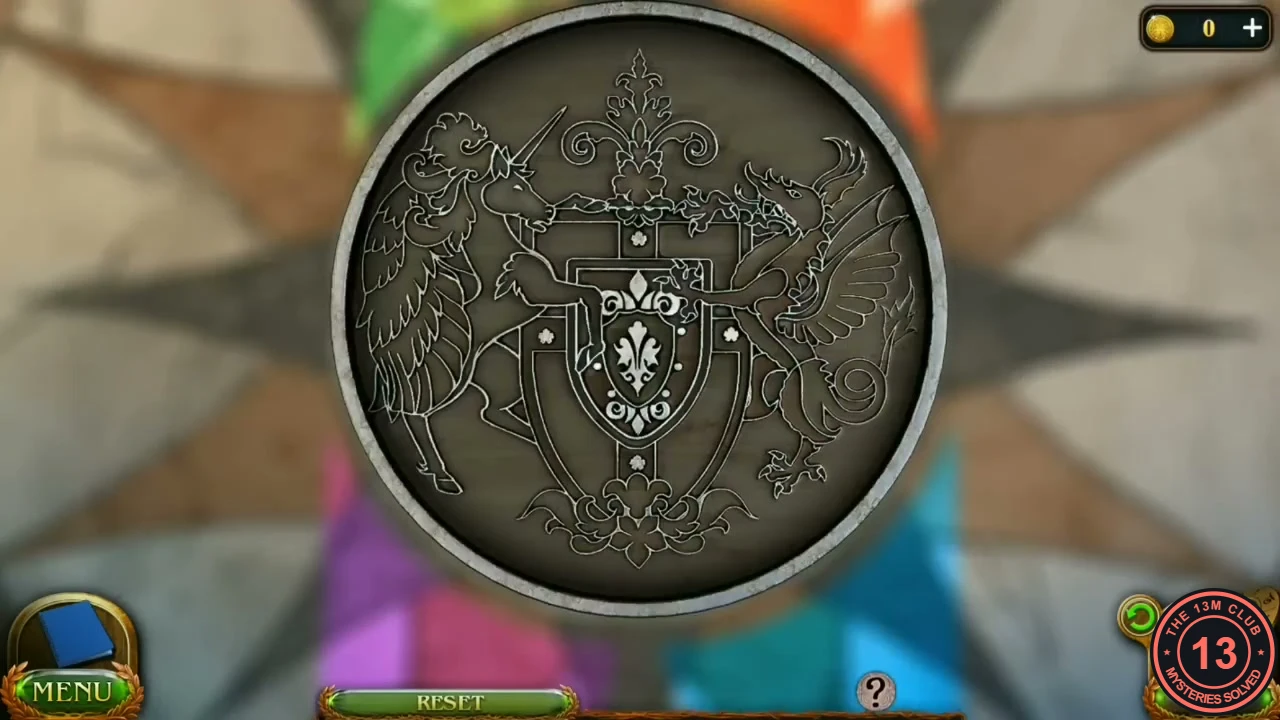
The Emblem engraving to compare with the floor. - Click the floor areas that do not match the engraving. The parts to correct include the bird's head at the upper left, the unicorn's raised foreleg, the leaves at the top of the lily, and the dragon's head and wings on the right. Keep comparing until no differences remain.
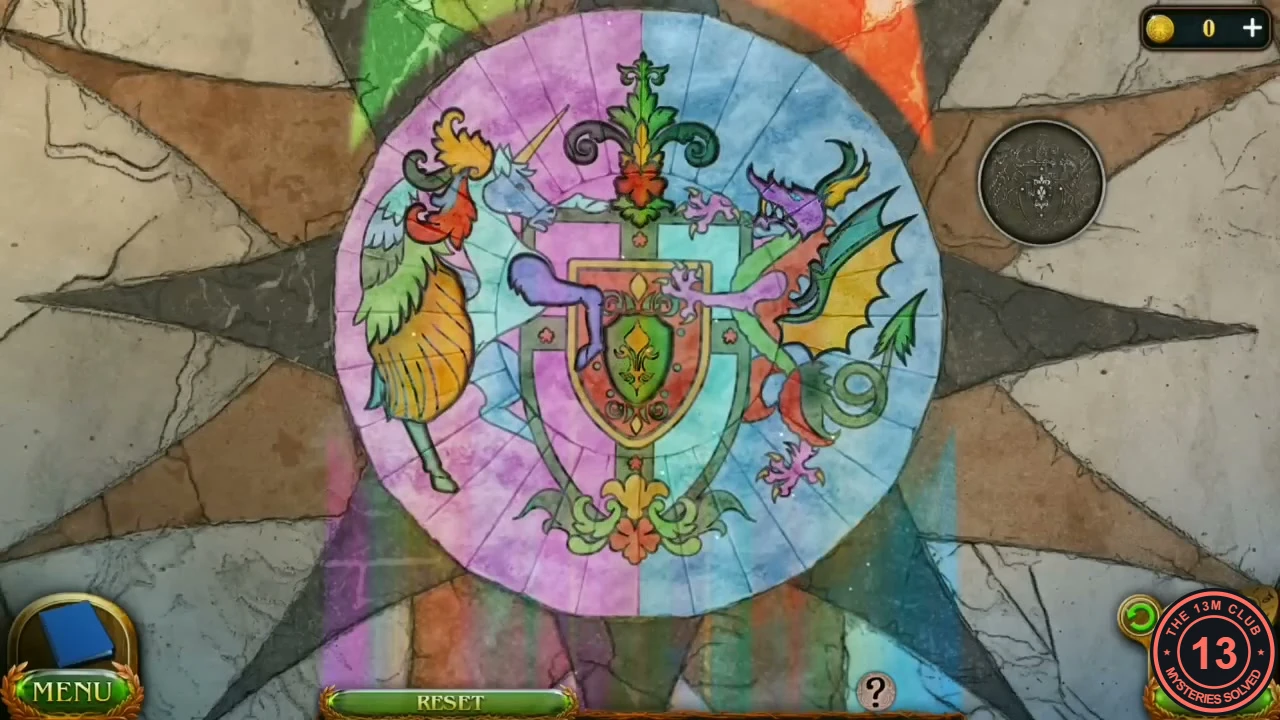
The corrected mosaic.
The Ritual Hall
A ring of standing stones surrounds a well. Each stone has a plate in its hole, except one.
- Go down the stairs into the ritual hall. Zoom into the stone just left of centre: its plate is missing. Zoom into the centre and take the Key lying next to the crystal at the lower right.
The Academy Model
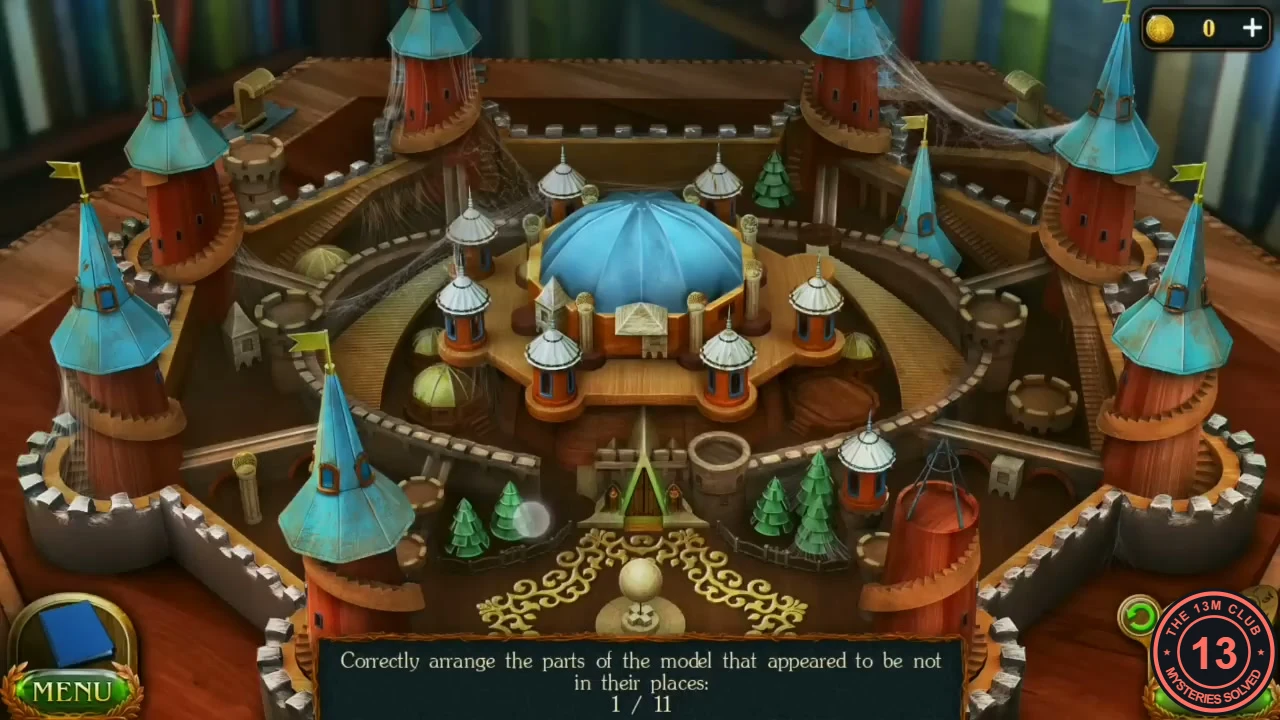
A glass case in the library hallway holds a model of the Academy. Eleven of its parts are in the wrong places.
- In the library hallway, zoom into the glass case on the left and open it with the Key.
- Click a misplaced part and then the spot where it belongs to swap them. The wrong parts include fir trees, small round towers, tall blue spires, flags and a ladder; compare matching buildings on both sides of the model to spot what does not fit. The counter reaches 11/11.
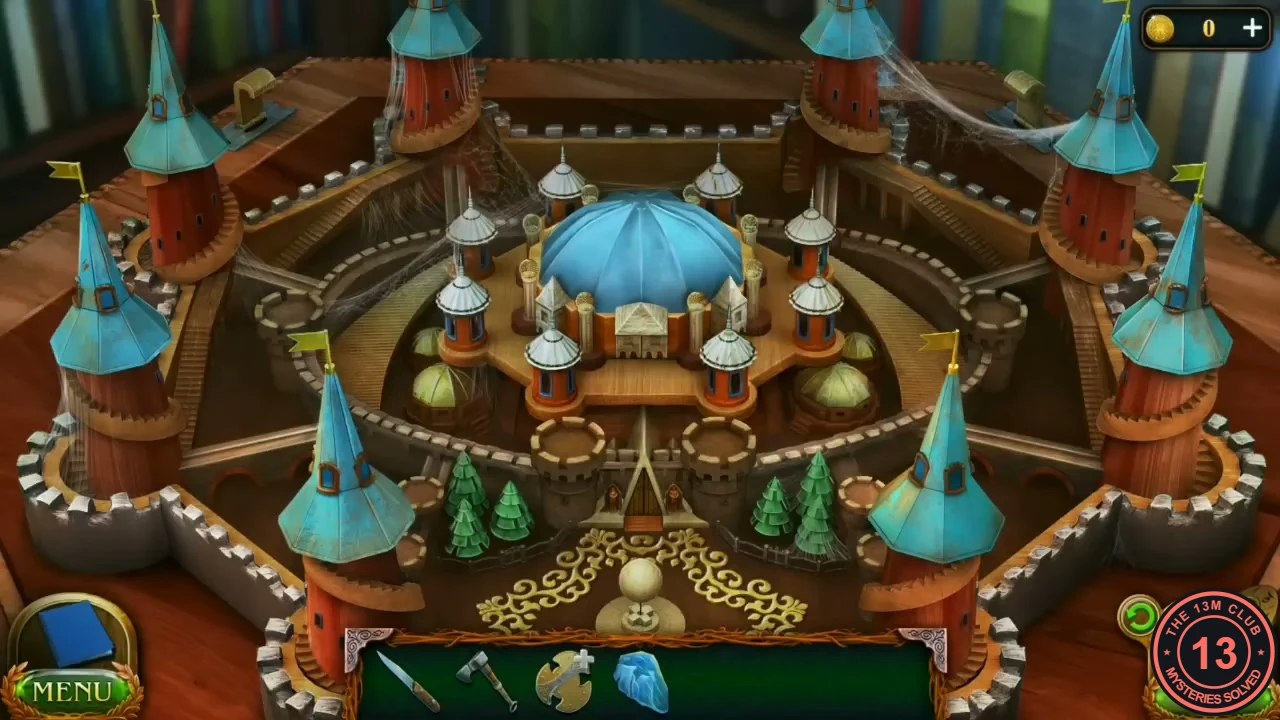
The corrected model. - Take the Signet ring from the model.
Animals and Their Habitats
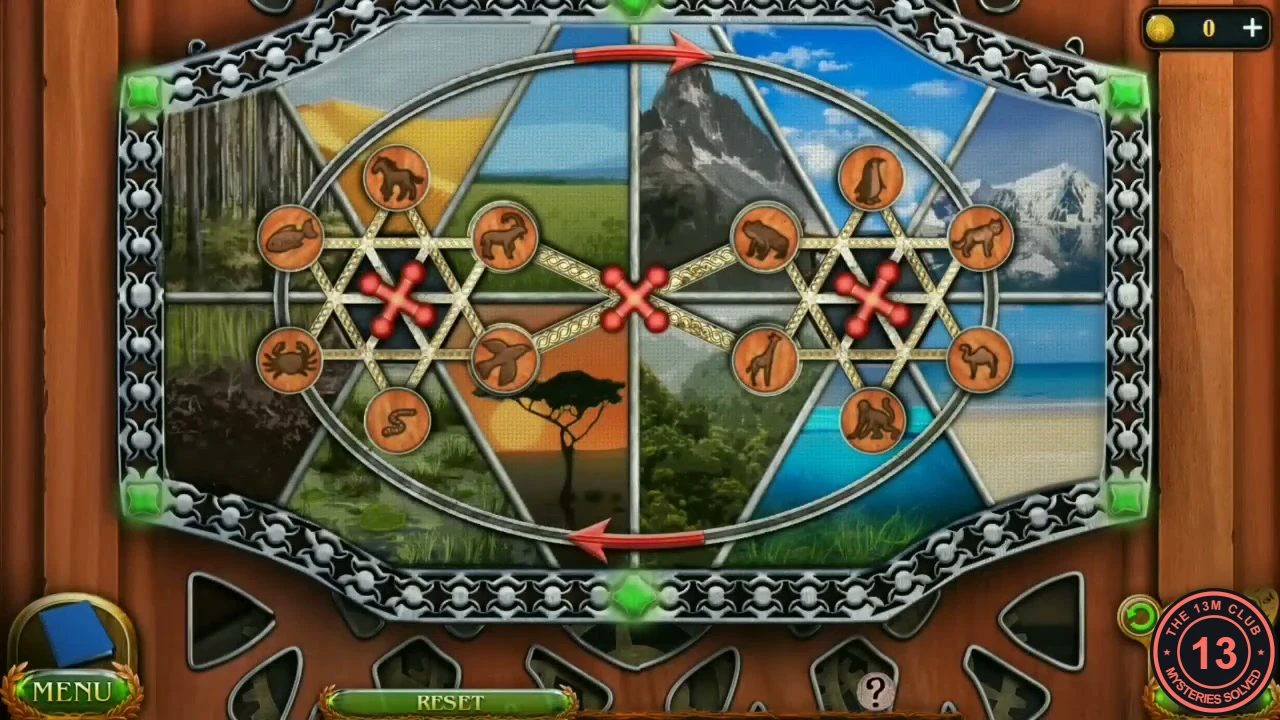
Maaron's wardrobe is locked by two hexagons of animal tokens over a picture of twelve landscapes. Turn the rings until each animal sits on its own habitat.
- In Maaron's room (room 3), zoom into the wardrobe by the birdcage and use the Signet ring on it.
- Use the arrows and red handles to rotate the tokens. Target layout, left hexagon clockwise from the top: camel (desert), horse (grassland), giraffe (savanna), frog (swamp), snake (dark soil) and lynx (forest). Right hexagon clockwise from the top: bird (sky), penguin (snowy peak), crab (beach), fish (sea), monkey (jungle) and goat (rocky mountain). This is the finished layout the game shows when the puzzle is completed.
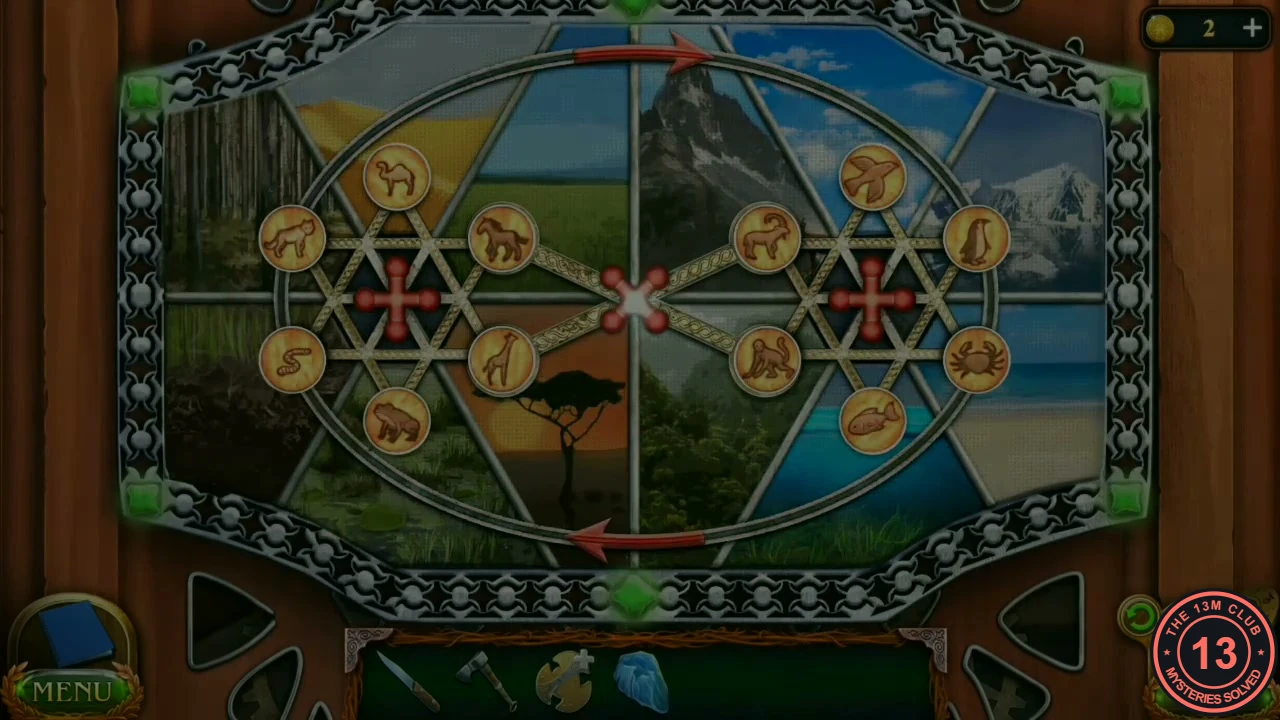
Solved: each animal on its own habitat. - Take the Lollipop from the upper shelf and the Box with balls from the lower shelf.
The Coloured Ball Picture
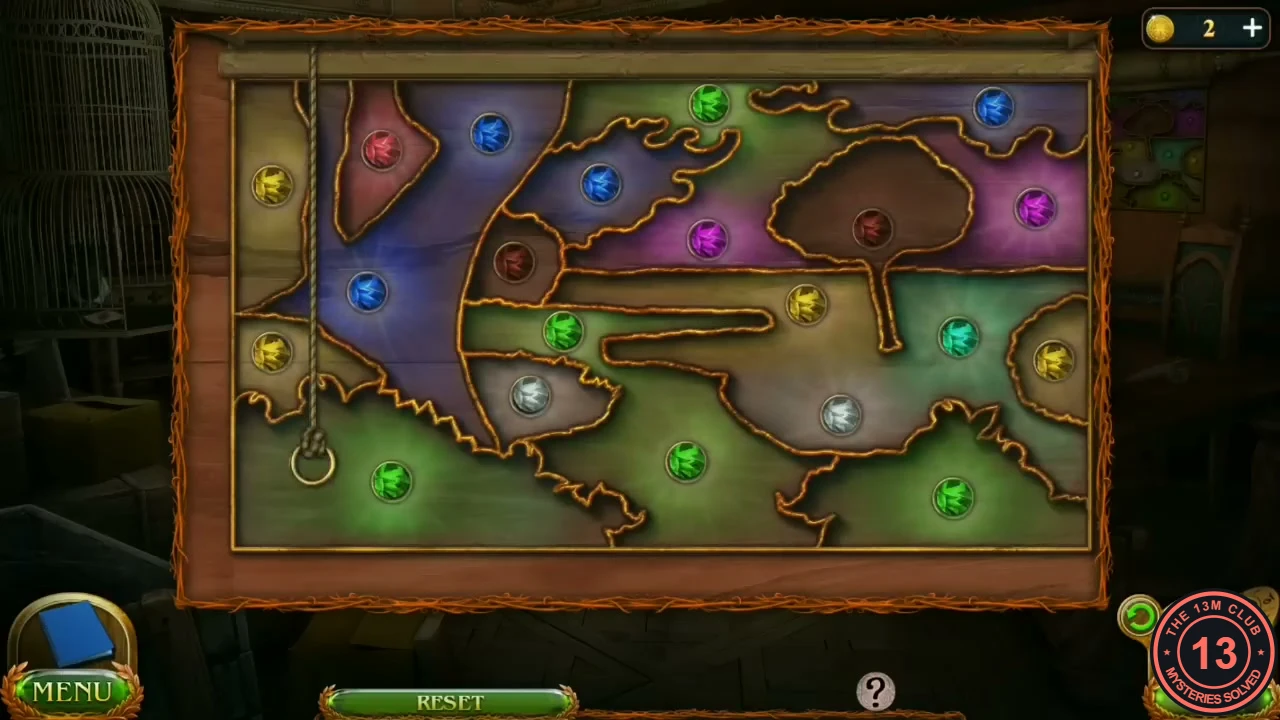
The board above the desk in Maaron's room holds coloured balls behind a roll-down picture. One ball is missing.
- In the greenhouse, zoom into the upper-right branch of the tree where ants are crawling and put the Lollipop there. Take the Ants on the lollipop.
- In Maaron's room, put the Ants in the birdcage on the left. A bird flies in to eat them; take the red Ball it leaves.
- Zoom into the board above the desk and place the Box with balls (one ball is still missing), then the red Ball.
- Pull the cord at the left to roll the picture up or down. Each ball tints the part of the picture in front of it, and the balls start in the wrong places. Move the balls along the grooves until the picture has natural colours: brown on the tree trunk, green on the treetops and bushes, blue in the sky and the water, white on the clouds, red on the sun, yellow on the fields, magenta on the flowers and turquoise on the mushroom. Roll the picture down often to check your progress. The solved picture is shown below.
- Note the three lit symbols: an orange squirrel, a purple hat and a green bird.
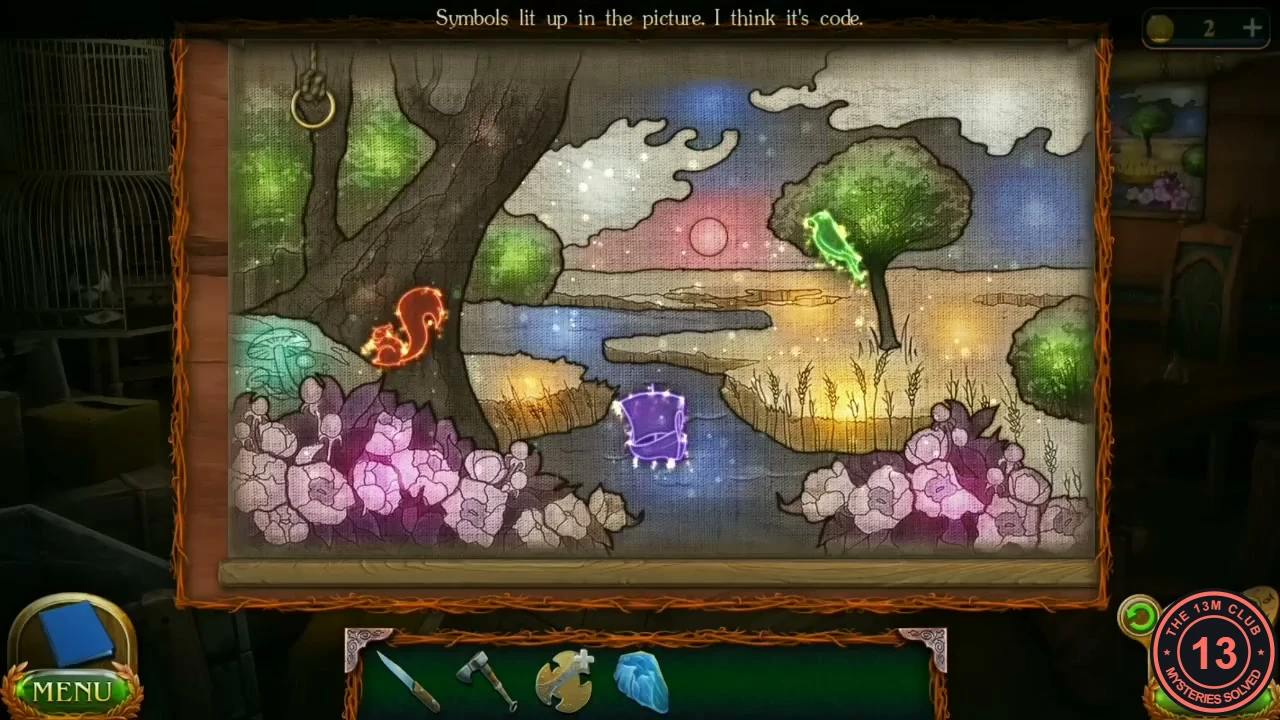
Solved: natural colours (brown trunk, blue sky and water). The squirrel, hat and bird light up.
The Wardrobe Dial
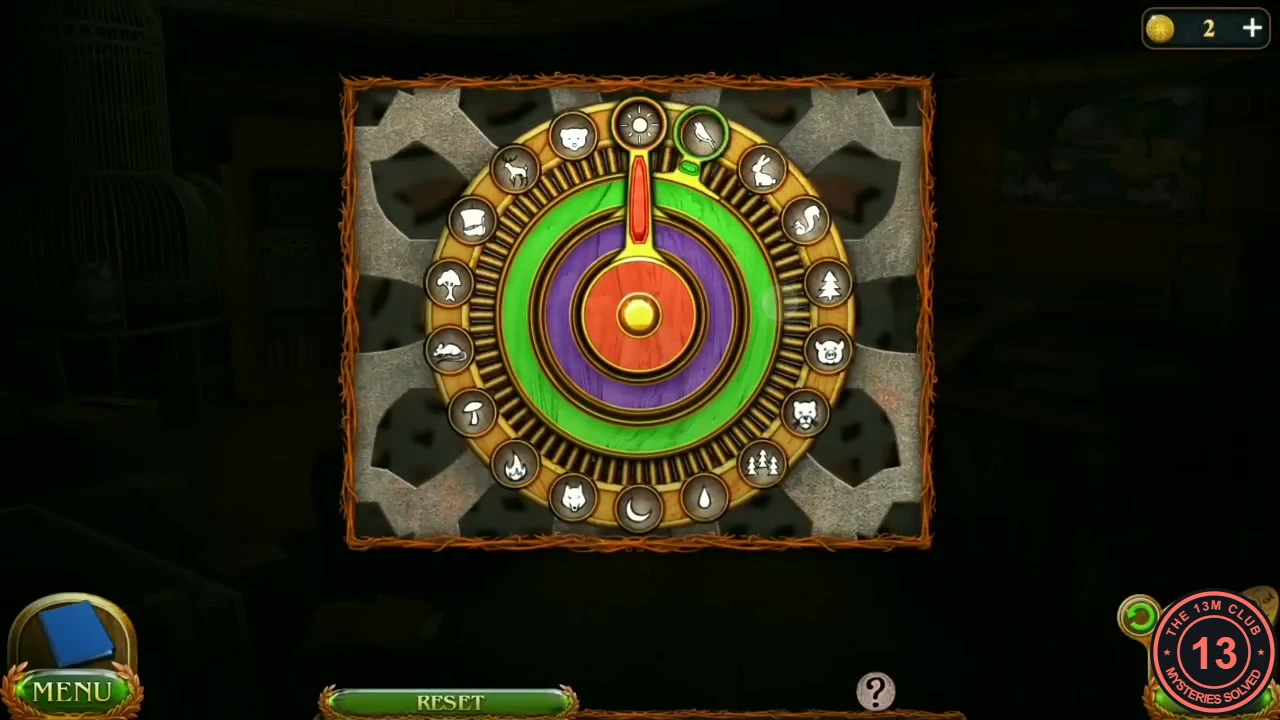
A locked box in the open wardrobe has three coloured hands on a ring of symbols.
- Zoom into the box in the wardrobe. Turn the orange (inner) hand to the squirrel, the purple (middle) hand to the hat and the green (outer) hand to the bird.
- Take the Plate from the box.
Lowering the Island
The ritual well needs crystal powder. Crush the crystal piece from the temple under a block at the Stronghold.
- At the Stronghold excavation site, zoom into the stone blocks in the centre below the crane and place the Part of the crystal on the low block.
- Zoom into the crane at the upper left and cut its rope with the Knife. The block drops on the crystal. Zoom into the blocks again and take the Crystal powder.
- Go down to the ritual hall and put the Plate in the stone just left of centre. All the stones light up.
- Zoom into the well and pour in the Crystal powder. Susan uses the hologram to lower Fugo Island into the lake, where it joins the crystal. The water creature gives Kiana an amulet as a keepsake. The task Find Centaurs in the Darkwoods is added.