Maaron's Yard
After the opening cutscene Susan arrives in Maaron's yard. You can choose the interactive tutorial or skip it.
- Take the Gardening scissors from the grass beside the pond, left of the stone path.
- Open the vine-covered pot in front of the hut and cut the vines with the Gardening scissors. The task Find Maaron is added.
- Lift the pot and take the Key hidden underneath.
- Open the door on the lower right of the hut with the Key and go inside.
Maaron's Hut
Search the hut for Maaron's note and the first pieces of the dolmen puzzle.
- Zoom into the table under the window on the left and take the Knife.
- Zoom into the rocking chair beside the fireplace, slit the seat cushion with the Knife and take the Owl emblem.
- Zoom into the fireplace, use the poker on the ashes and take the Coin.
- Zoom into the mantelpiece and read Maaron's note. It says the rune for the dolmen is hidden and that looking at the fish picture through four colored glasses reveals the ingredients of a mixture to pour into the pond. The task Find a rune for the dolmen is added. The clock on the mantel has no numbers yet. Take the Gear (1/2) from the left of the shelf.
- Zoom into the colored window on the right. Move the pot on the sill and take the Kyoll coin (1/6), then take the Colored glass. The green glass is shattered and must be found elsewhere.
- Roll back the rug in front of the fireplace to reveal the trapdoor and zoom into its lock plate. Place the Owl emblem on the plate.
- Zoom into the fish picture on the right wall and place the Colored glass on its shelf. Hold each glass over the picture: they reveal that a Pearl, Poppy seeds and a Snakeskin are needed. Another glass is still missing.
Back in Maaron's Yard
Prepare the two gears for the garden gate.
- Zoom into the flowered stump in the center foreground and take both poppy heads to get Poppy seeds (2/2).
- Zoom into the lock on the garden gate left of the hut and pry out the broken key with the Knife. The mechanism needs two gears.
- Examine the Coin in your inventory and pull off the wire. You keep the Wire and the coin becomes Kyoll coin (2/6).
- Look at the small arched letter box in the stone wall left of the gate: Some detail is missing to open it.
- Return to the hut, zoom into the trapdoor and use the Wire on the gap in the floorboards beside the lock to fish out the Detail.
- Go back to the yard and use the Detail on the letter box. Read Folnur's letter, then take the Gear (2/2) and the Star.
Garden Gate Lock
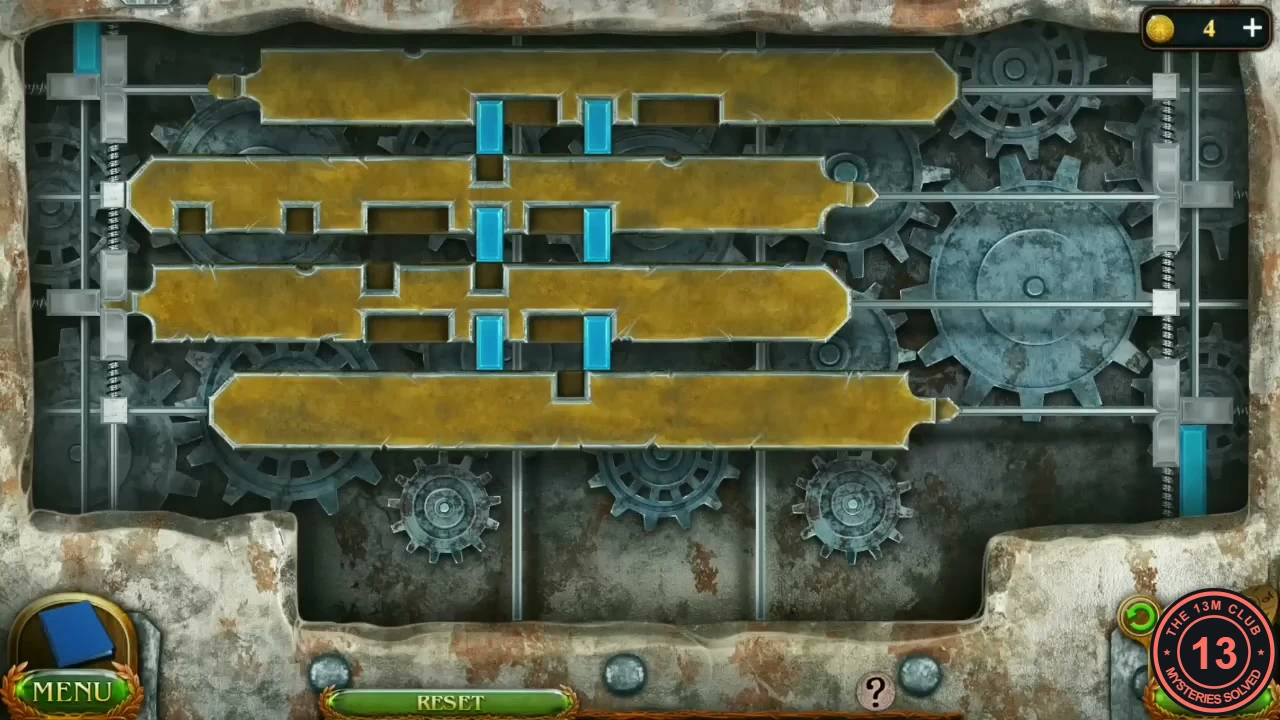
Open the gate lock again and add both gears to start the sliding-bolt puzzle.
- Place both Gears in the open gate lock to start the puzzle.
- Slide the four gold bolts left and right; the blue pegs in the notches block some moves, so shift bolts in turn to clear a path. Target: the top and third bolts all the way left, the second and bottom bolts all the way right, so each pointed end locks into the side blocks.
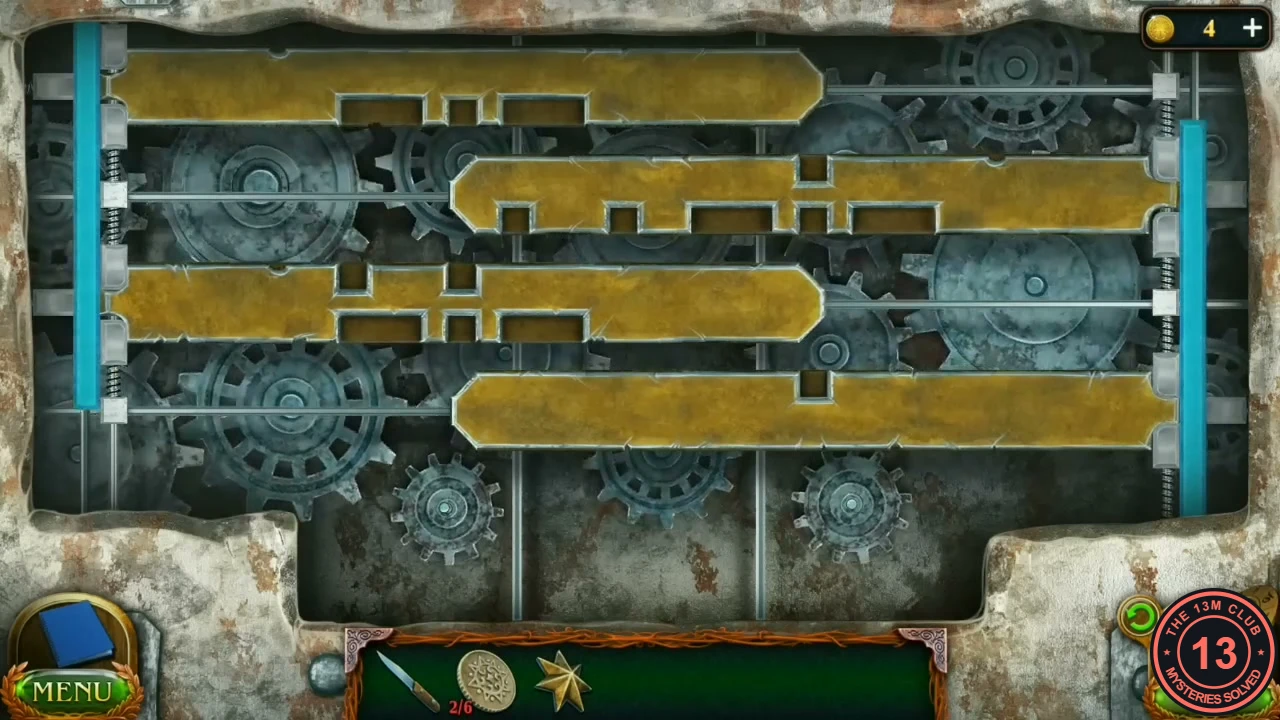
Solved: top and third bolts left, second and bottom bolts right. - Walk through the open gate to the road.
The Halfling's Road
A halfling's cart has a broken wheel and a torn sack. Helping him is the way forward.
- Click the cart and watch the conversation with the halfling. The task Help the halfling is added.
- Zoom into the small decorated tree. Take the Kyoll coin (3/6) from the branches, cut the hanging ribbon with the Knife to free the next Kyoll coin (4/6), and take the Pearl.
- Zoom into the split sack and take some Grain.
- Zoom into the broken ladder leaning on the shed and take the Steps.
- Open the latch on the shed (hen house) door. Throw the Grain inside to lure the chickens out, then go in and take the Wheel from the shelf. Read the book page on the shelf: it is Manuscript 1 of 10 (Halflings).
- Zoom into the broken cart wheel. Pull out the pin, remove the washer and take off the broken wheel. Fit the new Wheel, put the washer back and insert the pin, then pick up the yellowish rock lying on the ground to the left and use it to hammer the pin home.
- Zoom into the red bucket by the post on the left of the path and take the Rope.
- Go back to Maaron's yard, zoom into the ladder on the side of the hut and repair it with the Steps and the Rope. Climb up to the attic.
Maaron's Attic
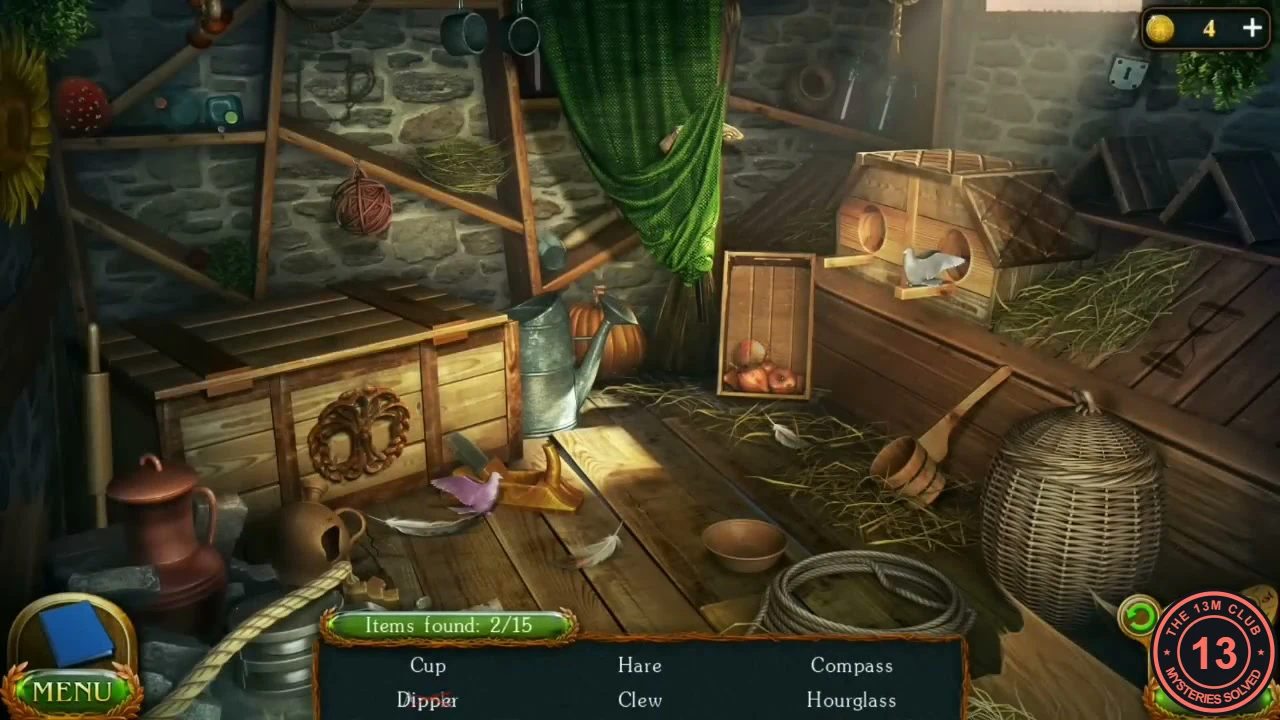
Find the 15 listed items. The list shows only a few names at a time and refills as you find them.
- Find the visible items: Cup (symbol at the top left), Apple (crate on the floor right of center), Dipper (long-handled bucket on the right), Clew (ball of cord on the top-left shelf), Rolling pin (far left by the big box), Hourglass (symbol on the wood at the far right), Lock (padlock top right), Plate (bowl at the bottom center) and Fly agaric (red mushroom on the top-left shelf).
- Click the green curtain so it falls and take the Hare lying on it, then take the Spice scoop from the shelf behind. Take the Tree symbol on the front of the large box on the left, open its lid and take the Compass inside.
- Put the pink dove from the floor into the dovecot on the right beside the white dove. Look into the opened nest: take the Needle from the blue thread spool and the Scissors from the egg.
Helping the Halfling and Finding the Ingredients
Finish the halfling's repairs, then gather the remaining ingredients for the mixture.
- Return to the road, zoom into the torn sack and sew it with the Needle with thread. Put the sack back on the cart; the halfling thanks you and gives you a Tile. The task Help the halfling is complete.
- Zoom into the pile of rocks on the left; the big stone is too heavy. Take the long Stick left on the broken ladder by the hen house.
- Use the Stick to lever the big stone aside. Take the Snakeskin, unwrap the parcel, take the green jar so it smashes, then take two Kyoll coins (5/6 and 6/6) and the Bottle shard.
- In the hut, zoom into the fish picture and use the Bottle shard as the green glass: it shows that Eggshell is the last ingredient.
- Go to the hen house and take the Eggshell from the nest.
- In the hut, zoom into the table on the left. Add the Pearl, Poppy seeds, Snakeskin and Eggshell, grind them with the mortar and take the Mixture of the hidden light.
The Chest in the Pond
The mixture reveals what Maaron hid in the pond.
- Zoom into the pond in Maaron's yard and pour in the Mixture of the hidden light. A chest appears under the water, out of reach.
- Go to the road, zoom into the red bucket and take the Hook from its handle. Combine the Hook with the Rope in your inventory to make the Rope with hook.
- Use the Rope with hook on the chest in the pond to pull it out. The Rope goes back into your inventory; keep it for later.
- Place the Star in the star-shaped notch on the chest, then put all six Kyoll coins into the round slots and turn them to open the lid.
Pond Chest Chip Grid
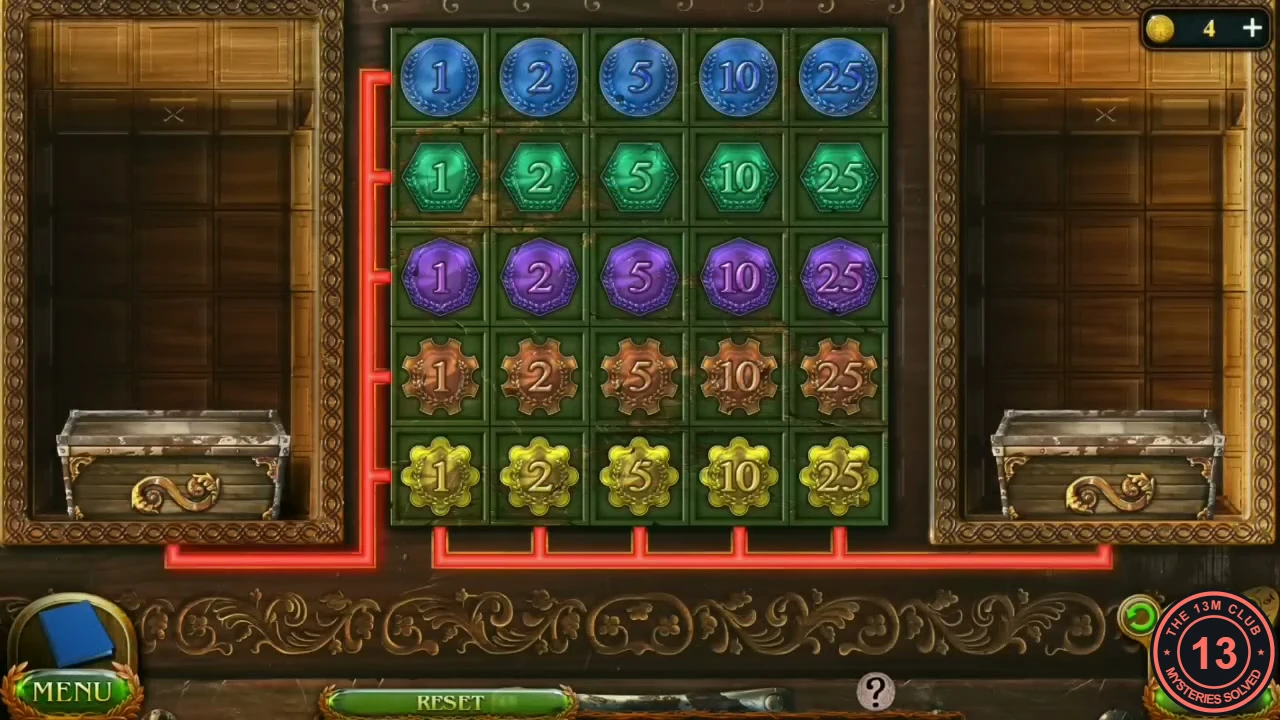
Swap chips so that no row or column repeats a color or a number. Several arrangements are valid; the arrangement below works.
- Click two chips to swap them. One valid solution, row by row from the top (B blue, G green, P purple, O orange, Y yellow): row 1 B1 G2 P5 O10 Y25; row 2 Y2 B5 G10 P25 O1; row 3 O5 Y10 B25 G1 P2; row 4 P10 O25 Y1 B2 G5; row 5 G25 P1 O2 Y5 B10.
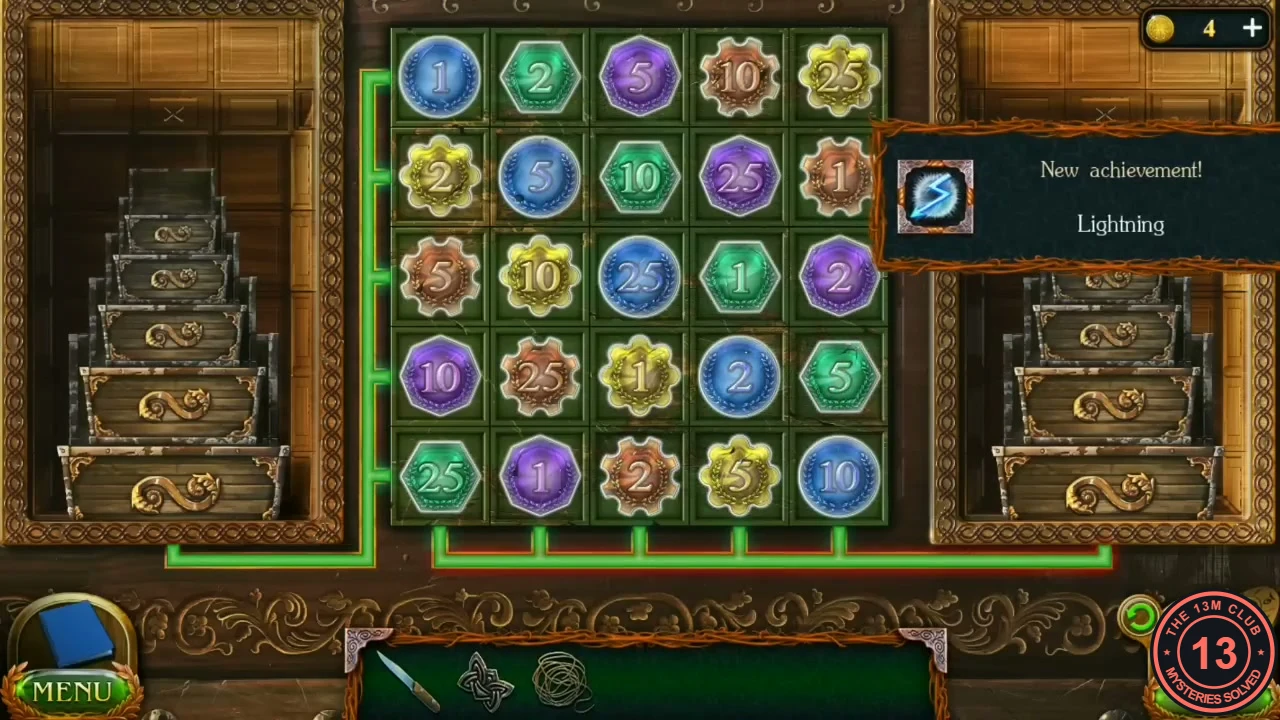
The solved grid from step 1. No row or column repeats a colour or number. - Read the page in the chest (Manuscript 2 of 10, Stronghold of the Five Worlds), then take the Boar emblem and the Rune. The task Find a rune for the dolmen is complete.
Activating the Dolmen
The Rune from the chest powers the stone gateway in the yard and takes you to the Stronghold excavation.
- Zoom into the stone below the dolmen arch on the right of the yard, set the Rune into the round slot and step through the glowing portal to the excavation site.