The flooded temple
With the potion, swim through the flooded tunnel to the temple, where Folnur and Buldan are.
- Travel to the dam and zoom on the flooded tunnel at its base. Use the POTION OF UNDERWATER BREATHING: Susan swims through the tunnel into an underground temple (task Potion of underwater breathing complete).
- Cutscene: Folnur and Buldan are in the temple. Maaron: "Buldan, may he be damned! He is the one who led astray our Folnur!" Folnur escapes with Maaron's Space Impaler, and Maaron notes that someone else saved them.
- Click the small figurine on the red cloth on the floor left of the altar, between the clay pots and the cluster of candles (Collection Drak Ul figurine 3/7).
- Zoom on the altar. Take the ELEMENT OF THE MECHANISM (the hexagon cluster in the middle), the manuscript page "Buldan" on the left front corner (Collection Manuscripts 6/9) and the LION'S HEAD (centre right). Susan: "Urns with the ashes of Folnur's parents! They did perform this ritual after all."
- The brazier is "The only source of heat in this cold room." Click the white-and-red morphing object on the red runner just right of the big candle stump in front of the altar (Morphing objects 13/42). Look at the glass dome on the pedestal: it covers a skull goblet and has three star-shaped sockets (nothing to do yet).
Temple door: pairs of runes
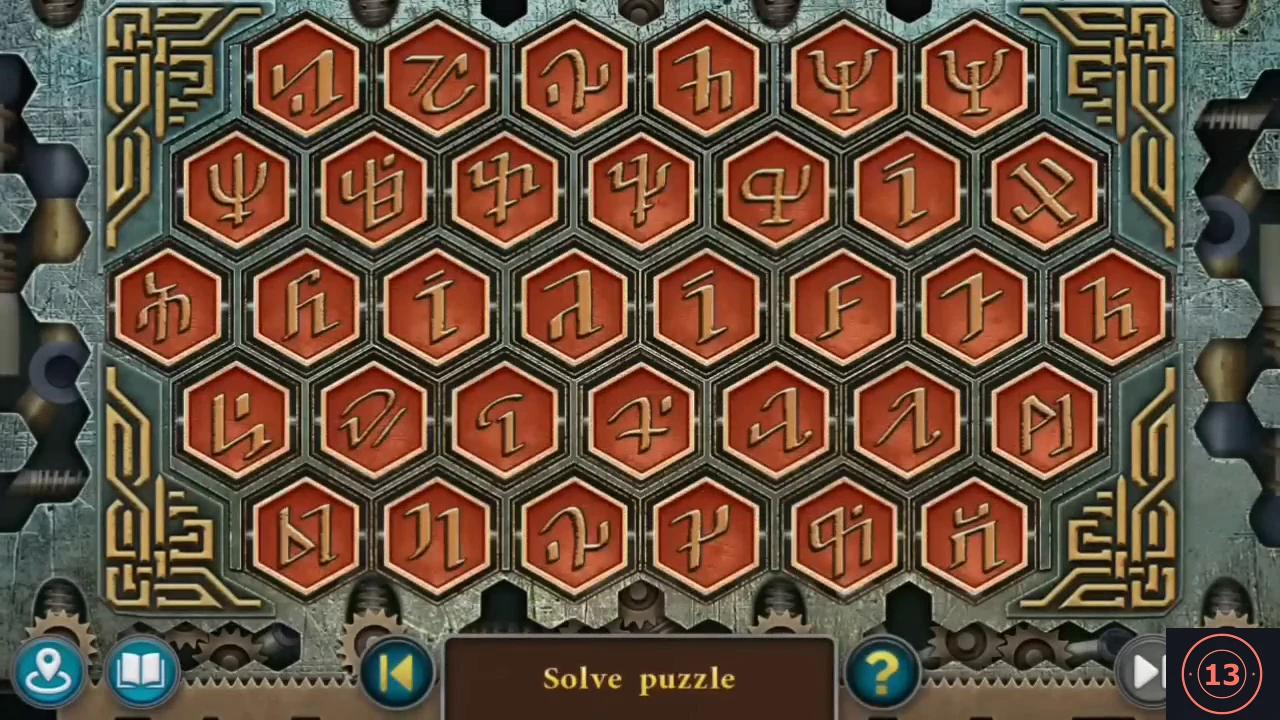
Clear the temple door by removing matching pairs of rune tiles. The Extras replay of this puzzle has several versions, so your board may start differently; the method below works for every version.
- Climb to the door at the top of the stairs and put the ELEMENT OF THE MECHANISM on the hexagon board.
- Clear the board: click two tiles showing the same rune and both vanish. Keep removing matching pairs until the board is empty; it glows and the door opens onto the foot of the Sacred Mountain.
Foot of the Sacred Mountain
At the foot of the Sacred Mountain, Kiana rejoins the group. Explore the area and prepare to go into the mine tunnel.
- Cutscene: Kiana arrives ("Kiana, where were you? How did you find us?" / "As you can see, you showed up just in time. Buldan was ready to crush us completely."). Maaron: "Susan, go with Kiana to the top of the Sacred Mountain. Just dress warmly, it would be cold there." New task: Snowy Peak.
- Click the small Toto toy at the lower left, tucked under the fern fronds at the left edge of the lowest paving slabs (Collection Toto toy 4/7).
- Look around: the fern-like tree ("What an unusual tree. I see it for the first time."), the wooden gate on the right ("This push mechanism is rusty, so the gate does not open.") and the stone post with a carved emblem. Susan: "We need to check the condition of the funicular." / "Maaron suggests performing our ritual on that mountain over there."
- Go back through the temple ("The water has left the tunnel. Great! Now we can move around it freely."). Travel to Folnur's house (Two houses page of the map) and zoom on the chest that had one item missing. Put the LION'S HEAD in the empty socket of the lock and open the chest: take the BOX OF DYNAMITE and the FUR SKINS.
- Travel to Maaron's house and look into the open floor hatch: take the BLANK RUNE STONE.
- Zoom on the rune machine on the fireplace and put the BLANK RUNE STONE in its holder ("Here is the rune I need. However, I cannot place it in a dolmen in this form."). Carve it with the cutter that makes the pumpkin sign (the second wooden test disc from the left shows a pumpkin) and crank the machine: you receive the PUMPKIN RUNESTONE.
- Travel to the foot of the Sacred Mountain (map, Sacred Mountain page) and zoom on the stone post with the carved pumpkin emblem. Put the PUMPKIN RUNESTONE in it: the emblem glows blue and the archway turns into a portal. Walk through it: it leads back to the mine ("Wow! We've made a circle!" / "That's right. Now we can move through this dolmen.").
- Zoom on the lift machinery in the shaft: the lift runs ("The big elevator is again at the very bottom.") and Susan and Kiana ride a trolley down into the mine tunnel ("The trolley ride was cool." / "Oh yeah! I wish there were more experiences like this in life!").
Folnur's lost hammer
Folnur's lost hammer lies in a slime pit in the mine tunnel. Find a way to clean it and take it.
- In the tunnel Susan spots "Folnur's lost hammer!" in a pit of green slime beside the rails. Zoom on the pit: cave cockroaches swarm over it ("A-a-a!!! It's disgusting!" / "These are the cave cockroaches that Joko was talking about."). Use the PERFUME HALFLING SCENT on them and they flee.
- Clicking the slime gives "We need something to wipe this slime off." Take the OLD FABRIC: the torn grey cloth hanging at the top right of the tunnel.
- Lift the planks off the coal cart on the left: "There are crystalline coals among ordinary coals." The dark passage at the back is blocked: "The cave collapsed. Now it is impossible to get there."
Tunnel stone: pictures on their backgrounds
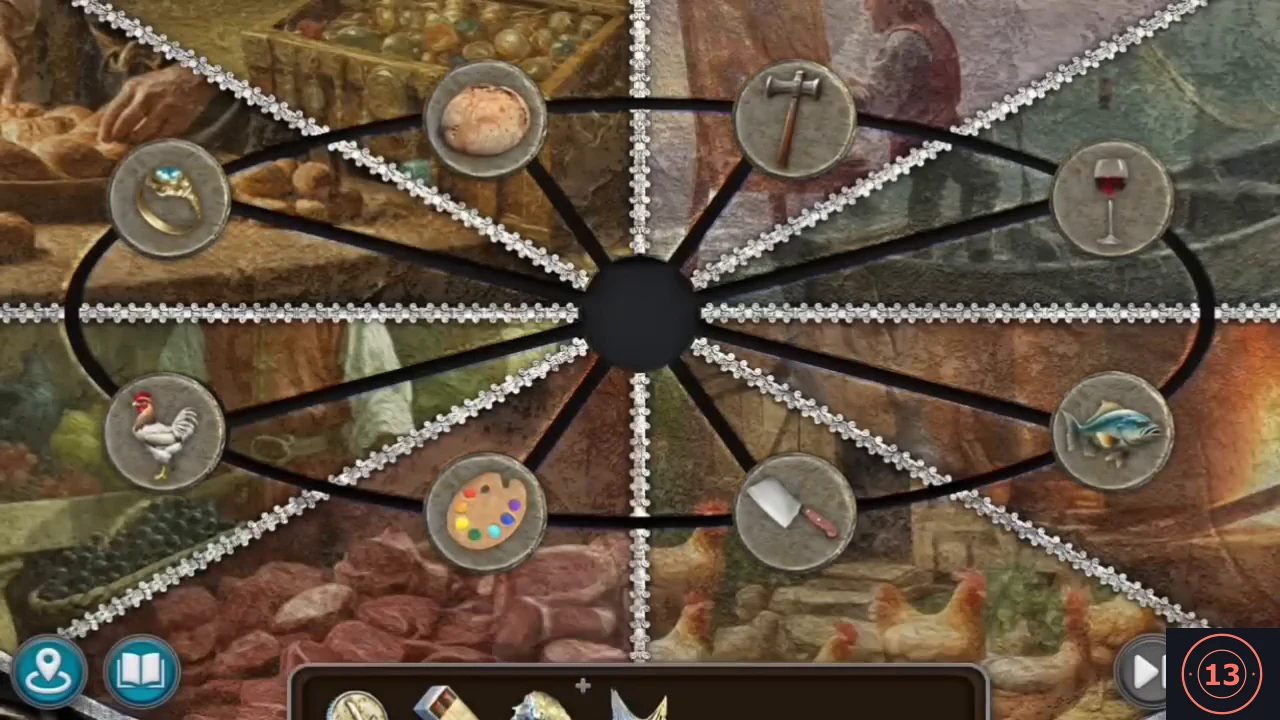
Slide the eight picture circles on the tunnel stone onto the backgrounds that match their meaning. The puzzle has more than one starting layout, but the solved picture is always the same. Achievement Craftsman: finish this wall puzzle at the bottom of the mine in fewer than 30 moves. Decide where each circle belongs before you start sliding. Our playthrough earned it.
- Zoom on the carved stone slab at the right of the tunnel to start the puzzle.
- "Move the circles with pictures onto a background that fits the meaning." Eight picture circles sit on points joined by lines (an outer ring and spokes to an empty centre); a circle slides along a line into a connected empty point. Solved layout in our playthrough, clockwise from the upper-left point: BREAD on the bakery loaves (left, upper), RING (top left), PALETTE (top right), FISH (right, upper), HAMMER by the forge fire (right, lower), ROOSTER on the hens (bottom right), CLEAVER on the meat (bottom left), WINE GLASS (left, lower). Achievement Craftsman.
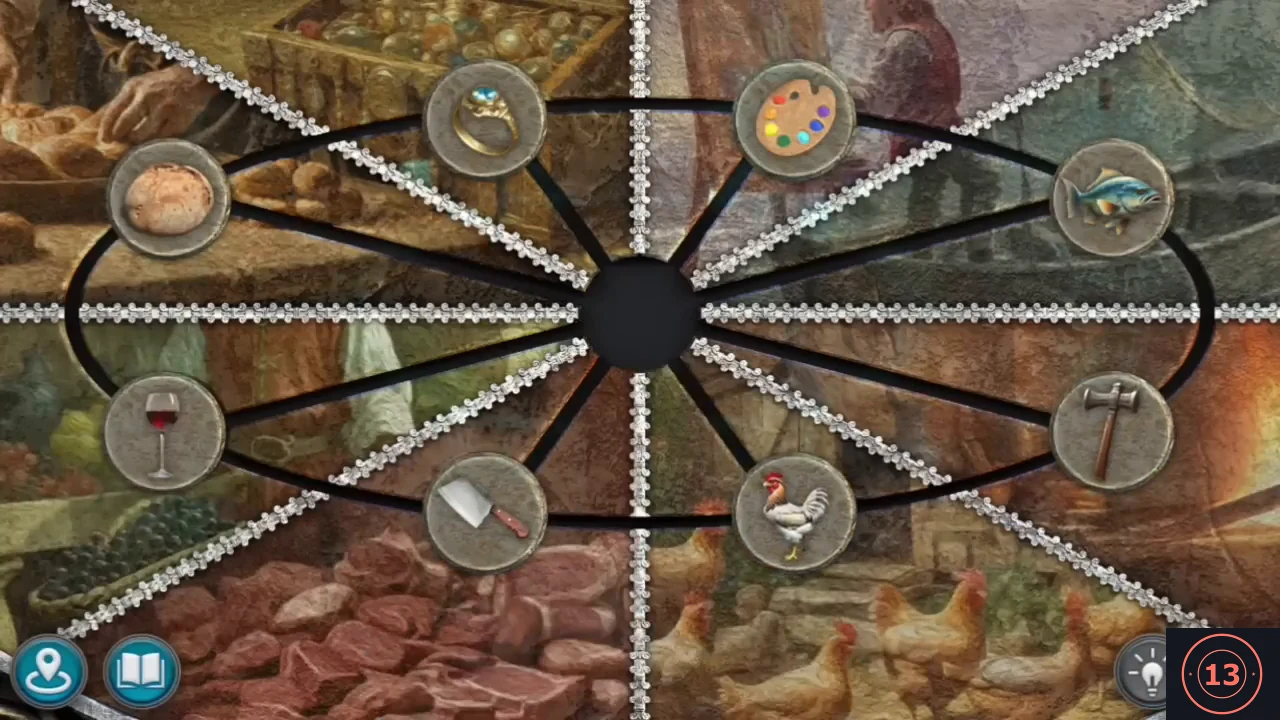
Solved: each picture circle rests on its matching background, such as the bread on the loaves, the hammer by the forge and the rooster on the hens. - The slab opens a blue-lit passage where the ghost of a woman blocks the way: "Go away, stranger..." (nothing to do yet).
- Click the tiny tower on the slanting wooden support beam at the back of the tunnel, right of the collapsed passage (Collection Academy tower 6/8).
- Zoom on the slime pit and use the OLD FABRIC: only part of the slime comes off. Susan: "Do you remember what remedy is considered good for cockroach slime? We've come across something like that before."
- Travel to the Halfling Fair (Halfling's Valley page of the map; "There is no one.") and zoom on the dressing table with the mirror at the left of the road: take the EMPTY BASKET.
- Go to the Lake of Love and zoom on the vineyard on the far right bank ("The pig has eaten its fill and it is sleeping now. How cute!"). Put the EMPTY BASKET under the vines and take the BASKET OF GRAPES.
- Return to the mine tunnel, zoom on the slime pit and use the BASKET OF GRAPES: the grapes are squeezed in a cloth over the slime and the juice dissolves it. Take FOLNUR'S HAMMER.
The funicular
Open the gate at the foot of the Sacred Mountain and repair the funicular with undamaged gear wheels.
- Travel to the foot of the Sacred Mountain and zoom on the wooden gate ("This push mechanism is rusty, so the gate does not open."). Use FOLNUR'S HAMMER on the rusty push mechanism: the bars swing apart and the gate opens onto the stairs. The hammer stays in inventory.
- Climb to the funicular cabin and zoom on its gear housing: "Apparently, the funicular will not move. The mechanism is missing gears." / "Let's try to look for them." The cabin becomes an interactive search: Find all undamaged gear wheels (16).
- Interactive search in the funicular cabin, "Find all undamaged gear wheels." (counter 0/16). Several rusty, broken or dark iron wheels lying around were never needed in our playthrough - ignore them. Our playthrough found the 16 gears in this order: (1) a wooden cog wheel lying on top of the fence at the top-left corner of the cabin. Zoom on the green sack at the back left (a copper jug and some rods lie on it): clear the rods and jug and pull the sack away to uncover a CHEST with a three-dial lock - it needs a code, so leave it for now. (2) Move the fern at the lower left and click the clay jug behind it: the jug breaks and a gear is inside. (3) Move the plank leaning against the front of the left fence: a gear lies on the ground at its foot, beside the broken jug; (4) another gear sits in the carved ring on the front of the left fence that the plank was covering. (5) Remove the curved wooden piece stuck in the spokes of the big wooden wheel in the middle of the cabin and take the gear behind it. (6) Move the large green leaf hanging over the tall rusty metal cabinet, then the horn lying on top of the cabinet, and take the gear on the cabinet top. Move the stack of planks on the cabinet as well: it hides a SCROLL - click it to unroll it. (7) The gear-shaped red wax seal on the scroll is itself a gear: click it. The fully unrolled scroll shows a circled 4 at the top, a circled 5 in the middle and a circled 3 at the bottom. (8) Go back to the chest and set the dials to LEFT 4, TOP 5, RIGHT 3: the chest opens; take the gear inside. (9) Click the latch on the left post of the wooden gate at the front of the cabin to swing the gate open, and take the gear on the floor beside the small wicker basket just inside. (10) Behind the open gate, at the upper right, click the brown sack with grass on top (a metal scoop hangs above it) to clear it away; take the gear on the back rail among the coils of yellow rope. (11) Click the round wooden shield standing behind the metal cabinet: it moves aside and a gear is fixed to the post behind it. (12) Click the broken barrel lying on its side at the front right, outside the gate: where it lay, a gear stands on edge on the floor. (13) A gear is set into the carved back rail right next to the spot where the yellow rope is knotted at the top of the post to the right of the gate - it is visible from the start. At the far right edge of the cabin, click the stack of barrel, crate and wheel until it is cleared away: this uncovers a lantern hanging from a post (upper right) and an ivy-covered corner on the floor. Zoom on the ivy corner: (14) move the horseshoe and nuts at the bottom and take the gear among the ivy leaves; (15) click the copper kettle to move it and take the gear on the rim of the wooden bucket behind it (leave the rusty broken gear and the dark iron wheel in this zoom). (16) The last gear is threaded on the chain of the lantern hanging from the post ("How can I get this gear out if it is strung on a chain?"): in the lantern zoom click the loose top rail of the fence at the left to reveal a pair of PLIERS, cut the chain with them and take the gear. The scene closes and the GEARS go to inventory.
Funicular: gear train
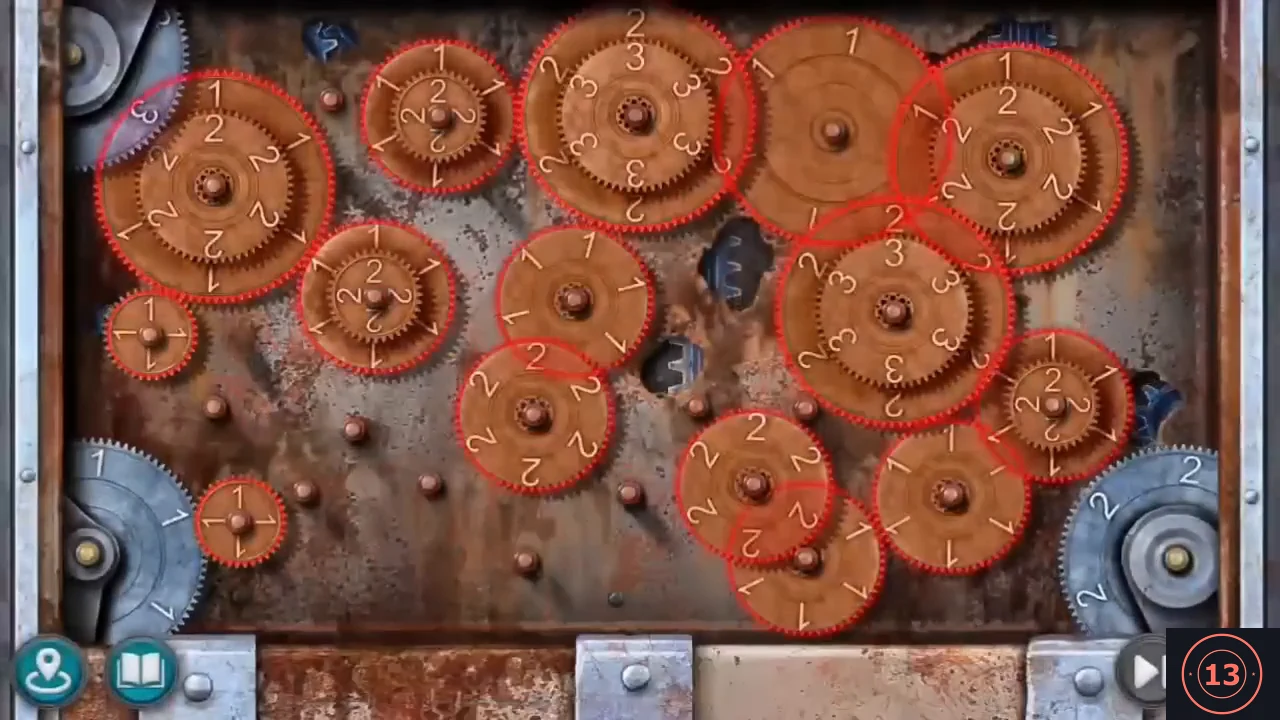
Rearrange the funicular gears so that none overlap and one unbroken chain turns the drive.
- Zoom on the funicular gear housing again and use the GEARS: they drop into the housing and the gear puzzle opens.
- The board is crowded with overlapping gears. Red gears are blocked (they overlap another gear or are not driven); gold gears are correctly meshed and turn. Click a gear to select it (green ring) and click a free peg to move it there. Rearrange the gears so that none overlap and an unbroken chain of gold gears links the blue drive wheel at the lower left to the blue wheels at the right. When every gear is gold the puzzle is solved.
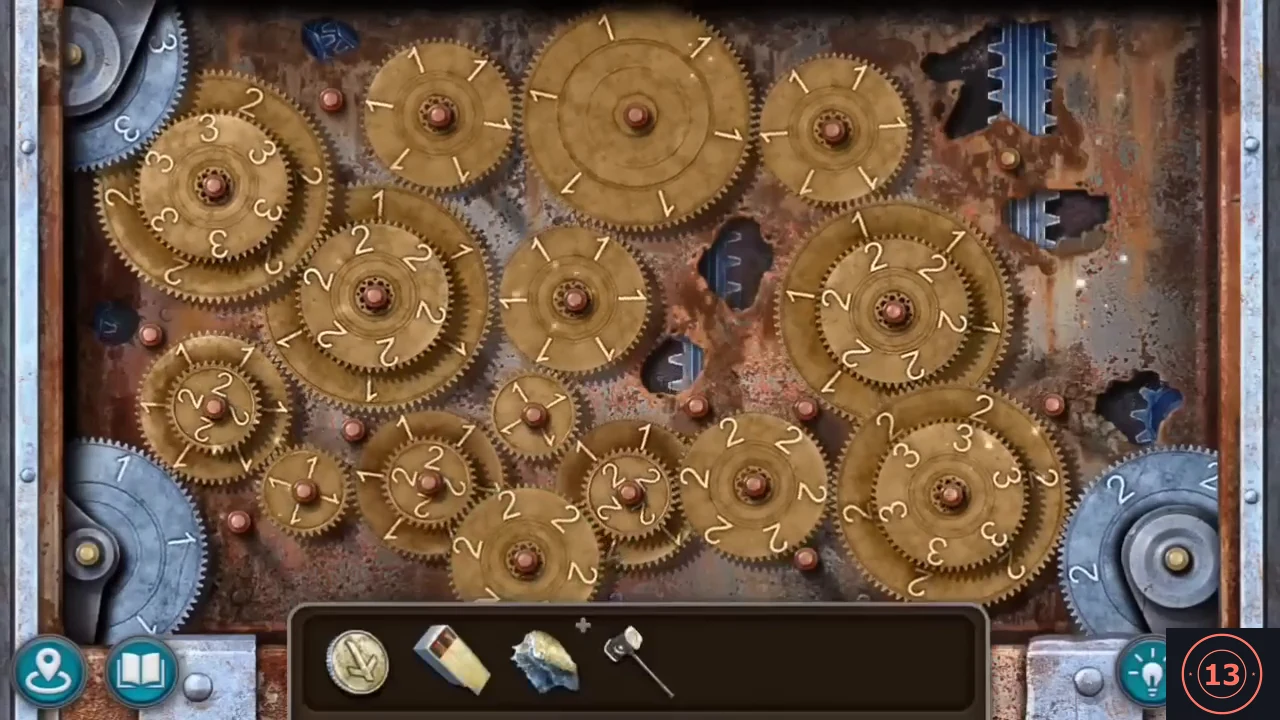
Solved gear train in our playthrough: every gear is gold and none overlap.
Warm clothes for the summit
Make warm clothes for the summit, then ride the funicular up to the snowy settlement.
- Back at the foot of the Sacred Mountain Kiana says: "It's time to dress warmly. It's going to be cold." / "We can make warm clothes from these fur skins."
- Travel to the Halfling Fair (Halfling's Valley page of the map) and zoom on the stall counter with the green cloth, the piggy bank and the bowl of yarn at the left of the fair road. Drop the IRON KYOLL into the piggy bank and take the SEWING KIT.
- First use the FUR SKINS on the counter: the stack of skins is laid out on the green cloth. Then use the SEWING KIT on the skins: they are cut out and sewn into a coat, boots and a hood automatically. Take the FUR CLOTHING.
- Travel to the Sacred Mountain and board the funicular: the companions, now in fur clothes, ride up to a snowy settlement. Kiana: "It looks like there was a settlement once." / "So where do we need to go?" / "Maaron said we need to get to the very top of the mountain."
- Click the glint on the wooden beam at the lower left, beside the funicular cable post (Collection Drak Ul figurine 4/7).
- Zoom on the broken sled and planks at the right and take the PRIMITIVE ICE GRIPPERS (1/4). "We could use some of these ice grippers. We need to look for more like this."
- Zoom on the horned skeleton ("Look, a dinosaur!"). Take the PIECES OF FROZEN ROPE tangled on the skull. Click the arrow stuck in the ribs: "This is a primitive arrow with a flint tip. This material will be useful to us. If you hit it with iron, you can strike a spark." / "I have an arrow with an iron tip." Take the IRON ARROW and the FLINT ARROW.
- Zoom on the snow-covered chimney in the snow ("The chimney is clogged with snow."). Put the BOX OF DYNAMITE beside it. (The iron arrow is refused here: "No, this item can't be used here..." / "Some other item is needed.") Take the STILT CANE at the top right edge of the zoom (1/4). Kiana: "It's easier to climb up the mountain with stilt sticks. I think you can find some here if you look."
- Break the snow plug in the chimney with FOLNUR'S HAMMER. Click the box to open it and put a stick of dynamite on the chimney. Use the IRON ARROW, then strike it with the FLINT ARROW: the spark lights the fuse, the stick drops in and the blast opens a hole in the snow in the middle of the settlement. Hammer and arrows stay in inventory.
- Zoom on the new hole: it shows the broken walls of a buried hut. Take the STILT CANE lying at the lower right corner (2/4).
- Zoom on the snowy trail at the back of the settlement: "The trail then climbs steeply. It is very deep in some places and slippery in others. It will be very difficult for us to climb here without special equipment." Take the STILT CANE standing in the snow on the left (3/4) and the ICE GRIPPERS on the low rocks at the left (2/4). "Both of us need special gear to continue the ascent. We can search for something in this ancient settlement."
- Go down into the hole to the buried dwelling ("...cough, cough!"). Click at the wooden fence on the right to find the manuscript page "Blizzard" (Collection Manuscripts 7/9). Click the long pole lying on top of the fence - it drops against the wall - and take the last STILT CANE (4/4). Take the ICE GRIPPERS hanging on the fence post at the right above the sack (3/4) and the last ICE GRIPPERS in the round iron basket at the lower left (4/4).
- Travel to the temple under the dam (Sacred Mountain page) and zoom on the brazier. Put the PIECES OF FROZEN ROPE in the fire to thaw them, then take the BELAYING ROPE.
Climbing to the ice wall
Climb the trail from the snowy settlement and blast the ice spikes blocking the ledge. Afterwards the group is trapped under the snow.
- Travel back to the snowy settlement and zoom on the trail at the back. Use the STILT CANES (4), then the ICE GRIPPERS (4), then the BELAYING ROPE on the trail; Kiana and Susan climb up to a ledge.
- "Well, that's just great! The way is blocked again!" Zoom on the ice spikes blocking the rocky ledge ("These ice spikes prevent us from climbing up the rocky ledge."); the hammer does not break them. Put the BOX OF DYNAMITE on the spikes, open it and set a stick of dynamite among the spikes.
- Zoom on the carved wooden idol at the left of the ledge: "This wooden idol is missing part of its face." (Nothing to do here yet.)
- Back in the spikes zoom, use the IRON ARROW on the dynamite stick, then strike it with the FLINT ARROW ("We need two materials to create a spark."). The blast shatters the spikes; an avalanche follows ("A-a-a!!! Grandma! What is this?" / "It's an avalanche! Kiana, run to the wall! Quickly!!!").
- Trapped under the snow ("We're trapped! What should we do now?!" / "Don't panic! It's just snow. Let's try to break through it!"), pick up the folded tool lying at the lower right corner of the cave. It goes into the inventory marked with a plus sign, so it still has to be assembled: click it in the inventory to open it, then unfold it part by part - swing the flat metal blade up, swing the folded handle frame out to full length, and finally flip out the small pick spike under the head. The finished tool is the ICE AXE.
Snow cave: rock arch
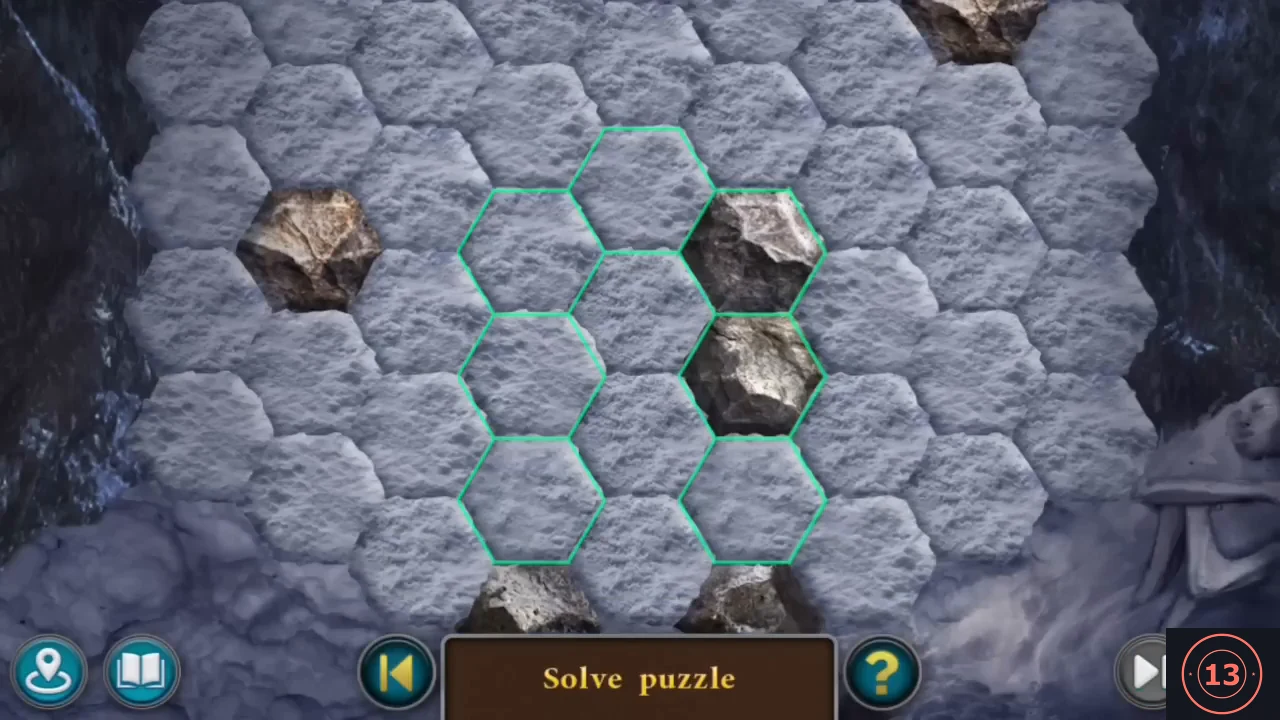
Break the snow cells in the cave so that the loose rocks drop into an arch, opening a tunnel.
- Use the ICE AXE on the snow wall to start the puzzle. Break snow cells with the axe so that the loose rocks drop down into the green-outlined cells. The goal is an arch of seven rocks: three stacked on the left of the outline, three on the right and one at the top, with the two middle cells left as snow. Clearing a middle cell too early lets rocks fall into it ("If the snow is removed here, the passage could be blocked by rocks."), so bring rocks in from above and from the sides first. When the arch stands, the middle snow is dug out and the passage opens.
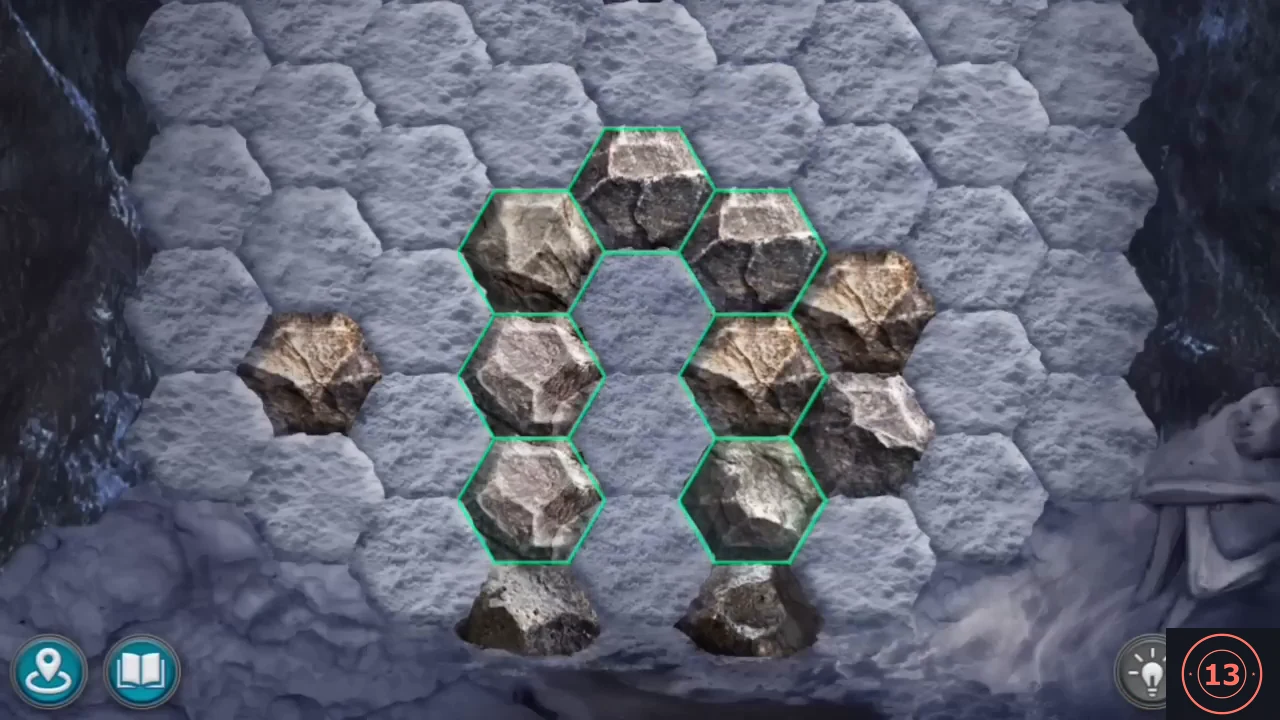
The finished arch: three rocks on each side and one on top inside the green outline, with the middle cells still snow.