Maaron's yard and the dolmen
In Maaron's sunny yard, meet Maaron again and look at the dolmen stone with its empty rune socket.
- Go through the opened door into Maaron's sunny yard. Susan greets her old friend Maaron ("Susan, is that you?!" / "Great to see you, my friend! So many years have passed!"). Zoom on the sawmill at the left ("This is the sawmill. Here I saw boards for repairs."): "Maaron is sawing boards on this machine. But it's missing a circular blade." New task: Portal Bridge.
- Click the glowing morphing object hanging on the shaded stone wall of the house, left of the path below the pointed thatched roof (Morphing objects 8/42), then the tiny tower spire at the top of the roof, just right of the pointed thatched cone (Collection Academy tower 3/8).
- Zoom on the dolmen stone on the path: it has a socket with a carved sign ("This dolmen will take us to Folnur's estate. We need a suitable runestone to activate the portal."). Zoom on the pond: Susan: "I remember last time you hid the runestone in this pond." Maaron: "Yes, I visualized it as fish." (no runestone there now).
- Zoom on the freshly painted red door: Maaron: "Oh, sorry, I just painted the door, so you can't get through it. You can use the window..." Zoom on the window right of the door: "I had already started to take out the stained glass windows, but suddenly I realized that I needed some kind of tool to remove the frame from the opening..." / "I can't get the frame out. Old dried clay holds it in place. I need to gouge the clay out with something."
- Go back out through the gate to the hut exterior, zoom on the fallen logs and mushrooms again and take the POINTED BONE. Return to the yard, zoom on the window and use the POINTED BONE on the dried clay around the frame; the frame comes out and you can climb in.
Inside Maaron's house
Inside Maaron's house, search for the runestone, clear the hatch and get the sawmill working.
- Inside, Susan asks where the runestone is; Maaron: "Honestly, I don't remember. But there is a special machine on the fireplace for making new runestones. You just need to find special cutters and blanks." Click the glowing figurine on the floor beside the logs in front of the fireplace (Collection Drak Ul figurine 2/7).
- Zoom on the wooden door at the left of the room: take the X-SHAPED ROD from the door frame, open the door and take the CIRCULAR BLADE from the small room behind it. The pot of cup grease hanging there is only described ("Cup grease. Very slippery. Maaron apparently uses it to lubricate door hinges and other crusty mechanisms.").
- Zoom on the sand-covered patch of floor: "I need to clean the hatch mechanism from the sand to open it." Zoom on the table ("This is where Maaron makes all sorts of potions. Maybe dinners too.") and on the machine on the fireplace: "This is the machine for making rune stones. There already are all the necessary magical components. You just need to choose the right attachment with cutters to carve the right sign on the stone." Its cabinet: "The cache is locked with a key."
- Go out to the yard and put the CIRCULAR BLADE on the sawmill.
- Zoom on the painted door: the brush in the paint pot "is all covered in paint. We need some kind of solvent." Pour the REMAINING ALCOHOL into the empty brass bowl, then click the brush to put it into the bowl ("It is a good idea to wipe the wet brush with a rag."). Click the rag lying on the step to wipe it and take the PAINTBRUSH.
- Back in the house, use the PAINTBRUSH on the sandy patch to uncover a metal hatch with four shaped sockets (H, T, X and Z shapes) and two arrow knobs. Zoom on the rune machine on the fireplace and take the Z-SHAPED ROD. Insert the H-, T-, X- and Z-SHAPED RODS into their matching sockets.
Maaron's floor hatch
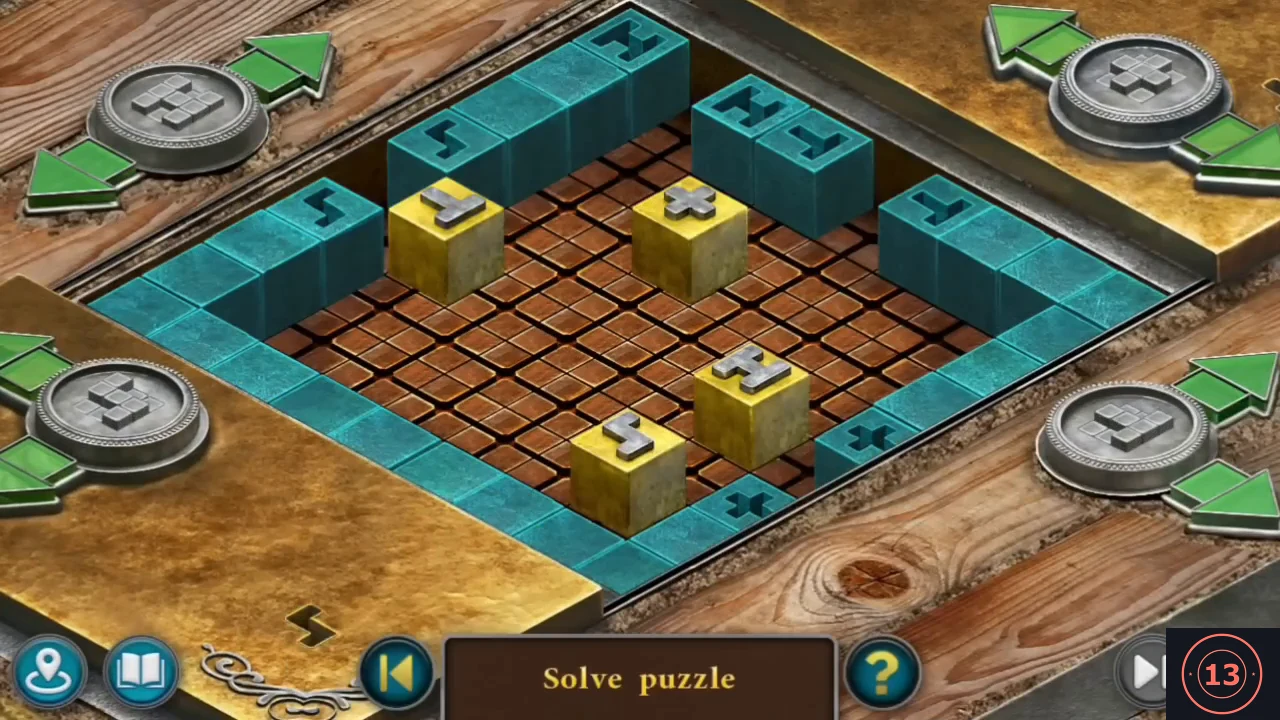
Slide the four lettered blocks in Maaron's floor hatch into their matching cut-outs. The Extras replay of this puzzle has several versions, so your board may start differently; the method below works for every version.
- The hatch opens into a walled grid with four yellow blocks marked +, H, T and Z. The teal walls have a notch for each block, marked with the same symbol: Z in the top-left wall, H and T side by side in the top-right wall, + in the bottom-right wall. Each round button in the corners shows the shape of one block, and its two green arrows move only that block: top-left button = H, top-right button = +, left button = Z, right button = T. Every press moves the block exactly one square in the arrow's direction, and each block travels on one line only: H and T move towards the top-right wall or back towards the bottom-left wall; + and Z move towards the top-left wall or towards the bottom-right wall. A moving block shoves any block directly in front of it along with it, and the walls stop movement. A block that reaches the notch with its own symbol drops into it and the symbol lights up blue. Because a block cannot leave its own line, line it up with its notch by shoving it with a block from the other pair (H or T shoves + and Z sideways; + or Z shoves H and T sideways), then press its own arrow towards the notch until it drops in. Example from our playthrough: with the + block in line with its notch, pressing the top-right button's lower arrow (pointing down-right) moved it one square per press until it dropped into the + notch in the bottom-right wall. Our finishing order was Z into the top-left wall, then +, then T into the top-right wall, and finally H, which stood just in front of the seated Z and was moved along the top-left wall into the H notch beside T. Your board may start in a different layout, so use the same method rather than a fixed press list.
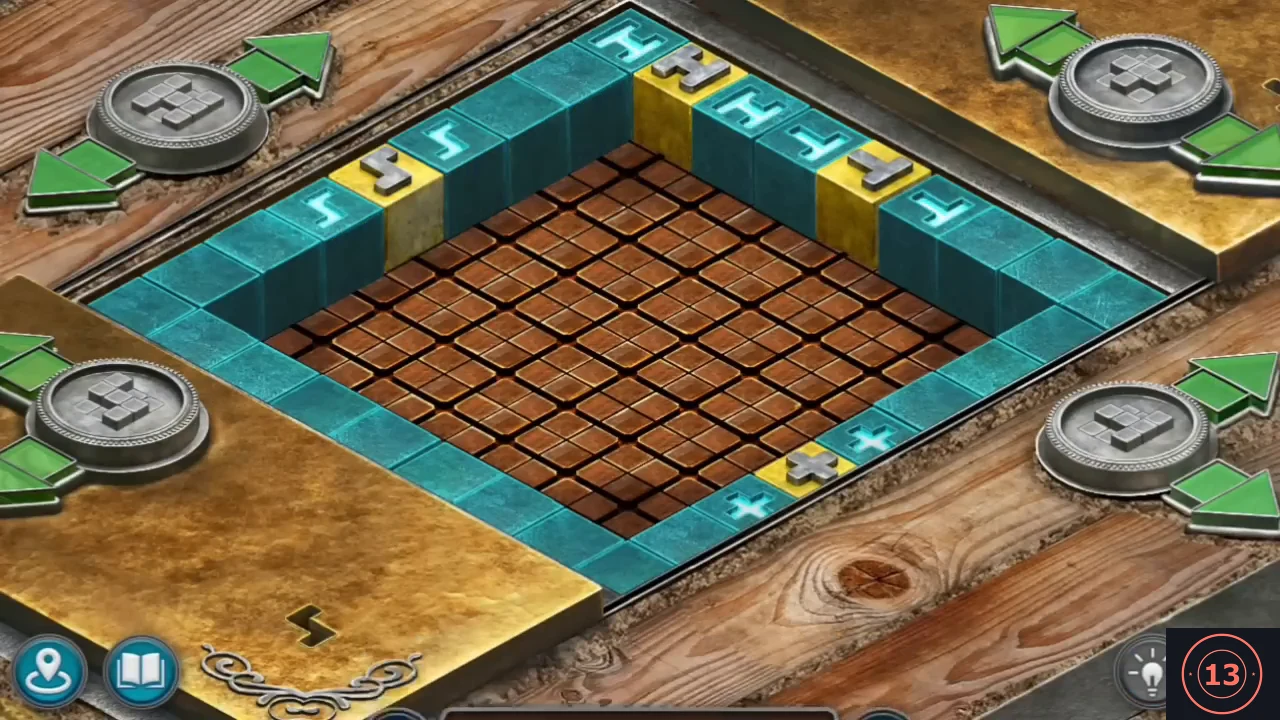
Solved: all four yellow symbol blocks sit in the cut-outs of the teal wall. - Take the KEY TO A CACHE and the RUNE STONE from the opened hatch ("This rune stone might come in handy."). Put the RUNE STONE on the machine holder and open the cabinet above the fireplace with the KEY TO A CACHE. Maaron: "I wouldn't advise you to carve on stone right away, because I don't remember which of the cutters will do. You need to try them on something else." The cutters come out ("These are the cutters that can be used to carve the desired symbol on the stone."). Kiana: "I need to test the cutters on some consumable material to understand the signs on each of them. Maybe the logs will be [suitable]."
- Take the LOG lying on the floor beside the opened hatch. Go out to the yard and put the LOG on the sawmill: it is sawn into round discs that drop into the tray. Collect the WOODEN BLANKS.
Carving the runestone
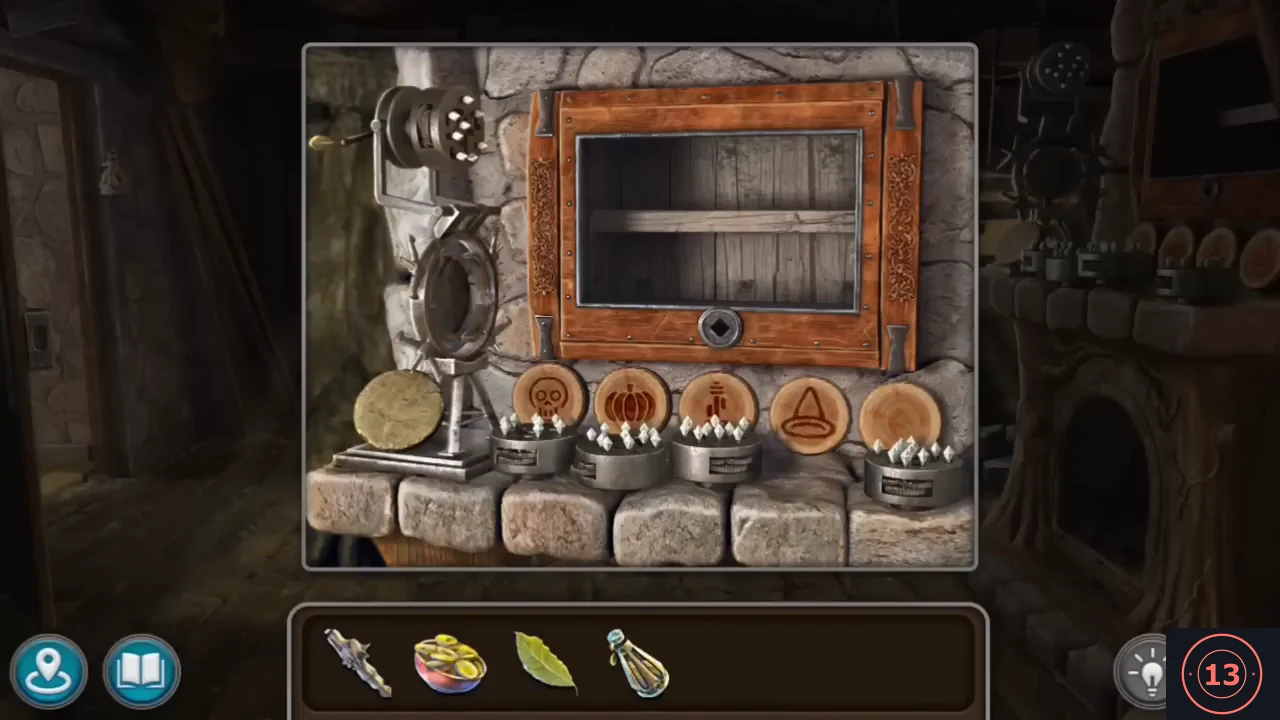
Carve the correct rune on a wooden blank with Maaron's rune machine and place it in the dolmen.
- In the house zoom on the rune machine and place the WOODEN BLANKS on the five cutters lined up on the hearth. Test the cutters one at a time: put a cutter into the machine and turn the crank to carve its sign on a blank. The tested blanks show a skull, a pumpkin, a tower and a triangle with a ring at its base (the same sign as on the dolmen socket). Put the cutter that carved the triangle with a ring (fourth from the left in our playthrough; the fifth was not needed) into the machine and carve the RUNE STONE with it.
- Take the finished RUNESTONE (named "Friend"), go to the dolmen in Maaron's yard and place the RUNESTONE in its socket. The stone glows and opens a portal; step through it to Folnur's estate.
Folnur's yard and the missing dog
Folnur's estate in the past: Folnur is away and his dog is missing. Search the yard, the kennel and the barn.
- In Folnur's yard Maaron calls: "Folnur! It's us, Susan and Maaron! Are you there?" Zoom on the empty kennel: "It's strange... The dog is gone. It was always on a leash." Susan: "Can we lure it somehow?" Kiana: "I need to find out if there is the Folnur's dog in the yard." New task: Bogro's Estate. The dog then appears ("He seems to be hungry.").
- Zoom on the kennel ("The dog is off-leash. So there's no one guarding the household."). Close the kennel's little door and take the horseshoe MAGNET hanging on its latch.
- The arched door of the house is locked. The well holds water ("There is water in the well.").
- Enter the barn on the right ("Knowing Folnur, I can assume that he would have hidden..." / "This barn was absent in my story about Folnur's youth." / "Folnur completed it later when he grew up."). Zoom on the haystack and use the MAGNET on it: it comes back covered in metal odds and ends. Note the ballista in the barn ("Is this a ballista? Why is it here? Who was Folnur defending...") and the wall ("I wonder what's behind this wall?").
- Open the loaded magnet in the inventory and pull off the odds and ends (needle, flower, bells, puzzle-shaped key). Take the KEY and the IRON KYOLL (round coin with an arrow rune), then take back the clean MAGNET.
- Unlock the arched house door with the KEY and go inside.
Folnur's house
Search Folnur's house and open the right-hand door with the horse-and-cart mechanism.
- Kiana calls "Folly! Hello!" / "Where did he go?" Zoom on the stove counter ("Folnur was cooking something in this cauldron.") and on the table with the fruit bowl ("The fruit is fresh. So he was definitely here recently..."); take the WINDING KEY from the fruit bowl.
- Zoom on the window at the back: take the manuscript page from the sill (Manuscripts 4/9, "Bogro's Estate") and the MECHANICAL HORSE standing in the window (the black figure beside it is an ashtray: "Folnur has such a creepy ashtray...").
- Click the tiny tower spire on the top shelf at the upper left, just right of the stacked metal pots (Collection Academy tower 4/8). Zoom on the chest: "There is one item missing from the chest." The framed picture on the back wall is a "Portrait of Folnur's young mother."
- Click the morphing object on top of the chest of drawers to the right of the far door: a small jug standing just left of the big vase of flowers (Morphing objects 9/42). In our playthrough it was collected with a click at the door's right edge next to the drawers, just as the door close-up opened.
- The cart on the door's toothed rack has no horse ("There is some element missing here."). Put the MECHANICAL HORSE in front of the cart and wind it with the WINDING KEY: the horse pulls the cart along the rack and the door panel turns into a chip puzzle.
Horseshoe chip door
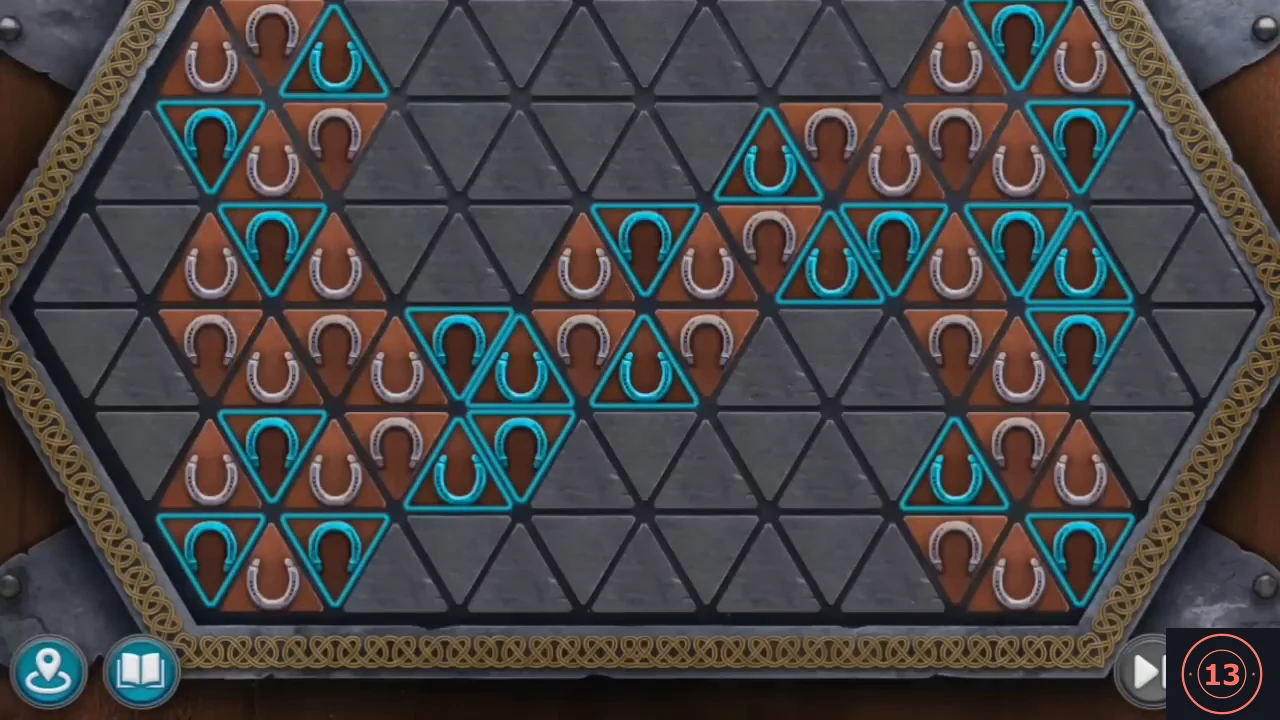
Light every horseshoe chip on Folnur's door. A click switches the chip you click and each chip touching it along a side, so the order of clicks does not matter. Below is a verified 16-click solution for the starting board shown above. Achievement Virtuoso: finish this door in fewer than 50 moves. Sixteen clicks is well under that limit, and our playthrough earned it.
- Click the triangular horseshoe chips to light them all up ("Click on the chips to light them all up."). A click switches the chip you click and every chip that shares a side with it between brown (unlit) and glowing blue (lit). Grey stone triangles are not chips and are never affected. Clicking the same chip twice cancels it out, and the order of your clicks does not matter. The board started in the same pattern in both playthroughs we checked (as in the picture above), so click each of these 16 chips once. Rows are counted from the top (1-6). Chips are counted from the left across the whole row, counting only horseshoe chips and skipping the grey gap in the middle (rows 1 and 6 have 6 chips, rows 2 and 5 have 9, rows 3 and 4 have 12): row 1 - chips 1, 4 and 6; row 2 - chips 2, 6 and 8; row 3 - chips 1, 4, 6 and 10; row 4 - chip 3; row 5 - chips 1, 3 and 8; row 6 - chips 2 and 4. Every chip then glows blue. If you click a wrong chip, click it again to undo it. In our playthrough the achievement "Virtuoso" pops up as soon as the board is solved.
Folnur's office: silhouette search
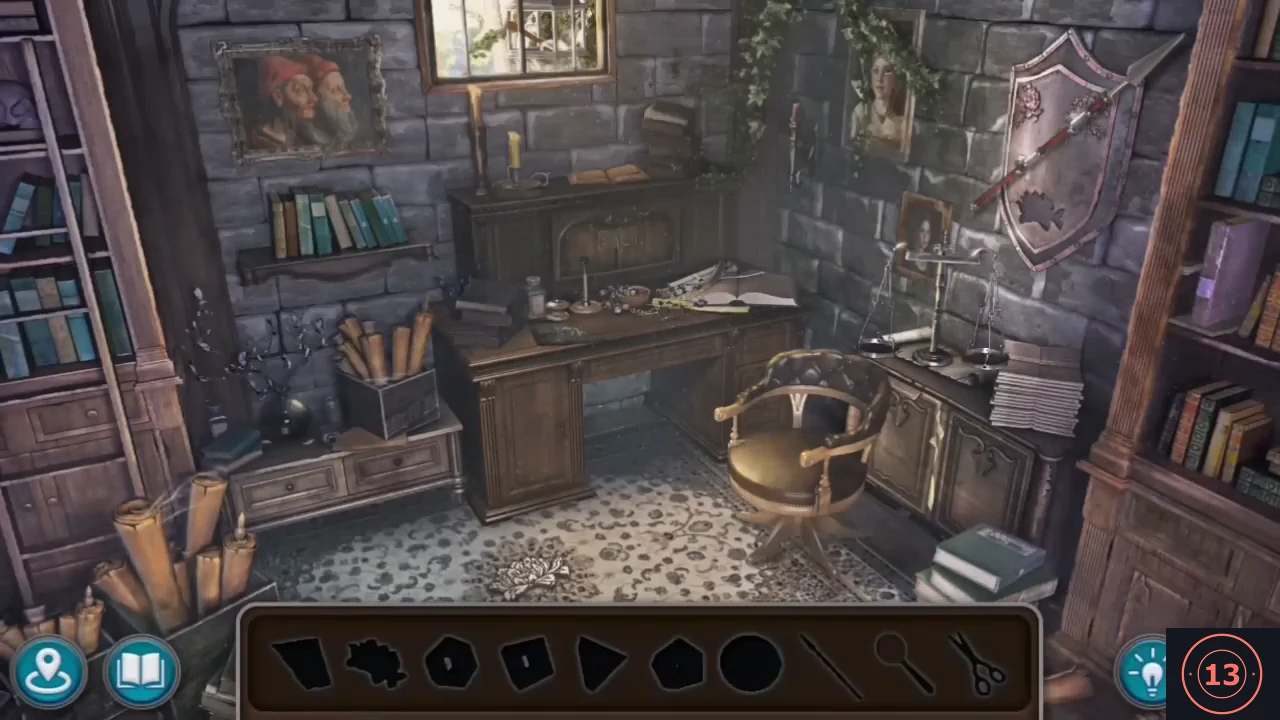
Search Folnur's office with the help of the silhouette bar, and assemble the clues for the book, the desk and the box.
- Go through the opened door into Folnur's office. Maaron leaves for the academy while Kiana searches the office.
- Interactive silhouette scene: the bar at the bottom shows ten silhouettes (scrap of paper, heraldic flower, hexagon, square with a slot, triangle, pentagon, compass, spear, magnifying glass, scissors). Zoom on the small table at the left: take the HEXAGON lying on it, then open its drawer and take the COMPASS. The portrait is "Folnur's grandparents"; the window is jammed. Zoom on the desk: take the PENTAGON from the bowl (the sheet on the desk is "part of the drawing on this piece of paper"; the desk panel has two gold slots). Take the SCRAP OF PAPER from the papers on the floor right of the chair.
- The SPEAR on the wall is clamped. Pick up the HERALDIC FLOWER from the rug left-front of the chair and put it into the shield on the wall: the clamp lets go and you can take the SPEAR. Use the SPEAR on the jammed window to pry it open and take the MAGNIFYING GLASS.
- Zoom on the base of the right bookcase and open the drawer without a handle to take the SCISSORS. Cut the ivy over the portrait with the SCISSORS: the portrait swings open as a door. In the niche take the TRIANGLE and the BOOK ("locked with internal locks... the cover is missing some element"). Put the COMPASS into the book's cover: it becomes a dial.
- Zoom on the desk and lay the SCRAP OF PAPER on the sheet there: it completes a chalk diagram of lines radiating from a centre, four of them coloured - red pointing to about 11 o'clock, blue up-right (about 2 o'clock), yellow to the right (about 3 o'clock) and green straight down (6 o'clock). Pass the MAGNIFYING GLASS over the lower right of the sheet: it reveals a row of small runes.
Folnur's book compass dial
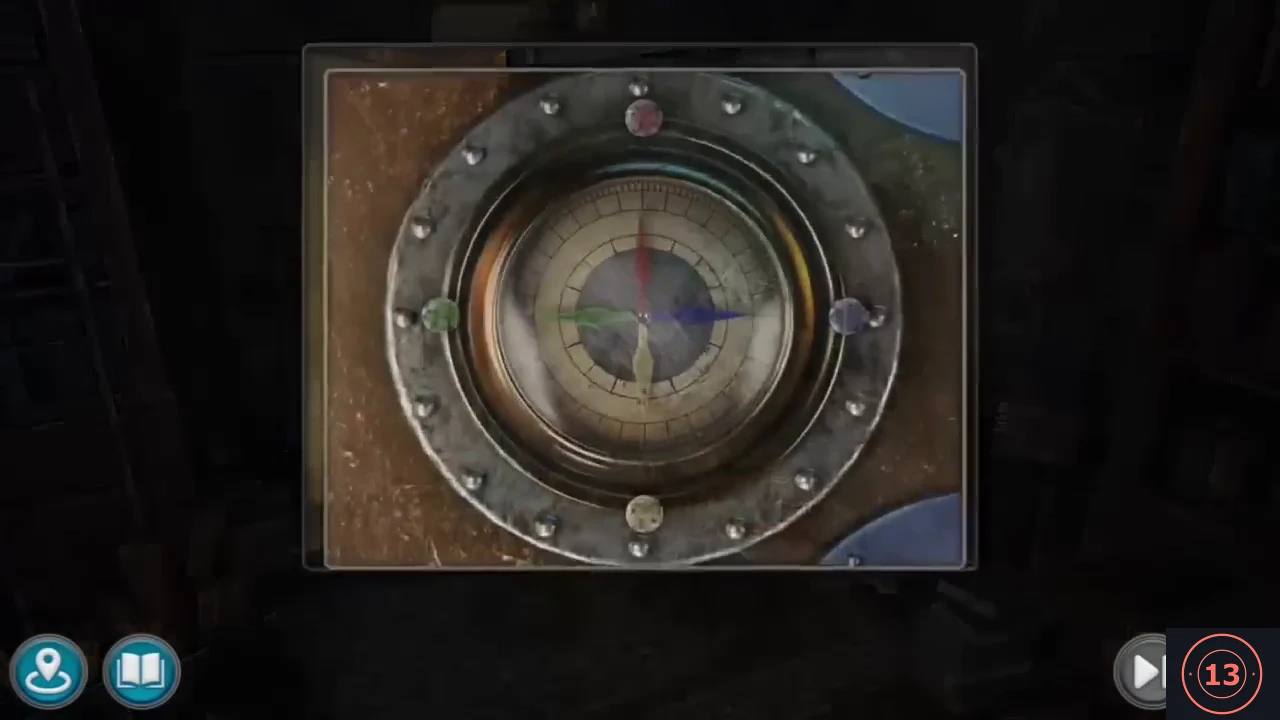
Set the four coloured needles of the book's compass dial to match the chalk diagram.
- Open the book's compass dial. Each of the four coloured gem knobs on the rim turns the needle of the same colour. Set the needles like the chalk diagram: red to about 11 o'clock, blue up-right (about 2 o'clock), yellow right (about 3 o'clock) and green straight down. The book opens and you take the FIGURED WHEEL from its hollow.
Rune cylinders in Folnur's desk
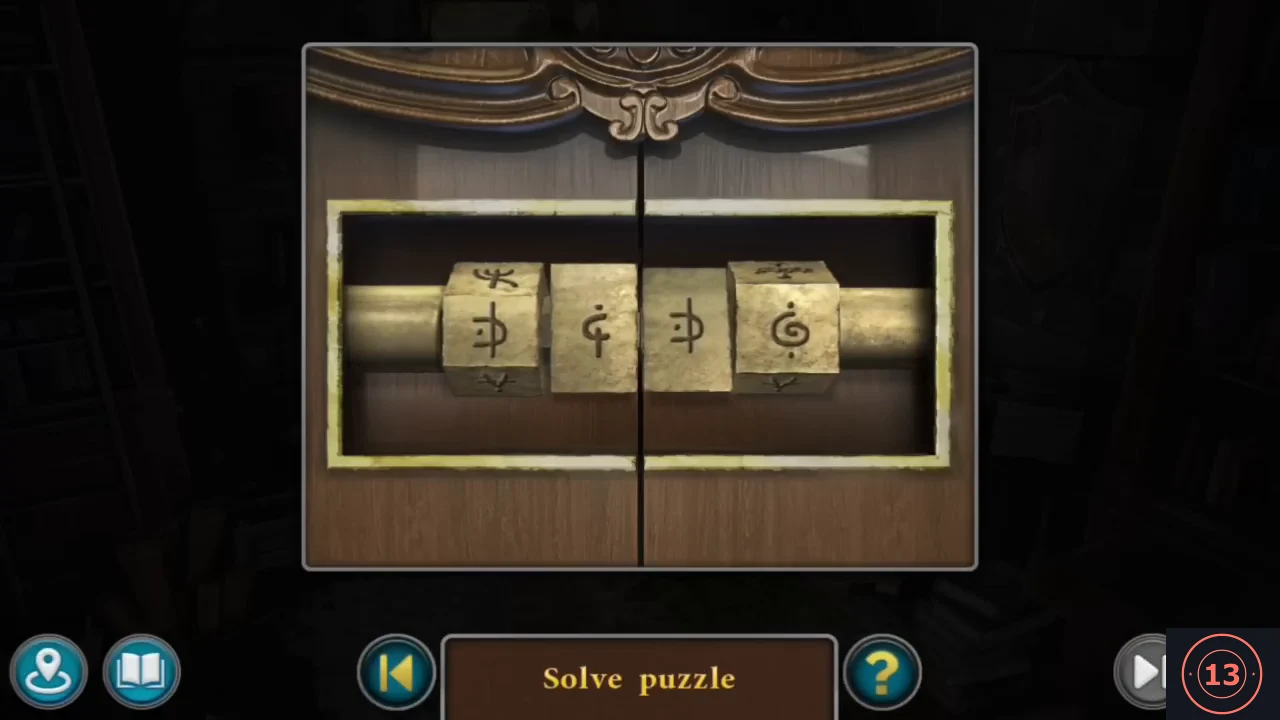
Turn the four rune cubes in Folnur's desk to the runes shown by the magnifying glass.
- Zoom on the sliding panel of the desk and open it: inside is a brass rod with sockets. Put the four collected blocks (the FIGURED WHEEL, the HEXAGON, the TRIANGLE and the PENTAGON) on the rod; they become four rune cubes that turn when clicked. Turn them to the runes shown by the magnifying glass. Solved state in our playthrough, left to right: an arrow-like rune with a dot under it, a three-pronged rune, a hook with a dot above it, and a D-shape with a crossbar. The panel opens and a chest appears on the desk.
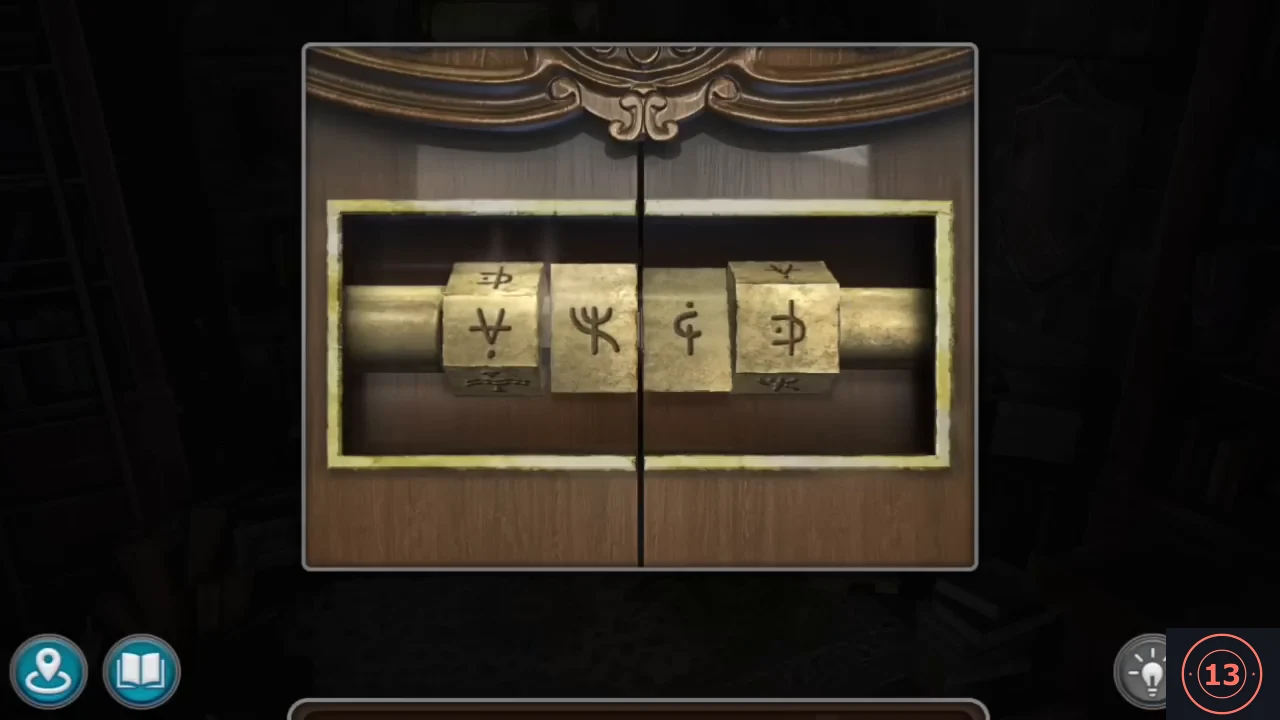
Solved rune cubes in our playthrough, matching the runes shown by the magnifying glass.
Folnur's box: shield rows
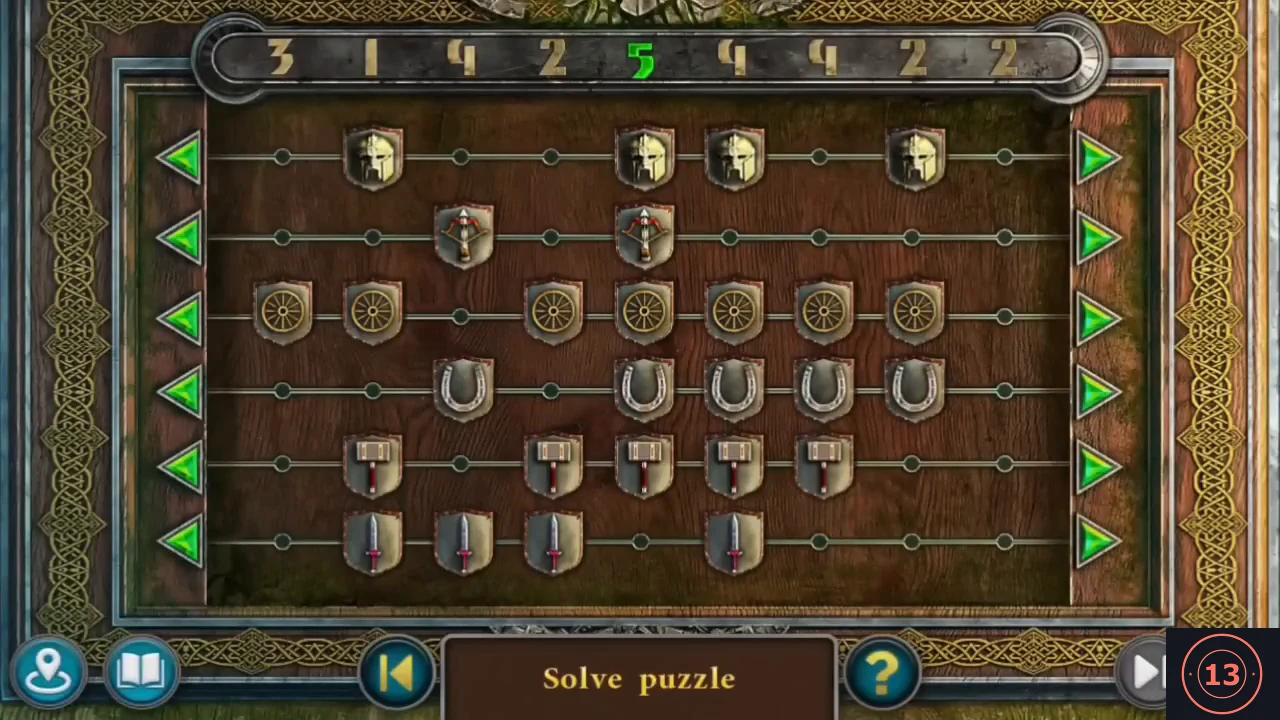
Slide the shield rows on the lid of Folnur's box until every column holds the number of shields shown above it.
- Zoom on the chest lid: a board of six rows of shields (helmets, crossbows, wheels, horseshoes, hammers, swords). The arrows at each end slide a whole row one space left or right; the numbers along the top give how many shields each of the nine columns must hold (3 1 4 2 5 4 4 2 2), and a number turns green when its column is right. Solved layout in our playthrough, column numbers 1-9 from left: helmets in 1, 4, 5, 7; crossbows in 1, 3; wheels in 2, 3, 5, 6, 7, 8, 9; horseshoes in 3, 5, 6, 7, 8; hammers in 1, 3, 4, 5, 6; swords in 5, 6, 7, 9. Each row keeps its spacing when it slides, so shift each row until it sits in these columns.
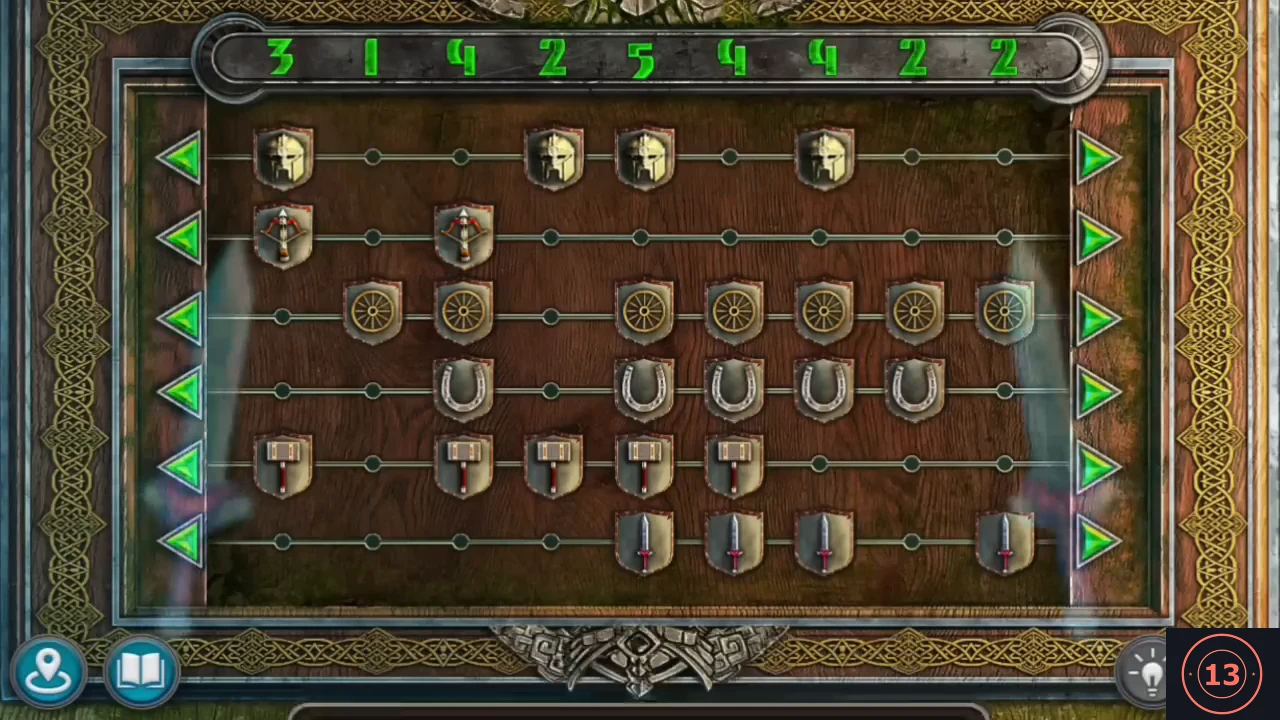
Solved shield board in our playthrough: every column number at the top has turned green. - The box opens. Read the letter signed "B" (it urges Folnur to bring his parents' ashes to a temple to regain his former appearance, and not to tell Maaron). Take the KEY lying in the box. Maaron then arrives ("Here I am! I told you I'd make it in time.").
- In the conversation Kiana and Maaron decide to use the See-Remember Stone, which shows what it last saw: Maaron will transfer the dog's memories into it. Back in Folnur's house you receive the SEE-REMEMBER STONE and FOLNUR'S BOX. New task: Dog's memories ("We can feed the dog.").
Porridge for the dog
Folnur's recipe book explains how to cook porridge to lure the dog home.
- Zoom on the stove in Folnur's house and read the recipe book "Porridge for dog": 1. Boil water. 2. Boil animal bones in water to make broth. 3. Grind any grain in a grain grinder to cook it faster. 4. Cook the grits in broth. Take the empty CAULDRON from the top of the stove. The stove is cold ("Maaron, we need fire." - "Oh, Susan, I taught you so many times! Come on, do it yourself again.").
Lighting Folnur's stove
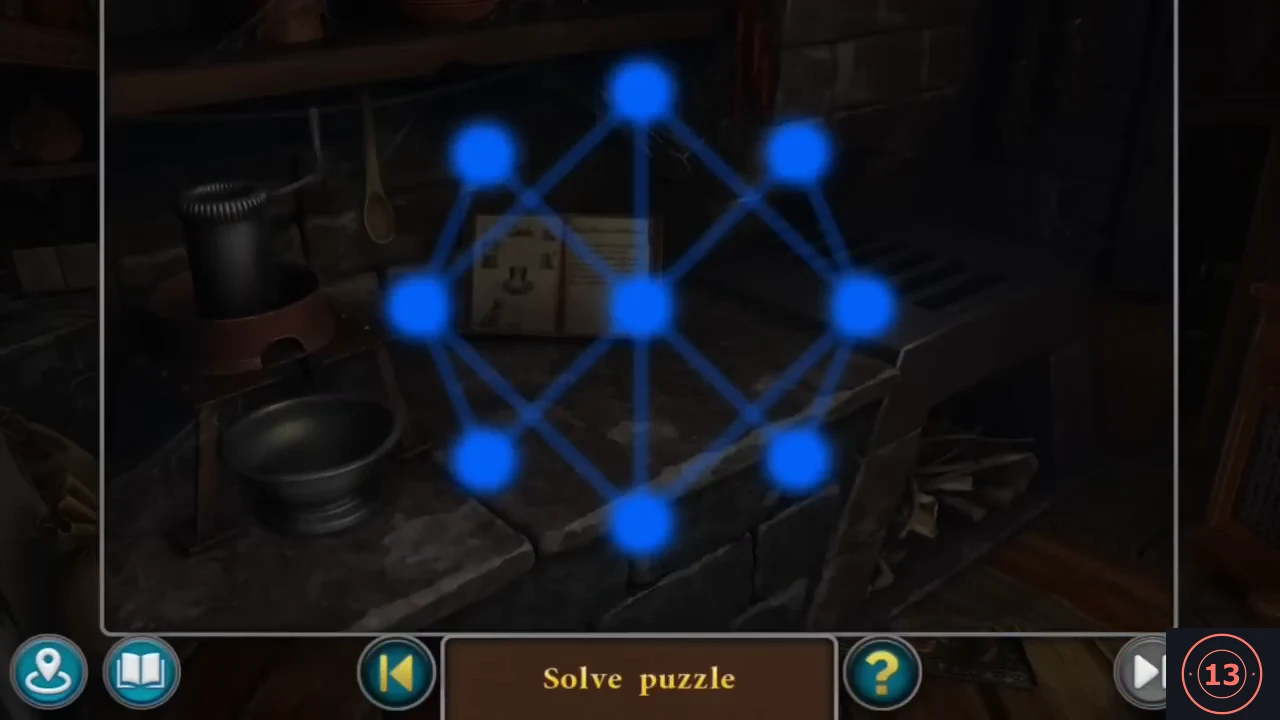
Light Folnur's stove with the nine-point pattern, then gather the grain, bones and water and cook the porridge.
- A pattern of nine glowing points appears (top, upper-left, upper-right, left, centre, right, lower-left, lower-right, bottom). Trace every line of the pattern in one continuous stroke without going over a line twice. Our playthrough's order: bottom - centre - upper-right - right - lower-right - centre - upper-left - left - lower-left - centre - top - left - bottom - right - top (14 lines in all). The stove fire lights ("There you go! Good job. I knew you could do it!").
- Go out to the yard and into the barn; take the BAG OF GRAIN from the floor by the haystack.
- Travel back to Maaron's hut (through Maaron's yard), zoom on the log and mushrooms right of the path and take the ANIMAL BONES lying in the grass. The odd mushroom is still left alone ("This mushroom is significantly different from others. It probably has special properties. But picking mushrooms without knowledge is dangerous.").
- Return to Folnur's yard, zoom on the well and lower the CAULDRON into it: you get the CAULDRON OF WATER.
- At the lit stove, pour the BAG OF GRAIN into the grain grinder and turn it: the grits fall into the metal bowl. Put the CAULDRON OF WATER on the hot plate, add the ANIMAL BONES and let it boil into broth, then add the grits from the bowl, cover, and stir with the wooden spoon. Take the PORRIDGE FOR DOG.
- In the yard zoom on the kennel and put the PORRIDGE FOR DOG into the dog's bowl. Use the DOG WHISTLE (from the fair) in the yard: the dog comes running ("Hey, doggie! Come on, come here! Poor boy, you're..."). While it eats at the kennel, use the SEE-REMEMBER STONE on the dog. Maaron casts the spell; the stone shows the dog's memory of Folnur's ghostly figure leaving through the house and on to a pink portal by a well.