Mechanisms for Mora
Mora has only two limbs. Collect what you need to build her prosthetics and open the workshop floor hatch.
- In Mora's cave room click the blue shimmer on the left part of the back bookshelf: Morphing objects 36/42. Tip over the wastebasket at the lower right: DRAWING OF A LEG PROSTHESIS. At the desk with the candle take the WORKSHOP KEY, open the drawer for a BLUNT PENCIL and sharpen it with the RAZOR: PENCIL. Unlock the plank door on the right with the WORKSHOP KEY.
- In the workshop click the fluffy figure on the wooden floor hatch at the left, near its lower right corner above the grindstone: Collection Fluffy 7/12. Pull the blue tarp off the crate at the back: SCREWDRIVER STEM. The assembly table at the back right shows the rocket-carrier parts list (20 parts; parts 2, 3, 7 and 9 are already ticked). On the candle shelf at the right pull out the large book on the left middle shelf until a paper falls: DRAWING OF A PROSTHETIC ARM.
- The floor hatch is screwed shut. In the Dam yard walk into the close-up right of the stone tower and take the HAND DRILL from the dirt; fit the SCREWDRIVER STEM into its chuck: HAND DRILL WITH A SCREWDRIVER. In the Dam yard click the small shimmer on the ground at the lower right by the path: Morphing objects 37/42.
Workshop floor hatch: the gold cross chips
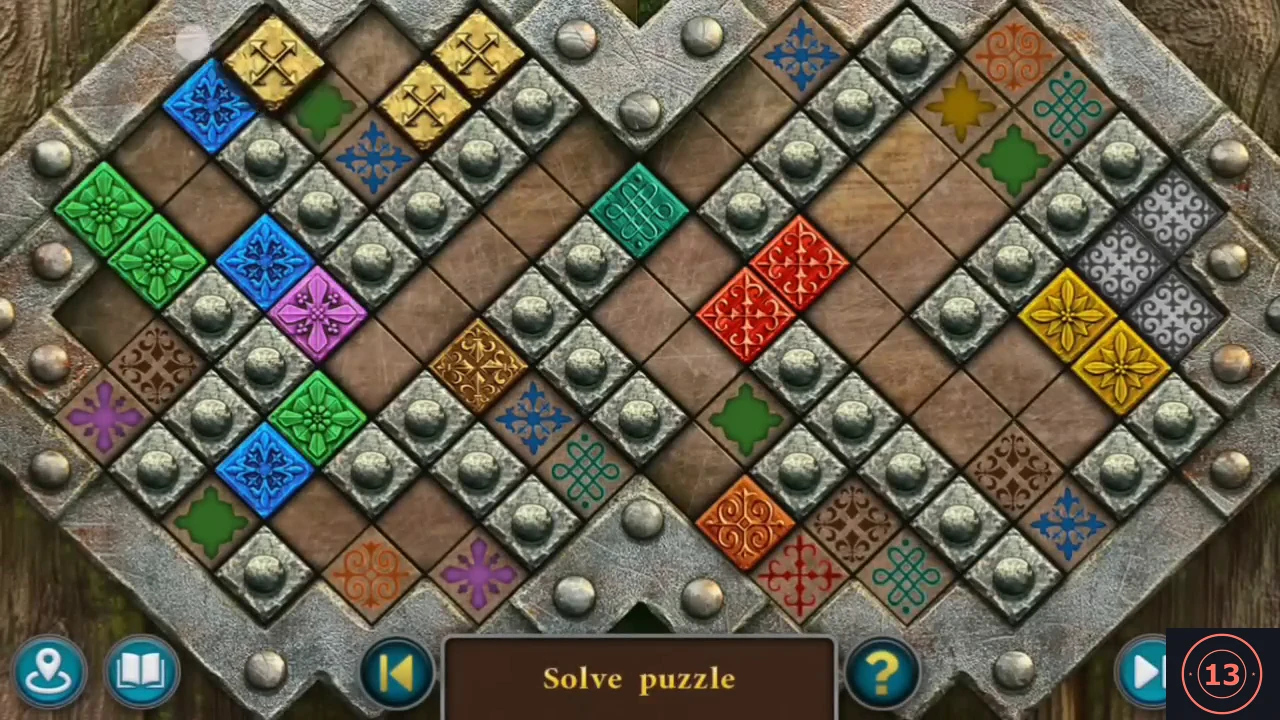
Move the gold cross chips on the workshop floor hatch so that one of them reaches a silver square. The Extras replay of this puzzle has several versions, so your board may start differently; the method below works for every version.
- Unscrew the hatch bolts with the HAND DRILL and lift it: a metal plate with a puzzle. Rule: "Move one of the chips with a cross to any highlighted square. Place the other chips onto the colored patterns to open a path." How the board works: only the gold chips with a cross move. Drag a cross chip and it slides along open squares - plain floor, the flat coloured patterns, and sunken chips. The metal stud squares and raised coloured chips block it. While a cross sits on a flat pattern, every chip of that colour sinks and turns dark, and crosses can then pass over them. Move the cross off the pattern and those chips rise and brighten again. The coloured chips themselves never change squares. Goal: get one cross onto one of the silver-grey ornament squares. In our game these are near the right edge; their position differs between versions. Method: 1) Look for a route from a cross to the silver squares and note which coloured chips block it. 2) Drag another cross onto a flat pattern of that colour. Its chips go dark, so that part of the route is open. Do the same with another cross for each further colour in the way. 3) Leave those crosses in place and drag the last cross across the dark chips onto a silver square. In our game we covered the gold four-point star pattern at the upper right and the red cross pattern near the bottom with two crosses. That sank the yellow and red chips, and the third cross could then reach the middle one of the three silver squares. The hatch opens onto a dark cellar: "I need to light the room somehow."
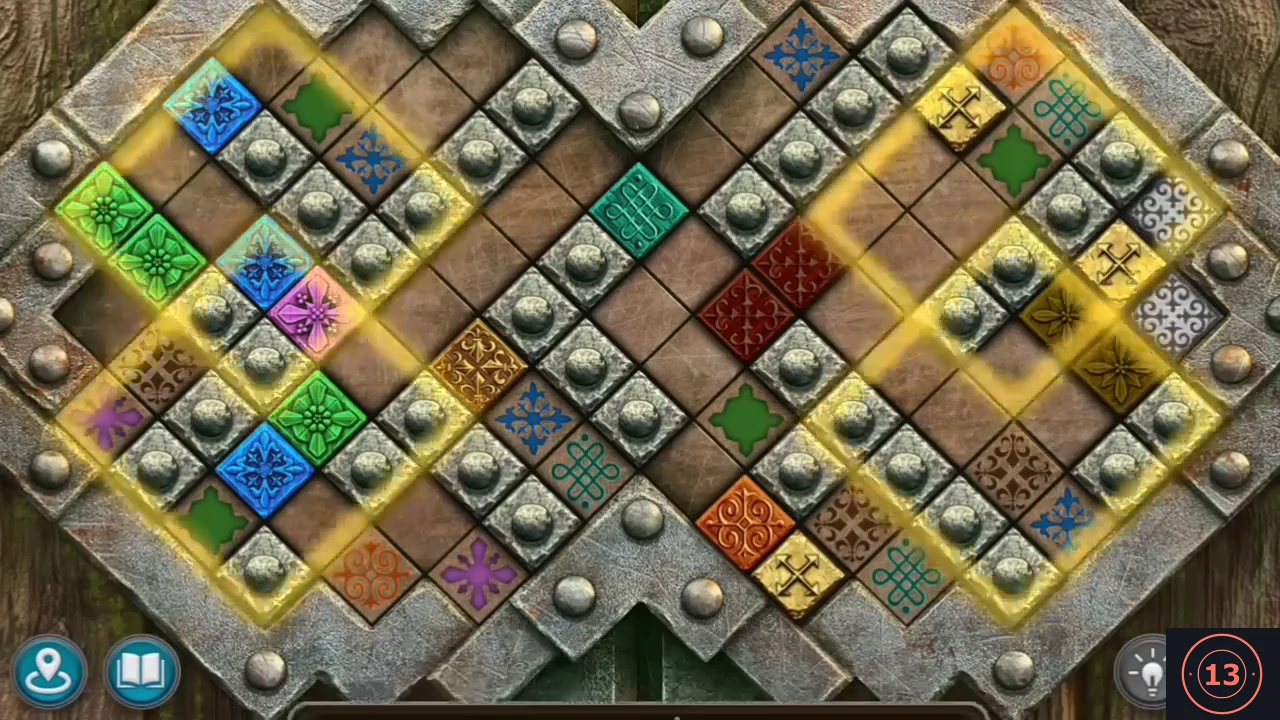
Solved board in our playthrough: two crosses cover the gold star and red patterns, so the yellow and red chips are dark, and the third cross sits on a silver square. The yellow glow appears on completion. - In the mountain yard take the FIREFLY VIOLETS pot from the right middle shelf of the flower niche. In the Firefly Forest the green glowing bush needs a trap for the fireflies. Cut the green fabric of the crashed glider with the RAZOR: PARACHUTE FABRIC. At the bush spread the fabric on the grass and lay the violets on it: FIREFLIES. Release them in the workshop cellar - it is a warehouse, now lit.
Warehouse: redrawing the leg prosthesis
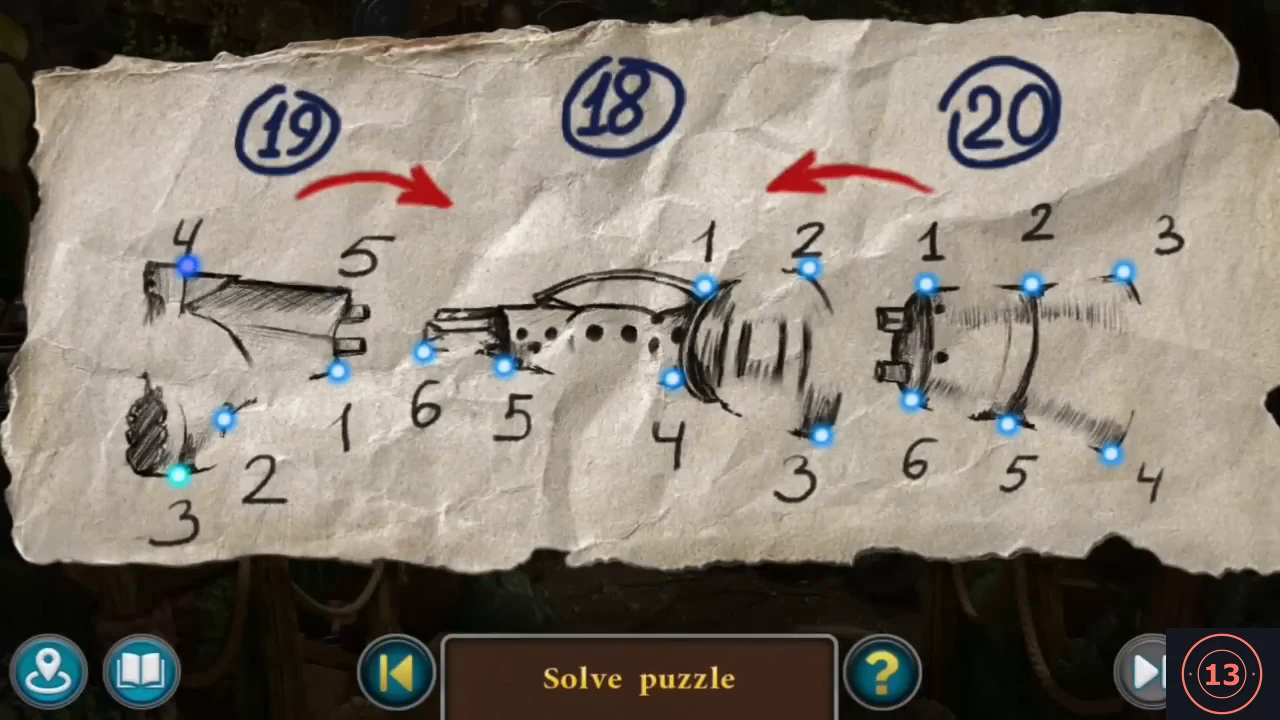
Redraw the faded parts of the leg prosthesis drawing by joining the numbered points.
- In the warehouse use the PENCIL on the DRAWING OF A LEG PROSTHESIS. Three faded parts - 19 boot, 18 knee mechanism, 20 receiving sleeve - each have numbered points 1-6: join each part's points in number order to redraw its outline: DRAWING OF A PROSTHETIC LEG. At the workshop assembly table place the leg and arm drawings on the list: DRAWING OF A ROCKET CARRIER.
Warehouse: the sixteen missing parts
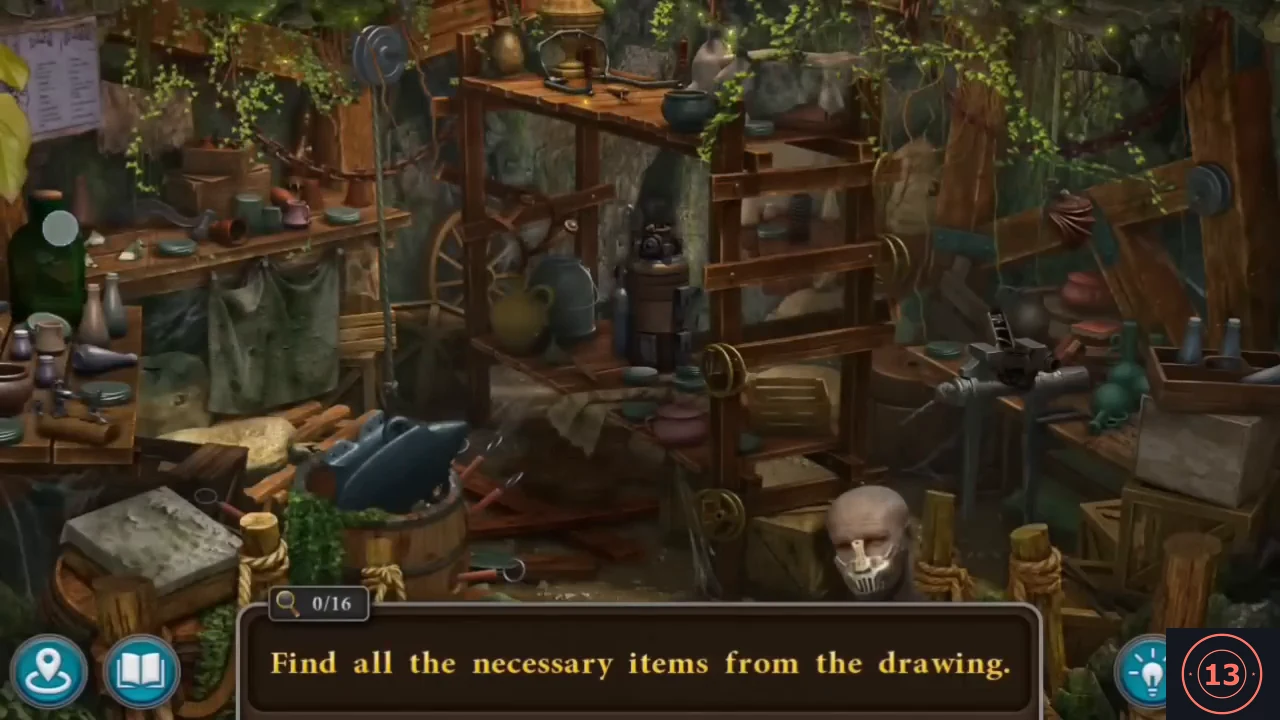
Find the 16 missing parts for the rocket carrier in the warehouse.
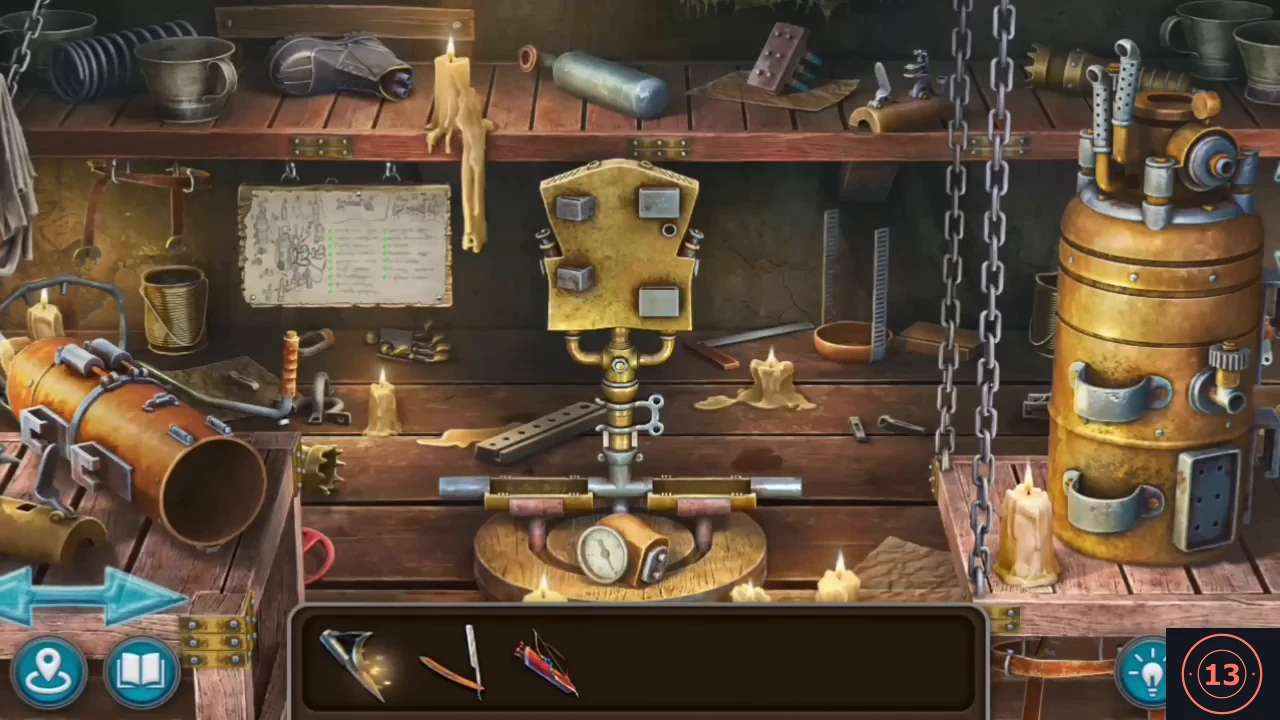
- Use the DRAWING OF A ROCKET CARRIER in the warehouse: "Find all the necessary items from the drawing." The drawing already ticks the four parts you own; find the other 16 (counter x/16) in any order. A found part glows and flies off after a moment. 1) Left table, front: the FLINTLOCK, a small firing mechanism on a wooden block in front of the green plates. 2) Top of the tall shelf rack in the middle: the STEERING ARMS, a bent metal frame with a red handle. 3) Middle shelf of the rack: click the tall brass GAS CYLINDER standing in front of the dark crevice in the rock. A close-up of the crevice opens and you take the cylinder. 4) In the same close-up, click the dark object standing in the crevice so it drops down, then take the brown leather part with two small studs behind it. 5) The VALVE, a small brass handwheel on the floor at the foot of the rack, left of the crate beside the mannequin head. 6) The ribbed copper-and-grey part on the ground behind the anvil, under the lowest shelf of the rack. 7) Right table: turn the handle of the vise to open it, then take the dark ribbed mechanism it was clamping. 8) The copper part with curved fins hanging from a hook on the slanted beam at the upper right. 9) The brass toothed nozzle behind the small crates on the upper-left shelf, below the chain. 10) Move the curtain under the left shelf: the HOSE is behind it. 11) Move the big green bottle on the left table: the RATCHET LEVER is behind it. 12) Move the stone slab lying on the crate at the lower left: the PALM (a metal hand) is under it. 13) The BELTS, a leather strap with a buckle hanging on the shelf post by the cart wheel. 14) The anvil on the barrel at the lower centre: "There is something under the anvil. But I can't lift it by myself." Click the hook of the rope hanging just above it so the hook catches the anvil, then turn the crank on the right-hand post at the upper right (turned before the hook is attached, it only gives "There must be something attached to the handle."). The anvil is hoisted off. Click the open barrel: lift the crossed metal rods off from the top one downwards and take the brown leather part at the bottom. 15) The SPRING at the back of the rack's middle shelf. 16) Right table: open the small wooden box under the tray of bottles and take the PRESSURE SENSOR, a round dial gauge. The helmet visor on the mannequin head is not one of the parts; remember it for later. All 16: ROCKET CARRIER PARTS.
Workbench: assembling the rocket carrier and the prosthetics
Assemble the rocket carrier and the prosthetics on the workbench following the numbered list.
- Put the ROCKET CARRIER PARTS on the assembly table. The parts lie on the bench, on the trolley at the left (the left-right arrow slides it), on the hanging tray at the right (the up-down arrow raises and lowers it) and on the shelves; if the bench does not fit the screen, scroll it with the side arrows. Drag each part onto the part it joins on the drawing. A part used out of turn is refused ("I need to follow the instructions carefully."), a part dropped on the wrong spot gives "No, this item can't be used here." This order works: 1) FLINTLOCK (small firing mechanism on the wooden block on the left trolley) onto the left half of the horizontal pipe at the bottom of the central stand. 2) SPRING (top-left shelf) onto the PLUG (the round cup on the middle shelf), then drag the spring and plug into the open end of the orange PRESSURE CYLINDER lying on the left trolley. 3) CYLINDER WITH CATALYST (thin silver bottle on the top shelf) onto the side of the brass GAS CYLINDER standing on the hanging tray. 4) PRESSURE SENSOR (the dial gauge on the base of the stand) onto the top of the gas cylinder. 5) INDICATOR (small panel on the top shelf, centre right) onto the lower front of the gas cylinder. 6) The second flintlock (top shelf at the right, beside the chains) onto the right half of the pipe. 7) Slide the left trolley to the left: the red VALVE handwheel and the orange-red receiving sleeve appear behind it. Put the valve on the indicator. The finished gas cylinder glows: drag it onto the stand. 8) Leg: the KNEE MECHANISM lies on the lower right shelf. Put the RECEIVING SLEEVE on its right end and the BOOT (top-left shelf) on its left end: PROSTHETIC LEG. 9) Two toothed brass TURBINES: the one on the top-right shelf behind the chains goes on the right end of the pipe, the one on the table left of the stand on the left end. 10) RATCHET LEVER (on the hanging tray) onto the top of the orange pressure cylinder. Click the pressure cylinder so it stands up and drag it onto the stand, left of the gas cylinder: the stand turns into the carrier body. 11) Raise the hanging tray. BELTS: drag the strap hanging under the tray onto the back pad of the body, then the second red strap from the wall peg above the drawing sheet onto the pad. 12) STEERING ARMS (bent bar with an orange grip at the back left of the table) onto the body. 13) HOSE (coiled on the hook on the left wall) onto the body. The carrier is complete. Arm (its parts are accepted alongside the carrier work): put the CORRUGATED SHOULDER PAD (ribbed copper cone on the back shelf at the right, under the hanging tray) on the right end of the ELBOW MECHANISM lying at the front right of the table. Raise the hanging tray, then put the PALM (metal hand at the back of the table left of the gas cylinder, behind the candle) on the left end of the elbow: PROSTHETIC ARM. Take the ROCKET CARRIER; the leg and arm PROSTHETICS are in your inventory.
Flight to the temple
Give Mora her prosthetics and prepare the rocket carrier for the flight to the temple.
- Give Mora the PROSTHETICS in her cave room. She reminds you: "roll round thing and carry square one. Don't confuse them." Task Mechanisms for Mora complete; new task Flight. Take the instruction sheet ASSEMBLY OF THE APPARATUS from the floor at the lower right.
Rocket carrier: the launch sequence
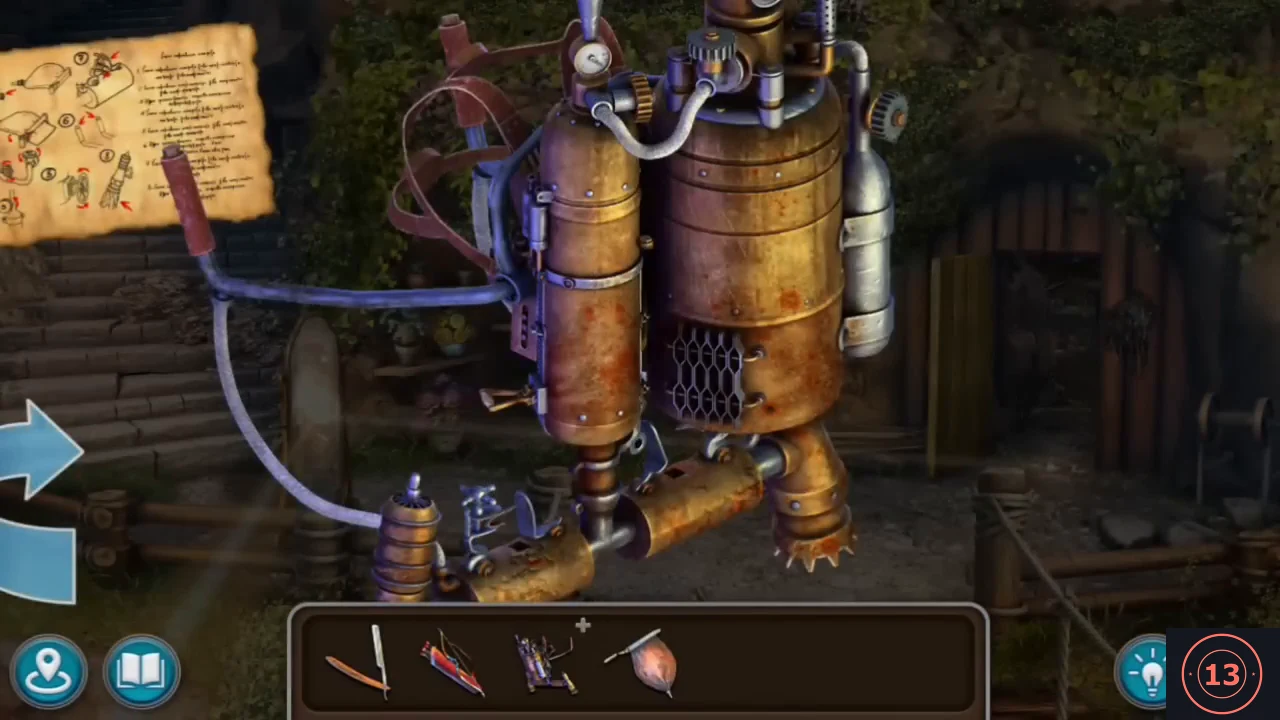
Prepare the rocket carrier with the instruction sheet in order, then fly to the temple plateau and collect the missing warrior pieces.
- Open the ROCKET CARRIER from the inventory and pin the instruction sheet. The curved arrow beside the carrier turns it between the FRONT view (two copper tanks, a hose with a red grip at the left, a small gauge on the left tank, a big dial dome on top) and the BACK view (purple tank, thin silver catalyst bottle, cyan vent grille with a small gold handwheel, red grip on the steering handle at the right). First click the flintlock on the lower pipe at the front left ("There is a flint stone missing here.") and put the FLINT on it. Zoom on the winch in the mountain yard and turn its crank to wind the floating wineskin down. It is still tied to the winch: cut the rope just below it with the STRAIGHT RAZOR (you keep the razor) to get the WINESKIN WITH GAS. Then follow the sheet: 1 in the back view put the wineskin on the tap just right of the silver bottle; 2 click it: the press bar squeezes the gas into the cylinder, the indicator panel lights cyan and the EMPTY WINESKIN goes to your inventory; 3 apply pressure: in the front view click the gear knob on top of the large cylinder (left of the dial dome), then the brass gear on the small left tank where the hose joins it (the two gear knobs linked by the hose in sheet picture 3; the small left gauge needle rises); 4 feed the catalyst: click the small gear on top of the silver bottle (seen at the right edge of the front view and at the top of the bottle in the back view; the PC player clicked it from both views); 5 feed the mixed gas to the turbines: in the back view turn the gold handwheel beside the cyan grille; 6 and 8 press the steering-wheel button: click the top of the red grip on the steering handle in the back view. After the last press sparks fly at the flintlock and the turbine fires; the ROCKET CARRIER is ready. Step 7 (flint covers): neither recording shows a separate click on the blue flint covers of the two flintlocks; the ignition worked after the actions above. If your turbine does not fire, check the flint and the blue covers on both flintlocks on the lower pipe, then press the grip again.
- Use the ROCKET CARRIER at the oasis: Kiana flies to a plateau with a closed stone gate guarded by two stone warriors ("Phew! That was extreme! However, the carrier works."). A ghostly dwarf walks straight through the doors; new task Temple entrance. The door zoom: the warriors should look the same, but the left one is missing elements.
- Collect the missing pieces: the HELMET with the red plume from the dead warrior at the oasis; at the bell terrace pry the emblem stuck by the hammers at the bell base with the RAZOR (used up): HERALDRY; the CUIRASS from the armour stand in the workshop: in the close-up first click the big plate on the left shoulder so it comes off, then the peg at the left of the neck, then the peg on the right shoulder (the small right shoulder plate comes off with it); only then click the chest plate to take the cuirass. On the temple door put the helmet and the cuirass on the left warrior and the heraldry on its shield.
- In the warehouse take the metal VISOR from the mannequin head at the lower right. At the oasis Mora arrives on her new prosthetics to fly you to the plateau, but the carrier's gas indicator is at zero. Fill the EMPTY WINESKIN at the green gas pit left of the red tree (WINESKIN WITH GAS), put it on the carrier's gas bottle and fly. Mora leaves you at the plateau ("Give that idiot a good beating!").
Temple doors: the stained-glass birds
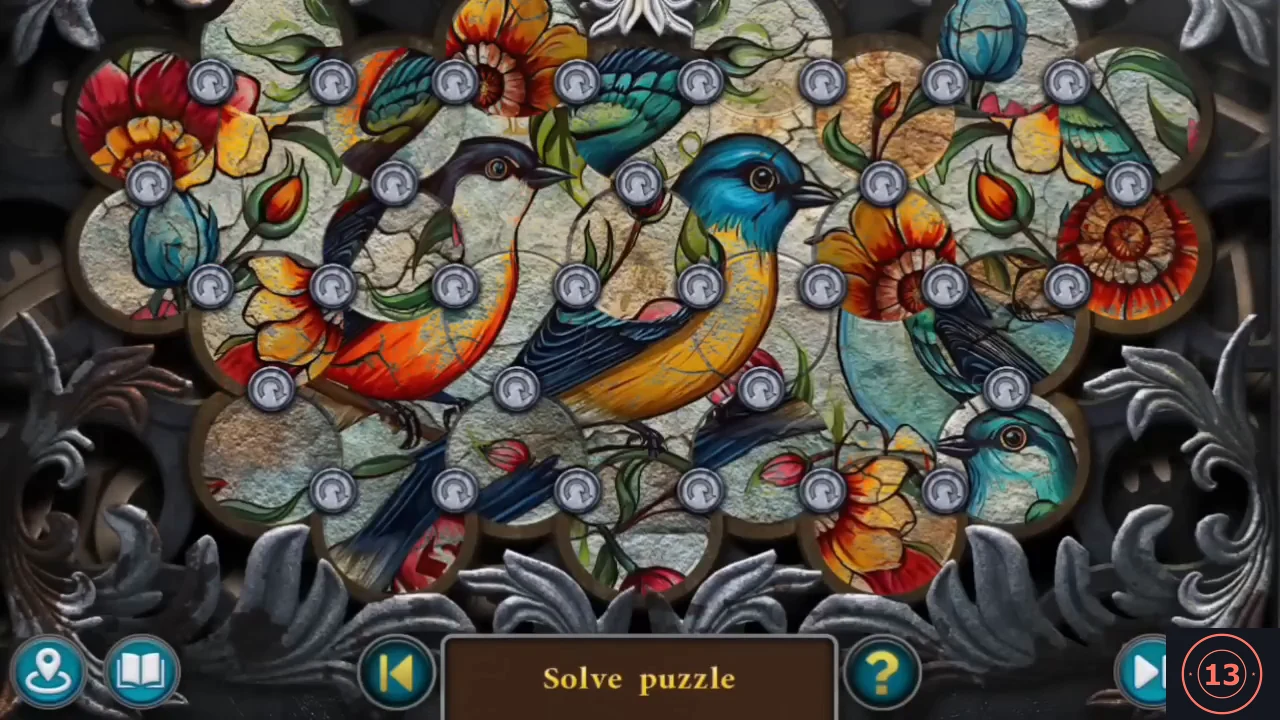
Rotate the round pieces of the stained-glass panel to restore the picture of birds and flowers. This opens the temple and ends the bonus chapter. Achievement Gifted: finish this temple gate door in fewer than 75 moves. Before you click a knob, check which pieces it will turn. Our playthrough did not earn it: no banner appeared when the picture was finished.
- Put the VISOR on the left warrior's helmet: both warriors now match and the small stained-glass panel between the shields opens a puzzle. The picture of birds and flowers is split into round pieces with silver knobs at the joints; click the knobs to rotate the pieces around them until the picture is whole - three birds (orange, blue-yellow and pale blue) in the middle among flowers. The doors open.
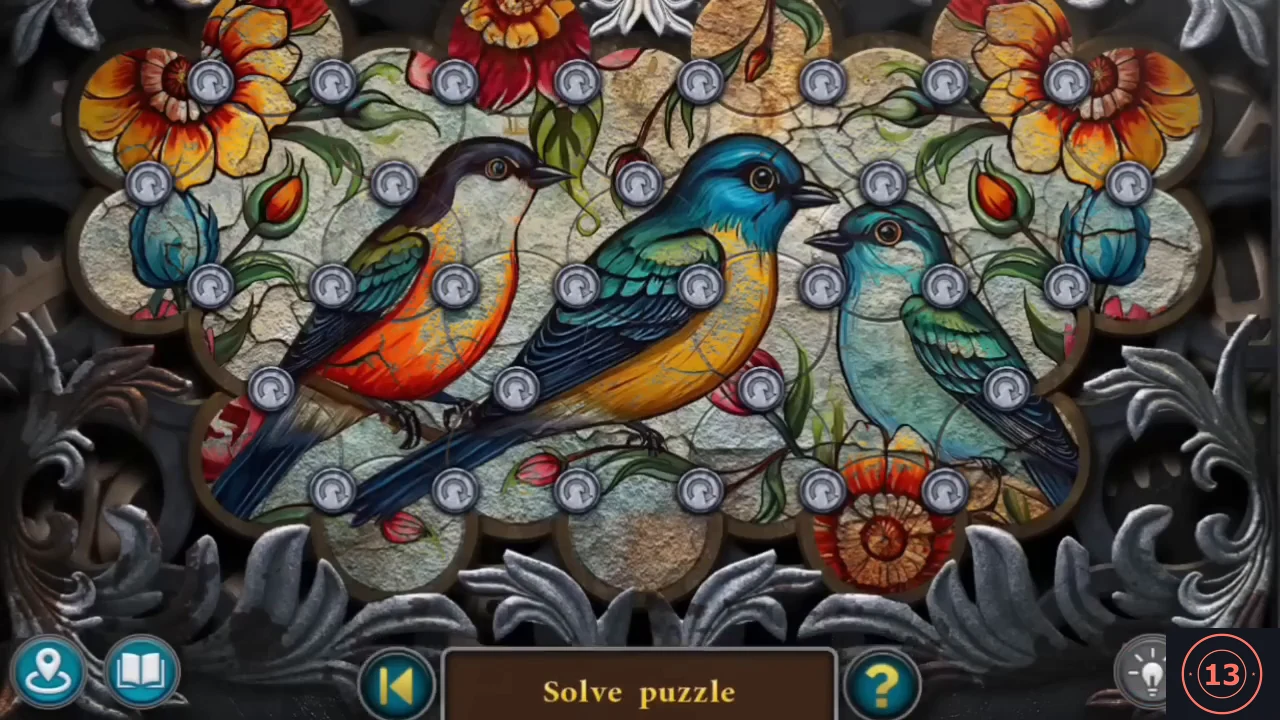
The finished stained-glass picture: three birds among flowers. - Ending: Kiana enters the temple and finds Grandma ("Grandma!"); she fires an arrow at the wizard, a magic blast throws her down, and her grandmother Susan rushes to her ("Kiana! Granddaughter! Are you okay?!"). The bonus story is complete; the final dialog lets you continue collecting.
Bonus chapter: the collectibles left after the ending
Optional: after the bonus ending, choose Continue to pick up the bonus Fluffy collection items and morphing objects that are easy to miss. Finding all of them unlocks the extra content in the Extras menu.
- (Optional, after the bonus ending: choose Continue and travel with the map. Each of these can also be picked up earlier, as soon as its scene is open.) These are the ten bonus collectibles that are easiest to miss (five Fluffies and five morphing objects); your counter numbers depend on the order you collect them. Inside Uri's dwelling: a grey Fluffy hides in the shadow under the right end of the table with the portable stove, between the curved table leg (grey cloth hanging over the edge) and the green plant at the right edge.
- Dam yard: a small grey-white Fluffy lies in the grass at the foot of the right stone column of the log dam wall, between the low stone block with the wooden wheel on the left and the small wooden chest on the right.
- Oasis: the morphing object is a small reddish-brown stick leaning in the grass behind the white flowers, just right of the dead warrior's boots.
- Canyon (observation post): the morphing object is the small distant rocky peak just right of the vulture sitting on its nest, between the bird and the tree trunk.
- Mountain yard (Mora's dwelling): a white Fluffy lies behind the lower rail of the wooden fence at the front, just left of the rope-wrapped fence post, below the mirror stand.
- In the same mountain yard the morphing object is a small brown pouch-like shape in the ivy on the rock above the left part of the round door.
- Mora's cave room: a faint grey Fluffy sits on top of the wooden crossbeam above the bookshelf, just left of the hanging crystal lamp. (Mora is gone: "Oops... Mora's gone missing... I guess she got used to her new prosthetics after all.")
- Workshop: the morphing object is a small brown stick lying in a crack of the mossy rock at the lower left, just above the candle stubs left of the grindstone.
- Temple gate: the last Fluffy is a faint grey figure half hidden in the dark ferns just right of the mossy mound above the small stone stairs, below the left dolmen and left of the main gate stairs. Completing the collection shows "CONGRATULATIONS! You found all the collection items. Go to the EXTRAS menu to solve a new puzzle!" and the achievement Collector.
- Still at the temple gate: the last morphing object is a small dark oval with a cross on the grey rock wall above the left dolmen, left of the gate pillar. Finding all 42 shows "CONGRATULATIONS! You found all the Morphing objects! 20 levels of Bonus Game are open for you now. Enter EXTRAS from the Main Menu to try them all." with the achievement Master of details (all morphing objects collected), then "All Morphing objects and collectibles received. Great job!" (Save and exit).