Opening the Extras: puzzles, mini-game replays and the Bonus Mini-Game
The Extras menu on the main menu has three kinds of play: six picture puzzles (Puzzles), replays of 24 story puzzles (Mini-games) and the 20-level Bonus Mini-Game. How to open each one is explained below.
- From the main menu choose Extras. The Extras page has the buttons Videos, Mini-games, Puzzles, Achievements and Bonus mini-game. Puzzles shows one picture puzzle at a time (arrows and a counter N/6, then Play). Each picture puzzle opens when you complete one of the six collections (Drak Ul figurines, Ghosts of the past, Toto toys, Manuscripts and Academy towers in the main game, Fluffies in the bonus chapter); each completed collection says "Go to the EXTRAS menu to find a new puzzle!". The Bonus mini-game button opens 20 levels once all 42 morphing objects are found.
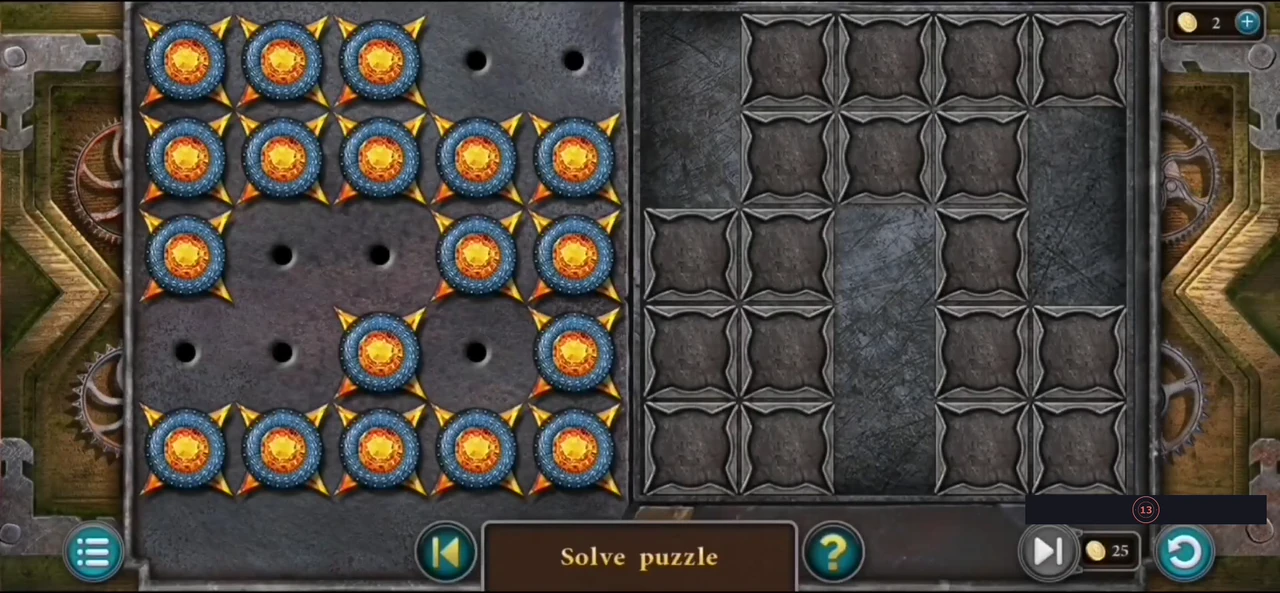
- Mini-games, the second button on the Extras page, replays 24 puzzles from the story. It is separate from Puzzles (the six picture puzzles) and from the Bonus mini-game (20 levels). The panel shows a picture of one puzzle with a counter N/24 between two arrows: click the arrows to page through the list, then press PLAY to start the puzzle shown. A replay uses the same controls as in the story; the skip button (25 coins) and the reset button sit at the lower right. The numbers are: 1 basement tower building, 2 cellar barrel chain, 3 chest symbol maze, 4 greenhouse door flower grid, 5 pumpkin game, 6 pig sorting, 7 mowing a path to the cache, 8 Maaron's floor hatch, 9 padlocks on Maaron's door, 10 twin-wheel door in the barn, 11 signal the crane at the dam, 12 temple door rune pairs, 13 catch the hen, 14 the red gem maze, 15 tunnel stone pictures, 16 fortress three-wheel lock, 17 dungeon number cube, 18 Buldan's crystal box, 19 spider-web floor hatch (bonus), 20 balance stones (bonus), 21 flower rings (bonus), 22 chain chips (bonus), 23 gold cross chips (bonus), 24 stained-glass birds (bonus). Solve each one with the method in its story section of this guide. A replay can start from a different layout than your story game. The goal stays the same, but for the flower grid, mowing path, twin wheels, number cube and chain chips the answer itself can change, so follow the method and the variation note in that section rather than the recorded answer. The recording shows this panel only with all 24 entries already selectable, so it does not show when each entry becomes available.
Picture puzzle 1: the mansion hall
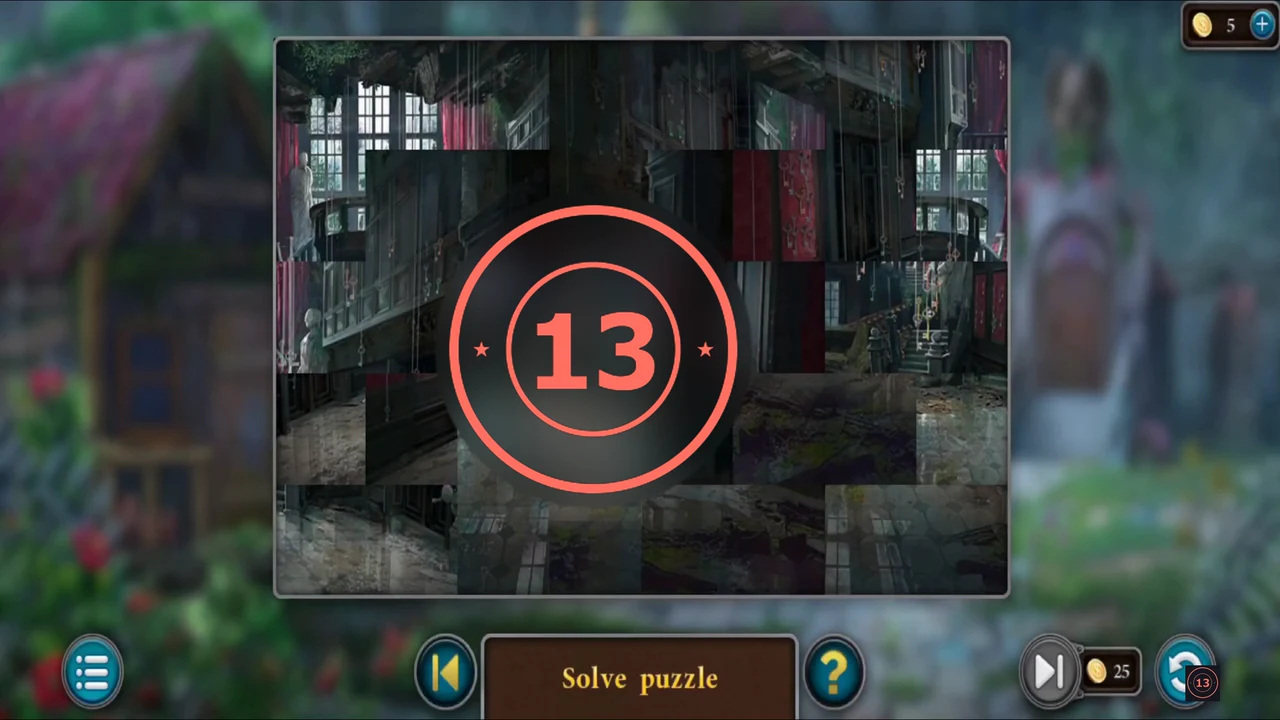
The first picture puzzle in Extras > Puzzles. The tiles are shuffled, so solve it by swapping tiles; there is no fixed move list.
- The picture is cut into square tiles and shuffled. Click a tile (it gets a white frame), then click the square where it belongs: the two tiles swap places. Work from edges and clearly recognisable details inward until the whole picture is restored. Picture 1 is the mansion hall with red curtains, tall leaded windows at the back and the staircase. The bottom bar also has a hint (?) button and a skip button.
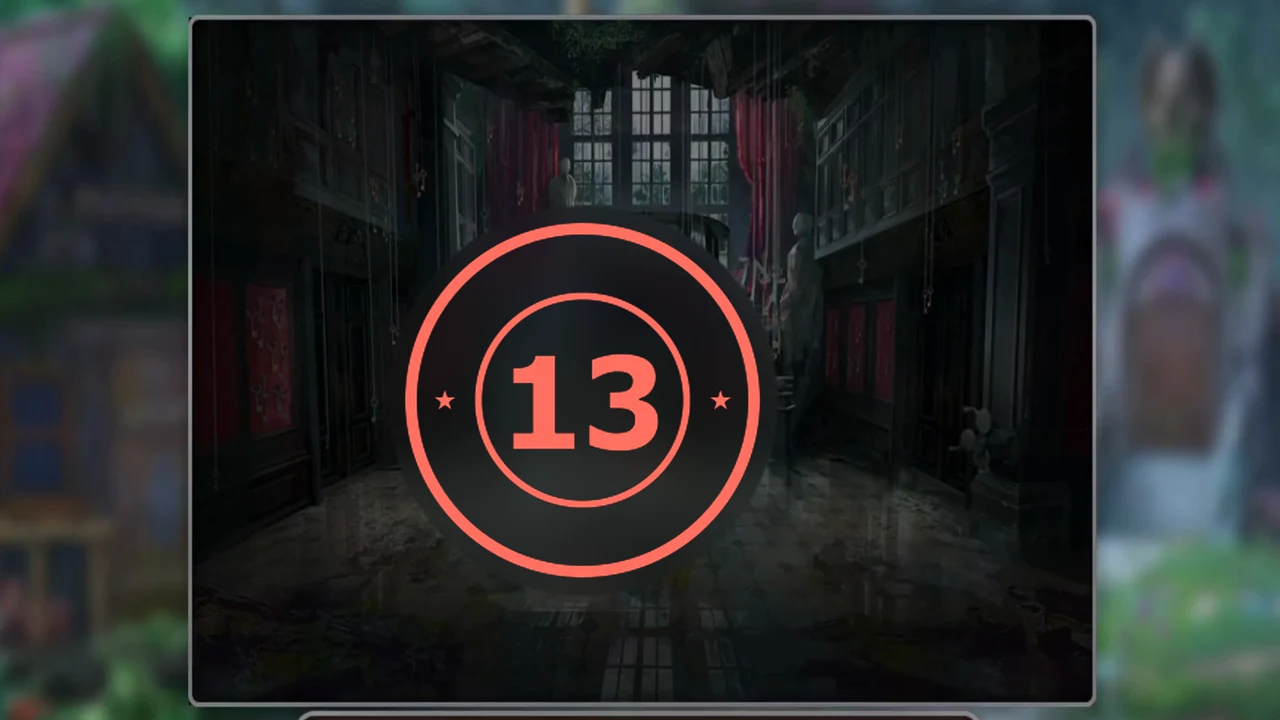
The finished picture: the mansion hall with red curtains and the staircase. The 13M logo covers the middle of the picture, so match the edges and corners first and fill the centre last.
Picture puzzle 2: the dark mansion room
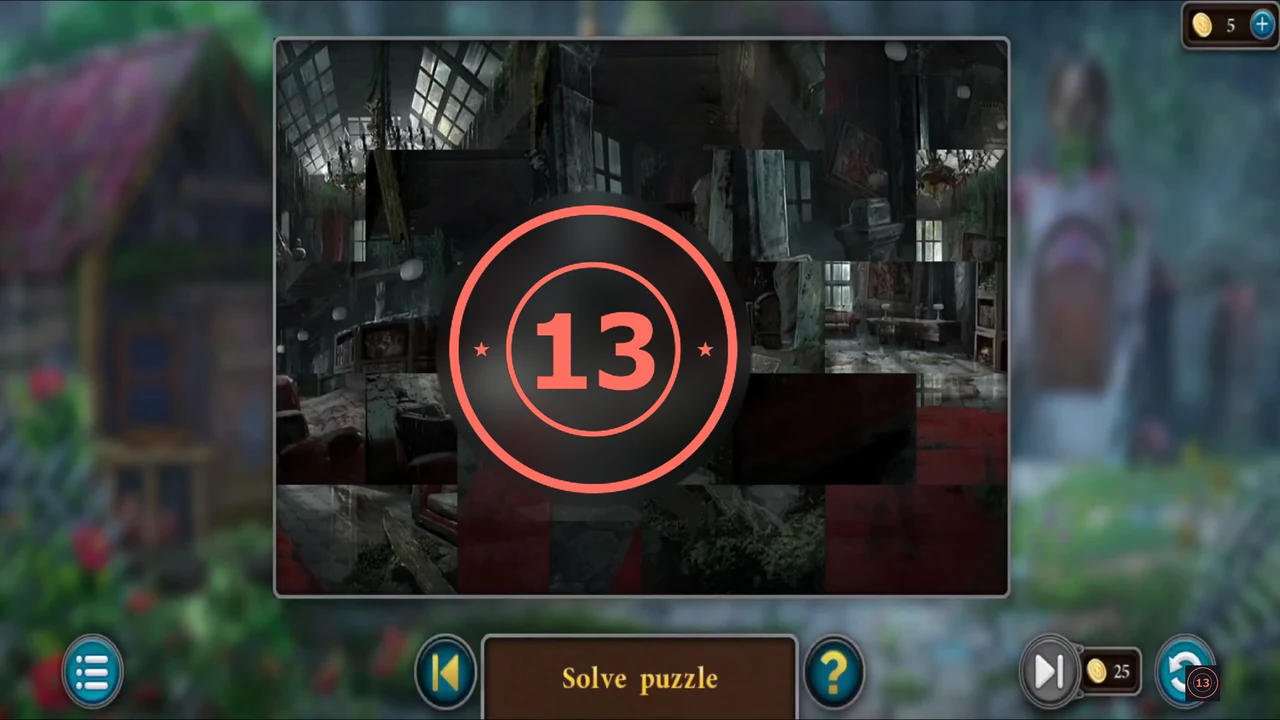
The second picture puzzle. It works in the same way as picture 1.
- Use the arrow to switch to 2/6 and press Play. Swap tiles in the same way until the picture of the dark mansion room with tall windows and the red carpet is complete.
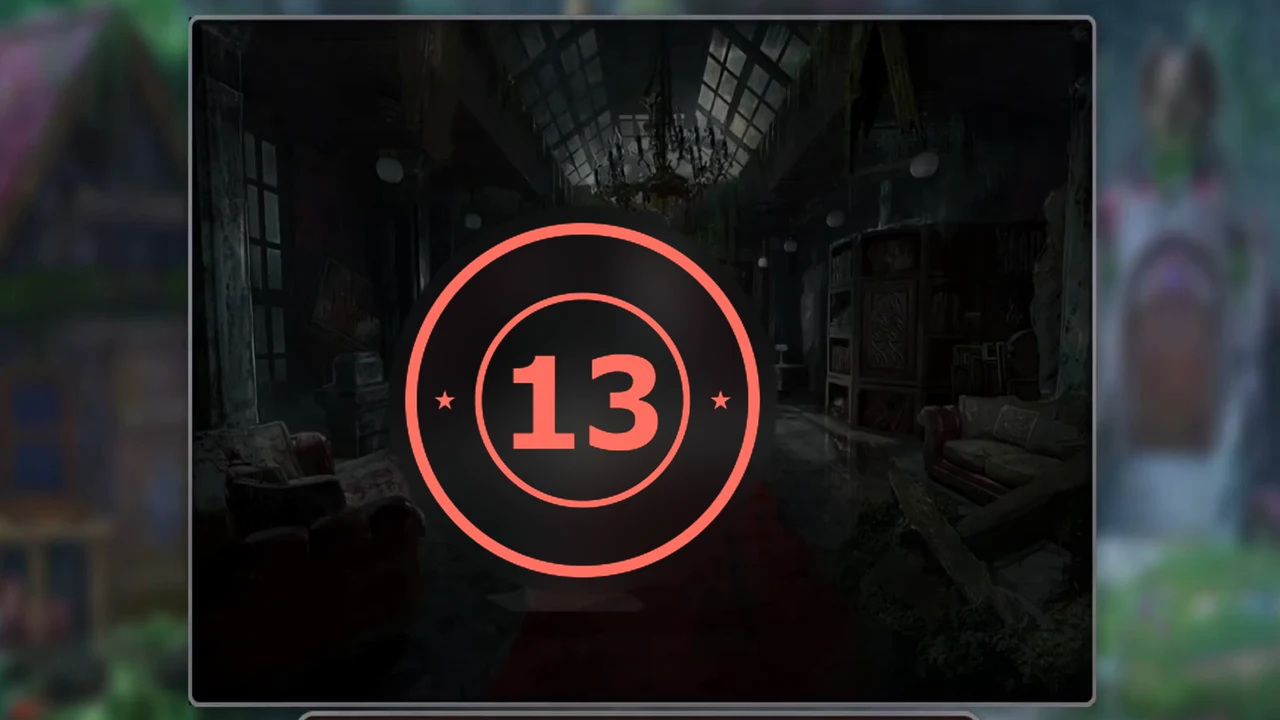
The finished picture: the dark mansion room with tall windows and the red carpet. The 13M logo covers the middle of the picture, so match the edges and corners first and fill the centre last.
Picture puzzle 3: the stormy path and the dolmen
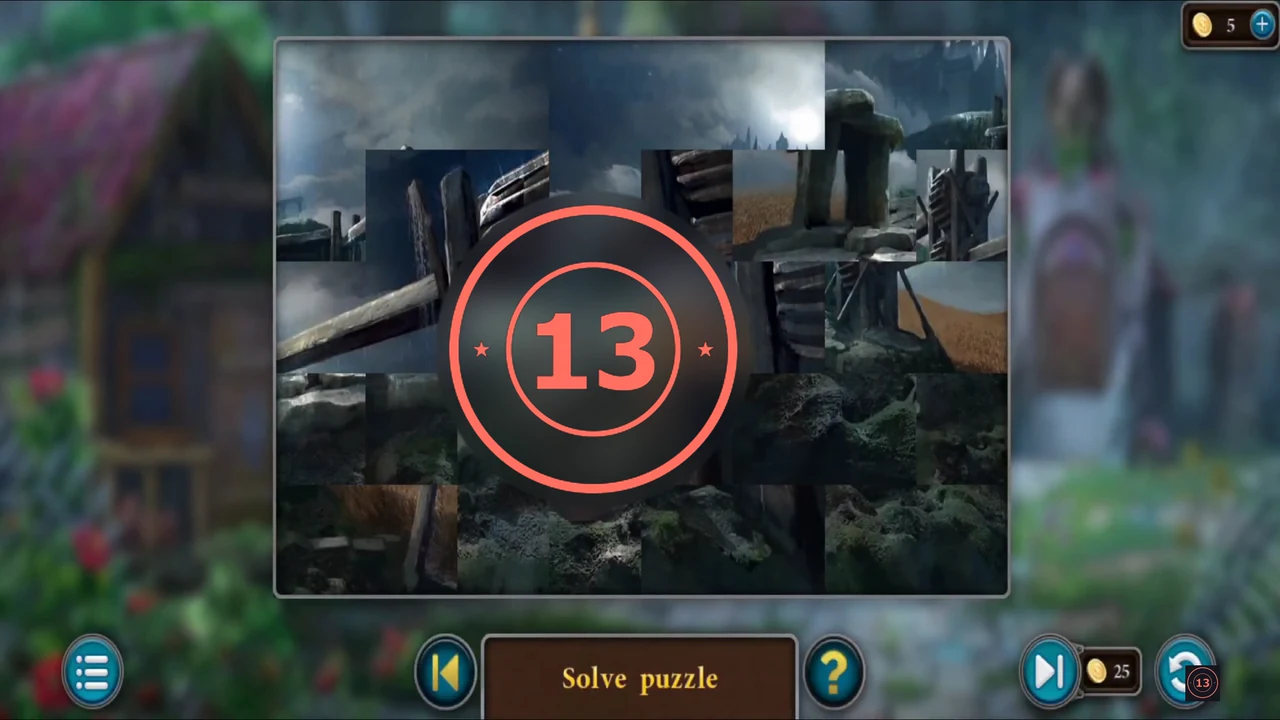
The third picture puzzle. It works in the same way as picture 1.
- Picture 3/6: restore the scene of a rocky stone path with a stone dolmen on the left, a long wooden barrier and a distant castle under dark storm clouds.
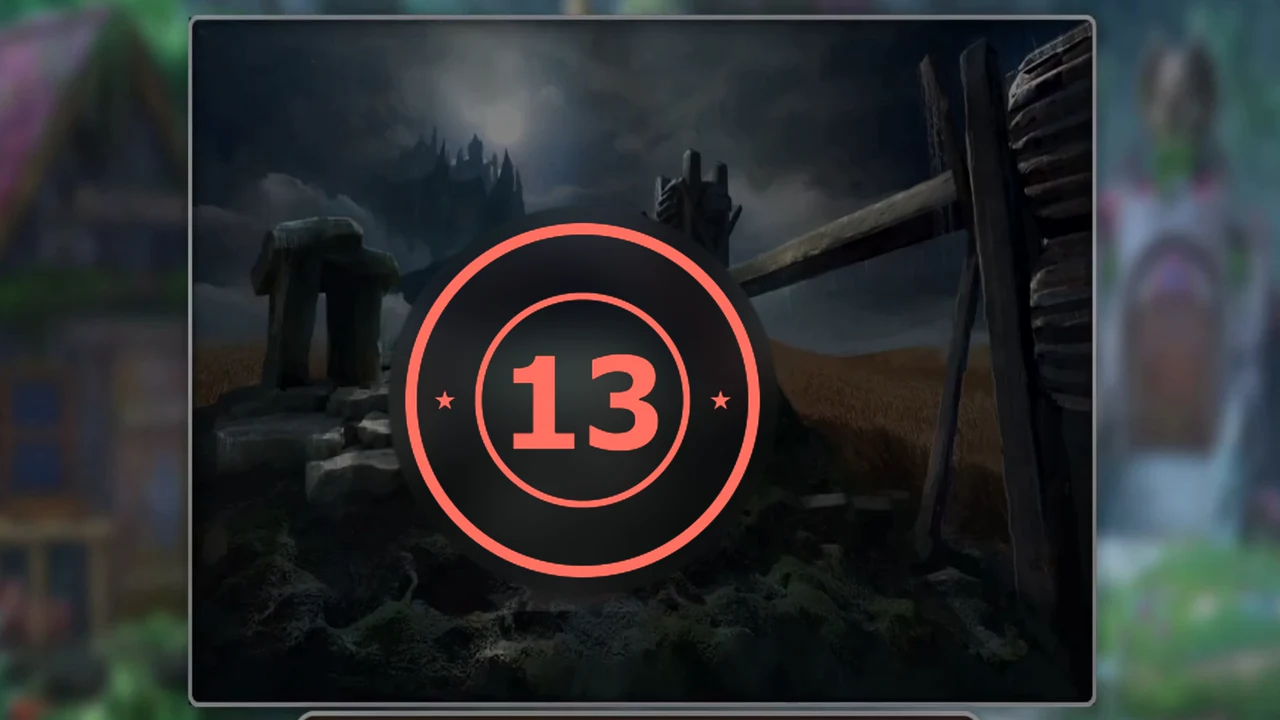
The finished picture: the rocky stone path with the dolmen, the wooden barrier and the distant castle under storm clouds. The 13M logo covers the middle of the picture, so match the edges and corners first and fill the centre last.
Picture puzzle 4: the mountain sunset
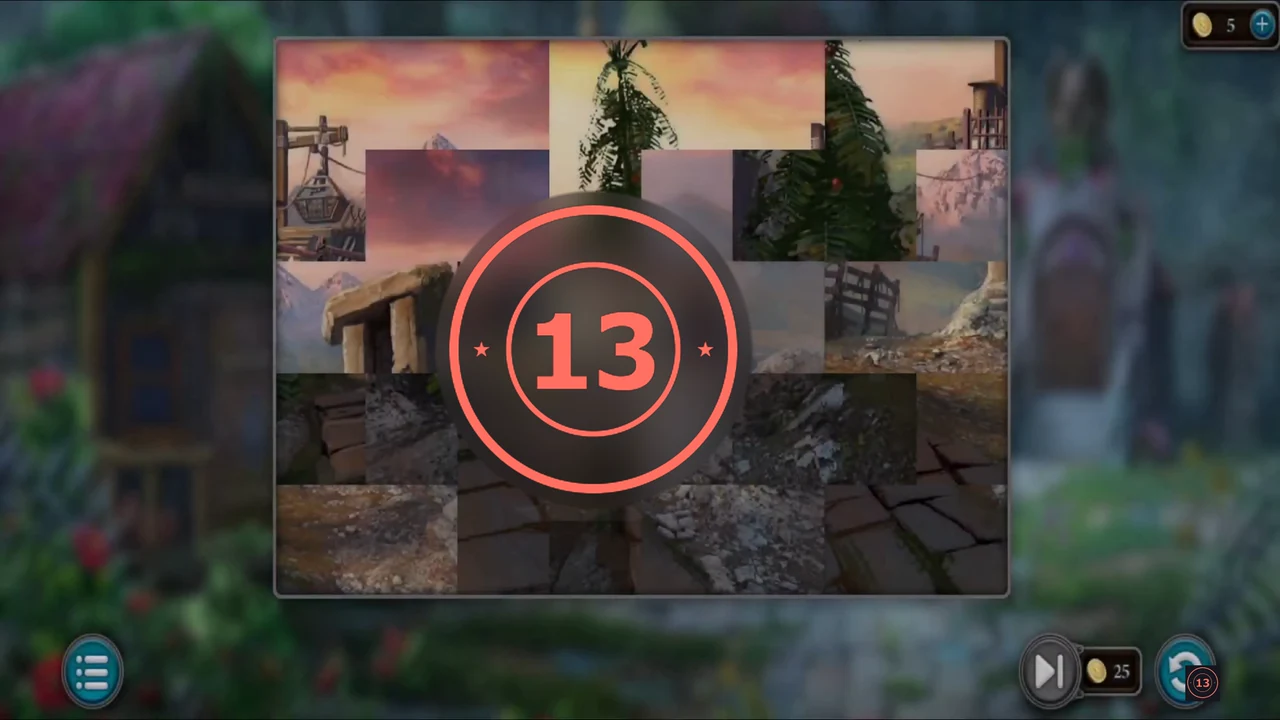
The fourth picture puzzle. It works in the same way as picture 1.
- Picture 4/6: restore the sunset scene with the fir tree, the red-railed wooden structure and the stone dolmen above a cobbled path.
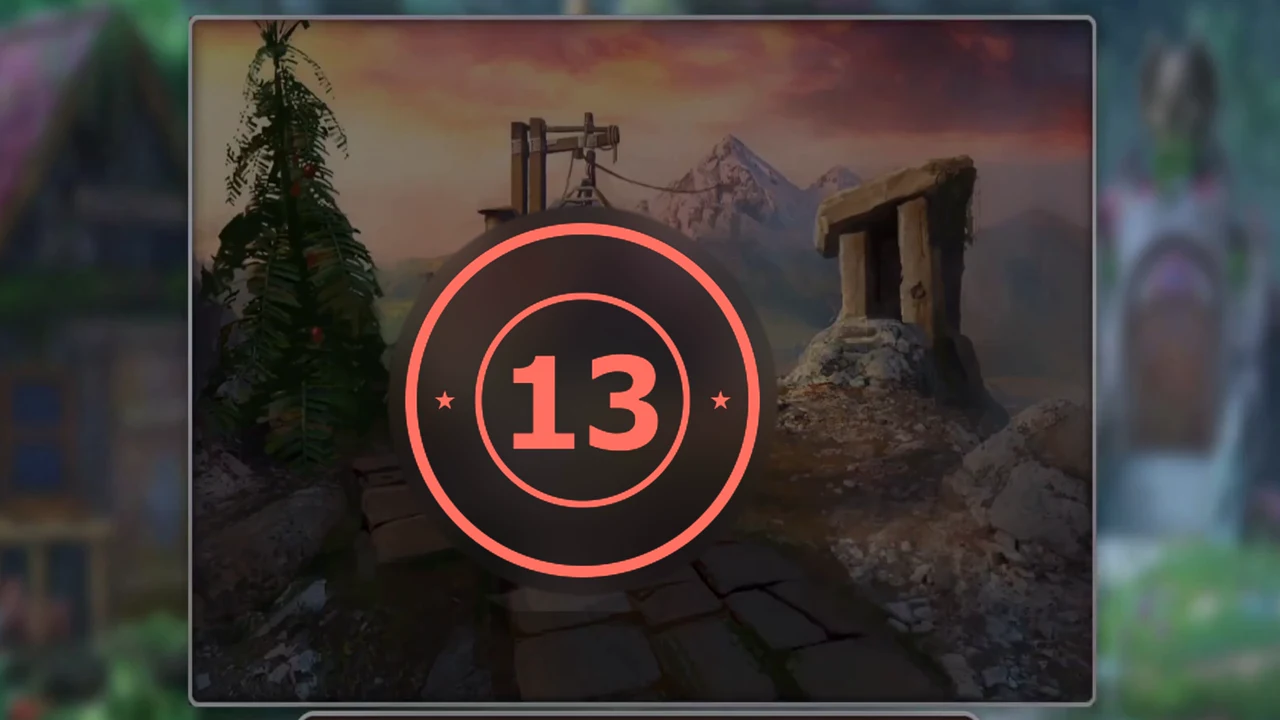
The finished picture: the sunset scene with the fir tree, red-railed structure and stone dolmen. The 13M logo covers the middle of the picture, so match the edges and corners first and fill the centre last.
Picture puzzle 5: the frozen waterfall
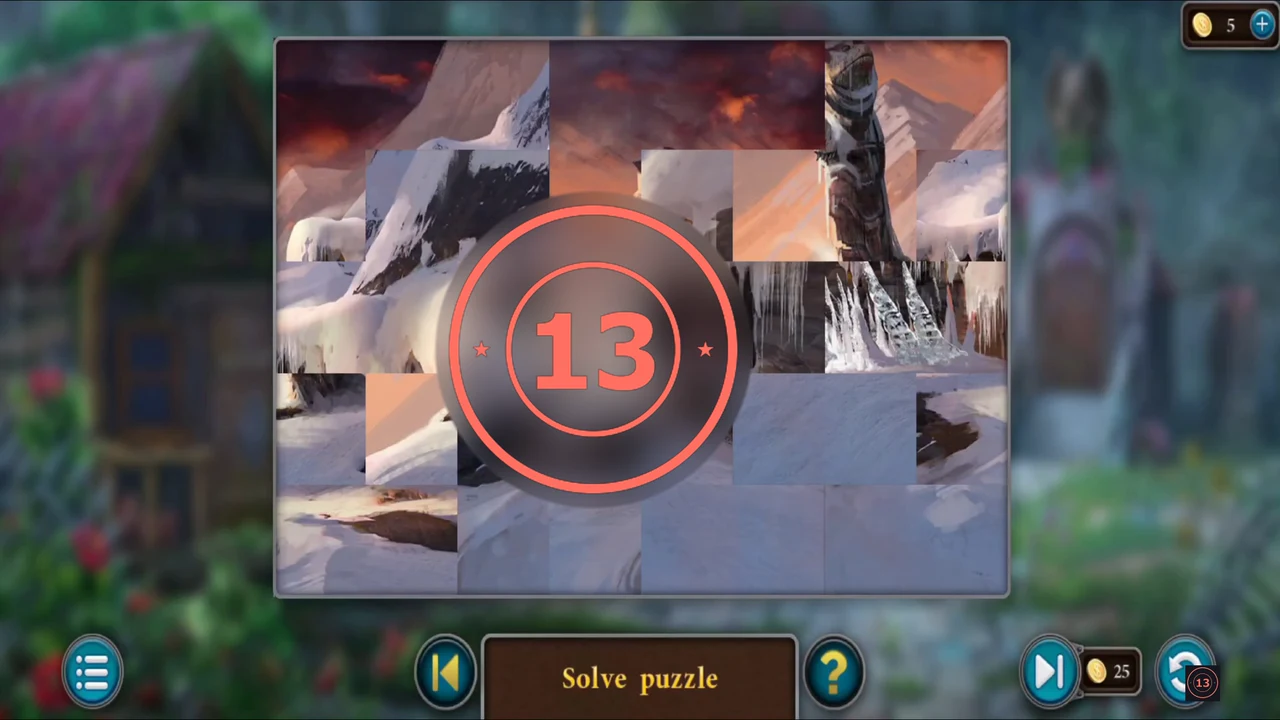
The fifth picture puzzle. It works in the same way as picture 1.
- Picture 5/6: restore the snowy scene with the frozen waterfall and the tall stone statue on the left.
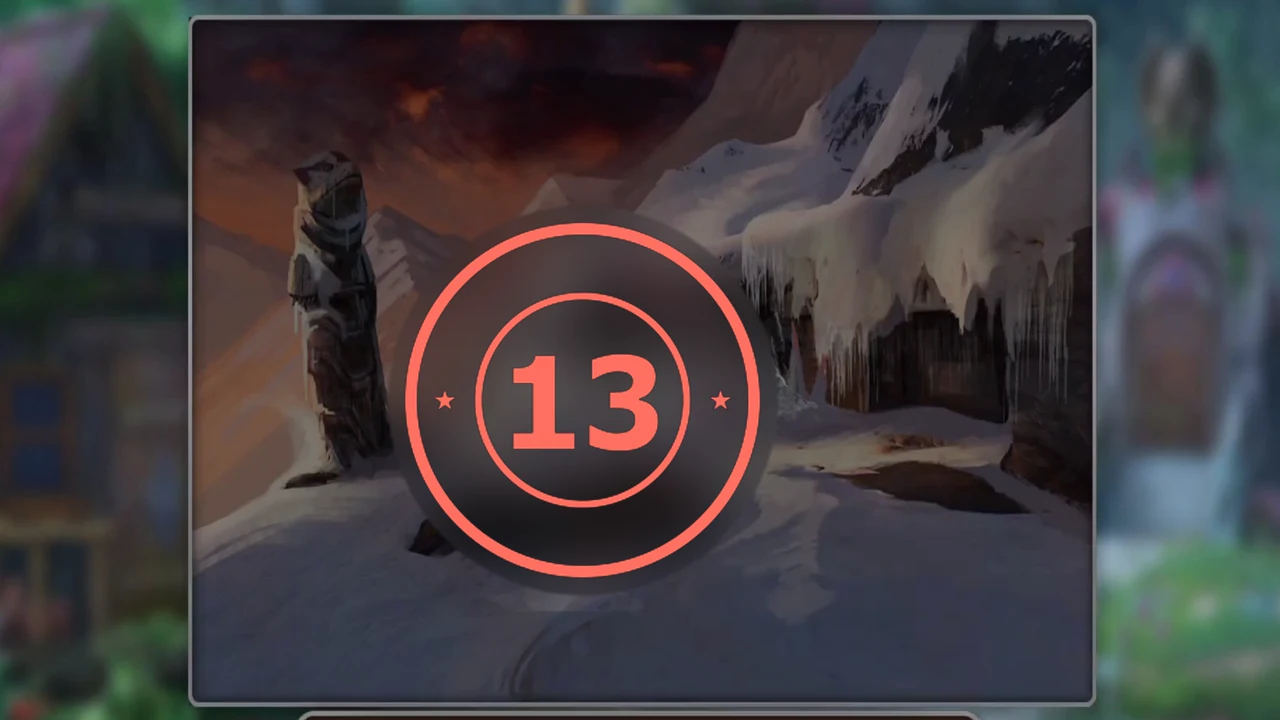
The finished picture: the frozen waterfall with the stone statue. The 13M logo covers the middle of the picture, so match the edges and corners first and fill the centre last.
Picture puzzle 6: the grey forest
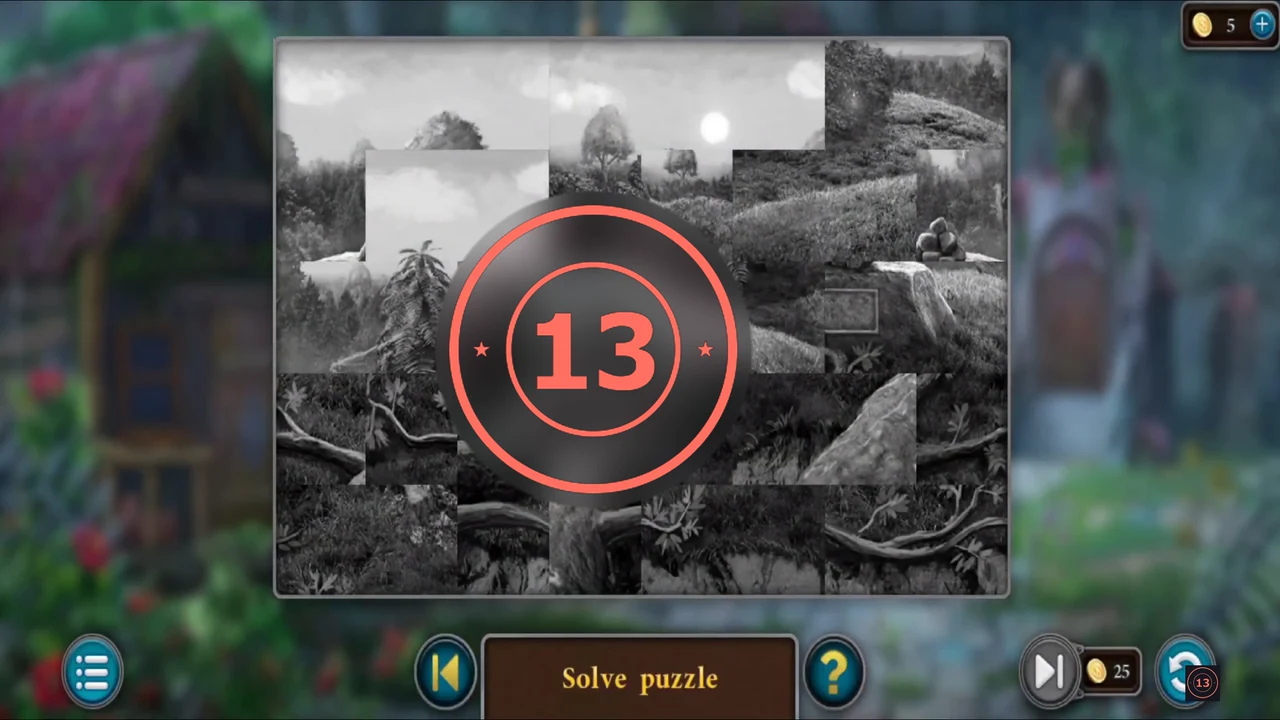
The last picture puzzle. Finishing all six earns the Puzzle lover achievement.
- Picture 6/6: restore the black-and-white forest scene with the huge fallen log and its roots. Finishing all six earns the achievement Puzzle lover. The Puzzles page first still shows 6/6 with Play under the message; a moment later it returns to picture 1/6 with COMPLETED written across it.
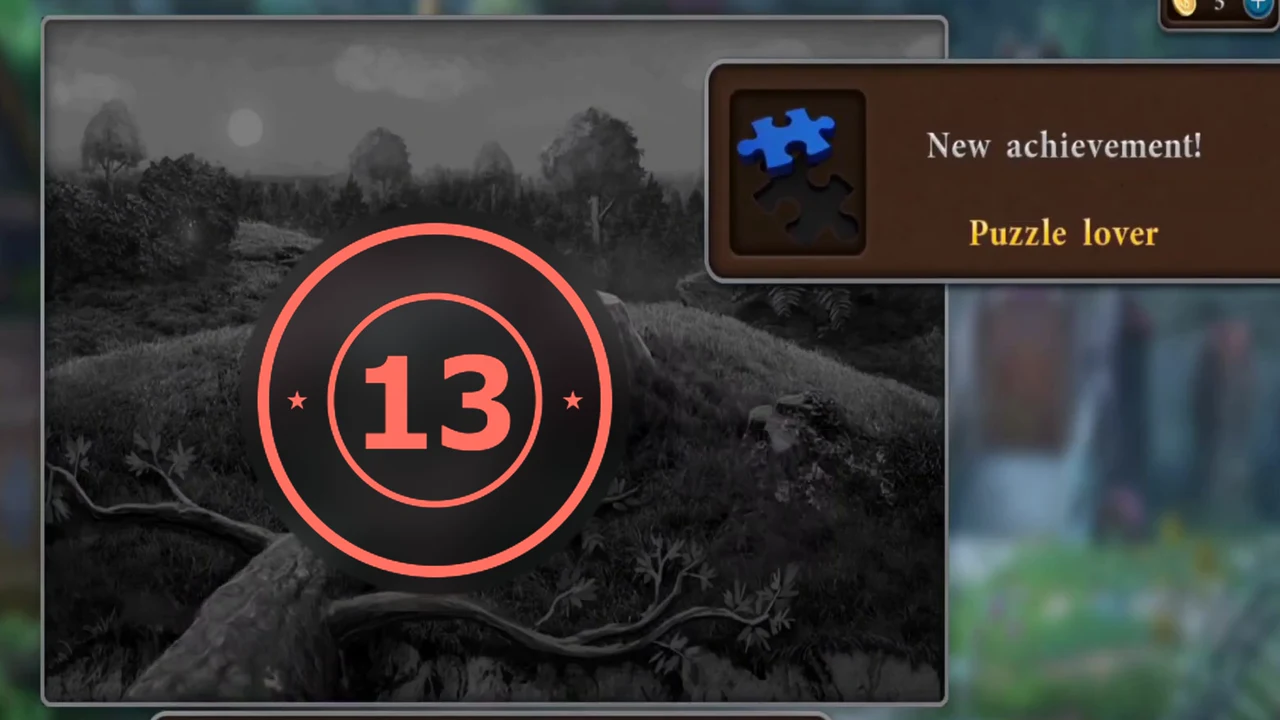
The finished picture: the grey forest with the fallen log; the Puzzle lover achievement appears. The 13M logo covers the middle of the picture, so match the edges and corners first and fill the centre last.
Bonus Mini-Game: levels 1-10
Levels 1-10 of the Bonus Mini-Game in Extras. Every level follows the same rule. Each level picture shows the finished board: every coloured outline with the same number is one piece (its tokens may be separated by empty cells), and the numbers give one working placement order. Match each outlined shape to a piece on the peg board.
- Rules: the peg board on the left holds pieces made of gold tokens (orange spikes link the tokens of one piece). Click a piece to pick it up whole (it turns blue) and drop it into the frame on the right. The pieces must exactly fill the recessed dark cells of the frame; the level is solved when the shape flashes gold. Start with the pieces that only fit one way (long bars, corners) and fill awkward gaps last. Level 1 (six pieces): fill the frame as in the picture below.
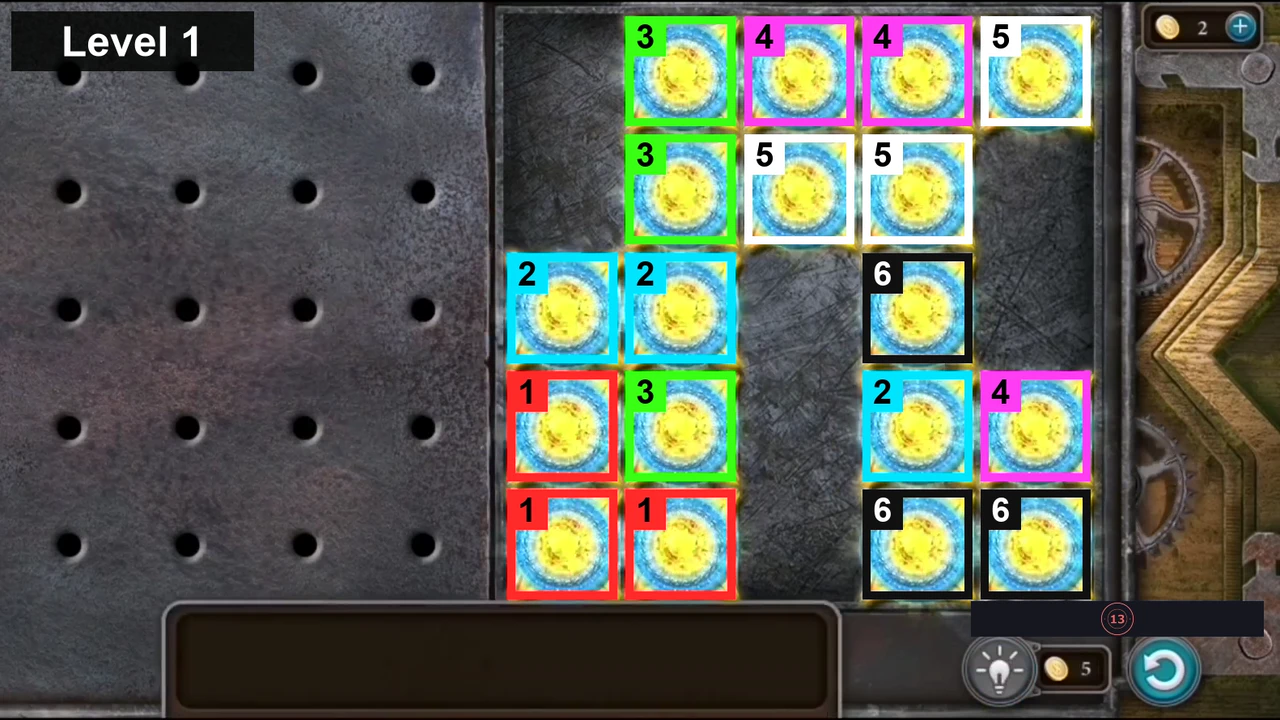
Level 1 solved: tokens with the same colour and number belong to one piece; numbers give one working placement order. - Level 2 (seven pieces): move every piece from the peg board into the frame as shown in the picture below.
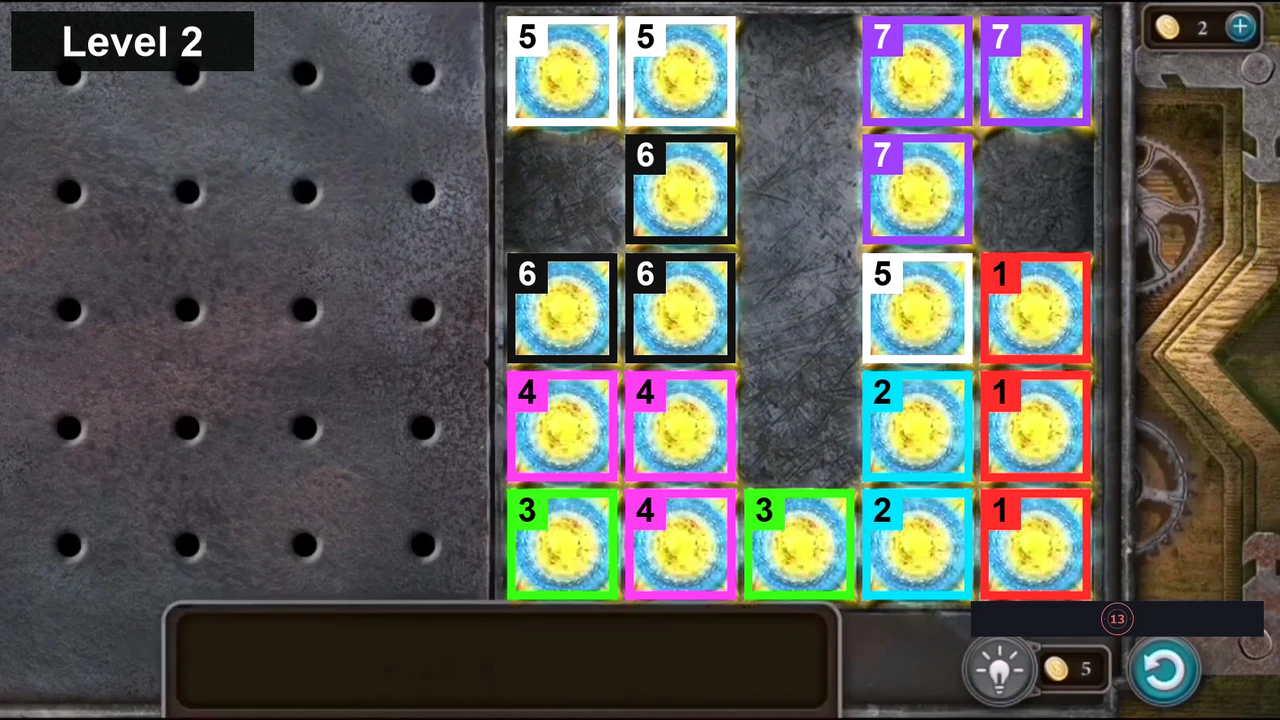
Level 2 solved: tokens with the same colour and number belong to one piece; numbers give one working placement order. - Level 3 (seven pieces): move every piece from the peg board into the frame as shown in the picture below.
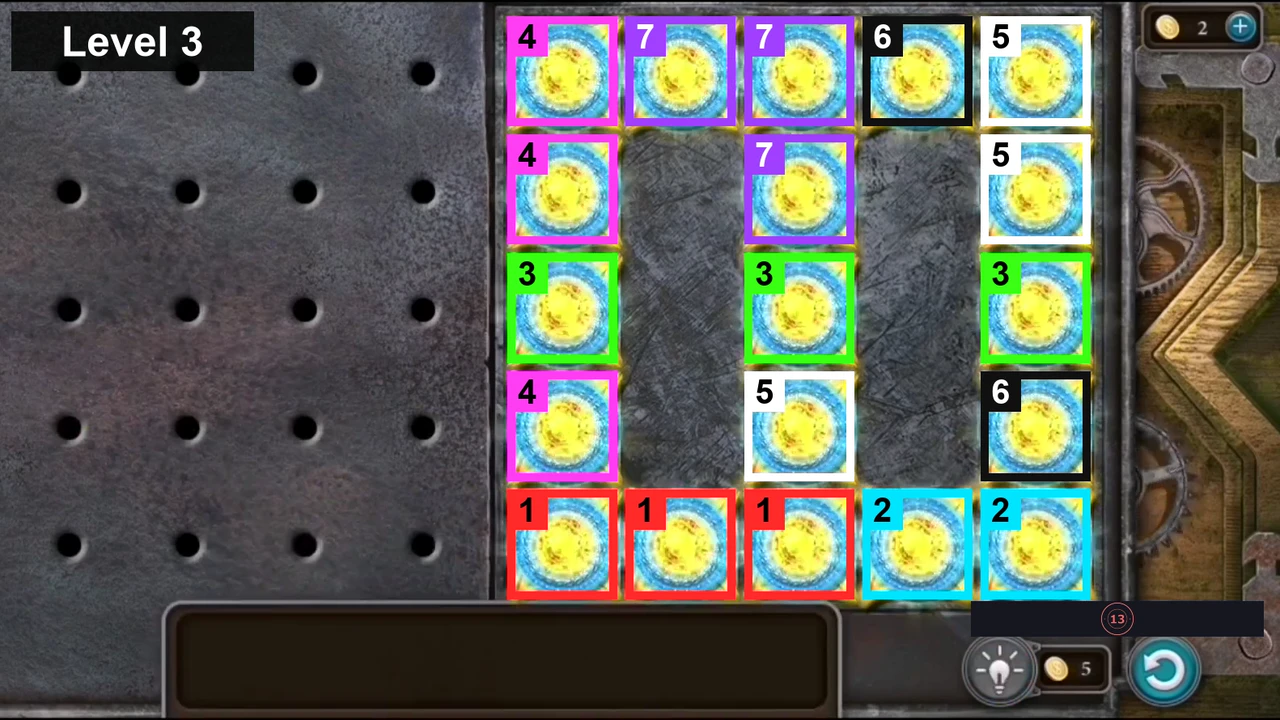
Level 3 solved: tokens with the same colour and number belong to one piece; numbers give one working placement order. - Level 4 (seven pieces): move every piece from the peg board into the frame as shown in the picture below.
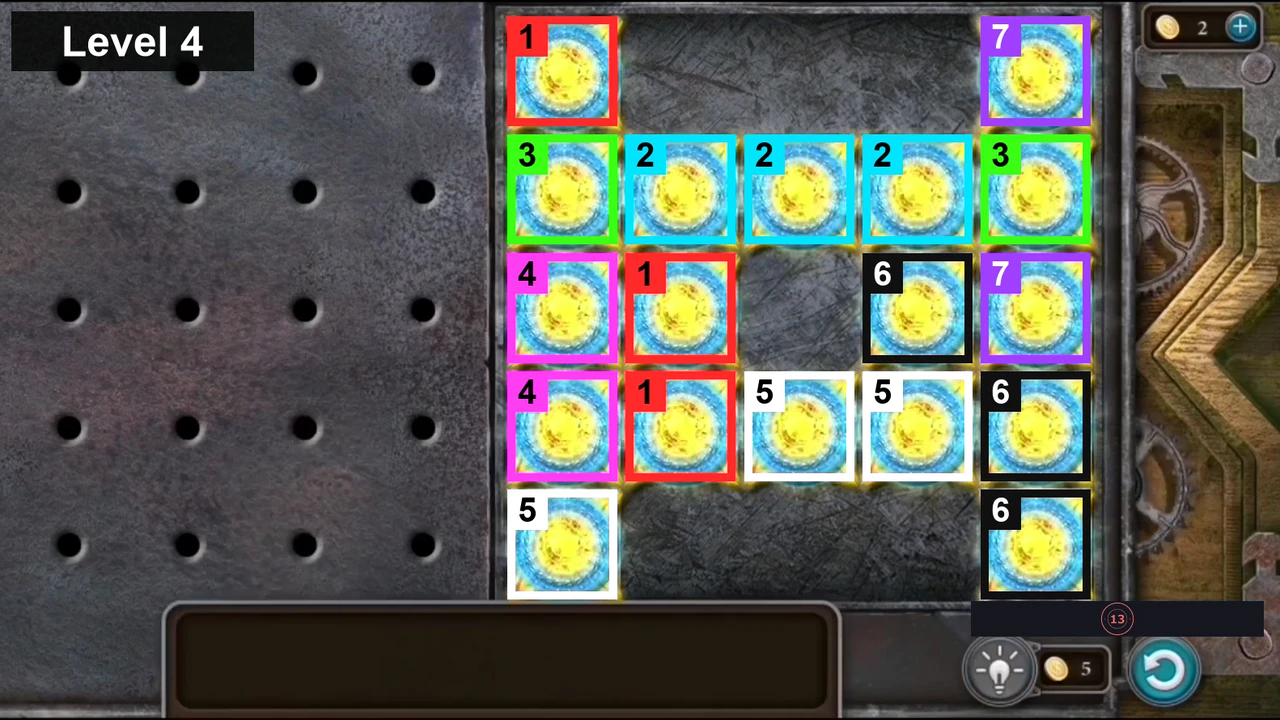
Level 4 solved: tokens with the same colour and number belong to one piece; numbers give one working placement order. - Level 5 (six pieces): move every piece from the peg board into the frame as shown in the picture below.
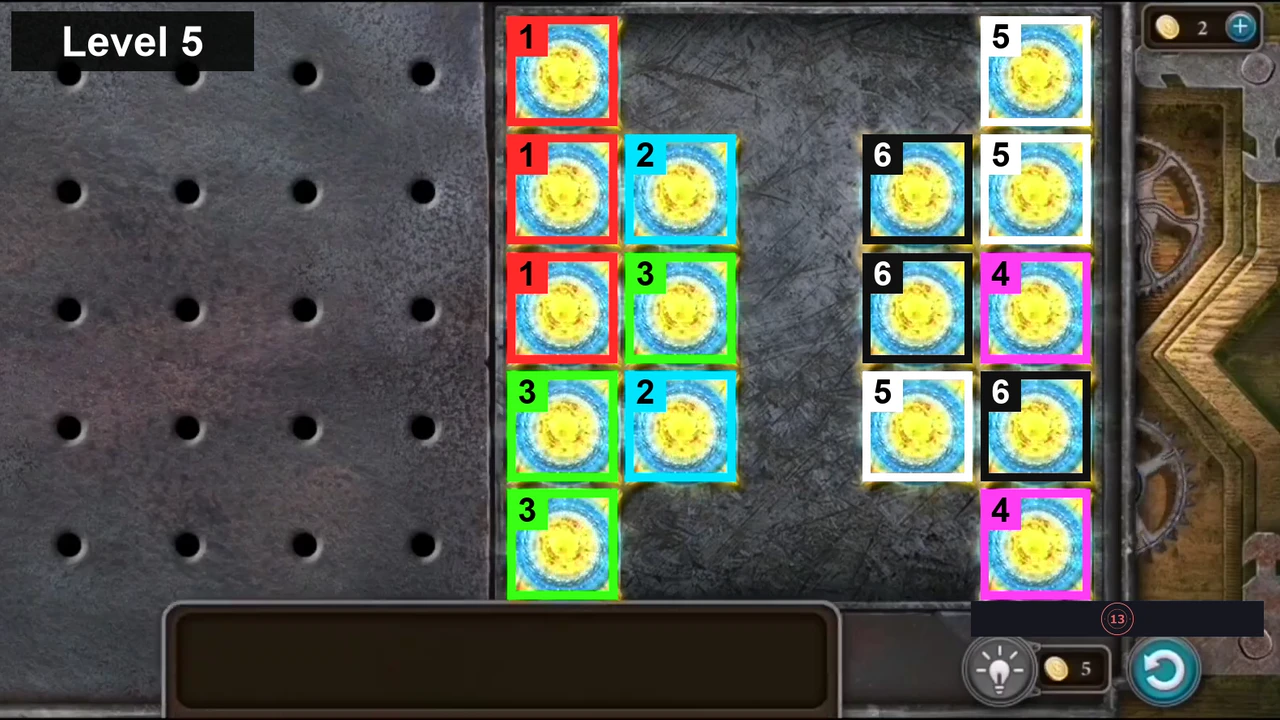
Level 5 solved: tokens with the same colour and number belong to one piece; numbers give one working placement order. - Level 6 (six pieces): move every piece from the peg board into the frame as shown in the picture below.
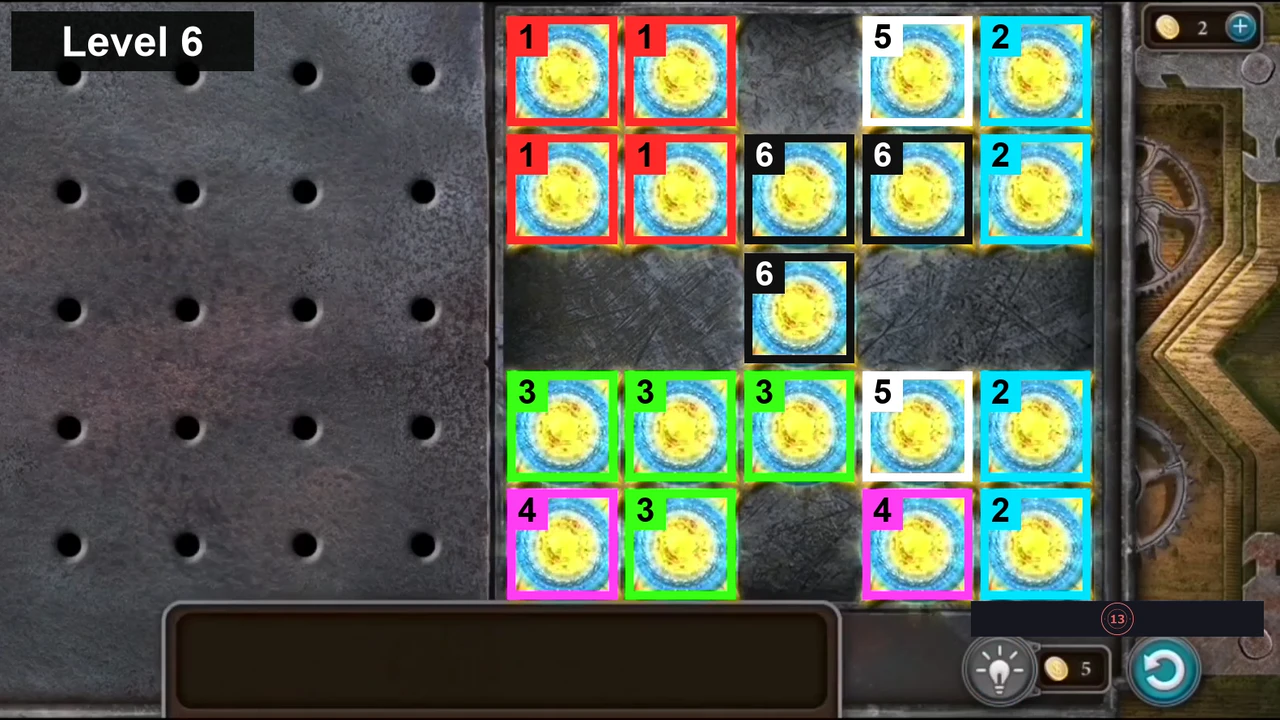
Level 6 solved: tokens with the same colour and number belong to one piece; numbers give one working placement order. - Level 7 (seven pieces): move every piece from the peg board into the frame as shown in the picture below.
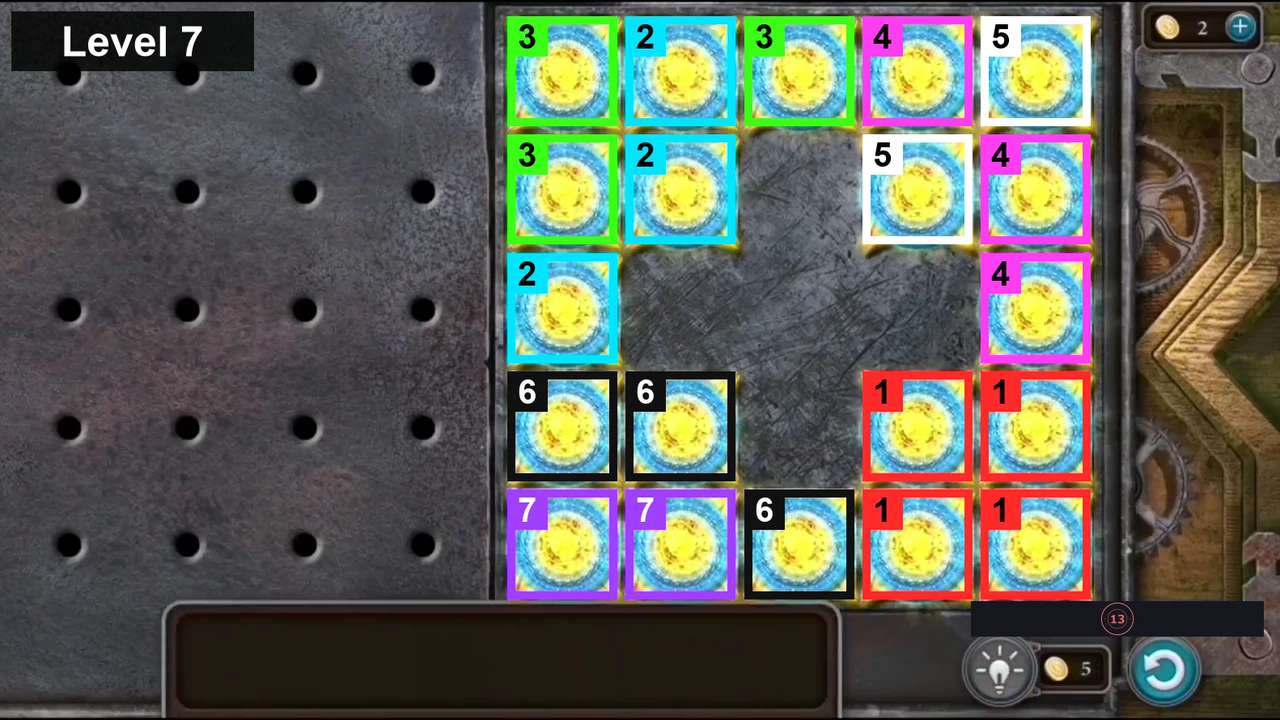
Level 7 solved: tokens with the same colour and number belong to one piece; numbers give one working placement order. - Level 8 (six pieces): move every piece from the peg board into the frame as shown in the picture below.
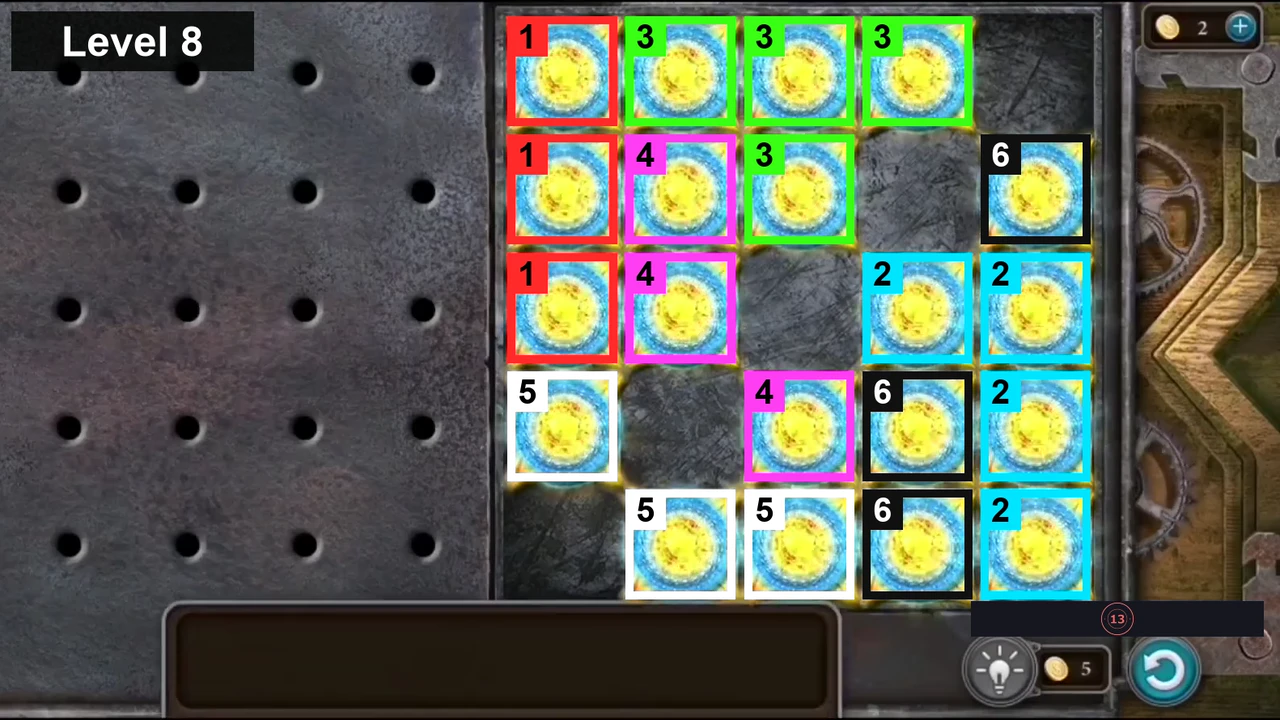
Level 8 solved: tokens with the same colour and number belong to one piece; numbers give one working placement order. - Level 9 (seven pieces): move every piece from the peg board into the frame as shown in the picture below.
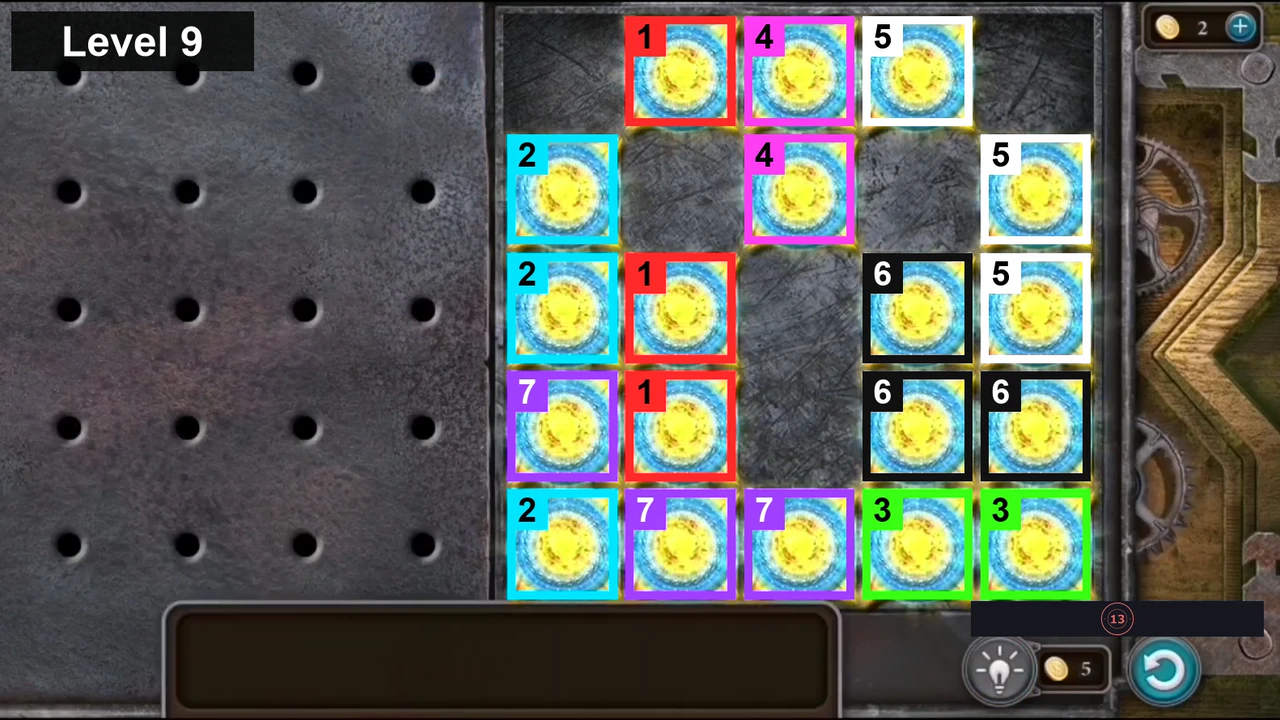
Level 9 solved: tokens with the same colour and number belong to one piece; numbers give one working placement order. - Level 10 (six pieces): move every piece from the peg board into the frame as shown in the picture below.
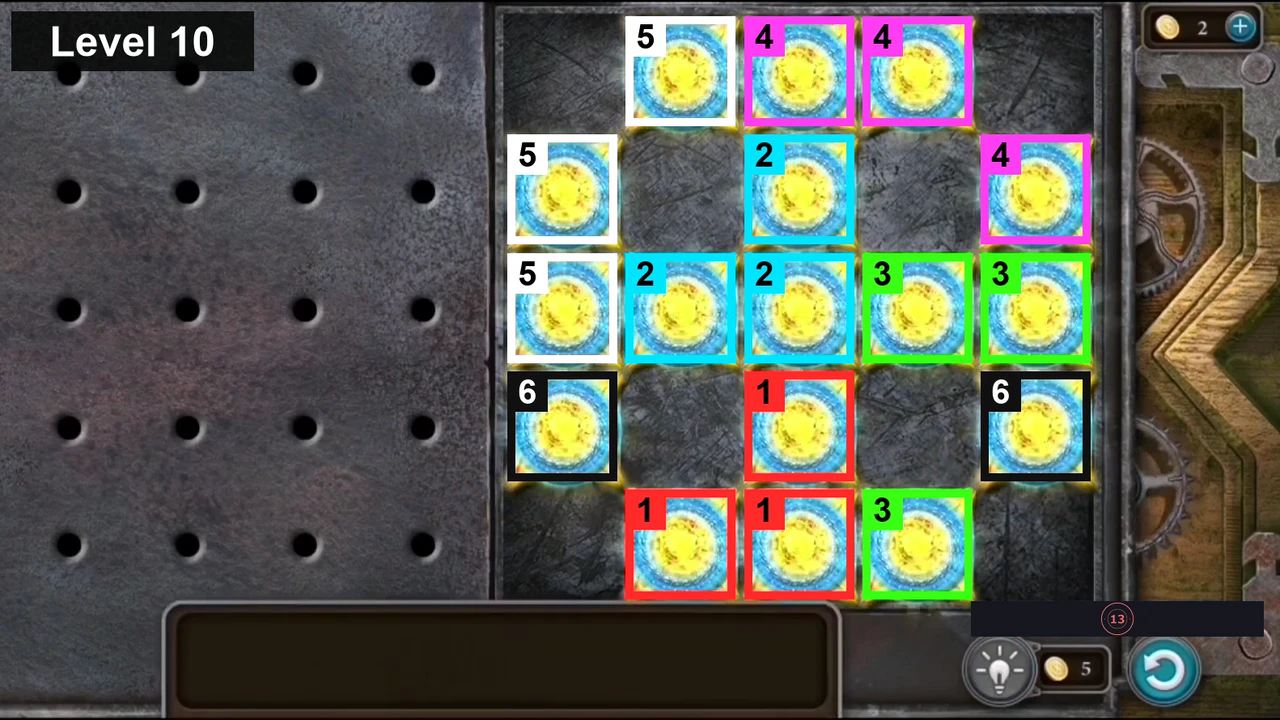
Level 10 solved: tokens with the same colour and number belong to one piece; numbers give one working placement order.
Bonus Mini-Game: levels 11-20
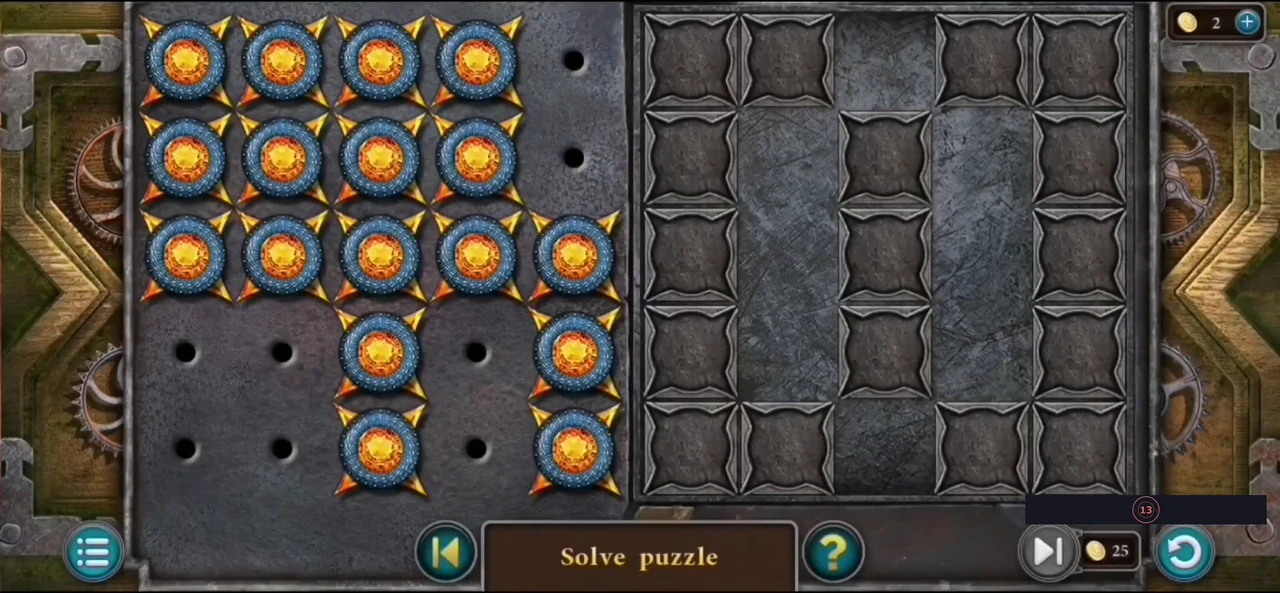
Levels 11-20 of the Bonus Mini-Game. The pictures use the same key as levels 1-10: one colour and number per piece, numbered in one working placement order. Finishing level 20 earns the Unstoppable achievement and the selector shows COMPLETED.
- Level 11 (seven pieces): move every piece from the peg board into the frame as shown in the picture below.
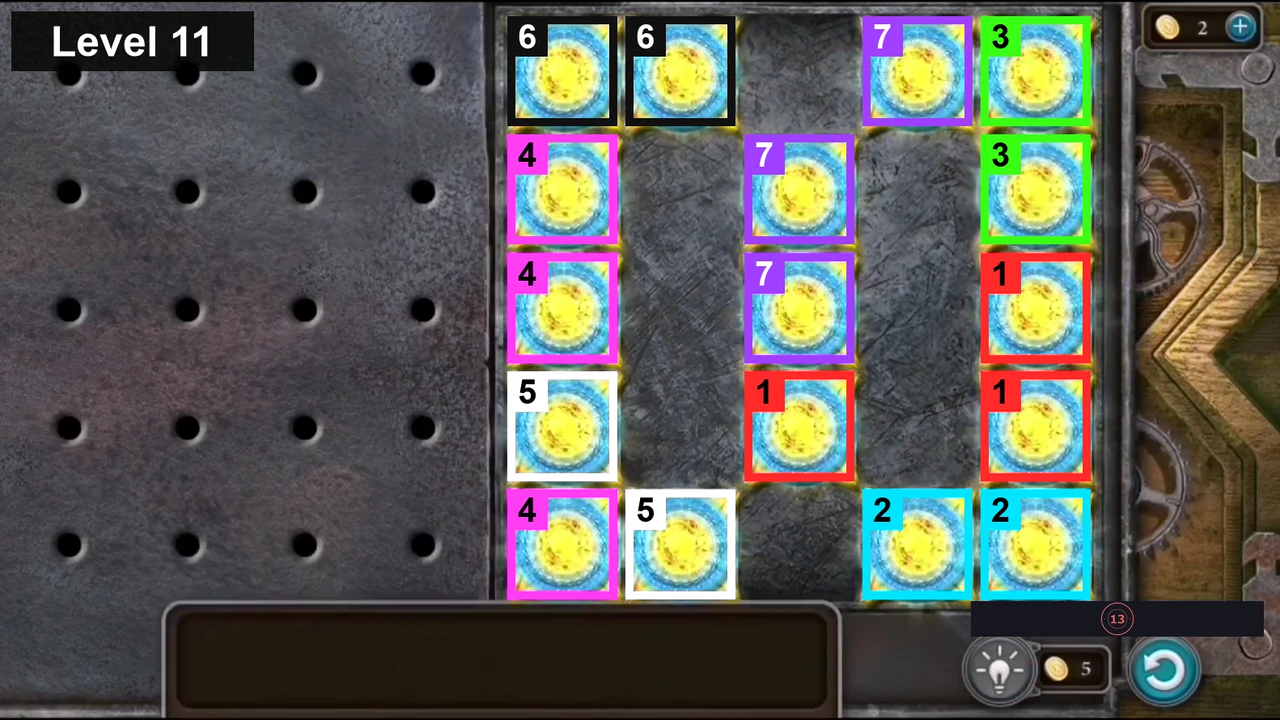
Level 11 solved: tokens with the same colour and number belong to one piece; numbers give one working placement order. - Level 12 (seven pieces): move every piece from the peg board into the frame as shown in the picture below.
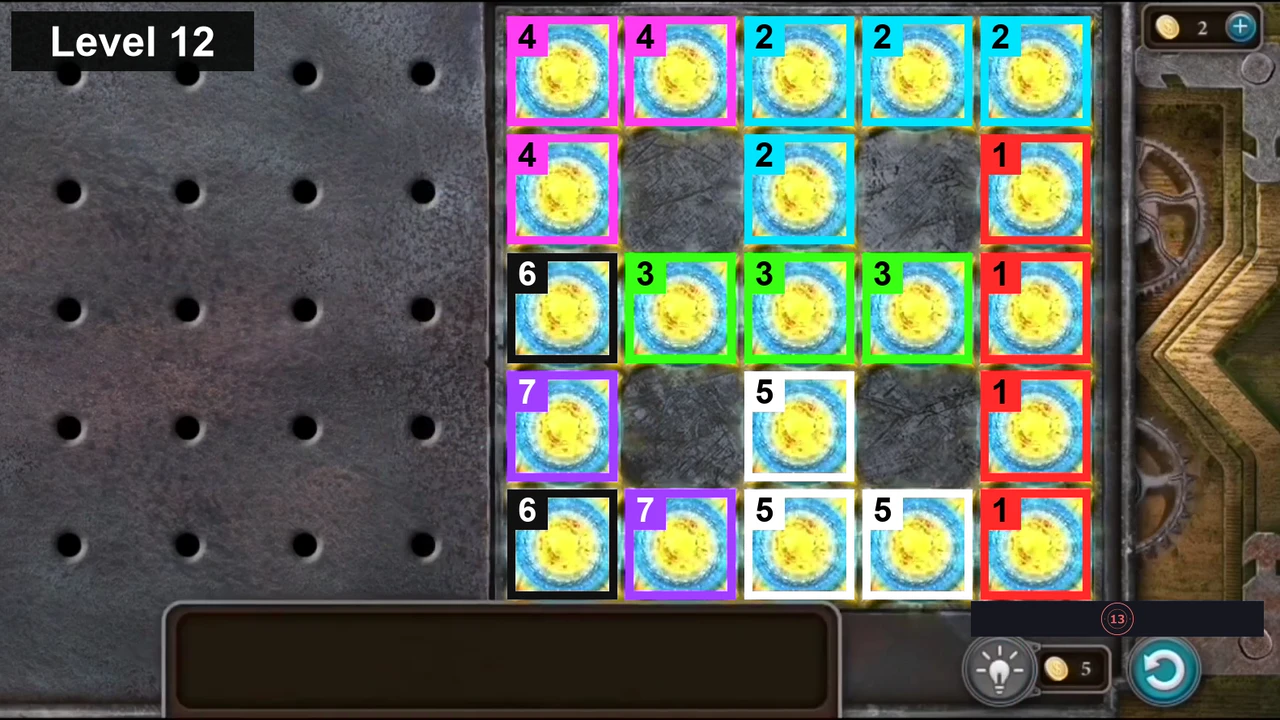
Level 12 solved: tokens with the same colour and number belong to one piece; numbers give one working placement order. - Level 13 (seven pieces): move every piece from the peg board into the frame as shown in the picture below.
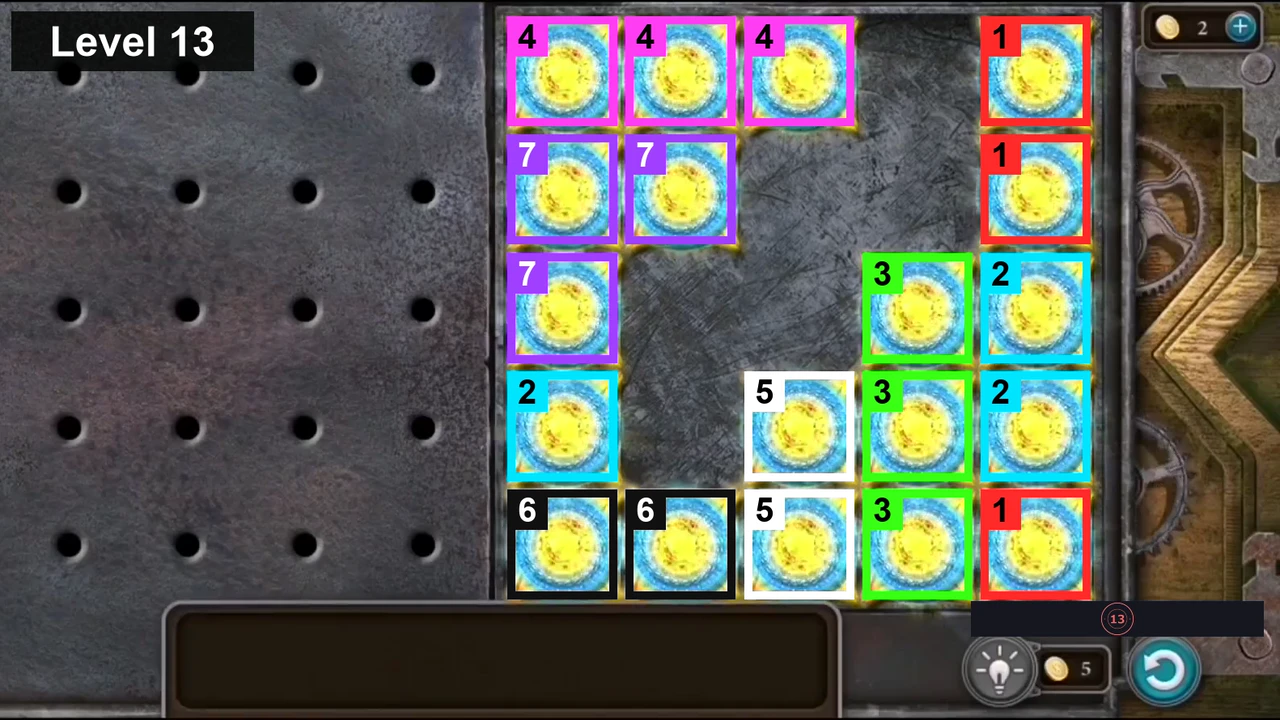
Level 13 solved: tokens with the same colour and number belong to one piece; numbers give one working placement order. - Level 14 (six pieces): move every piece from the peg board into the frame as shown in the picture below.
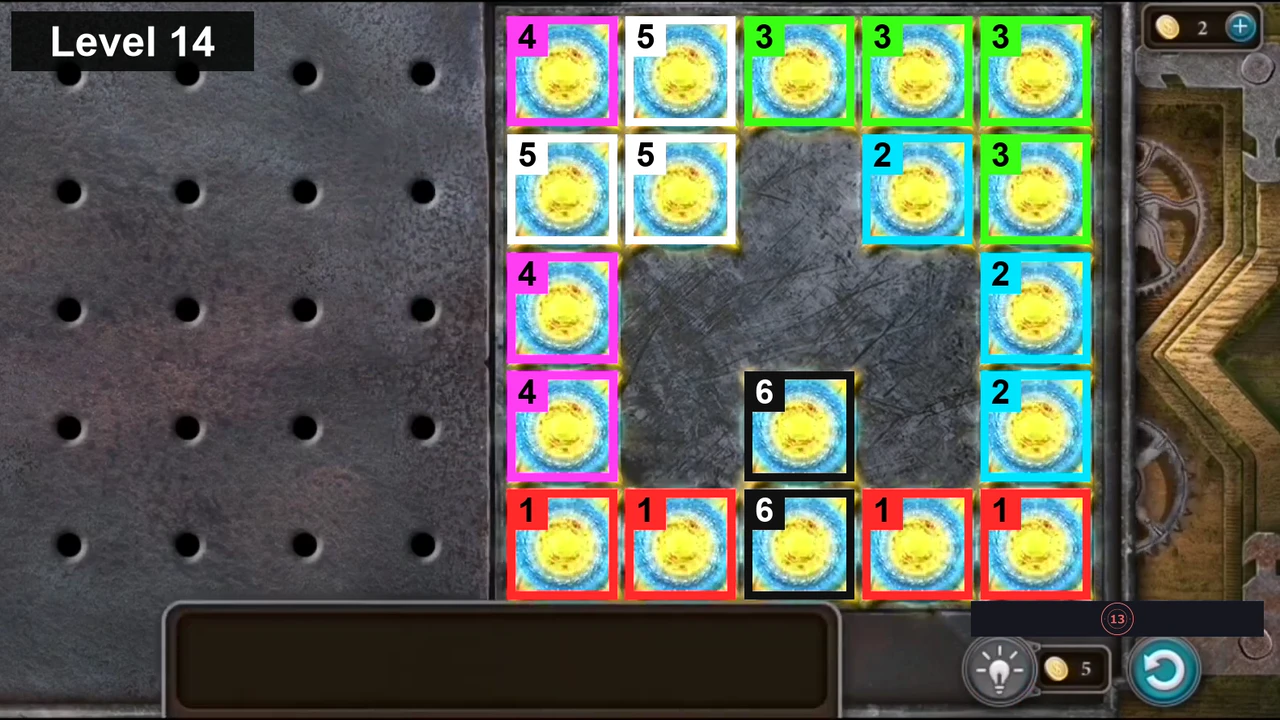
Level 14 solved: tokens with the same colour and number belong to one piece; numbers give one working placement order. - Level 15 (seven pieces): move every piece from the peg board into the frame as shown in the picture below.
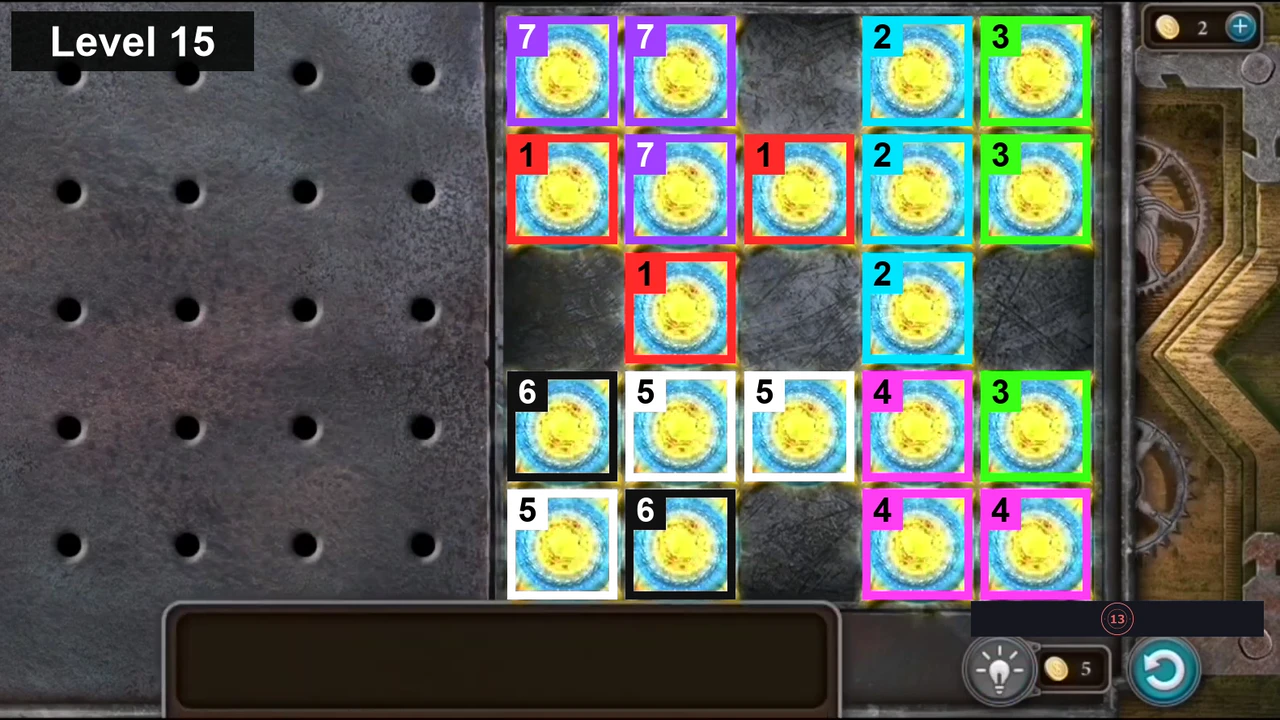
Level 15 solved: tokens with the same colour and number belong to one piece; numbers give one working placement order. - Level 16 (seven pieces): move every piece from the peg board into the frame as shown in the picture below.
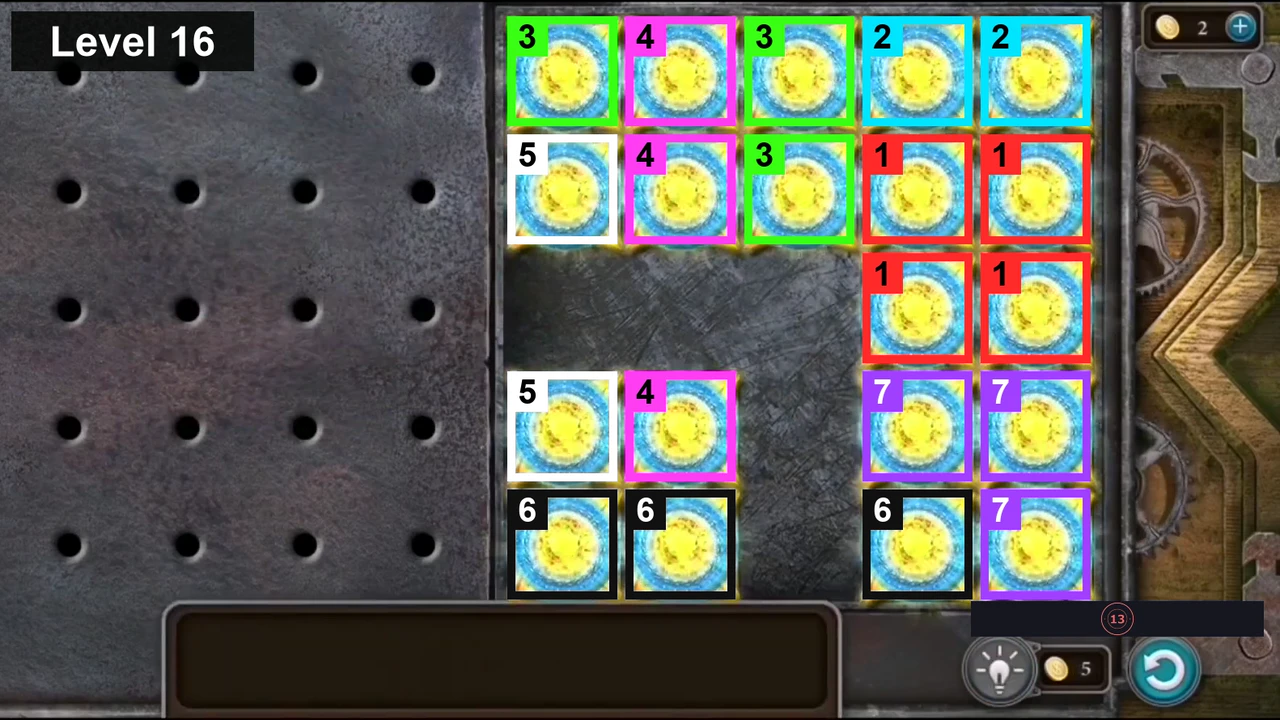
Level 16 solved: tokens with the same colour and number belong to one piece; numbers give one working placement order. - Level 17 (seven pieces): move every piece from the peg board into the frame as shown in the picture below.
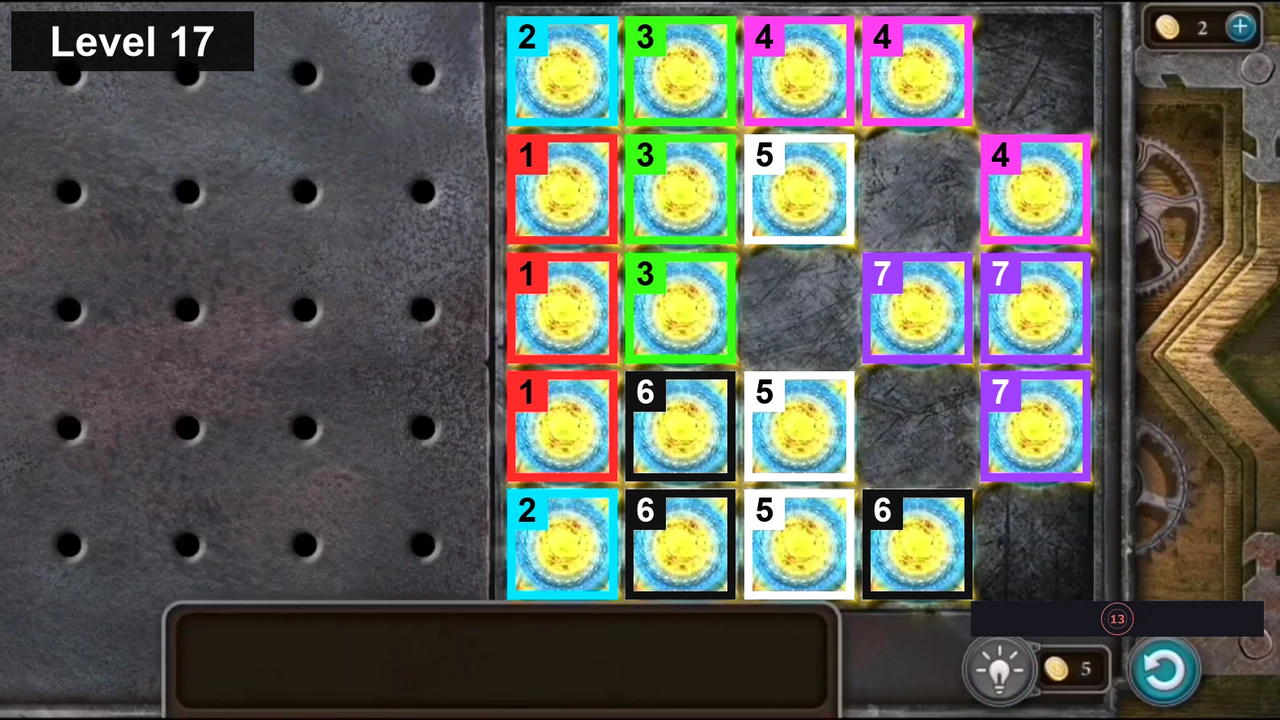
Level 17 solved: tokens with the same colour and number belong to one piece; numbers give one working placement order. - Level 18 (seven pieces): move every piece from the peg board into the frame as shown in the picture below.
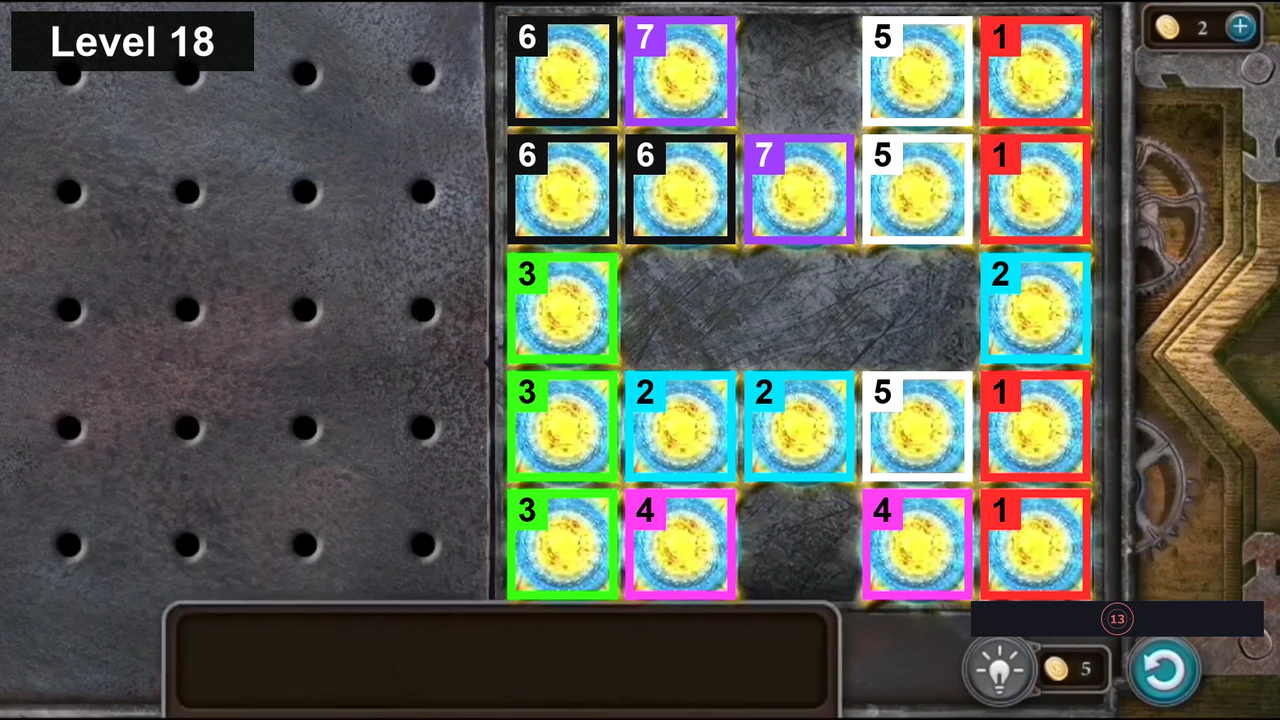
Level 18 solved: tokens with the same colour and number belong to one piece; numbers give one working placement order. - Level 19 (six pieces): move every piece from the peg board into the frame as shown in the picture below.
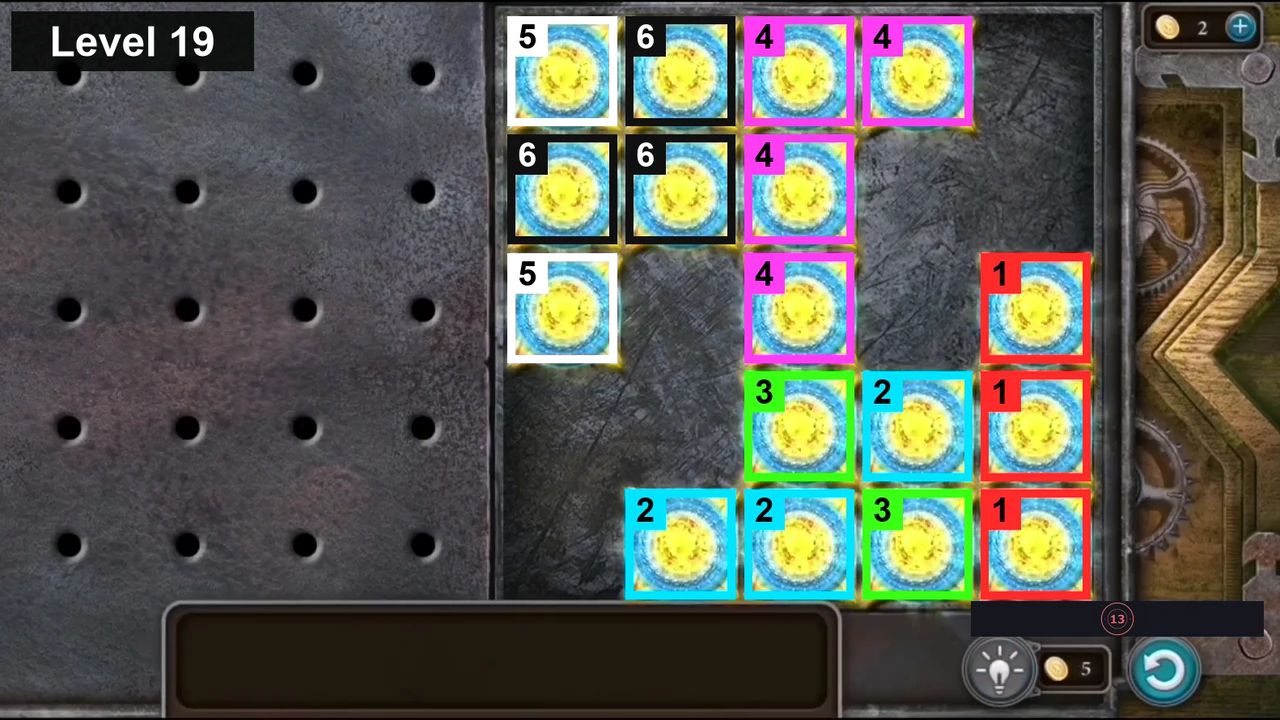
Level 19 solved: tokens with the same colour and number belong to one piece; numbers give one working placement order. - Level 20 (six pieces): place the pieces as shown in the picture below. Completing it earns the achievement Unstoppable and the Bonus mini-game page shows COMPLETED.
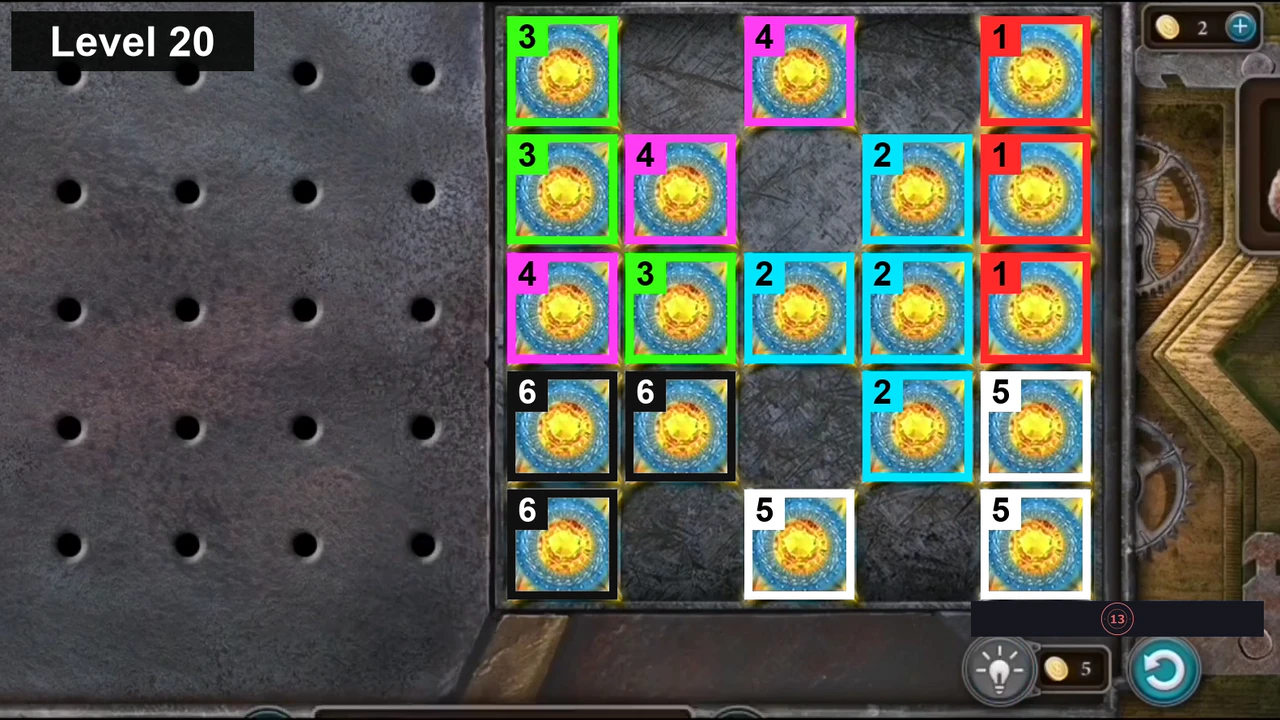
Level 20 solved: tokens with the same colour and number belong to one piece; numbers give one working placement order.