Korko
Up on the dam crest, meet Korko the foreman and look at his table, the blueprint easel and the rope ladder.
- The elevator takes you up to the dam crest. Kiana recognises the foreman: "I can't believe my eyes! Korko!" Korko greets Susan the Warmaiden and old mage Maaron; Kiana asks about a temple in the area. Korko is not a local - they came to fix the dam: "An explosion occurred somewhere at the base of the dam during the last night. It shook the dam quite violently and caused the upper part to collapse." You receive the OLD FLAGS. New task: Dam repair.
- Click the morphing object on the plank walkway just left of the blueprint easel's left leg (Morphing objects 12/42).
- Zoom on the rope ladder at the lower right of the crest: "There is a rope ladder. I just need to remove the blocker from it." (a chained clamp holds it).
- Zoom on Korko's work table (left of the beaverling): a journal page about Korko is added, and you find a manuscript among the scrolls (Manuscripts found 5/9). A small wooden box with a gold-and-pink lid sits on the table.
The box with folding sashes
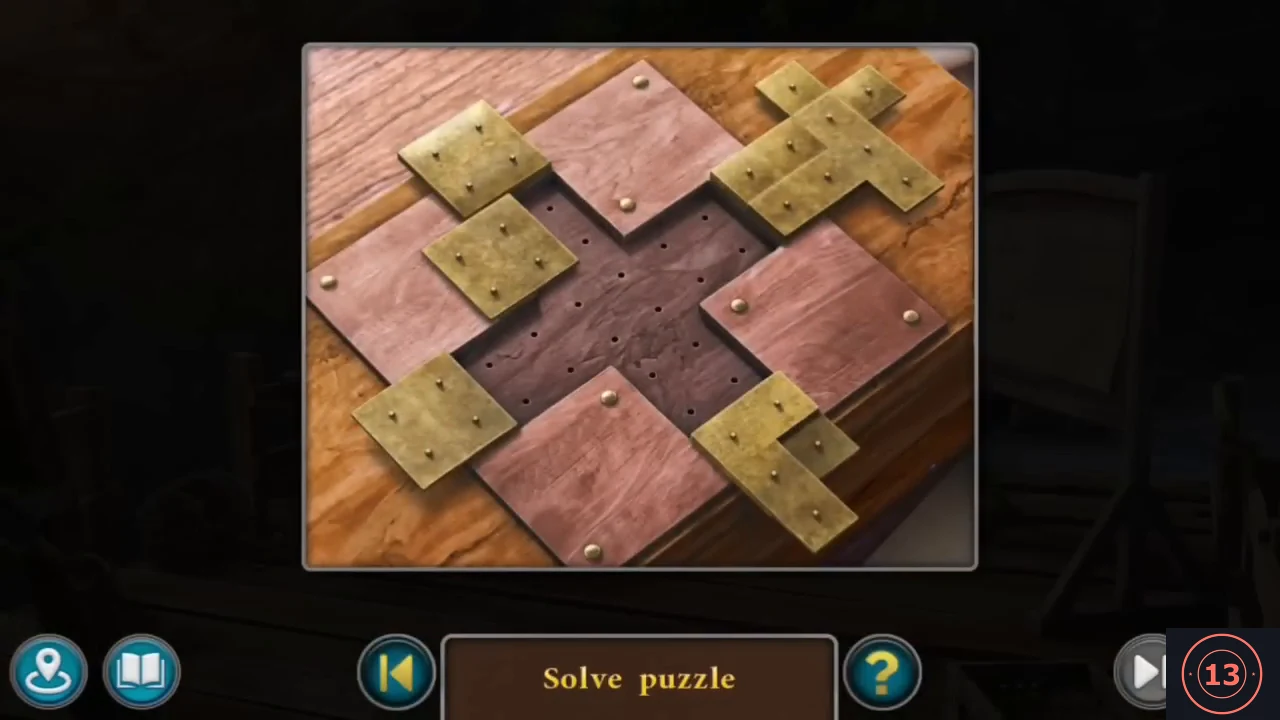
Fold the gold sashes on the box on Korko's table to cover the cross-shaped notch, then use what is inside to get the signal flags. The order of the sashes matters.
- Click the box on Korko's table. Its lid has a cross-shaped dark notch surrounded by five hinged gold sashes on the pink panels: a square sash at the top-left corner, a second square sash just below it beside the notch's left arm, a large zigzag-shaped sash at the top right, a square sash at the bottom left and an L-shaped sash at the bottom right. Click a sash to fold it over the notch; click a folded sash again to unfold it. The sashes overlap when folded, so the order matters: if a sash will not fold, the game says "The notch cannot be closed - part of the other sash is in the way". When that happens, unfold the sashes you folded after the first one and fold them again in a different order - folding the blocked sash first is not what worked. The order that closed the notch in our playthrough: 1) the top-left corner square, 2) the zigzag sash at the top right, 3) the L-shaped sash at the bottom right, 4) the square at the bottom left, 5) the second square on the left (last). The cross glows when it is fully covered and the box opens.
- Inside the box: "A set of syringes. I don't want to know why the beaverling builders need them. But judging by the size, they're more likely for animals." Nothing is taken here yet.
- Zoom on the blueprint easel at the right and take the KEY pinned to the drawing. Note the flag-signal chart on the left of the blueprint: DOWN = red flag pointing down-left with green flag pointing down-right; UP = red flag pointing up-left with green flag pointing up-right; LEFT = red and green flags both pointing left; RIGHT = green and red flags both pointing right.
- Click the glowing ghost spot at the right edge of the blueprint easel, near its upper right corner (Collection Ghosts of the Past 4/8: Mermaid Aquamarine).
- Zoom on the rope ladder at the lower right of the crest and unlock the chained blocker with the KEY: the ladder drops down the dam.
- Look at the OLD FLAGS (at the bottom of the dam): "The old paint is faded and peeling. We need a new paint or something of the same color that would look bright and clear from afar."
- Open the map and travel to Maaron's yard (Halfling's Valley). Zoom on the round stone window with the broken lattice frame right of the red door and take the box of COLORED GLASS.
- Open the OLD FLAGS and put the COLORED GLASS on them: the case of stained glass opens and a red and a green glass sheet lie beside the two flags. "I need to get pieces of a suitable shape for flags from these stained glass pieces." (The pickaxe does not work: "No, this item can't be used here...")
- Optional look around (no item needed): Maaron's house interior - "This is where Maaron makes all sorts of potions. Maybe dinners too." and "Looks like a potion recipe book. I don't see any use for it right now."
- In Maaron's yard zoom on the pond: "It looks like there are deposits of diamond crystals there. They are so strong and sharp that you can cut glass with them." Use the PICKAXE on the crystal deposit on the rocks at the upper right of the pond and take the DIAMOND CRYSTAL.
- Open the flags again and use the DIAMOND CRYSTAL on the glass sheets: it cuts a green and a red triangle. They are fitted onto the two flags, giving the SIGNAL FLAGS.
Signal the crane: fill the dam breach
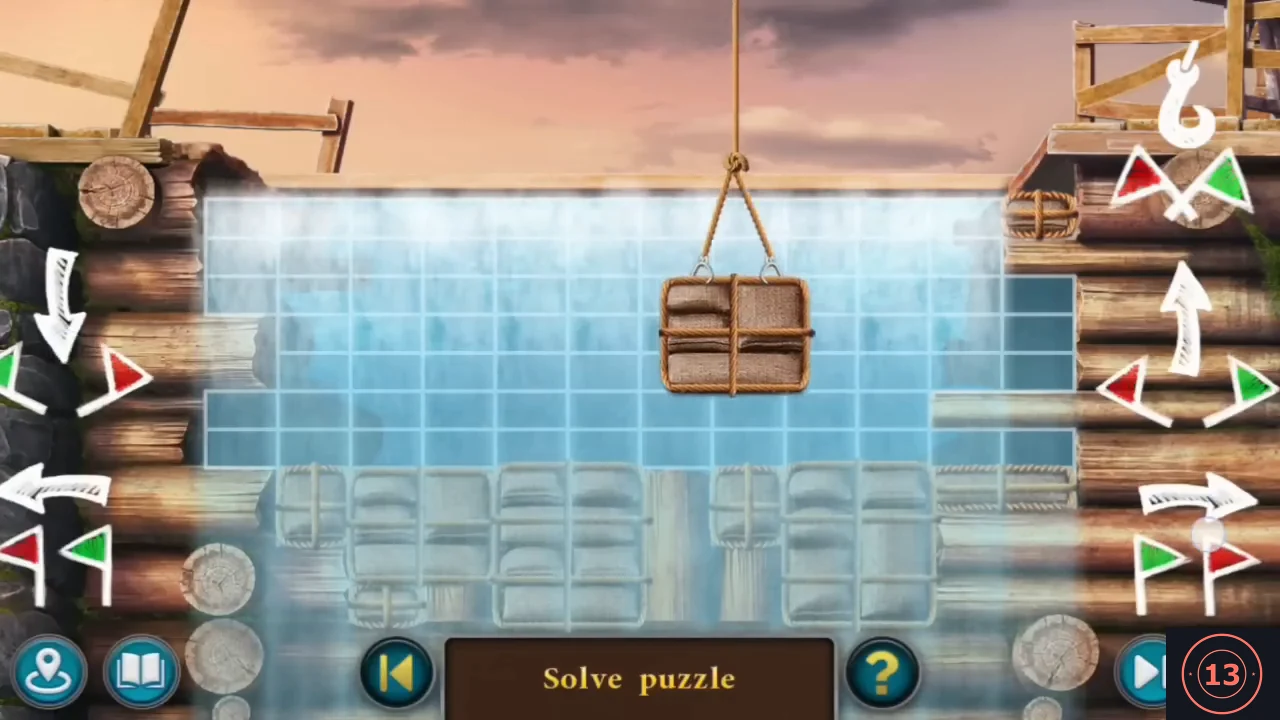
Signal the crane to lower the sandbag bundles into the breach in the dam wall. The Extras replay of this puzzle has several versions, so your board may start differently; the method below works for every version.
- Travel back to the dam and use the SIGNAL FLAGS at the bottom of the dam ("Give me the bags!!!"). The broken dam wall is a grid with a gap of blue (water) cells. Bundles of sandbags of different shapes - small single blocks, tall blocks and wide blocks - hang from the crane at the top, one bundle at a time. Each bundle keeps its shape: there is no rotate control, so a tall bundle and a wide bundle are two different bundles, not one bundle turned. The flag buttons work like this: the down arrow at the upper left lowers the hanging bundle until it is just above whatever is already below it; the left arrow at the lower left and the right arrow at the lower right slide it sideways; the HOOK at the upper right releases the bundle, which drops straight down and settles in the wall. A new bundle then appears at the top. The up arrow at the upper right is the remaining control (it was not needed in our playthrough). Before you click the hook, slide each bundle over the part of the gap it fits exactly. Continue until no blue cells remain; the wall turns solid and the puzzle ends.
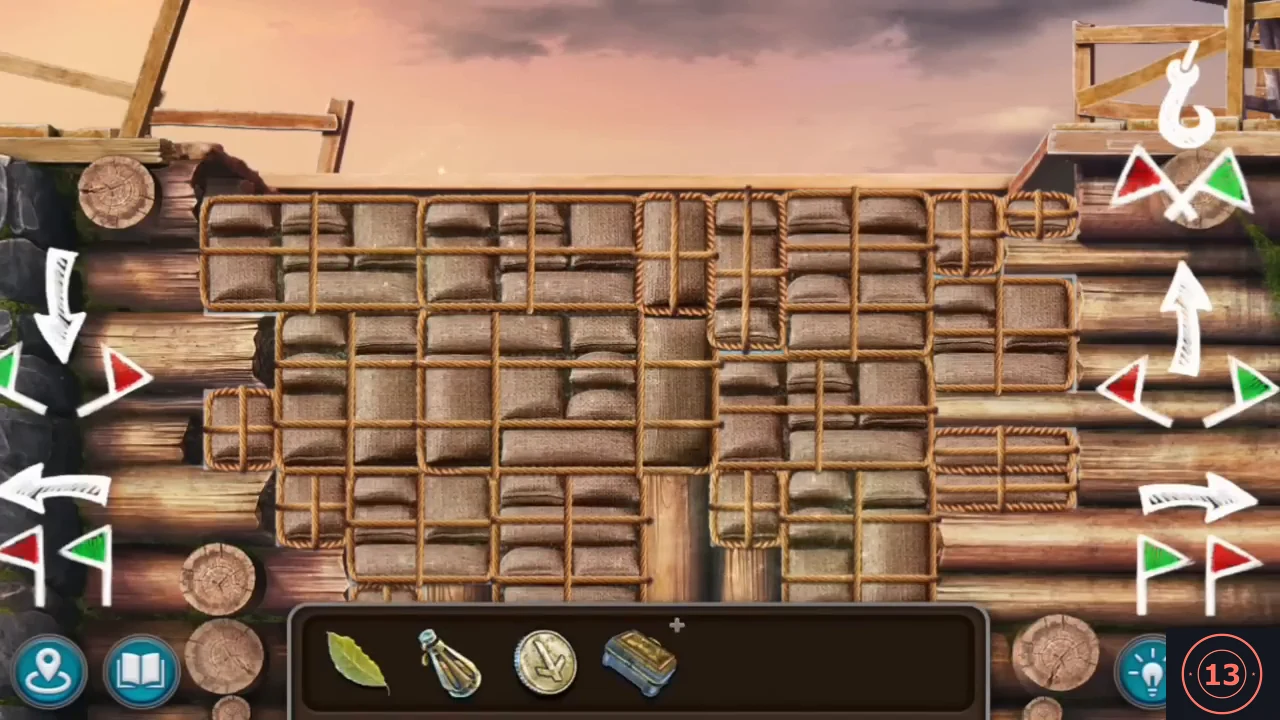
Breach filled in our playthrough: the sandbag bundles interlock with no blue water cells left. - Korko: "Excellent! We managed to stop the water flow, more or less. Thanks, friends! When the rest of the Beaverlings crew arrive, we will completely restore the dam." Susan: "We can now examine the base of the dam where the explosion occurred." Zoom on the rubble at the base of the dam on the right: a door with a blue gem is revealed. Task complete: Dam repair.
The secret rune door
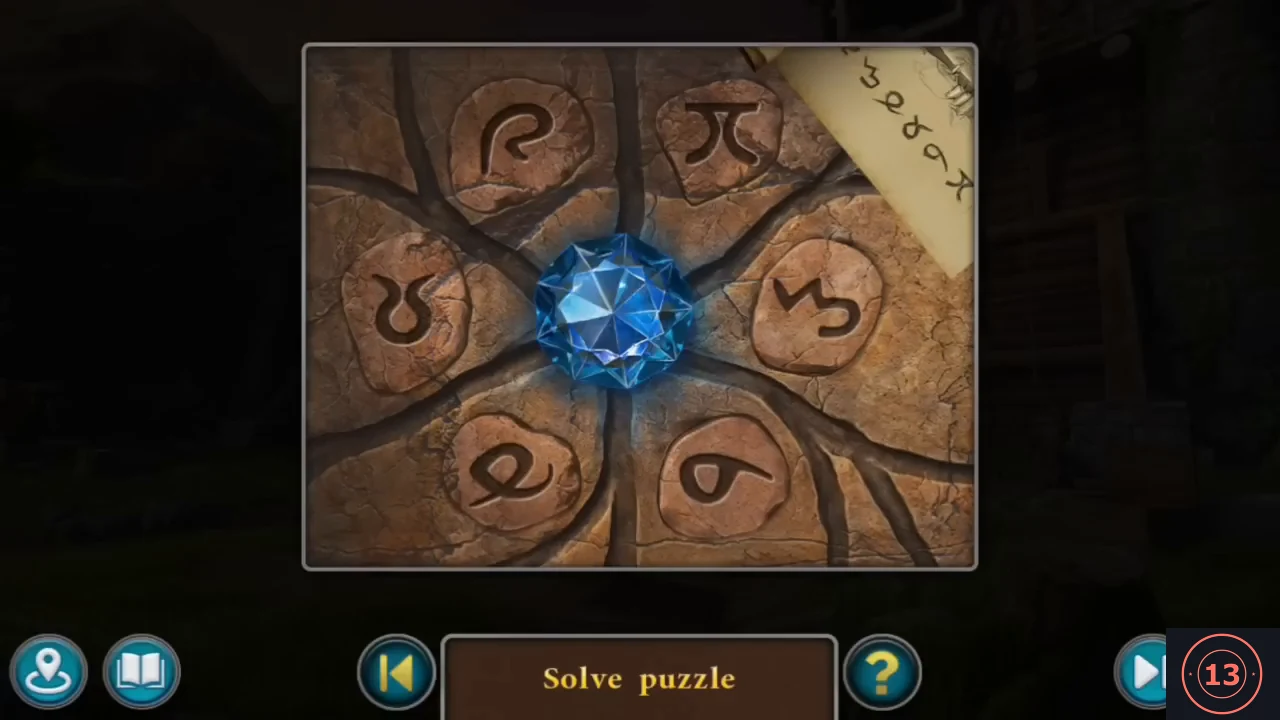
The explosion uncovered a secret door with six rune stones. A scroll gives the order to press them in.
- "It looks like some kind of secret door." "I think they needed the explosion to get to the door." "And most likely, Folnur was the bomber." The door shows six rune stones around a blue gem, and a scroll in the corner shows the order: hook-R, 3/m-shape, looped e, horned circle, curled sigma, pi. Click them in that order: top-left (R) - right (3/m) - bottom-left (looped e) - left (horned circle) - bottom-right (sigma) - top-right (pi).
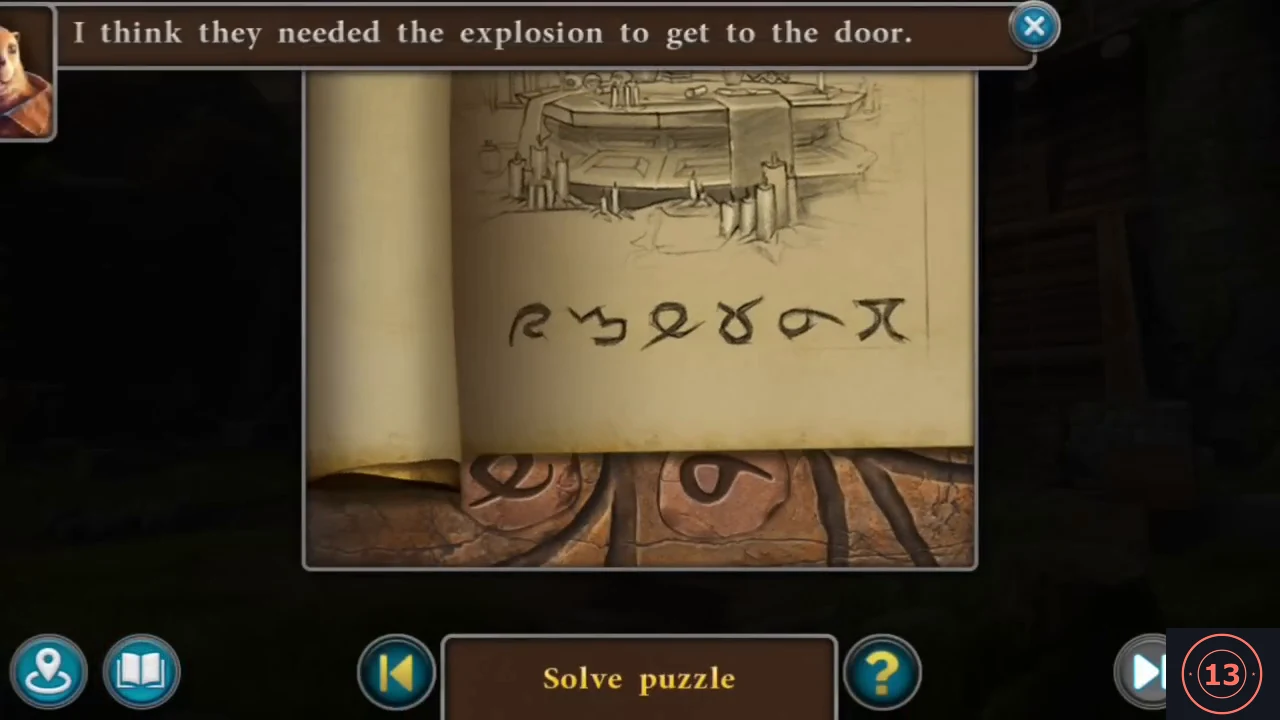
Clue: the scroll lists the six runes in the order to click them on the door, read left to right. - Behind the door is a flooded tunnel ("The tunnel is flooded. What should we do?"). Korko swims in to find out how long the tunnel is: "There is a long and deep corridor. It is all flooded with water, you can't just swim through. However, there is some kind of temple room at the end of the corridor and it is not flooded." Maaron: "We'll need a potion of underwater breathing. I happen to have a recipe for this potion at home." New task: Potion of underwater breathing.
Potion of underwater breathing: ingredients
Collect the ingredients for the potion of underwater breathing at Maaron's house, the hut, the yard, the dam and the dam crest.
- Open the map and travel to Maaron's house. Zoom on the potion table under the round window: take the RECIPE book and the EMPTY BOTTLE. Recipe "Potion of underwater breathing": 1. Water - 1 bottle; 2. Toad algae - 1 stem, 5 lengths; 3. Bay leaf - 1 pc; 4. Firebugs - 5 pcs; 5. Juniper root - 3 weights; 6. Juniper branch - 1 pc; 7. Juniper leaves - 2 weights; 8. Juniper berries - 4 pcs. IMPORTANT: 1. Take the water for the potion from the reservoir where you will dive later. 2. Mix the final potion with the core of a juniper branch, then pour it into a bottle and strain the solution. 3. Place a magic sign on the bottle with the potion. "I need to collect all the necessary ingredients to prepare a potion."
- Travel to Maaron's hut (stone wall with arched door) and zoom on the tree stump with the firebug nest: take the FIREBUGS.
- In Maaron's yard zoom on the pond and take the TOAD ALGAE.
- Travel to the dam (map), zoom on the open door to the flooded tunnel at the base of the dam and fill the EMPTY BOTTLE: CAVE WATER (the recipe wants water from the reservoir you will dive in).
- Go up to the dam crest and zoom on the juniper growing out of the rock at the upper left: "I can't break it... Would be good to have the right tool for this." Take the SAW-CLEAVER at the crest (the popup appears over Korko's table area).
- Zoom on the juniper again and use the SAW-CLEAVER on it: take the JUNIPER BRANCH and the JUNIPER ROOT (the saw-cleaver stays in inventory).
- Open the RECIPE from the inventory and drop the ingredients onto its pages: firebugs, toad algae, cave water, juniper root, juniper branch and the BAY LEAF (the leaf icon carried since the fair). Each one is ticked on the list. After the branch and the bay leaf all eight lines (including juniper leaves and berries) are ticked and the recipe closes into a POTION KIT.
Brewing the potion of underwater breathing
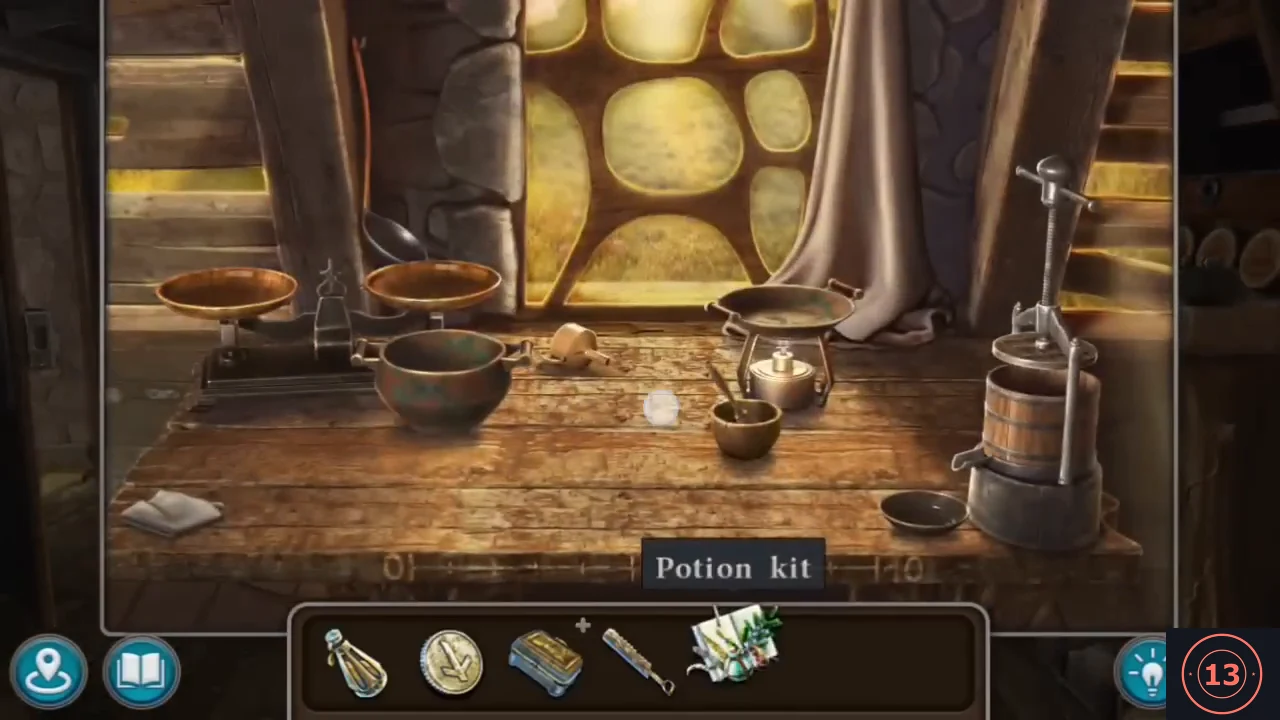
Brew the potion of underwater breathing at Maaron's potion table by following the recipe in order.
- Travel to Maaron's house (Two houses on the map) and zoom on the potion table under the round window. Put the POTION KIT on it: the ingredients are laid out next to a scale with weights, a pot, a press, a burner with a pan, a mortar, a cloth strainer, a scoop and a ruler.
- Follow the recipe; wrong actions give "I need to follow the recipe." About the four JUNIPER BERRIES (line 8 of the recipe): they lie as a small blue heap on the table just right of the juniper branch, and the recipe diagram draws an arrow from the berries straight down into the pot (not into the press). In our playthrough the berry heap was never touched - it is still on the table when the potion is finished - and the game accepted every step without it. If your game refuses a step with "I need to follow the recipe", the berries are the one listed ingredient we did not use. Observed order: (1) pour the cave water from the bottle into the pot; (2) put two weights on the right pan of the scale, put juniper leaves from the branch on the left pan, then drop the weighed leaves into the press bowl ("The components for juicing should be placed into the press bowl."); (3) use the SAW-CLEAVER on the toad algae lying along the ruler to cut the required length ("I need something to cut the required length.") and put it into the press; (4) cut the juniper root into pieces with the saw-cleaver; (5) set the cup and the cloth strainer on the empty bottle; (6) turn the press handle and pour the green juice into the pot; (7) put the bay leaf in the pan on the burner, light the burner, add the firebugs, roast them, tip the pan into the mortar, grind with the pestle and pour the powder into the pot; (8) put three weights on the right pan and juniper-root pieces on the left until the scale balances ("I need to put the required weight on the scales to achieve balance."), then tip the root into the pot; (9) set the pot on the burner and stir with the core of the juniper branch until the potion turns bright green; (10) take the scoop ("It's easier to pour with a scoop.") and pour the potion through the strainer into the bottle; (11) draw the magic sign on the bottle by tracing the faint lines between the glowing points in one stroke. Our playthrough draws: right - upper right - centre - lower left - left - upper left - centre - lower right - bottom, then the vertical line through the centre to the top. You receive the POTION OF UNDERWATER BREATHING.