The fireball and Folnur's fortress
Disguised as Folnur, follow the fireball to the abandoned fortress and find Maaron and Kiana in the dungeon.
- Susan drinks the potion and looks like Folnur ("I need a mirror urgently!"); look in the open cabinet mirror ("I can't believe my eyes. This is the very Folnur I..."). A fireball bursts out of the fireplace ("A-a-a! What is this?" / "What was this? Where did it fly?"): new task Fireball.
- Follow the fireball through the locations it flies to: Maaron's yard, the beaverling dam ("The Beaverlings have restored the dam!"), the sunken temple, the foot of the Sacred Mountain and through the blue portal to the mine, past the slime pit and down into a dungeon ("What is this place? It looks like a dungeon.").
- In the dungeon, click the Drak Ul figurine high on the stone wall right of the barred door at the top of the stairs, near the top edge of the screen (Collection Drak Ul figurine 5/7). Then click the morphing object on top of the tall iron coffin at the right edge (Morphing objects 14/42).
- Zoom on the cell: Maaron and Kiana are inside ("We need to open the cage."). The real Folnur, in the next cell, talks to Susan ("Who are you? Are you me from the future?" / "Okay, Susan! Buldan is not here now, you can move freely... get my weapon and you can free everyone and think of a further plan."): new task Preparation. Folnur also hands you the KEY TO THE CAGE. Zoom on Maaron and Kiana's cell again and use the KEY TO THE CAGE on the padlock on the right of the cell door: the door swings open. Inside the open cell: "We are all tied hand and foot. We need to cut it with..." / "The bonds on their hands and feet are tied very tightly." The hanging cage "hangs on an S-shaped hook."
- Climb the stairs to the fortress courtyard. Zoom on the big gate on the left: "Behind the gates are the remains of the old siege that Joko spoke of. There are many arrows there. We may need them against Buldan. We should raise these gates somehow." Take the long wooden pole leaning against it ("A long wooden pole that resembles a lever."): WINCH LEVER 1/3. Zoom on the wooden winch post in the middle: "This winch does not have all the levers in place."
- Zoom on the round table with party leftovers on the right ("What kind of party did Folnur have here?") and take the round metal lock piece (a ring with a cross-shaped centre) from the front edge of the table. Zoom on the arched wooden door on the right and fit the piece into its lock.
Fortress door: three-wheel lock
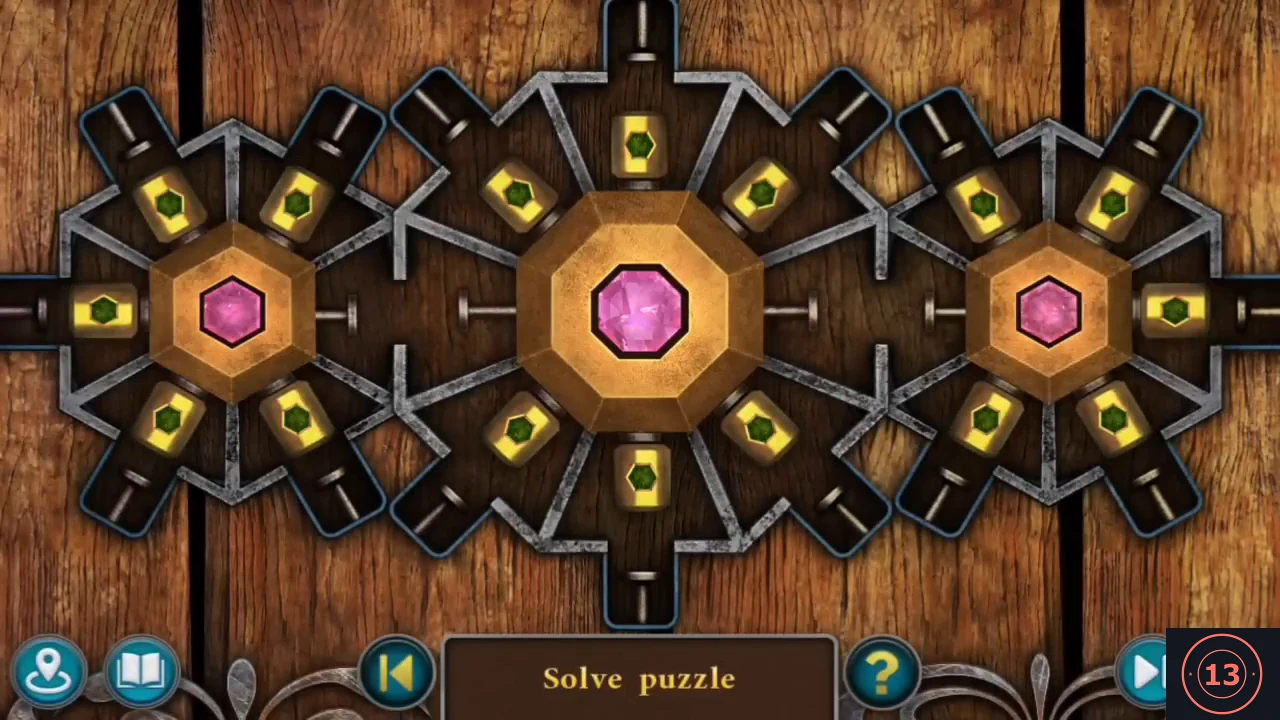
Click the yellow pins of the fortress door lock until every spoke arm holds a pin at its outer end; each click also turns a wheel. Then gather the winch levers. Achievement Erudite: open this fortress door in less than 2 minutes. Study the solved picture and the click sequence in the step before you start. Our playthrough did not earn it: no banner appeared when the door opened.
- Lock with three wheels: two side wheels with hexagonal hubs and a larger centre wheel with an octagonal hub, each with a pink gem. Every yellow pin starts on a hub, at the inner end of a spoke. The goal is a pin at the outer end of every spoke arm: 5 on each side wheel and 6 on the centre wheel, i.e. every arm except the horizontal channels that join the wheels, as in the solved picture. You never turn a hub directly; you only click pins. A pin on a hub slides out to the end of its arm if that end is empty. A pin at the end of an arm slides back onto the hub if that hub position is free. A hub pin that faces a channel (right side of the left wheel, left or right side of the centre wheel, left side of the right wheel) slides across into the facing position on the neighbouring hub if that position is free. After every move, the wheel the pin came from turns one step clockwise (a sixth of a turn for a side wheel, an eighth for the centre), carrying the pins still on its hub to new spokes; pins at arm ends stay where they are. Method: before each click, check where the remaining hub pins will land after the turn. When no hub pin points at an empty arm, pull a pin back in from an arm or send one across a channel to turn that wheel one more step; sending a pin across and straight back turns both wheels one step each. Verified sequence of 28 clicks, from the Extras replay of this lock, which starts from the same layout as the story lock. Each direction is where the pin is at the moment you click it. (1-4) Right wheel: push out the upper-left, right, lower-left and upper-right pins. (5-6) Centre wheel: push out the upper-right pin, then the top pin. (7-10) Send the centre wheel's right-hand pin across to the right wheel, click the same pin to bring it back, then send it across and back once more. (11) Right wheel: push out the lower-right pin; the right wheel is complete. (12-13) Centre: push out the upper-left pin, then the lower-right pin. (14-17) Left wheel: push out the upper-right, upper-left, left and lower-right pins. (18-19) Send the left wheel's right-hand pin across to the centre and click it again to bring it back. (20) Centre: push out the bottom pin. (21-22) Send the left wheel's right-hand pin across and back again. (23) Centre: push out the lower-left pin; the centre wheel is complete. (24-25) Left wheel: pull the pin at the end of the left arm back in, then the pin at the end of the upper-right arm. (26-28) Push out the upper-right, left and lower-left pins. The three pink gems light up and the door opens into the forge. Our story playthrough used a longer route under the same rules.
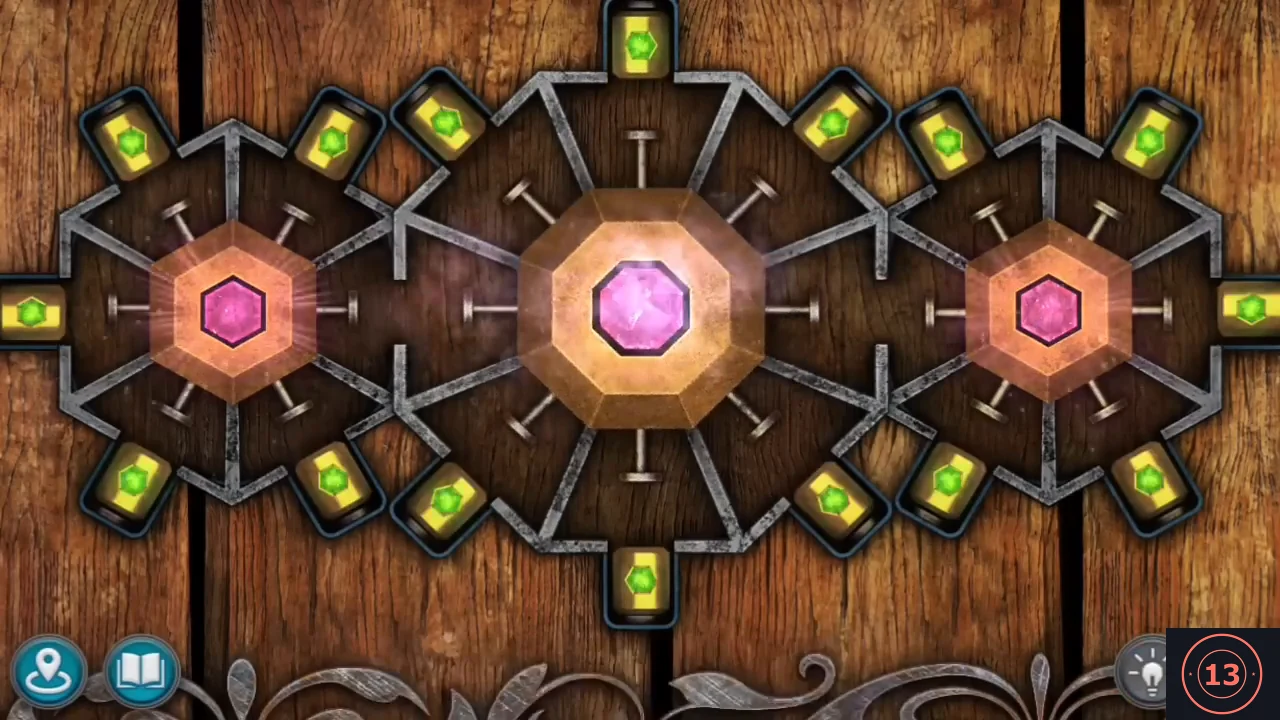
Solved: every yellow pin rests at the outer end of a spoke and the three pink gems light up. - In the forge ("This looks like a very high-tech forge. I recognize Folnur's style."), click the little tower model on the top beam above the drop hammer, near the top centre of the screen (Collection Academy tower 8/8; achievement Architect).
- The grindstone at the left: "Stone sharpening wheel sharpens metal well." Zoom on the furnace and take the BLANK FOR A SWORD BLADE from the coals. Take the long pole leaning on the drop-hammer frame: WINCH LEVER 2/3. Put the blank on the grindstone and crank it: SHARPENED SWORD BLADE. (The locked box on the bench and the drop-hammer are only described for now.)
- Back in the dungeon, zoom on the hanging cage and take WINCH LEVER 3/3 from it. Zoom on the cell and cut Maaron's and Kiana's bonds with the SHARPENED SWORD BLADE ("Thank you, Susan!").
- In the courtyard zoom on the winch post and insert the three WINCH LEVERS. Turn it together with Folnur ("Come on, Folnur, let's do it together!" / "How hard it is..."); the gate rises and the round tower is reached.
- Inside the round tower ("Wow! It's big... Look, you can climb to the very top."), click the ghost glint floating in the light beam in the middle of the room (Collection Ghosts of the Past: Resistancer Mira 8/8; achievement Mystic). Then click the morphing object at the right side of the room, mid-height (Morphing objects 15/42).
- Zoom on the chains hanging to the floor: "One of the chains has come loose. How can I hook it?" Zoom on the wheel by the wall and turn it (Kiana: "Well, are they rising?" - "No. But a shaft on a chain is spinning near the gate..."). Go back to the dungeon, zoom on the hanging cage and take the S-HOOK; use it on the loose chain in the tower so both chains hang from the floor rings. "We could try to climb to the second floor using these chains, but they are so spiked..."
- In the forge zoom on the drop-hammer bench ("Construction staples are used to fasten wooden beams together during construction.") and take the BUCKET OF STAPLES. Use it on the chains in the tower: the staples become rungs and form a ladder.
- Climb the ladder to the upper floor. Zoom on the stairs at the back and pick up the scroll: Collection Manuscripts 9/9 "Dugar-Bor Fortress" (achievement Historian; "CONGRATULATIONS! You have collected all historical manuscripts. Go to the EXTRAS menu to find a new puzzle!"). In the zoom on the floor plate under the stairs ("This appears to be where the chandelier attaches to the ceiling.") take the CUBE WITH NUMBERS. The hatch beside it: "The hatch cover is locked with a key."
Dungeon crate: the cube with numbers
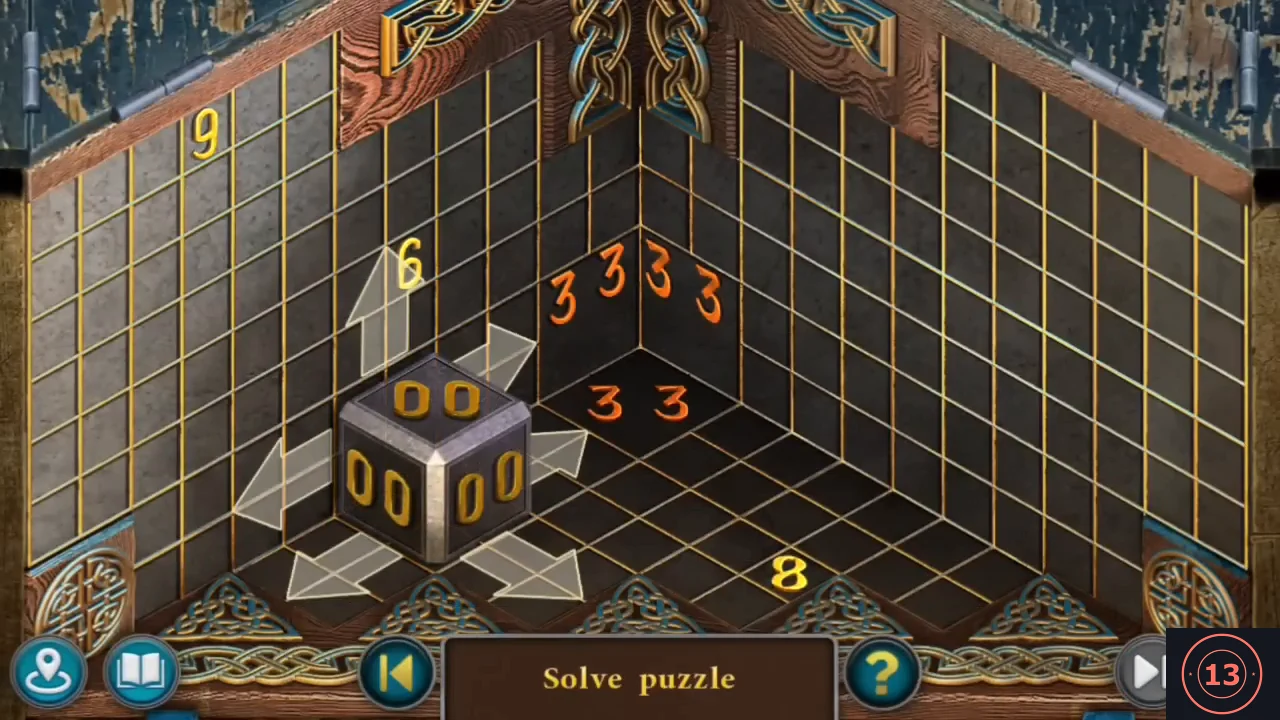
Roll the numbered cube around the dungeon crate to collect exactly the target total. The target and the numbers on the board change between playthroughs, so read your own board; our route is given only as an example.
- Back in the dungeon zoom on the crate by the stairs and place the CUBE WITH NUMBERS inside. Roll the cube with the arrows across the floor and walls of the box; each gold number it lands on is added to all of its faces. Collect exactly the number shown by the orange target mark in the corner, then roll the cube onto that mark. The target and the gold numbers differ between playthroughs (versions with targets 32, 33 and 35 exist; our playthrough's target was 33), so read your own board and plan a route to the exact total. (Our playthrough's running total went 00, 03, 06, 14, 17, 20, 33.) The crate opens: take the MAGIC ATTACHMENT and the ADJUSTABLE SPANNER.
Morphing objects round, the gate and the arrows
Collect the morphing objects in the fortress, open the portcullis gate and prepare for the arrow search.
- (Optional collectibles, all picked up here in one trip over the map.) Morphing objects 16/42: forest clearing with the pumpkins under the big tree - a small dark leaf sprig in the upper left, hanging just left of the leftmost big trunk with the orange-lit edge (on a zoomed-in screen it sits at the very left edge). 17/42: river scene with the mill and wooden bridge - round pale object at the very left edge, level with the grass below the bridge. 18/42: mountain-foot portal scene - at the bottom of the portal steps, left of the stairs. 19/42: snowy slope with the rope post and crow - on the snow left of the dark hole. 20/42: snow field with footprints - near the top centre. 21/42: summit hut exterior - on the side wall between the front corner and the window under the eaves.
- Climb to the tower's upper floor and zoom on the floor plate under the stairs (where the chandelier attaches). Use the ADJUSTABLE SPANNER to unscrew its nuts: the chandelier wheel falls to the ground floor. Go down, zoom on the fallen wheel, clear the lumps off it ("These brackets are unnecessary here.") and remove the brackets with the spanner: you get the WOODEN GEAR.
- In the courtyard zoom on the portcullis gate on the left and put the WOODEN GEAR into the empty slot on the right-hand wall. Turn the wheel on the tower's ground-floor wall: "Something happened. The winch isn't turning..." The gate zoom explains why: "The gate is warped and jammed due to rusty guides."
- Take the EMPTY BUCKET standing left of the ladder on the tower's ground floor. In the forge zoom on the furnace ("Bellows are used to fan the heat in the oven." / "Coals and metal are heated in the furnace's crucible.") and take the SCOOP SHOVEL. Travel to the mine tunnel, zoom on the slime pit and put the bucket down ("I can't scoop up the slime with a bucket. And putting it into a bucket with bare hands could be dangerous to health."); use the SCOOP SHOVEL to fill it: BUCKET OF SLIME. Back at the fortress gate, smear the slime on the rusty guides (the empty bucket returns to your inventory).
- Turn the wheel in the tower again: "The gate can rise to the top, but there is nothing to hold it up." Jam the SHARPENED SWORD BLADE into the wheel to lock it; the gate stays up. Go through into the yard full of old siege debris: "We need to find more arrows here. We've already seen that they can hurt Buldan."
Siege yard: collect the arrows
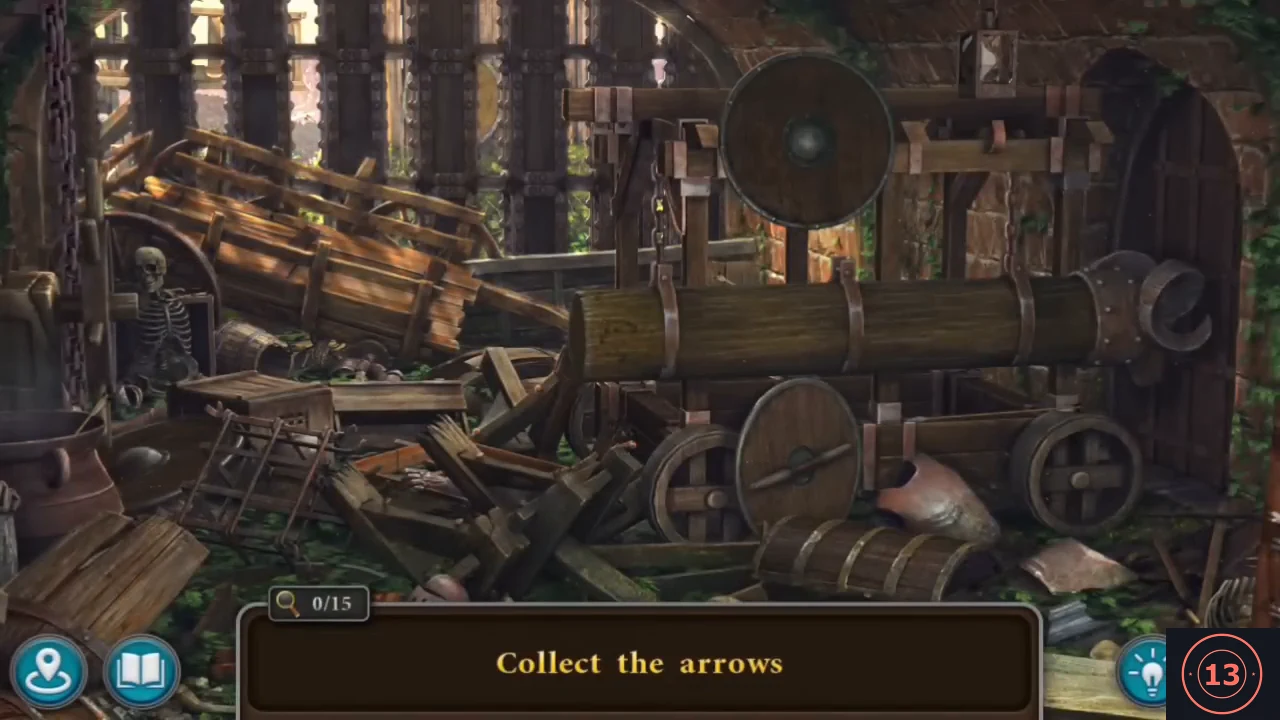
Find the 15 arrows in the siege yard and its close-ups.
- Interactive search "Collect the arrows" (15). Some arrows only appear after you move or click something. Main scene: (1) take the arrow lying on top of the battering-ram log. Cauldron corner (zoom on the cauldron at the lower left of the yard): (2) pick up the rag on the stump at the left - it pulls an arrow out of the hot cauldron; (3) move the small yellow round shield at the right of the wheel and take the arrow behind it (the large round shield at the lower right can also be moved aside); (4) take the arrow standing at the right edge between the wheel and the wooden post. Cart zoom (the tilted wooden cart): click the cart - it tips up and drops back; then take (5) the arrow on the ground under the cart near the skeleton, (6) the arrow sticking out behind the right wheel at the right edge and (7) the arrow lying on the cart bed by the back rail. Post zoom (click the small round shield on the gate frame at the upper left of the yard): (8) take the arrow poking out of the bushes left of the stump at the foot of the post; (9) click the large round shield on the plank wall - it slides down - and take the arrow stuck in the planks behind it. Back in the main scene: (10) click the round shield hanging on the top beam above the ram - it falls - and take the arrow lying on the beam; (11) click the barrel and broken jug lying in front of the ram - a leaning crate takes their place - and take the arrow at its foot; (12) take the arrow behind the top edge of that crate, by the ram's right wheel. Barrel corner (zoom on the dark corner at the far left, just right of the skeleton sitting by the big wheel): (13) an arrow is stuck in the skull lying on the sack at the right; clicking it only gives "The arrow is stuck in the skull." Tap the loose brick at the upper left of the close-up, in the wall just above the barrel and left of the upright plank: it flies across and smashes the skull, and the freed arrow drops onto the sack - take it; (14, 15) take the two arrows stuck in the crossed planks at the top. At 15/15 you receive the QUIVER OF ARROWS.
- Folnur returns: "Friends, I'm back! Susan, you look like you used to!" / "Well, now everyone is here. Let's take a little rest and discuss our next steps." After the talk ("Folnur, where is Buldan now? Does he know about our meeting?") he hands over the SCARAB FIGURINE: "This is the key to the Buldan's box in the forge." New task Magical weapons.
Forge: Buldan's crystal box
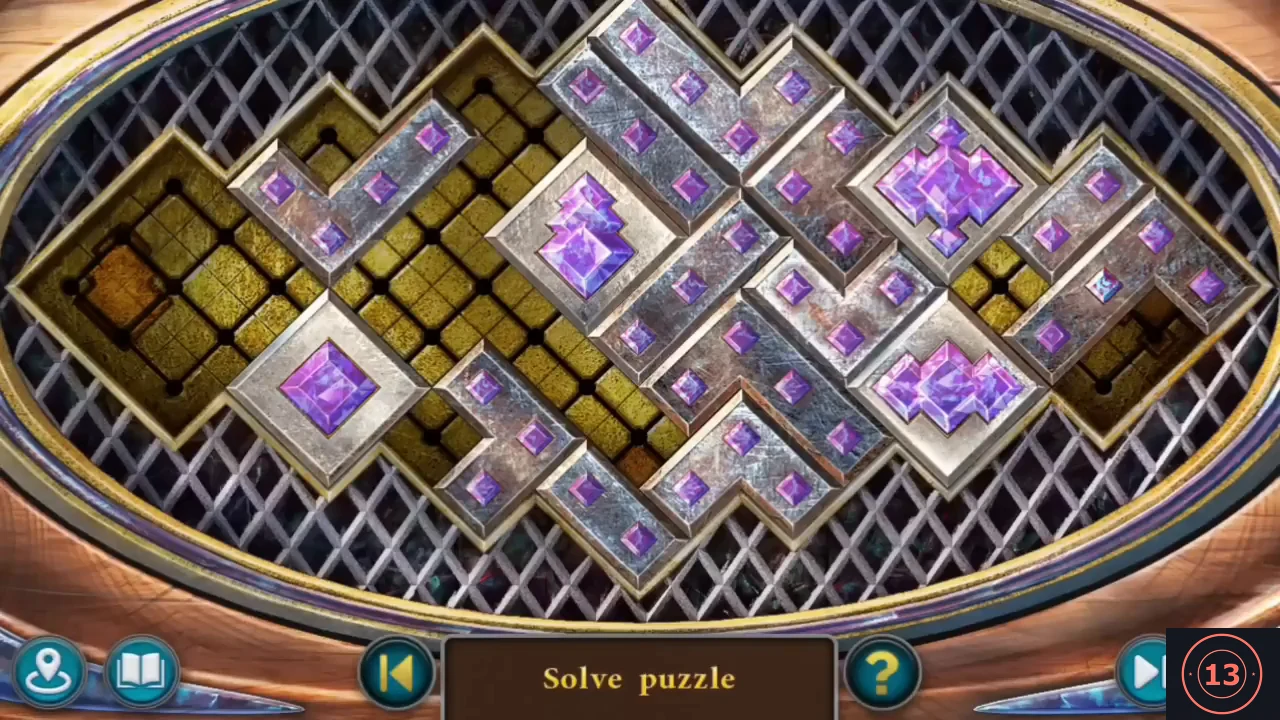
Slide the tiles of Buldan's crystal box until the four big crystal tiles sit at the four tips of the board. This sliding puzzle takes many moves, so the step gives the goal and method rather than every move.
- In the forge zoom on the ornate box on the bench and put the SCARAB FIGURINE into the scarab recess. A sliding-tile puzzle opens: the pieces slide along the diagonal grid (the cyan outline marks the piece you move). Goal: the four big crystal tiles must sit in the four tips of the board - left, top, right and bottom. A crystal glows pink once it sits in a tip. Drag a piece to slide it along the diagonal grid into empty gold cells; pieces cannot pass through each other, so most moves are about making room. Work in stages and use the open gold area in the middle as parking space. 1) Left tip first - it is almost empty at the start: move the plain square crystal at the lower left up out of the way, slide the tall stacked crystal from the centre down-left and into the left tip. 2) Top tip: shift the long bars and L-shaped pieces between the top tip and the crystal clusters at the upper right sideways into the middle, then slide one crystal cluster up into the top tip. 3) Right tip: clear the small pieces from the right-hand channel and push the other crystal cluster into the right tip. 4) Bottom tip last: the plain square crystal goes to the bottom; move the remaining bars out of its diagonal path through the centre, then slide it down into the bottom tip. Leave crystals that already glow where they are while you clear the next path. The solved board is shown in the image.
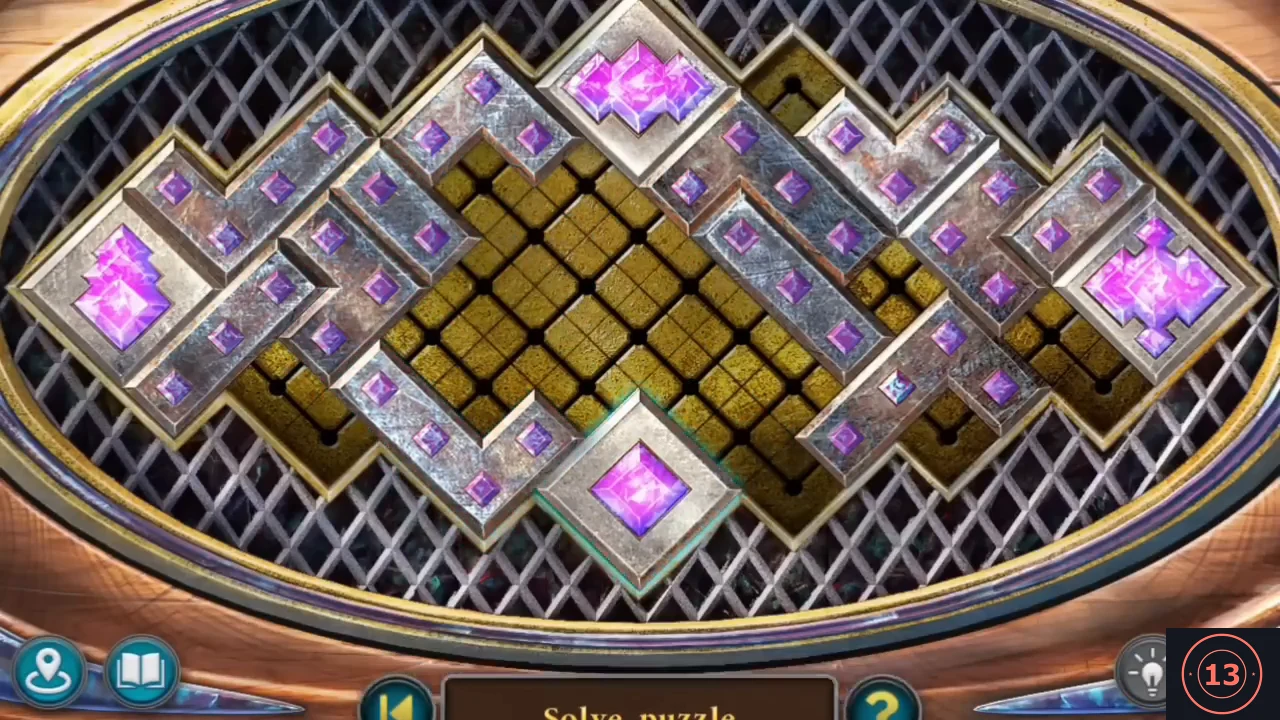
Solved: the four big crystal tiles sit at the left, top, right and bottom tips of the board. - Take the CRYSTAL BALL ("You can summon Buldan with this ball. We will do it when we will be ready."), read Buldan's letter - the sword recipe: 1. Heat the blade in a furnace on crystalline coals. 2. Forge the blade on a mechanical machine using a magic attachment. 3. Cool the blade in water. 4. Sharpen the blade on a jade whetstone. 5. Place the guard on the blade. Take the GUARD OF THE MAGIC SWORD and MOUNTGOR'S APPLE ("This is Mountgor's apple. Do you remember?" / "Of course! It was our first adventure together. This apple cured you of a fatal wound.").
Ingredients for the magic sword
Gather the sword blade, the jade whetstone and the crystalline coal for forging the magic sword.
- In the tower, zoom on the wall wheel and take the SHARPENED SWORD BLADE back out of it (the gate is no longer needed). In the forge zoom on the drop hammer ("According to Folnur, the mechanism is missing some kind of magical attachment that would imbue the weapon with mana.") and fit the MAGIC ATTACHMENT on top of the hammer head.
- Travel to the tower ground floor and pick up the JADE WHETSTONE - the green stone disc lying on the right side beside the sacks.
- Travel to the mine tunnel and zoom on the coal cart: blue crystals glitter in the coal. Put the EMPTY BUCKET into the cart to fill it: CRYSTALLINE COAL.
Forge furnace: light the crystalline coal
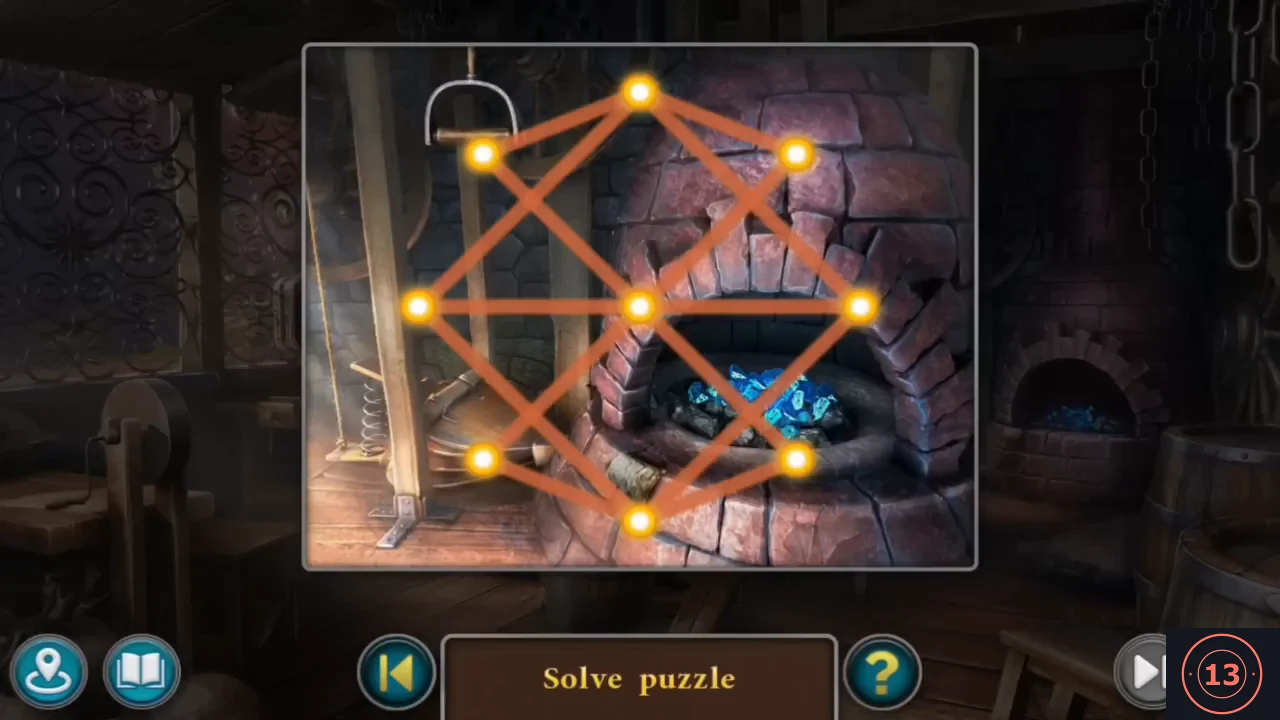
Light the forge furnace by tracing every line of the pattern in one stroke.
- Back in the forge zoom on the furnace and put in the CRYSTALLINE COAL. Folnur: "Come on, Susan, light it up like I taught you." A one-stroke line puzzle appears with nine nodes (top, upper-left, upper-right, left, centre, right, lower-left, lower-right, bottom) and fourteen lines; trace every line once without lifting. Only the left and right nodes have an odd number of lines, so start at the right node and finish at the left. Order used in our playthrough: right-top, top-upper-left, upper-left-centre, centre-upper-right, upper-right-top, top-left, left-centre, centre-right, right-bottom, bottom-lower-right, lower-right-centre, centre-lower-left, lower-left-bottom, bottom-left. The coal burns with blue fire; put the SHARPENED SWORD BLADE into it to heat it: RED-HOT BLADE OF THE SWORD.
Drop hammer: forging the sword and the arrows
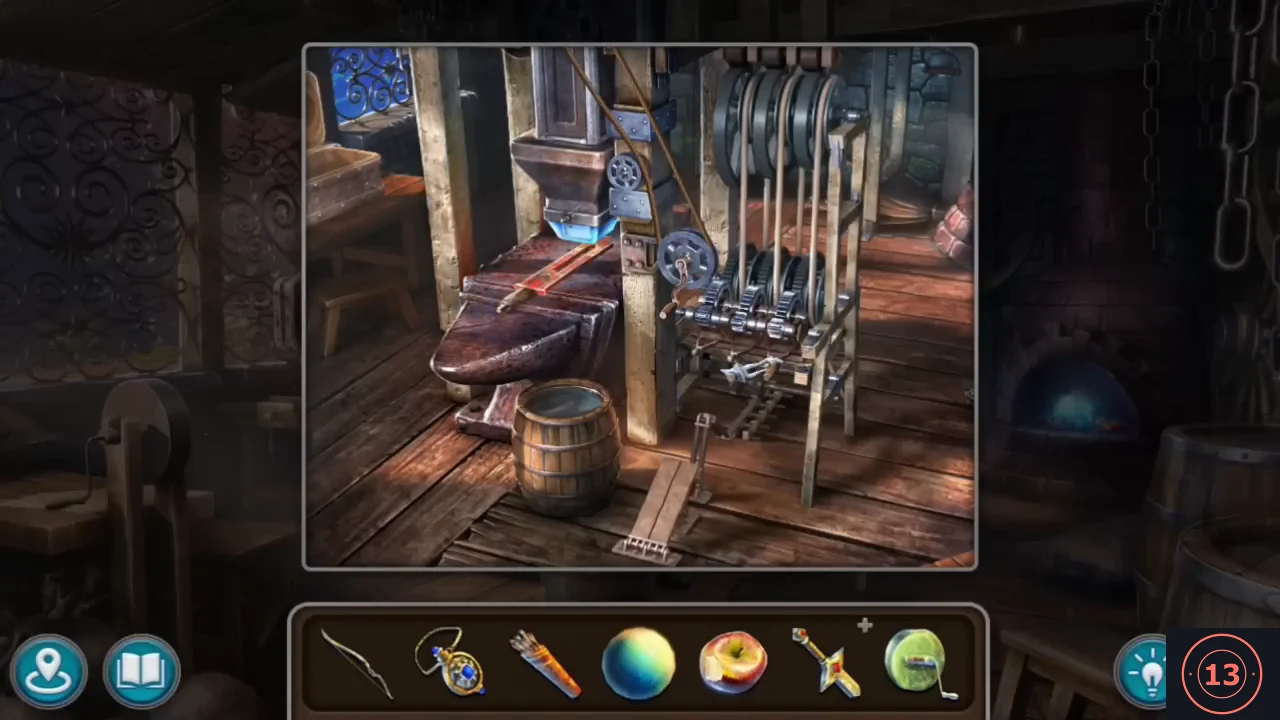
Forge the sword and the arrows on the drop hammer. Each item needs a different power setting.
- Zoom on the drop hammer. Folnur explains: "You can use the lever to change gears and set the power of the blow. For the hammer, I need the most power. I will need less power for sword and arrows." / "You can turn the valve to set the hammer to the highest position. You will need a lower level for swords and arrows." / "You can press the pedal a few times to get the hammer going and the job is done." Put the RED-HOT BLADE OF THE SWORD on the anvil. Turn the valve to lower the hammer head and change the gear lever (our playthrough succeeded with its handle pointing straight down), then press the pedal several times: the blade glows blue. (A wrong setting gives "This weapon requires a different machine setting." - change the lever and try again.) Dip the blade into the water barrel: FORGED SWORD BLADE.
- Zoom on the grindstone to the left of the forge and mount the JADE WHETSTONE on it. Sharpen the FORGED SWORD BLADE on it: BLADE OF THE MAGIC SWORD. Put the GUARD OF THE MAGIC SWORD on the blade to assemble the MAGIC SWORD.
- Back at the drop hammer, put the QUIVER OF ARROWS (the arrows from the siege yard) on the anvil. Change the setting again - our playthrough moved the gear lever so its handle points to the right, with the hammer head still lowered - and press the pedal: the arrows glow. You get ENCHANTED ARROWS.
The fight with Buldan
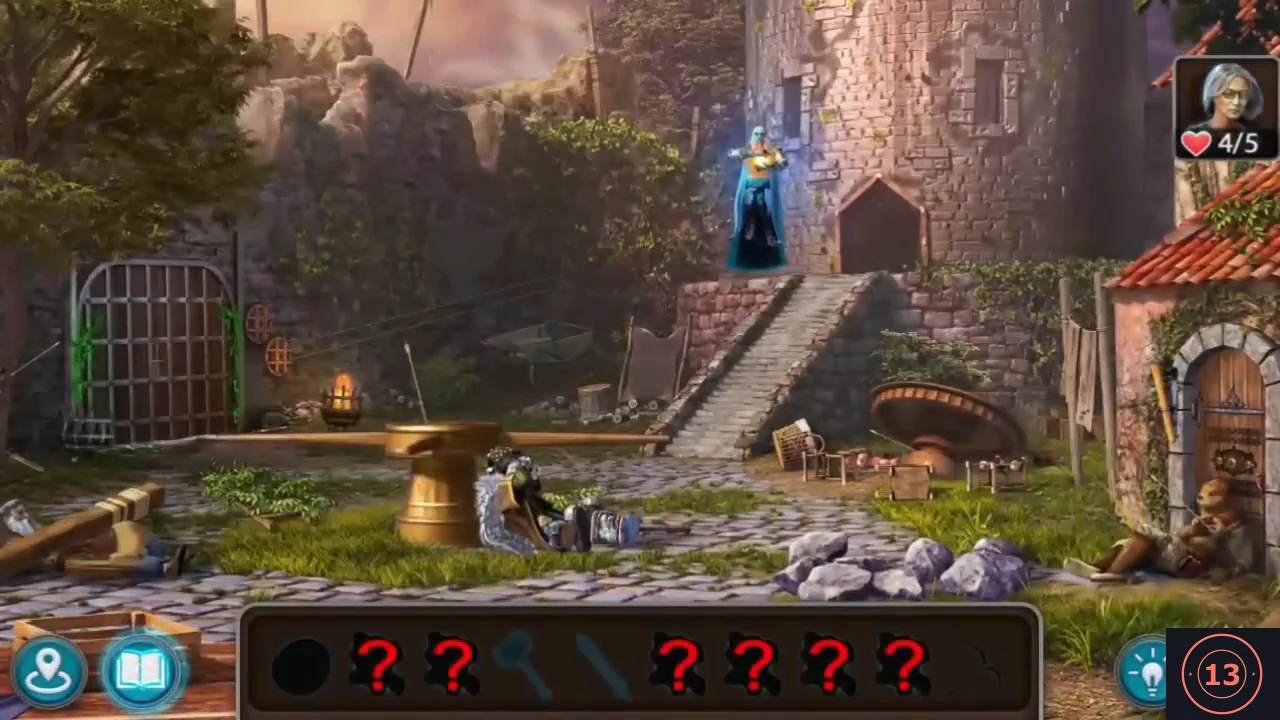
Summon Buldan and fight him in the fortress courtyard. Collect the battle items, keep the bow loaded and watch your hearts.
- In the fortress courtyard: "Susan, we're ready! Call Buldan!" Use the CRYSTAL BALL. Buldan appears ("Susan the Warmaiden! What a pesky mouse you are!" / "Folnur, my boy, I didn't expect this from you..." / "I didn't expect it from myself either! Attack!!!"). His explosion knocks out everyone except Susan, whom Maaron protected: "Buldan is levitating! You can't reach him with hand weapons! You need to find all the arrows and hit Buldan with them! Hurry, time is running out!" New task Confrontation.
- Battle rules: the normal inventory is replaced by battle slots (red question marks for items still to find, silhouettes for the hammer and sword); the bow shows how many arrows it holds; the hearts at the top right show Susan's health, and Buldan strikes at intervals (our playthrough dropped from 5 to 4 hearts at 9760). Collect what the courtyard zooms offer (order from our playthrough): right after Buldan's first strike one arrow flew into the bow slot without a visible click, so the bow shows one arrow. Zoom on the overturned round table and take MOUNTGOR'S APPLE from the apples on the ground ("Mountgor's apple! It restores health!"). Zoom on the wounded Korko sitting by the house door at the right and give him the APPLE first ("Korko, this is the Apple of Life. Take a bite of it when I get the arrow out."), then pull the arrow out of his chest: second arrow. Zoom on Folnur lying beside the golden anvil in the middle; his hammer lies by his feet ("What about the hammer? Is it intact?" / "The power stone is lost... Without it... the hammer has no... magical power..."). Zoom on Maaron, pinned under a beam at the far left ("Don't waste your time on me! I can handle it... myself!"): take the arrow lying on the cobbles at the top of the zoom (third arrow) and the POWER STONE on the beam. Go back to Folnur and put the POWER STONE into the hammer: it glows blue and you take FOLNUR'S HAMMER ("Folnur is concussed, he cannot help now. At least he's alive."). Then zoom on the unconscious Kiana by the brazier and take the bow lying beside her.
- Shoot Buldan with the LOADED BOW: "Why didn't I hurt him? I hit him!" Maaron: "Buldan has cast a protective field on himself!... Find me a bottle of alcohol and I'll tell you what to do next!" Zoom on the stones on the path at the right foreground: an arrow lies between them. When you try to take it, Buldan freezes the stones into a heap of ice over the arrow. Use the recharged FOLNUR'S HAMMER on the ice: it shatters and the arrow lies free - take it ("...you nasty... I will destroy you all anyway!"). Buldan strikes again soon after (our playthrough dropped to 3/5 hearts). Zoom on the cart with logs at the left foreground and take the BOTTLE OF RUM from the crate. Give it to Maaron ("Yes! We need to cast a destructive spell on it! Do it like I taught you!"): nine blue nodes surround the bottle; trace the faint guide shape - vertical line top-centre-bottom, horizontal line left-centre-right and the two diagonals from the top node to the left and right nodes (the four corner nodes stay unused). Order used in our playthrough: bottom, centre, left, top, centre, right, top. "Excellent! Now this bomb will destroy Buldan's protective field!" Throw the BOMB at Buldan: the field disappears.
- Keep shooting Buldan whenever the bow has arrows ("How ticklish!", "That was a little more painful...", "I don't believe it!", "Right in the finger!"), and refill it from the zooms: first click the wooden ladder lying on the ground at the left foreground - Susan carries it over and leans it against the roof of the house at the right. Now zoom on the roof at the top of the ladder, move the leafy branch on the tiles aside and take the arrow lying there. Another arrow lies in the Kiana zoom. When "I might need fire." appears, take the TORCH stick in the Kiana zoom (by the brazier) and light it in the brazier: BURNING TORCH. Use it on the ice figure at the far left of the courtyard ("This is ice. We can melt it.") to free the MAGIC SWORD. The sword cannot reach Buldan ("I need a range weapon!") - zoom on the overturned round table in the courtyard: thorny vines spring up over it. Cut them with the MAGIC SWORD and take the arrow lying on the ground beneath the table, by the clay pots; shoot Buldan with it ("A-a-a!!! Susan, this is not funny anymore!"). The bow is empty again. Zoom on Folnur, who lies in the middle of the courtyard beside the golden pedestal ("Folnur is concussed, he cannot help now. At least he's alive."). On the cobbles behind him, beneath the horizontal wooden beam, move the leafy branch aside and take the arrow it was hiding. Shoot Buldan with this last arrow and he falls: "Susan, you won! You did it!!!" Buldan flees into the tower ("Leave him alone, he lost." / "No! If I leave him alone, he won't leave us alone!").
Buldan on the tower roof and the ending
Talk to Buldan on the tower roof to finish the main story.
- Go into the tower ("Buldan! Where are you?! Let's talk!"), zoom on the staircase, push the broken planks off the steps and climb through the hatch to the roof. The ending plays: Susan offers peace ("Buldan?.. I don't want to fight anymore! Let's resolve this peacefully!" / "I can't stand being fooled! We won't negotiate."), Folnur uses the potion from Drak Om's amulet ("Drak Om gave me this amulet with a potion."), Susan says goodbye to her friends ("Thanks for the years of adventure." / "I will wait for you at home.") and wakes up at home. Then: "The chapter's plot is complete. You can continue collecting Morphing objects and collectibles in locations or explore the area."
Main game: the collectibles left after the ending
Optional: after the ending, pick up the main-game collectibles and morphing objects that were still missing. This completes the main game at 100%.
- (Optional, after the ending.) Now pick up what is still missing. In our playthrough the counter bar "Collected in this chapter" showed 5/7, 8/8, 4/7, 8/8, 9/9, 21/30. Estate basement (the room with the stone beasts): Drak Ul figurine 6/7 at the open toolbox crate on the left. Sacred Mountain summit hut: morphing object 22/42 on the barrels at the right edge.
- Mine tunnel (slime pit): morphing object 23/42 high at the upper left, between the timber props. Fortress courtyard: morphing object 24/42 on the stone wall above the iron gate, left of the tower; Drak Ul figurine 7/7 in the grass at the left foot of the golden anvil - completes the set, achievement Explorer. Forge: morphing object 25/42 on the wrought-iron window grille at the left.
- Halfling's Valley pond (where the lotus grew): morphing object 26/42 at the far left edge, low in the bushes above the path. Folnur's dungeon on the estate (the room with the green crystal and the cage where you found the robot; on the map it is under Estate, not the Abandoned Fortress): Toto toy 5/7 between the crate and the barrel at the right of the cage bars. The stone wall with the arched gateway ("Maaron's house. I recognize this silhouette even in the dark."): morphing object 27/42 high up on the ruined top storey of the building behind the wall, above and slightly left of the arch. Inside Maaron's house: morphing object 28/42 on the wooden beam right of the fireplace.
- Folnur's yard (well, shed and kennel): morphing object 29/42 on the carved post at the right edge; Toto toy 6/7 on the ground in front of the bench by the shed door at the left. From the back of the yard go on to the forest path: Toto toy 7/7 on the ground right of the path, by the mossy log at the lower right - completes the set, achievement Enthusiast, "You have gathered all collectibles in the current chapter." Limbo (tree and stone blocks): morphing object 30/42 - a small yellow-green sprig caught in the crook of the branches in the middle of the pink tree's crown (it slowly changes shape; the striped object on the central stone block is scenery). "You found all the Morphing objects in this chapter!" / "All Morphing objects and collectibles received. Great job!" (Save and exit.)
- Chapter selection: Main game 100% (30/30 and 30/30); Bonus chapter - Play (0/12 and 0/12).