The Dryad's House: Find 15 Items
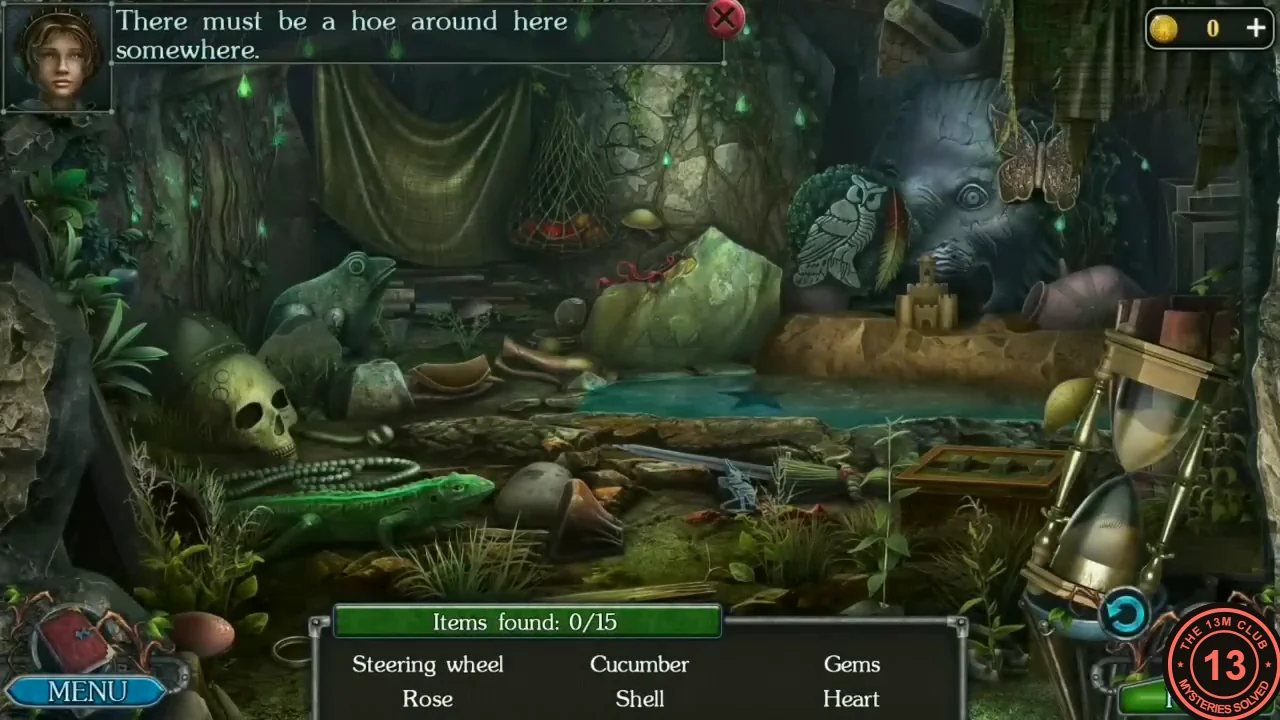
The dryad's house in the valley is a list hidden-object scene with an 'Items found x/15' counter. The last item is in a locked box (next section), and the Garden hoe is the reward.
- Enter the dryad's house ('There must be a hoe around here somewhere'): a hidden-object scene with 15 items. The list shows six names at a time and new names replace the ones you find. Found items fade out slowly, so wait a moment before deciding a tap did nothing. Where we found them, in the order we found them: Heart: the dark curly wire shaped like a heart on the rock wall just right of the hanging string bag of fruit. Beads: the long string of green beads lying behind the green lizard at the lower left. Gems: the little heap of red and green gems on the ground in front of the clay pot right of the lizard. Steering wheel: tap the drawn-back curtain at the upper left to slide it aside; the wheel hangs on the wall behind it. Clicking the string bag first only gives 'I need to cut the net'; in our game it dropped and spilled its fruit along the edge of the water when the Steering wheel was taken. Cucumber: the green cucumber among the spilled fruit at the water's edge. Toad: the big stone frog statue at the upper left, behind the skull. Doll: the green straw doll tied with red, lying across the sword blade right of the small blue figurine in front of the pool. Ribbon: the red ribbon lying on top of the big green stone. Shell: tap the big hourglass at the right; it tips over and stands up again with a spiral shell in its lower bulb: take the shell. Feather: the red-and-green feather leaning beside the owl carving at the upper right. Star: the blue star shape under the water of the pool. Map: the dark green checked cloth hanging at the top right, above the butterfly ornament. Castle: the little sand castle on the sandy ledge right of the green stone. Garden hoe: the green-handled hoe lying along the ledge under the stone boar's snout, left of the purple vase. The fifteenth item, the Rose, is locked in the small wooden box with three number dials just left of the hourglass; the next section explains the lock.
The Dryad's Shape Lock
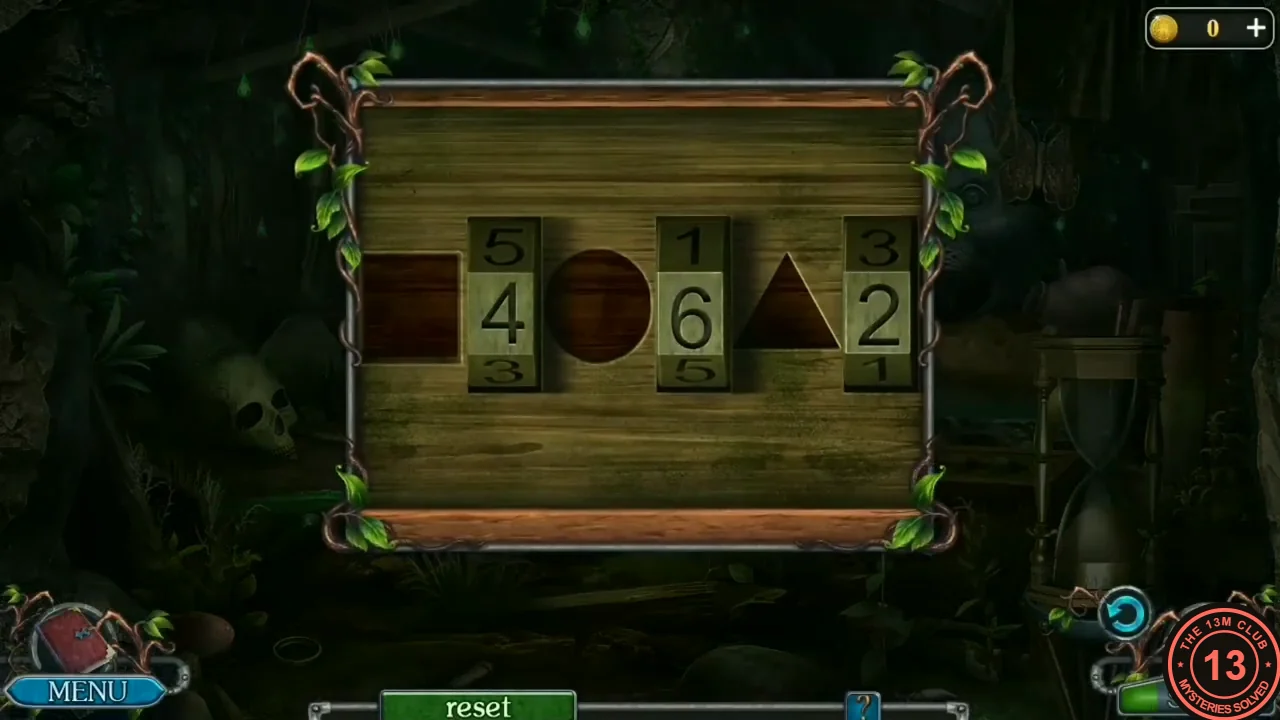
The Rose, the last item in the dryad's house, is in a box with three shape dials.
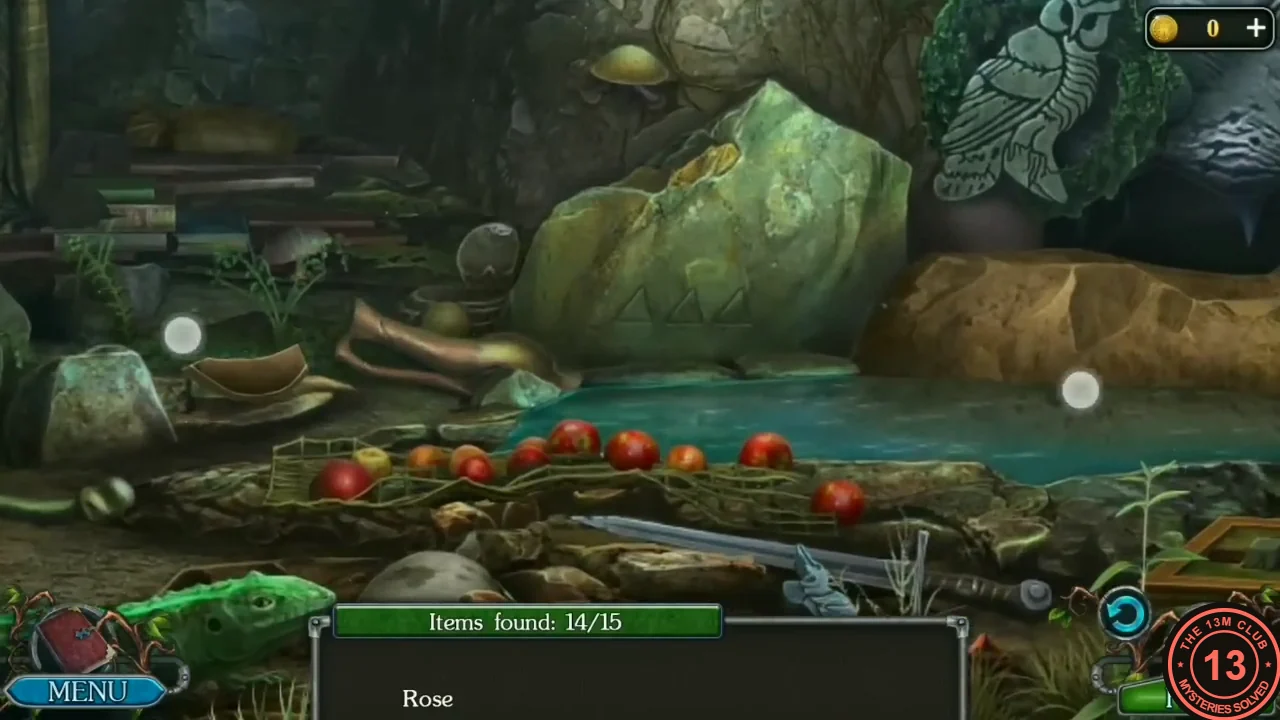
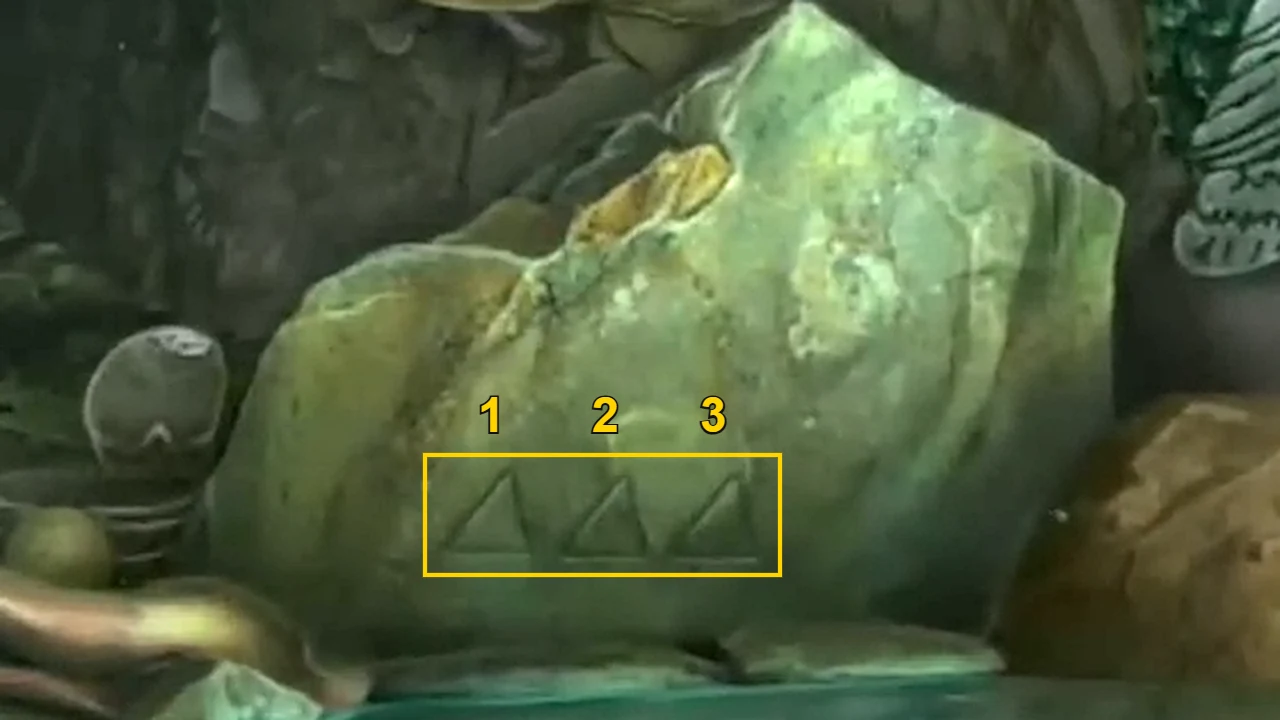
- Tap the small wooden box left of the big hourglass to zoom in. Its three dials show a square, a circle and a triangle, and each must be set to the number of times that shape is marked in the room. In our game there were three triangles carved on the big green stone, three circles on the helmet over the skull at the left and two faint square outlines near the top of the hanging cloth at the upper right. Tap each dial until it shows its count (here square 2, circle 3, triangle 3); the box opens and you can take the Rose (15/15). You receive the Garden hoe. If your marks differ, count the shapes you can see and set the dials to those numbers.CODE2-3-3
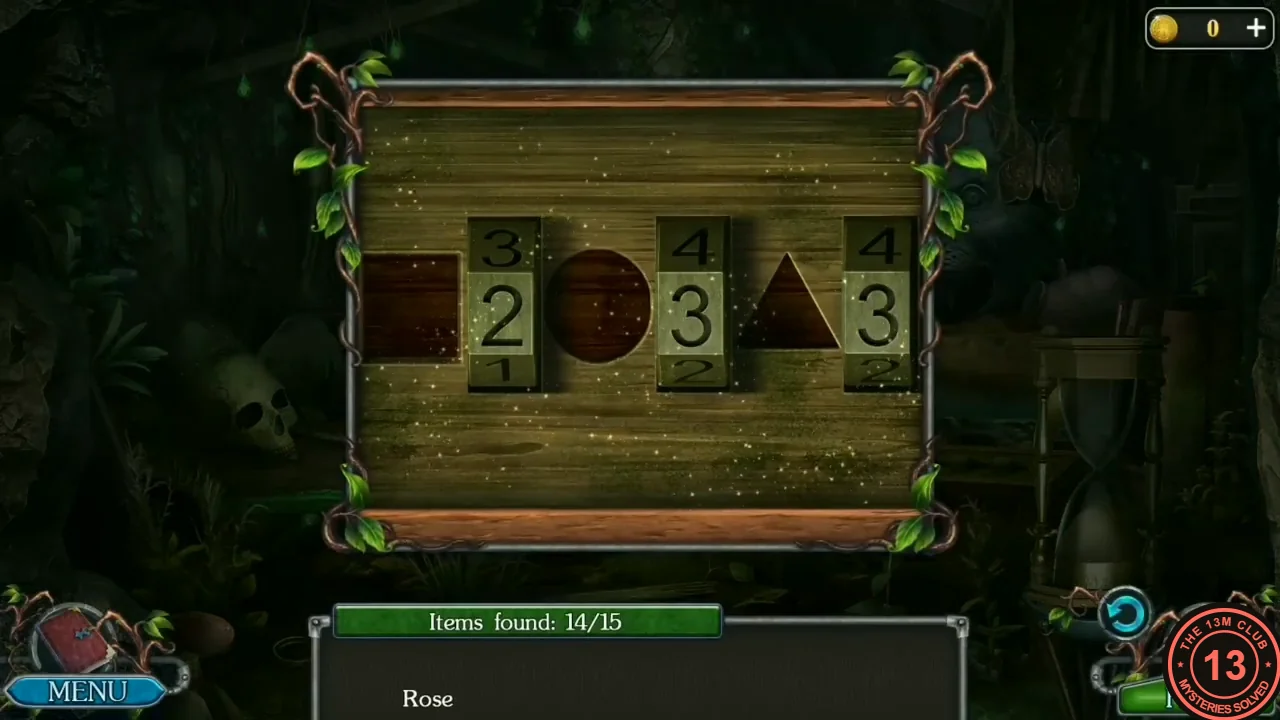
The accepted setting in our game: square 2, circle 3, triangle 3.
The Valley of Sulfur Geysers: Destroy the Creeper
Hot water, salt and acid finish the creeper. The machine on the right of the valley is missing the centre of its pedestal for now.
- In the valley, zoom into the scalding steam vent and use the Garden hoe to pull out the Waterskin. Fill it in the hot pool (Waterskin with boiling water). Note the salt crust at the edge of a spring ('I need a container') and the machine whose pedestal is missing its centre. Pour the boiling water on the frozen pool to melt the ice and take the Rune (3/3).
- Back at the forest entrance, zoom into the cut tree stump with bracket fungus in the middle of the scene, just left of the tall tree trunk, and peel off the Bark. Go to the Valley of Sulfur Geysers, zoom into the yellow salt crust at the right edge of the hot spring and use the Bark on it to scoop up Salt. Return to the forest entrance and zoom into the creeper roots at the left of the path. The Acid cannot be used first ('No, this item can't be used here'): first use the Garden hoe on the roots to dig the sprout up, then pour the Acid on the exposed roots and sprinkle the Salt on them. Walk on to the clearing; the dryad thanks you ('Hmm... It turns out not all of you witches are evil. Thank you. I'll allow you to pass through.'): Task complete: Destroy the creeper.
- Go through to the windmill. Task complete: Find a way out of the forest. Watch the miller's story: he found a sick griffin nestling and cured it; Griffin Mountain lies behind the mill. New task: Take the Griffin nestling to its nest. The nestling is in a cage on the wagon in the mill yard: zoom into the cage and take the Detail, a small dark metal part lying on the cage floor beside the nestling. You need it for the floor panel inside the mill.
The Windmill: The Painted Floor Panel and the Basket
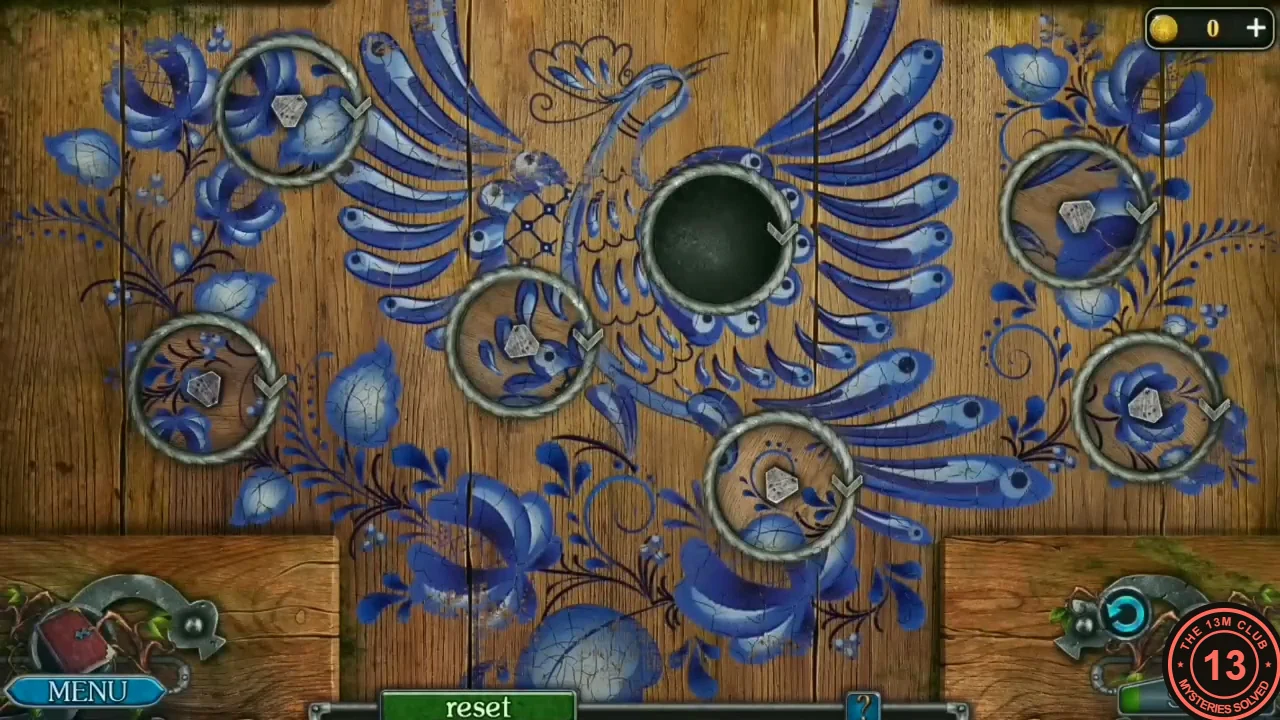
Skarlett needs a carrier for the nestling and something to calm it. The windmill yard and the mill interior supply most of the parts.
- In the mill yard, take the Axe from the stump and the Hay from the haystack. The scarecrow's long cloth 'might come in handy': you will cut it off later with the Knife. Zoom into the window planter ('Valerian. An infusion from its root is very soothing') and dig up the valerian with the Garden hoe to get the Valerian. The Axe does nothing here; keep it for later.
- Enter the mill. Take the green bottle standing among the empty bottles on the floor at the left. Zoom into the round wooden panel carved with a tree, high on the back wall at the upper left (left of the big cog wheel, next to the small hanging lamp): it opens and you can take the Lantern from the niche behind it. Optional: a straw doll lies on the left end of the big burlap sack in the middle of the floor, and the Morphing Object is the pitchfork leaning against the wire-cage stand just right of the big blue pot (tap it; it turns into a spade as it is collected). You can look at the iron-bound chest at the lower left, but nothing is needed there yet. Zoom into the green cupboard at the back: on top are a small bowl (left), a bigger bowl (right), a pestle and a jug. Click the cupboard's left door to open it and click the sieve on the lower shelf: it is placed on top of the small bowl, ready for later. Zoom into the wire cage on the stand at the right: a honeycomb lies inside ('I need to cut off a piece of honeycomb').
- Zoom into the painted floor panel in the middle of the mill floor and use the Detail (from the nestling's cage) on the grey plate in the bird's chest at the centre of the painting: the plate becomes an empty black hole and the puzzle starts. Puzzle: the blue bird-and-flower painting has seven round places: six hold movable discs, and one (the bird's chest, upper centre at the start) is an empty black hole. Controls seen in our video: tap any disc and it slides straight into the empty hole, even from the far side of the board, leaving a new hole where it was; to turn a disc, put your finger on its metal rim and drag around it (the small arrow on the rim turns with the picture). A 'reset' button at the bottom restarts the panel. Goal: every disc in the place where its picture continues the painting around it, turned so that the blue lines run straight across its rim. Method: 1) Use the empty hole to shuttle discs: to bring a disc to a certain place, first move away the disc that sits there (so that place becomes the hole), then tap the disc you want. 2) Find each disc's place by looking at its content (part of a flower head, leaves or feathers) and the painting around each empty place. 3) When a disc is in the right place, turn it until its lines join the painting; the disc's picture then blends in with no visible break. 4) Finish with the empty hole back in the bird's chest. The solved panel opens a compartment: take the Basket. Put the Hay into it ('If I close it on top and make straps for the back, I can make a carrier for the griffin from this basket').
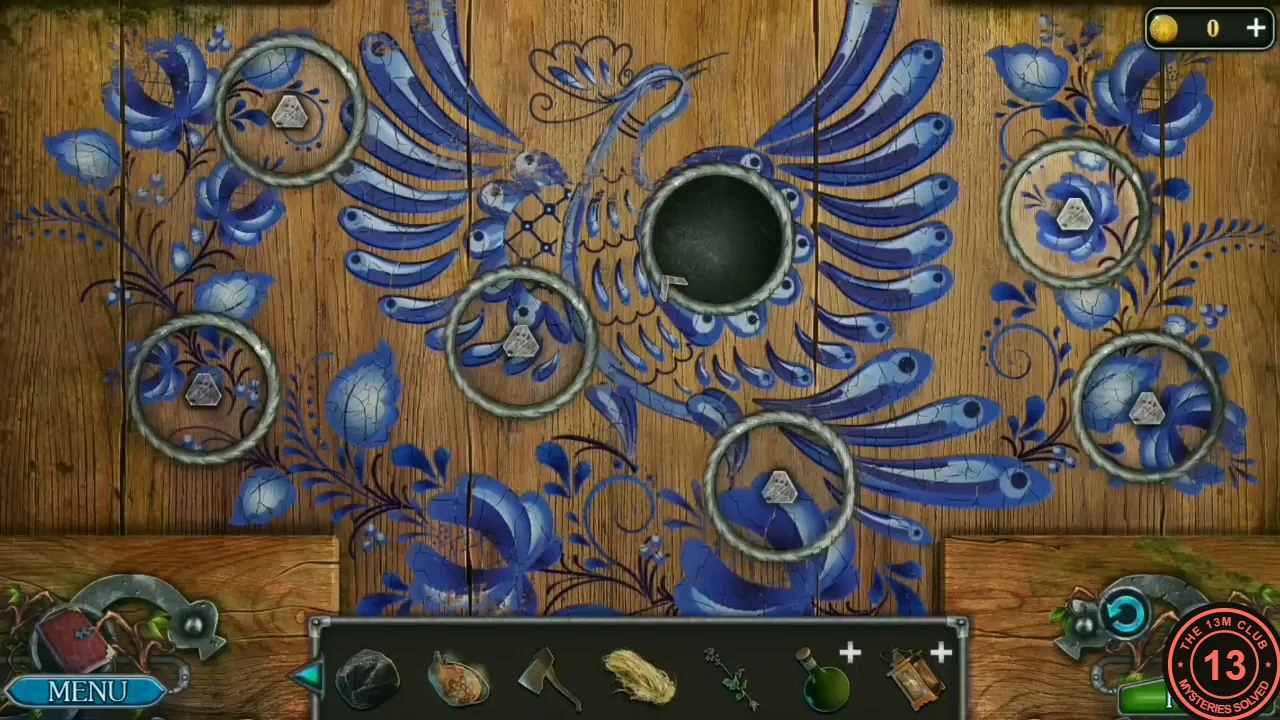
Solved: the painting is complete. - In the clearing, put the Valerian root into the green bottle ('I can make an infusion of valerian in this bottle'); the game says 'The root should be finely chopped', so the infusion must wait for a knife.
The Tree Spirits
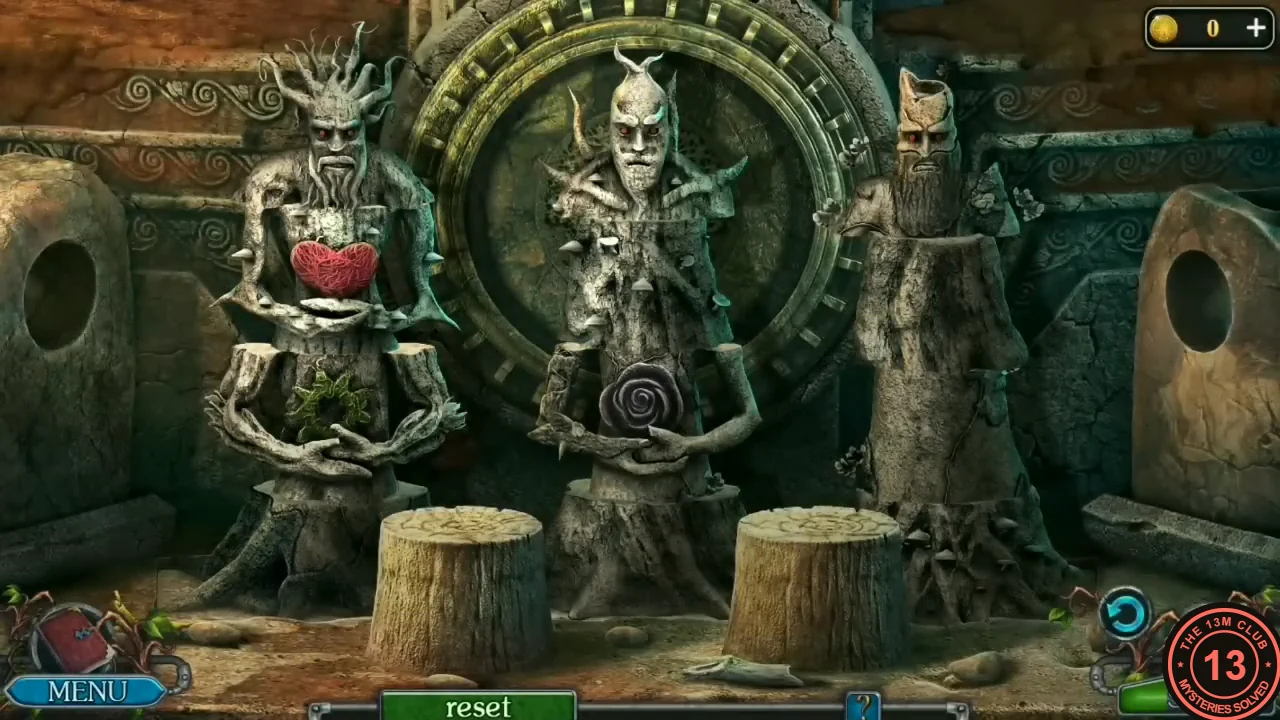
The three Runes open a coloured rune altar, but the right layout comes from a charcoal rubbing taken later. The valley machine holds the second half of the story: rebuilding three tree-spirit statues.
- At the forest entrance, zoom into the mossy rock to find a stone altar with a triangular recess and put the three Runes into it. The coloured rune circle appears ('What should I put where?'); you have no clue yet, so leave it for now.
- Split the mushroom stump in the forest with the Axe and take the round golden tree medallion.
- In the valley, put the medallion into the centre of the machine's pedestal. Puzzle: three tree-spirit statues stand in front of the disc, and two empty stumps in front of them are temporary holders. Each statue is a stack of loose pieces of three kinds: heads, torsos holding an emblem (red heart, green wreath or black rose) and bases. At the start the stacks are mixed and uneven: the left statue has the head with root-like hair on top of TWO torsos (red heart above green wreath), the middle one has the horned head on the black-rose torso, and the right one is only the cut-off stump head on a tall plain base. Controls seen in our video: drag the top piece of a stack and drop it on top of another statue or on an empty front stump. A stack can hold extra pieces for a while (in our video the middle statue briefly held the heart torso on top of the rose torso, with the horned head on top of both). Only top pieces were ever moved, so work from the top down: park heads on the stumps first, then move torsos and bases. Goal: each statue made of one head, one torso and one base of the same style. In our solve: left statue = cut-off stump head with a long beard, smooth torso with the black rose, plain stump base; middle = head with root-like hair, gnarled torso with the green wreath, base of spreading roots; right = horned head, thorny torso with the red heart, base covered in thorns. Tip: match the texture: thorns go with thorns, roots with roots, smooth wood with smooth wood. The statues' eyes glow red, they sink into the ground and the disc lights up and swings open: take the Griffin figurine and the Paper.
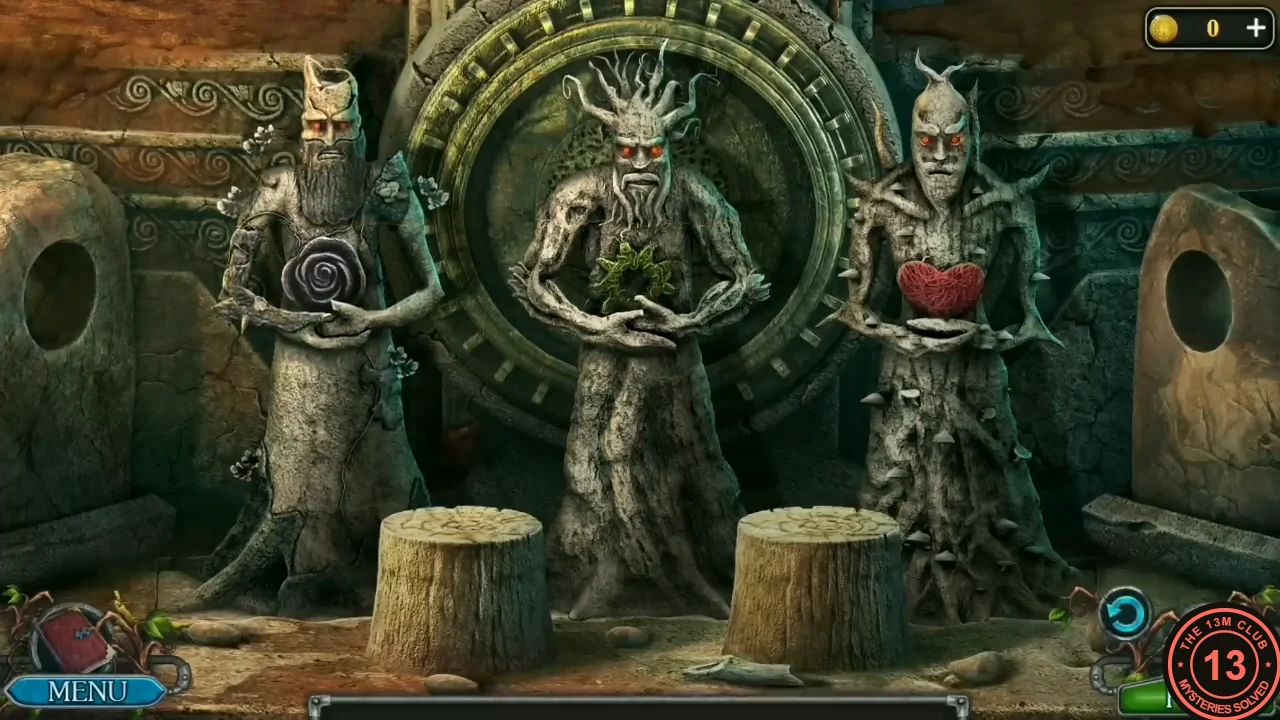
Solved in the example game: the accepted arrangement, a moment before the statues sink into the floor. - In the clearing, zoom into the carved round dial on the tree face. Lay the Paper over it and rub it with the Coal: the charcoal rubbing shows a ring of runes crossed by a row of runes. It is kept as a clue.
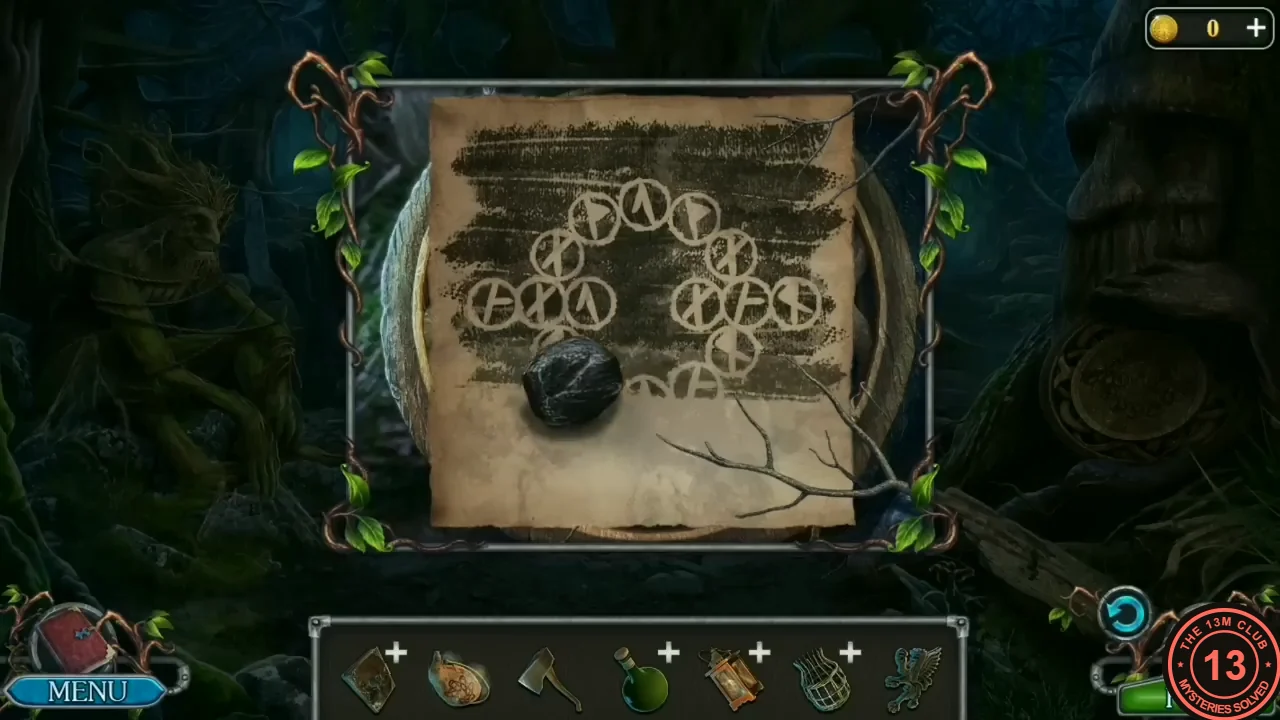
The rubbing from the tree-face dial.
The Rune Altar
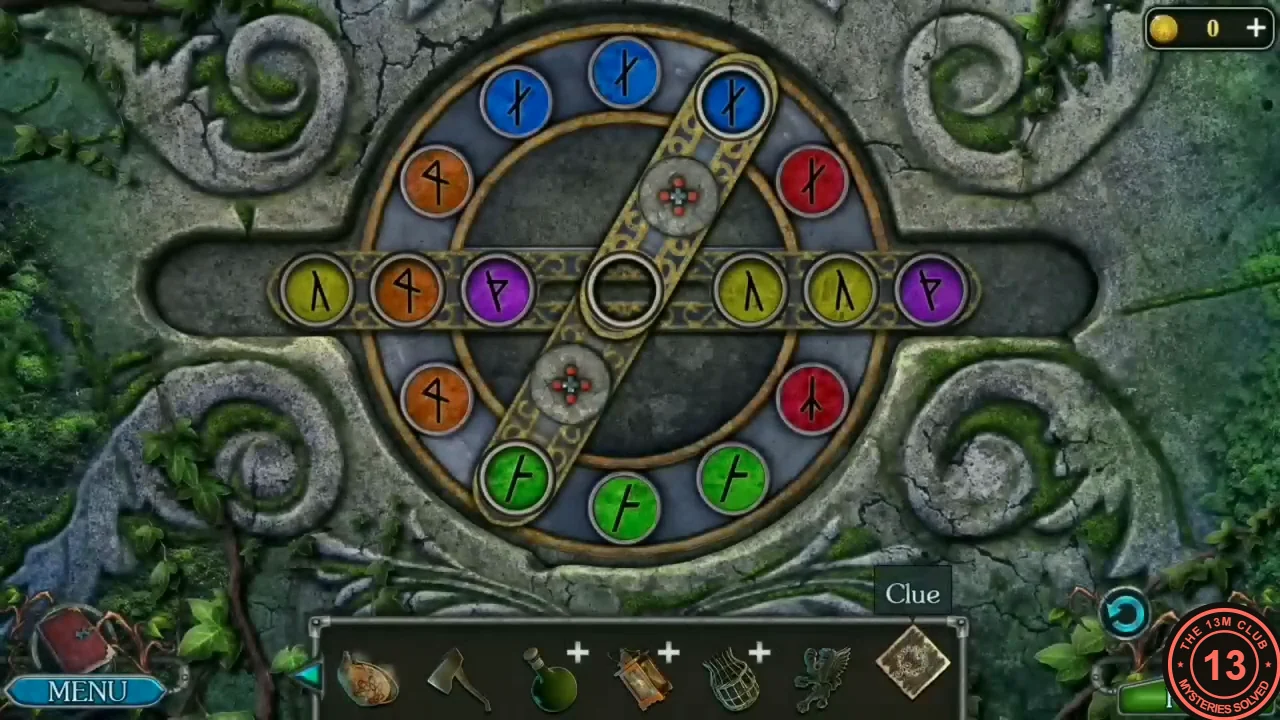
Back at the stone altar by the forest entrance, use the rubbing to arrange the rune tokens.
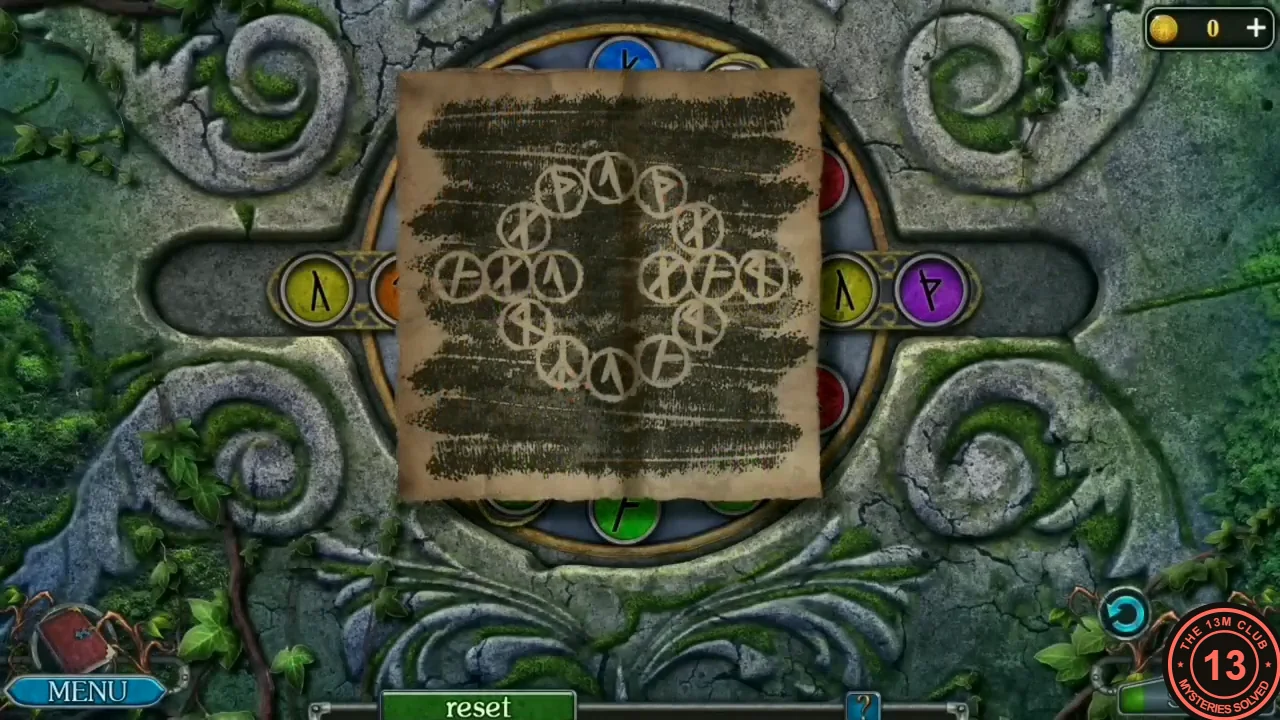
- Return to the rune altar. Puzzle: coloured rune tokens sit on an outer ring, on a horizontal bar that runs through the ring and on a diagonal bar; one place is empty. The centre, where the two bars cross, is the empty place at the start. Moves seen in our video: drag along the ring to turn all ring tokens around it (the bars stay where they are; the tokens pass under their end places); drag the horizontal bar sideways to slide its whole row one place along (two of its places lie on the ring and one is the centre, so this moves tokens between ring, row and centre); tap the round medallion on one half of the diagonal bar and that half flips over end to end, swapping the token at its ring end with whatever is in the centre. Each colour always carries the same rune, so you only need to match colours to the rubbing (open it with the clue paper at the lower left; the paper covers the board while open). Our final layout: ring clockwise from the top = yellow, purple (upper end of the diagonal bar), red, green (right end of the row), orange, green, yellow, red (lower end of the diagonal bar), orange, blue (left end of the row), blue, purple; the full horizontal bar left to right = green (outside the ring), blue (ring), yellow, empty centre, blue, green (ring), orange (outside the ring). Work outward from the tokens already in place. To move a single ring token, turn the ring until it sits at an end of the diagonal bar, flip that half to lift it into the centre, turn the ring to bring the target place to the bar's end and flip it back out; the row slide swaps tokens between the ring and the row. The ring glows, the altar opens: take the Knife (the broom doll and horn inside are not taken).
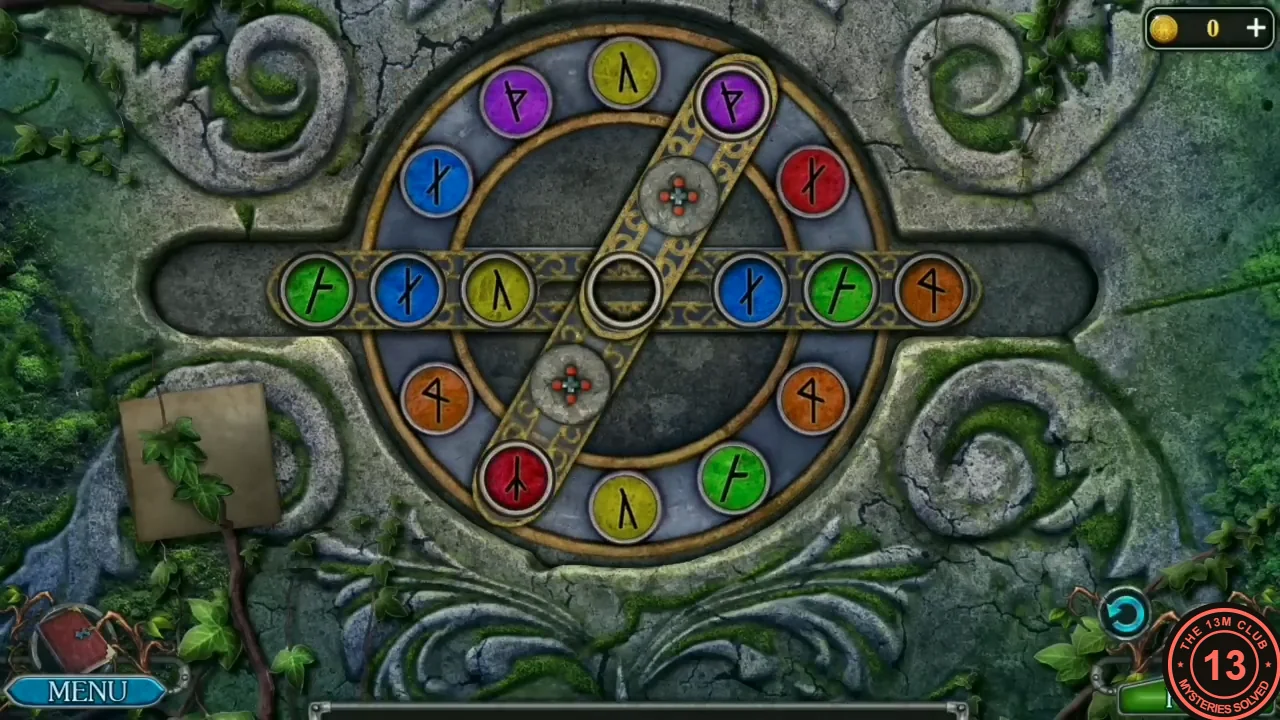
The example final layout of the rune altar.
Valerian, Honey and Wax: The Lantern and the Carrier
With the Knife, Skarlett can free the bound tree spirit, finish the valerian infusion and make a candle for the lantern.
- In the clearing, zoom into the bound tree spirit and cut its ropes with the Knife. Its hand opens: take the second Griffin figurine.
- Open the green bottle with the Valerian root, chop the root with the Knife and pour in the Waterskin with boiling water: Valerian infusion.
- Go to the mill yard and zoom into the scarecrow. Use the Knife on its long cloth to cut off a Piece of cloth. Open the Basket from the inventory and use the Piece of cloth on its open top: the cloth ties the top closed ('I must make some straps to attach the carrier to my back').
- In the mill, zoom into the wire cage on the stand at the right and use the Knife on the honeycomb: it cuts off a piece (Honeycombs). Zoom into the green cupboard at the back of the mill: put the Honeycombs into the sieve sitting on the small bowl, then click the pestle lying behind it to crush them. The honey runs through the sieve into the small bowl and the wax left in the sieve is tipped into the bigger bowl on the right; take the bowl of honey and the Bowl with wax ('I can make a candle with this wax'). Go to the forest entrance (the path with the tall tree whose round hollow, higher up the trunk, holds an owl guarding a key ring) and zoom into the anthill at the foot of the tree: pour the honey next to it. No ants are visible at this video's resolution, but when you leave the close-up the owl drops out of the hollow and flies off down towards the anthill. Zoom into the now-empty hollow and take the Key.
- In the Valley of Sulfur Geysers, zoom into the round blue hot pool in the foreground and put the Bowl with wax in it: the wax melts and you get Wax (the bowl is gone). Go back to the mill and zoom into the iron-bound chest at the lower left of the room: open it with the Key. Inside are a tin candle mould with a wick and a coil of rope (the rope stays in the chest for now). Pour the Wax into the mould; the mould opens and you can take the Candle. (Our player also opened the basket carrier from the inventory here: 'I must make some straps to attach the carrier to my back'.) Optional: on the way out, in the mill yard, a Morphing Object is the small round object on the wattle fence just right of the big round haystack, left of the little cage cart. In the forest clearing, zoom into the blue crystal cluster: a small fire burns at its lower left. Tap the fire to zoom into the fiery crack and hold the Candle in it: it lights (Burning candle). Open the Lantern from the inventory, open its little door and put the Burning candle inside, then close it: Lit lantern.
- Take the Rope lying by the freed tree spirit's foot and attach it to the closed Basket as straps: Carrier.
The Nestling and the Cliff Climb
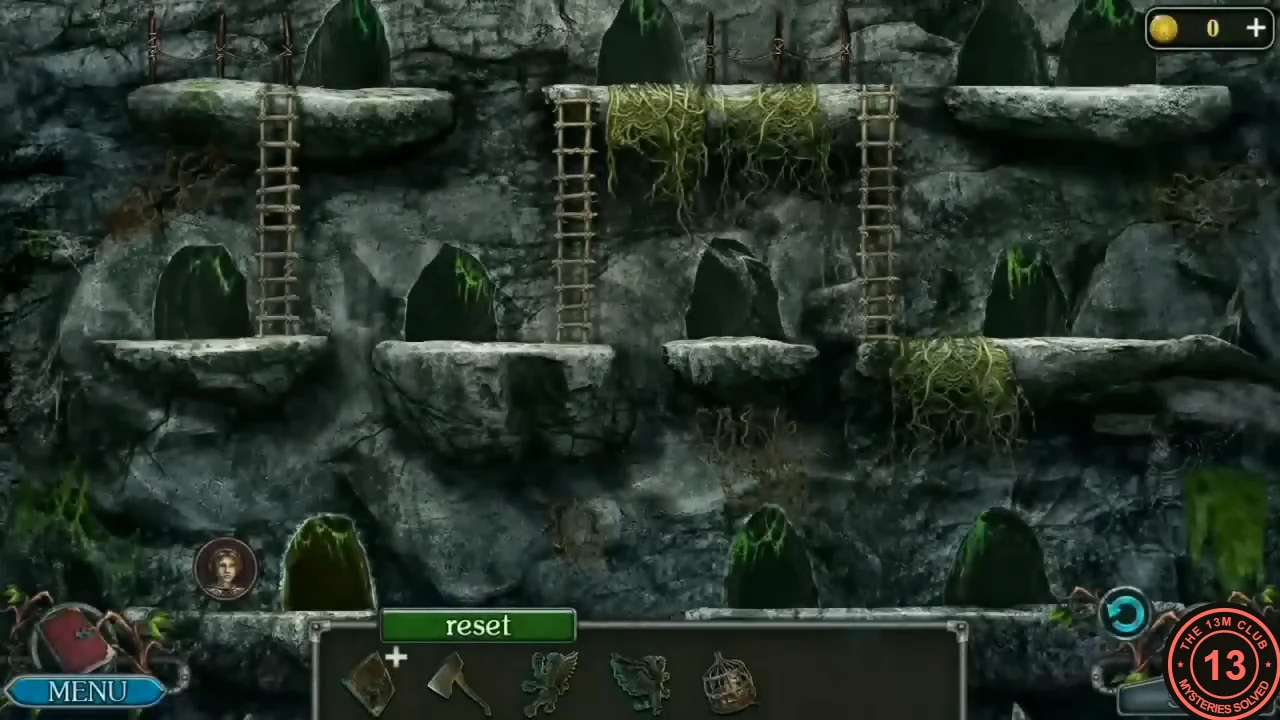
The last stretch takes the sleeping nestling up the cliff to Griffin's Mountain.
- In the mill yard, zoom into the cage on the wagon: give the nestling the Valerian infusion to calm it, then use the Carrier to pick it up (Griffin nestling).
- Zoom into the dark crevice in the rocks on the left of the mill yard and put the Lit lantern inside. Mini-game: guide Skarlett's portrait token up a cliff of three stacked screens. Click a spot to walk there along a ledge or ladder; entering a cave mouth moves the token to the cave it is linked to, and the view scrolls when that cave is on another screen. Reset restarts the climb. Route through the footage, with detours removed: Bottom screen (dark): 1) from the start on the bottom-left ledge, enter the cave just to the right; you come out of the right-hand cave on the middle row. 2) Walk left to the ladder, climb to the top ledge with hanging roots, walk left along it and climb down its left ladder to the middle row. 3) Enter the cave beside that ladder; you come out of the top-left cave. 4) Climb down the far-left ladder and enter the left-most cave on the middle row; you come out at the top right. Walk left into the next top cave; the view scrolls up. Middle screen: 5) You come out of a bottom-row cave. Walk left, climb the ladder to the middle row, walk left and climb the next ladder to the top-left ledge, then enter the cave there; you come out of the right-hand cave on the middle row. 6) Climb down the ladder beside it and enter the bottom-right cave; you come out of the big cave on the root-covered ledge at the top right. 7) Walk left and climb the ladder up; enter the cave on the ledge it reaches. Top screen: 8) You come out of the big cave on the root-covered ledge at the lower right. Walk left, climb the ladder to the middle row and enter the cave on that ledge; you come out of the right cave of the fenced two-cave ledge on the left. 9) Walk left and enter the left cave; you come out of the right-hand cave on the middle row. 10) Climb the ladder up to the top ledge, walk left past the first cave and the posts, and enter the next cave. (The first cave only leads to the cobweb cave at the lower left and back.) You come out of the bottom-left cave of the middle screen. 11) Walk right and enter the next cave: the token reaches the top and the climb ends.
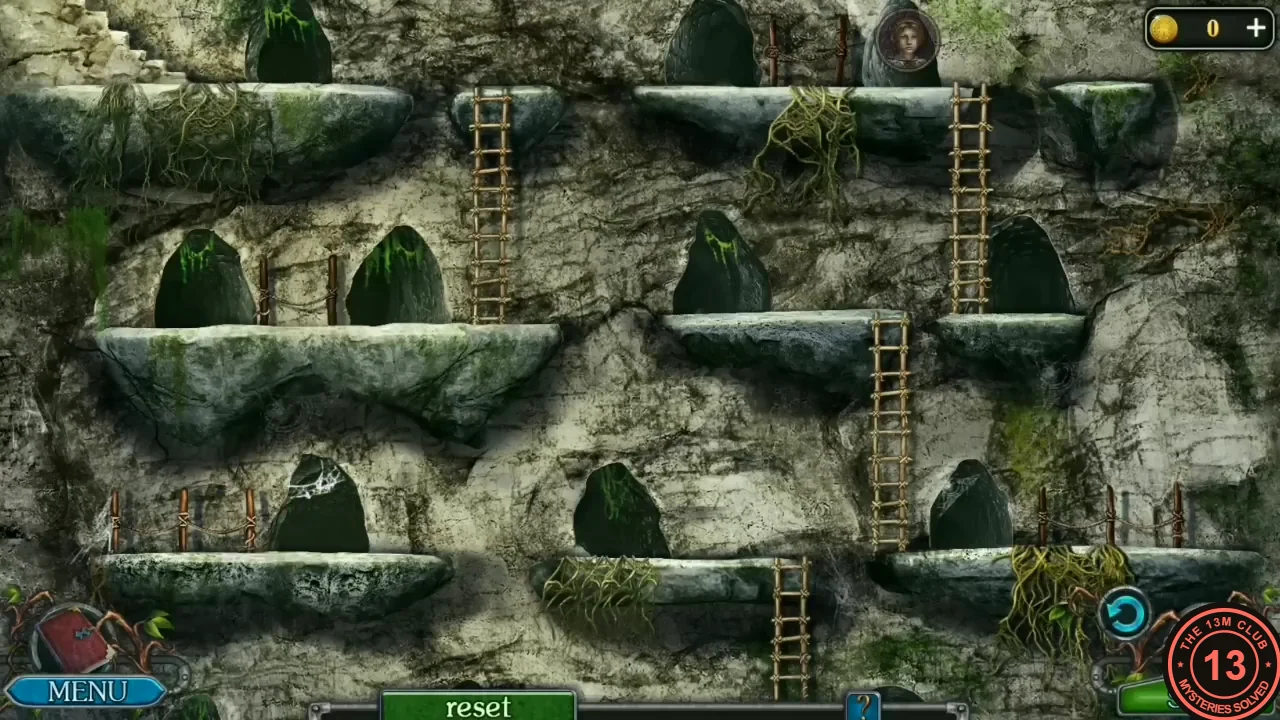
Near the end of the climb: the token on the top ledge.
The Griffin Panel and the Nest
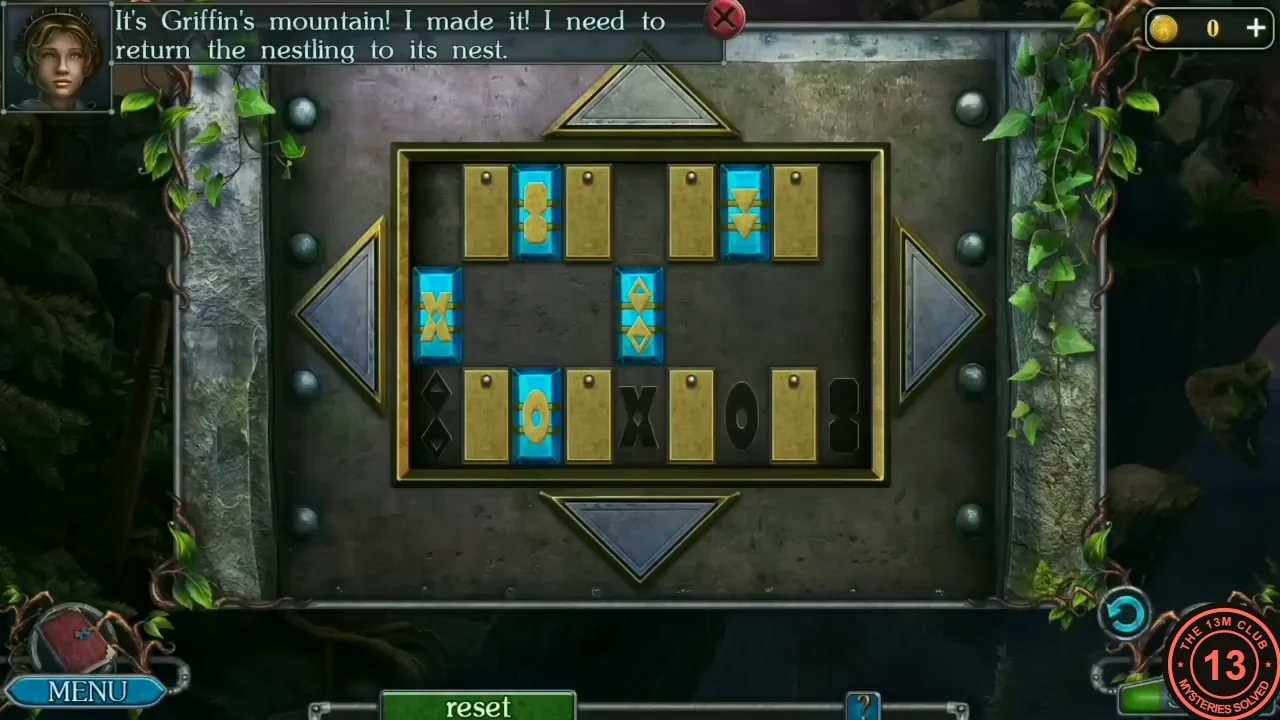
The stone panel on Griffin's Mountain is a sliding-tile puzzle; solving it brings the nest within reach.
- On Griffin's Mountain ('I made it! I need to return the nestling to its nest'), zoom into the stone panel with two griffin reliefs and put both Griffin figurines on it. Puzzle: five blue symbol tiles sit on a board with fixed gold tiles in the top and bottom rows; the middle row is open. The bottom row has five holes, each with a black silhouette. The four arrow buttons around the board move ALL blue tiles at once, one space per press (in our video a right press moved two loose middle-row tiles one place each, although the row was open further); a tile that is blocked by a gold tile, the frame or another tile stays where it is. Goal: each blue tile in the bottom hole with its own silhouette. In our game the bottom row from left to right needed: double diamond, double triangle pointing down (this hole was hidden under the O tile at the start), X, O and figure-eight. Method: 1) Tiles in a bottom-row hole are held between gold tiles, so left and right presses do not move them; only an up press lifts them out again. 2) Use the open middle row to shift loose tiles sideways until one sits directly above its hole, then press down. 3) Several tiles can drop with the same press: in our solve one down press dropped the double diamond and the double triangle into the two left holes; after a few more moves another down press dropped the X and the figure-eight together into the middle and far-right holes; finally one left press put the O above its hole and a down press dropped it in. 4) If tiles get stuck in the top row, press down to bring them into the middle row, or use reset.
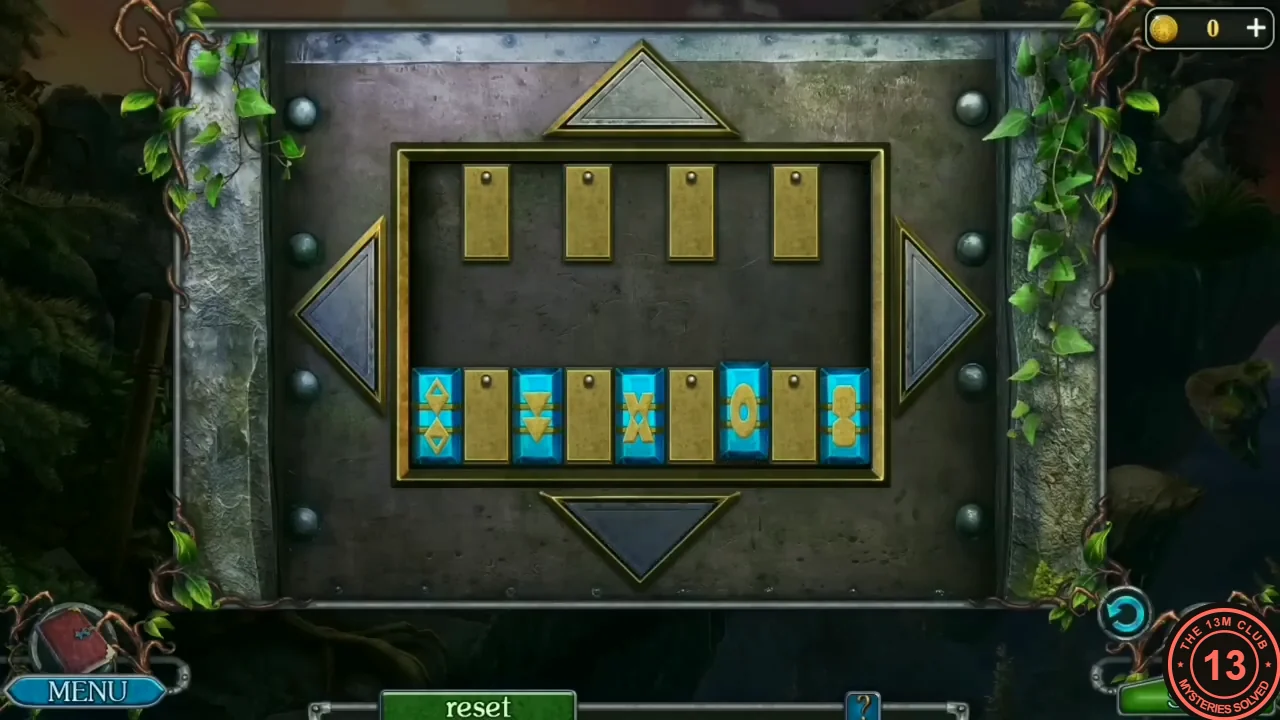
Solved: the bottom row is full. - When the panel is solved, floating rocks drift together and the floating cliff with the cave comes close to the end of the path. Zoom into the gap at the end of the path, just left of the floating cliff: a boulder there is wrapped in thick thorny roots. Use the Axe on the roots (it is used up): Skarlett chops several times (four swings in our video) until the roots are cut, and the boulder breaks free and falls away, leaving the way open. Tap the cave mouth on the floating cliff and zoom into the nest inside: another griffin chick sits there next to a large feather. Take the Griffin feather ('And here is the griffin's feather! Hooray!'), then put the Griffin nestling back into the nest beside the other chick. Watch the ending: Skarlett tells the teacher 'I found and read the book, as you requested. I also found a griffin feather!'; the teacher answers 'Don't lie, no one has seen a Griffin for a long time. And what conclusions did you come to for yourself?'; Skarlett: 'I concluded that people and magical creatures are not like we are taught. And the world is nothing like the witches have portrayed it to be.'; teacher: 'What? Looks like I'll be seeing you after class, Skarlett... again.' Chapter 4 is complete (100%) on page 2 of the Chapter Selection screen, and Chapter 5's PLAY button is now active.