Chapter 5 (Bonus)
The Floating Casket
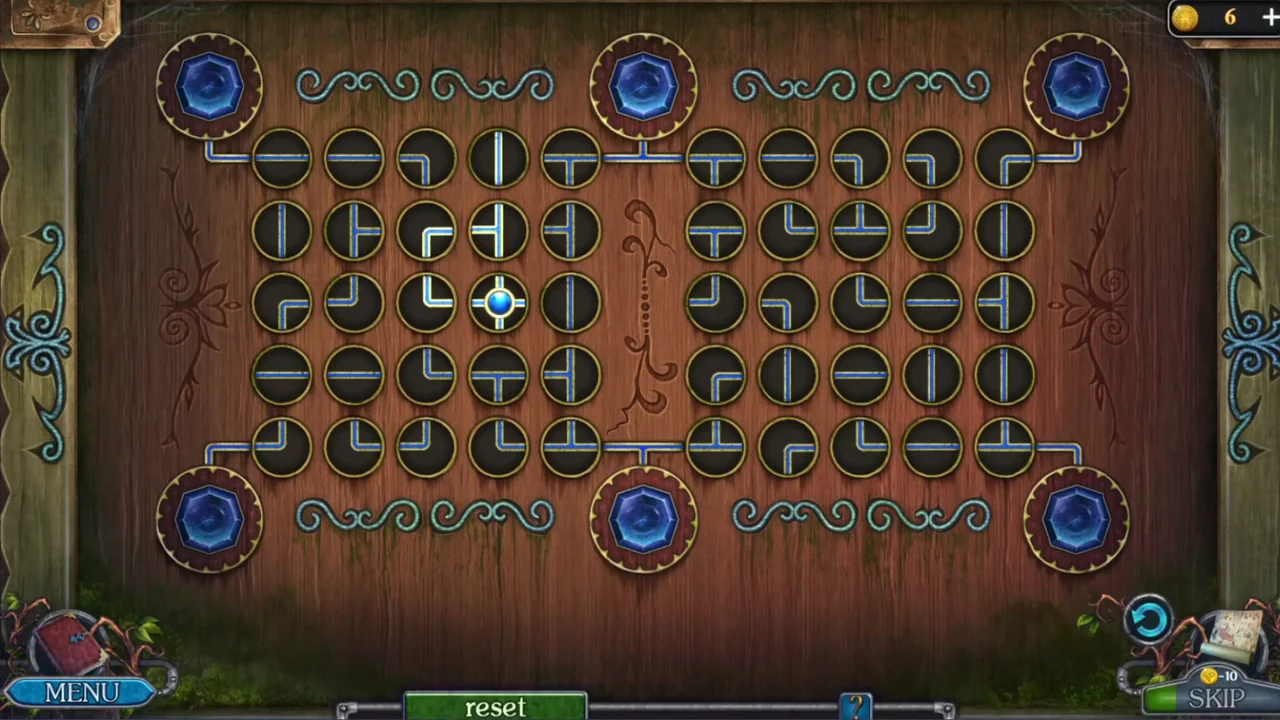
A box is floating in the glade pond.
- In the glade, zoom into the pond and use the Net to scoop out the floating box: you get the Casket. Open it from the inventory. Puzzle: the board has two 5x5 grids of pipe tiles. The tile with the blue ball in the middle of the left grid is the source, and six blue gems sit on the frame (three at the top, three at the bottom). All six gems must be connected to the source. The tiles do not turn on their own spot. Tap a tile and the tiles around it move one place around it, clockwise; each tile keeps its direction and the tapped tile stays where it is. In our test this happened with the eight tiles around a middle tile, so eight taps on the same middle tile bring its ring back to the start. Tapping a tile on the edge of a grid moves only the neighbouring tiles that exist (five for a tile in the middle of an edge). Pipes connected to the source glow brighter. Press Reset if the board gets too mixed up. Work outward from the source. The two grids meet only at the top-centre and bottom-centre gems, so the right column of the left grid must carry the connection to them. In our solved board, the source connected right and then up the right column of the left grid to the top-centre gem. From there, row 2 and the top row led back to the top-left gem. The source also connected left, then down, and along row 4 to the left edge, which led down to the bottom-left gem. The right column carried on down to the bottom-centre gem, and the whole bottom row of the right grid led to the bottom-right gem. From the top-centre gem, the top row and row 2 of the right grid led to its right column and up to the top-right gem. When all six gems light up, the box opens. Take the Key from the box of scrolls. Your tiles may start in different places; the start and solved boards in the images are one example.
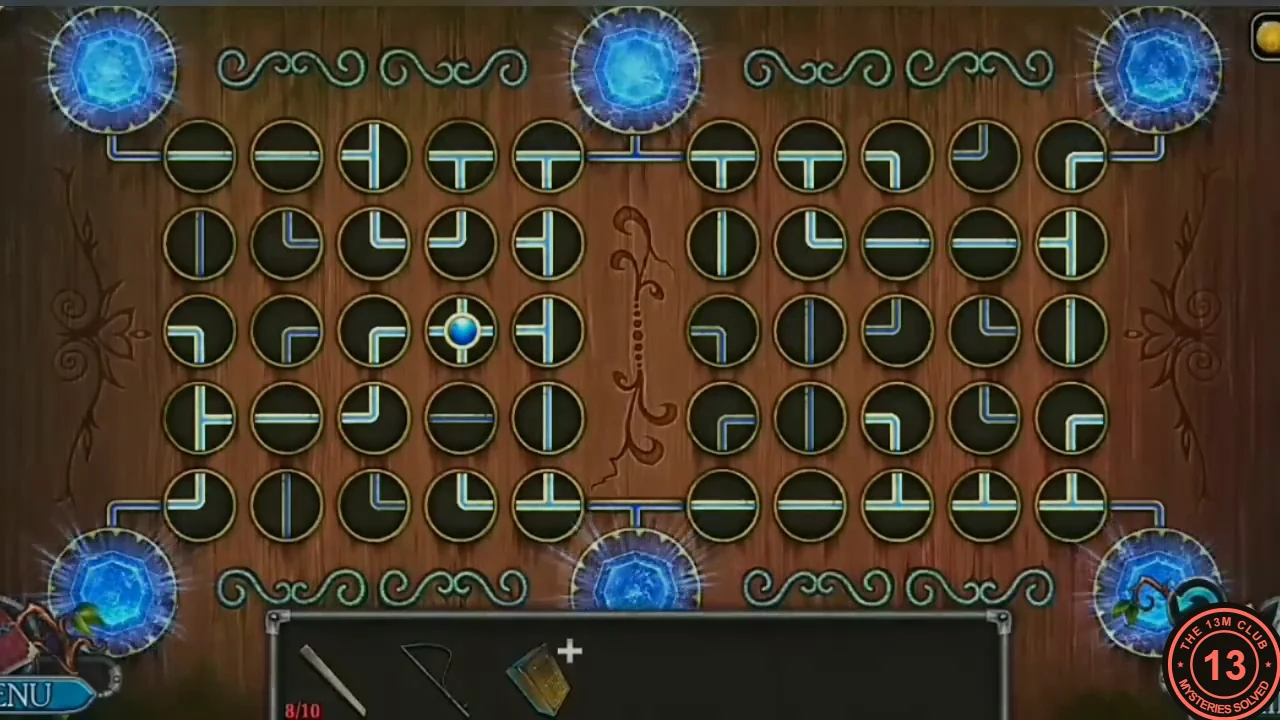
Solved: all six orbs light up.
Chapter 5 (Bonus)
The Messy Hut (Hidden-Object Scene)
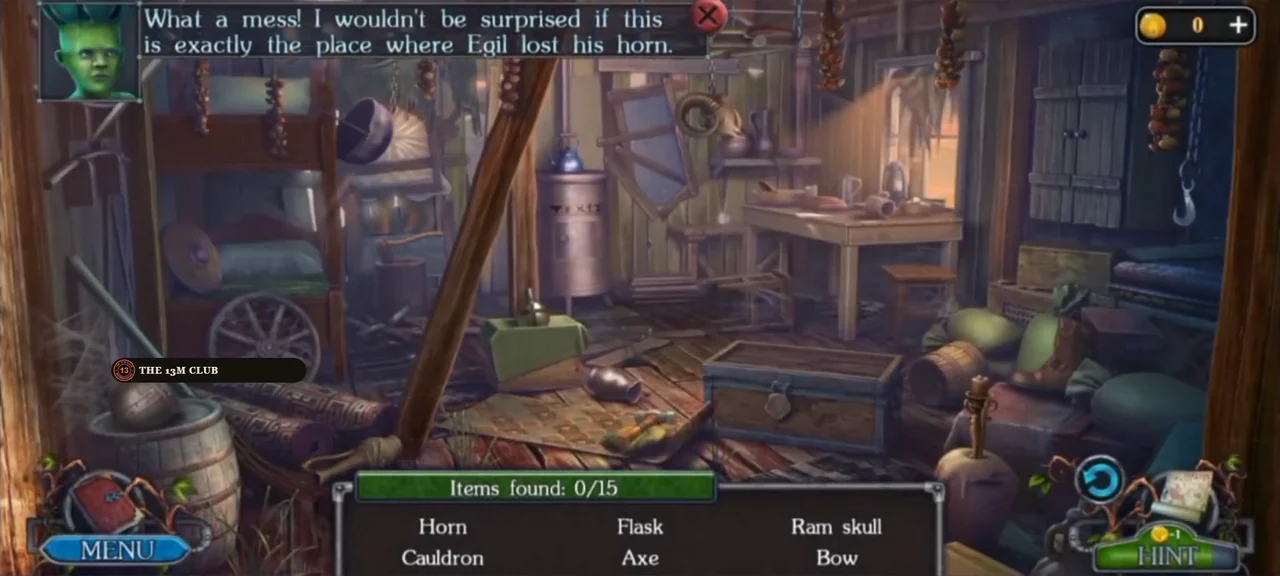
The key opens the hut on the far bank. Inside is a hidden-object list scene ('What a mess! ... Egil lost his horn').
- Open the hut padlock with the Key. Hidden-object scene ('What a mess! I wouldn't be surprised if this is exactly the place where Egil lost his horn'): find the 15 items in the list (Items found x/15). The room is wider than the screen, so drag it sideways to see the right-hand wall cupboard. The list includes Horn, Cauldron, Flask, Axe, Ram skull, Bow, Candle, Boot, Slingshot, Shield, Helmet, Corn, Smoking pipe, Deer figurine and Sword. Locations: the Cauldron is the dark round pot hanging on a chain from the ceiling just right of the top bunk; the Sword hangs in the very top-left corner of the room, above the bunk bed, its hilt near the ceiling and the blade slanting down along the left edge; the Bow lies across the top of the wooden rack hanging on chains from the ceiling in the middle of the room; the Ram skull sits on the wall shelf above the table, just right of the crooked window frame; the Axe is stuck in the chopping block left of the stove, behind the diagonal beam; the Slingshot is on the bottom shelf of the wall cupboard on the right; the Shield is the round shield leaning at the foot of the bunk bed on the left; the Helmet is the metal helmet sitting on top of the barrel in the lower-left corner; the Flask is the round metal flask standing on the crate under the green cloth in the middle of the floor; the Corn is hidden in the patterned rug rolled up on the floor in front of that crate: tap the rug to unroll it and take the yellow cobs; the Boot is the brown laced boot standing among the green sacks at the right, behind the small barrel; the Candle is the candle in the tall brass holder standing on the round pot at the front right; the Deer figurine is inside the stove: zoom into the stove and tap its door to open it; and the Horn is in the wooden chest in the middle of the floor: tap the chest to open its lid and take the Horn from the close-up. The last item, the Smoking pipe, is in the box on the table, which has a rune lock (next section).
Chapter 5 (Bonus)
The Rune Box and Egil's Horn
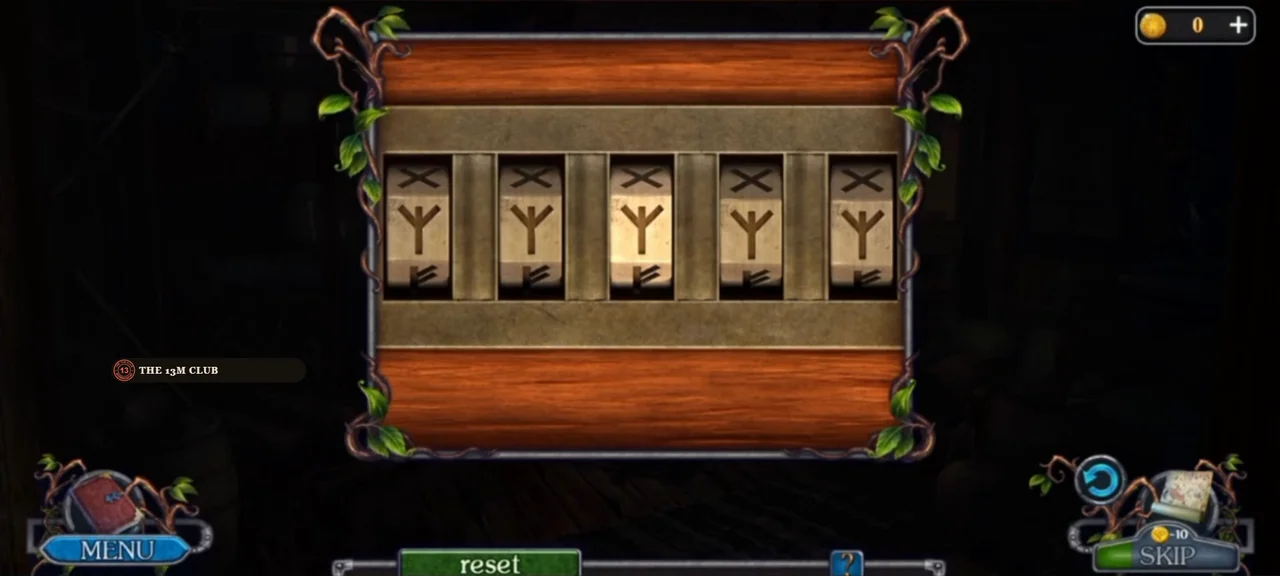
The box on the hut table has a five-wheel rune lock; the code is on the stove.
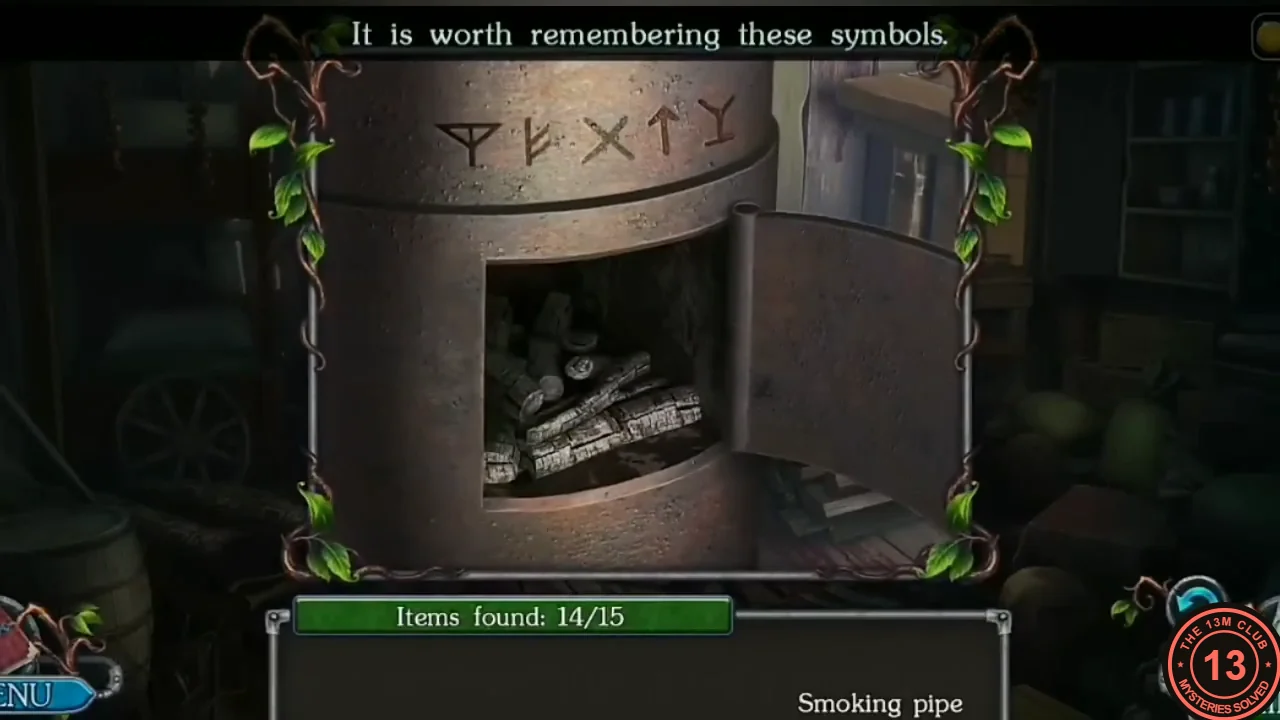
- Look at the five runes on the stove and remember them ('It is worth remembering these symbols'). Zoom into the box on the table: its rune lock has five wheels. From left to right, set them to the stove runes: Y with a stem, F-rune, X, up-arrow, and Y on a bar. Take the Smoking pipe from the box (15/15) and the Horn is yours. Herby decides to return to the pier and blow the horn.
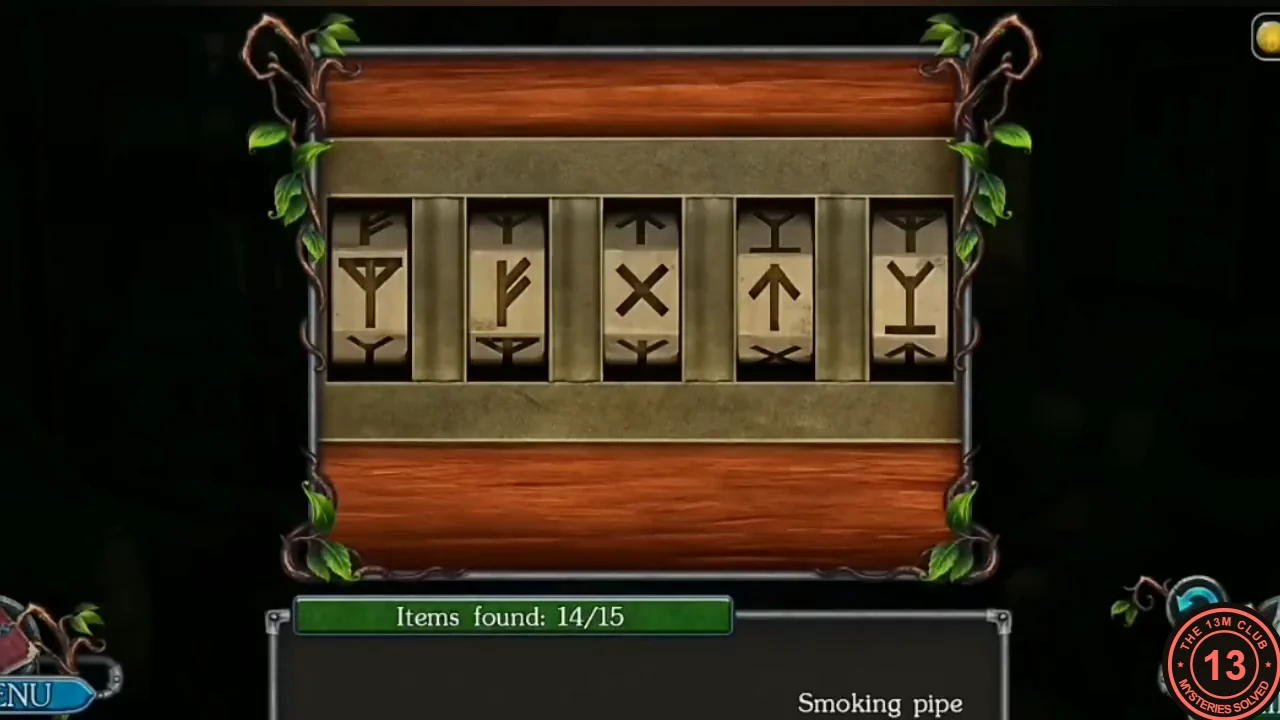
The rune box set to the stove code. - Go to the swamp pier and blow the Horn there. 'A few minutes later' Egil arrives ('I heard the horn blow. You found it; excellent!'). A lot of time has passed and the turtle should already have answered the horn, so Egil fears something happened to her: he will search upstream and leaves the downstream search to you. Herby is afraid of the predatory mushroom bees downstream, so Egil gives him a special instrument to scare the bees away: the Jingle bells. New task: Find the turtle.
Chapter 5 (Bonus)
The Trapped Turtle and the Animal Rings
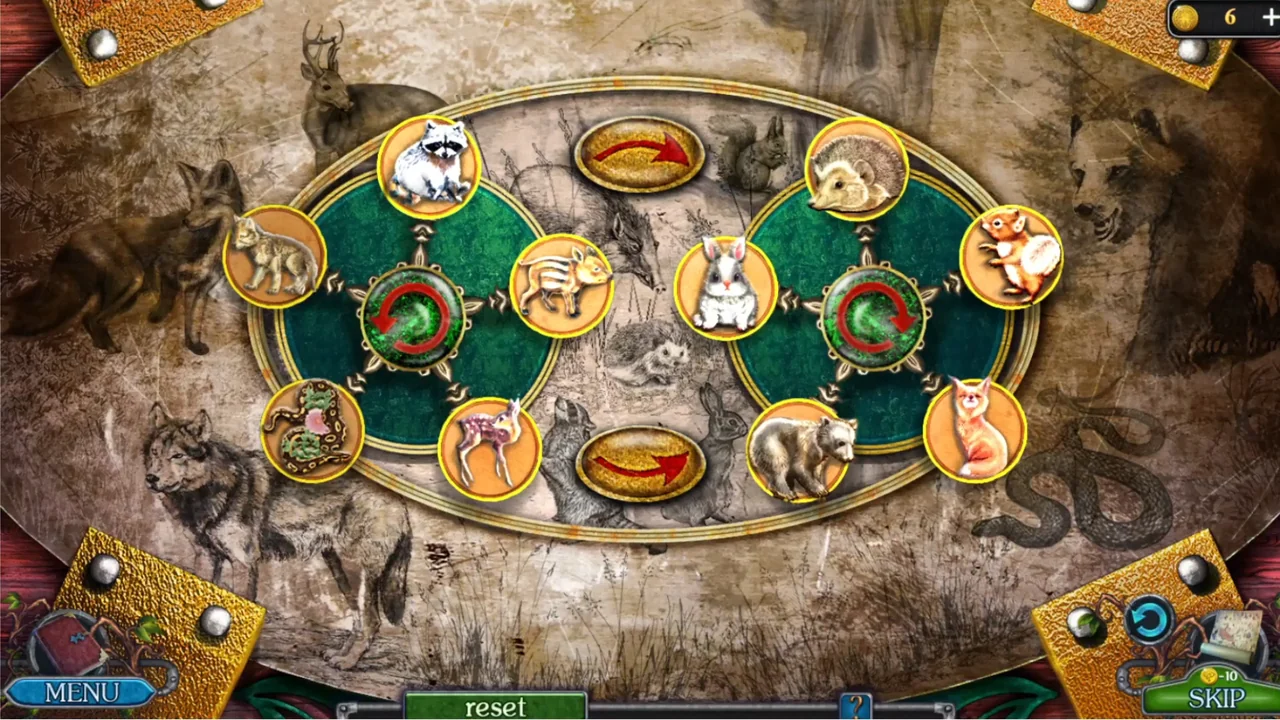
Downstream, the giant turtle has fallen into a trap under a heavy cage.
- In the glade, zoom into the mushroom-lined path in the middle of the scene: a few small bees crawl over the mushrooms. Use the Jingle bells there to scare the bees away, then walk on along the path to the next clearing. The turtle is trapped under a cage ('Oh no! The turtle fell into a trap. I need to free her! But I can't lift this heavy cage by myself'). Zoom into the stone well on the right and take the board lying across it (Boards 9/10). Optional: click the small grey Morphing Object on the grass just left of the cage (Morphing objects 39/65). Zoom into the well again: a small amulet floats on the water. Lower the Fishing rod into the well to fish out the Fish amulet. Optional: click the green medallion hanging in the yellow tree at the top left of the scene (Collection items 11/15). Look at the rope hanging from the branch above the cage ('If only I had the strength to pull this end of the rope...'; 'I need to raise this cage somehow').
- Put the Fish amulet into slot 4 of the chest in the druid's yard. Puzzle: there are two green rings, each with five animal tokens, and the background shows sketches of the animals. Tap a ring's centre to turn its five tokens one place in the direction of the red arrow on that centre: the left ring turns anticlockwise and the right ring turns clockwise. The big outer oval passes through only four tokens: the left and lower-left tokens of the left ring and the right and lower-right tokens of the right ring. Tap the red arrow plate above the rings to move those four tokens one place clockwise around the oval (the token at the far left jumps across the top to the far right). Tap the plate below the rings to move them one place the other way (the token at the lower right jumps along the bottom to the lower left). This is how tokens change rings. The top and bottom tokens of each ring and the two tokens in the middle, between the rings, stay put when you use the plates. Put each token next to its matching sketch. In our solved board the left ring holds the deer at the top. Going clockwise, it then holds the piglet (right, by the boar sketch), the raccoon (bottom), the wolf cub (bottom left, by the wolf) and the fox (left, by the fox). The right ring holds the squirrel at the top. Going clockwise, it then holds the bear cub (right, by the bear), the snake (bottom right, by the snake), the rabbit (bottom, by the hare) and the hedgehog (left). The solved board is shown in the image. Take the Hook (a three-pronged hook) from the chest. The sketches are part of the background, so the target layout should be the same for you even if your tokens start differently.
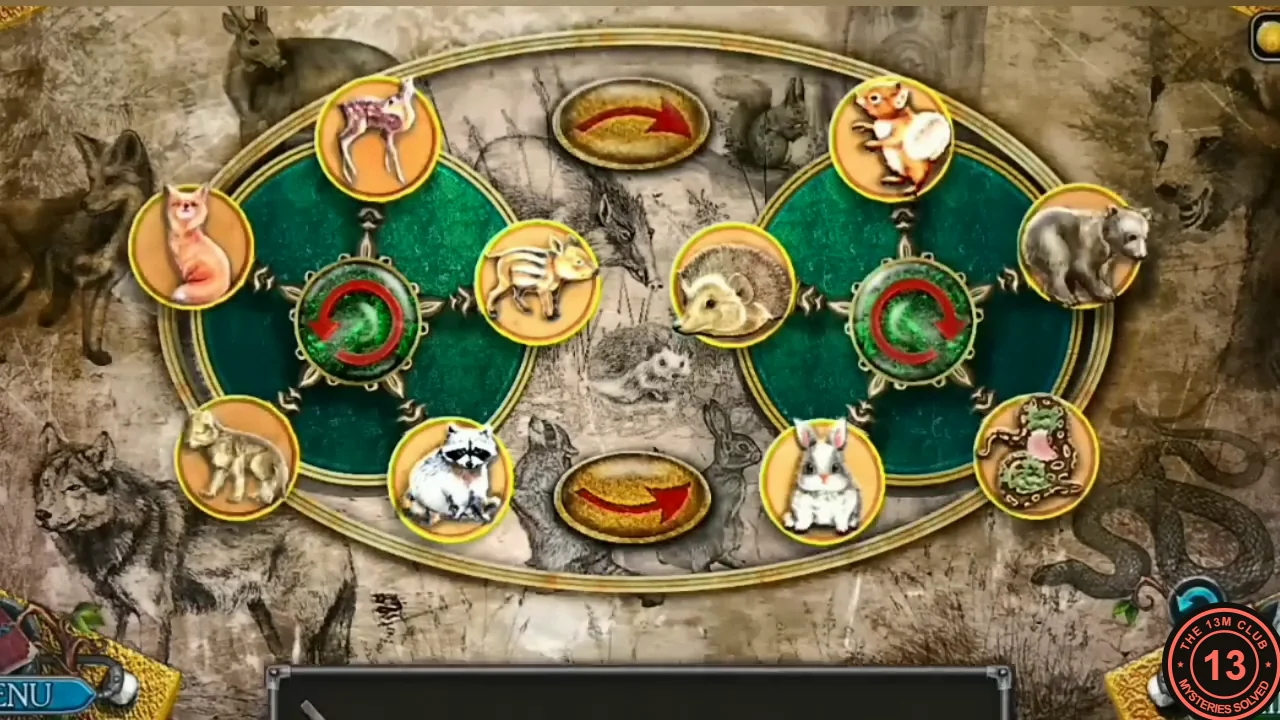
The example solved layout.
Chapter 5 (Bonus)
The Abandoned Ship
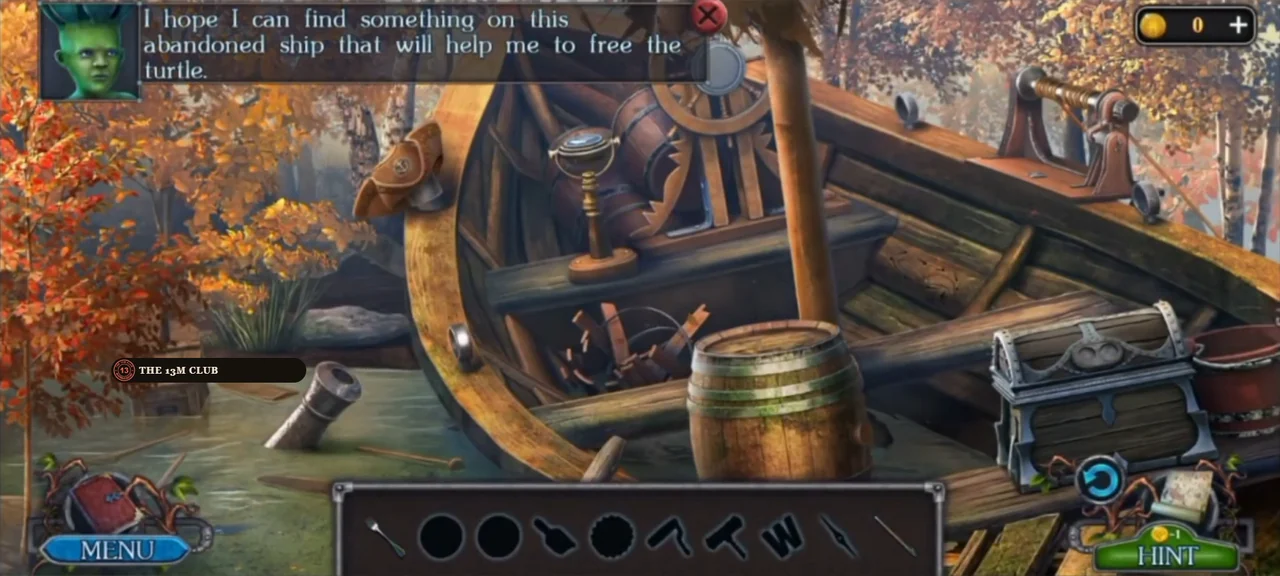
All ten boards make a bridge to an abandoned ship. Herby hopes to find something there to free the turtle.
- In the cage clearing, take the last board from the ground near the cage (Boards 10/10). Go to the glade and use the Boards to build a walkway to the abandoned ship.
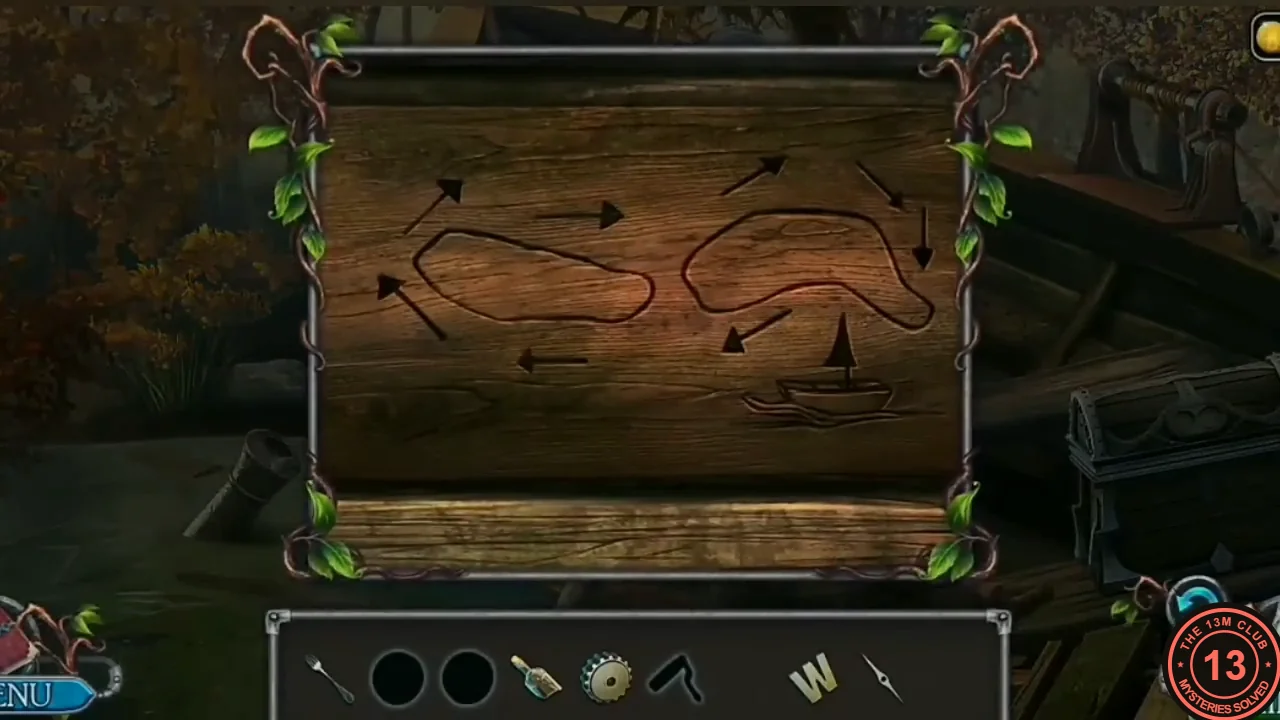
- The ship is a silhouette search: the bar shows dark outlines of the items, and each lights up when you find it. Take the Fork stuck upright in the top of the barrel in the front of the boat. Zoom into the hat hanging on the post at the left of the boat: it has an anchor medallion sewn on. The compass on its stand by the ship's wheel has no needle. A wooden board in the boat has a route carved into it (see the image). Zoom into the winch at the right end of the boat ('The winch is faulty') and take the Letter W lying on its wooden base. Take the Pike pole, the long pole that leans out of the wooden post in the water at the left. Use it to pull in the floating crate. In the crate close-up, take the Corkscrew from the left-hand compartment. The bottle standing in the crate then lay broken on the deck in front of the crate in our recording; take the Cogwheel from the back-right compartment and the bottle from the deck (Broken bottle). Zoom into the barrel and use the Corkscrew on its bung. Take the Needle from what spills out.
Chapter 5 (Bonus)
The Compass Route
The carved route on the ship gives the directions for the compass on its stand.
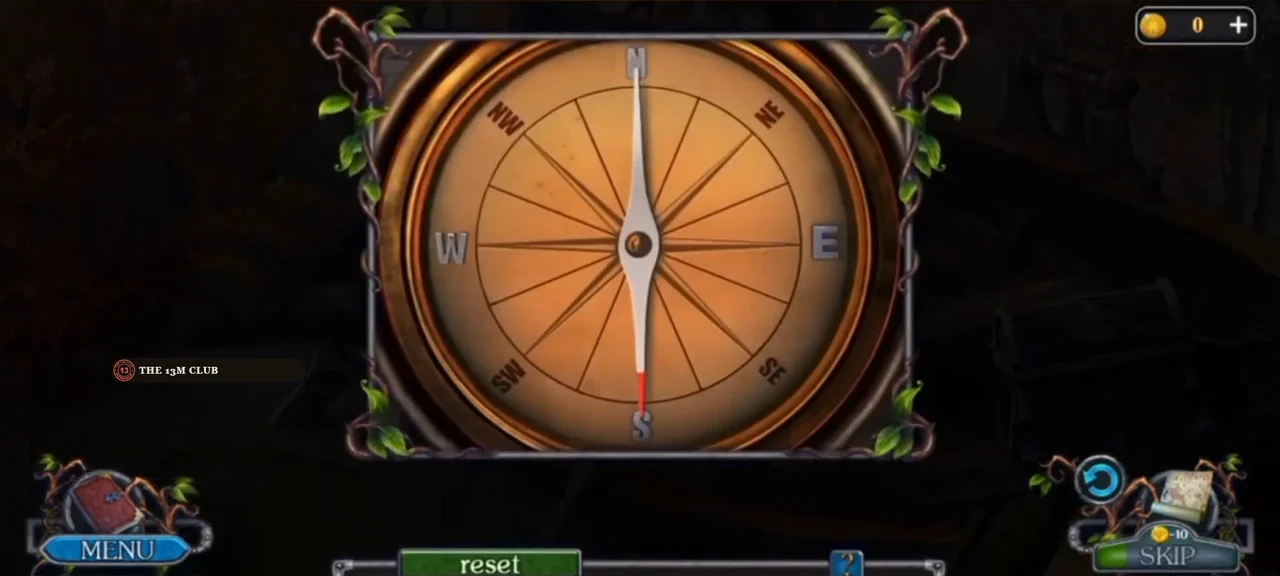
- Zoom into the compass stand: put in the Letter W, then the Needle. Puzzle: follow the arrows carved on the board, starting at the little ship. Point the needle's red tip in each direction in turn: SW, W, NW, NE, E, NE, SE, S. Take the Bird medallion.CODESW, W, NW, NE, E, NE, SE, S
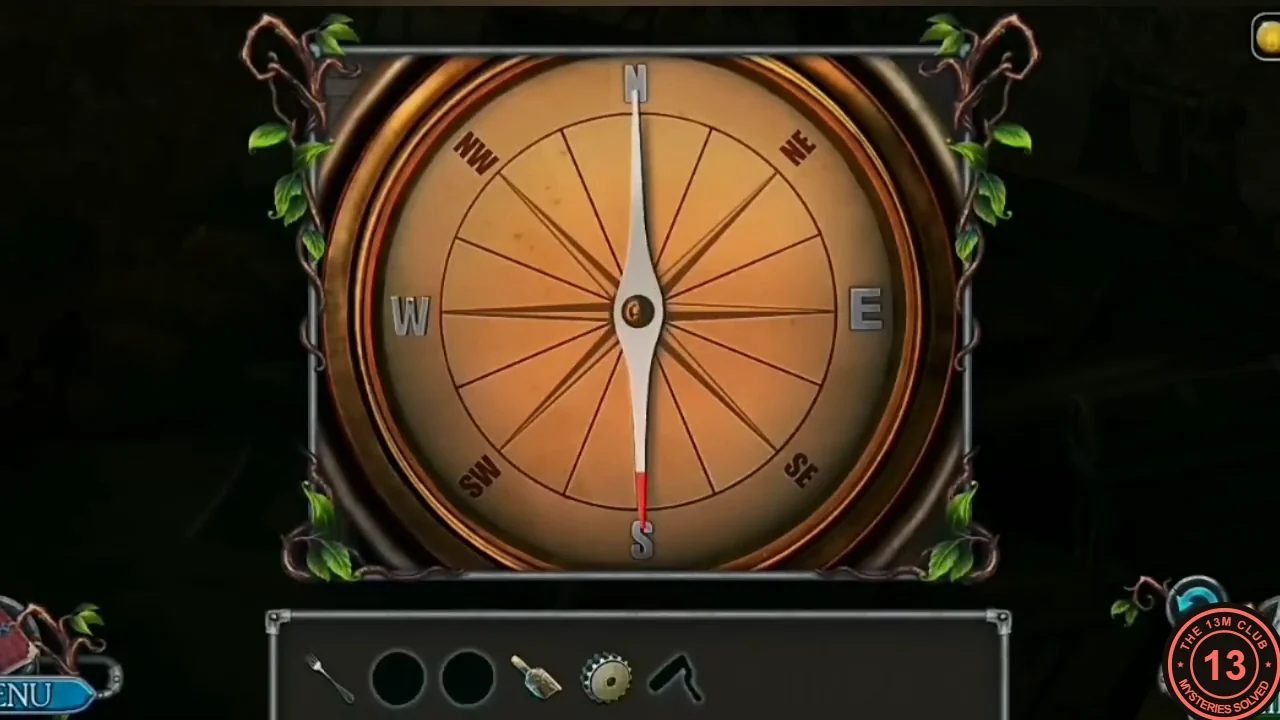
The last direction, S. - Zoom into the winch and put the Cogwheel on it (still 'The winch is faulty'). Zoom into the hat and use the Fork to prise the Anchor medallion off it. Zoom into the metal-banded chest on the right of the deck: put the Bird medallion and the Anchor medallion into its two round recesses, open it and take the Lever. Attach the Lever to the winch and turn it to haul up a net ('...those nets. I'll have to cut them off with something'). Cut them free with the Broken bottle to get the Nets.
Chapter 5 (Bonus)
Twelve Stones for the Net
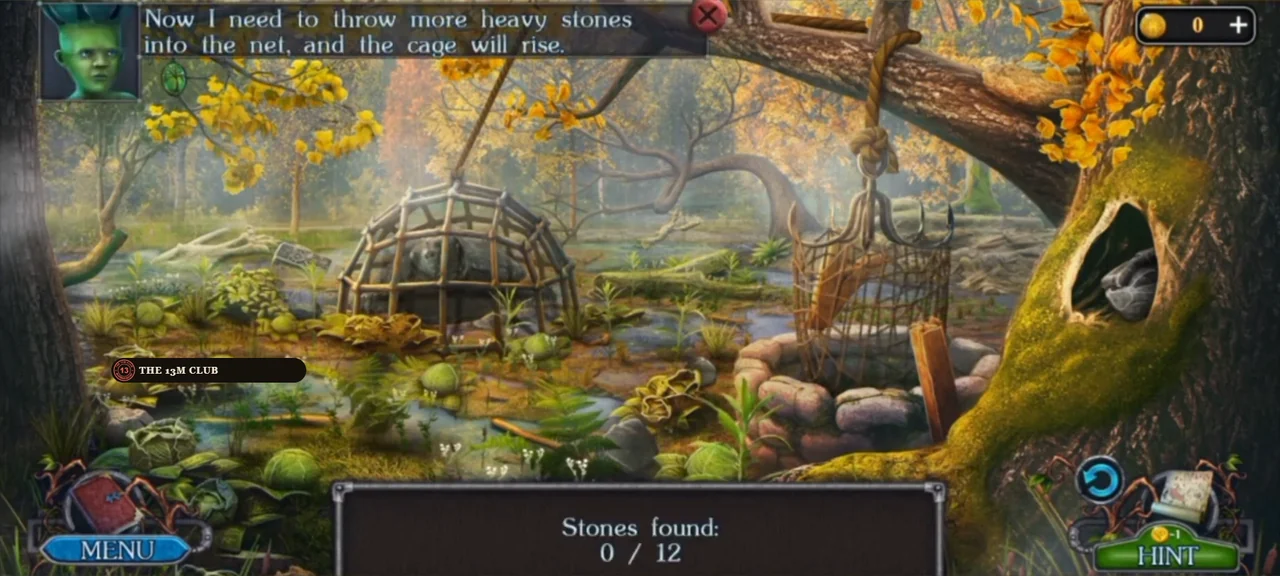
Fill the net with 12 stones to raise the turtle's cage.
- In the cage clearing, hang the three-pronged hook on the end of the rope above the well, then hang the Nets on it. Now 'I need to throw more heavy stones into the net, and the cage will rise': find 12 stones (Stones found x/12). Tap a stone to take it; it glows briefly and disappears. In our playthrough the stones were found in this order. The first two are the grey stones lying in the dark hollow of the big mossy tree trunk on the right. The third is the grey stone in the lower middle of the clearing, between the fern and the yellow flower, left of the well. Two more are in the fern-pool close-up, among the ferns at the edge of the water. A sixth stone in the same close-up sits in the hollow of the old stump at the top left, behind a cobweb ('I need something to remove this sticky web'). Take the dry stick that lies diagonally across the ferns, use it on the web, then take the stone. The seventh is in the main clearing: the grey stone left of the cage, just below the carved stone sign, between the cage's left side and the leafy bush. Three were in the grassy close-up with the pile of sticks and the mossy log: one at the left edge; one hidden under the pile of dry sticks in the middle (click the pile first: the sticks are pushed aside and the stone underneath can be taken); and one at the top by the bush. The eleventh is the grey stone at the far left edge of the main clearing, just left of the big cabbage plant at the lower left. The twelfth is the flat pale stone lying in the straw nest on top of the big tree branch at the upper right, above the rope. When you have all 12, put the Stones into the net. The cage rises and the turtle is free.
- Watch the ending: 'A few hours later' Egil praises Herby ('Well done! Although you are only a young boy, you are brave, agile...'), and Herby says he's always happy to help look after the forest. Chapter 5 is complete (100%) on page 2 of the Chapter Selection screen.