The Cellar Door's Symbol Lock
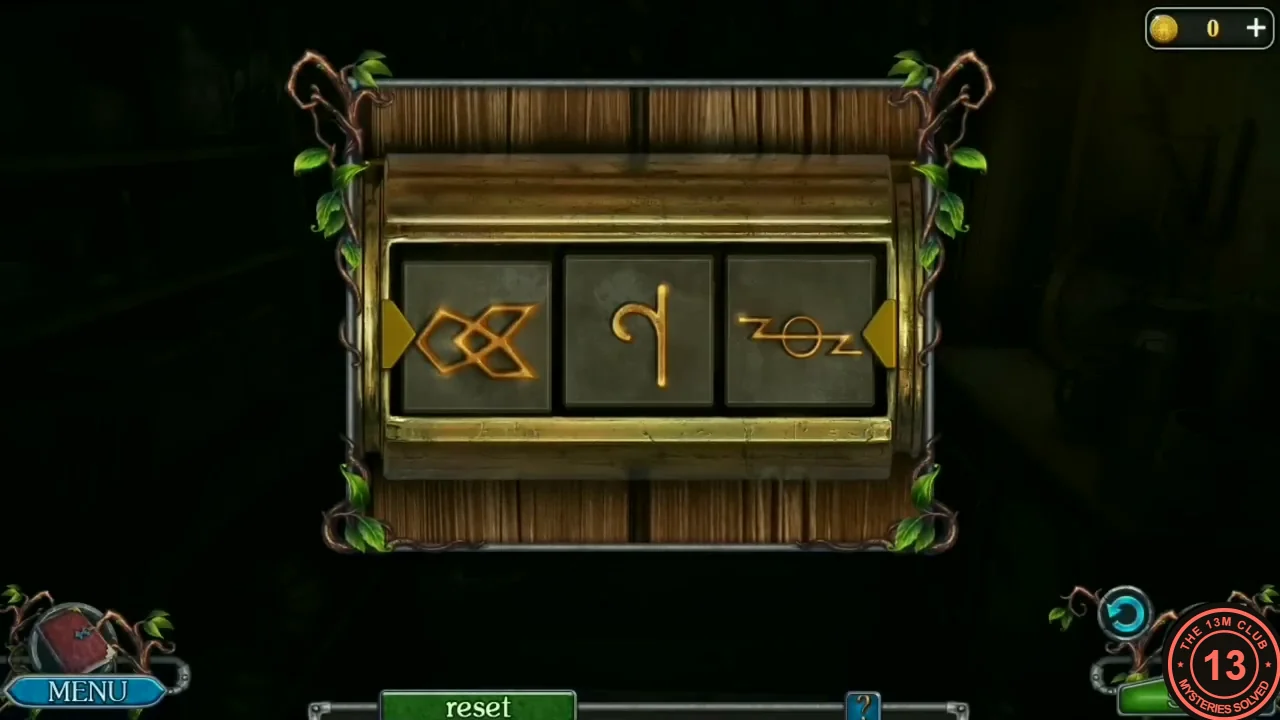
The coloured lantern light reveals the last symbols for the three-dial lock on the cellar's back door.
- In the coloured lantern light more symbols show: a hook-shaped rune on the front of the crate at the left (above the twig bundle), and a pale, glowing flag-shaped rune in the middle of the round patterned plate standing on the counter at the right. Together with the clover knot washed clean on the tray under the barrel, these are the three dial symbols. Zoom into the back-door lock and click each dial face to scroll through its symbols until the three dials show, from left to right: clover knot, hook rune, flag-shaped rune (as in the image). The door opens on a meat store: saw through the chain under the hanging meat with the Hacksaw and take the Chain. Combine it with the Hook in the inventory to make the Chain with hook.
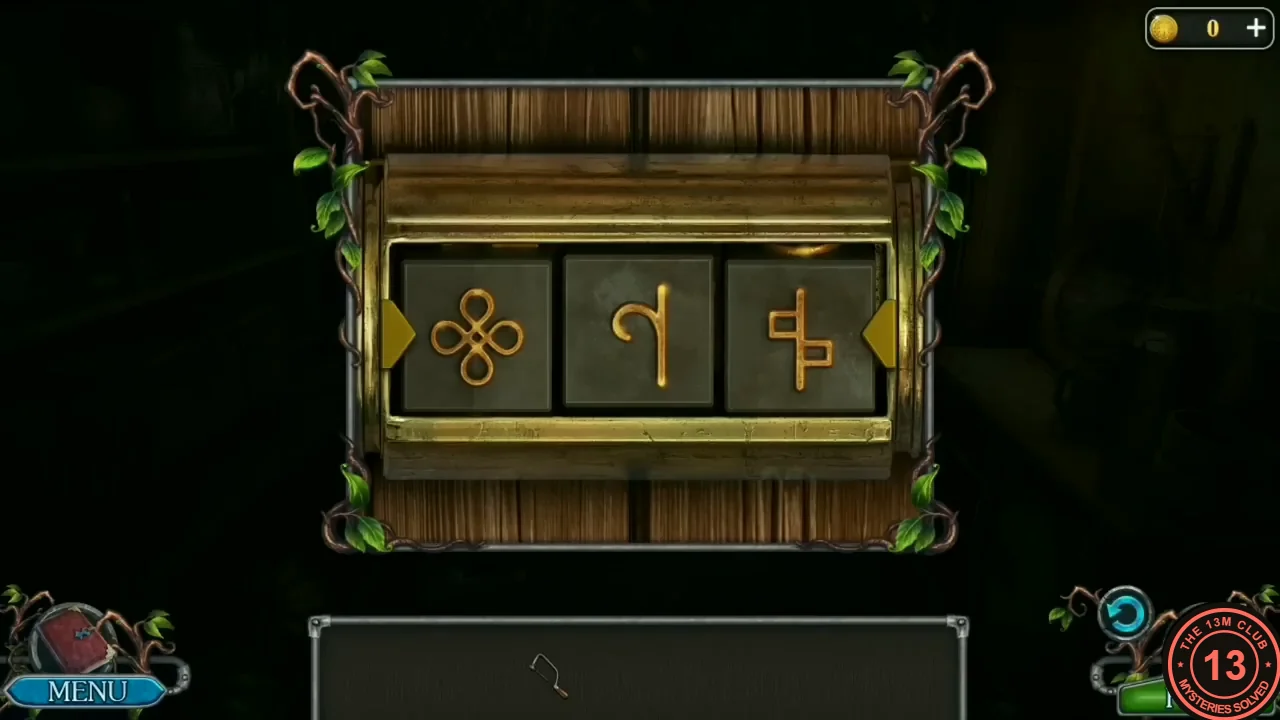
The accepted combination: clover knot, hook rune, flag-shaped rune. - Return to the camp and use the Chain with hook on the boulder in front of the shelter: the chain is attached, but the boulder stays put. Click the wooden pulling frame in the foreground, in the middle of the scene: it drags the boulder aside. Task complete: Open the shelter. Go inside.
The Children's Hideout and the Crystal Cave
Behind the boulder is a dug-out room with a ladder, a big clay pot and a stone wall with a handprint. A hint bottle stands on the table.
- Zoom into the dusty wooden box at the front left: a metal hand is fixed to its inside. Use the Knife under the metal hand to pry it off and take the Handprint.
- Zoom into the big bottle by the candle on the right. It is too dirty to read: use the Brush on it to wipe the glass clean ('It looks like a hint.'). Six symbols are scratched on it, each with a number (keep them for the rose relief). Left column: 1 = a stem with a U-shaped fork on top and two crossbars; 2 = a circle with an upturned crescent (horns) on top; 3 = a crescent over a circle over a cross, with a small hook beside it. Right column: 4 = an A-shaped sign with an extra crossing stroke; 5 = a three-pronged cup (trident) over a cross; 6 = a circle with a P-like stroke inside.
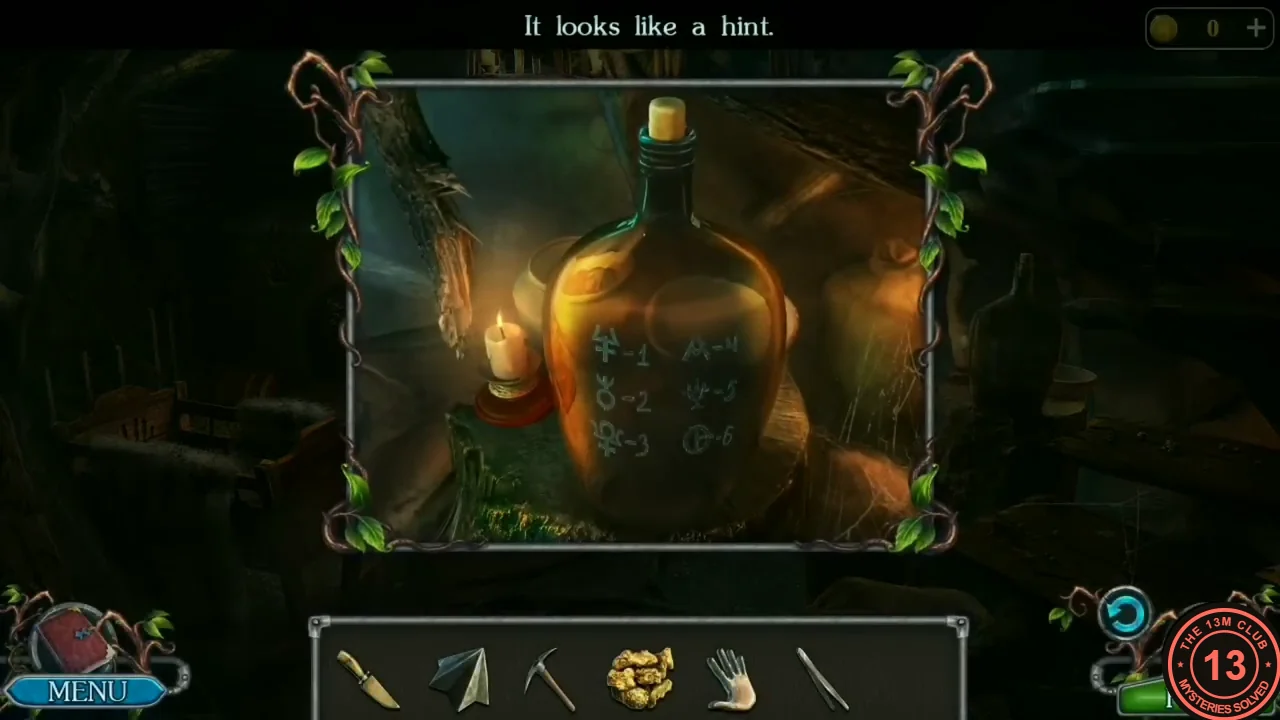
The bottle hint pairs six symbols with the numbers 1 to 6. 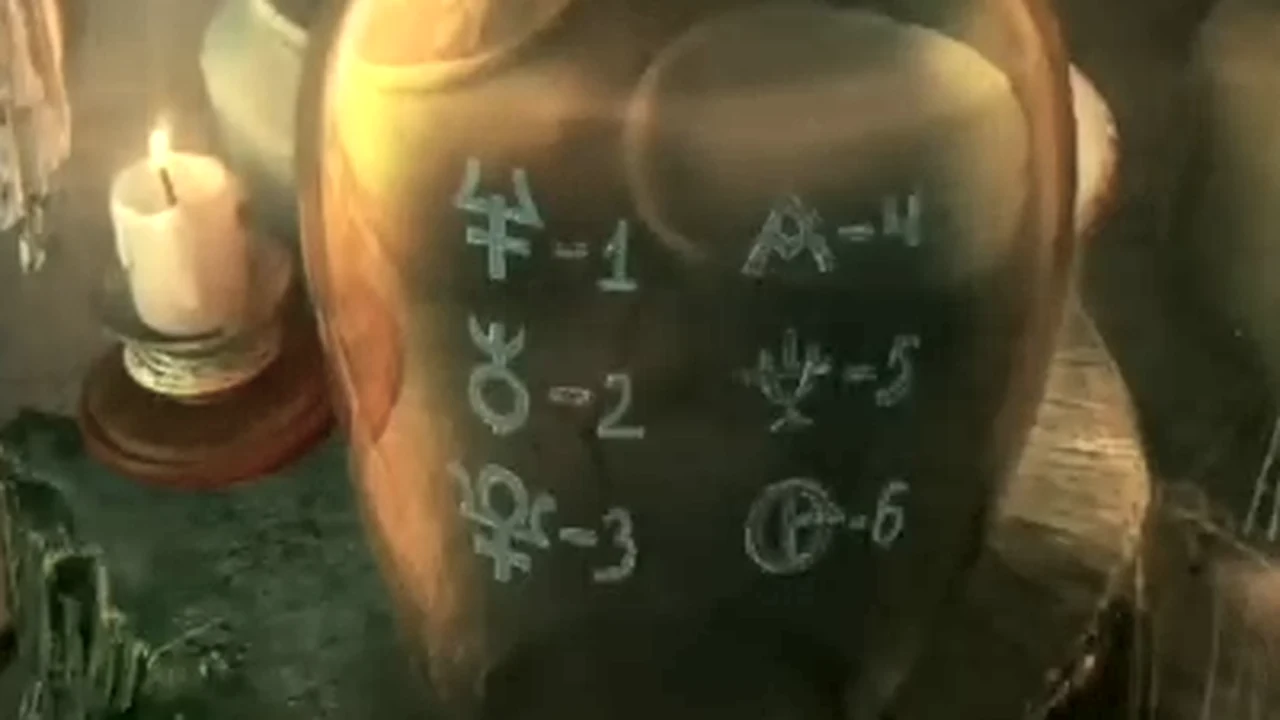
Brightened close-up of the bottle: left column symbols 1, 2 and 3, right column 4, 5 and 6. - Zoom into the sack and the clay pot at the back. Cut the sack open with the Knife ('There is something sewn inside here') and take the Rose. Fish in the pot of red berries with the Ladle and take the Tweezers.
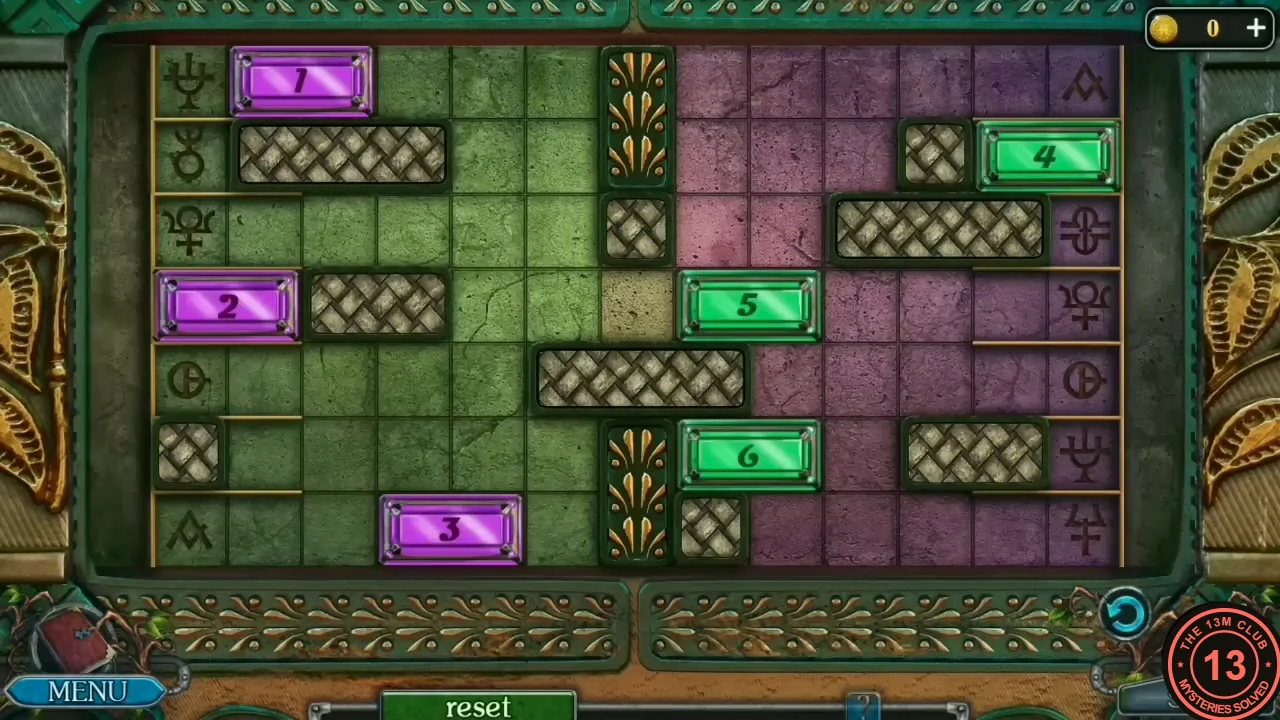
- Zoom into the green box on the left shelf with the rose relief missing two corners (gold nuggets are refused here). Put both Roses into the relief to open the sliding-tile puzzle. At the start the three purple tiles (1, 2, 3) are on the green left half and the three green tiles (4, 5, 6) on the purple right half. Controls: swipe a tile up, down, left or right; it slides in that direction until it hits an edge, a grey woven block, a central ornament or another tile. Tiles can cross between the halves only through the gaps in the central column. Goal: every green tile on the far-left edge and every purple tile on the far-right edge, each stopped beside the edge symbol that has its number on the bottle hint. The finished board: left edge 5 (top row, trident over a cross), 6 (5th row, circle with a P-like stroke), 4 (bottom row, A-shaped sign); right edge 2 (2nd row, circle with horns), 3 (4th row, crescent over circle over cross), 1 (bottom row, forked stem with two crossbars). The Reset button below the board was not used in the recording. Take the Pliers and the Pawprint from the opened box.
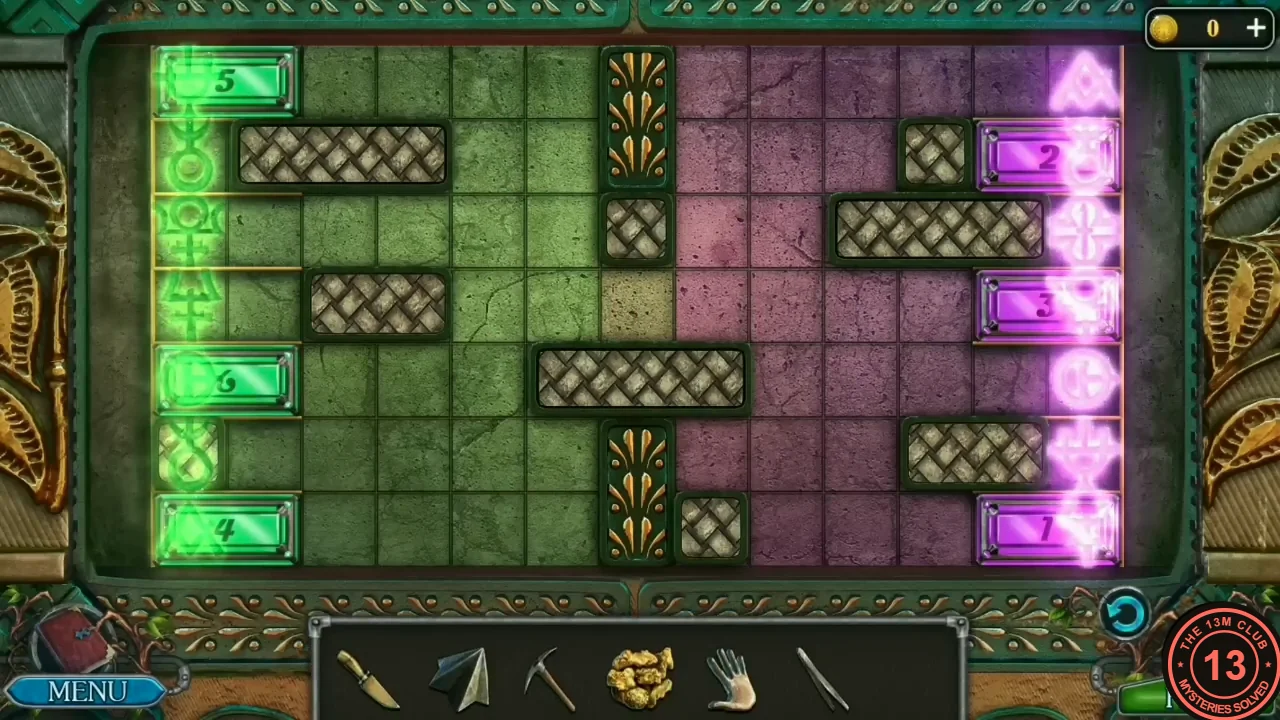
Example finished board: left edge 5, 6, 4; right edge 2, 3, 1. - Zoom into the stone wall with the carved panel: put the Handprint and the Pawprint into the two matching hollows. A low tunnel opens; crawl through to the crystal cave.
- 'The kids were supposed to be here, that's for sure! But no one is here.' Zoom into the big blue crystal cluster on the right and break off a Crystal with the Pickaxe. Zoom into the sleeping bag at the front: take the Scales ('I have a druid friend that can help me figure it out'; New task: Go to the druid), then use the Tweezers (from the pot of red berries in the hideout) on the torn gap in the sleeping bag to pull out the Ruby. No Knife is needed here.
The Wolf Statue
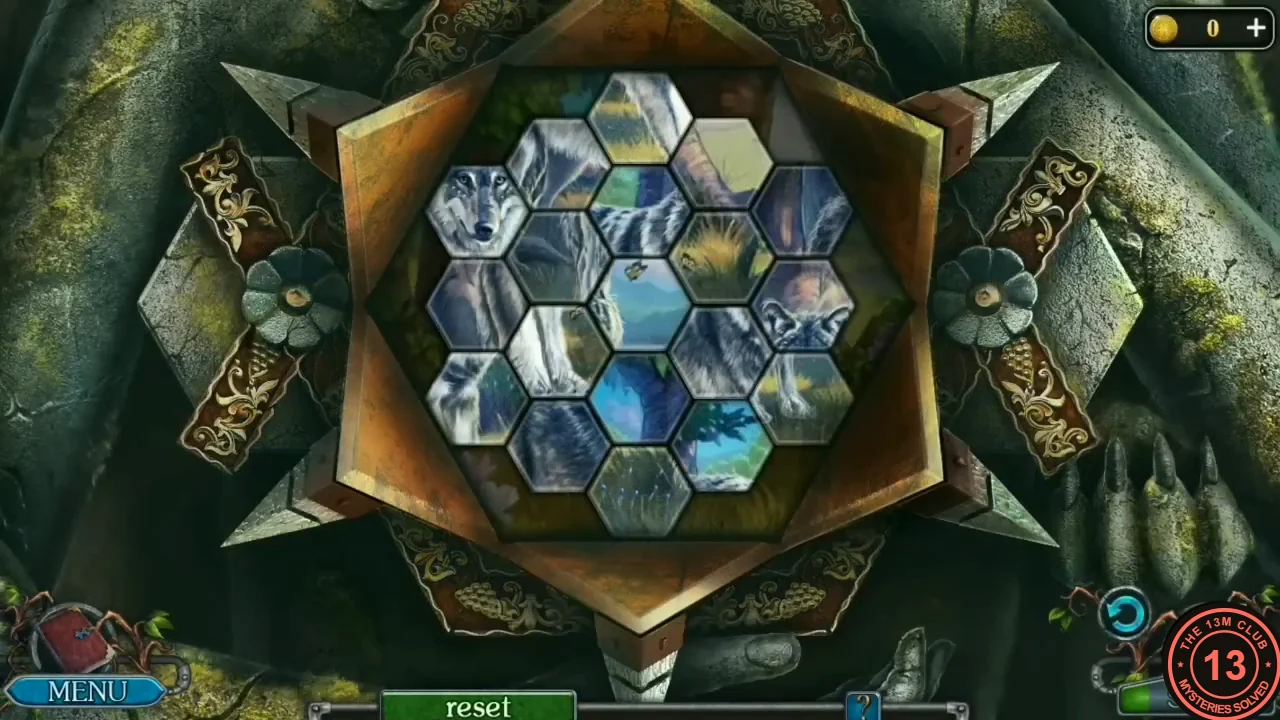
The stone statue at the back of the crystal cave hides a hexagon picture puzzle.
- Zoom into the stone statue at the back and put the Detail (dark metal triangle from the camp) into the centre of its hexagon. Puzzle: rebuild the picture of the wolf. Click a hexagon to select it (it gets a blue outline) and then click another to swap the two; the two hexagons do not have to be next to each other. Work outward from recognisable pieces such as the wolf's head and eyes. A Reset button sits below the board (not used in the recording).
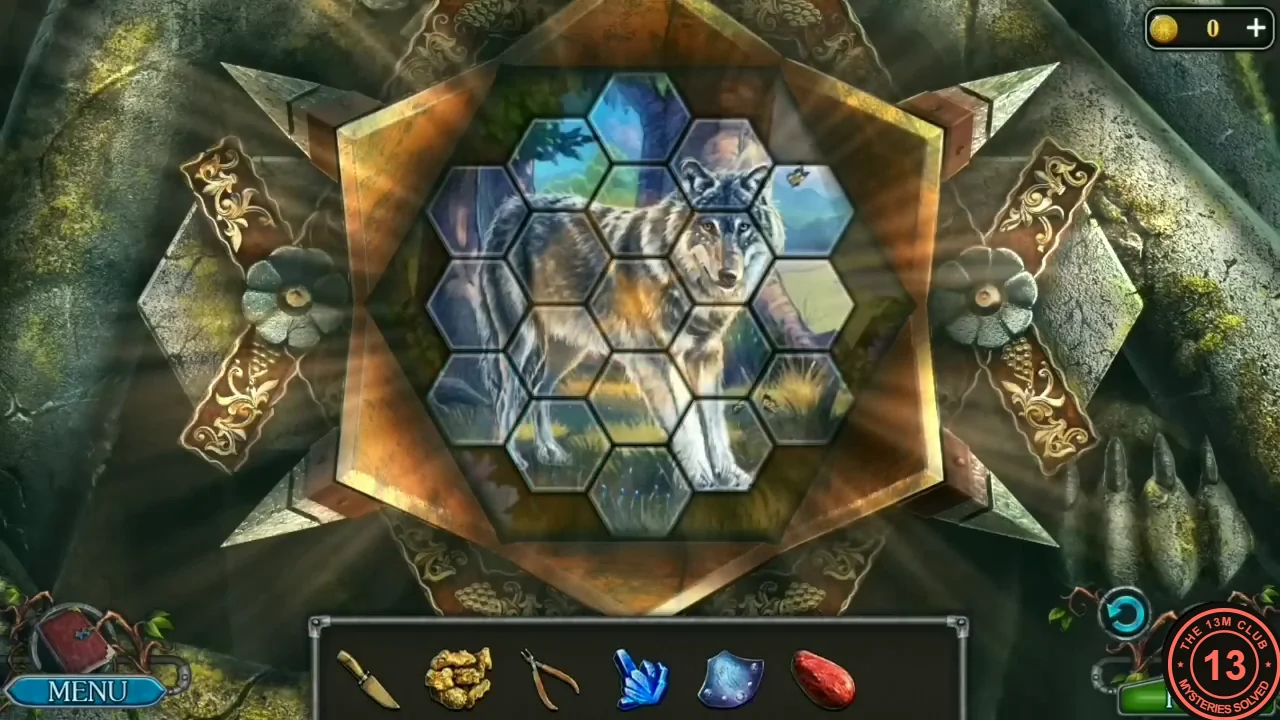
The finished wolf picture. - Take the Bird figurine and the Key from the statue niche. Optional collectible: click the ship model on the rock ledge between the statue and the chest. Zoom into the chest on the ledge and open the left padlock with the Key; the right padlock stays locked for now ('The chest is closed'). Optional: click the Morphing Object, a small blue jar on the dark rocks just right of the lower centre, at the foot of the blue crystals.
The Goddess Statue
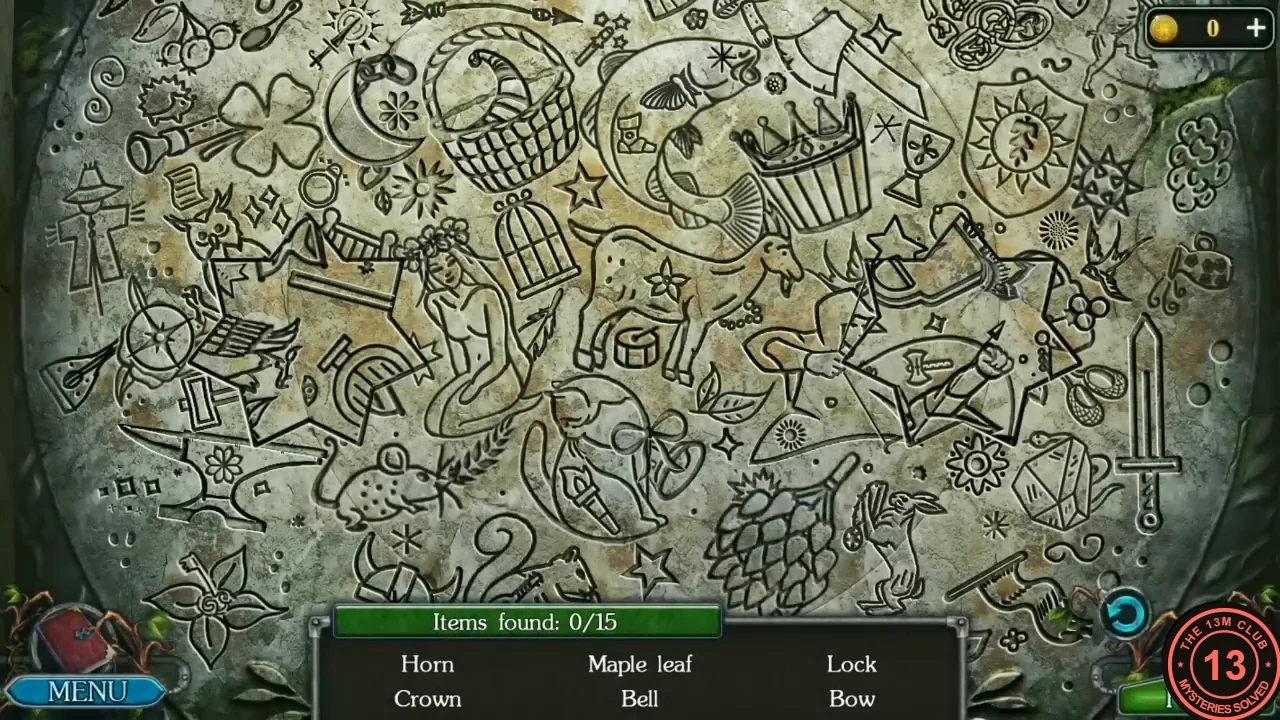
With four minerals in hand, the mountain-goddess statue at the Lake opens a carved hidden-object relief. Completing the relief gives the first Feathers (1/2) and a Key. The Key opens the chest in the crystal cave, which holds the second Feathers (2/2). Both are needed for the river gate (next section).
- Travel to the Lake shore and zoom into the goddess statue (the Scales are refused: 'A different item is needed'). Put the Crystal in the lower-right socket, the Ruby in the upper-right socket and the Gold nuggets in the upper-left socket.
- Zoom into the breach of the wrecked hull. Cut the wire around the steering wheel with the Pliers and take the Silver from its centre. Put the Silver into the last (lower-left) socket of the statue: the centre slides open.
- Hidden-object relief (Items found: 0/15): find the 15 carved shapes on the list; a found name is replaced by a new one. Two six-pointed star panels in the relief (one left of the kneeling girl, one right of centre near the swallow) turn their carving each time you click them, and four items only appear inside them. Item locations in our game: Maple leaf - the leaf on top of the big pine cone at the bottom centre. Lock - keep clicking the right-hand star until a padlock appears in it. Crown - on top of the wooden bucket, upper right of centre. Bell - just below the ribbon bow in the lower middle. Horn - the striped curved horn in the woven basket at the top centre. Harp - click the left-hand star until a harp shows at its top point. Hourglass - in the left-hand star, at its lower point after further clicks. Bow - the bow and arrow that appears in the right-hand star. Butterfly - on the head of the big fish at the top, left of the bucket. Mace - the spiked mace right of the sun shield, upper right. Flute - the pipe left of the four-leaf clover, upper left. Chain - the links along the crescent moon, upper left. Wreath - the flower wreath on the kneeling girl's head. Spikelet - the ear of wheat at the mouse's nose, lower left of centre. Snake - coiled on top of the faceted crystal at the lower right, left of the sword. The relief then turns aside: take the Key and the Feathers (1/2).
- Travel (map, Forest tab) to the crystal cave. Zoom into the chest and open the right padlock with the Key. Take the second Feathers (2/2).
The River Gate Lock
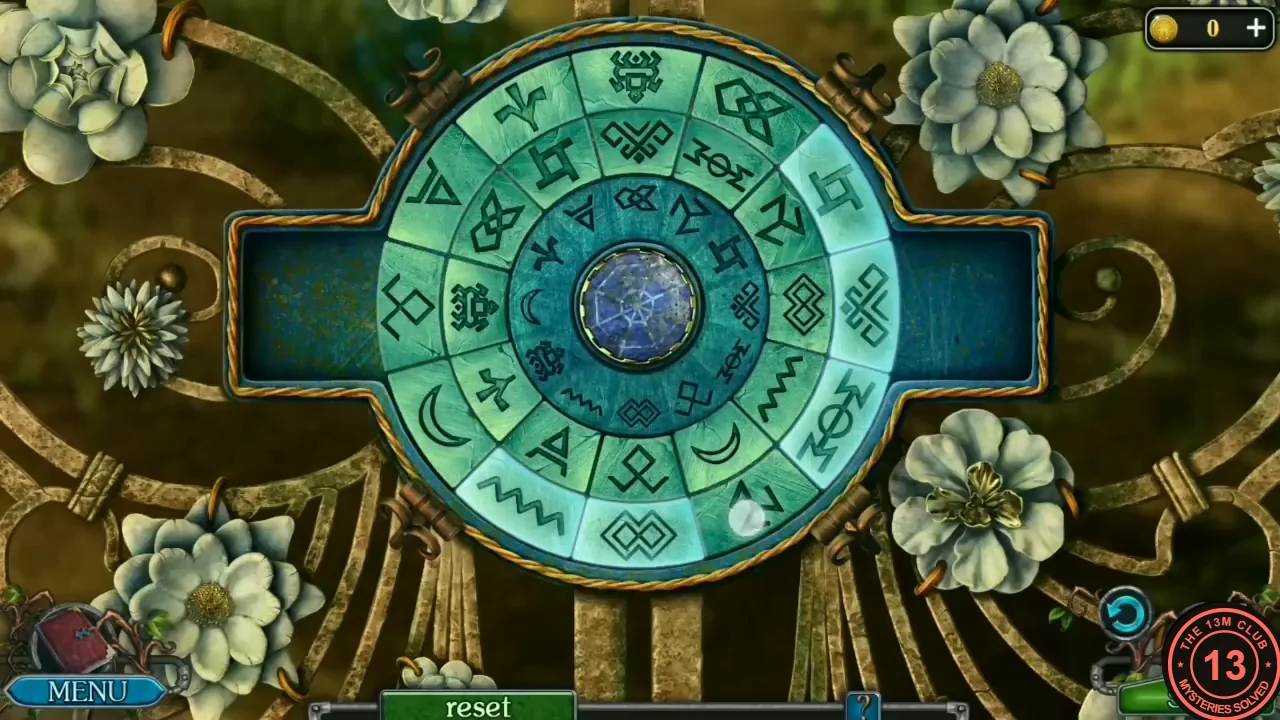
The ornate lock on the gate at the river bridge takes both Feathers and opens with a ring puzzle.
- Travel (Forest tab) to the river bridge below the windmill and zoom into the ornate gate lock. Put both Feathers into the two recesses. Puzzle: 'Stack three identical symbols to match the symbols on the inner ring.' The dark inner ring next to the centre stone never moves. Tap the middle or the outer ring to turn it a step (the ring you touch lights up). The empty channels on the left and right are parking spaces: tap a channel once and the outer-ring tile at that spoke slides out into it; tap it again and the middle-ring tile follows. While tiles wait in a channel you can keep turning the rings; the empty slot turns with its ring, and the parked tiles go back into the slot at the channel. This is how you change which tiles sit together on a spoke. Finish when every spoke shows the same symbol on the inner, middle and outer ring (see image). Achievement: Skillful. The gate swings open. Your starting layout may not match ours, so read the symbols on your own inner ring; the image shows one finished lock as an example.
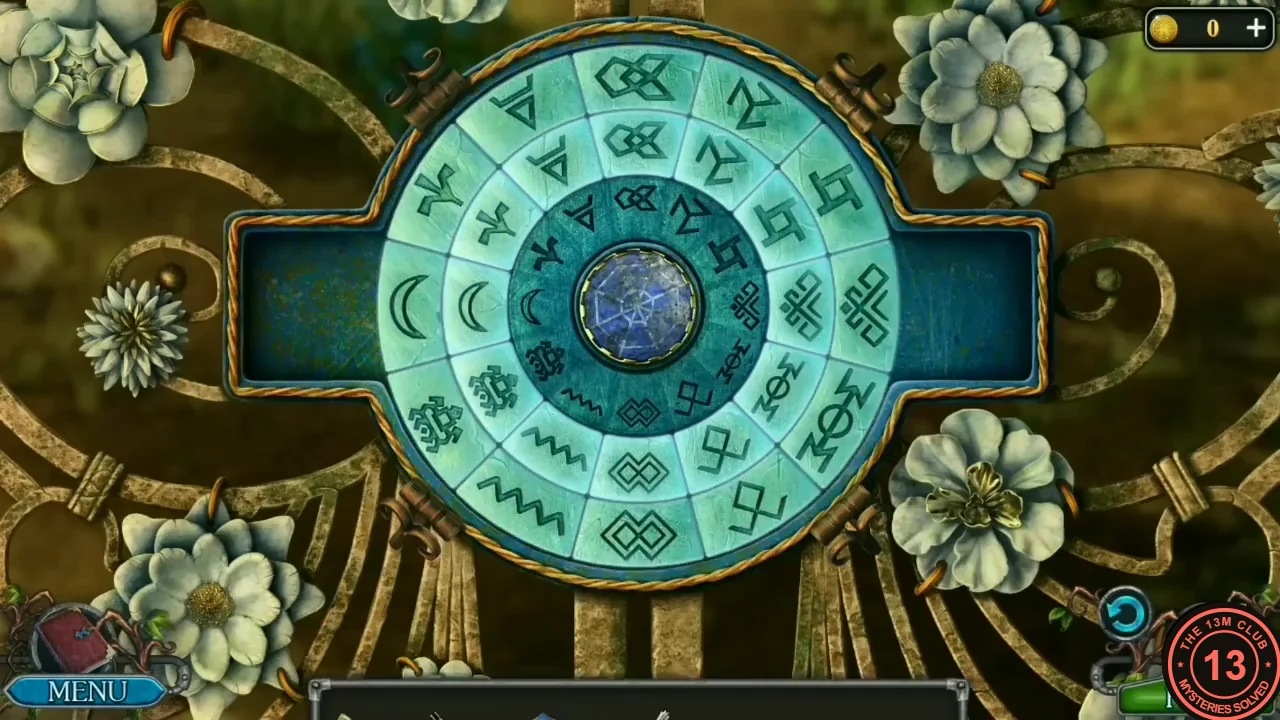
Solved example: every spoke repeats the inner-ring symbol on all three rings; the rings light up once it is accepted.
Egil's Garden and the Diving Suit
Beyond the gate Osbert finds the druid Egil in his garden. The scales point to water spirits, so the next step is to assemble a diving suit from the fishing hut at the Lake.
- Watch the conversation with Egil: the children may have been taken by the water spirits beyond the mountain lake. He gives you a Detail to open the barn by the lake. New task: Look for the children underwater.
- In Egil's garden: zoom into the bench by the hut on the right. Take the Resin: the dark lumps in the metal bowl behind the watering can, next to the yellow sack. The watering can itself is blocked by a thick spiked sprout. Zoom into the scarecrow. Use the Knife on the white flowering plant in front of it to cut the Dried flower. Take the Garden hoe leaning against the post of the wooden bench at the left of that close-up. Optional collectible: click the small white ship model standing at the right edge of the stone path, beside a purple flower in front of the hut on the right. The barn in the background is 'Locked with a key'.
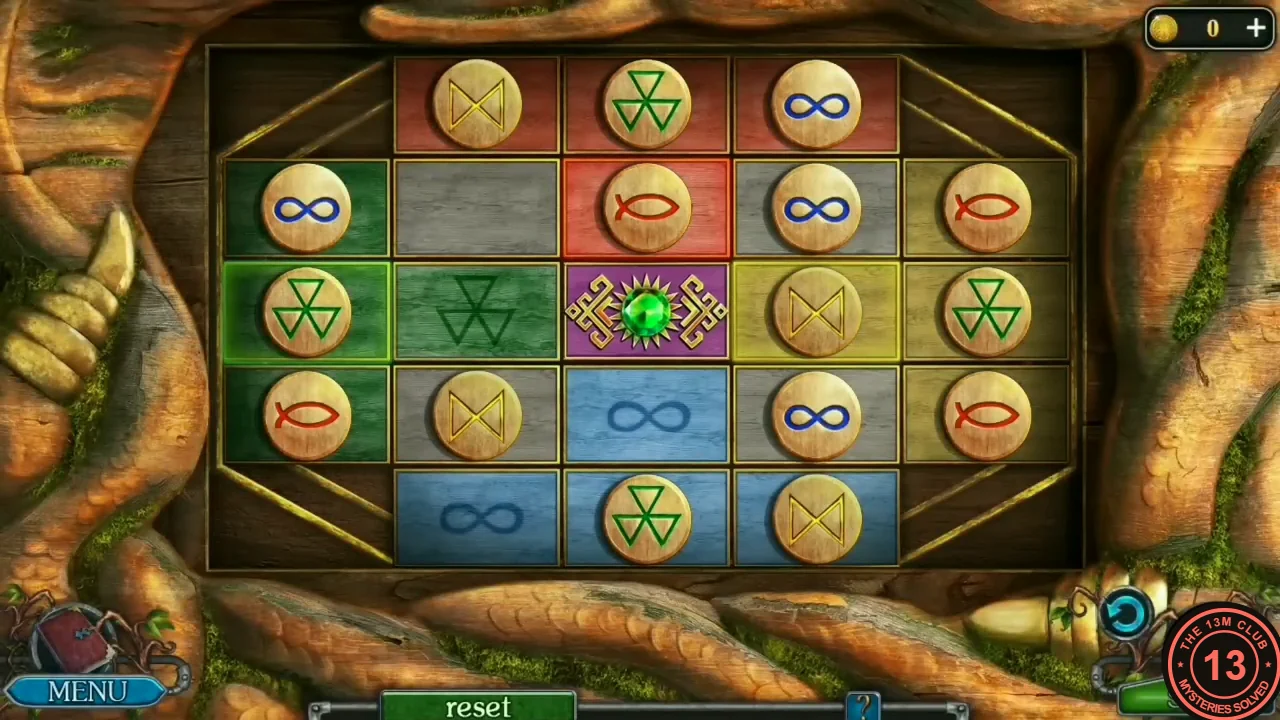
- Travel to the Lake shore and zoom into the fishing-hut door on the left. Put the Detail into the centre of the token grid. Puzzle: the cross-shaped board has 16 round tokens and 4 free cells. Each arm is a colour zone of four cells (the three outer cells plus the cell next to the centre): red fish along the top, green triple-triangles on the left, yellow bow-ties on the right and blue infinity signs along the bottom; an empty zone cell shows its symbol printed faintly. The four grey corner cells around the centre stay empty at the end. Controls: swipe a token up, down, left or right; it slides in that direction until it hits the board edge or another token (it cannot stop halfway, and it cannot pass the centre). Practical approach: fill the outer cells of each arm first, using the grey cells and the long empty lines to steer tokens, and leave the four cells next to the centre for last. The recording finishes with: fish in the upper-left grey cell swiped right into the red cell below the centre top; bow-tie in the upper-right grey cell swiped down into the yellow cell right of the centre; bow-tie in the lower-right grey cell swiped right to the yellow edge. Expect many moves; a Reset button sits below the board. Your starting layout may not match ours, so plan from your own board.
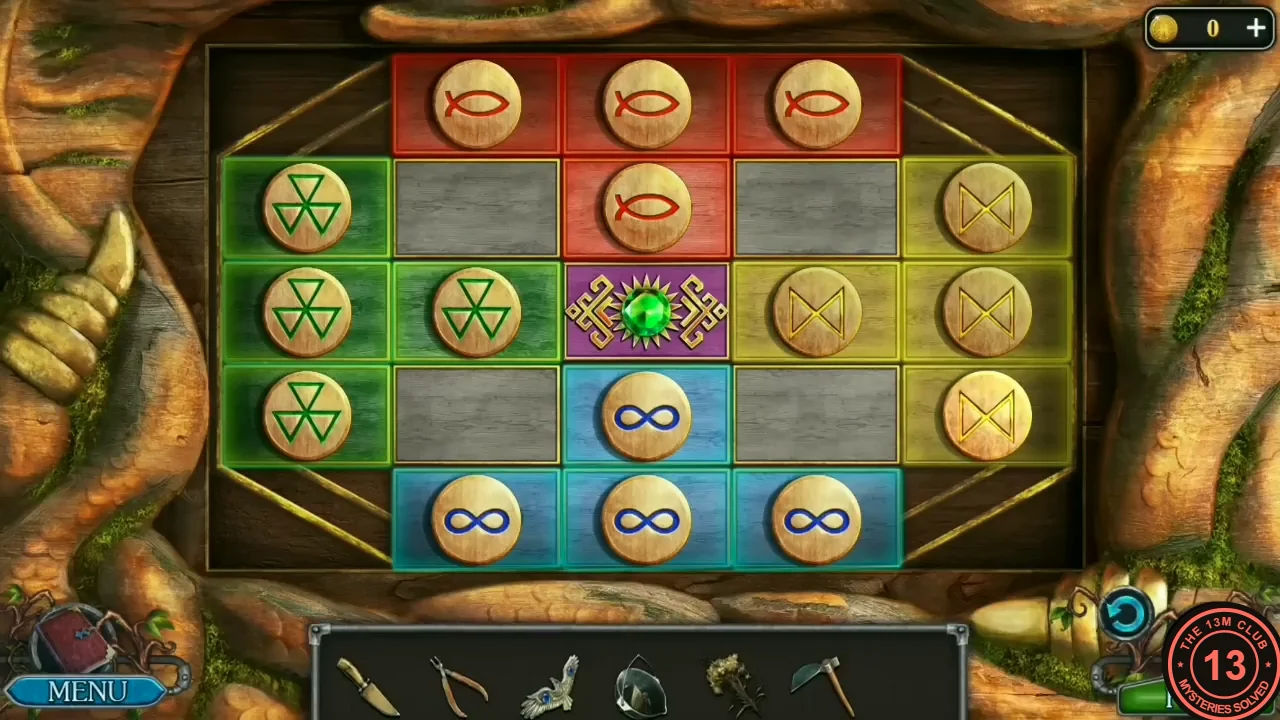
Solved: red fish at the top, green triangles on the left, yellow bow-ties on the right, blue infinity signs at the bottom. - Inside the fishing hut: zoom into the open wicker crate on the floor at the left and take the dark Boots lying in it under the straw hat. The wardrobe at the back left needs a handle ('I need a handle to open the cabinet'). Optional collectible: click the ship model on the beam high on the back wall, above the sack on the bench. Zoom into the tied sack on the bench at the back, slit it with the Knife and take the Belts. Take the Diving helmet: the round brass helmet standing at the left end of the table under the window.
- Go to the werewolf camp and hold the Dried flower in the campfire to get the Smoldering dried flower. At the Lake shore, zoom into the snake burrow in the sand on the left and put the smoldering flower in it: the smoke drives the snake out. Take the Seahorse figurine from the hole.
- Travel to Egil's garden, zoom into the scarecrow and click its chest: a panel with two bird silhouettes ('There should be two bird figurines here'). Put the Bird figurine from the crystal cave into the left silhouette; the second bird comes later.
- Return to the Lake shore and click the round hollow in the big tree at the top right to take the Handle. In the fishing hut, put the Handle on the left door of the wardrobe at the back left; both doors open. Take the Weights (a pair of brass sole plates) from the upper shelf inside. Click the Boots (marked +) in the inventory to open their combine view and drag the Diving helmet into it if it is not there yet (we added it straight after taking it; the Belts are refused at that point with 'No, this item can't be used here'). Drag the Weights onto the boots: they fit under the soles. Then drag the Belts on to strap the weights to the boots: 'The diving helmet will allow me to breathe underwater for a while.' You receive the Diving suit. Leave the fishing hut and go back out to the Lake shore, zoom into the wooden pier reaching into the water on the left, and use the Diving suit there: Osbert dives into the lake.
The Lake Bed
On the bottom of the lake a sunken wagon, a chest, pots and a fishing net lie around a cave sealed by a purple magic field.
- Task complete: Look for the children underwater. Zoom into the cave mouth: 'Wow, some powerful magic. I can't get through this field. I need to return to Egil and find out what to do with it.' New task: Remove the magical protection barrier.
- Zoom into the carved rock with the seahorse relief on the left and put the Seahorse figurine into it. The rock opens: take the Magical gem ('It is a gem of growth. It should accelerate the plant's growth'). Zoom into the moss-covered crate held under water by a metal chain and cut the chain with the Pliers: the crate floats up to the surface (later it turns up at the dock). The Pliers are used up.
- Optional: the Morphing Object is the starfish on the sea floor just right of the ship's wheel at the bottom centre; click it. Zoom into the broken pots in the middle of the scene, just right of the sunken carriage. Move the blue boulder resting on the fence at the upper right of the close-up (in our recording it was pushed a little to the right): it rolls down onto the big cracked jar and smashes it. Take the Bird figurine from among the shards. Zoom into the fishing net lying on the sea floor right of centre: cut it with the Knife and take the golden Horse figurine (the red algae there are noted: 'Red algae are rare').
- Travel to Egil's garden. Osbert tells him: 'I saw someone, a Medusa? A Mermaid? I don't know what she was. She swam out of the cave and closed the passage behind her with a spell of some sort.' Egil: 'Hmm, that sounds like a Vila. Vilas are aquatic creatures that look like young girls with wings and scales. They live in the region of mountain lakes. You won't be able to catch her; they are too fast. Why bother? I'll give you a recipe for a potion that will break the barrier she created. If she did take the children, you'll find them there.' New task: Create a Glow potion. The Glow potion recipe lists: 1) Tears of verida, 2) Perphedra juice, 3) Purple moss, 4) Red algae, 5) Sun flower pollen. Its note reads: 'Collect all ingredients in separate flasks and mix them in a bottle in the correct sequence.'
The Scarecrow Puzzle and the Greenhouse
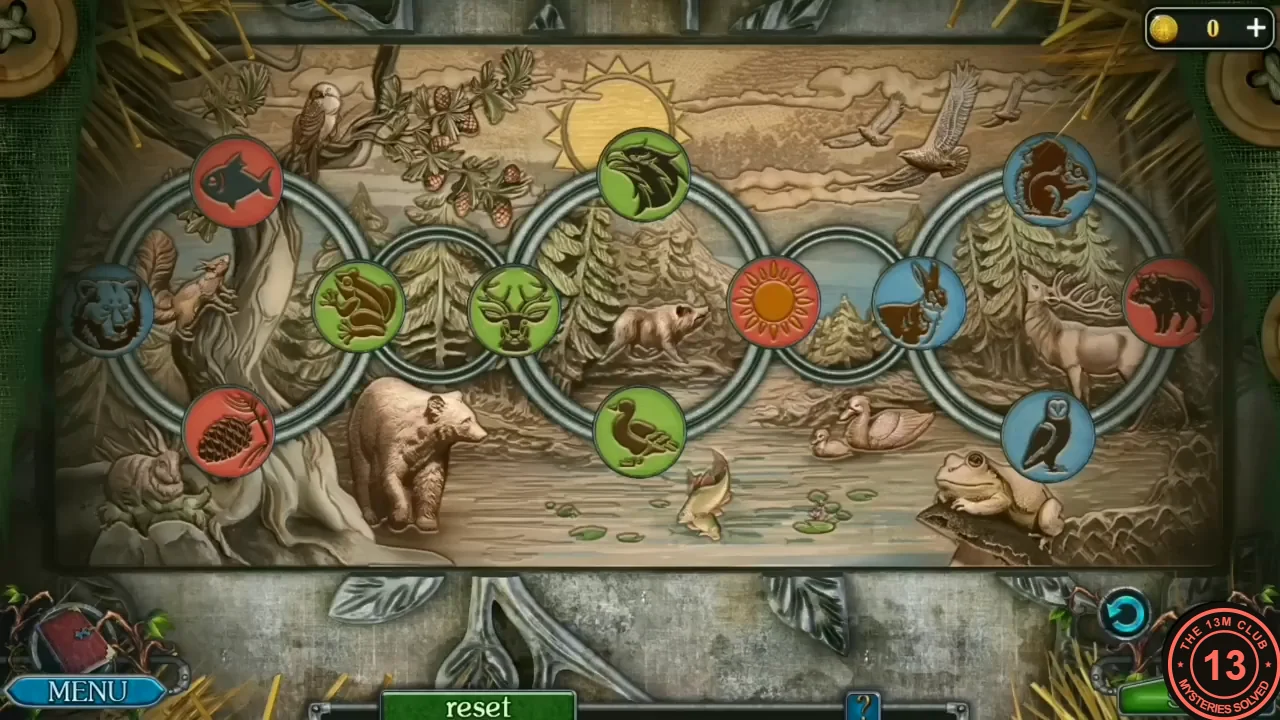
The second bird completes the scarecrow panel. Its reward and a key from the hammock open Egil's greenhouse, where most of the potion ingredients and tools are.
- Zoom into the scarecrow and put the second Bird figurine into the right silhouette. Puzzle: three large rings each hold four animal tokens (top, bottom, left and right). Between neighbouring large rings sits a small ring that links the right token of one large ring with the left token of the next. Clicking a large ring turns its four tokens one step clockwise (left to top, top to right, right to bottom, bottom to left); clicking a small ring turns it so that those two linked tokens trade places, which is the only way to pass a token from one large ring to another. Goal: all blue tokens (owl, squirrel, hare, bear) on the left ring, all red tokens (sun, pinecone, fish, boar) on the middle ring and all green tokens (deer, eagle, frog, duck) on the right ring (see image). Practical approach: turn a large ring until a token that belongs elsewhere sits at a linked side position, turn the neighbouring ring so that a token belonging here waits opposite, then click the small ring to swap them; finish the left ring first, then the middle one. A Reset button sits below the board (not used in the recording). Achievement: Virtuoso. Your starting layout may not match ours, so the tokens may start in different places; sort them by colour as described.
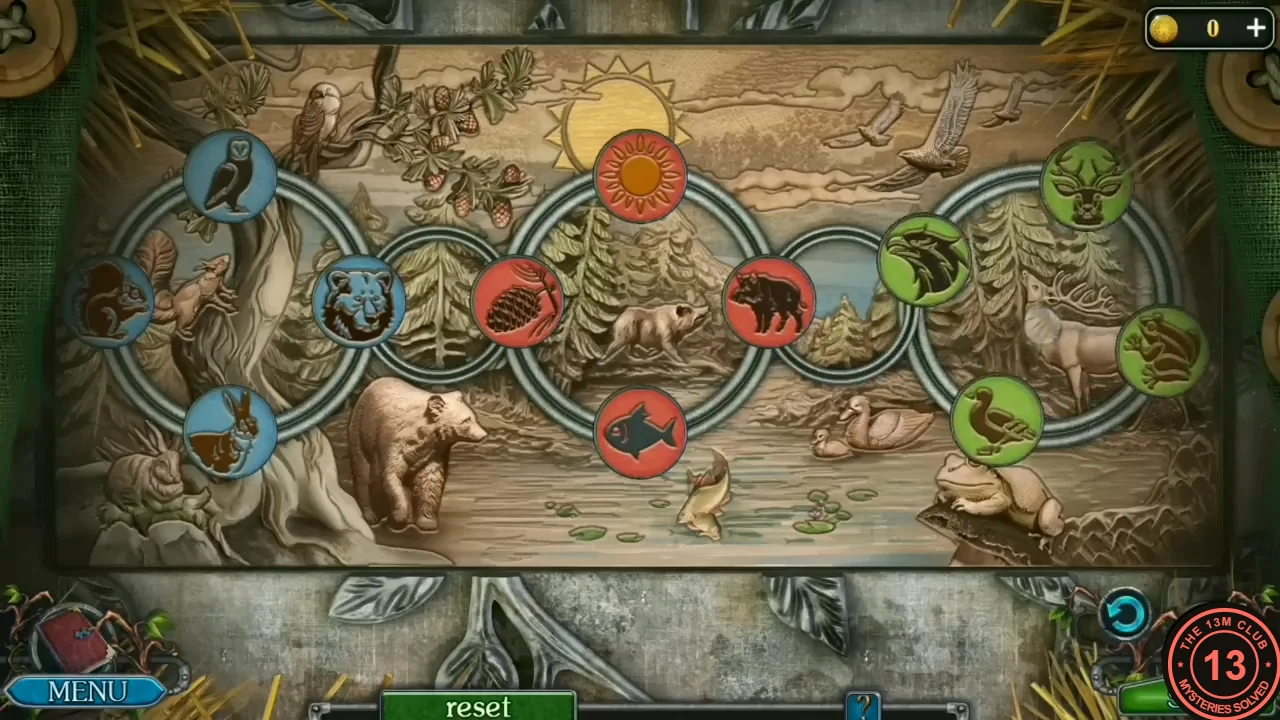
Solved: blue tokens left, red tokens middle, green tokens right. - Take the Bronze flower and the Hint (a sailboat made of dots and lines) from behind the panel. Zoom into the cushions on Egil's hammock and tap the cushions a few times: they shift aside and uncover a Key lying underneath. Take the Key (no tool is needed).
- Zoom into the greenhouse door at the back of the garden and unlock it with the Key. Inside, zoom into the wall cabinet on the left, put the Bronze flower into the round lock on its door and take the Flasks.
The Sun Statue Dot Board
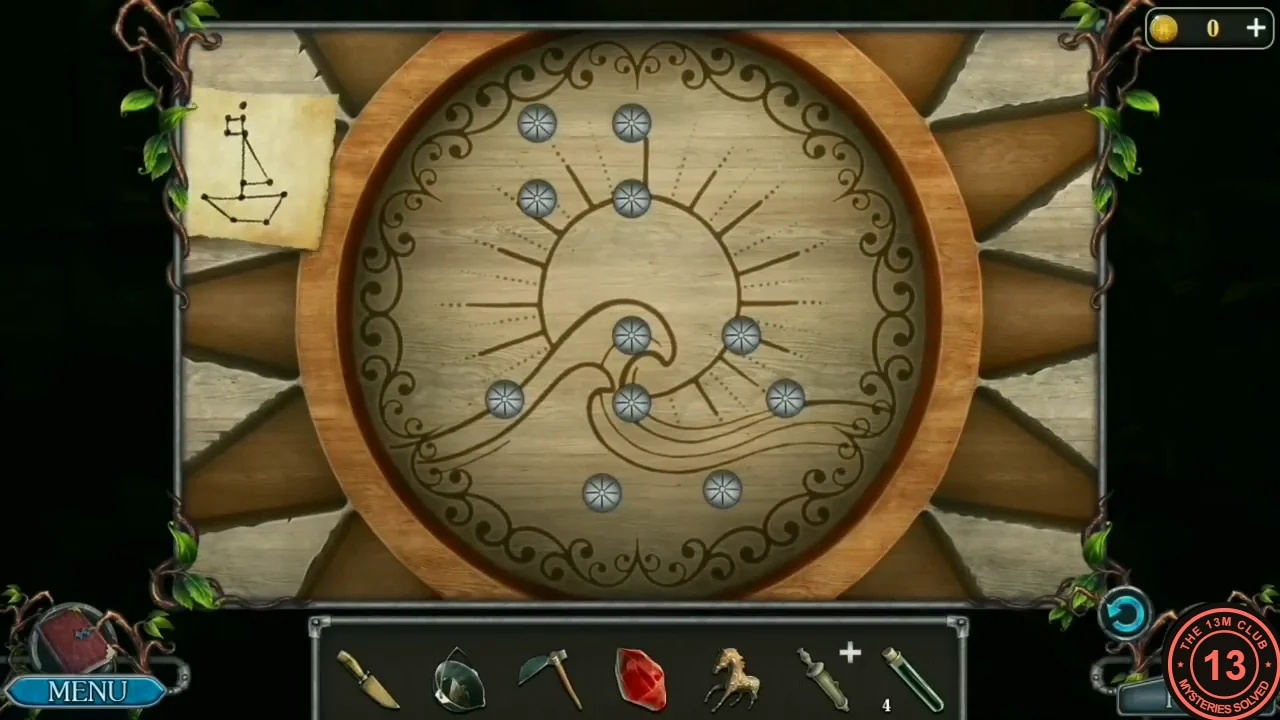
Draw the sailboat from the Hint on the dot board of the sun statue in the greenhouse.
- Clicking the hanging lamp gives 'If I insert a magical gem here, the plant will grow faster under its light' (for later). Zoom into the carved sun statue and place the Hint on the round dot board. Puzzle: draw the sailboat from the Hint by linking the dots: click a dot, then click the next dot to draw a line between them. Each further click draws a line on from the last dot you clicked, so you can trace the outline in one go; keep the lines exactly as on the drawing (see image). The finished drawing uses 11 dots: a small square flag at the top (the two top dots and the two dots below them, all four sides linked); the mast runs straight down from the flag's lower-right dot through the centre dot to the dot on the wave line; a triangular sail links the flag's lower-right dot, the dot to the right of the centre dot and the centre dot; the hull is the deck line from the left dot through the mast-foot dot to the right dot, with both ends slanting down to the two bottom dots, which are linked to each other. A reset button sits under the board; it was not used in our recording. The shelf compartment opens: take the Tears of verida.
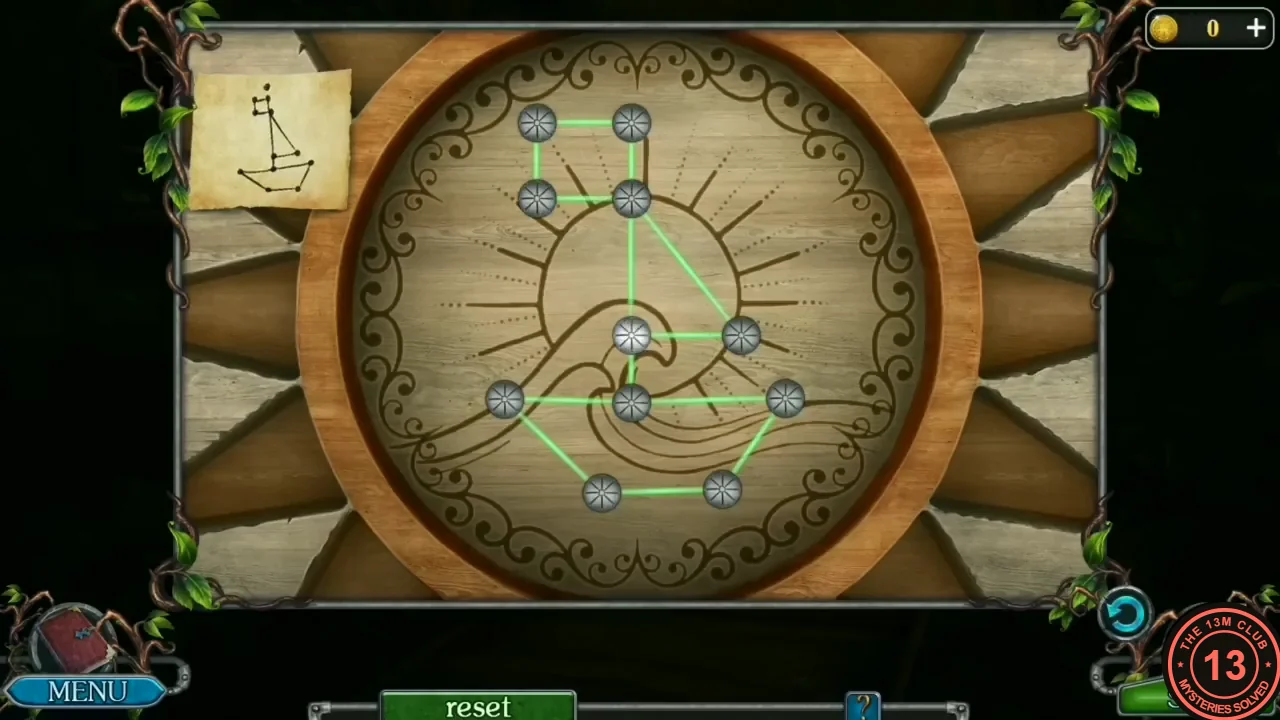
The finished sailboat drawing. - Optional collectible: click the ship model at the foot of the wooden ladder in the middle of the greenhouse, just left of the potion table. Zoom into the potion table at the back right ('I can prepare potions here') and take the Glove lying on the green cloth at its front left. Zoom into the box of flowerpots on the right, beside the path, and take the Garden shears lying in the wooden tray. Click the green lantern hanging at the top left of centre ('If I insert a magical gem here, the plant will grow faster under its light') and put the Magical gem into it: it glows red over the planting bed.
The Glow Potion
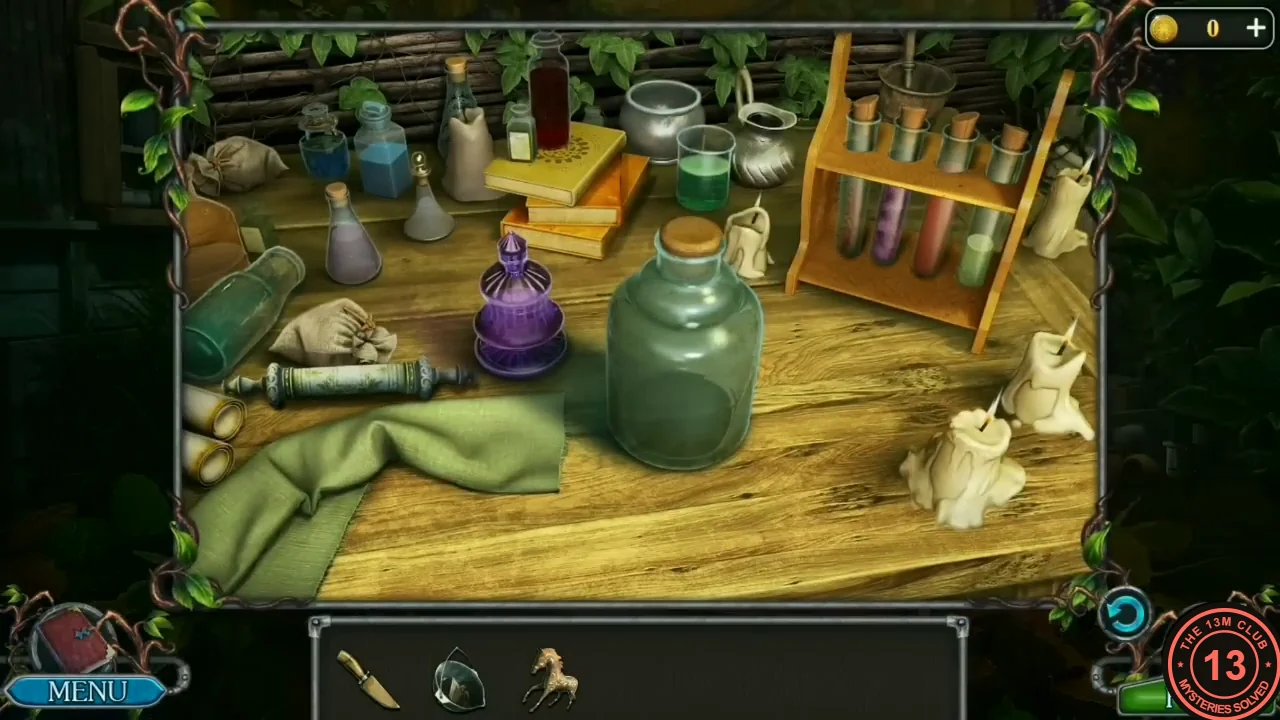
Gather the remaining four ingredients in the Flasks, grow the sun flower in the greenhouse and brew the potion that dissolves the Vila's barrier.
- In Egil's garden, zoom into the bench where the spiked sprout traps the watering can, cut the sprout with the Garden shears and take the Watering can. Zoom into the tall red-flowered bush by the path, set a flask in front of it and use the Glove on the red pod so the gloved hand holds it. Then use the Knife on the pod held by the glove to cut it: the glove squeezes the juice into the flask. Take the Perphedra juice.
- Travel to the forest path with the big hollow stump beyond the river bridge. Zoom into the rock covered in purple moss just right of the stump's opening. Use one of the Flasks on the rock (it stands at the foot of the moss), then use the Knife: it scrapes moss down into the flask. Take the Purple moss. Travel to the lake bed and zoom into the fishing net with the red algae (right of centre). The Purple moss flask is refused here ('This item is unlikely to be of any use in this situation'). Use another Flask on the net (it lies across the middle of the net), then use the Knife: it cuts a red algae stem at the upper right and the cutting falls into the flask. Take the Red algae. Open the Glow potion recipe and drag each filled flask onto it; each gets a tick ('I need to collect all the ingredients from the list').
- Travel to Egil's garden: 'I brought you the seeds that I mentioned' - he gives you the Seeds and tells you to plant them in the greenhouse under the gem lamp. In the greenhouse, zoom into the red-lit planting bed: dig a hole with the Garden hoe, put in the Seeds, cover them with the hoe and water them with the Watering can. When the sun flower has grown, hold a flask to it and take the Sun flower pollen.
- Open the Glow potion recipe again and drag the Sun flower pollen flask onto it: its fifth line, Sun flower pollen, gets a tick, and now that all five lines are ticked the ingredients join as Potion ingredients. Zoom into the potion table and use them on the table beside the big empty bottle: the purple bottle appears on the table and four filled tubes stand in the wooden rack (from left to right: clear tube with red algae cuttings, purple moss, orange juice, yellow-green pollen). Click them one at a time to pour each into the big bottle in the order numbered on the recipe: 1) Tears of verida (the purple bottle), 2) Perphedra juice (the orange tube, third in the rack), 3) Purple moss (the purple tube, second), 4) Red algae (the tube with red cuttings, first), 5) Sun flower pollen (the yellow-green tube, fourth). The mixture turns from violet to pink to red. Task complete: Create a Glow potion; take the Glow potion.
- Travel to the lake bed and use the Glow potion on the purple barrier at the cave mouth. Task complete: Remove the magical protection barrier. Swim into the air-filled cave: 'There is air here! I hope I find the children here somewhere.'
The Vila's Cave and the Pearls
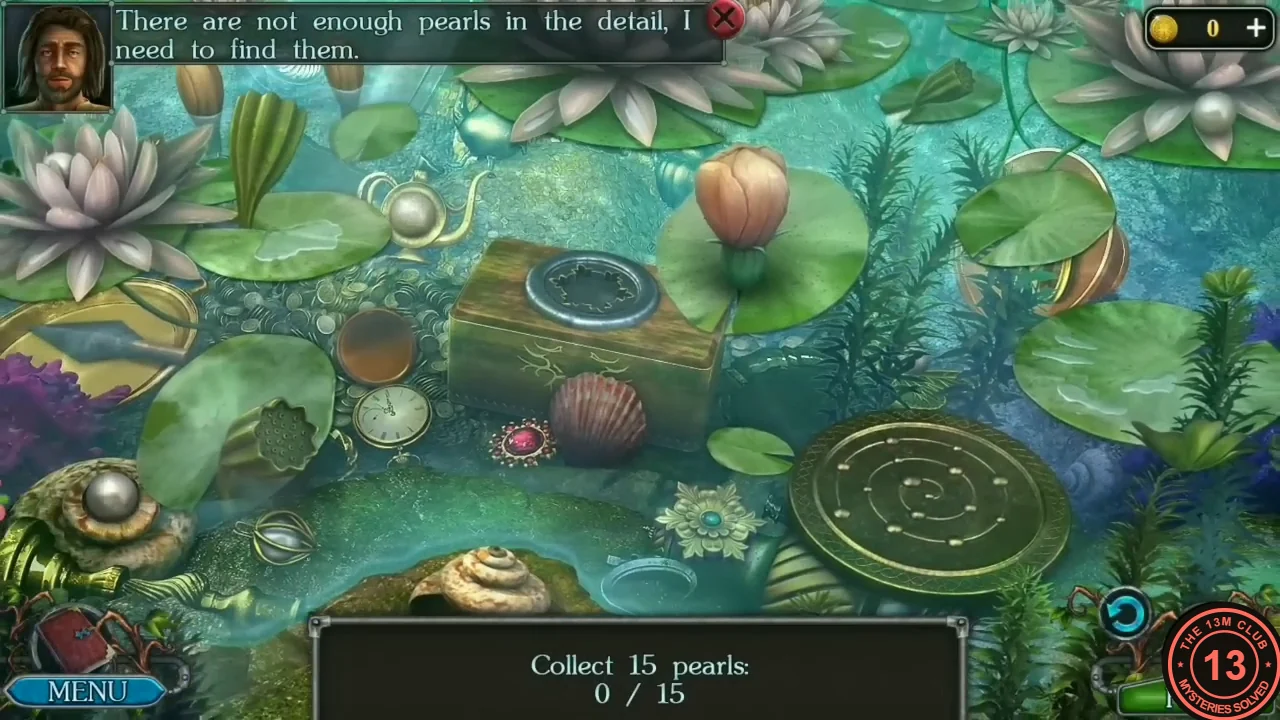
Behind the barrier is an air-filled cave where Ulf and Lucia are hiding. Osbert decides to repair an old barrel and float the children out in it.
- Watch the children's scene: 'Lucia has been crying for ages. She lost her favorite toy and won't go anywhere without it. You'll have to find and return her toy before she'll go anywhere.' The view then shows the broken barrel. New task: Repair the barrel ('I can fix the barrel and put the kids in it to bring them to the surface'). Zoom into the children's nook (upper middle of the cave, right of the chest) and give the Horse figurine (Toy horse) to Lucia. She gives you a Key. Take the first board, lying in the nook in front of the children (Boards 1/10).
- Collect the boards lying around the cave until the counter shows 7/10 (the nook board was 1/10). In our game the other six were: the long plank lying on the mossy bank in the bottom-left foreground; a thin plank floating in the water right of centre, just below the water lilies; a thin dark plank in the water at the left, left of the central rock; a plank leaning on the rocks at the far left, left of the chest; one inside the close-up of the fire tripod (zoom into the fire on the central rock); and one at the far right edge of the water, beside the right-hand rocks. Optional collectible: click the ship model on the rocks on the right, just above the water. Zoom into the fire tripod and put the Resin into the pot hanging over the fire. The chest in the cave is locked with a key; you will open it later.
- Click the glowing patch in the water at the lower left of the cave. Puzzle: Collect 15 pearls. Each pearl you click flies into one of the holes of the round spiral plate at the lower right ('There are not enough pearls in the detail' until all are found). Some pearls lie in the open; others appear only after you click something. All 15 spots in our recording: inside the little wire ball at the lower left; under the amber glass ball on the coins left of the carved box (click it: the ball rolls down onto the pocket watch below and the pearl is left on the coins); under the small scallop shell in front of the box (click the shell: it lifts away and the pearl lies just right of the red jewel); the white pearl sitting in the silver teapot above the box (the teapot looks gold once it is taken); click the green bud left of the teapot to open it and take its pearl; take the gold flower-shaped ornament with a teal centre lying below the box, left of the spiral plate, and put it into the round recess on the box lid (clicking the box first gives 'The lid is missing a detail'): the box opens with a pearl inside; click the closed pink lotus bud on the lily pad to make it bloom, then take the pearl from its centre; click the large lily pad on the right, beside the lotus pad: it fades away and uncovers a closed scallop shell; then click the silver spearhead lying on the gold dish at the left edge: it flies across and prises the scallop open (clicking the spearhead before the scallop is uncovered only makes it wobble) - take the pearl inside; a small pearl among the water plants right of the lotus pad; one among the plants at the lower right next to the spiral plate; and click the green flower bud at the bottom right to open it for its pearl (14/15 in our recording). The other four: the big pearl inside the coiled snail shell at the lower left, just left of the wire ball; the white pearl in the centre of the open white water lily at the upper left; the pearl in the small open white water lily at the top edge, just right of the big white lily at the top centre (this was our last one); and the pearl held in the gold claw ornament on the round gold disc at the upper right. When the plate is full, the box opens: take the Detail (a gold medallion).
- Swim back to the lake bed and zoom into the door of the sunken carriage, which has a lock with two disc sockets. Put the Detail (gold medallion) into the right socket. Zoom into the chest at the back of the carriage, open it with Lucia's Key and take the Rim (a metal hoop).
- Travel to the lake shore. The moss-covered chest you cut loose on the lake bed has floated up to the dock: 'Seaweed entangles the chest.' Cut the seaweed with the Knife, open the chest and take the Cable and a second Detail (a gold disc).
The Sunken Carriage Door
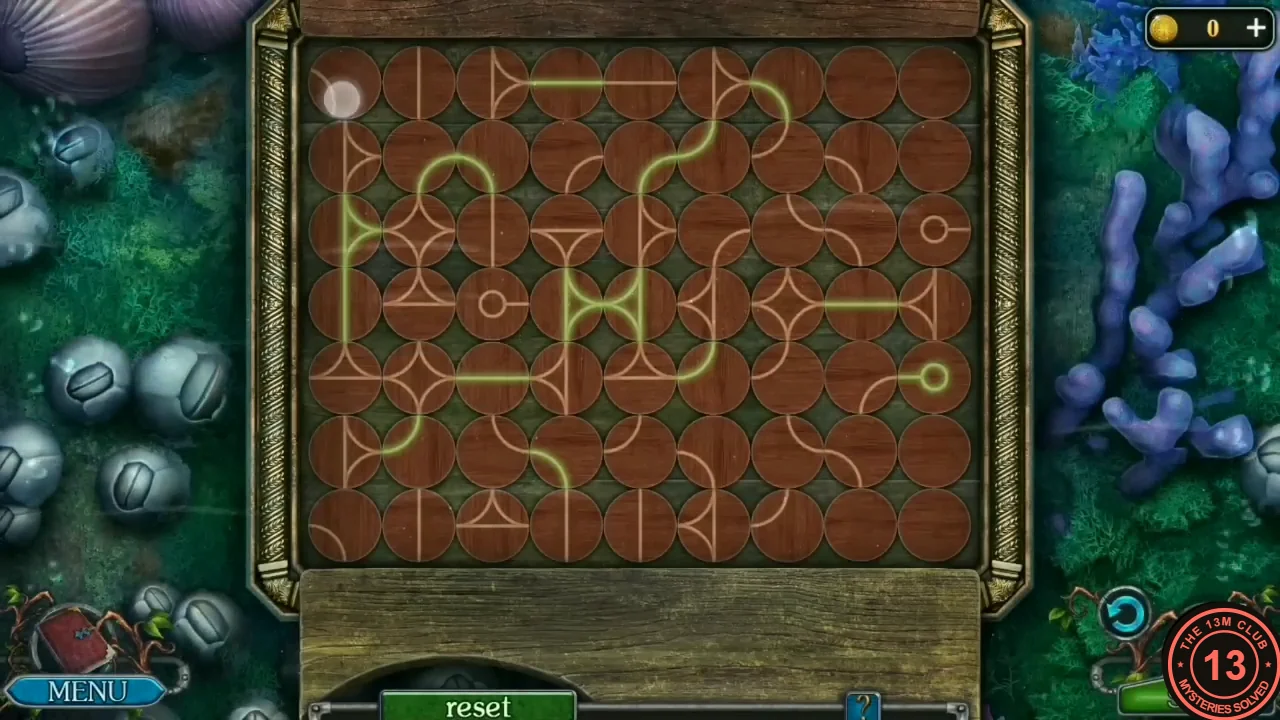
The gold disc Detail opens the track puzzle on the door of the sunken carriage on the lake bed. The search inside follows in the next section.
- Back on the lake bed, put the gold disc Detail into the left socket of the carriage door. Puzzle: the board is covered with round tiles carrying track pieces; clicking a tile turns it. A track lights up only when it is connected back to the glowing start points, so the lit part grows as you connect tiles. Work outward from the lit lines: turn the next tile at the end of the glowing track until its piece continues the line, then move on. The goal is one closed network in which every track segment glows (see the solved image). When all lines glow, the door opens. Your starting layout may not match ours, so your tiles may start in different positions and the solved image is only an example.
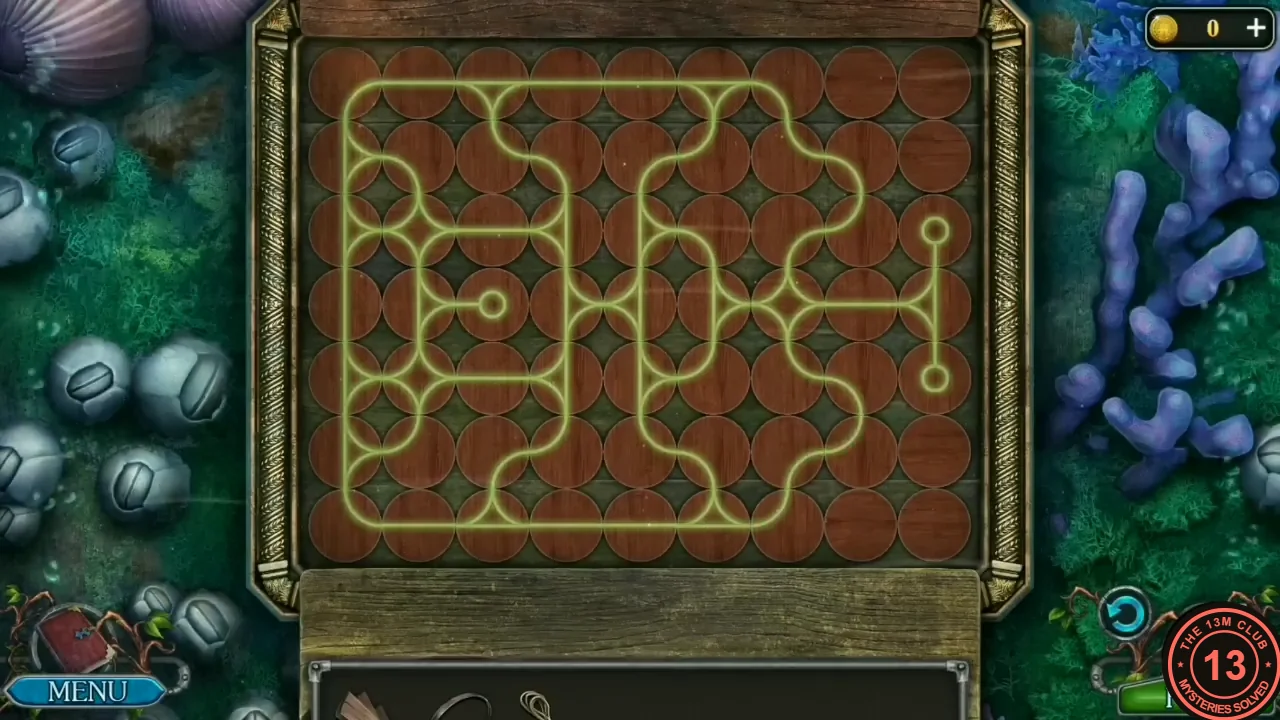
Solved example. Your tiles may start in different positions.
Inside the Carriage and the Vila's Barrel
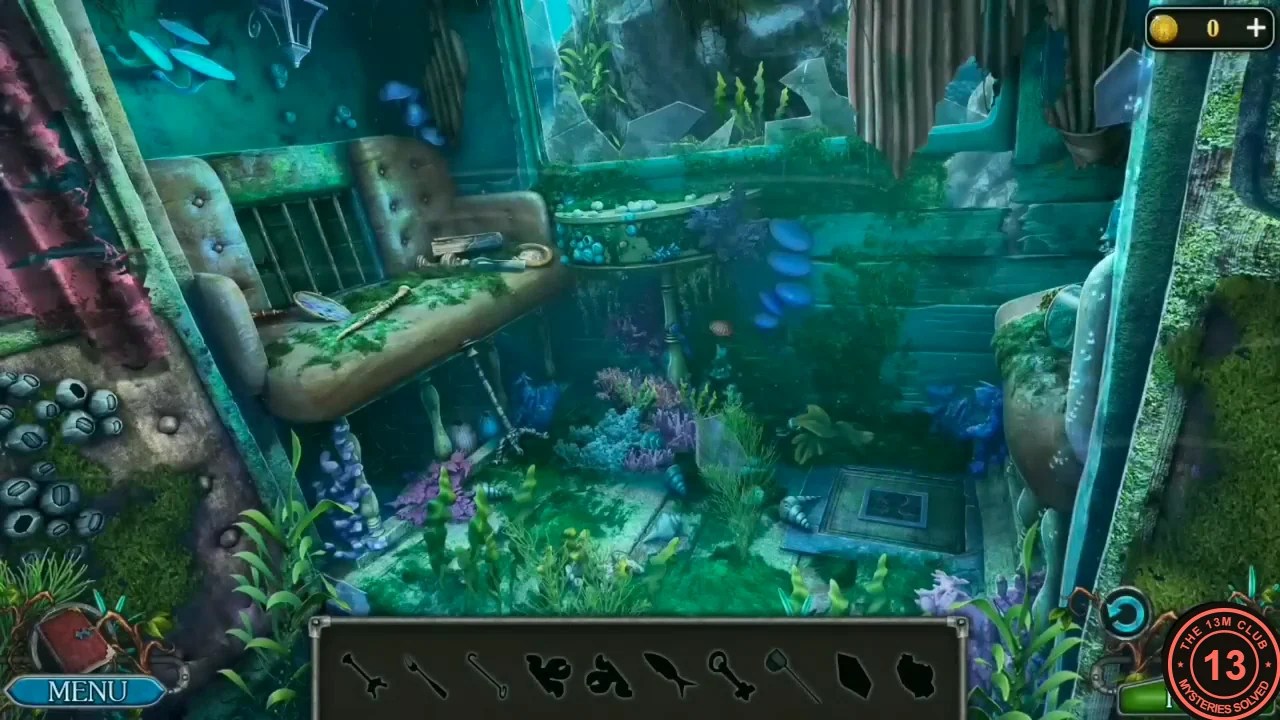
Search the sunken carriage for the items shown as silhouettes, then finish the chapter at the Vila's cave.
- Inside the carriage the item bar shows dark silhouettes to find (Fork, Hook, two Parts of a flower, Fish, Key, Net and others). Take the Candlestick: the thin silver stand with three feet standing on the floor under the right end of the seat. Click the torn curtain hanging at the top right ('The curtain is torn and wet, but it is still strong'). Take the Glass: the dark glass shard leaning against the upper-left corner of the hatch in the floor at the lower right. Use the Glass on the curtain to cut off a piece (Curtain). Zoom into the barred window at the back. Put the Candlestick between the bars as a lever, tie the Curtain around the bars and the candlestick, then click the candlestick to twist the bars apart. Take the Part of a flower from behind the bars. Back in the carriage, take the Net from the floor in front of the seat (left of centre).
- Zoom into the coral bed at the lower centre of the carriage. The scallop shell on the right is tightly closed ('The shell is tightly closed'), and a fish swims among the coral ('I need something to catch a fish with'). Use the Net in the coral close-up: it scoops through the coral at the left and catches the Fish. Zoom into the dark rock hole right of centre in the carriage, where a moray eel lurks, and give it the Fish: the eel swims away. Take the Key and then the Hook lying on the sea floor in front of the hole. Zoom into the hatch in the carriage floor at the lower right and take the Fork lying on the planks, lower right of the hatch's centre panel. Use the Fork on the shell in the coral close-up to prise it open and take the second Part of a flower.
- Zoom into the hatch in the carriage floor and put both Parts of a flower into it; the hatch glows and opens. Use the Hook (from the sea floor at the eel's hole) to lift the box out of the hole. The box is locked ('Locked'): use the Key you took at the eel's hole on it, then open the box and take the new Key inside.
- Return to the Vila's cave. Open the chest with the Key and take the Boards and the Harpoon. Zoom into the fishing net hanging on the right and knock the debris out of it with the Harpoon: take the last Boards (10/10). Zoom into the barrel by the fire: add the Boards (the barrel is rebuilt) and put on the Rim. Click the rag lying on the ground in front of the fire: it dips into the hot resin in the pot and then smears the gaps of the barrel. Finally tie the Cable around the barrel. 'That's it, done. Now I'm going to put the children in the barrel and get them out of here.' Task complete: Save the children.
- Watch the closing scene: a moray-like creature attacks, the Vila (water spirit) appears and explains that she hid the children to protect them, and Lucia gives her the toy horse. Chapter 3 is complete. The chapter selection now continues with the bonus chapters: Chapter 4 (Bonus) Little Witch, Chapter 5 (Bonus) Egil's Helper and Chapter 6 (Bonus) The Captain of the Ship.