The Dark Storeroom (Hidden-Object Scene)
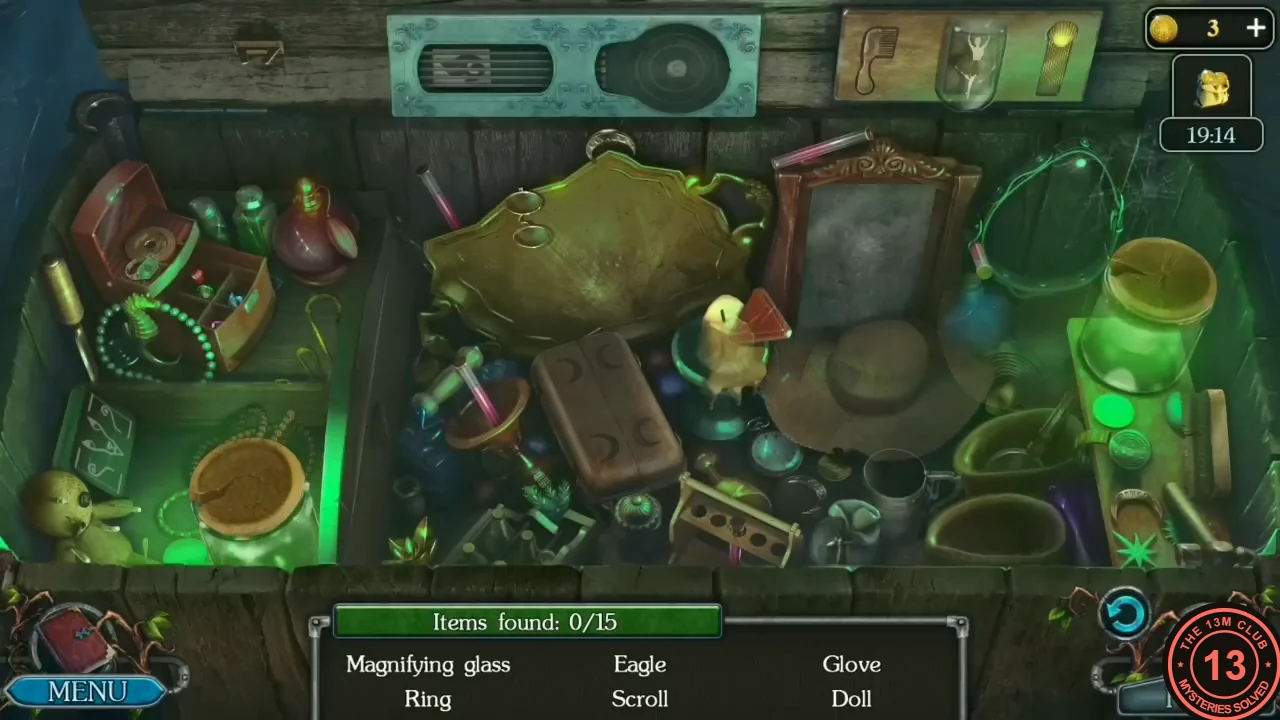
Egil has barricaded himself in the old woman's dark storeroom. This is a list hidden-object scene with 15 items: the scene is dark, so drag the glowing green jar around to light up the area you are searching. Names written in a different colour on the list need an extra action before the item can be taken.
- Hidden-object scene in the dark storeroom: drag the glowing jar around to light the shelves; new names replace found ones on the list (15 items). Item positions as found in the recording: Scroll – the dark green rolled scroll lying just left of the straw hat in the middle; Shell – the gold ribbed shell on the top shelf, right of the glass dome; Doll – the straw voodoo doll in the lower-left corner of the left compartment (light it with the jar); Magnifying glass – in the olive bowl at the foot of the glowing jar on the right; Mug – the grey metal tankard below the straw hat; Glasses – the round spectacles lying on the upper edge of the big gold tray; Goat – the small goat drawing at the left end of the chalk-drawn board in the bottom of the left compartment (only visible in the jar’s light); Bow – the standing mirror with the carved frame is too dirty at first (“The mirror is so dirty that I can't see a reflection.”). Tap the light wooden scrubbing brush standing upright just right of the glowing jar at the lower right, then tap the mirror: the brush scrubs it clean. Then tap the middle of the clean mirror to get the Bow. Hidden compartment: tap the narrow dark board just right of the left compartment (left of the copper funnel): it opens a compartment with scissors, a cloth, spools and a quilted purse. There take the Glove lying on the white cloth and the Scissors; tap the purse so it opens and spills gold coins, then tap the coin stamped with an eagle (Eagle). Set of test tubes: tapping the empty test-tube rack at the bottom middle (in front of the carved brown box) makes Egil say “I need to collect all the test tubes here.” The rack has five holes; each pink tube you tap flies into it: one leaning against the left edge of the gold tray, one in the copper funnel left of the carved box, one leaning against the left end of the rack itself, one leaning above the blue bottle between the mirror and the glowing jar, and the last lying across the top of the mirror’s carved frame. When all five are in, the Set of test tubes is ticked off.
- Tapping the open red jewellery box in the upper-left compartment (with the green seahorse and bead string) gives the message that there is no figurine on the music box. The figurine is the little ballerina inside the glass dome on the top shelf (between the comb and the gold shell): tap the dome to open it and take the figurine. Put it on the music box: a close-up opens. The ring lying at the left, in front of the turntable, has an empty green setting. Tap the small drawer at the lower-right corner of the music box so it slides out, take the purple gem from it and put the gem into the ring's empty setting. Then take the Ring.
- Tapping the carved brown box in the middle gives the message: “I need to return all crescents to the lid.” Its lid has four crescent-shaped hollows. Find the four small crescents and tap the box after each one to put it in. Positions in the recording: (1) among the gold coins spilled from the purse in the hidden compartment (left of the copper funnel); (2) the silver crescent standing on the top tip of the big gold tray; (3) in the dark upper-left corner of the left compartment, above the red music box (bring the jar’s light there); (4) on the floor below the candle holder, between the small brass bell and the teal shell. The box opens and reveals a round dial; drag it into the round socket of the blue lock panel at the top of the scene.
The Crystal Lock
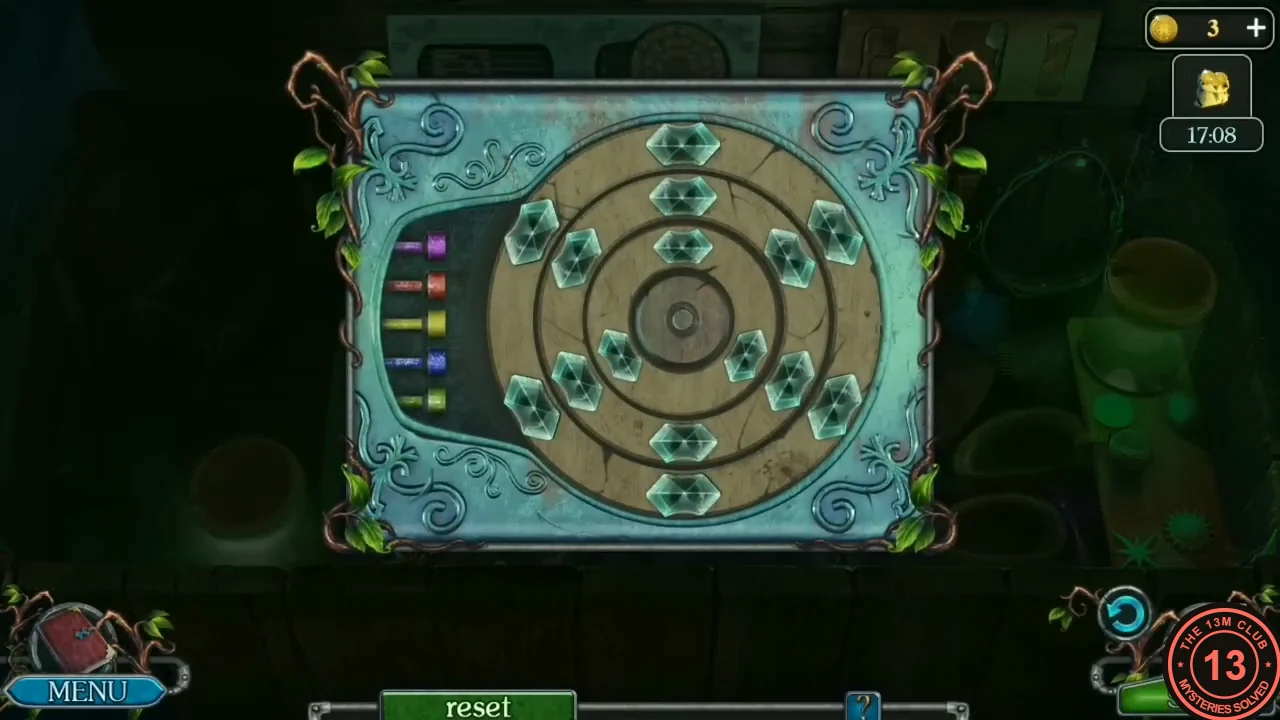
The blue lock panel in the dark storeroom is a crystal memory puzzle.
- Zoom into the blue lock panel. Puzzle: 15 crystals sit on three rings – six on the outer ring, six on the middle ring and three on the inner ring. Tapping a crystal lights it in its hidden colour. Keep tapping crystals of the same colour: a completed set of three stays lit. If you tap a crystal that does not match, it briefly shows its colour, the crystals of the unfinished set go dark again, and the rings turn: in both recordings each wrong tap turned the outer and inner rings one position anticlockwise and the middle ring one position clockwise. Every crystal keeps its colour and moves with its ring, and finished sets turn along too, so use the lit sets as markers and shift the colours you remembered by one position in the same direction. Completing a set did not turn the rings. Light three crystals for each of the five colours shown by the pins on the left (purple, red, yellow, blue, green); each pin slides to the left when its colour is done. Because wrong taps turn the rings, the crystals can sit at different positions in your game, so work by memory. The order of colours around each ring was the same in both inspected recordings (only turned to different positions), but we cannot confirm that every game uses it. Example finished pattern from the main recording (after one wrong tap had turned the rings), going clockwise from the top: outer ring – yellow, blue, yellow, green, purple, red; middle ring – blue, purple, purple, red, green, yellow; inner ring (its three crystals at the upper right, bottom and upper left) – green, red, blue. When the lock is solved, the close-up closes and the left slot of the blue panel slides open, showing a matchbox with a flame symbol. Tap it: the Matches are crossed off the list.
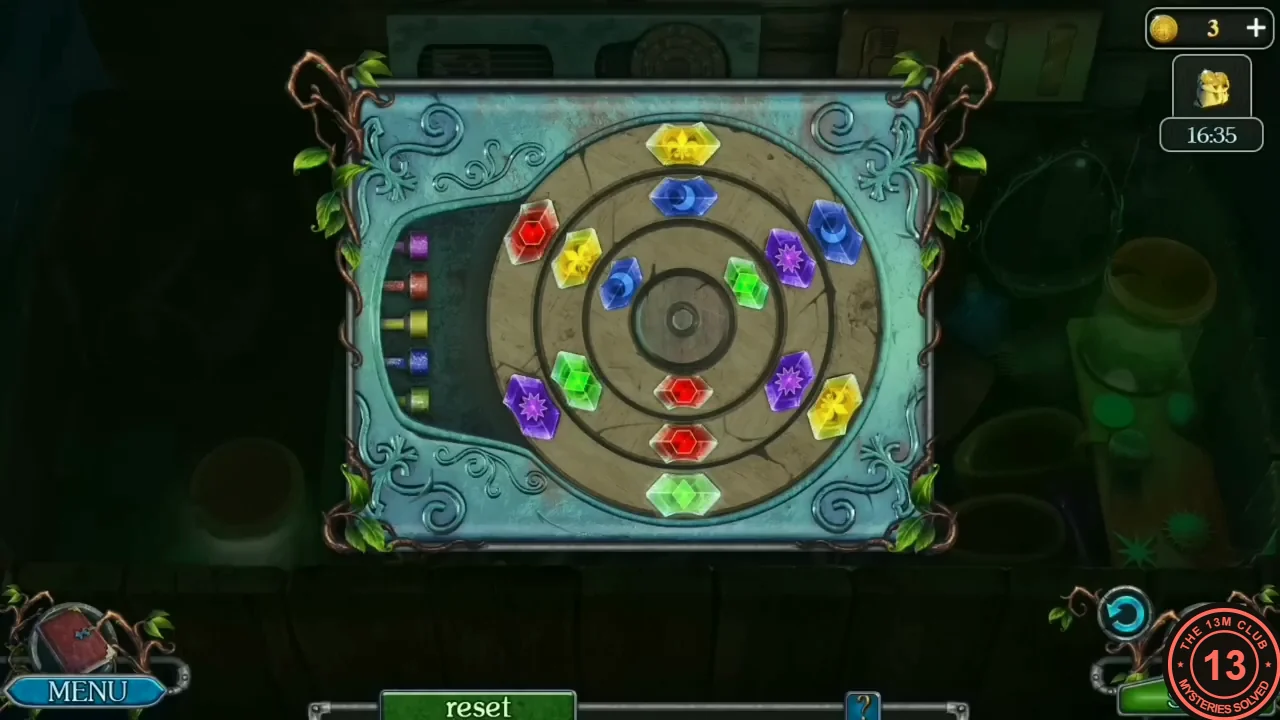
The finished lock from the main recording, matching the pattern described in the step. Wrong taps turn the rings, so in your game the colours may sit at other positions. - Back in the storeroom only the Knife is left on the list. Drag the glowing jar to the left compartment so it lights up. The Knife stands at the far left edge of that compartment, next to the red music box with the dancing figure: a slim gold handle at the top with the blade pointing down. Tap it. The hidden-object scene is complete and the Matches go into your inventory.
The Workshop and the Crowbar
Behind the storeroom is a small workshop with a vise and a floor candle wheel.
- Light the candles on the wheel-shaped candle holder on the floor with the Matches.
- Take the Hacksaw by the stool with the vise ('I can work with metal here').
- Saw off one arm of the candle wheel with the Hacksaw to get the Chandelier part.
- Optional: click the Morphing Object, a small changing metal object lying on top of the little wooden chest in the middle of the workshop, just left of the big clay pot.
- Clamp the Chandelier part in the vise and strike it with the Hammer to forge a Crowbar.
- Use the Crowbar on the boarded opening to break out. Egil enters an underground maze: 'I need to get out quickly before she catches me.' The maze is timed: a 2:00 countdown runs on the bar at the bottom, with a reset button above the task text. Tap an opening to walk through it and the round blue arrow button above SKIP to step back to the previous cave. Both recordings we checked finished with time to spare (about 0:48 left in the main one), so we cannot say what happens when the timer runs out.
Timed Maze: Escape the Evil Spirit
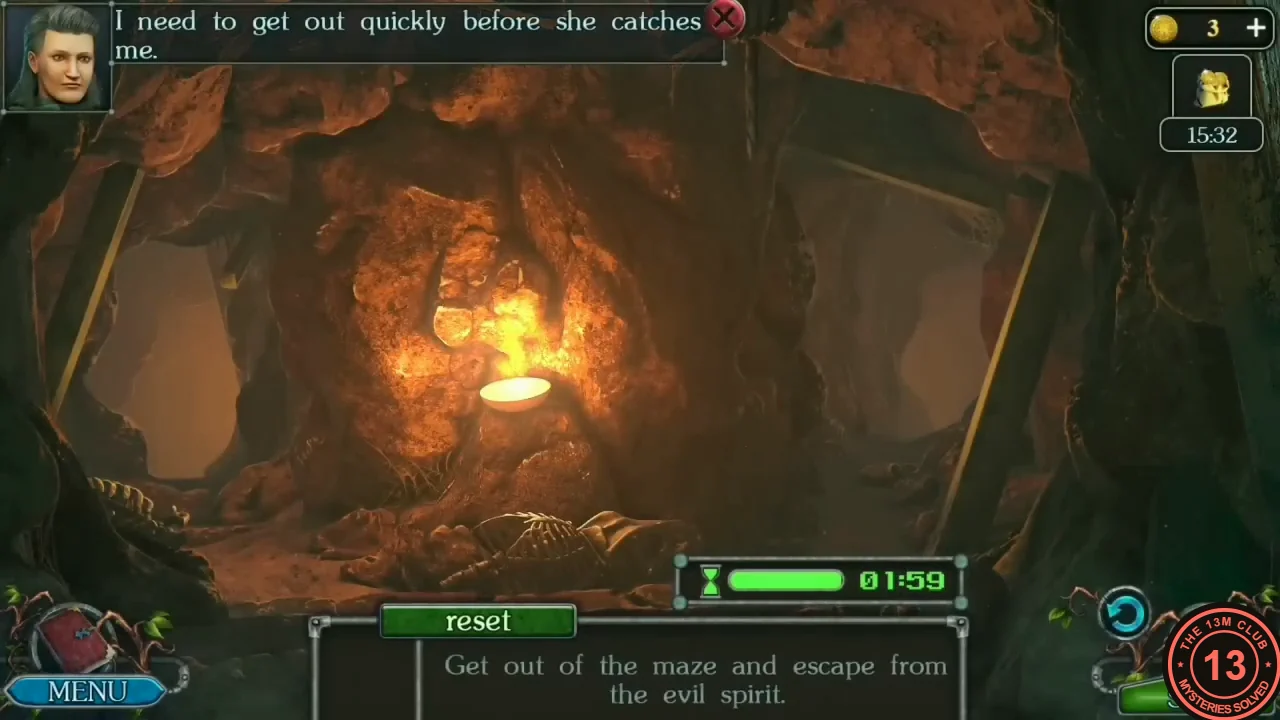
Task: get out of the maze and escape from the evil spirit. A countdown of about two minutes runs on the bar at the bottom, and there is a Reset button; in both recordings we checked the player got out in time and never pressed Reset, so we cannot say what the timer or Reset does. Move between caves through the openings and step back with the round blue back arrow. Each cave holds one obstacle or one item. The steps below follow the route from our recording, cave by cave: which opening to take, what to pick up and where to use it.
- In the first cave (lantern on the wall), take the opening on the right into the leafy tunnel, then tap the middle of the tunnel to go straight on into the cave with boarded-up rocks (“This is a dead end”). Take the Key lying at the bottom left. Step back twice with the round blue arrow above SKIP to return to the first cave, and take the opening on the left to the cave with the wooden door. Unlock the padlock on the door with the Key and open the door.
- Go through the open door into the cave where a pickaxe head is stuck in a boulder (“A shaft is missing”; also a dead end). Tap the wooden handle leaning against the rock to the lower right of it: it fits into the head; tap the assembled tool to take the Pickaxe. Step back to the door cave and take the opening straight ahead into a cave with a wall of stacked stones on the right (“There’s a hidden passage behind these rocks”). Break the stones with the Pickaxe.
- Go through the broken wall on the right into the cave with water and take the Lever (dead end). Step back and take the left opening into the cave with the spiked bars; a lever slot is on the right wall. Put the Lever into the slot and pull it: the bars slide across to the left half and free the opening on the right.
- Go through the right opening into the cave with bones and take a Bone; step back. Pull the lever again so the bars slide back to the right, and go through the left opening into the cave with the wooden stakes and a boulder high on the right ('A rolling stone will break the barrier'). Use the Bone on the boulder: it rolls down and smashes the stakes. Go through the gap where the stakes were.
- You reach a cave with two green openings. The right one leads to the exit shaft, but it is too high to climb without a rope (“It’s an exit, but it’s too high up. If only I could find a rope to hook on the snag”). Take the left opening into the dead-end cave with a cage hanging at the upper left: its rope runs diagonally across the cave to a bracket on the right wall. Tap the rope where it is tied to that bracket: the cage drops to the floor. Tap the fallen cage to take the Rope. Step back, take the right opening and use the Rope on the snag at the exit to climb out of the maze.
The Island: Summoning the Goddess
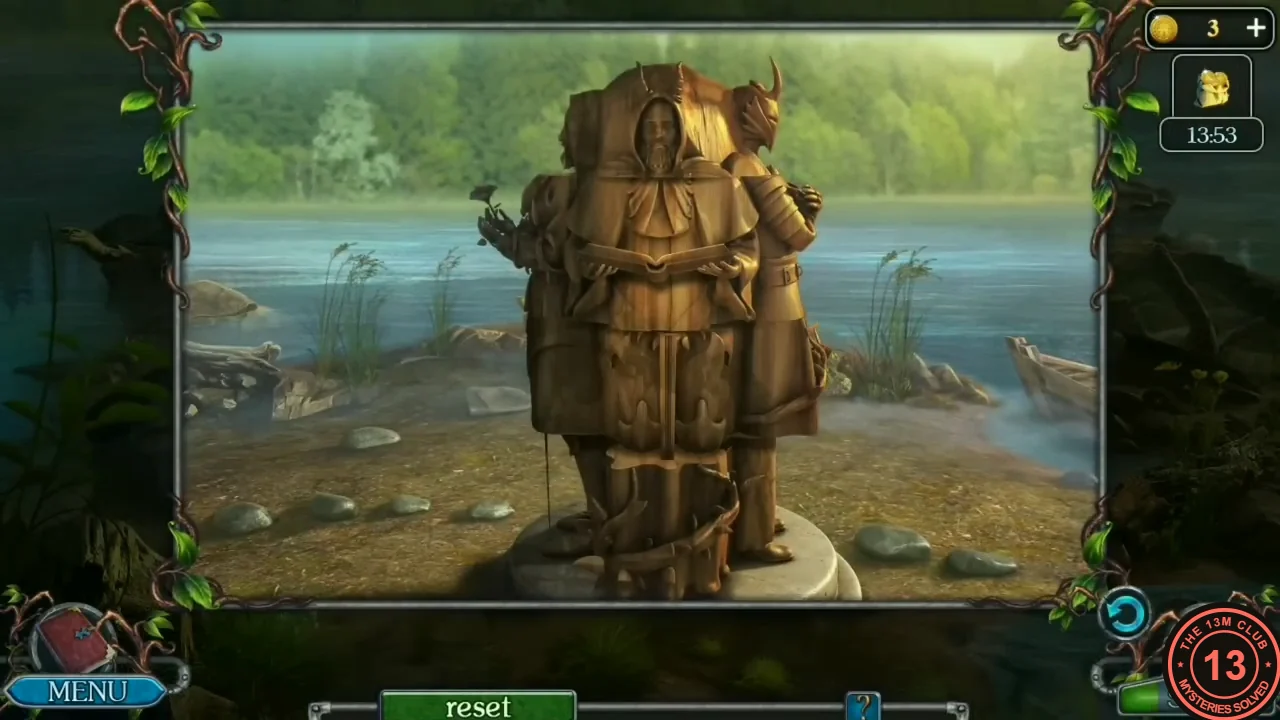
The tunnel out of the maze comes out on the island with the stone circle and the wooden statue. New task: Summon the Goddess.
- On arrival Egil says: “I must block this passage quickly before the monster catches me.” Tap the pile of loose boulders over the tunnel mouth at the far left: they tumble down and block the passage, and you get the Book. Zoom into the beached boat on the right shore and take the Hand net lying in the sand in front of it. Zoom into the root-choked hole in the rocks on the left bank and use the Hand net to fish out the Bag. Open the Bag in your inventory to get the Crystal.
- Optional collectible: click the straw doll on the ground in the lower middle of the island, to the right of centre.
- Zoom into the three-figured wooden statue behind the stone circle and put the Book into the open hands of the hooded figure (front). Puzzle: the statue is cut into three tiers – head, chest/arms and the lower robe – and each tier turns separately when you tap it, showing a part of one of the three figures. Tap the tiers until one figure is whole at the front: the long-haired woman holding two roses at her chest, with vines winding down her robe. (In the solved state the hooded figure with the Book is on the right side.) The statue glows when it is correct.
- Egil notes: “This statue had a diadem on its head.” Put the Diadem on the statue’s head. A beam of light rises from the stone circle and the Goddess appears: “Who are you? Name yourself; why have you summoned me?” Egil explains that an unknown disease is killing people in his settlement. She answers that she can cure it, but interfering with the natural course of events has a cost: first he must collect the seven seeds of the Tree of Life, come back and place them at the altar of power. When Egil says a Water Spirit is preventing him from leaving the island, she tells him to find the magic crystal on the island and bring it to her, so she can enchant it with a protective spell against the Water Spirit.
- New task: Perform the Seed Ritual. Zoom into the statue again and give it the Crystal; the Goddess enchants it ('As long as this crystal is with you, the spirit will not dare to leave its shelter'). You can now take the rowboat back to the lake shore.
The Seven Seeds of the Tree of Life and the Rune Stones
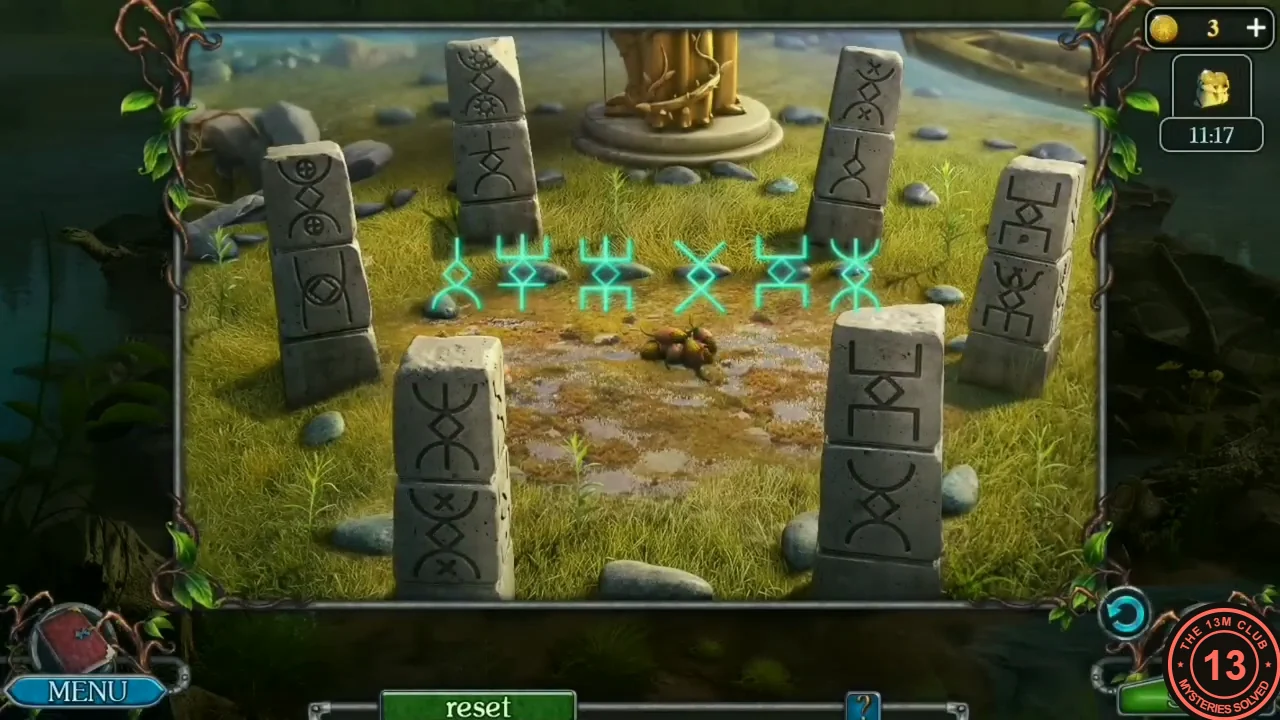
Egil has seen the glowing seeds all along: one seed now waits in each of seven earlier locations. Collect all seven (the inventory counter shows x/7), then return to the island.
- Seed 1: at the lake shore by the pier, zoom into the upturned boat hull on the left and take the seed of the Tree of Life.
- Seed 2: in the old woman's cabin yard, zoom into the vine-covered carved post and take the seed (2/7).
- Seeds 3 and 4: go back through the pond with the stepping stones into the Satyrs’ cave. Zoom into the white stone plinth just right of the statue’s stairs (where you placed and silvered the mirror, by the green plant) and take seed 3 there. Go on into Skarlett’s camp in the inner cave, zoom into the shrine between the two ornate pillars at the right and take seed 4 from the left side of its altar.
- Seed 5: at the mountain camp, zoom into the cloth tent on the left (where you found the Spear) and take the seed.
- Seed 6: enter the mushroom dungeon, zoom into the opened alcove where the ghost mushroom grows and take the seed beside it.
- Seed 7: take the forest path to the Ruins of the Ancients. Zoom into the broken stairs on the left: the seed is out of reach in the gap, so use the Hand net to fish it out (7/7).
- Return by boat to the island, zoom into the stone circle and use the seeds of the Tree of Life (one inventory item) on the middle of the circle. The Goddess appears again. Egil: “I have collected the seeds. What’s next?” She explains that the scales of balance must stay equal: if she restores prosperity and heals his villagers, he must rebalance the scales with his life. Egil says he is ready if his death helps others survive. She answers that he does not have to die: he will become a druid, a guardian dedicated to the life and well-being of this forest. If he is willing to pay that price, he must send her energy through the stone columns to the seeds so they can germinate, and an agreement between him and the forest will be concluded.
- Puzzle: six glowing runes float in the middle of the stone circle. Number them 1 to 6 from left to right: 1 = single stem, diamond, curved legs; 2 = three-pronged top, diamond, cross-bar with a stem; 3 = three prongs at top and bottom; 4 = an X; 5 = square cup on top, diamond, square legs; 6 = curved cup on top, diamond, curved legs. Each of the six pillars has two carved blocks (top and middle) above a plain base. Click a block to turn it to its next carving (each click changes the carving once); some carvings are decoys with extra dots, circles or suns. Set the blocks to this target, which was accepted in two separate playthroughs: left pillar - top 2, middle 4; back pillar left of the statue - top 3, middle 6; back pillar right of the statue - top 4, middle 1; right pillar - top 1, middle 2; front-left pillar - top 6, middle 5; front-right pillar - top 5, middle 3. The pillars light up when the arrangement is correct. A reset button sits below the board; it was not needed in the recording.
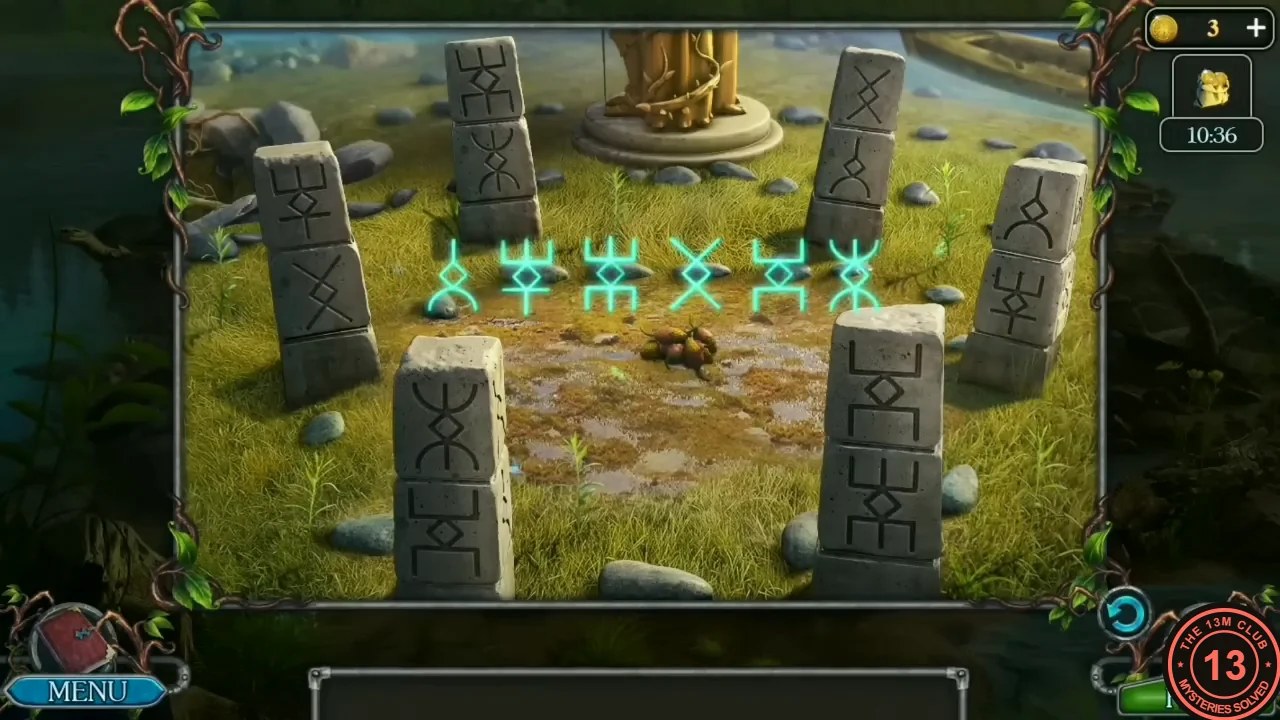
The solved pillars. Compare each pillar's blocks with yours. - Watch the closing scenes: energy from the stones makes the seeds sprout, the Tree of Life rises, Egil is transformed into the horned druid, his power spreads over the land, and the last scene returns to the village. Chapter 1 is complete, and the game goes on to Chapter 2.