The Druid's Yard and the Bead Lock
Chapter 5 (Bonus) Egil's Helper is the second entry on page 2 of the Chapter Selection screen. Its PLAY button becomes active once Chapter 4 is finished (100%). You play Herby, the druid's little helper. Egil has lost the horn he uses to summon the giant turtle. Two counters run through this chapter: Boards (x/10), which you need for a bridge at the very end, and the optional green medallions, which continue the set started in Chapter 2.
- Press PLAY next to Chapter 5 (Bonus) Egil's Helper. Watch the cutscene: Egil has lost his horn, which he needs to call the giant turtle, and Herby offers to help. In the druid's yard Herby says the short path to the northern pier goes through the cave, but its door has to be opened first. New task: Find the horn.
- In the yard (the druid's hut on the left, a stone stove with a barrel in the middle, a scarecrow with a pumpkin head on the right), optionally click the green medallion fixed to the short wooden post among the yellow flowers at the lower left, by the end of the fence. Zoom into the scarecrow's chest and take the Runestones (1/3) from the straw under its pumpkin head. Zoom into the stone stove and take the Spoon lying on the right-hand edge of the stove top, beside the grate. Take the board leaning against the wooden fence just right of the wooden chest, left of the stove (Boards 1/10). The wooden chest with five round slots in front of the hut can't be used yet.
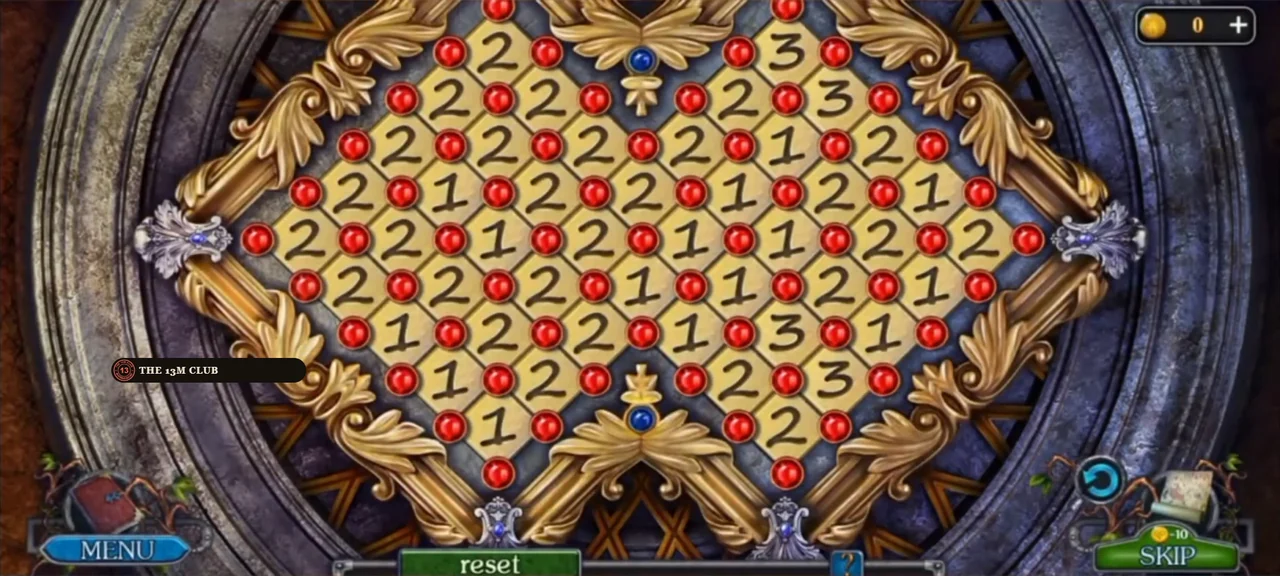
- Zoom into the roots at the foot of the bare tree behind the fence, left of the stove. Take Ball (1/5) lying on the ground, then use the Spoon where 'There is something buried here' to dig up a leather case with a bead lock. Puzzle: the board is a diamond-shaped grid of number tiles with a red bead at every corner. Clicking a red bead turns it green, and clicking a green bead turns it back to red, so you can undo a single mistake at any time; the reset button under the board starts the whole board over. Each number says how many of that tile's four corner beads must be green; a tile turns light blue when its count is right. Every tile must be light blue at the same time. Tip: each bead is shared by up to four tiles, so work from the edges inward: on the outer rim a bead belongs to only one or two tiles, and a tile showing 3 needs three of its four beads green. Recheck the neighbours after every click. Our finished layout from the main recording is shown in the image. The two recordings we inspected had different numbers on the board (the start image above comes from the second one), so your board may differ too: use the counting rule rather than copying our beads. Take Runestones (2/3).
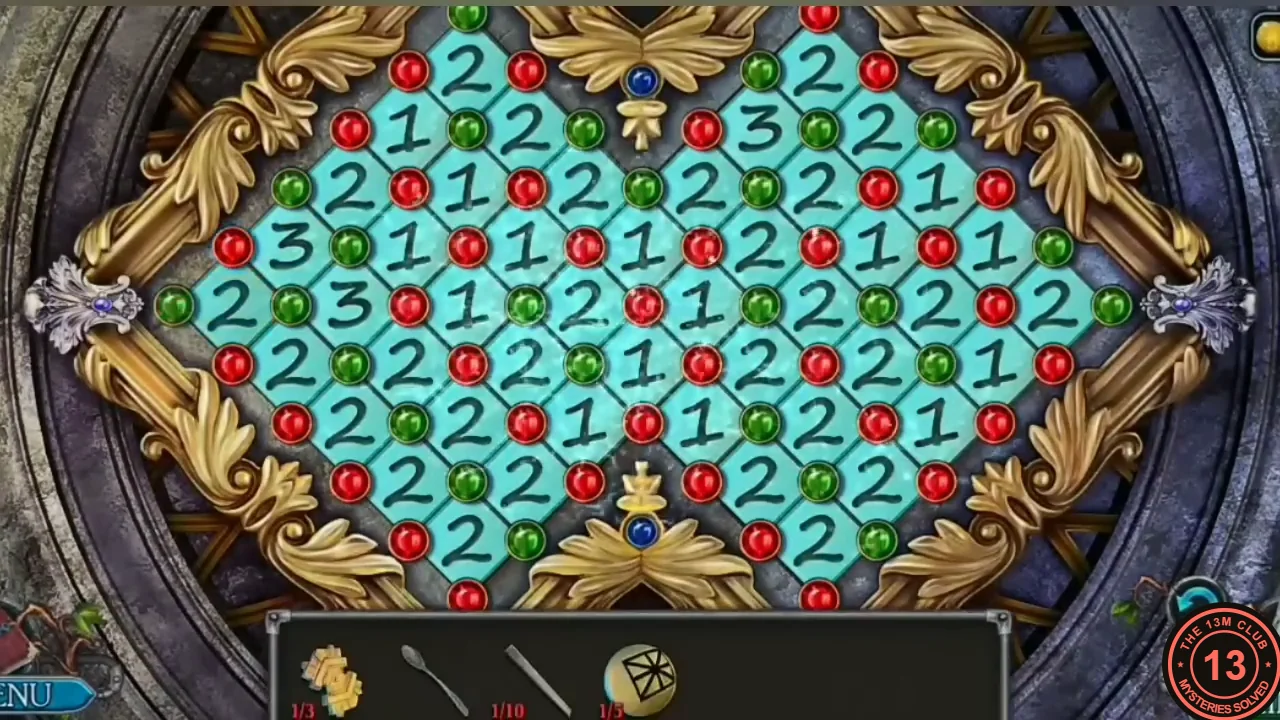
An example finished layout: every tile has turned light blue.
The Druid's House and the Cave Door
The cave door needs all three runestones. The third one is inside the druid's house.
- Go to the cave door. Take the board leaning by the door (Boards 2/10). Use the Spoon on the resin on the tree stump to get Tree resin (1/4).
- Enter the druid's house ('Egil is gone. I will have to look for the runes that will open the entrance to the cave'). Zoom into the potion table at the left: take the Sheet of paper lying right of the white mortar, and Ball (2/5), the small pale ball with dark markings lying among the bottles at the upper left of the table, beside the green bottle at the back left. Optional: a Morphing Object is the small red pot standing on top of the tall wooden wardrobe, at its left corner. Take the board lying on the floor in the middle of the room (Boards 3/10). Zoom into the bed on the right and tap the plaid blanket to pull it back: underneath lie a brush head ('Without a handle, the brush is useless') and the Runestones (3/3); take the Runestones. The room is taller than the screen: scroll down and take the Gears (1/3) lying on the stack of books in the lower right corner.
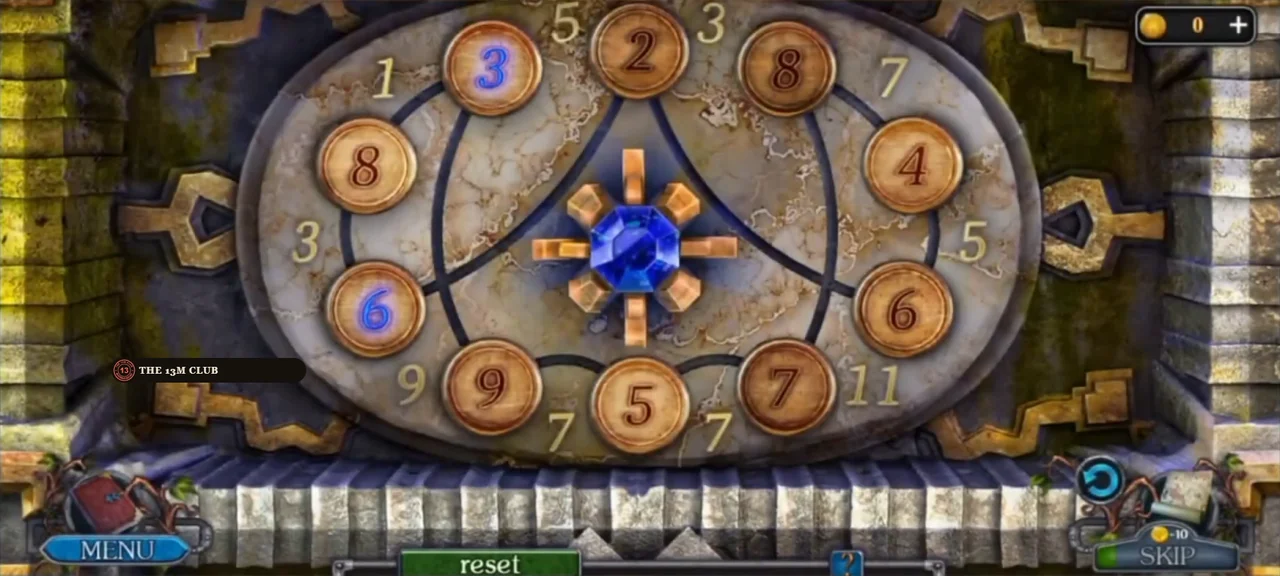
- Put the three Runestones into the cave door. Puzzle: ten numbered chips sit around a stone oval, and between each pair of neighbouring chips there is a fixed number on the rim. Click two chips to swap them. Each chip must equal the average of the two rim numbers on either side of it; a chip's number turns blue when it is right and stays dark red while it is wrong. Start at the left chip of the three in the top row (it sits between rim numbers 1 and 5) and go clockwise: the rim numbers are 1, 5, 3, 7, 5, 11, 7, 7, 9, 3, so the chips must read 3, 4, 5, 6, 8, 9, 7, 8, 6, 2. In other words: top row 3, 4, 5; right side 6 above 8; bottom row 9, 7, 8 from right to left; left side 6 below 2. The door opens.
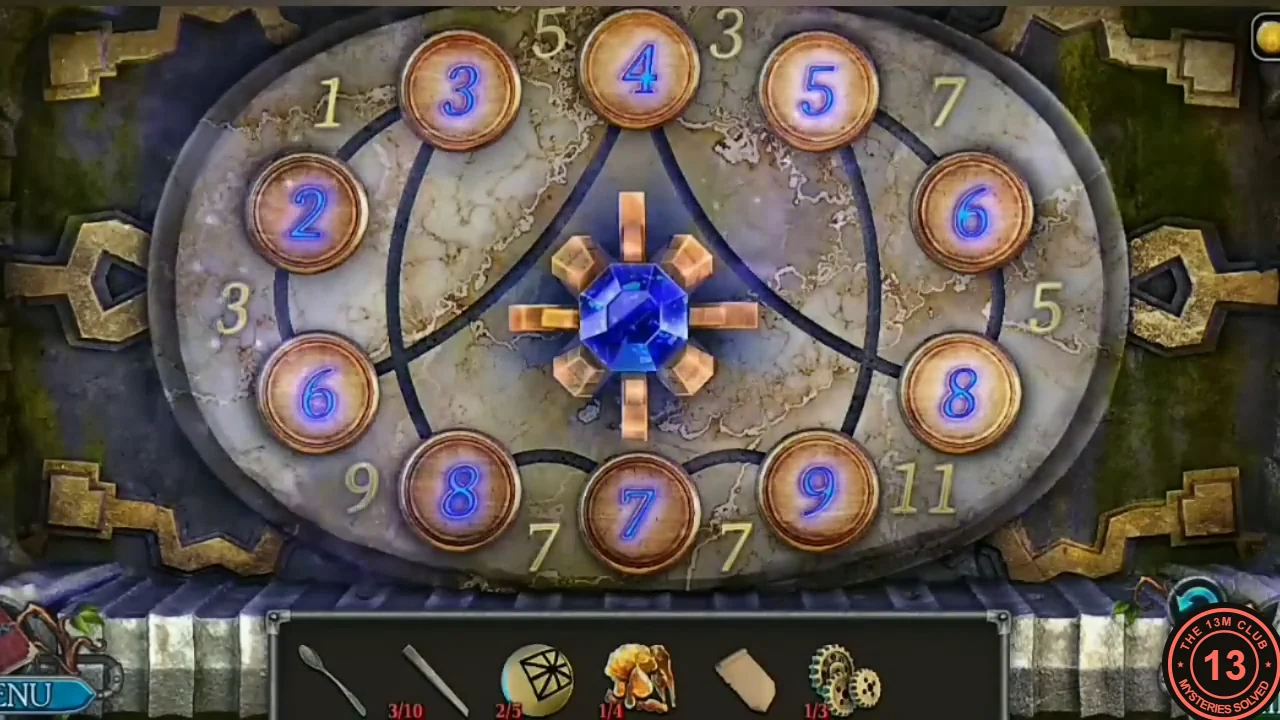
Solved: 3, 4, 5, 6, 8, 9, 7, 8, 6, 2 clockwise from the top-left chip.
The Crossroads with the Idol
Past the cave is a crossroads with a carved idol and a broken cart ('There is still quite a bit to go... I hear the sound of the river').
- Use the Spoon on the fork of the tree to get Tree resin (2/4). Optional: click the green medallion at the glowing root on the right. Take Gears (2/3) at the cart.
- At the crossroads with the carved idol: take the board lying in the grass among the blue flowers just right of the idol, near the stream (Boards 4/10). Zoom into the flat stone altar in front of the idol (apples, a deer skull, a bone); look at the flax growing there (you'll come back for its seeds: 'I can make excellent oil from its seeds') and take Ball (3/5) lying on the lower-right corner of the flat altar rock, just right of the triangular cut in the stone. Back in the scene, take the Cauldron standing at the far left edge, at the lower left of the idol's base behind a round yellow gourd. Zoom into the mossy tree roots at the lower right of the scene (left of the fallen log): take Ball (4/5) from the grass, and use the Spoon on the orange resin on the mossy root to get Tree resin (3/4). Optional: a Morphing Object is the loose wheel lying on the ground at the left end of the cart. There's a casket in the cage on the cart, but 'I can't reach the casket' yet.
The Swamp Pier and the Peg Box
North of the crossroads is a pier on the river, with a ballista and a barrel. Herby needs to get to the far bank. New task: Cross the river.
- At the pier ('Can I build a crossing out of an old ballista and a barrel?'; new task Cross the river): take the loose board lying across the right side of the wooden dock (Boards 5/10). Optional: click the green medallion in the grass to the right of the dock, left of the mossy stump. Zoom into the ballista on the right: 'the projectile in the ballista has no arrowhead'. Use the Spoon on the orange resin (the Spoon is used up) on the tree stump at the far left edge of the scene to get Tree resin (4/4). Take the Fire iron at the far end of the dock, by the barrel on the post (in our video it was tapped there straight after the resin; the thin rod itself is hard to make out at video resolution). Zoom into the small wooden chest on the left part of the dock: take the Empty pouch and Ball (5/5) from its lid. Zoom into the barrel standing on the dock and take the Handle from beside it.
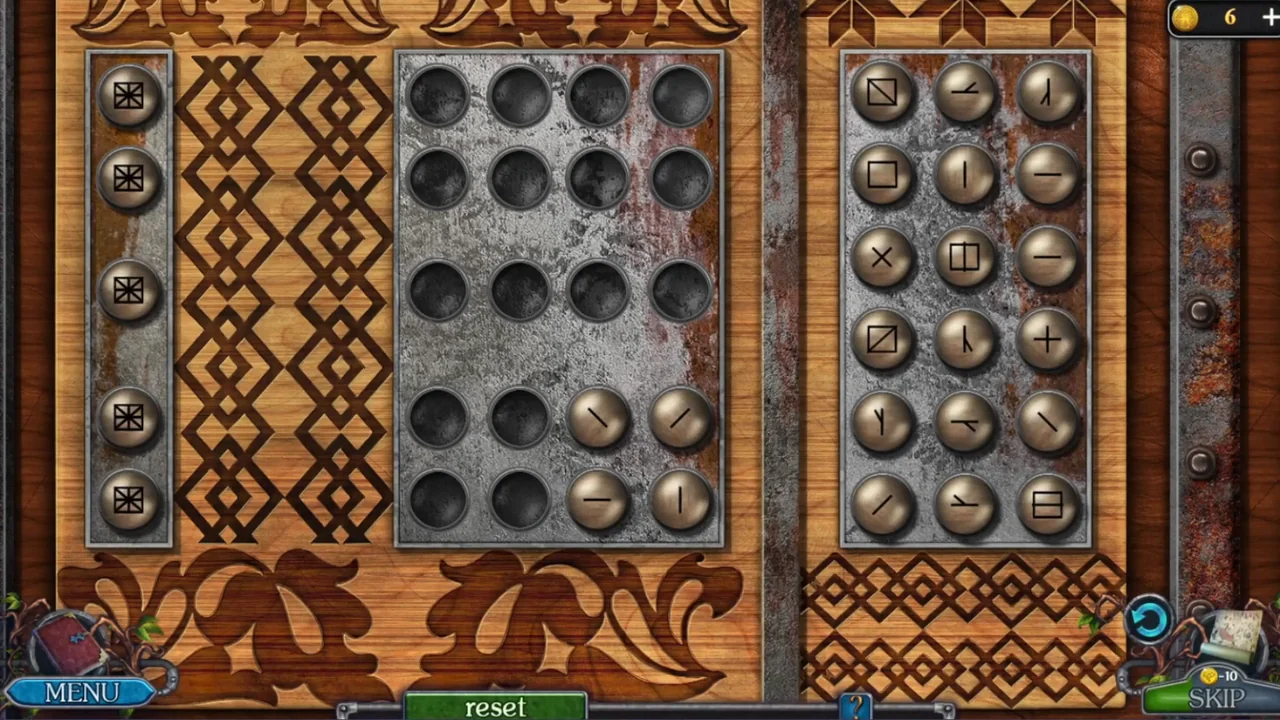
- Go back to the cage on the cart at the crossroads and use the Fire iron to pull the box out. The box is 'missing several balls': put the five Balls in. Puzzle: the middle board has five rows of four holes; the panel on the right holds the spare balls, each engraved with a square or with one or more lines. Every row has a target ball in the column at its left edge (cut off in our main recording but clearly visible in the second recording): a square with both diagonals plus a vertical and a horizontal line through the centre. Drag balls from the panel into a row so that their engravings together draw exactly that full symbol (in our solve no line was ever doubled); a row's balls and its target light up blue when it is complete, and not every row needs all four holes (rows 1, 3 and 5 below used only three). Balls already on the board can be dragged elsewhere too, and the reset button at the bottom restarts the board. Our five rows: 1) square with a vertical line, X, horizontal line; 2) plain square, +, /, \; 3) square with one diagonal plus two balls engraved with half-lines that together complete the vertical, the horizontal and the other diagonal; 4) square with a horizontal bar, vertical line, \, /; 5) square with the other diagonal plus two more half-line balls that complete the rest. Tip: start each row with the ball that has the square, then add the lines that are still missing. The box opens: take the Lockpick and Gears (3/3).
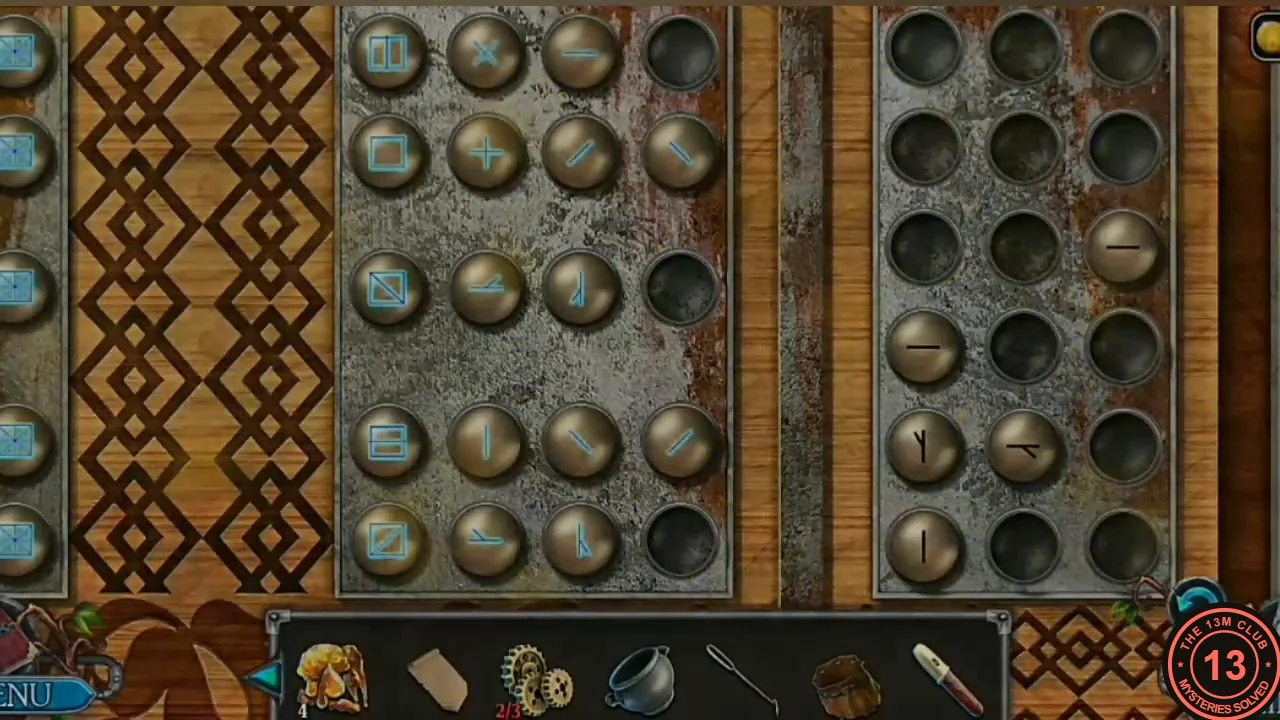
An example solved box. - Go back to the druid's house. Open the wardrobe with the Lockpick and take the Rope and the Hoop. Put the Handle on the brush on the bed to get the Brush.
Flaxseed Oil, the Ballista and the Barrel Crossing
To cross the river, Herby fires a rope across with the ballista and rides over in a sealed barrel.
- Zoom into the stone stove in the druid's yard, put the Cauldron on the grate and add the four pieces of Tree resin: they melt into Resin, which goes into your inventory in the pot. At the idol, zoom into the stone altar and use the Empty pouch on the flowering flax behind the slab to collect Flaxseed. In the druid's house, zoom into the potion table: put the Flaxseed into the white mortar and crush it with the pestle until it turns into oil. Tap the mortar to pour the oil into the small round flask in the middle of the table, and take the Flaxseed oil.
- At the pier, zoom into the ballista's winch. Put in the three Gears, then the Rope.
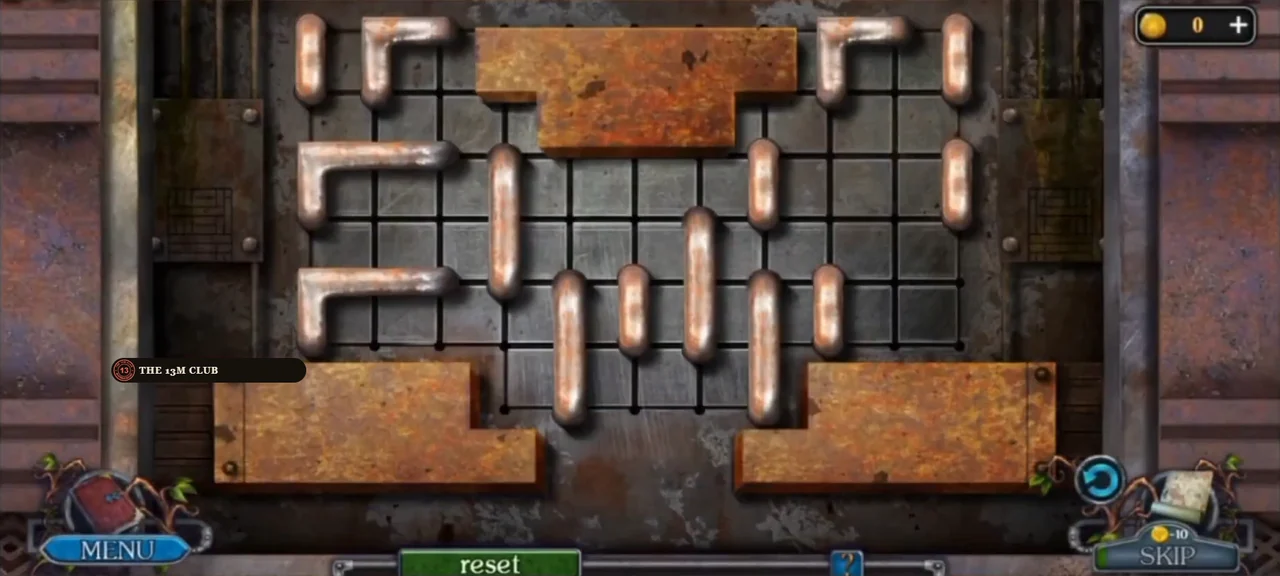
- Use the Flaxseed oil on the rusty chest on the dock. Sliding-block puzzle: drag the copper pipes and the rusty T-shaped block along the grid so the T can drop into the notch between the two rusty blocks at the bottom. Strategy used in our solve: first push the straight pipes up against the top edge of the board, one by one, to empty the middle rows; as space opens, move the T down and to the left; in our solve the T then sat on the left block with its stem one column left of the notch, blocked on the right by two L-shaped pipes; push those L pipes up towards the top right corner until the T's right side is clear, then slide the T right: it drops down into the notch. If you get stuck, press Reset under the board. The start and solved layouts are shown in the images. Take the Arrowhead. The second recording we checked shows the pipes in different places early in this puzzle, so your starting layout may not match ours: treat the images as an example and follow the strategy.
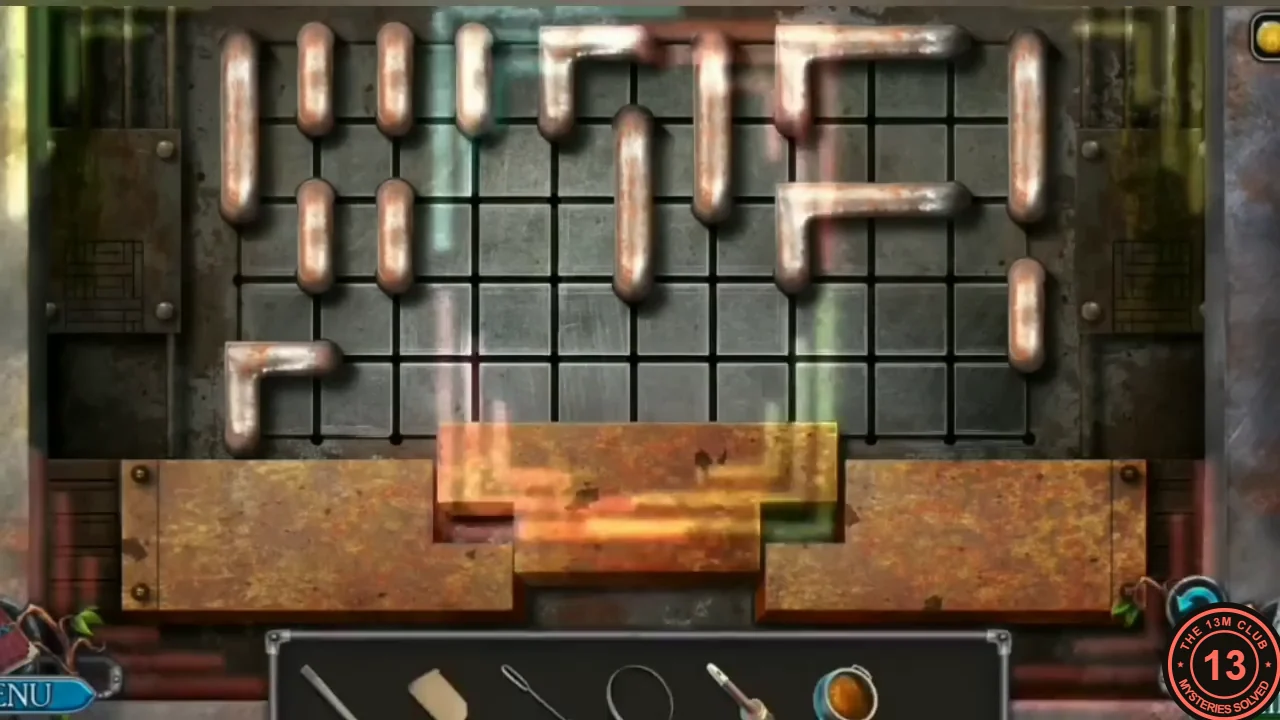
Solved in the example game: the T-block drops into the bottom notch and glows. - Put the Arrowhead on the ballista bolt and fire; a rope now stretches across the river. Zoom into the barrel on the dock: fit the Hoop on the barrel, then click the lid lying on the planks so it goes on top. Put the Resin pot beside the barrel and use the Brush on it: Herby coats the lid and then the staves with resin. The sealed barrel goes into the water by the rope and carries Herby across. Task complete: Cross the river.
Across the River: The Swamp Hut
On the far bank is a hut on stilts with a rope ladder out of reach ('This was once a large lake; now it has become a hazardous swamp').
- Zoom into the wooden post by the landing. Pry the board off with the Fire iron and take the board (Boards 6/10) and the Wolf amulet underneath. Take the board floating in the water to the left of the post (Boards 7/10). Optional: click the green medallion on the roof of the hut porch. Take the Handle from the crevice at the base of the post.
- At the hut across the river, zoom into the doorway: the rope ladder hangs out of reach ('I need to reach the rope ladder'). Go back over the river crossing and along the path past the idol to the druid's yard. Zoom into the stone stove and drag the Handle from the inventory onto the stove door: it fits on the door, and the door swings open about a second later, showing the glowing fire ('The fire is still burning.').
- Back at the hut, the door is padlocked. Take the Fishing rod lying diagonally across the stones at the water's edge, its end near the foot of the tall post, and use it in the doorway close-up to pull down the rope ladder. Climb up: 'It's dark here, and I can't see anything.' Go back out and zoom into the ladder again: the Torch hangs in an iron holder on the wooden support post left of the ladder, under the porch roof. Take it. Return to the druid's yard, zoom into the stove and hold the Torch in the fire to get a Burning torch. Go back to the hut, climb in and use the Burning torch to light up the room.
- In the lit hut, zoom into the floor: take the Bucket standing behind the small stool at the upper left, then tap the rug to pull it back ('There is something scribbled here that looks like a map'). Lay the Sheet of paper over the carving, then take the Snake amulet that lies on the folded-back rug just above the paper. Herby notes: 'I have to transfer the image to the paper.' Go to the druid's yard (on foot or with the map), zoom into the stove and drag the Bucket onto the water tub on the left: it fills, and the water is poured on the fire, which goes out (the bucket is used up). Take the Bear amulet and then the Coal from the cold firebox. Back in the hut floor close-up, rub the Coal over the paper to get the Map ('...the marshes and it points to some place. But what is there?').
The Bog Path and the Amulet Chest
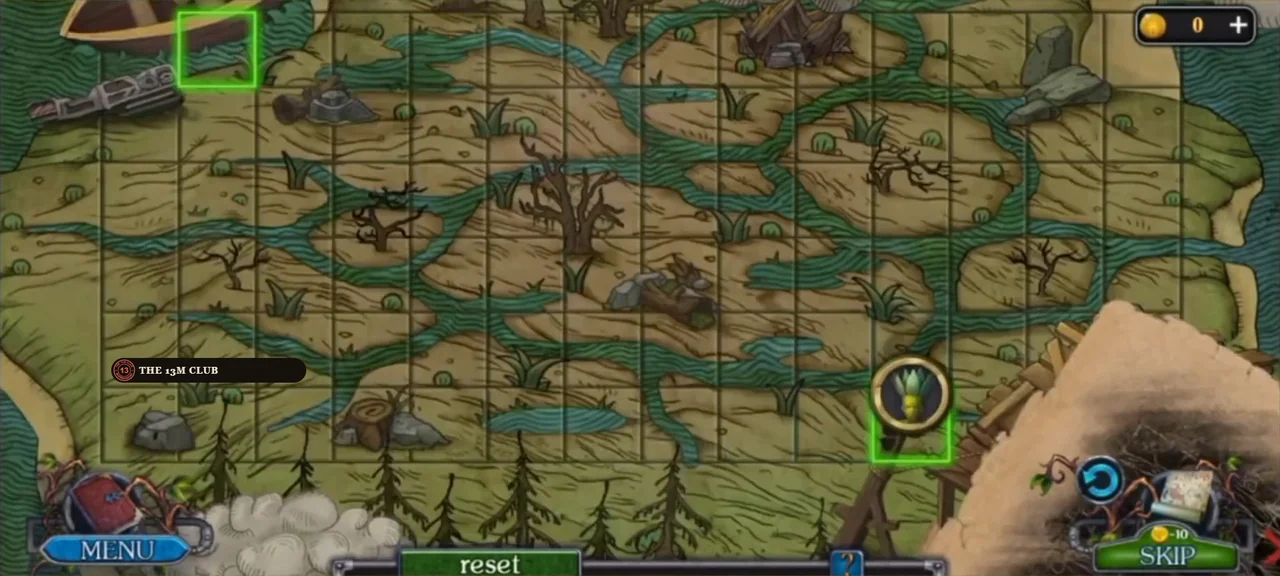
The rubbed map shows a safe route through the marsh.
- Use the Map on the swamp path. Herby says: 'I need to mark places with a bog on the map and make a safe path past them.' First the map rubbing is shown with its grid, a circle at the bottom right (start) and a circle at the top left (goal). Then the swamp board opens: Herby's token stands on the green square at the bottom right, and the goal is the green square in the top-left corner. The squares next to the token are outlined in blue; click one to step onto it, one square per click; footprints mark your path. (Our player first stepped one square left and was back on the start square a moment later, then took the route below.) In our playthrough no separate marking was done; the route that worked was: from the start square go up 1, right 1, up 2, left 3, up 2 to the top row, left 4, down 1, left 3 to the left edge, then up 1 onto the goal square. Press Reset under the board to start again. The map rubbing and the solved path are shown in the images.
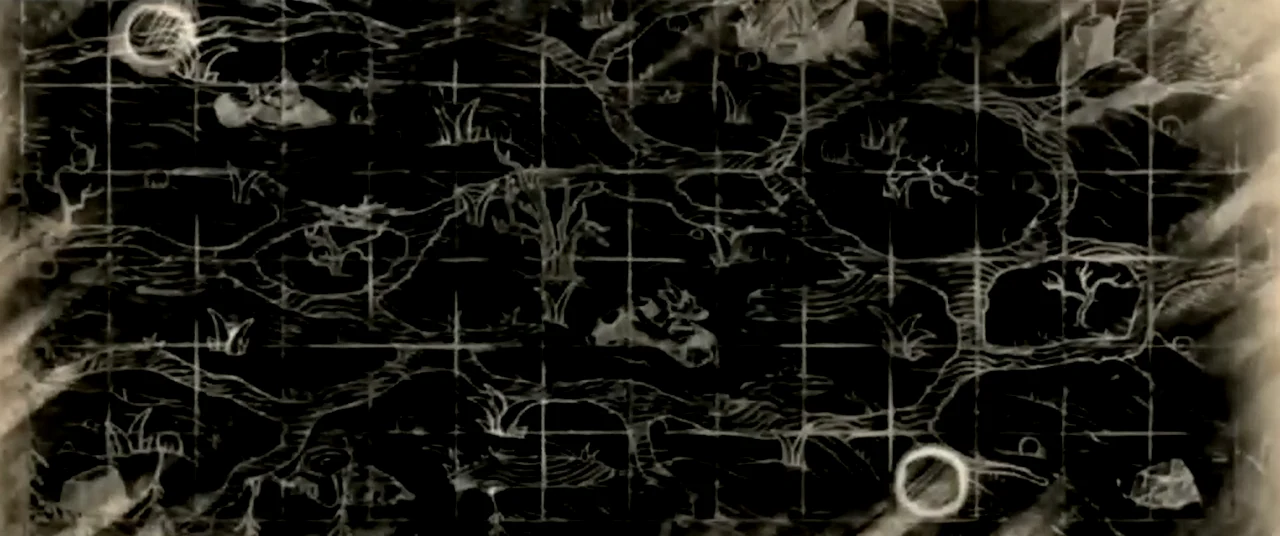
The map rubbing with contrast raised: start circle at the bottom right, goal circle at the top left. Its faint lines do not show the bogs clearly, so follow the footprint route in the next image. 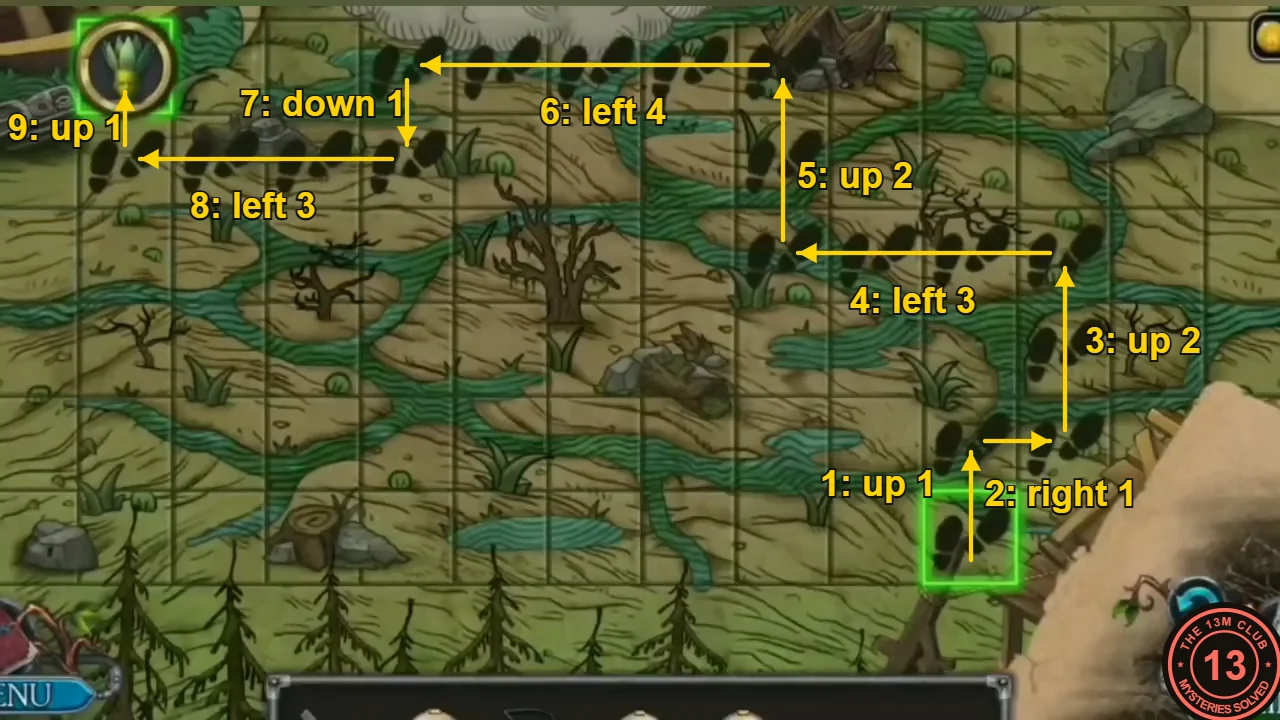
The safe route that worked, traced over the footprints: 1 up 1, 2 right 1, 3 up 2, 4 left 3, 5 up 2, 6 left 4, 7 down 1, 8 left 3, then 9 up 1 onto the goal. - In the glade ('The map allowed me to pass through the swamps and get here. What should I look for?'), you can click the green medallion glowing at the end of the carved fallen log on the right (Collection items 10/15, optional). Zoom into the pond: take the plank lying across the water (Boards 8/10). Then zoom into the tall grass with the mushrooms: click the rock to move it aside and take the Fox amulet underneath.
- Go back to the druid's yard and zoom into the wooden chest standing in front of the house, left of the stone stove; its lid has five round slots. Put in the amulets. In our playthrough they ended up, counting slots from the left: Snake in slot 1, Wolf in slot 2, Fox in slot 3 and Bear in slot 5 (drag each amulet from the inventory onto its slot; our player placed them in the order Fox, Wolf, Snake, Bear). Slot 4 stays empty for now; you need a fifth amulet.
- Go back across the river to the hut: the padlock is still closed ('The lock is closed'). Optional: a Morphing Object is the small grey stump on the reed island in the water at the upper left of the scene. Take the Net: its thin pole, with a small hoop at the top, leans against the front of the hut, just right of the slanted wooden prop under the left end of the porch roof (well to the right of the tall post by the water).