The Frozen Lake and the Ship
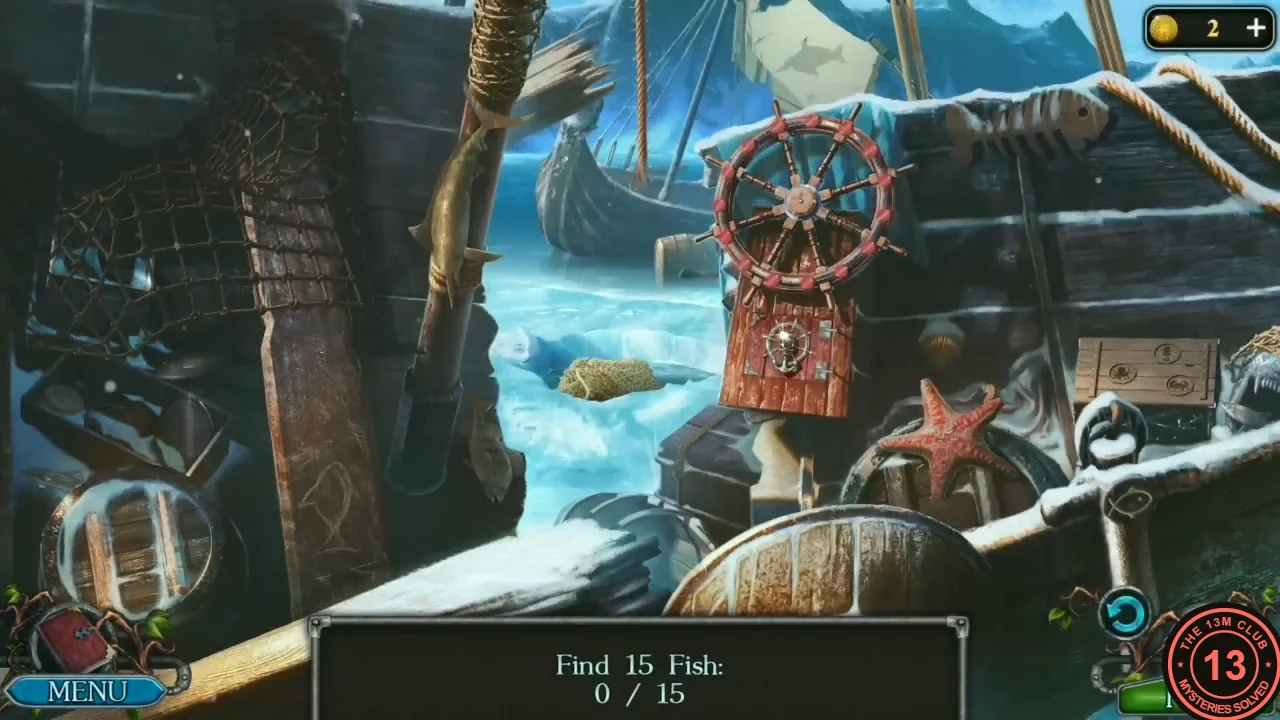
After the spider puzzle Mira comes out on a frozen lakeshore: 'Across the lake is my grandmother's house, but I must fix the broken crossing first.' A wrecked ship sits in the ice on the right; on the travel map this shore is part of the Witch forest.
- Click the wrecked ship to start a hidden-object scene: Find 15 Fish. Each fish you find lights a lamp on the ship's wheel, and the counter at the bottom keeps the score. Positions in our recording: (1) a fish scratched into the dark wooden post at the lower left. Zoom into the shadowy area at the left beside that post to see an open tackle box: (2) the flat fish lying on the top-right edge, (3) the fish picture on the lid of the round tin in the box and (4) the big grey-green fish lying on the floor below the box at the lower left. Back in the main view, tap the net hanging at the upper left: it drops and uncovers (5) a silver fish lying on the beam at the top left. (6) The long brown fish hanging on the mast left of the wheel. Tap the rolled net on the ice in the middle to open it, then zoom into the ice hole. Tap the harpoon lying across the net: it swings up and spears (7, 8) the two fish that swim past. (9) The fish painted on the sail at the top. (10) The striped fish skeleton on the hull at the top right, right of the wheel: it fades away after the tap. (11) The dark fish hanging vertically on the thick pole at the left edge of the ice, below the rolled net: when you tap it, it only swings and stays in place, but the counter goes up (a second tap on it adds nothing). Zoom into the area right of the wheel; a hint says 'I need to insert a figurine into the notch'. The chest lid there has round notches. Click the starfish at the lower left to move it aside. Take the small seahorse figurine standing on the cloth at the upper left; it goes into a notch on the lid. Click the dark hollow in the lower middle to uncover a card with a fish drawing (12). Click the crab carving on the barrel at the lower left; it lifts off and goes into the other notch. The chest opens: tap the golden fish (13). Tap the small silver fish sticking out of the jaws of the big fanged fish head to the right of the chest (14). The golden fish lifts away and uncovers a long fish lying under it: tap it (15). That completes the scene, and the panel under the wheel opens.
- When all 15 fish are found, the compartment under the ship's wheel opens. Take the Hammer.
- Zoom into the split tree stump on the shore. Put the Chisel in the crack and hit it with the Hammer. Take the green gem from inside; its inventory name is Emerald.
- Zoom into the raft crossing: 'A few boards on the crossing were broken off.' Take the path on the left to the hunter's house.
The Hunter's Yard, the Owl and the Bedroom Window
On the travel map this log house is the Hunter's dwelling. A boy calls from behind the bars of a basement window.
- Click the barred basement window. The boy, Hjalmor, does not know how he ended up there; someone must have locked him in the basement. He promises to help with the crossing if you get him out. He says there is a cave with a giant spider on the way here, where his father keeps some supplies, with a hidden cache holding a key to the house. New task: Release the boy. In the window close-up, take the board lying in the snow below the window (Boards 3/4).
- Optional: click the Morphing Object on the wooden wall to the right of the door, up near the gable.
- Zoom into the barrel at the lower right, slide off the lid and take the Resin (black lumps). Optional collectible: click the small green medallion in the snow at the left end of the log pile, at the lower left of the yard. Zoom into the old well on the left and take the loose board lying across it (Boards 4/4). Mira notes that the well's crank handle might come in handy; hit its bracket with the Hammer and take the Handle.
- Zoom into the drying rack with the hanging meat at the left side of the house and cut off a piece with the Knife: Meat. The outdoor stove says 'I can cook or melt something on the stove'; the house door is locked with a key.
- Open the travel map, choose Witch forest and go to the clearing with the totem. Zoom into the tree hollow with the snowy owl and give it the Meat. The owl flies off; zoom in again and take the gold crown, the last of the Figurines (3/3). You now have the full set: two boots and a crown.
- Travel to Mira's house and go to Mira's bedroom. Zoom into the carved panel with the purple valance above the bed and put the Figurines in the three matching recesses (boot, crown, boot).
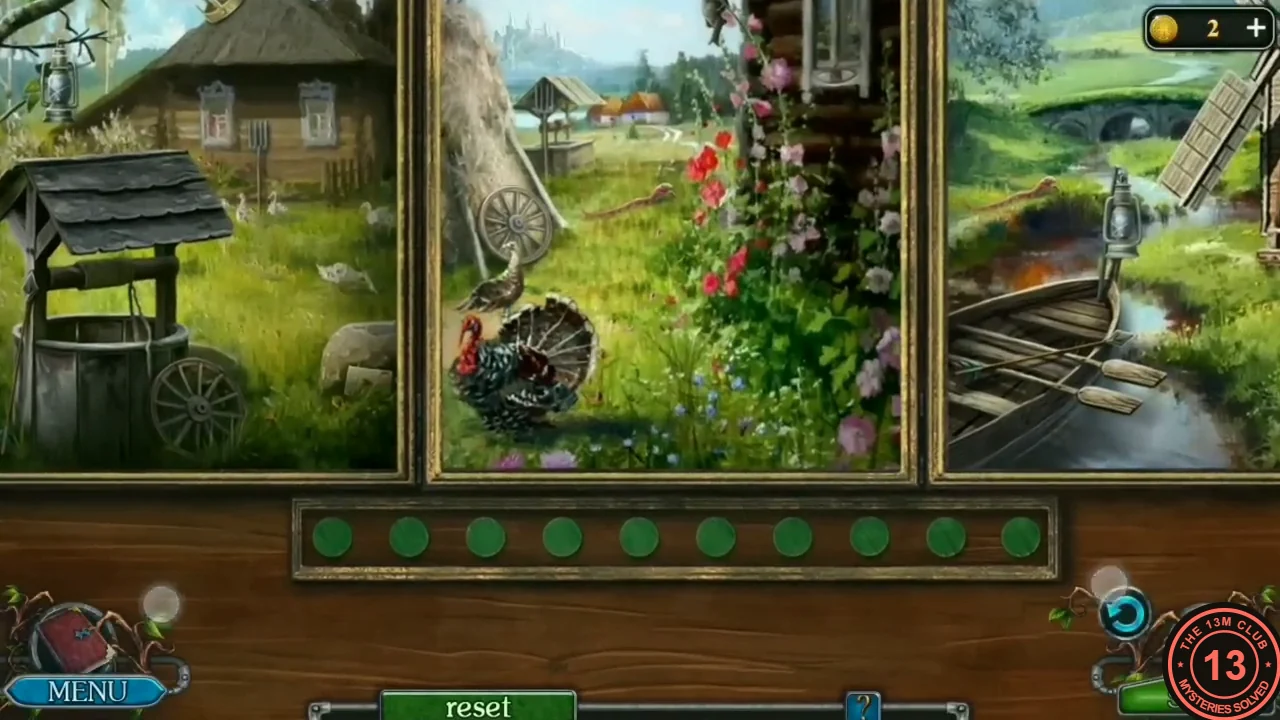
- Puzzle: three window pictures with ten lamps underneath. Ten objects each appear twice, in two different pictures. Click one copy (it glows) and then its twin; both disappear and a lamp lights. The pairs, in the order the lamps were lit: 1) lantern hanging in the apple tree (left) and on the boat's pole (right); 2) cartwheel by the well (left) and leaning on the haystack (middle); 3) thin fishing rod leaning against the left side of the well (left) and lying across the boat (right); 4) pitchfork against the house (left) and a tiny pitchfork by the distant well (middle); 5) hanging fish in the apple tree (left) and on the log-house wall (middle); 6) reddish stick in the grass (middle) and on the stream bank at the left, above the boat (right); 7) small box by the rock (left) and at the foot of the windmill (right); 8) birdhouse by the chimney of the house (left) and on the side of the windmill (right); 9) castle on the hill in the distance (middle and right); 10) fish-shaped outline in the twigs of the apple tree (left) and carved on the bottom of the log-house window frame (middle). When all ten lamps are lit the picture slides up.
- Take the Flint and Steel from the compartment that opens behind the picture.
- Travel to the Hunter's dwelling and zoom into the outdoor stove. Put the Cauldron on the grate. Put the firewood leaning against the right side of the stove into the hearth and light it with the Flint and Steel. Put the Resin into the pot to melt it. Open the Old torch in your inventory: cut off the old rag with the Knife and wrap the Cloth around the end to make a Torch. Use the Torch on the stove: it is dipped into the melted resin in the pot and then lit in the fire, giving a Burning torch.
The Hunter's Storeroom
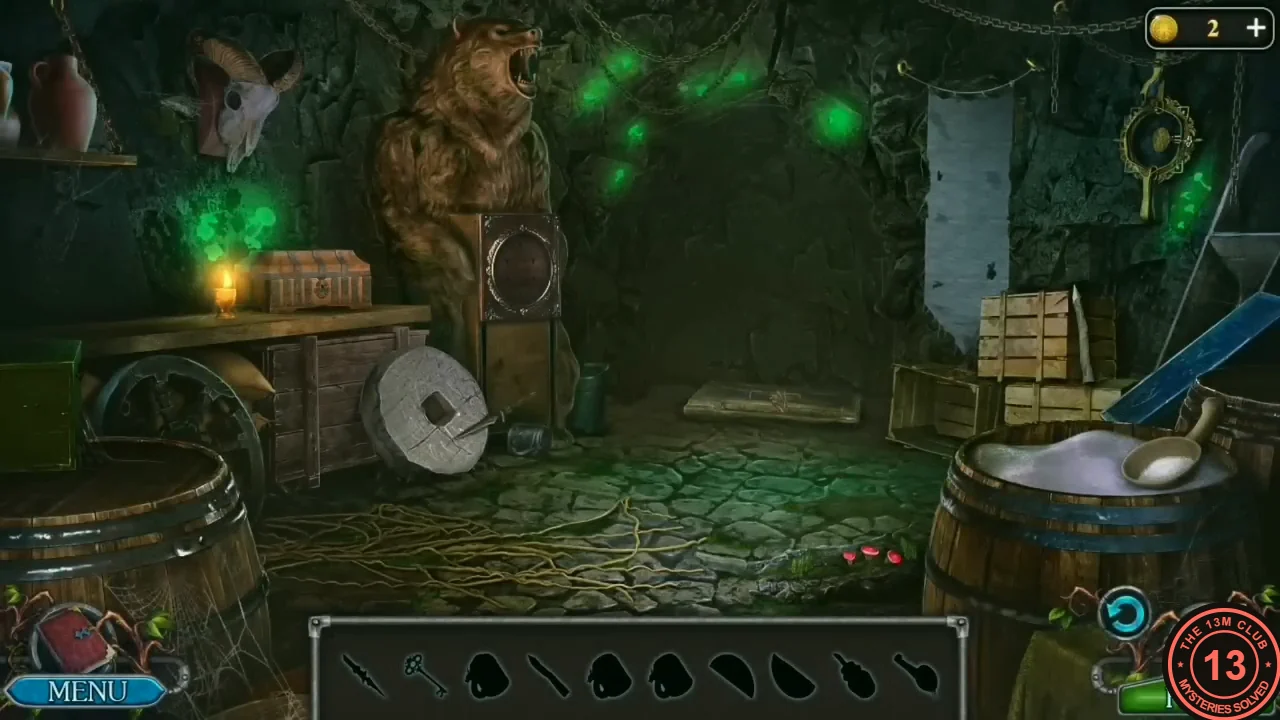
Hjalmor said the key to the house is kept in his father's storeroom by the spider cave. A bar at the bottom of the screen shows the outlines of items to find here; each item fills its outline when found.
- Go back to the spider cave. Zoom into the barred gate on the left and put the Burning torch in its bracket. The gate opens; go in.
- This room has an item bar at the bottom showing silhouettes of the items to collect here. Take the Dagger stuck in the hole of the millstone leaning against the cart at the left. Take the grey mug standing on the floor just right of the millstone. (The small chest standing beside the candle on the table at the left is locked for now.) Zoom into the floor hatch tied with rope and cut the rope with the Dagger: 'There is something under the ice and snow. I need something to remove it.' Scoop up the snow with the mug.
- Zoom into the table with the candle on the left and put the mug of snow by the candle to melt it into hot water. Take the spoon from the salt barrel at the lower right (Spoon with salt). Click the white cloth hanging on the right wall: it falls onto the crates, a wooden Peg drops onto the floor in front of them (take it) and a niche is uncovered. Zoom into the niche: take the small bottle of Oil standing in it, and Mira notes the square spiral symbol on the plate behind it ('I may need this symbol'). Back at the candle table, stir the Spoon with salt into the hot water to make a Saline solution. Zoom into the floor hatch and pour it on the ice, then use the Peg on the softened ice to break it open. Take the red Picture part from the hole.
- Zoom into the round mechanism on the right wall and take the Key from it.
The Storeroom Spiral Chest
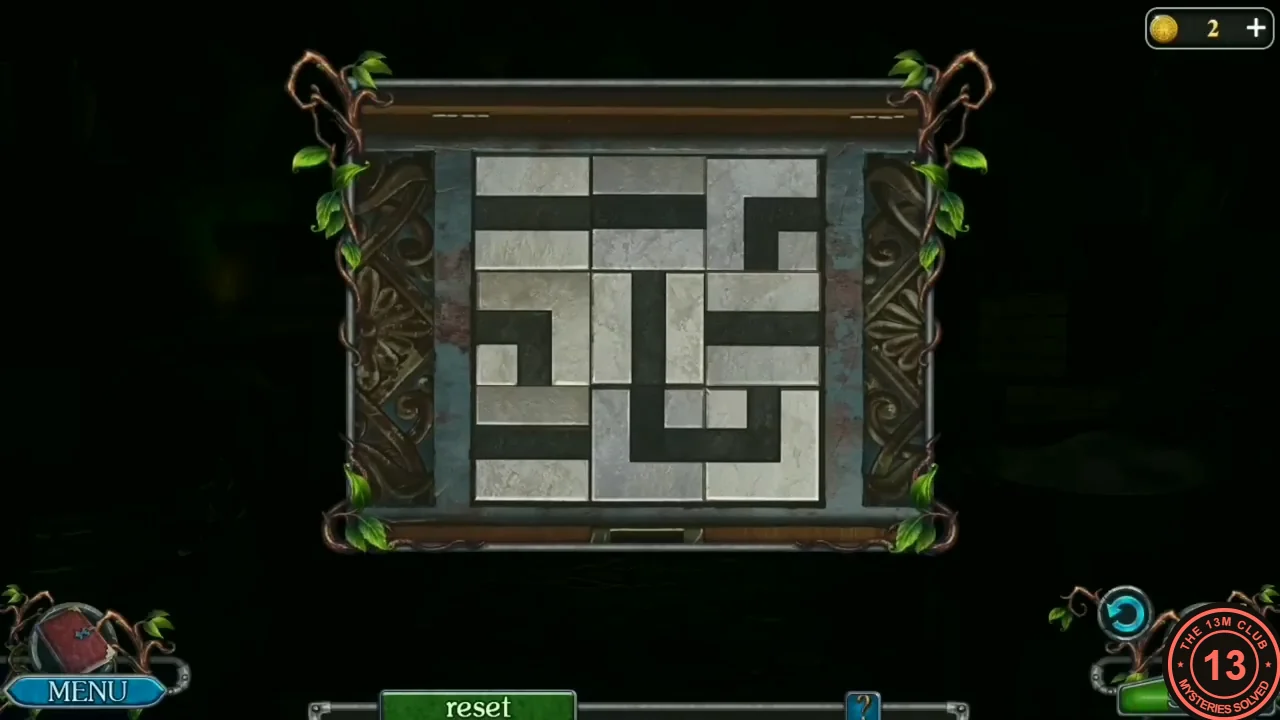
The small chest beside the candle opens with the storeroom Key and the Oil and holds a tile puzzle; its Picture part completes the house key.
- Zoom into the small chest beside the candle on the table at the left. Use the Key you just took from the ring in its lock, then use the Oil on the lock as well (the Oil alone only gives 'A different item is needed'). The chest opens on a puzzle. Puzzle: a 3x3 board of stone tiles, each with part of a dark band. Make the bands form the square spiral you saw in the wall niche. In the footage, every move made two neighbouring tiles trade places (both light up while they swap), and the tiles did not turn. There is a reset button under the board; we did not see it used. Target (see the solved image): the band enters the top-left tile from the left edge and runs straight along the top row, turns down in the top-right tile, runs straight down the middle-right tile, turns left in the bottom-right tile, runs straight through the bottom-middle tile, turns up in the bottom-left tile and turns right in the middle-left tile. It then runs straight into the centre tile and ends there with a flat end. So the top-left, top-middle, bottom-middle and centre tiles carry straight horizontal bands (the centre one stops short of its right edge), the middle-right tile carries a straight vertical band, and the top-right, bottom-right, bottom-left and middle-left tiles carry the four turns. Work out where each tile belongs from its band shape and where the band sits on it. Place the turning tiles first, then the straight pieces, and finish with the middle-left and centre tiles. Take the second Picture part from the open chest.
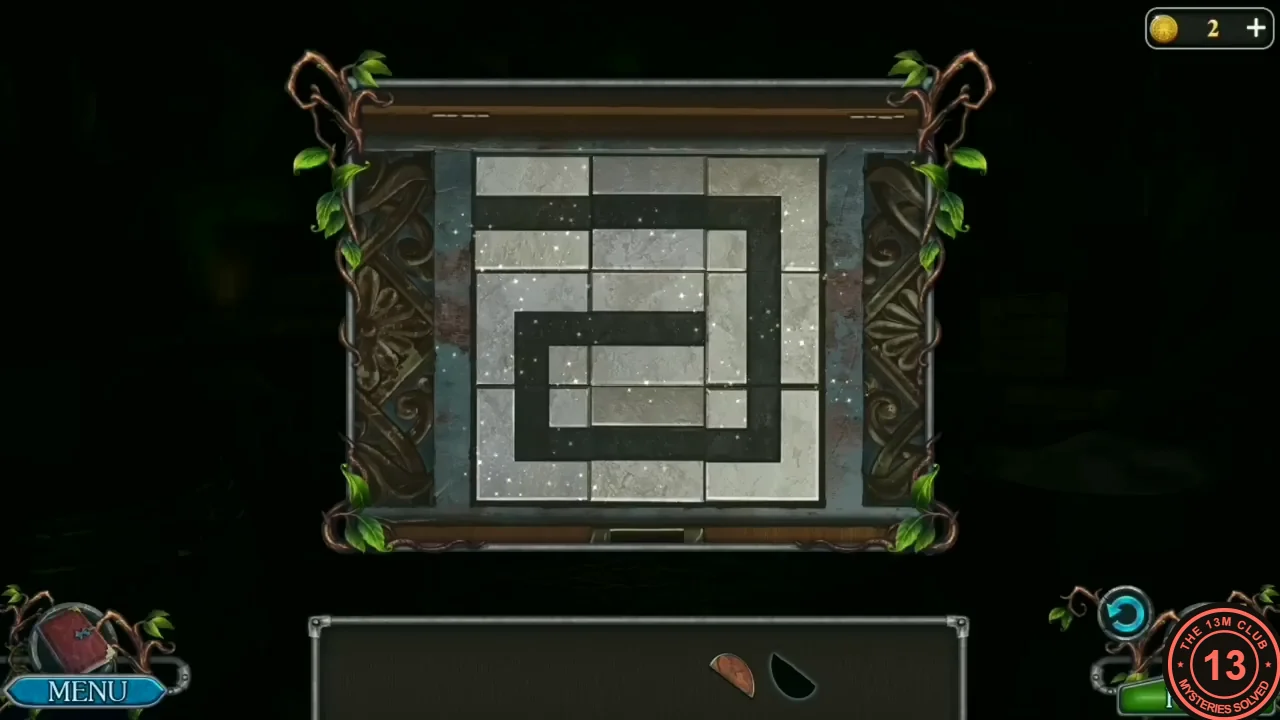
Solved: the dark lines form the square spiral. - Zoom into the box under the stuffed bear: 'There was some kind of picture in this notch.' Put both Picture parts into the round notch and take the Key from the compartment.
Inside the Hunter's House and the Crossing
With the key from the storeroom Mira can enter the hunter's house and look for the way into the basement.
- Return to the Hunter's dwelling. Zoom into the ladder fixed to the house wall, knock its bracket loose with the Hammer and take the Ladder. Open the door with the Key and go inside.
- Zoom into the dark chest on the floor at the left, below the window. Sweep the cobwebs away with the Broom from the wagon chest and take the Deer figurine. Then zoom into the carved bird skull on the table ('Part of the beak is missing') and attach the Beak. The skull opens and shows a small round box holding 9 bullets. You cannot take anything from it. The bullets are a clue for the trapdoor puzzle later.
- Zoom into the carved log above the fireplace with five figurine stands. Place the Lynx and the Deer. Zoom into the fur rug on the floor in front of the table and pull it aside: it uncovers a trapdoor, and the Eagle figurine lies next to it. Take the Eagle. Zoom into the stuffed bear at the right of the fireplace: there is a notch in the centre of its medallion. Put the Emerald (the green gem from the stump) in it: the round lid at the bear's feet opens, and you take the Bear figurine from it. Place the Eagle and the Bear on the log too. In our recording each figurine went to its own stand: from the left, Lynx, (empty), Deer, Eagle, Bear. The second stand stays empty for now.
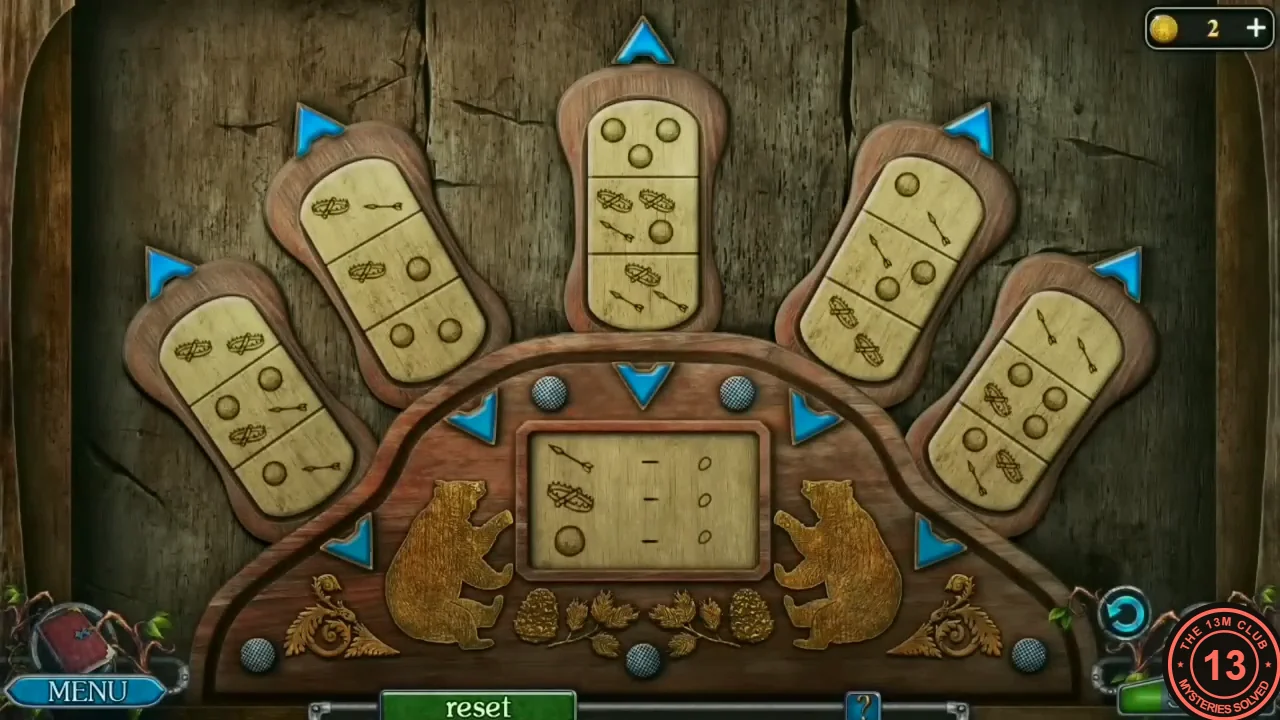
- Zoom into the trapdoor under the rug. Puzzle rule: 'Raise or lower cards so that the number of symbols in the center is correct, according to clues seen elsewhere.' The centre panel has three rows: arrows (top), toothed traps (middle) and round bullets (bottom). The clues are in the room. The horn quiver by the window holds 5 arrows. The box inside the bird skull holds 9 bullets. Mira remarks 'So many traps!' about the traps around the house, and the accepted panel showed 7 traps. Targets, top to bottom: 5 arrows, 7 traps, 9 bullets. Each of the five cards has three sections. The blue arrow on the board just below a card pushes that card one section deeper into the board, and the blue arrow beyond its outer end pulls it back out. Only sections pushed inside the board count toward the panel, and the panel updates as you move the cards, so you can watch the totals. In our game all five cards started fully out. The panel read 5/7/9 after these moves: push the top card all the way in. Push the second card from the left in until only its outer section (a trap and an arrow) still shows. Push each of the other three cards in by one section. If your cards show different symbols, use the same rule and add up the hidden sections.
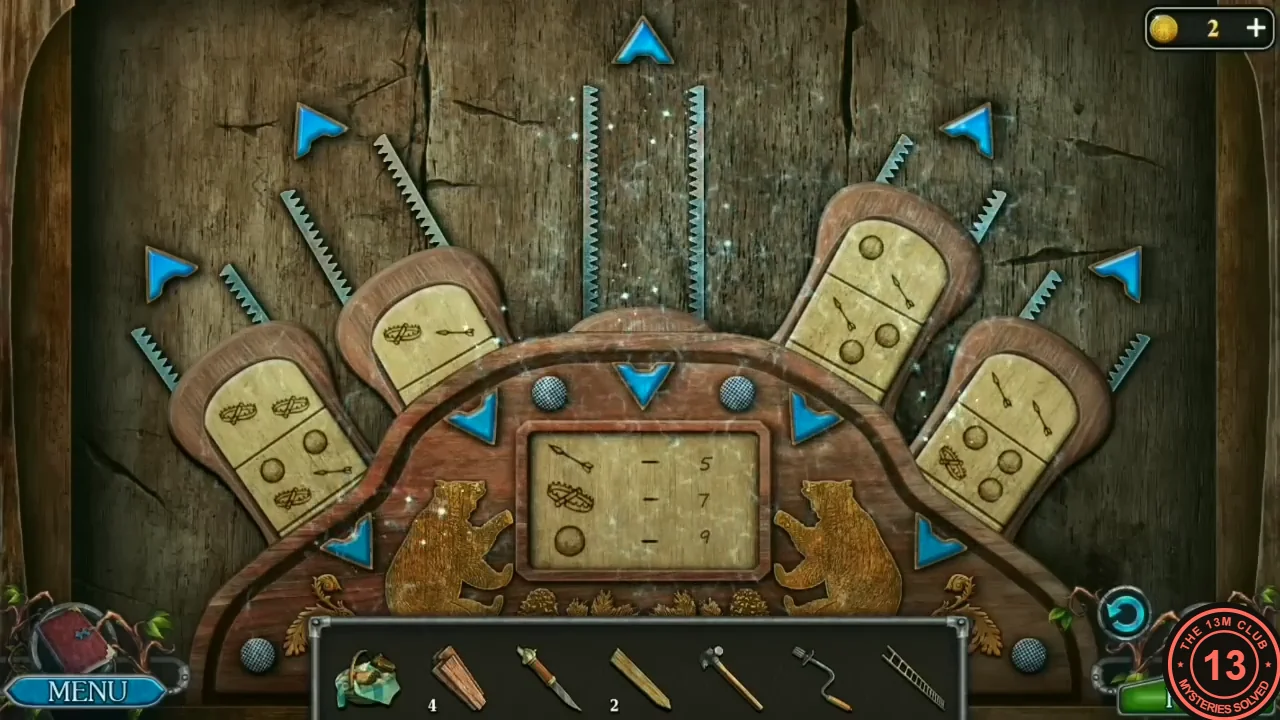
Solved: the counters read 5 arrows, 7 traps and 9 bullets, top to bottom. - Hjalmor is free and thanks Mira. She tells him she almost fixed the crossing, but nothing works without nails. He knows where his father keeps them: in a cache above the fireplace that opens with figurines. He only has one figurine himself, so you had to find the others. Task complete: Release the boy. The boy's figurine, the Wolf, then appears in your inventory. Zoom into the log above the fireplace, put the Wolf on the empty second stand, and take the Crossbow bolts and the Stained glass part from the opened log.
- Go back to the lakeshore and zoom into the raft crossing. Use the Crossbow bolts on the toothed winch mechanism on the post. Then hit the winch with the Hammer. Fit the Handle you took from the well onto the winch. The game refuses the Handle until the bolts are hammered in. Finally, lay the Boards (4/4) across the gap in the deck. The zoom closes and Mira crosses the lake.
The Settlement by the River and the Mill
Across the lake: 'Grandma's house is just over this hill. But I will need ice axes to climb over it.' On the travel map this is the Settlement by the river.
- Zoom into the rowboat by the pier, cut the net with the Knife and take the Chain and the Lever.
- Zoom into the signpost in the middle of the settlement. Only one board hangs on it, 'Southeast Mountains of Ice Dragons', next to two empty hooks. Use the Signs from the wagon chest on the post: both boards attach at once. Now it reads 'Southeast Mountains of Ice Dragons', 'Southwestern Deserts of Sand Cats' and 'North Lake of Flying Fish'. The shed on the right is locked with a key.
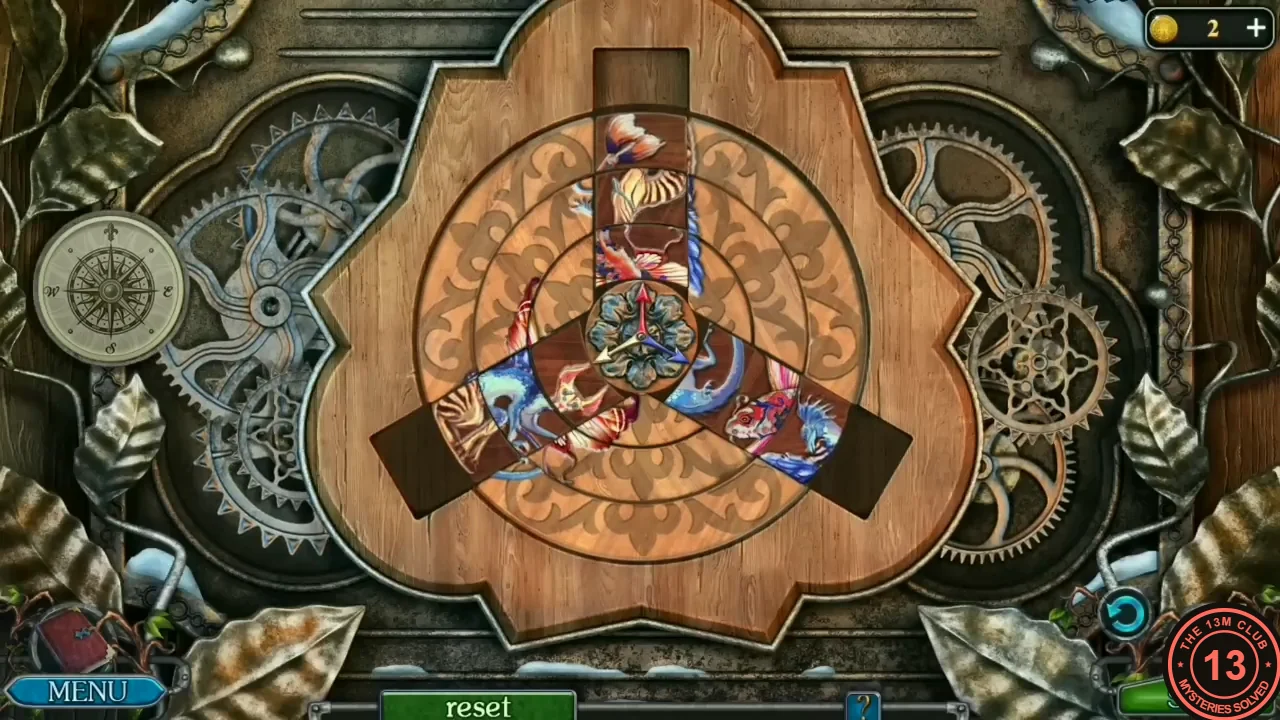
- Zoom into the carved panel on the door of the left house (the mill). Puzzle: three concentric rings surround a compass rose, and each ring has three slots that hold picture pieces. When a ring is lined up, its slots form part of the three arms (top, lower left, lower right). At the outer end of each arm there is one more fixed spare slot outside the rings. There are two controls. Touch a ring to turn it; its pieces travel with it. Tap a piece lying on an arm to slide it along that arm into the empty slot next to it, inward or outward, including the spare slot at the end. To move a piece from one ring to another, slide it out along an arm into an empty slot (for example the spare slot), turn the ring so a different slot lines up, and then slide the piece back in. Use this to build one complete creature on each arm, matching the signpost directions: the flying fish on the top arm (north), the sand cat on the lower-left arm (southwest) and the ice dragon on the lower-right arm (southeast).
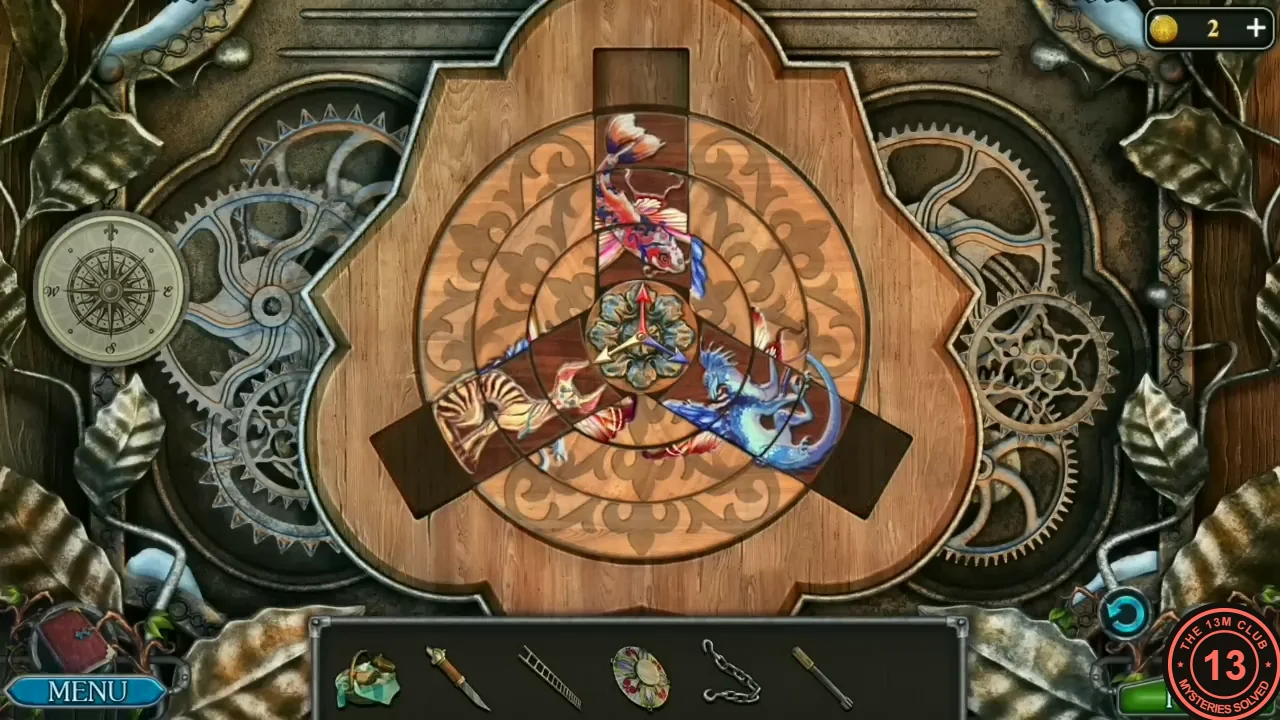
Solved: flying fish north (top), sand cat south-west (lower left), ice dragon south-east (lower right). The reset bar has gone and the inventory is back, so the panel has accepted the layout. - Inside the mill Mira says: 'I don't think there are tools here to help me climb the mountain. But I hope I find something useful here.' Optional collectible: click the hunting horn lying on top of the large barrel with the painted grapes on the left wall, just right of the small stuffed animal.
- Zoom into the gear slot in the floor, put the Lever in it and pull it: 'The millstone is working now.' Mira notices the sack ('There is something in the bag – probably flour or grain') and a cache under the floorboards ('There's a cache here! I need something to pry the boards up with'). At the hoist she says she could attach a hook to the basket, but the chain is missing a hook, and 'The chain is too short.'
The Mill Hoist and the Ten Sacks
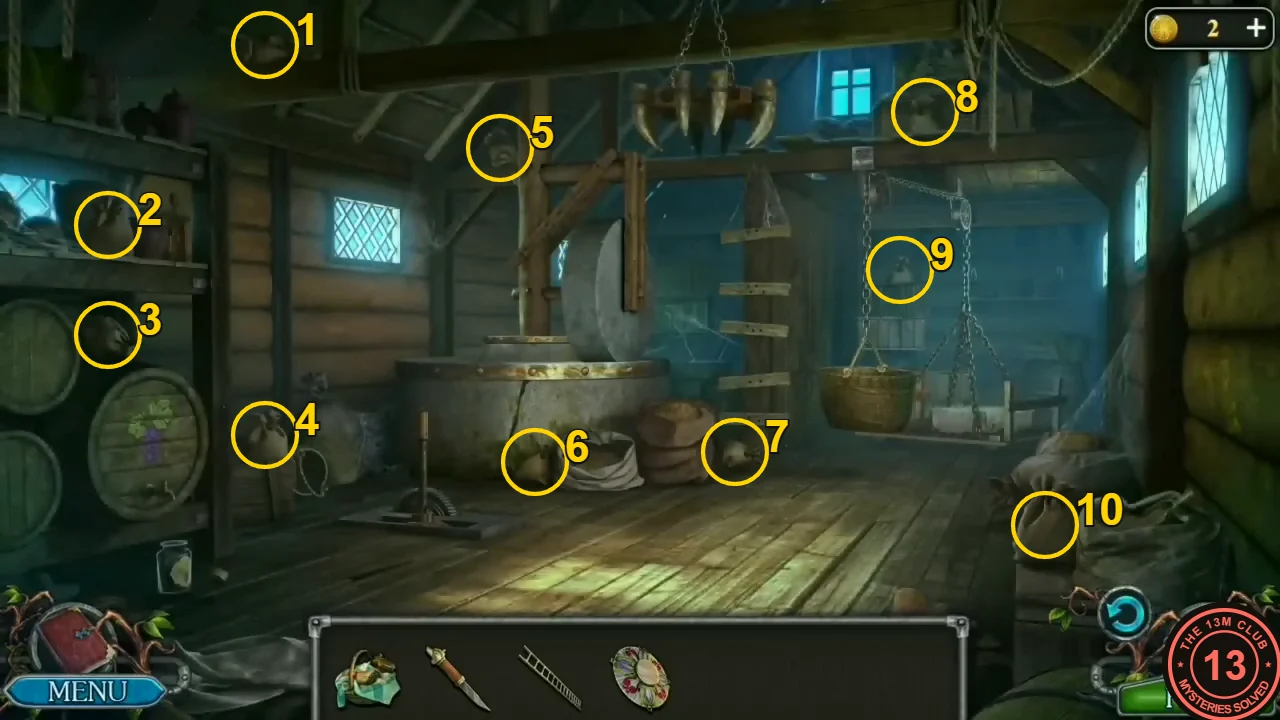
Inside the mill, the hoist basket must outweigh the stone: find ten small tied sacks around the room to lift the loose floorboard.
- Zoom into the hoist and attach the Chain to the short hanging chain so it reaches the basket. Mira needs to put more weight in the basket to make it heavier than the stone. Ten small tied sacks are scattered around the mill, and each one you click flies into the basket. Their locations: (1) on the high rafter at the top left; (2) on the left shelf beside the jugs; (3) on top of the wine barrels at the left; (4) on the floor in front of the left wall, left of the millstone; (5) hanging from the beam above the millstone; (6) on the floor at the base of the millstone, left of the open flour sack; (7) on the floor just right of the stacked sacks; (8) on the high back shelf under the roof at the top right; (9) on the back wall behind the hoist chains; (10) in front of the large sacks at the lower right. If you click the basket before all ten are in, Mira repeats that it needs more weight. When the basket outweighs the stone, the hoist lifts the loose floorboard. Zoom into the opened cache in the floor and take the Key from the green cloth.
The Climbing Gear Shed (Hidden-Object Scene)
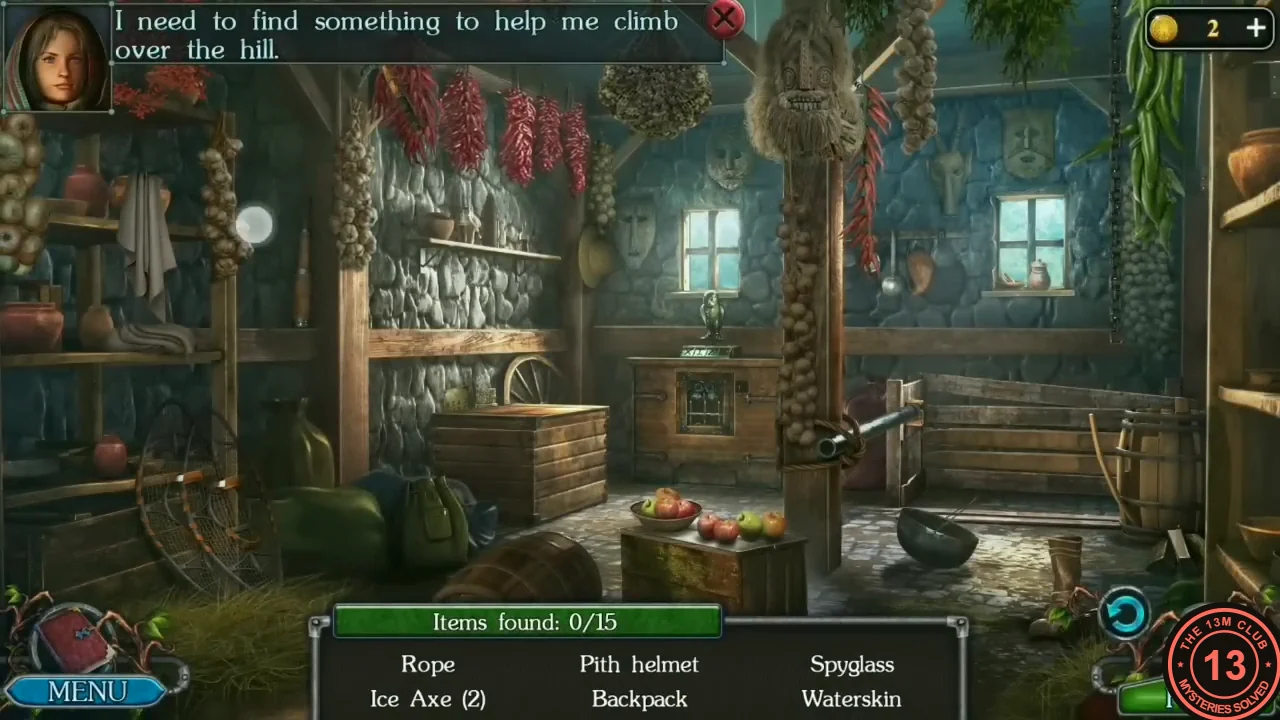
The locked shed on the right of the settlement holds mountain gear.
- Open the shed padlock with the Key and go in: 'I need to find something to help me climb over the hill.' This is a hidden-object scene with 15 items. Only six names are listed at a time, and each found item is replaced by a new name. A found item stays in the picture for a moment before it fades out. The order we found them in: Spyglass: the brown tube hanging on the wooden post at the left, between the shelves and the stone wall. Backpack: the green backpack on the floor in front of the wooden crate. Rope: the coil wrapped around the central post. Taking it drops the long pole tied there to the floor. Ice Axe (first of two): stuck high in the beam at the upper left, among the chili strings ('The blade is stuck firmly in the wood; I can't reach it'). After the pole has fallen, click the axe again: the pole swings up and knocks it down. Green gloves: zoom into the wooden crate at the centre-left, open it, move the red cloth aside and take the gloves. Boots: the brown boot standing on the floor at the right, near the barrel. Snowshoes: the two racket-shaped frames leaning at the lower left. Compass: zoom into the right-hand window and take it from the sill. Camping kettle: the black pot on the floor right of the central post. Skis: lying along the wooden rail at the right. Pith helmet: high on the central post, just below the straw mask. Carabiner: in the open crate close-up, hanging at the top right by the cart wheel. Waterskin: the brown leather flask hanging from the utensil rail on the back wall, next to the ladle and left of the right-hand window. Sleeping bag: in the crate close-up, close the lid. The rolled sleeping bag stands behind the crate against the stone wall. The last item, the second Ice Axe, is locked in the wooden cabinet below the metal owl box (next step).
The Owl Box
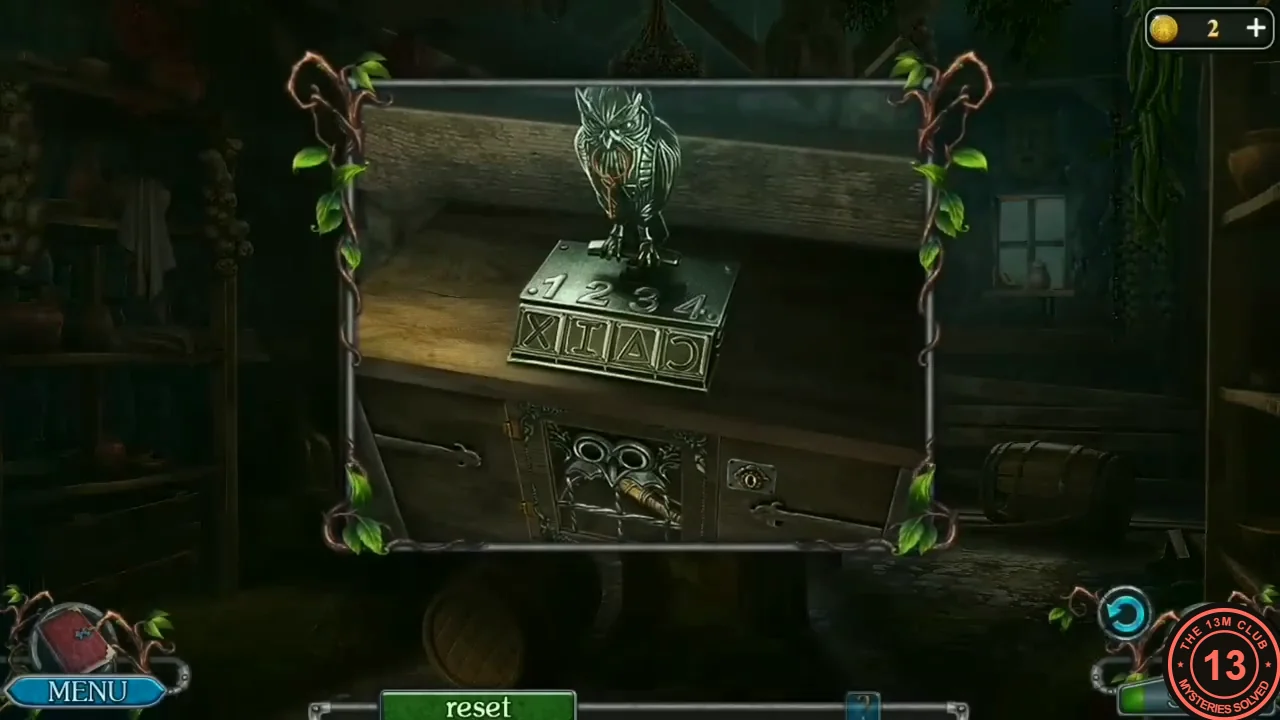
The metal owl box on the cabinet releases a Key that opens the wooden cabinet below it, where the second Ice Axe is.
- The last item, the second Ice Axe, is locked inside the wooden cabinet that the metal owl box stands on. The clue is the paper plate pinned to the stone wall behind the crate in the left corner. It shows X I Δ Ɔ, with the numbers 3, 5 and 2 under the last three symbols; X has no number. The front of the box has four symbol buttons in the same order (X, I, Δ, Ɔ), numbered 1–4 on top. Pressing a button makes it light up briefly but does not change its symbol; only the number of presses counts. Press X once, I three times, Δ five times and Ɔ twice. The owl's eyes glow. Tap the owl: a Key appears in its beak. Take the Key and use it on the keyhole at the right of the wooden cabinet front directly below the owl box. The cabinet door opens; take the Ice Axe from inside (15/15). You receive the Ice axes.
The Ice Wall Climb
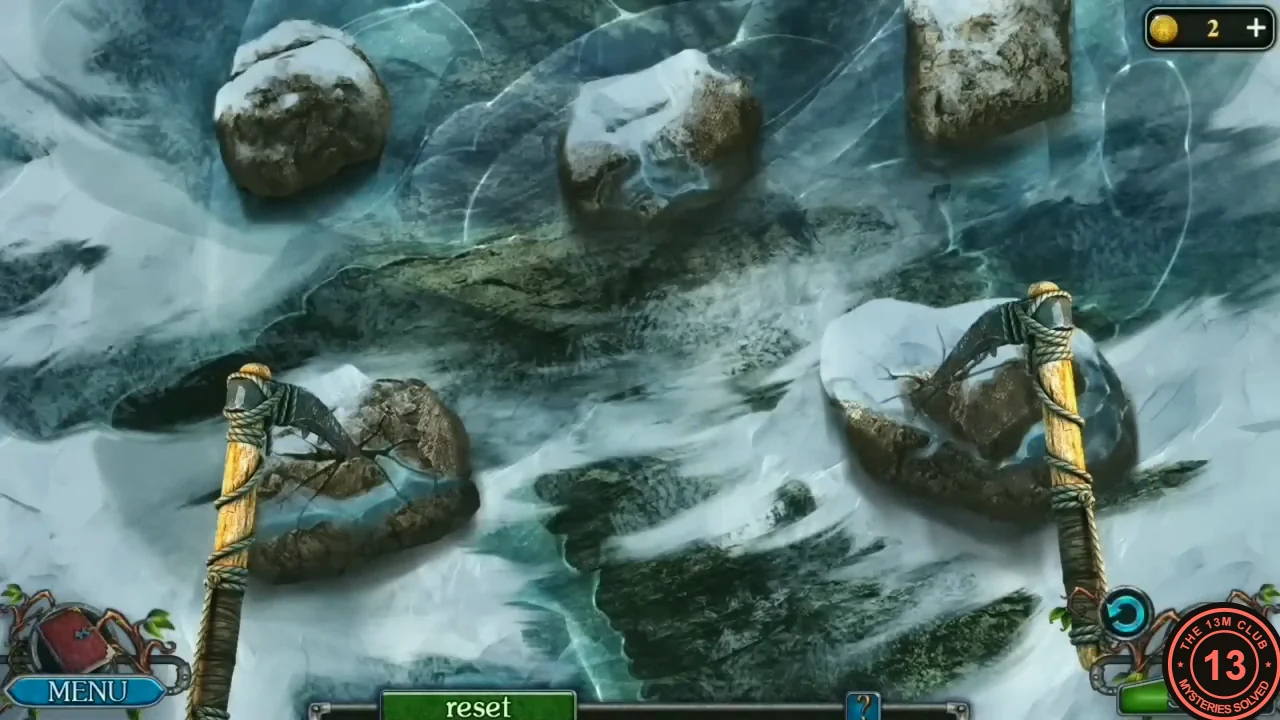
Climb the frozen waterfall behind the settlement with the two Ice axes.
- Use the Ice axes on the frozen waterfall behind the settlement. Climbing puzzle: the two axes are hooked on rocks in the ice. Click a rock a little above the higher axe: the lower axe swings up and hooks onto it, and the view scrolls up. Keep doing this so the axes take turns climbing, until you reach the top edge. Our recording only clicked nearby rocks above the axes, so we cannot say what happens if you click one that is too far away. A Reset button at the bottom of the screen restarts the climb; it was not needed in our recording.
Grandma's House
Above the ice wall Mira meets the druid Svarog and the hunter, who take Hjalmor home. Then she reaches the hill above Grandma's house: 'My mother taught me to take the shortest route for a good reason. But there is already my grandmother's house!' The flower-shaped Chips (5 needed) are collected over the next scenes.
- On the hilltop, Mira sees her grandmother's house below. Take the Shovel stuck upright in the snow to the left of the sled. Zoom into the sled seat: a small red Chip lies at the upper-left of the wooden seat, near the end of the rope. Take it (Chips 1/5).
- Go down to the house and zoom into the door. Grandma doesn't answer the knocking: 'Grandma doesn't hear me knocking. I hope she's all right. I need to find something louder.' Zoom into the thorny bush at the front corner of the house, to the right of the door under the window. The Bell lies in the snow under the thorny branches; take it. Optional collectible: click the green medallion glinting on the snow to the right of the path, in front of the shed. Zoom into the door again and use the Bell on the curved iron hook to the right of the door knocker. Then click the bell to ring it, and the door opens.
- Watch the conversation: Grandma feels her senses fading, and Mira offers to bring the druid. New task: Help grandma. The green wall cupboard is missing a mushroom ornament; Grandma says she dropped it in the snowdrift in the yard. Take the Carrot from the basket on the table.
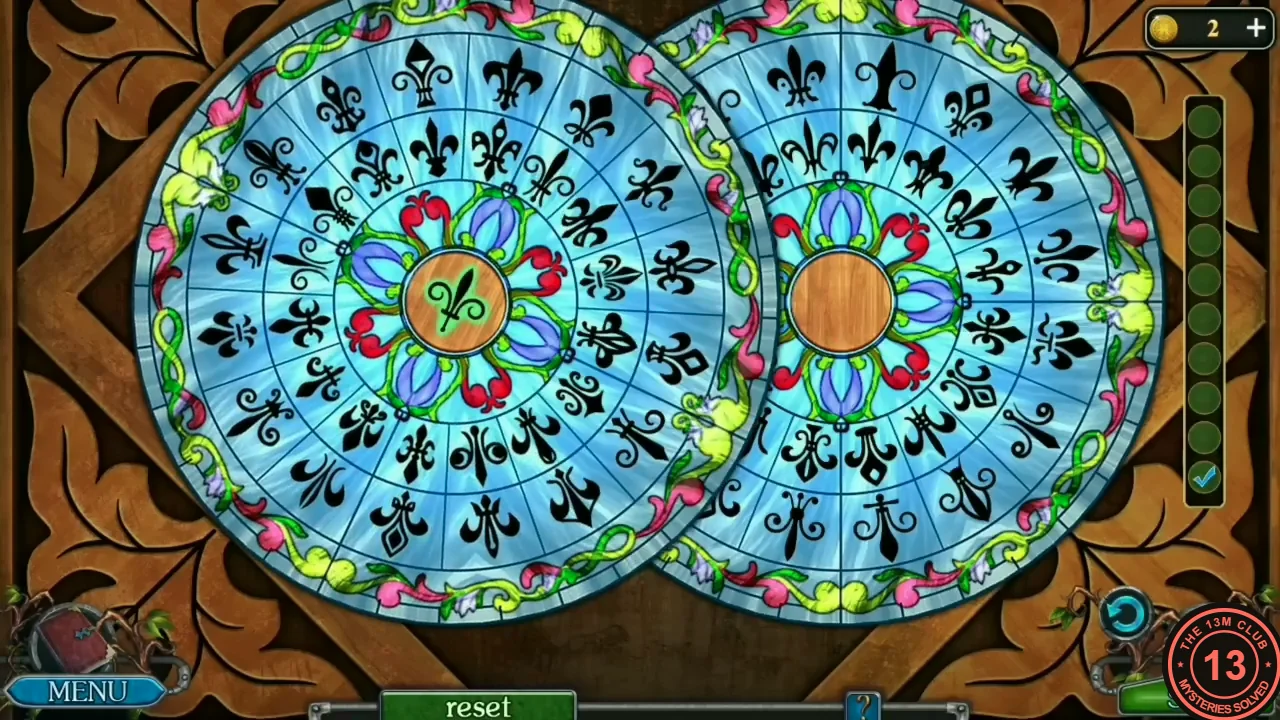
- Zoom into the round stained-glass frame above the fireplace and put the Stained glass part in the empty centre. Puzzle: two overlapping glass wheels covered in similar fleur-de-lis symbols. The centre of one wheel shows a symbol; the other centre is plain wood. Find the same symbol on the other wheel and click it. The centre symbol flies onto it, a check mark appears in the column on the right, and that wheel now shows a new symbol in its centre: search the first wheel for that one. The wheels overlap, so part of the back wheel is hidden; in our recording, clicking the wheel at the back brought it to the front. Fill all ten check marks to finish. A reset button is at the bottom of the screen; it was not used in our recording.
- After the stained glass is finished, the carved stone panel above the fireplace has opened into a niche. Zoom into that niche and take the Chip lying on its floor (2/5). Go out to the barn on the right of the yard and zoom into the sheep pen. A green Chip lies on the straw at the lower left of the pen, just in front of the sheep. Give the Carrot to the sheep: it turns away to the trough on the right. Then take the Chip (3/5). Our recording fed the sheep first, so we cannot say whether the Chip can be taken without the Carrot.
- Zoom into the snowdrift in front of the house, dig with the Shovel several times and take the Mushroom. Put it on the green cupboard: the right door opens on a jar of honey ('A beekeeper friend gave this honey to my grandmother'). Optional: click the Morphing Object on the round table beside Grandma's bed, in front of the fireplace: the candlestick at the right edge of the table, which turns into a goblet.
- The thorny bush in the yard hides something else: 'There is something behind the thorns, but I need something to protect my hands.' Open the map and go to the frozen lakeshore with the raft crossing. It is the lake picture at the bottom right of the Witch forest page (with the totem clearing, the hut and the spider cave). Zoom into the foot of the snowy pine tree on the left, in front of the cabin and beside the path (not the cut stump further right by the water). In the close-up, three pine cones lie in the snow at the base of the trunk. The small blue Chip is half-buried in the snow just above and left of the cones. Take it (Chips 4/5).
The Druid's Potion
Mira needs the druid's help to cure Grandma, and the ingredients for his potion are spread over the earlier locations.
- Travel to the spider cave and put the Ladder against the giant spider. Mira notes the mushrooms growing on the spider's head and the glowing mushrooms on the wooden pillar on the left.
- Travel to the Hunter's dwelling and go inside. Optional collectible: click the green medallion hanging on the hide stretched to the right of the fireplace. Mira asks the druid for help: her grandma is dizzy, hard of hearing and can hardly get out of bed. He knows the illness and gives her a potion recipe: she must mix all the ingredients in a large mug and bring it back to him so he can enchant the potion. You receive the Potion recipe. Open it from your inventory: it lists Rowan, Pinecone powder, Glowing mushroom, Spider mushroom, Honey and Tincture. The last Chip, a teal star-shaped one, lies on the recipe; take it (Chips 5/5).
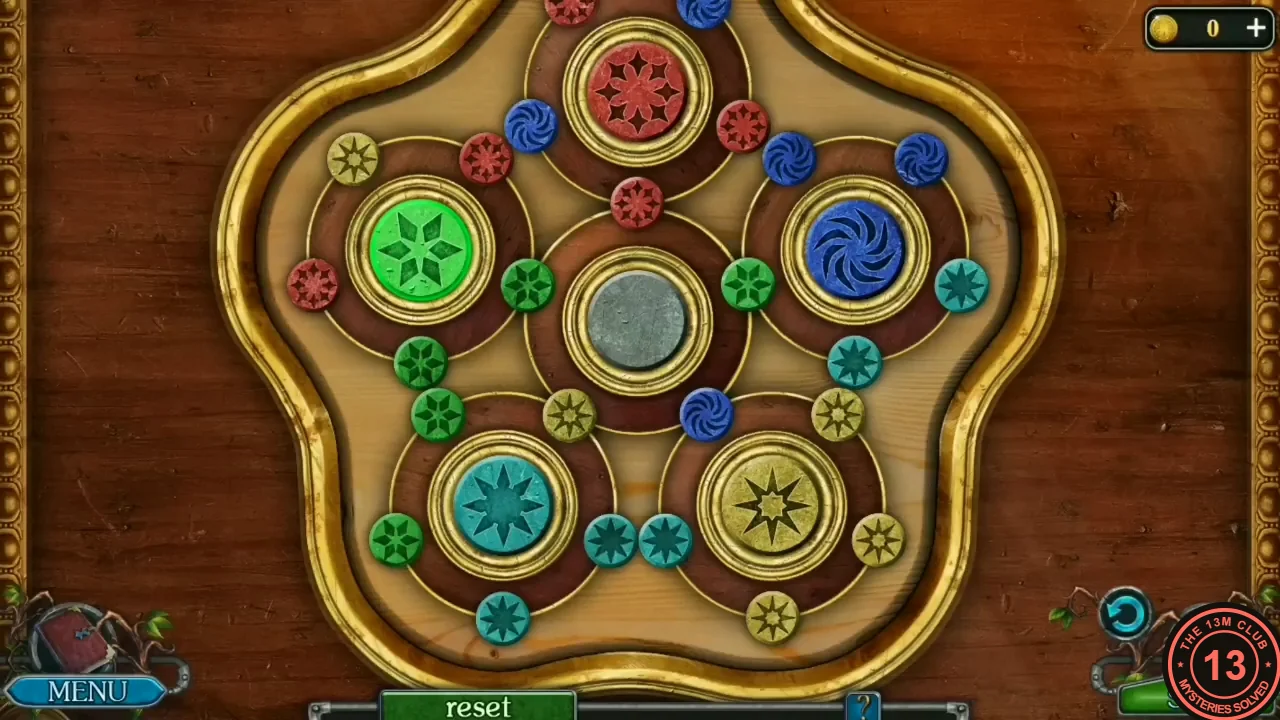
- Travel to Grandma's house and zoom into the chest by the bed. Put the Chips in its lid. Puzzle: five large discs (red, green, blue, cyan and yellow) each have a ring of small tokens around them. In the middle is a grey disc with its own ring of five tokens. Each of those five tokens also sits in one coloured ring, where that ring touches the centre. Goal: every coloured ring holds only tokens of its own colour and symbol. Controls: click a coloured disc to turn its ring one step; its tokens move round, including the one in the shared centre slot. Click the grey centre disc to turn the central ring one step. This moves those five shared tokens on to the neighbouring coloured rings, and it is the only way to move a token from one coloured ring to another. A ring glows when all its tokens match. Method: turn a coloured ring until a wrong token sits in its centre slot. Then click the centre until that token reaches the slot of the ring it belongs to. Turn that ring to tuck the token in and bring another wrong token into its centre slot. Repeat. Turning the centre also moves tokens out of rings that were already correct, so check which rings still glow. In our game the last move was a click on the centre disc. The chest lit up and opened. Take the Mitten. If your tokens start elsewhere, the same method works.
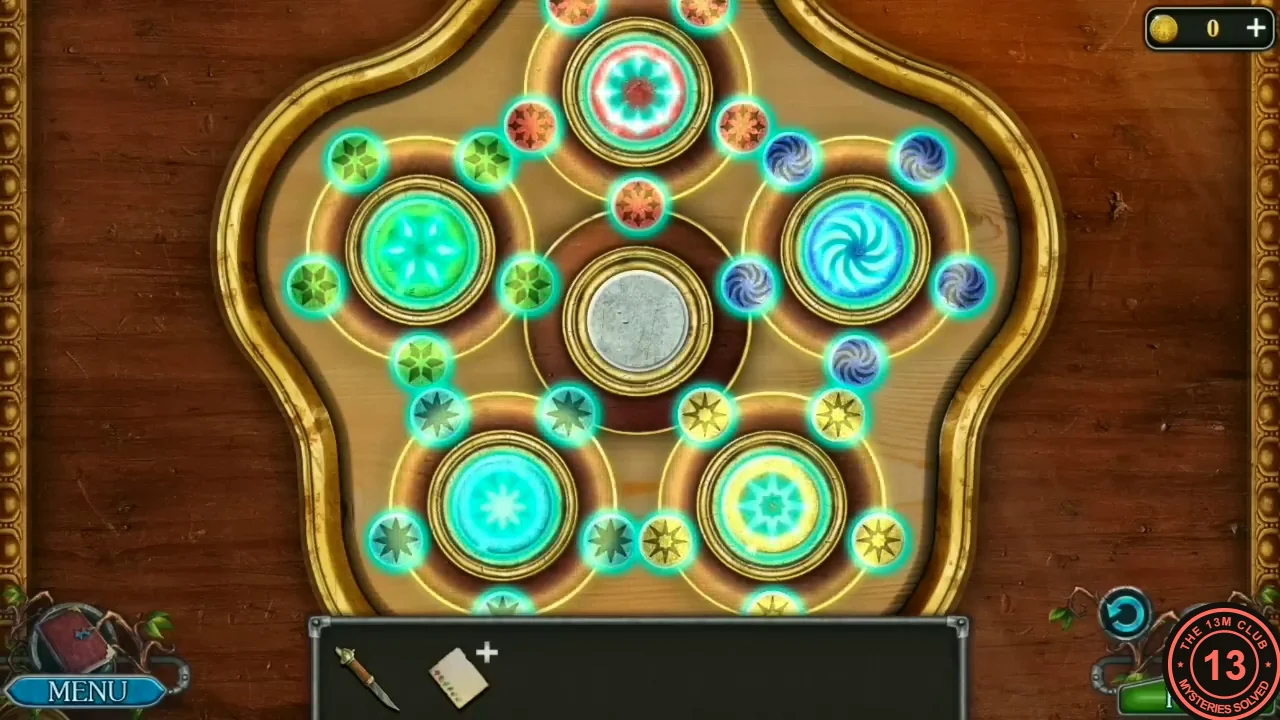
Accepted: every coloured ring holds only its own tokens and glows. The grey centre disc stays plain. - Go out to the yard and zoom into the thorny bush right of the door. Use the Mitten on it: the mitten presses the thorny branches down, and the Valve (a small yellow tap handle) appears among the branches just above it. Take the Valve. Go back inside Grandma's room. Zoom into the small wall cupboard with the green door on the back wall, left of the bed (its door is already open, with the mushroom ornament on it). Take the Honey jar from the left end of its upper shelf.
- Go to the mill at the Settlement by the river. Zoom into the barrel on the left: 'It's a barrel of tincture, but the valve is missing a handle.' Attach the Valve to the tap and click it: tincture runs into the empty jar standing under it. Click the cork beside the jar to close it, then take the jar of Tincture. Go to the lakeshore and zoom into the foot of the same snowy pine where you found the fourth Chip. Take the Pinecones lying in the snow. Back in the mill, zoom into the millstone and put the Pinecones on it ('I can grind the pinecones on this millstone!'). Leave the close-up and click the long lever on the floor to the left of the millstone: the stone rolls round and grinds the cones. Zoom into the millstone again and click the ground cones: they go into a sack. Take the Pinecone powder.
- Travel to the spider cave. Select the Knife and use it on the large glowing green mushroom cluster on the tree trunk at the far left, at mid-height, to cut it loose. Then click the cluster to take a Glowing mushroom. Click the spider's back at the top of the ladder to zoom in. Use the Knife on the large mushrooms growing on its back ('I need this mushroom for a potion') to get the Spider mushroom. Then travel to the Witch forest (the clearing with the carved totem and the stone steps). Click the snowy branches above the steps, just left of the totem's head. The close-up shows a broken fence under snowy branches with red rowan berries at the upper left and lower right. Click the berries to take the Rowan. Now tap the Potion recipe (the scroll at the start of your inventory) to open it, and use each ingredient on its own line of the recipe; each line gets a check mark. Our order: Honey, Tincture, Pinecone powder, Glowing mushroom, Spider mushroom, Rowan. When all six lines are checked, you receive Ingredients: 'The druid said to mix all the ingredients in a mug.'
- Travel to Grandma's house and zoom into the table with the wooden mug ('I need to mix all the ingredients from the recipe in a mug'). Use the Ingredients on it: the six ingredients spread out on the table. Click each one to put it into the mug. When all six are in, you get the Mug with potion. Travel to the Hunter's dwelling and ask the druid to enchant it. Travel back to Grandma's house and give her the Enchanted potion.
- Watch the ending: Grandma drinks the potion and recovers ('Thanks, Mira. Now I feel much better.'). 'Several years have passed': Grandma sits knitting in her rocking chair outside the house. Mira and Hjalmor arrive ('Grandma! Hello grandma!'), and she asks: 'Oh-ho-ho! Mira, Hjalmor! Who is this sweet muffin?' The answer: 'Grandma, say hello to Ulf, your great-grandson.' The Chapter Selection screen then opens. Press PLAY next to Chapter 3: Osbert Comes to the Rescue (third entry, 0% at this point). The chapter opens with the title card 'Chapter 3 (Osbert Comes to the Rescue)'.