Signal puzzle: the rooftop antenna
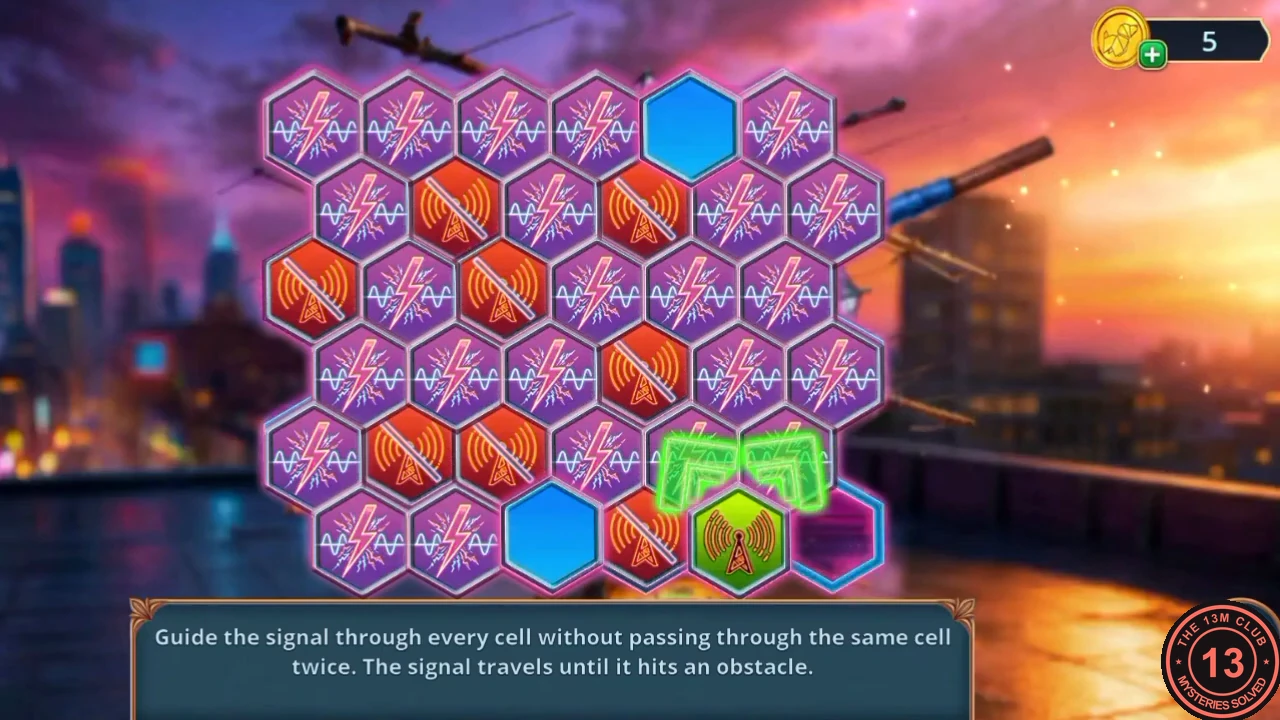
'Guide the signal through every cell without passing through the same cell twice. The signal travels until it hits an obstacle.' The board has six rows of six hexagons; rows 1, 3 and 5 (counted from the top) sit half a cell further left than rows 2, 4 and 6. Columns are counted from the left in each row. The green signal starts in the bottom-right cell. Red crossed-out cells are obstacles: row 2 columns 2 and 4, row 3 columns 1 and 3, row 4 column 4, row 5 columns 2 and 3, and row 6 column 4. The two blue cells (row 1 column 5 and row 6 column 3) are gaps that the signal crosses without stopping. Swipe or tap in one of the six directions; the signal slides until the next cell is an obstacle, a used cell or the edge. This layout appears to be fixed.
- Lower right corner: send the signal left (it stops beside the red cell), up-left, right, up-right, left, up-left, right, up-right, left and up-right. It is now in the top-right cell.
- Send it left along the top row; it crosses the blue gap and runs to the top-left cell. Then send it down-right (it runs three cells to row 4), left, down-left and down-right. It is now in the bottom-left cell.
- Send it right into the blue gap on the bottom row; it comes out up-right into row 5, column 4. Finish with up-left, up-right and up-left. Every cell is now used.
The Lumiere sign and the gear
While the signal plays you overhear two guests: 'I heard Monique's designs aren't what they used to be. Her collection last season was a flop.' and 'And tomorrow she'll be presenting her gem - the dress that's supposed to save her.'
- Take the Brightness Controls from the antenna case.
- Open the big Lumiere sign on the rooftop and attach the Brightness Controls; the sign is turned up to 100% and blazes. Take the Hose and the Metal Plate revealed behind its glass.
- Open the Metal Plate in your inventory and use the Milling Cutter on it. It cuts out a Gear.
- Travel to the Fashion House Backyard, open the dial box on the display stand and fit the Gear into the empty spot. A sliding puzzle starts.
Sliding puzzle: the gear box
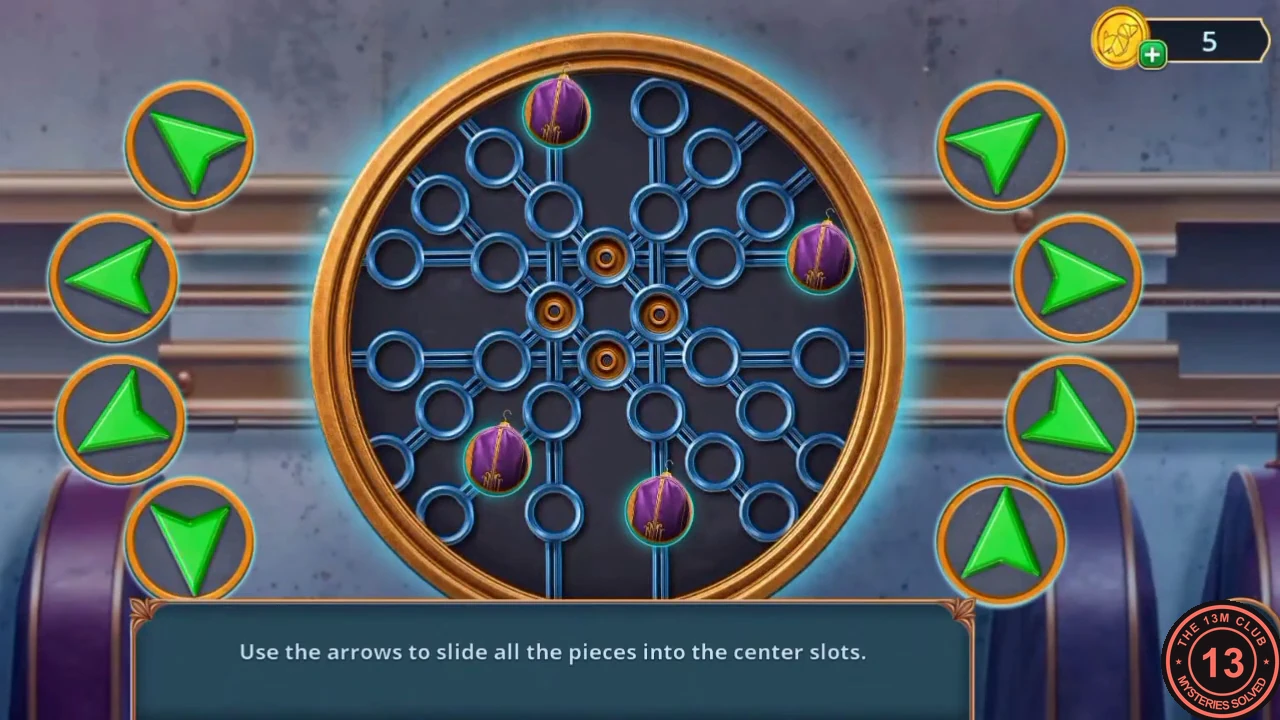
'Use the arrows to slide all the pieces into the center slots.' Four purple pieces sit on a round network of rings, and the four orange centre slots form a small diamond. Each of the eight green arrows moves every piece one ring along the lines in its direction; a piece with no line that way, or with another piece or the rim in front of it, stays where it is.
- Use pieces that are stuck against the rim or against each other to line the others up: keep moving until the four pieces form the same diamond shape as the centre slots. One way that works: build the diamond in the upper-right area, mostly with the top-right arrow, plus the left, bottom-right and bottom-left arrows.
- When the diamond is complete, press the arrow that moves it straight towards the centre (for a diamond built in the upper right, the third arrow on the left) until all four pieces drop into the slots.
The key chain and the reference photo
The solved gear box slides the purple garment bag aside and shows a gold net.
- Use the Funnel on the gold net to scoop out the Casino Chip and the Key Chain. Keep the Funnel.
- Open Monique's Bag in your inventory and use the Key Chain on its lock. Take the Reference Photo: 'Approved by Monique. Use for all models. A copy for makeup artists. The original was lost after Alice disappeared.'
- Travel to the Gallery Show, open the perfume display and hold the Reference Photo to the phone. A make-up search at Monique's table starts.
Make-up search: Monique's table

A list search around a bust of Monique, surrounded by cosmetics.
- Find the objects named in the three slots at the bottom; a number such as 'x2' means two of them. Each found object is replaced by a new name (Hair Clip, Mirror, Sponge, Nail File, Eyebrow Brush, Fan and more). Wrong taps in quick succession lock the scene for a few seconds ('Wait: 5 seconds'), so tap deliberately. The search ends with the Eyeshadow.
The fingerprint safe and the washing machine
Eyeshadow and a brush make a stand-in fingerprint kit for the safe behind the sketch panel.
- In the Gallery Show, open the safe behind the dress-sketch panel. Put the Eyeshadow and the Make-Up Brush into the two empty spots beside it; the powder shows which keys were pressed and the safe opens. Read the note ('A contract with a shell company. Materials written off as waste but actually used in the "exclusive" line. Monique. Destroy this after receiving the samples. Mike, make sure it's done.') and take the Oxygen Powder.
- Travel to the Backroom, open the washing machines showing 'Error Refill Detergent' and pour the Oxygen Powder into the detergent drawer. A washing puzzle starts.
Washing puzzle: the drum
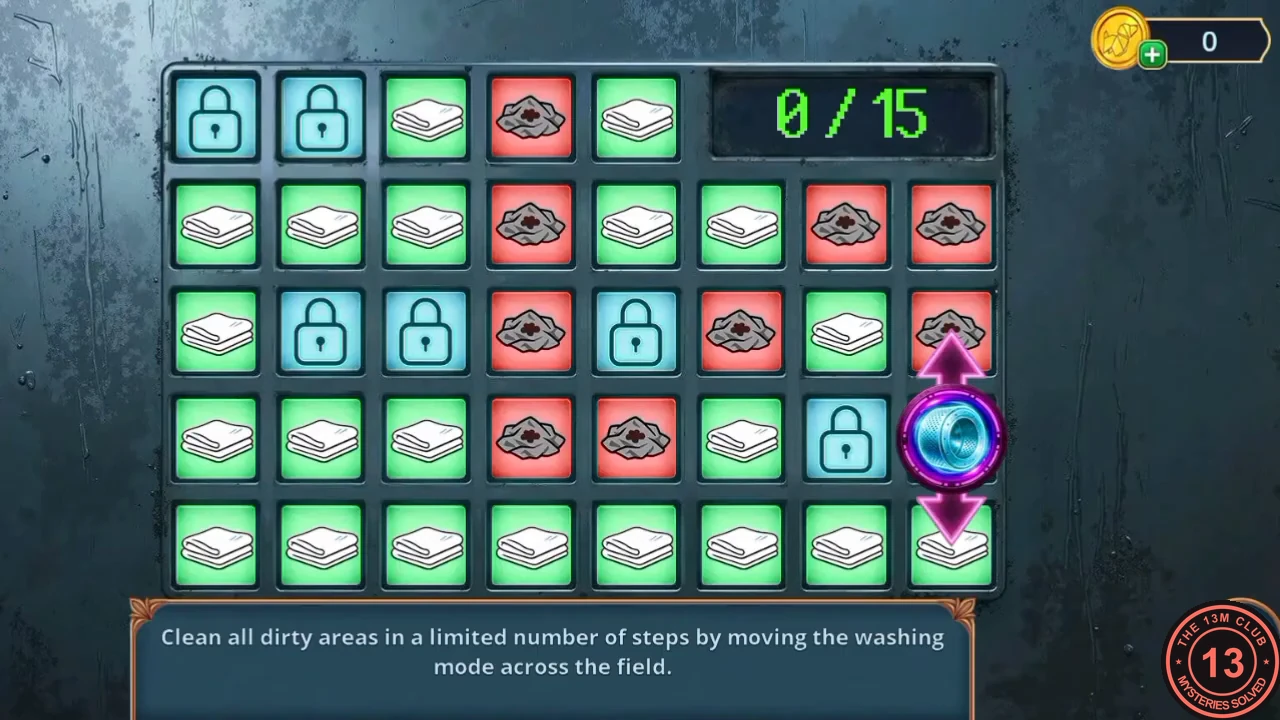
'Clean all dirty areas in a limited number of steps by moving the washing mode across the field.' The field has five rows and eight columns; the top row has only five cells because the step counter fills its right end. Green cells are clean, red cells are dirty and blue padlocks are blocked. The drum starts in row 4, column 8 (rows from the top, columns from the left). Each move takes the drum one cell, and every cell it enters flips between clean and dirty, so stepping onto a clean cell makes it dirty again. You have exactly 15 moves. At the start the dirty cells are column 4 in rows 1 to 4, row 2 columns 7 and 8, row 3 columns 6 and 8, and row 4 column 5.
- Move up, up, left, left, down, up, left. The drum is now in row 2, column 5 (this cell and the one above it will turn dirty on the way, which the next moves repair).
- Move up, left, right, down, left, down, down, right. All cells are clean on the 15th move.
The foam compound and the spotlight
The clean laundry holds two useful things.
- Take the Clean Collar and the Lavender Sachet from the opened washing machine.
- Open the backroom shelf with the yellow canister and the moths. Put the Lavender Sachet down to drive the moths away, then take the Empty Canister.
- Travel to the Podium and open the red FOAM machine. Attach the Hose to the top, put the Funnel on the front nozzle and set the Empty Canister beneath it. Take the Foam Compound.
- Open the dirty spotlight on the podium. Set the Foam Compound beside it and lay the Clean Collar on the lens; the foam washes the lens clean. 'The spotlight is now illuminating the passageway, and I can use the beacon to track down Vivienne.'
Stealth game: reaching Vivienne
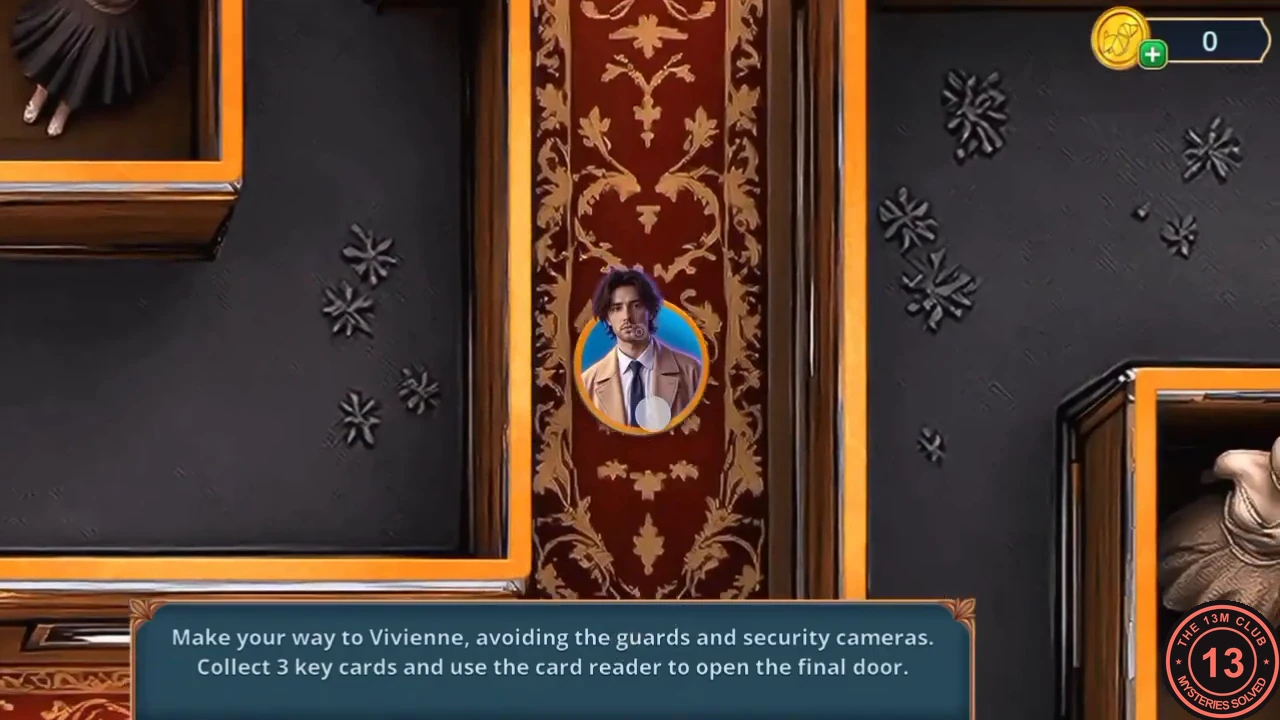
'Make your way to Vivienne, avoiding the guards and security cameras. Collect 3 key cards and use the card reader to open the final door.' The backstage corridors are seen from above and the view follows Will. Tap the floor to walk there. Guards and cameras throw pink cones of view across the corridor.
- Press Start. Walk only while the nearest pink cone points away from your path, and wait in side passages when a guard is coming. Pick up the three key cards on the way: the red card beside a potted palm near the start, the blue card beside another palm further on, and the yellow card in a corner next to a dress form. Then go to the card reader beside the green EXIT door to open the final door.
Chapter 2 brooch locations
Chapter 2 has 13 brooches worth 33 in total. They are listed in the order you reach them, and the number in brackets is how much each one adds to your total out of 140. After this chapter a complete collection shows 70/140.
- Backroom at the start of Chapter 2 (the attacker is tied to the chair): on the floor beside the vacuum cleaner hose, bottom centre. (+3)
- Fashion House Backyard: on the low crates in the middle of the yard, in front of the clothes rail. (+3)
- Fashion House Backyard: in the close-up of the purple shoe on the rail beside the purple garment bag, top-left corner. (+2)
- Open Terrace: upper left, beside the floor lamp at the window. (+3)
- Monique's office: on the bookshelf to the left of the bronze relief. (+2)
- Monique's office: in the close-up of the desk with the blueprint and the glass panel, top-left corner. (+2)
- Backroom: in the close-up of the washing machines, bottom-left corner. (+2)
- Street outside the gallery: on the cobblestones between the lamp post and the fountain. (+3)
- Street outside the gallery: in the close-up of the round metal housing with the circuit board, bottom-left corner beside the lever. (+2)
- Gallery rooftop: to the left of the big fan, on the cabinet with the cables. (+3)
- Gallery reception: on the seat of the green chair in front of the round table with the red roses, left of centre. (+3)
- Gallery reception: in the close-up of the buffet tray with the porcelain dish, top-right corner. (+2)
- Runway hall: at the foot of the runway steps, bottom left of centre. (+3)
Chapter 2 results: decision points
The chapter ends with the decision-point summary and an outcome scene.
- Chapter 2 has four scored choices, worth up to 12 points, and every one of them costs coins: Vivienne's thanks ('Suggest joining forces.' +2), the talk about Mike ('Support Vivienne.' +2), the figure at the office door ('Panic' +3 or 'Hide quietly' +6, only one of them) and the phone call before the show ('Wait for me! I'm close!' +2). The outcome cards show Monique holding a jewelled rose (0 points) and Vivienne on stage (10 points). At 12 points the closing scene shows Monique among jewelled roses, then Trent clears the gallery ('Everyone out! The gallery is now closed. They've found a body in the dressing room...'). Will's call to Vivienne goes unanswered, Trent tells him outside the boutique that the victim was one of the seamstresses, and a bloodied Vivienne appears ('Will...'). The 0-point recordings we found show at most the jewelled roses and Trent clearing the gallery, then go straight to the words 'One hour earlier...'. They don't show whether the unanswered call and the bloodied Vivienne also play at lower scores. At any score, 'One hour earlier...' leads into Chapter 3. A total of 4 to 9 points earns the 4 card, for example 'Suggest joining forces.' and 'Support Vivienne.' (4 points) or 'Hide quietly' alone (6 points). No public recording we could find scores in that range, so its scene is not described here.