Powering Monique's laptop
Use the Handle from the backroom search to reach the last items needed for the laptop.
- In the Backroom, open the washing machines and attach the Handle to the left washer door. Open it and take the Stocking.
- Combine the Stocking with the Vacuum Cleaner in the inventory.
- On the Open Terrace, open the wicker chair and use the Vacuum Cleaner with the Stocking to suck out the packet underneath. Take the Lamp Button.
- Open the grey cylinder lamp on the table and press the Lamp Button into its top. The lava rises and lifts Monique's Flash Drive; take it. (The heavier metal objects stay at the bottom for now.)
- In Monique's office, open the laptop. Plug in the Laptop Charging Cable, then insert Monique's Flash Drive at the password screen. A network puzzle starts.
Network puzzle: Monique's laptop
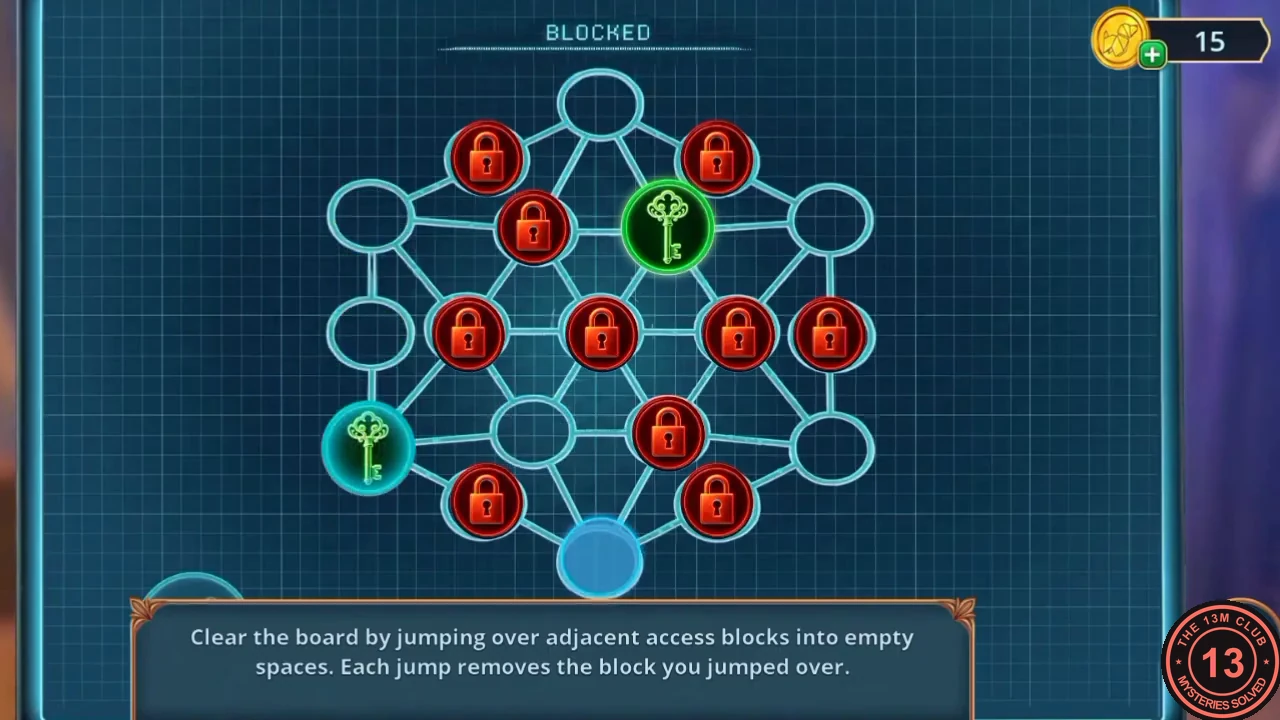
'Clear the board by jumping over adjacent access blocks into empty spaces. Each jump removes the block you jumped over.' Only the two green keys move. A key jumps along a straight line over a neighbouring red lock into an empty circle, and that lock disappears. The board is a large hexagon: six outer corners, a circle halfway along each outer side, an inner ring of six circles and one centre circle. At the start, the key sits on the upper-left outer corner and on the upper-right inner circle, and the empty circles are the top, upper-right, lower-right, bottom and lower-left outer corners plus the lower-left inner circle. This starting layout appears to be fixed.
- Move the key on the upper-left corner around the outside: jump down to the lower-left corner, then to the bottom corner, then to the lower-right corner, then up to the upper-right corner, then to the top corner, and finally back to the upper-left corner. Each jump clears the lock halfway along that outer side.
- Jump the inner key (upper-right inner circle) down over the right inner lock to the lower-right corner, then left over the lower-right inner lock to the lower-left inner circle.
- Jump the upper-left corner key right over the upper-left inner lock to the upper-right inner circle. Jump the lower-left inner key up over the left inner lock to the upper-left corner. Finally jump the upper-right inner key over the centre lock to the lower-left inner circle. All locks are gone and the laptop opens.
The email, the intruder and the gallery address
Monique's email says Alice was leaking collections to competitors and asks for her assistant Mike.
- Someone appears at the door. Choose how Will reacts: 'Freeze' is free and worth no decision points; 'Panic' costs 30 coins and is worth 3; 'Hide quietly' costs 60 coins and is worth 6. The story continues the same way.
- Read the phone conversation with Vivienne. You receive the Show's Address and complete the task to find evidence.
- Travel to the Fashion House Backyard, open the van interior and put the Show's Address (the phone) into the phone mount. A driving game starts.
Driving game: getting to the gallery
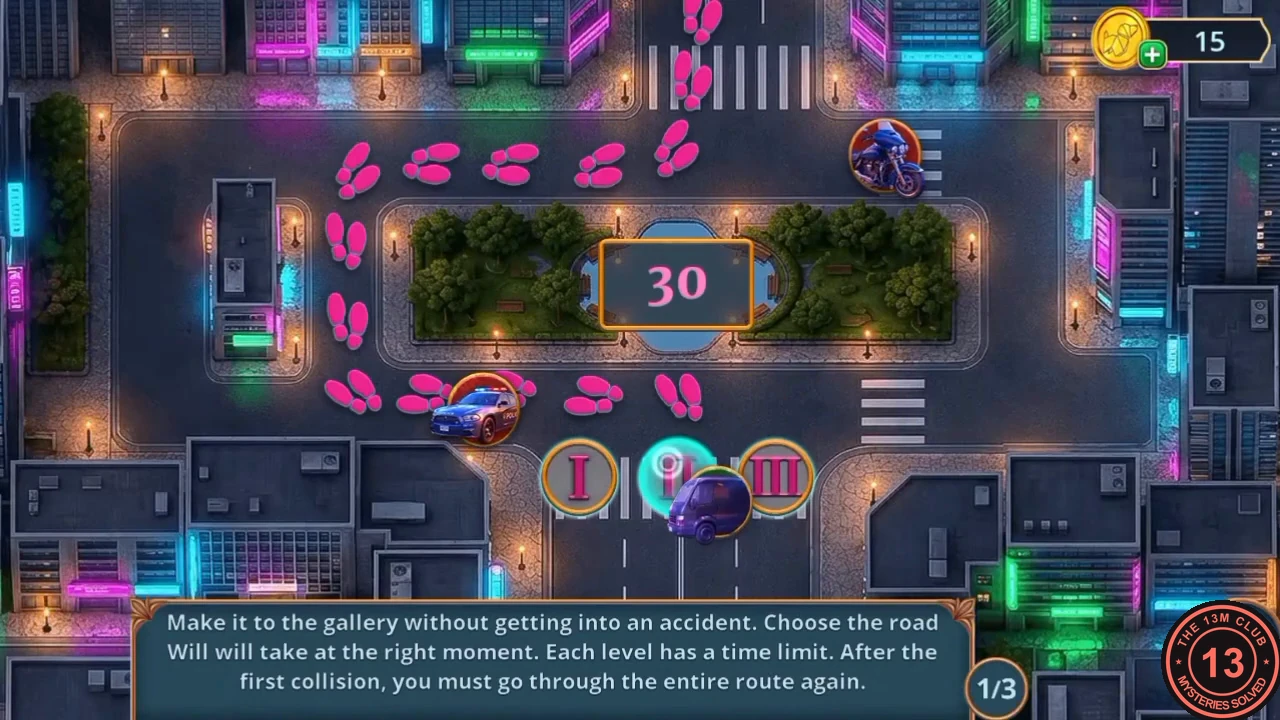
'Make it to the gallery without getting into an accident. Choose the road Will will take at the right moment. Each level has a time limit. After the first collision, you must go through the entire route again.' There are three levels. The buttons I, II and III each send Will's purple car along a different road, shown by footprints, while a police car and a motorbike circle the block.
- On each level, watch the police car and motorbike before choosing. When the road you want is clear of them, tap its button; you can switch roads while the car is moving. Example run: route II on level 1 just after the police car had passed, route III on level 2, and route II on level 3 after waiting until the timer was near 20. Clear all three levels to reach the gallery.
Outside the gallery: the photo booth and the hand truck
A bouncer guards the gallery and Will is not on the list.
- Talk to the bouncer, then open the photo booth on the left and take a selfie to get My Photo. The booth panel needs a small screwdriver and the reader is not usable yet.
- Open the round housing by the fountain and take the Elevator Lever.
- Open the hand truck by the wall and strap the boxes with the Belt. Take the bottle of water and the Walkie-Talkie.
- Put the Elevator Lever into the bracket on the wall beside the hand truck. The elevator mechanism opens.
Chain puzzle: the elevator mechanism
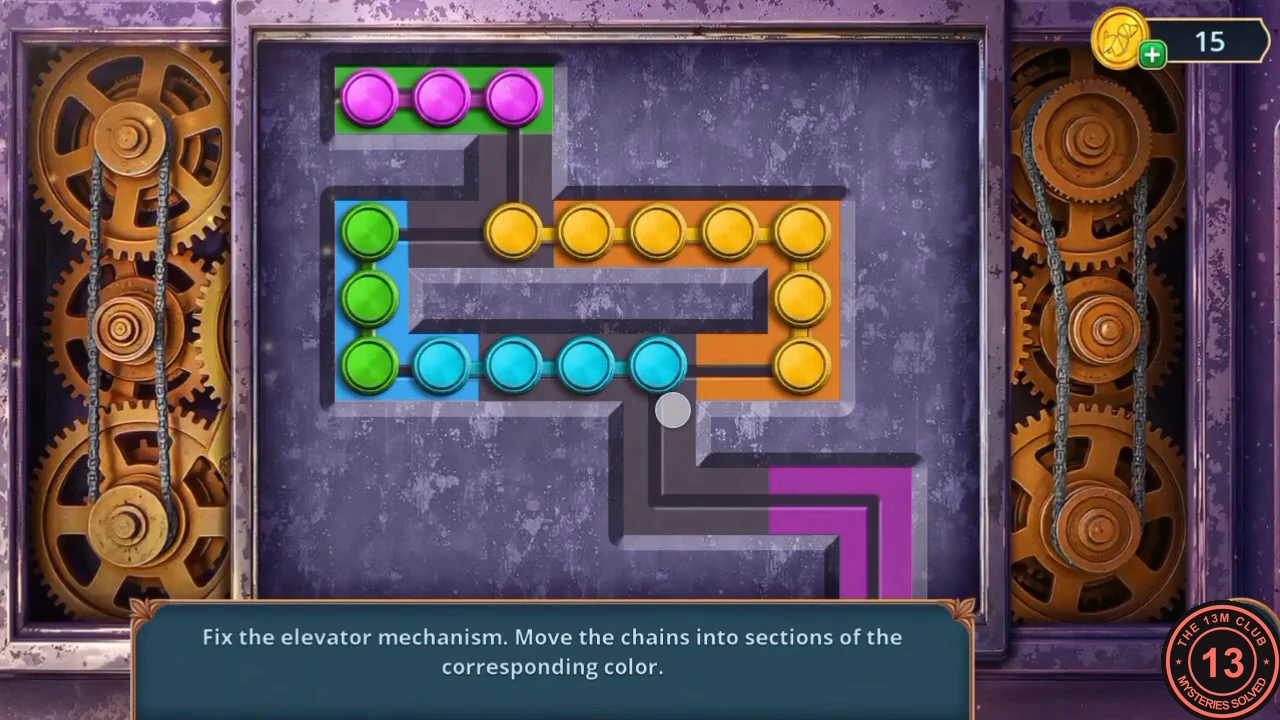
'Fix the elevator mechanism. Move the chains into sections of the corresponding color.' Four bead chains lie on a grey track: magenta (3 beads) starts in the green section at the top, green (3) in the blue section on the left, cyan (4) along the bottom of the loop and yellow (7) over the orange section on the right. The magenta section is at the bottom right. Drag either end of a chain to slide the whole chain along the track; chains cannot pass through each other.
- Use the empty grey branches, especially the long track down to the magenta corner and the middle channel, as parking spaces. Slide the cyan chain out of the way first, move the magenta chain down out of the top section, and then work the green chain up into the green section. Shuffle the chains until magenta fills the bottom-right corner, green the top section, cyan the blue section on the left and yellow the orange section on the right. This is a lengthy rearrangement, so the guide gives the approach rather than a move list; expect a few detours while you park chains out of the way.
The rooftop fan
With the mechanism repaired, Will rides up to the gallery rooftop.
- Open the electrical box and pour the water from the bottle over the burning cable. When the box opens, take the Fan Blades.
- Open the big fan. Take the Glue tube in the corner, then fit the Fan Blades. The fan spins and blows out a crumpled sketch signed by Monique: 'Your design is now mine.' Keep the Glue for later.
Riddle search in Monique's costume room
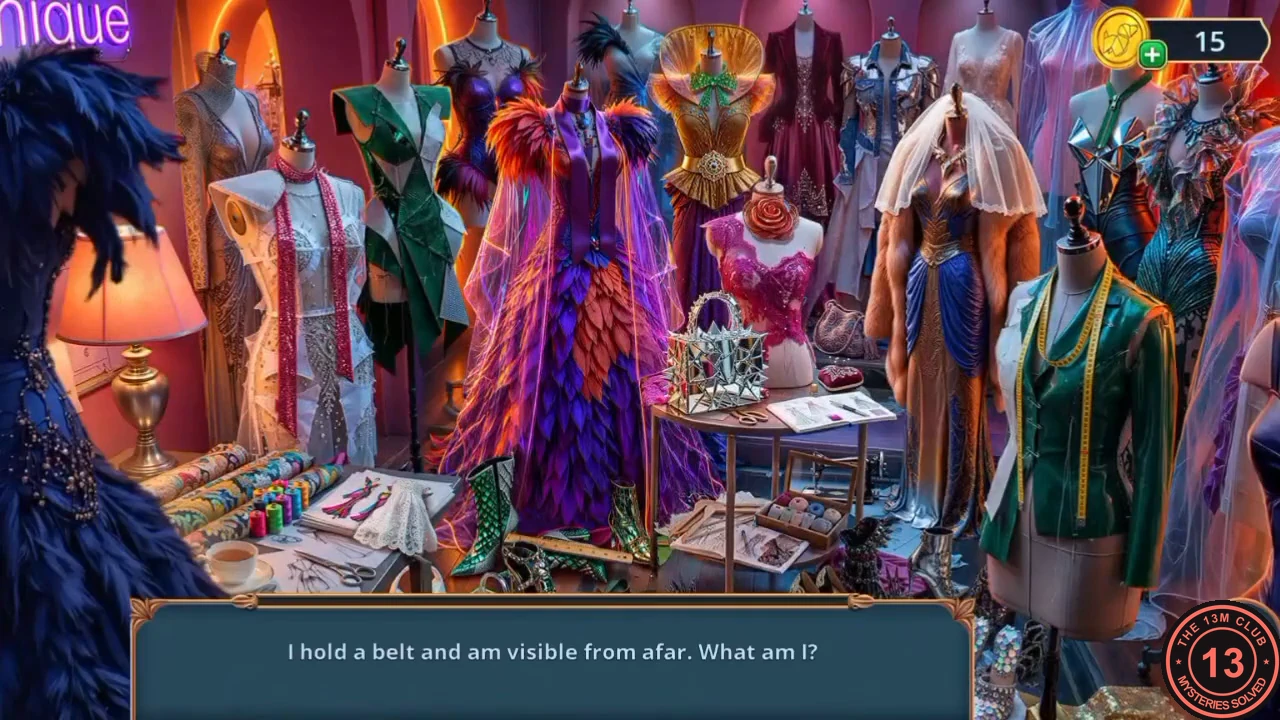
The stolen sketch makes Will wonder: 'Did someone really take Monique's designs? Or maybe she's lying... It's worth checking out.' Head back to Monique's office. Each riddle in the box at the bottom points to one object in the costume room; find it and the next riddle appears.
- Use the map to travel to Monique's Office and tap the sparkling costume room doorway to start the riddle search.
- Riddles 1-4: the belt that is visible from afar is the gold belt with a jewelled buckle on the gold corset at the top centre. The tool that keeps pattern lines precise is the wooden ruler on the floor between the green boots. The light haze that conceals the face is the white veil on the mannequin in the orange fur coat at the top right. The thing that measures so everything fits is the yellow tape measure around the neck of the mannequin in the green jacket.
- Riddles 5-8: the fastener that joins two sides in one motion is the green zipper at the neck of the silver angular dress (top right, under the coin counter). The decoration you can tie into a bow is the purple ribbon down the front of the feathered gown in the centre. The thing that makes shoulders broader is the white shoulder pad on the white mannequin at the left. The piece that hugs the wrist and finishes a sleeve is the white lace cuff on the sketchbook at the bottom left.
- Riddles 9-12: the sharp helpers are the pincushion on the round table in front of the pink bodice. The thing that works stitch by stitch is the small black sewing machine under the round table, behind the yarn box. The thing that holds a garment's shape when nobody wears it is the wooden hanger on the floor under the table, left of the yarn box. The last riddle asks for what joins fabric next to the machine: tap the coloured thread spools at the bottom left on the fabric rolls. You receive the Dancing Figurine.
The staff ID and the bouncer
The bouncer outside the gallery only lets staff in. Build a staff ID from the badge taken from the attacker.
- Still in Monique's office, open the ballerina relief on the wall and put the Dancing Figurine into the empty slot. The lower-left compartment opens; take the Lumiere Stamp.
- Open the ID Badge in the inventory (the item marked with a plus). It is a staff ID card with three empty spots: add My Photo, the Glue and the Lumiere Stamp to get the Staff ID Badge.
- Travel to La Mode Boulevard, open the bouncer and show him the Staff ID Badge. 'Oh, I see. Yes, you can come in.' Will enters the gallery reception.
The gallery reception
Vivienne calls as soon as Will is inside.
- Vivienne says she is going in alone. Choose your reply: 'Wait for me! I'm close!' costs 60 coins and earns decision points (the chapter summary lists 'Insist on waiting' as 2); 'Be careful!' is free and earns none. The story continues the same way and the task changes to finding Vivienne.
- Open the buffet table with the chafing dish. Take the Make-Up Brush and the Firecracker, then dip the Deep Fryer Basket into the hot dish to fish out a Golden Puppet.
- Open the panel with three purple dress sketches and hang the Golden Puppet on the hook at the right. The panel slides away to reveal a safe with a keypad and fingerprint scanner, which you cannot open yet. Take the Megaphone.
- Use the Megaphone on the crowd blocking the way into the show. A crowd game starts.
Crowd game: reaching the show
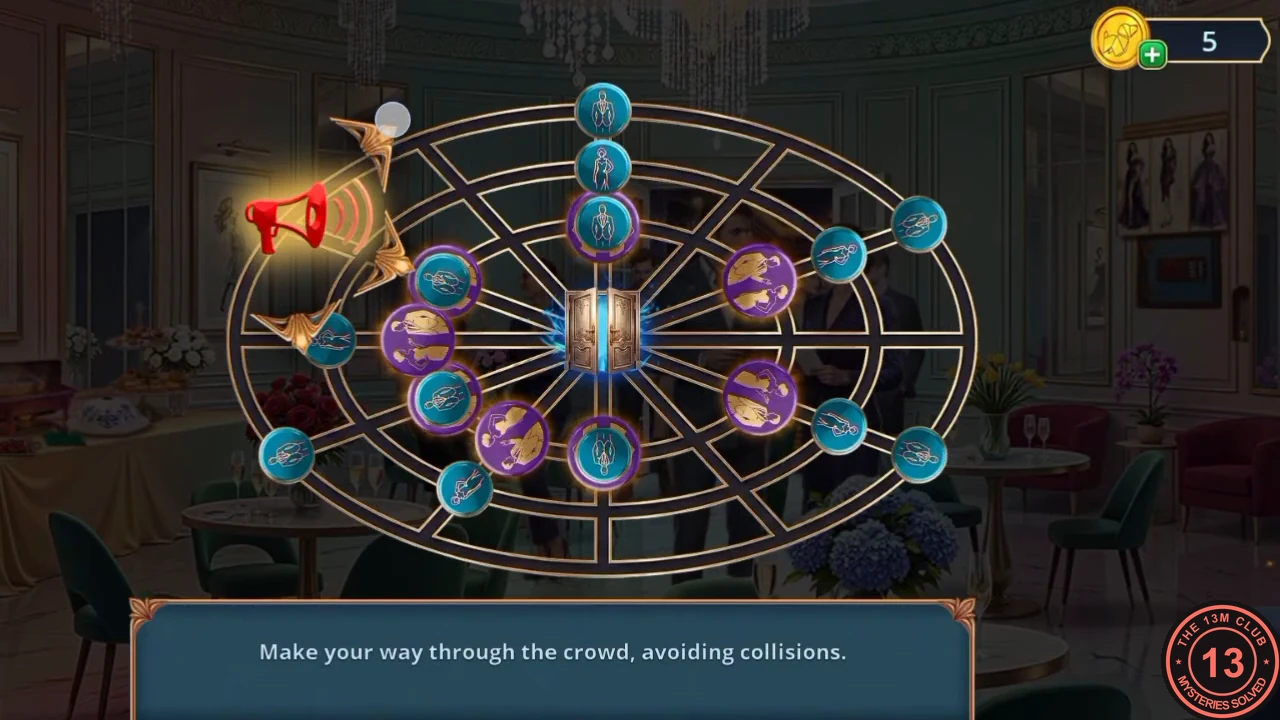
'Make your way through the crowd, avoiding collisions.' The board is a set of oval rings joined by spokes, with the goal in the centre. Your red megaphone starts on the outer ring at the left. Gold arrows around it show where it can step; tap one to move one point along a ring or spoke. Blue guests circle the outer rings and purple guests circle the inner rings, so the gaps keep moving.
- Watch the guests nearest you and only step into a point when the next guest on that ring is still some distance away. Example route: go clockwise round the outer ring over the top to the right side, then step inward along the right spoke to the middle ring, follow that ring up to the top, and finally move down the top spoke into the centre. The crowd parts and Will reaches the runway hall.
The runway hall
'Vivienne is somewhere backstage. I need to find her as soon as possible!'
- Open the gold armchair with the silver case beside it. Take Monique's Bag (the blue Lumiere bag). The case has a fingerprint scanner and the chair seat is missing its lever.
- Open the spotlight and take the Chair Lever.
- Go back to the armchair and fit the Chair Lever. Lift the seat and take the Popcorn Bucket.
- Open the small table with the spilled flower pot. Use the Popcorn Bucket to scoop up the soil, uncovering a blue crystal flower. A flower puzzle starts.
Flower pot puzzle
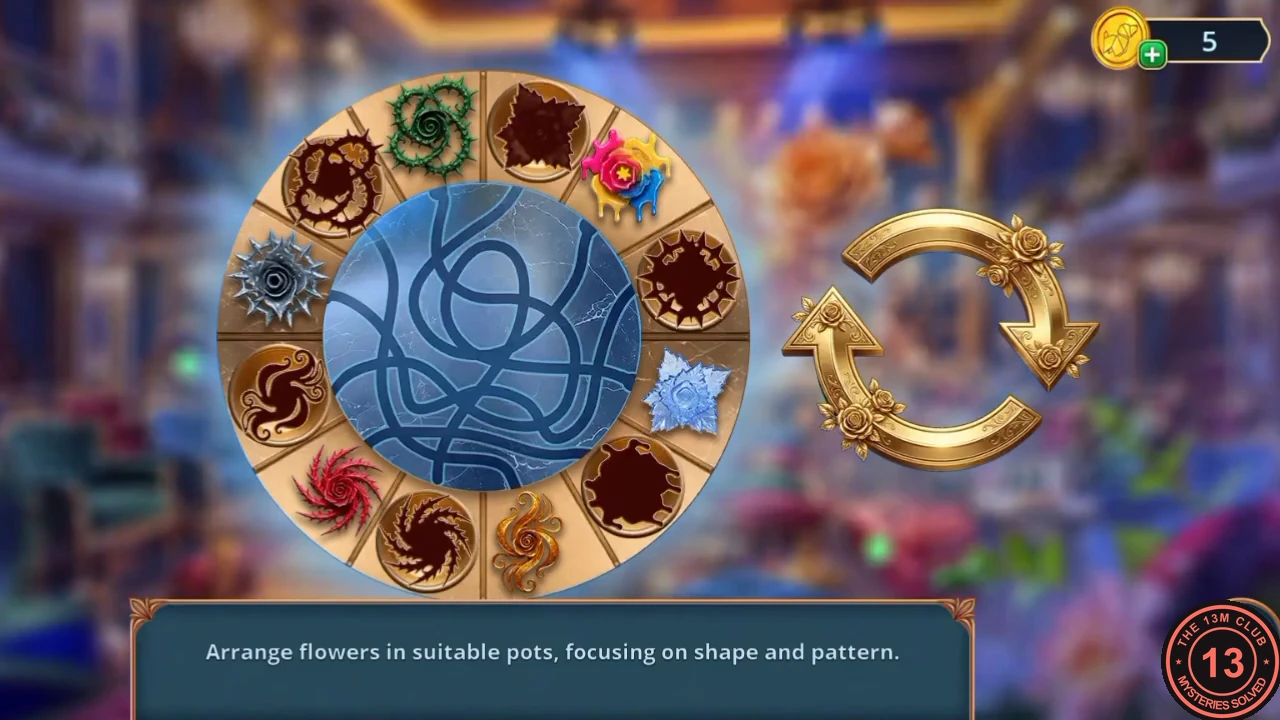
'Arrange flowers in suitable pots, focusing on shape and pattern.' Twelve slots form a ring around a blue disc carved with channels. Six slots hold flowers (green thorny spiral, red spiky swirl, silver spiky rosette, blue crystal star, multicoloured splash, gold flame swirl) and six hold pots with a dark hole in a particular outline. The arrows on the right turn the ring; tapping a flower sends it along a channel across the disc to another slot.
- Pair each flower with the pot whose hole has the same outline: the green thorny spiral into the hole with a thorny curl, the red spiky swirl into the pinwheel-shaped hole with curved arms, the silver rosette into the spiky ring-shaped hole, the blue crystal star into the four-pointed star hole, the multicoloured splash into the rounded blob hole, and the gold flame swirl into the flame-shaped hole.
- Turn the ring with the arrows until a matching pot sits where a flower's channel ends, then tap the flower so it travels into that pot. Repeat for each flower; flowers already potted move with the ring. When all six flowers are in their matching pots, a drawer under the table opens. Take the Spring.
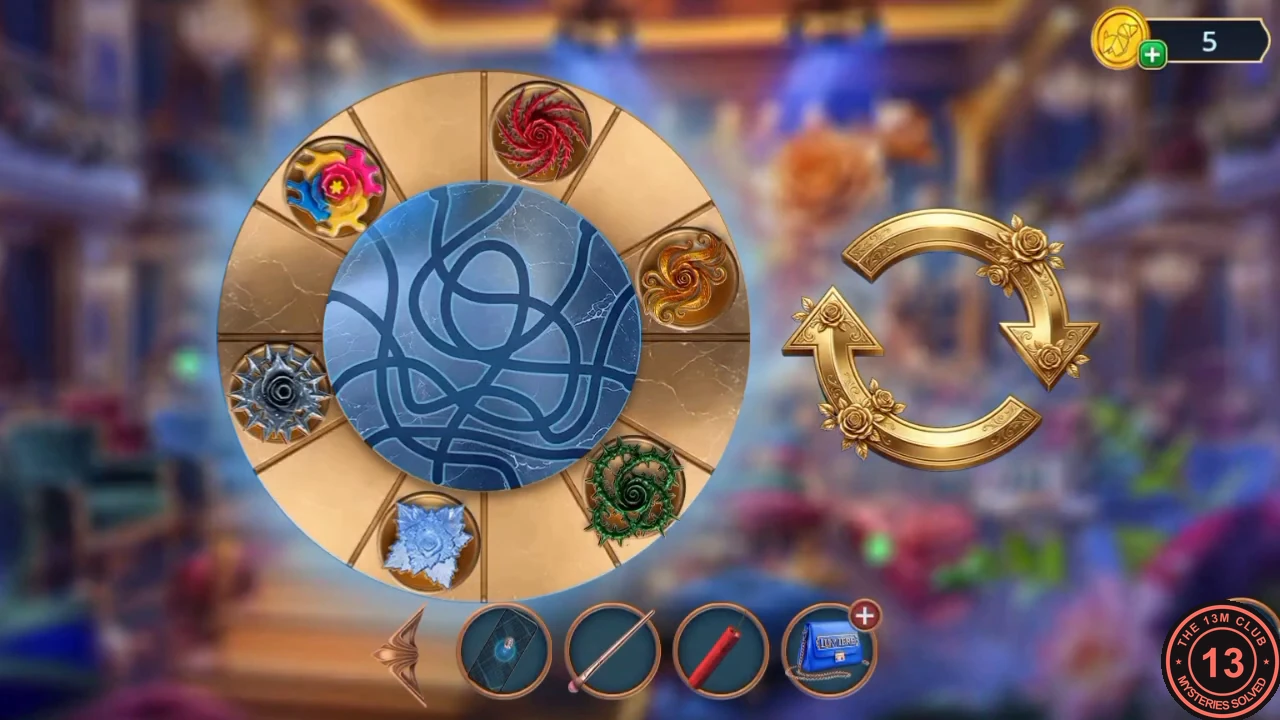
Solved: all six flowers sit in the pots with matching holes.