Mini-game: the leaves on the window ledge
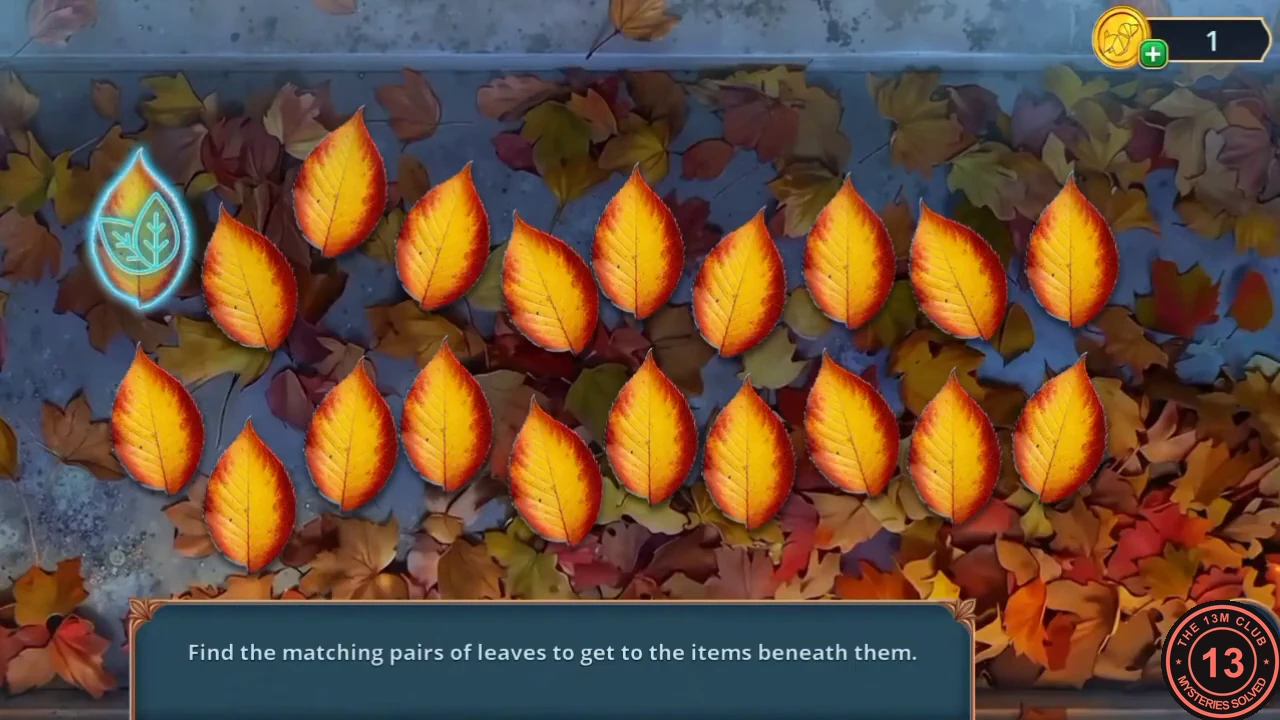
'Find the matching pairs of leaves to get to the items beneath them.'
- Tap a leaf to reveal the vein pattern on it, then tap another. Two leaves with the same pattern disappear; leaves that don't match turn back. Clear all the leaves to uncover what lies beneath them. You receive the Remote Control and a horseshoe Magnet.
The bolted drawer, the pencil and the wiring diagram
The magnet opens the desk drawer in the Lobby, and the scissors lead to a pencil that reveals the hidden diagram.
- In the Lobby, open the desk and use the Magnet on the drawer to slide the bolt across. The drawer opens: take the Scissors.
- Use the map to go to the Lighting Room. Open the leather armchair beside the safe and cut the torn leather with the Scissors. Take the Pencil.
- Open the pencil sharpener on the wooden door and sharpen the Pencil. Then open the pile of papers on the floor and shade the blank notepad with the sharpened pencil. A sketch of the wiring appears, marked 'Spare wire'. Take the diagram.
- Use the map to go to the Lighting Grid. Open the electrical box and place the diagram on it. The wires are sorted out. The glass-door cabinet to the right of the box starts to sparkle: tap it to open a hidden-object scene.
Hidden-object scene: the fashion workroom
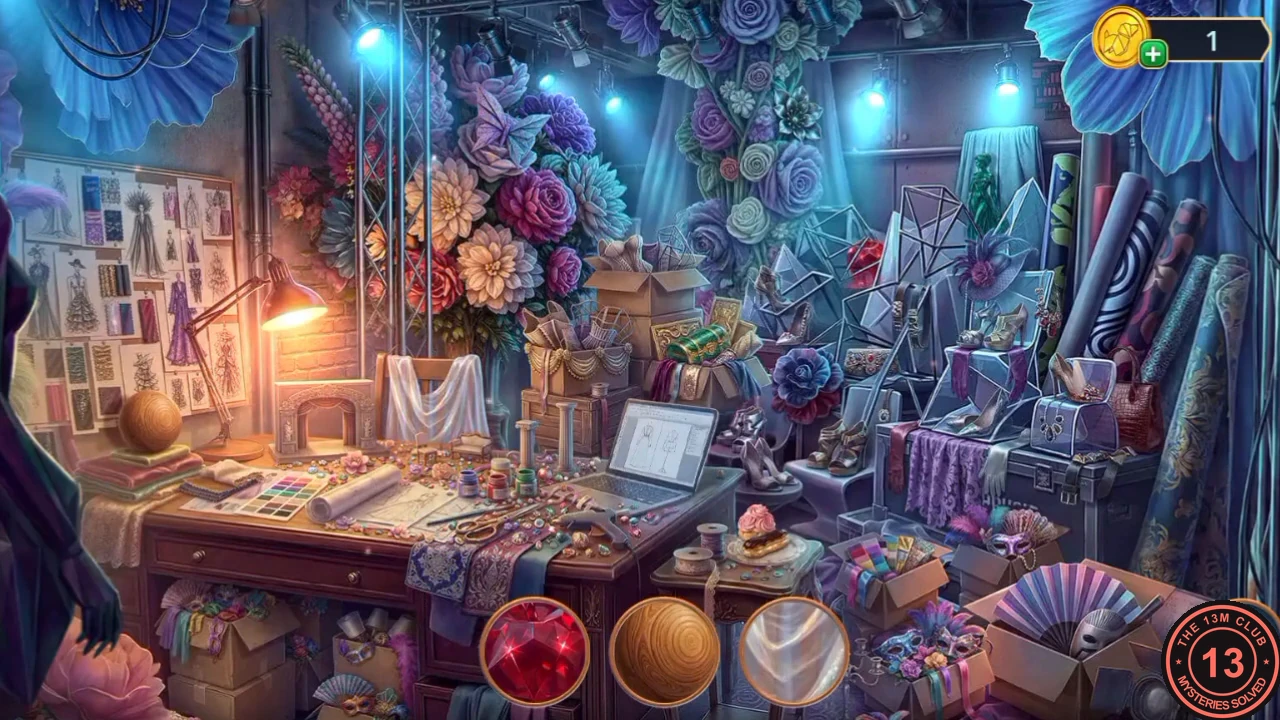
A cluttered design workroom with flowers, fabric rolls, a laptop and a sketch wall. The objects to find are shown as round close-ups at the bottom.
- Match each round close-up at the bottom of the screen to the object in the scene and tap it. New close-ups replace the ones you find. When all are found you receive the Fryer Basket.
Chips for the rat
The rat beside the crate is guarding something.
- Open the red fryer next to the big fan and put the Fryer Basket in it. Take the Chips.
- Open the crate where the rat sits and give it the Chips. A puzzle starts.
Puzzle: untangling the chips
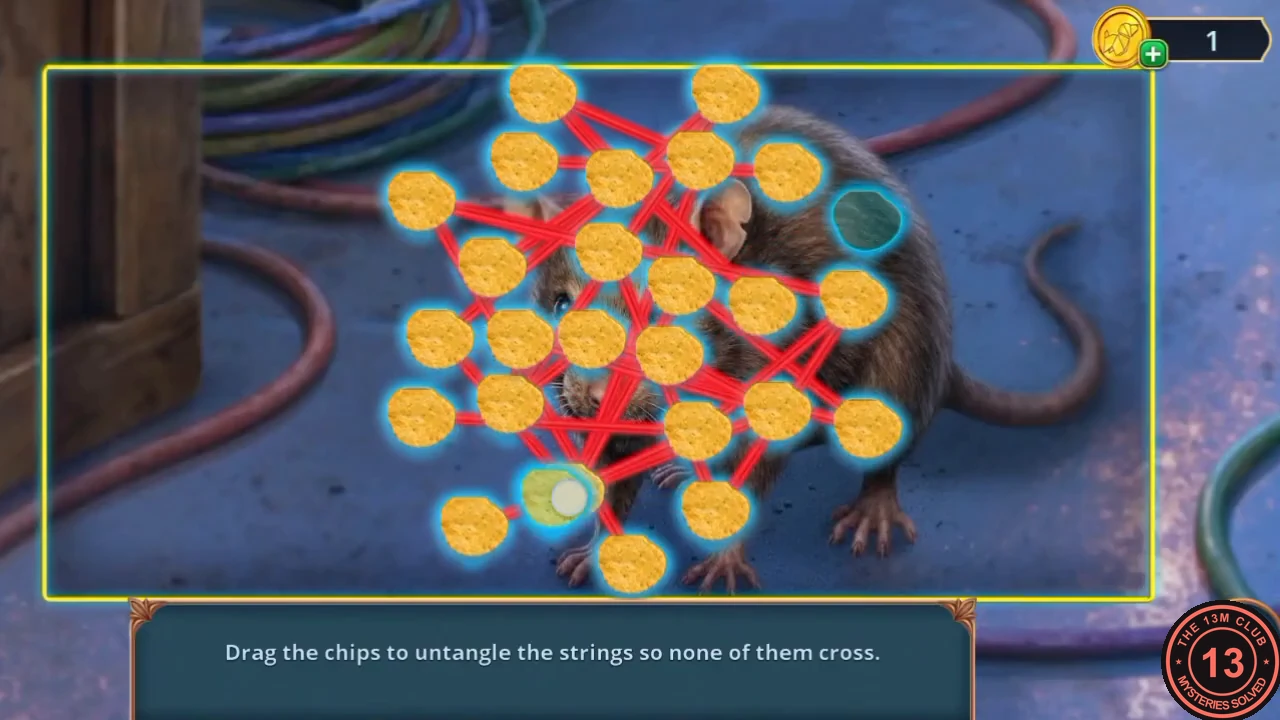
'Drag the chips to untangle the strings so none of them cross.'
- About thirty chips are joined by strings. A string that crosses another is red; a string that crosses nothing is green. Drag the chips to new positions until every string is green. It helps to start with the chips that have only two strings and arrange them round the outside, then fit the busier chips into the middle. The rat eats the chips and leaves. Take the Extension Cord it was hiding.
Powering the desk and repairing the lantern
Back in the Lobby.
- In the Lobby, open the desk with the monitor and put the Extension Cord on the counter. The monitor powers up and shows 'UNLOCK', and the cash drawer under it opens. Take the green Control Button (2/3) and the Carabiner.
- Open the gold crystal lantern and repair its broken chain with the Chain Part and the Carabiner. The lantern is lifted, revealing a Camera on the floor. Take the Camera.
Building the mini drone
The drone from the Lighting Room needs a camera and a controller.
- Open the Drone in the inventory and add the Camera and the Remote Control to its two slots. You get the Mini Drone.
- In the Underground Parking, open the floor hatch you unlocked earlier and send the Mini Drone down the shaft. A drone puzzle starts.
Puzzle: guiding the drone with blocks
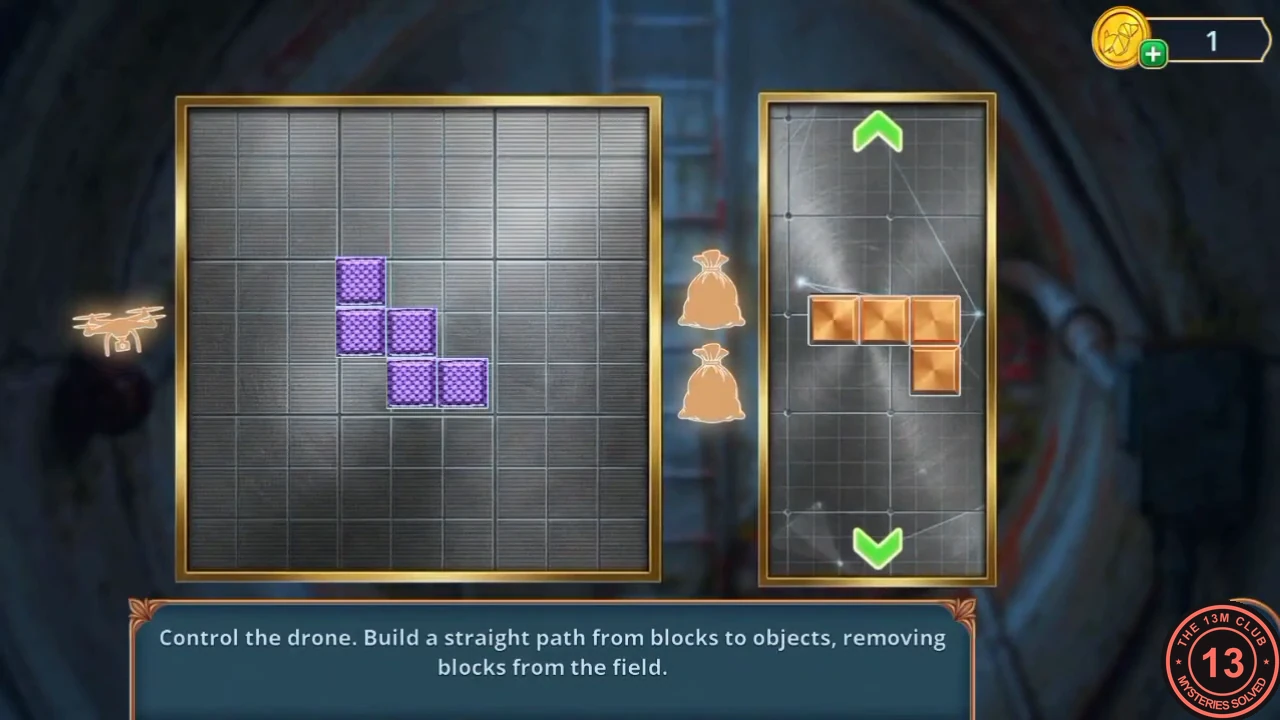
'Control the drone. Build a straight path from blocks to objects, removing blocks from the field.'
- The field is a 9 x 9 grid. The drone waits on the left and two money bags hang on the right, level with rows 4 and 6 (counting from the top). Purple blocks already fill row 4 column 4, row 5 columns 4-5 and row 6 columns 5-6. Drag pieces from the scroll panel on the right (use its arrows to see other pieces) onto the grid. When a row next to a bag is completely filled, the drone flies along it, collects the bag and that row is cleared. Blocks above it do not fall.
- Placements that work (row, column from top-left): 1) orange L in row 6 columns 7-9 plus row 7 column 9; 2) blue Z in row 6 columns 3-4 plus row 7 columns 4-5; 3) orange Z in row 6 columns 1-2 plus row 7 columns 2-3. Row 6 is now full and the drone takes the lower bag. 4) Green S: row 3 column 8, row 4 columns 8-9, row 5 column 9. 5) Blue T: row 3 column 7, row 4 columns 5-7, row 5 column 7. 6) Red piece: row 4 columns 2-3, then rows 5 and 6 of column 3. 7) Orange straight bar standing upright in column 1, rows 4-7. Row 4 is full and the drone takes the upper bag. The drone flies back with the red Control Button (3/3) and a Banknote.CODERow 6: orange L (r6 c7-9 + r7 c9), blue Z (r6 c3-4 + r7 c4-5), orange Z (r6 c1-2 + r7 c2-3) | Row 4: green S (r3 c8, r4 c8-9, r5 c9), blue T (r3 c7, r4 c5-7, r5 c7), red (r4 c2-3, r5 c3, r6 c3), orange I (c1 r4-r7)
The pinwheel, the shutters and Sterling's daughter
With all three control buttons, Will only needs to raise the shutters and get the lever.
- In the Underground Parking, open the vending machine and put the Banknote into its slot. Take the Pinwheel Souvenir from the tray.
- Use the map to go to the Lighting Room. Open the wooden door with the pencil sharpener and fit the Pinwheel Souvenir onto the switch on the door. It spins and the shutters rise (achievement 'Let the show begin'). Vivienne appears on the catwalk, and Sterling is wiping his hands behind the curtain.
- A dark-haired woman arrives: 'Are you Will? Vivienne told me about you... We need to stop my father right now!' Scored decision: 'I'll save Vivienne.' (60 coins, +2 points) or 'And what do you want me to do?!' (free, 0 points). She replies, 'Try to distract him! I'll get the police!' and you receive the Lighting Control Lever. The task 'Get a view of the catwalk' is completed.
- Open the control panel on the desk. Fit the Lighting Control Lever and the three Control Buttons (blue, green, red) into the empty spaces. The final puzzle starts.
Final puzzle: the mirrors and the guards
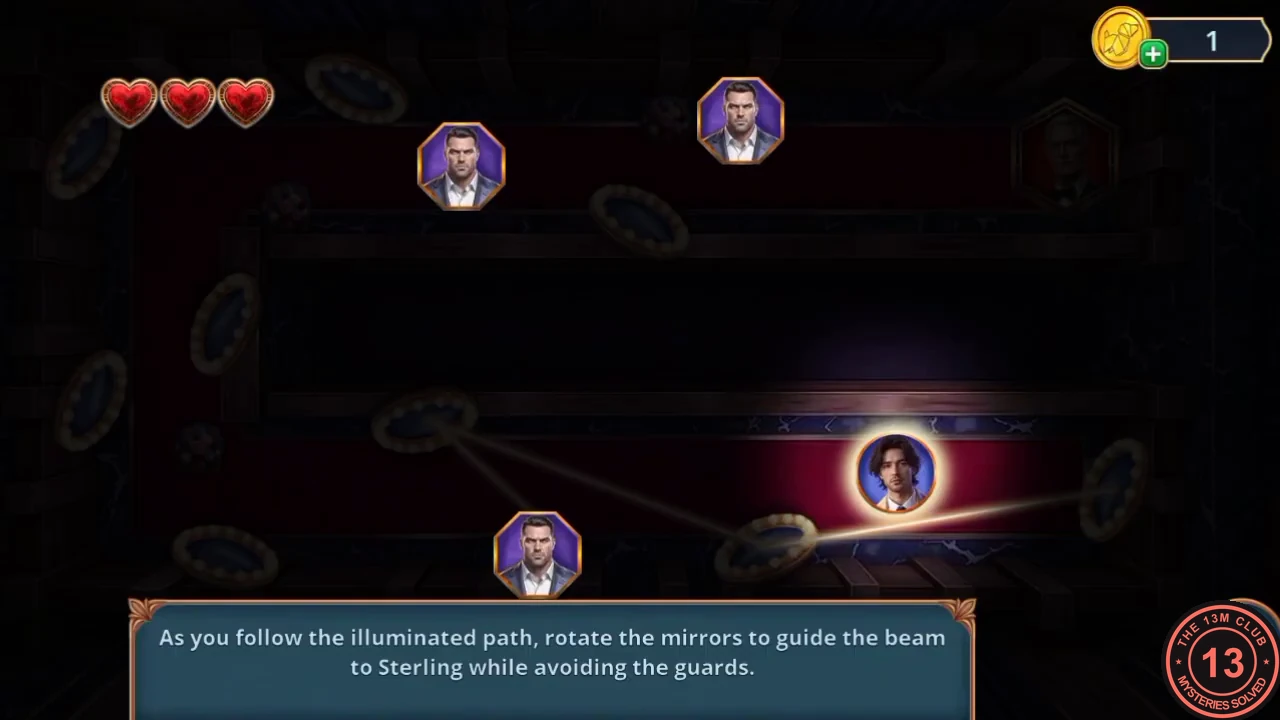
'As you follow the illuminated path, rotate the mirrors to guide the beam to Sterling while avoiding the guards.' You have three hearts.
- The board is very dark. Will's portrait starts in a spotlight on the stage (bottom right). Sterling's portrait is in the top-right corner. Three guards patrol the walkways, two on the upper one and one on the lower one. Tap a mirror to rotate it. Will follows the beam as it is extended from mirror to mirror. Mirrors, by position: A bottom centre (just under Will); B lower middle-left; C bottom-left; D left side, low; E left side, middle; F top-left corner; G top edge, left of centre; H upper middle; plus one on the right wall that starts the beam.
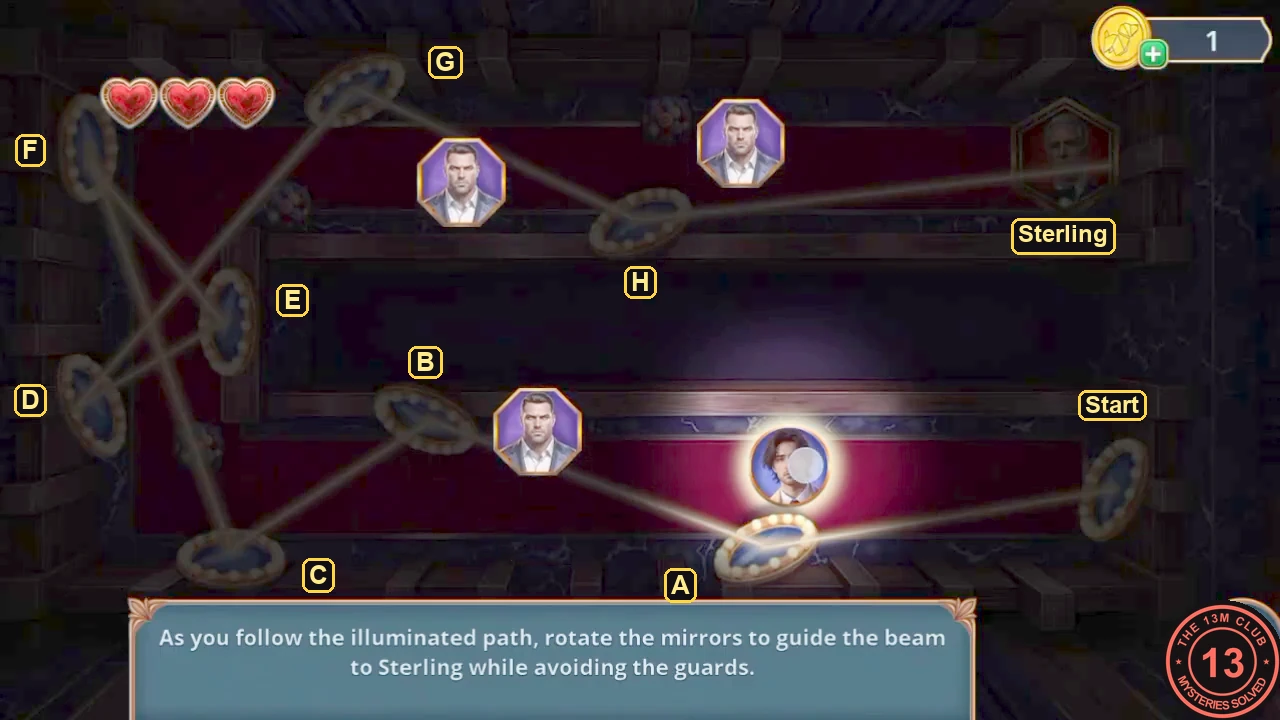
Mirror letters used in this guide, with the solved beam lit from Start to Sterling (picture brightened). - Turn the mirrors so the beam runs: bottom-centre mirror (A), lower middle-left (B), bottom-left (C), top-left corner (F), left middle (E), left low (D), top edge (G), upper middle (H), then across to Sterling. Watch the guards and only extend the beam past a walkway when no guard is on that part of it. When the path is complete, Will's light travels along it and reaches Sterling.CODEA -> B -> C -> F -> E -> D -> G -> H -> Sterling
Chapter 4 brooch locations
Chapter 4 has 14 brooches worth 35 in total. They are listed in the order you reach them, and the number in brackets is how much each one adds to your total out of 140. After this chapter a complete collection shows 140/140.
- VIP Lounge Backstage: at the bottom of the serving cart beside the glass table. (+3)
- Technical Corridor: in the open cardboard box at the lower left, in front of the fabric rolls (above the HIGH FASHION sign). (+3)
- Show Dressing Room: inside the stuck desk drawer once it is open (where you find the Pencil). (+3)
- Technical Corridor: in the close-up of the PROPS box, top left on the plastic bag. (+2)
- VIP Lounge Backstage: in the close-up of the mini fridge with the fruit basket, at the bottom edge below the fridge. (+2)
- Photo Studio: in the close-up of the open suitcase with the wireless charger, bottom-left corner. (+2)
- Garage, now as Will: on the wall pipes at the upper left, above the limousine. (+3)
- Garage: in the close-up of the vending machine, at the top edge above the recycling bin. (+2)
- Lobby: among the potted plants just right of the purple column with the draped mannequin, at the foot of the column. (+3)
- Lobby: in the close-up of the marble desk with the monitor, at the right edge beside the monitor. (+2)
- Lighting Grid (the technical room with the big fan): on the grey machinery on the high shelf at the upper right, above the wire cabinet. (+2)
- Lighting Room: under the desk, on top of the small grey computer tower immediately right of the red chair. (+3)
- Lighting Room: in the close-up of the armchair and the safe, on the floor below the armchair. (+2)
- In the close-up of the red fryer next to the fan, top-right corner above the fryer. This is the last brooch: the total reaches 140/140 and the achievement 'Inspiration Archive' (find all collectibles in the game) unlocks. (+3)
Chapter 4 results: decision points and the ending
The game ends with the Chapter 4 decision summary and an ending scene that depends on your points.
- Chapter 4 has four scored choices worth up to 12 points, and every one of them costs coins. Monique at the dress: 'Interrupt Monique.' +2 (summary 'Stop Monique'). Monique's decision after the photo shoot: 'Ask her to stay calm' +3 or 'Appeal to her conscience' +6, only one of them (summary 'Appeal to Monique's feelings' / 'Insist on justice'). Vivienne's call: 'I'll be there to have your back!' +2 ('I'll cover you'). Sterling's daughter: 'I'll save Vivienne.' +2. As in earlier chapters, the summary shows ending cards marked 0, 4 and 10, and the card for the highest mark you reached is highlighted. With 0 points, Sterling points his gun at Vivienne on stage ('You... It's all your fault!') and the game ends on the title screen. With 12 points the same confrontation is followed by 'Police Officer: Sterling Wainwright, you are under arrest!', Vivienne taking a bow on the catwalk and Will raising a toast. A total of 4 to 9 points earns the 4 card, for example 'Interrupt Monique.' and 'I'll be there to have your back!' (4 points) or 'Appeal to her conscience' alone (6 points). No public recording we could find scores in that range, so that ending is not described here.