Conway Boulevard
The trail leads to the Blue Spoon Diner, where the sheriff is already waiting.
- Zoom into the bench with the Blue Spoon bag and take the Mirror and the Reporter's Token (42/140). Note the red "3 COINS" box nearby.
- Enter the diner (the door sign says it is on a break). Talk to the sheriff. Decision: "Bring up the invoices." (60 coins, +2) or "Pretend you came in for a cup of coffee." (free, 0 points). This walkthrough takes the free option.
Diner Hall
Look around the diner hall while the sheriff talks to Olivia.
- Zoom into the jukebox and take the Coins and the Nickel-Plated Plate. The flyer on it cannot be peeled off yet.
- Zoom into the small shelf by the restroom door and take the Rubber Cork and the Souvenir Magnet.
- Zoom into the cook holding a metal box. Put the Souvenir Magnet on the box lid; the box opens. Take the Brush from inside.
- Go outside to Conway Boulevard and zoom into the fire hydrant next to the police car. Scrub the rusty cap with the Brush, then use the Oiler on it to start the peg puzzle.
Fire Hydrant Peg Solitaire
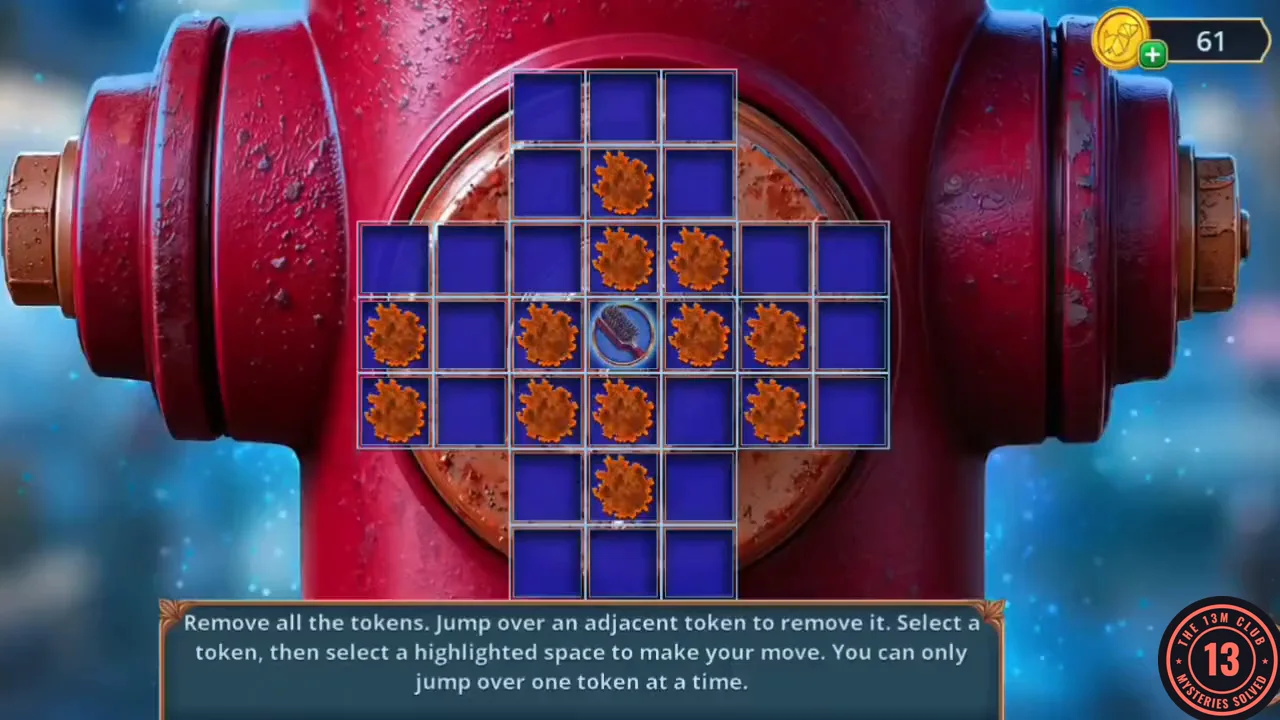
Remove all the tokens. Select a token, then a highlighted space, to jump over one adjacent token and remove it.
- Number the rows 1–7 from the top and the columns 1–7 from the left across the whole cross. The 13 tokens start at row 2 col 4; row 3 cols 4–5; row 4 cols 1, 3, 4, 5 and 6; row 5 cols 1, 3, 4 and 6; and row 6 col 4. One working sequence (each move jumps over the token in between): 1) row 3 col 4 up to row 1 col 4; 2) row 5 col 6 up to row 3 col 6; 3) row 5 col 1 up to row 3 col 1; 4) row 5 col 3 up to row 3 col 3; 5) row 4 col 5 left to row 4 col 3; 6) row 3 col 6 left to row 3 col 4; 7) row 6 col 4 up to row 4 col 4; 8) row 4 col 4 up to row 2 col 4; 9) row 1 col 4 down to row 3 col 4; 10) row 3 col 4 left to row 3 col 2; 11) row 3 col 1 right to row 3 col 3; 12) row 3 col 3 down to row 5 col 3. One token remains and the puzzle is solved.
Olivia and the Restroom
With the sheriff gone, question the owner, Olivia.
- Back in the Diner Hall, talk to Olivia. Decision: "Press Olivia with an invoice." (60 coins, +2) or "Ask about Eleanor." (free, 0 points). This walkthrough takes the free option. Olivia gives you the Restroom Key.
- Zoom into the restroom door and use the Restroom Key on the keyhole to go in.
- In the restroom scene, tap the Reporter's Token in the sink basin under the steam jet (44/140).
- Zoom into the sink, where hot steam is jetting from a hole above the basin. Plug the hole with the Rubber Cork, then take the Cleaner's Notes (a notebook with a page of symbols) from the edge of the sink. Vivienne notices blood on the floor.
- Zoom into the floor vent and tap the Reporter's Token in the lower right corner of the close-up, by the red hose of the hand pump (46/140).
- Zoom into the floor vent. Take the Hairspray and the Hand Pump lying in front of it, then use the Nickel-Plated Plate as a screwdriver to remove the vent cover. Take the Sugar Tongs from inside. Something like a blade lies deeper in the vent; Vivienne says a UV light will show what she can't see on it.
- Zoom into the small green wall panel with ten round buttons and place the Cleaner's Notes on it; the page of symbols becomes your guide and the symbols puzzle starts.
Restroom Wall Panel Symbols
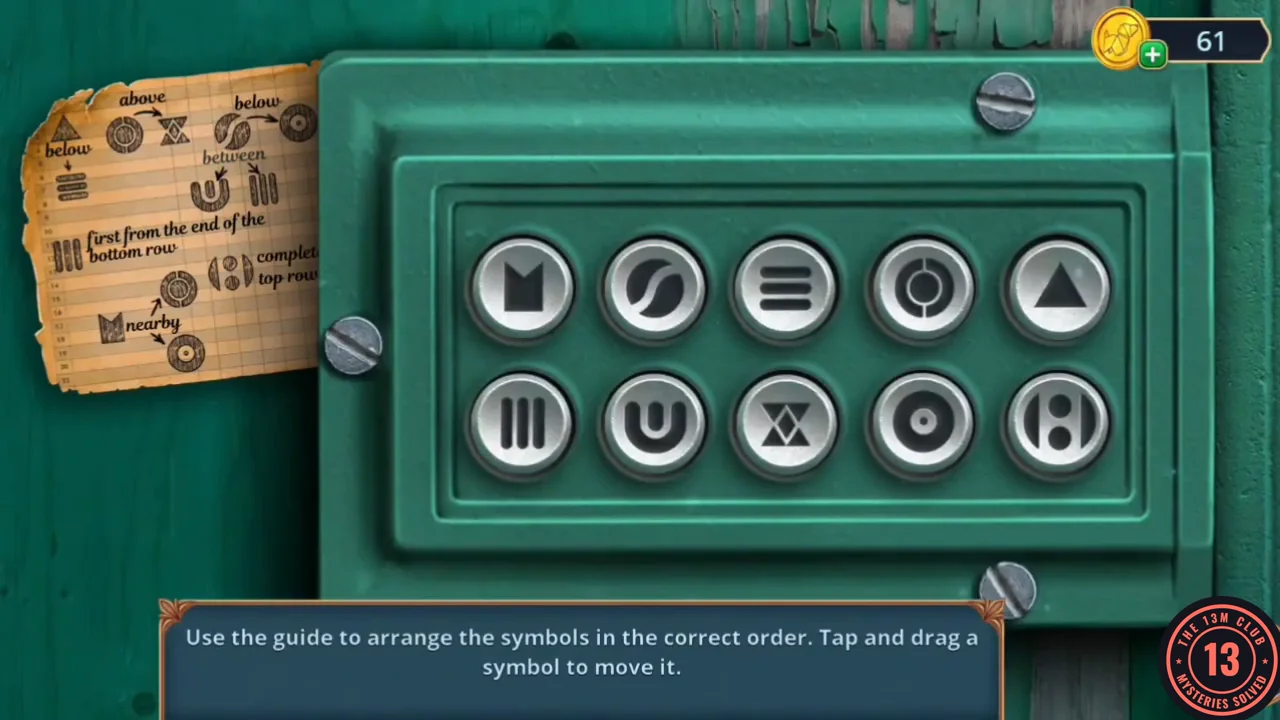
Use the guide to arrange the symbols in the correct order. Drag a symbol to move it.
- The guide in the top-left corner gives position clues (for example, the triangle goes below the three horizontal bars, and the three vertical bars go at the end of the bottom row). Drag the buttons into this arrangement. Top row, left to right: three horizontal bars, circle with a cross-bar, M shape, circle with a dot, round 8-shaped symbol. Bottom row, left to right: triangle, hourglass, U shape, S swirl, three vertical bars.
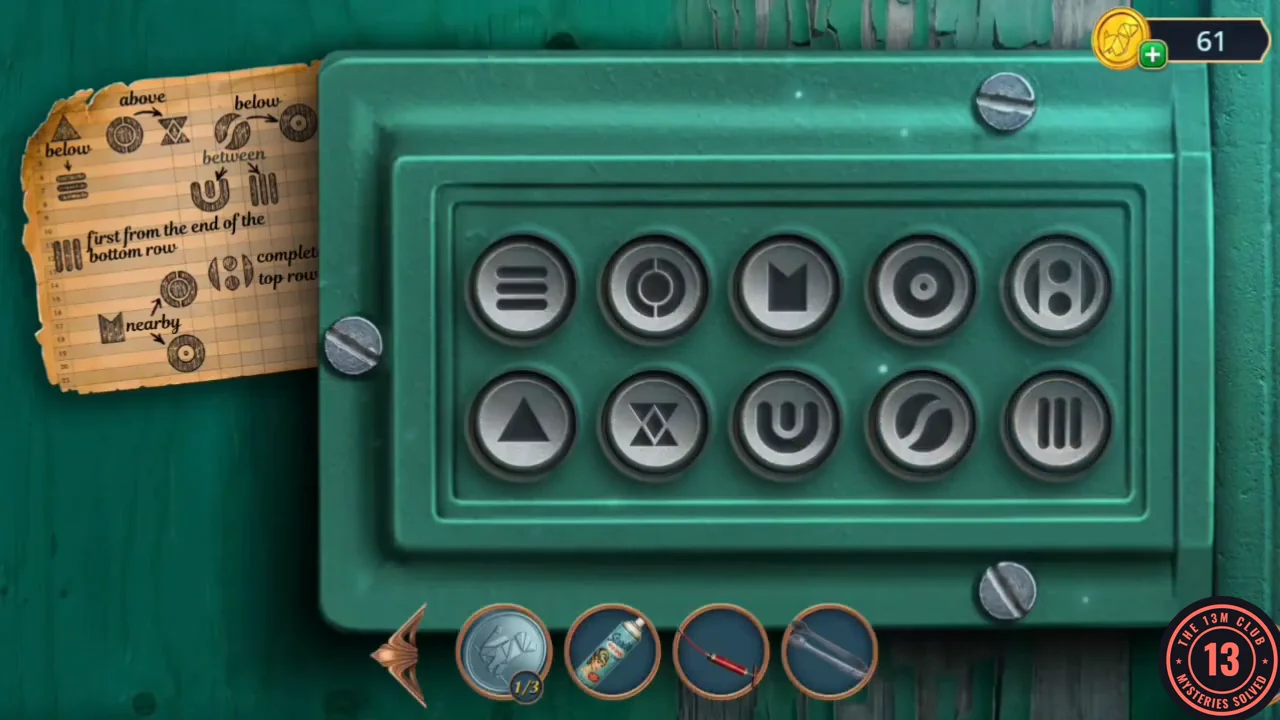
Solved panel. Top row: bars, crossed circle, M, dotted circle, 8 shape. Bottom row: triangle, hourglass, U, S swirl, vertical bars. - Inside the opened panel, take the Bucket with Mop and the Reporter's Token (48/140) on the leather bag. The bag itself is locked: its zip has no slider ("If only I had some kind of slider"), so leave it for now.
- Go back to the Diner Hall and use the Bucket with Mop on the flooded floor in front of the dining-room doorway. Once the water is mopped up you can go through to the Dining Room.
Dining Area
Explore the dining area beyond the hall.
- In the Dining Room scene, tap the Reporter's Token resting on top of the rolled-up blind over the left-hand window, above the green neon bottle sign (50/140).
- In the Dining Room, zoom into the counter by the pink cake cloche. Lift the cloche and take the Sandwich.
- Zoom into the booth seat with the yellow patch and the Blue Spoon mug, and tap the Reporter's Token on the seat beside the mug (52/140).
- Zoom into the booth by the window and then into the split in the seat cushion ("Something's wedged deep in the couch"). Use the Sugar Tongs to pull out a Blue Spoon flyer; it folds into a paper plane. Take the Coins (2/3) and the Paper Plane.
- Tap the torn photo lying on the booth table to open the comparison puzzle.
Blue Spoon Comparison
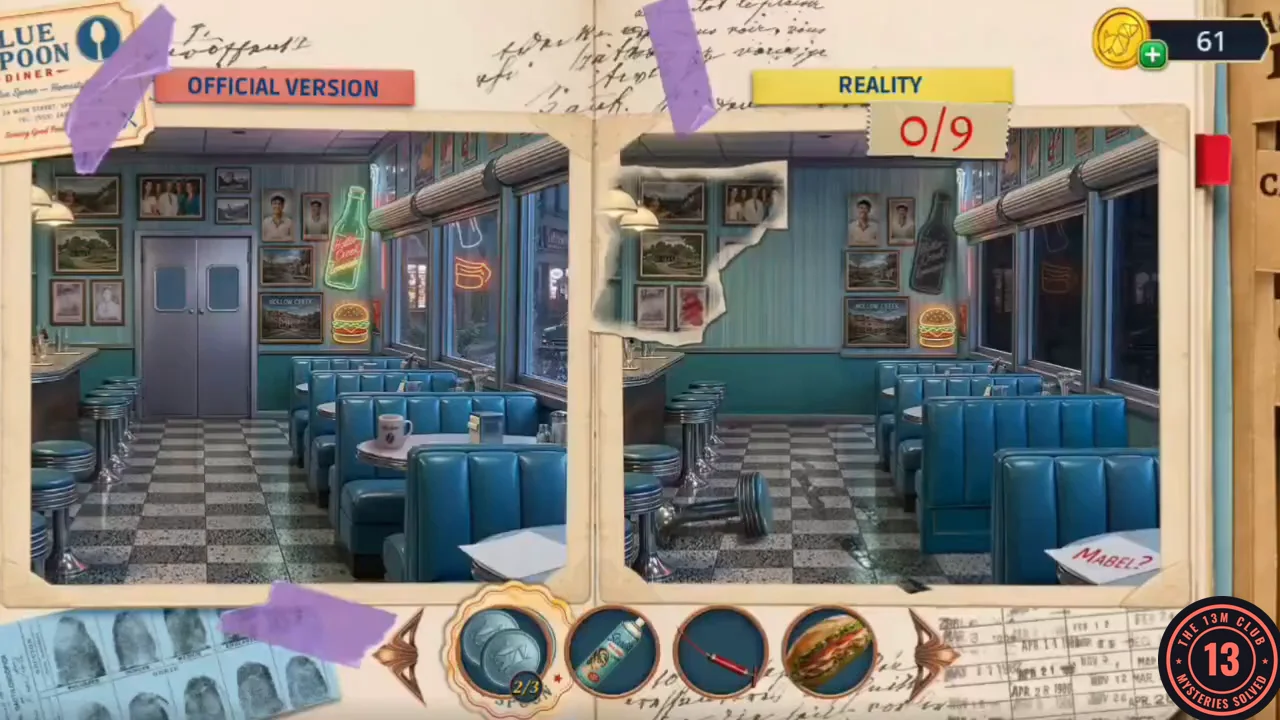
Find the 9 differences between the two scenes.
- Here the Reality picture is pieced together from torn photo scraps. Tap the 9 places where it differs from the Official Version: the small framed photo left of the kitchen doors, the round window in the kitchen doors, the red mark at the foot of the doors, the neon bottle sign (unlit in Reality), the neon cup sign in the window (unlit in Reality), the stool knocked over on the floor, the floor in front of the booths, the mug on the booth table and the note reading "MABEL?" on the front table. The note concludes that Eleanor was at the Blue Spoon last night looking for Mabel, and that Vivienne needs to check the staff photos and the kitchen.
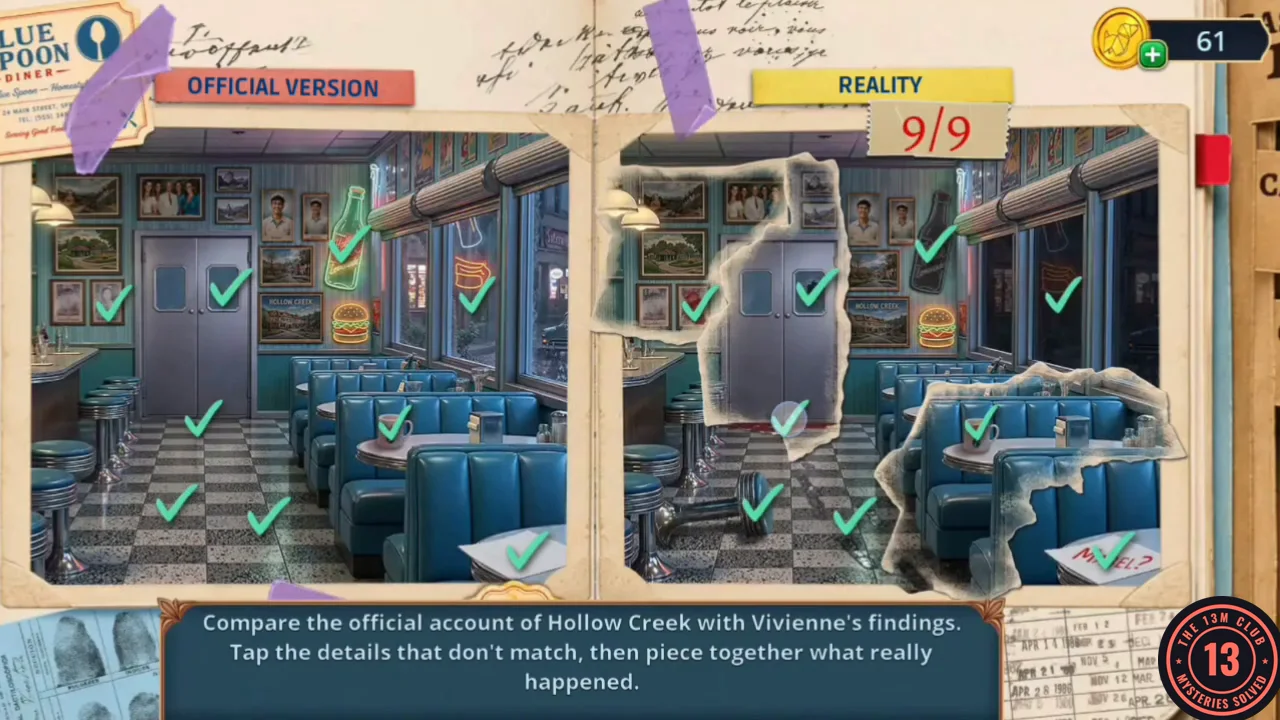
All 9 differences found in the dining room.
Diner Counter
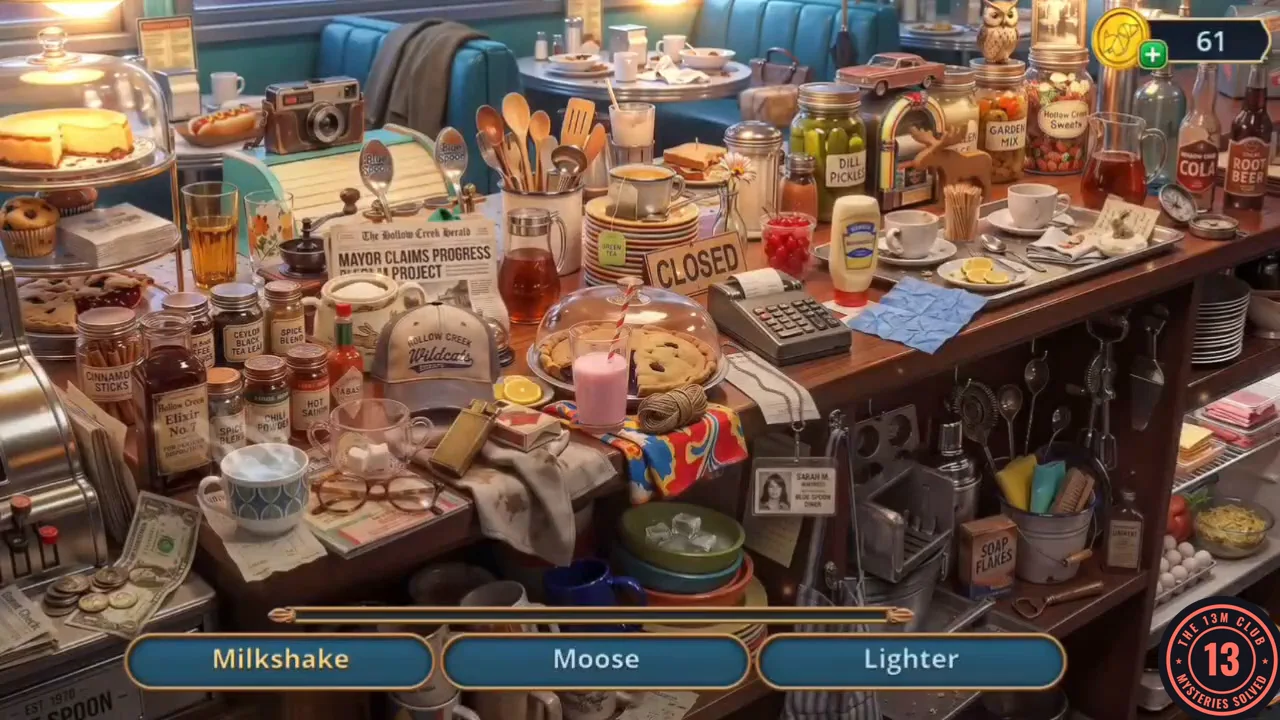
Find the listed items on the counter.
- In the Dining Room, zoom into the staff photo wall (one face is scribbled out in red). Throw the Paper Plane at the top shelf: it knocks down the Wine Glass Amulet (achievement Disaster). Then zoom into the counter with the wine bottles and fit the Wine Glass Amulet into the wine-glass-shaped slot on the teal panel; it opens and the counter hidden-object scene becomes available.
- Find the Milkshake, Moose, Lighter, Green Tea, Employee Badge, Sugar Bowl Lid, Ice, Cinnamon, Hot Dog, Package, Napkin Holder and Origami Crane. You receive the Polishing Cloth.
Mabel's Photo
Someone removed a staff photo in a hurry.
- At the staff photo wall, polish the empty frame with the Polishing Cloth (achievement) and take the Torn Photo of Mabel, the last of the Coins (3/3) and the Reporter's Token (54/140).
- Go out to Conway Boulevard and zoom into the red "3 COINS" newspaper box by the bench. Drop the Coins (3/3) into the slot; the box opens. Take the Work Glove and the Photo Fragment (keep the glove for the Back Alley pallets). Open the Torn Photo of Mabel in the inventory and add the Photo Fragment to complete the Photo of Mabel.
- Show the photo to Olivia. Decision: "Ask what happened to Mabel" (free, 0), "Use Eleanor's book" (30 coins, +2) or "Ask about the red mark" (60 coins, +6). This walkthrough takes the free option. Olivia claims Mabel started a kitchen fire and ran off; you receive an Umbrella.
- Use the Umbrella on the garbage truck's handbrake so the truck rolls away (achievement), opening the Back Alley.
- In the Back Alley, zoom into the dumpster and give the Sandwich to the stray dog (achievement Sandwich Truce); the dog leaves. Take the Reporter's Token (56/140), the Chopsticks and the Lock Picks (1/2). The boards of the crate in the dumpster are wedged tight, so leave them for now.
- In the Back Alley scene, tap the Reporter's Token on the lid of the metal trash can at the far end of the alley (58/140).
- Zoom into the pallets above the Blue Spoon crate. Take the Seam Ripper and the Empty Canister (red) from the crate, then use the Work Glove on the pallets to start moving them.
Back Alley Pallets
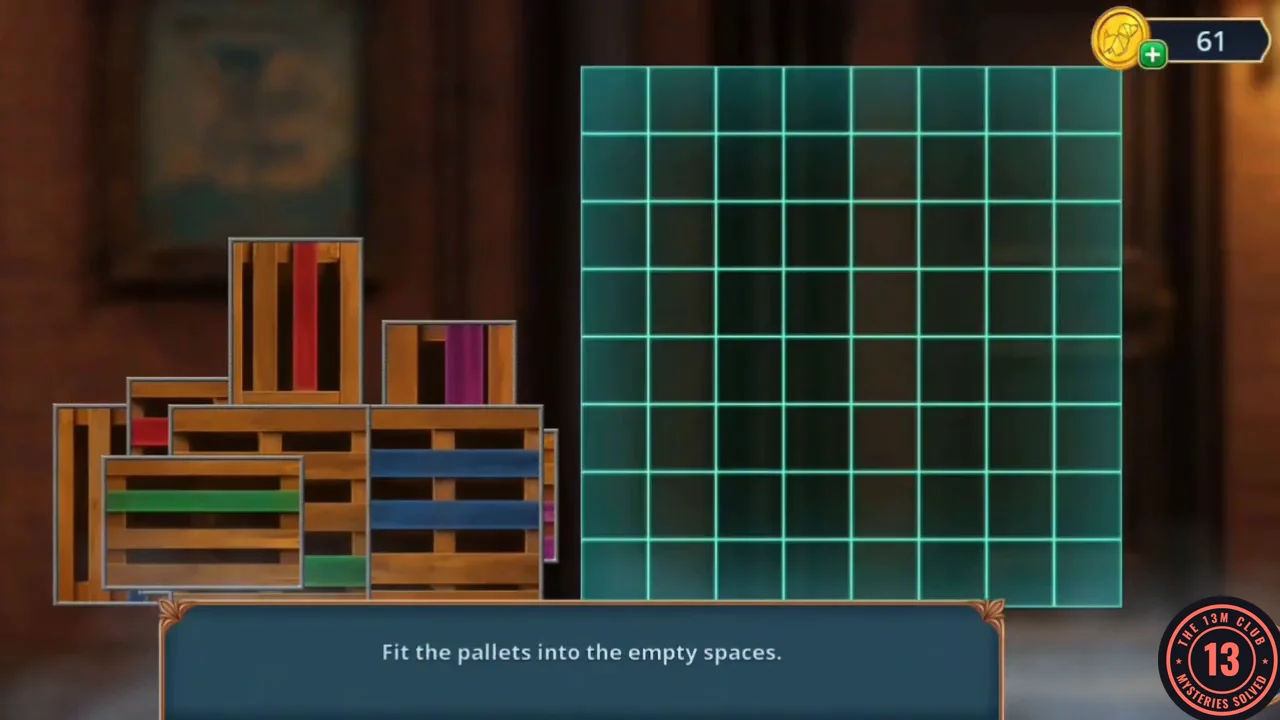
Fit the pallets into the empty spaces.
- Drag the nine pallets onto the 8×8 grid until it is completely filled. One completed layout: top row band (rows 1–3) from left: red horizontal pallet (3 columns wide), blue vertical (2 wide), narrow lime vertical (1 wide), purple vertical (2 wide). Rows 4–6, columns 1–3: blue horizontal (3×3). Rows 4–5, columns 4–6: purple horizontal (3 wide, 2 tall). Columns 7–8, rows 4–8: tall red vertical pallet. Rows 7–8, columns 1–3: small green horizontal; rows 6–8, columns 4–6: larger green horizontal.
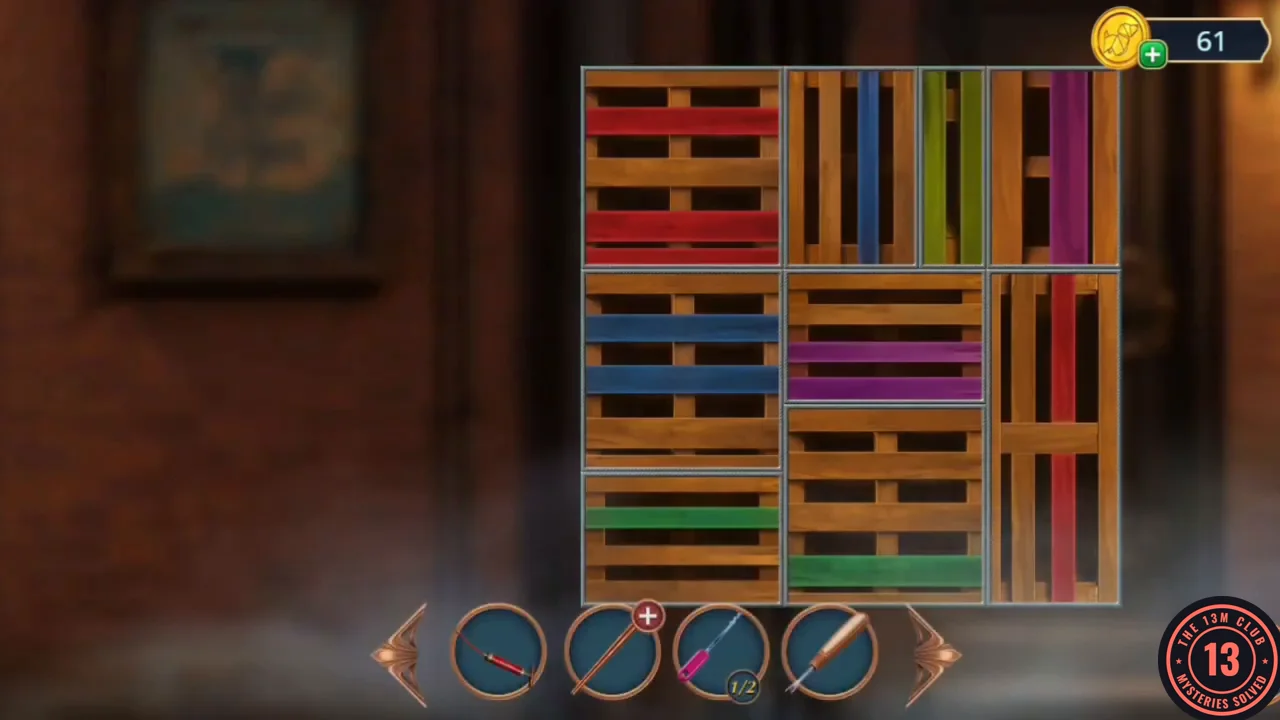
One completed pallet layout, matching the description above. - Behind the moved pallets, take back the Work Glove, the second Lock Pick (Lock Picks 2/2) and the Broken UV Lamp.
Diner Back Door Lock Pick
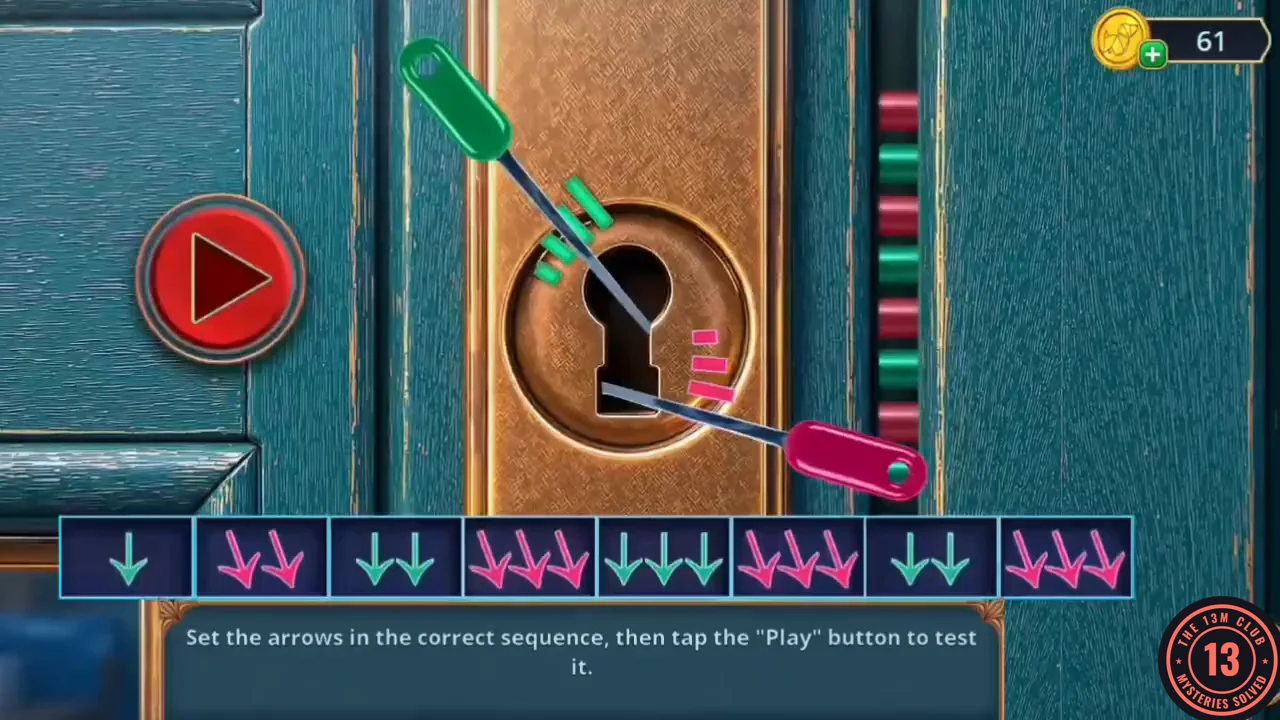
Set the arrows in the correct sequence, then tap Play to test it.
- At the diner's teal back door, use the Lock Picks (2/2) on the lock. Tap each of the eight slots to change its number of arrows; colours alternate green and pink. Set, from left to right: 2 green, 3 pink, 3 green, 2 pink, 2 green, 1 pink, 3 green, 2 pink. Press Play; the slots light up green one by one and the lock opens.CODE2-3-3-2-2-1-3-2
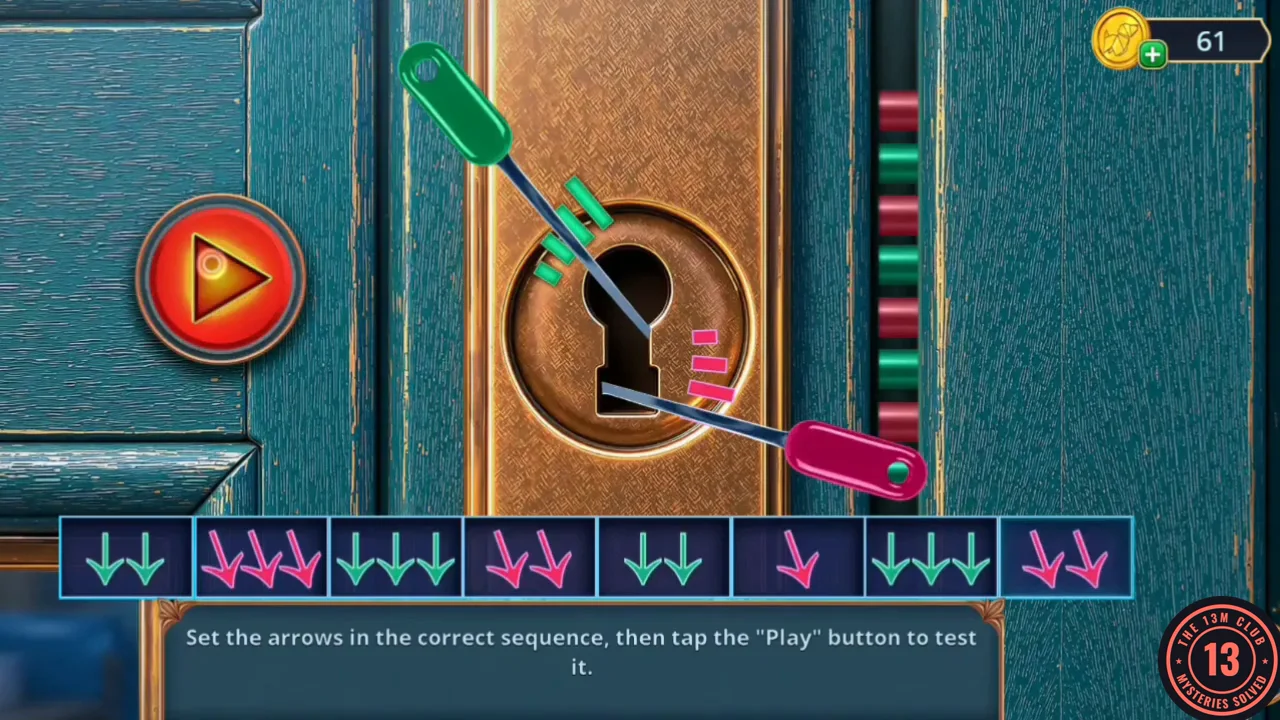
The correct arrow sequence, just before you press Play.
The Diner at Night
Search the closed diner without being noticed.
- Inside, Vivienne can't switch on the main lights without being seen. Switch on the small lamp by the counter near the jukebox (achievement Moonlight). Go on into the dining room, close the window blinds, then switch on the light.
- Zoom into the booth seat with the yellow patch. Use the Seam Ripper to cut the patch open and take the Mesh Fabric and the Ice Cream Emblem from inside.
- Zoom into the kitchen door wheel and place the Ice Cream Emblem in its empty socket to start the puzzle.
Kitchen Door Selector Wheel
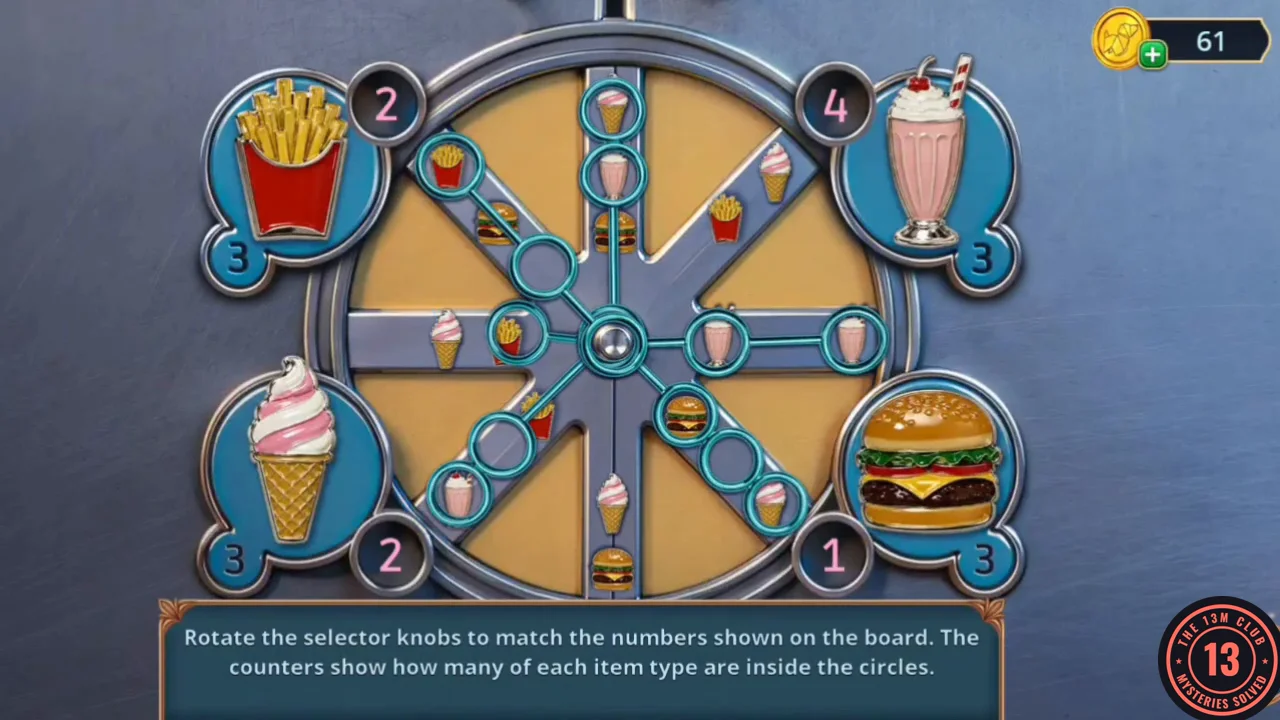
Rotate the selector knobs to match the numbers on the board. The counters show how many of each food item (fries, milkshake, ice cream, burger) lie inside the circles.
- Each food has two numbers: the outer number on the board is the target (3 for every food in the version this guide follows) and the small counter shows how many of that food are currently inside the circles. Tap the selector arms to rotate them until every counter reads 3. Example solved layout: arms point up (3 circles), up-left (2), up-right (2), right (2), left (1) and down-right (2).
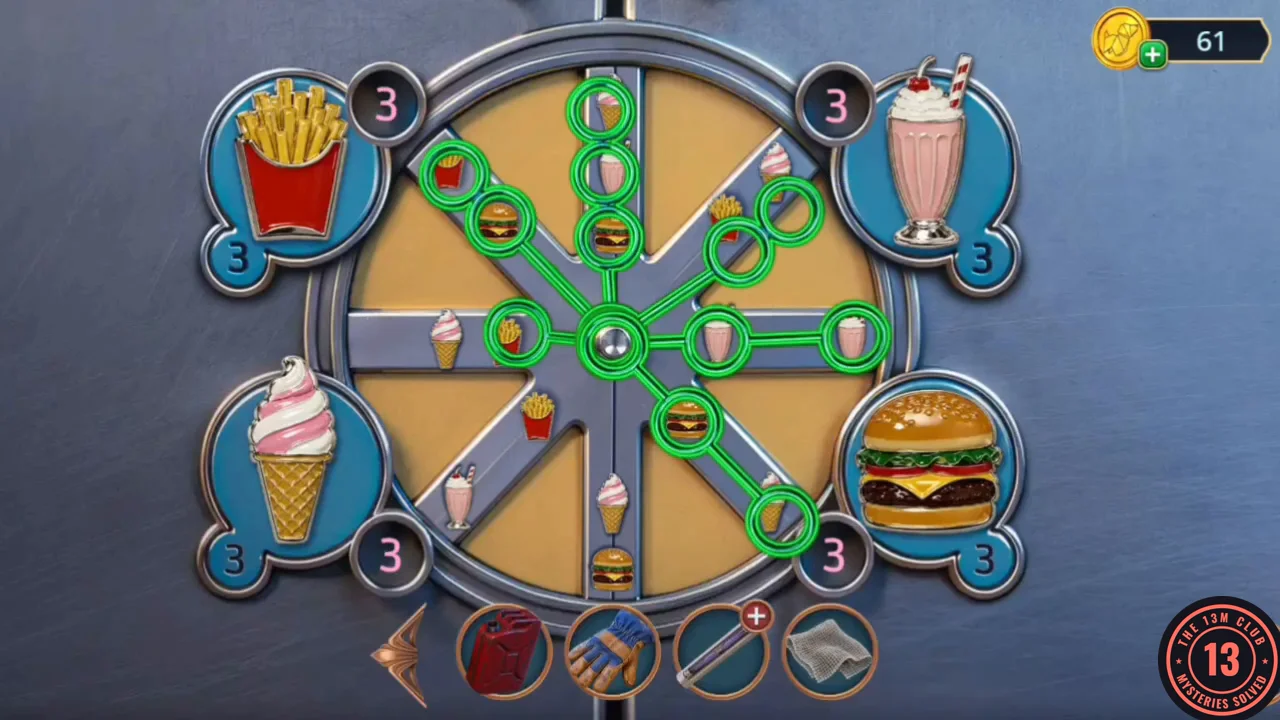
Example solved wheel: every counter reads 3.