CHAPTER 3
Finding East
Pour the MANA ESSENCE into the hole on top of the statue pedestal.
- The glowing text reads: "When the arrow flies north and the west smells of death, salvation will come from the east." To find east you need Kaira's iron kyoll, which Mini dropped into the gorge.
- Gorge: sweep the MAGNETIC GLOVE over the bone field to pick up the MAGNETIZED IRON SCRAP (Kaira's kyoll). Open it in the inventory, press its secret button to reveal a hidden blade, and hold the blade against the glove magnet to get the MAGNETIZED BLADE.
- Central compass pedestal: put the WOODEN BOWL into the round recess inside the gold ring ("The magnetized blade needs to float"). Take the JUG from the gold pile and fill it at the gorge waterfall. Pour the JUG OF WATER into the recess around the bowl, not into the bowl: the wooden bowl floats on the water. Put the MAGNETIZED BLADE into the floating bowl; it swings round and points north ("Okay... if north is that way, then east..."). The pedestal edge carries four symbols numbered 1 to 4.
PUZZLE
Rune Wall
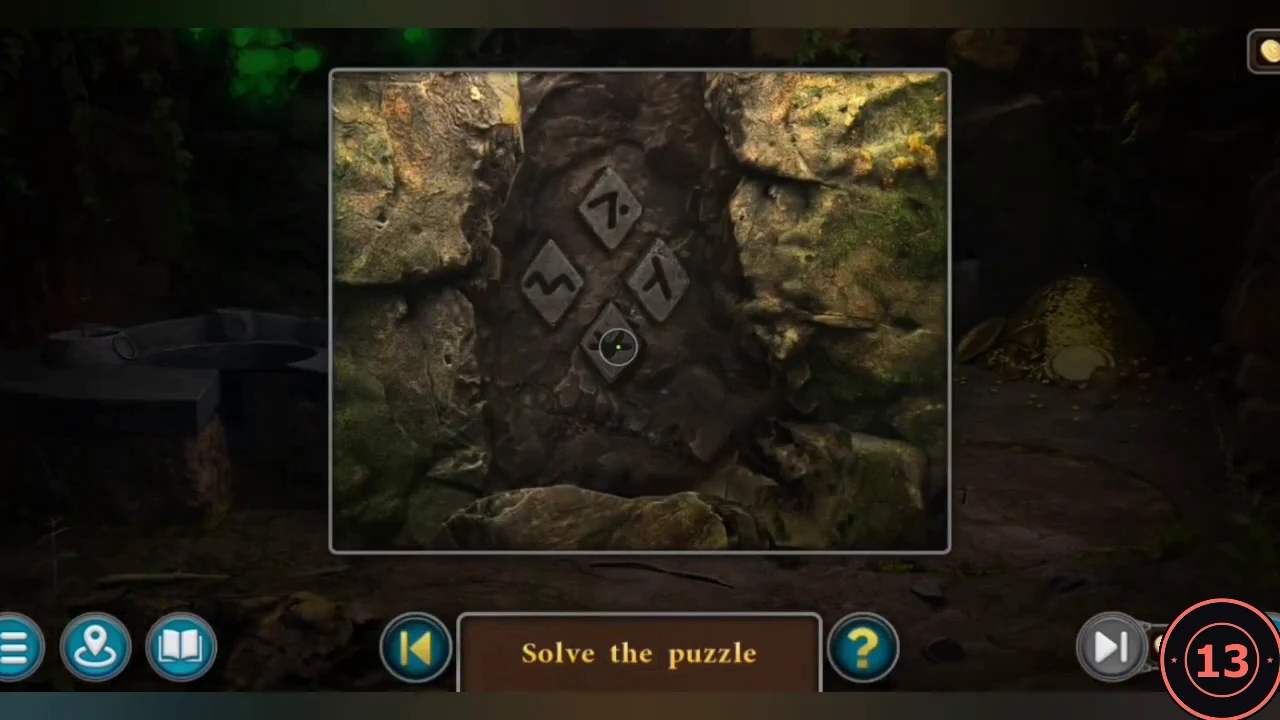
The stone panel on the rear wall right of the hooded statue has four diamond symbols. "Press the symbols in the correct order. You have already seen the hint."
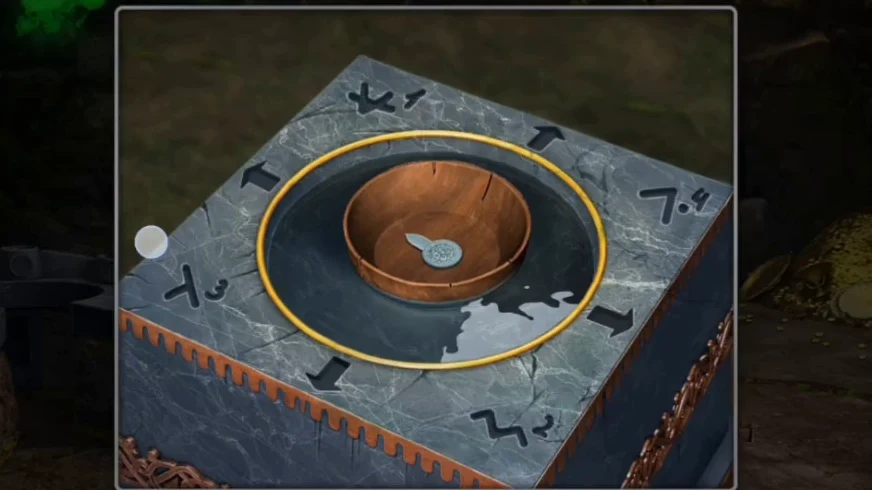
- The compass shows that this rock wall at the upper right of the chamber is on the east side, where the riddle says salvation comes from. In the reference recording the four diamond symbols were already visible and the panel opened with a simple tap; no wall had to be broken. Press the symbols in the order of the numbers beside the same symbols on the compass pedestal: 1 bottom, 2 left, 3 right, 4 top. All four glow and a stone column rises from the floor circle.
- Take the MAGNETIZED BLADE back out of the floating bowl on the compass pedestal. Then tap the risen stone column on the floor circle: it lifts Mini and Kaira up the shaft to the mountain summit. New task: Final trial. Rivals are already on the high ledge near the prize.
PUZZLE
Summit Totem Board
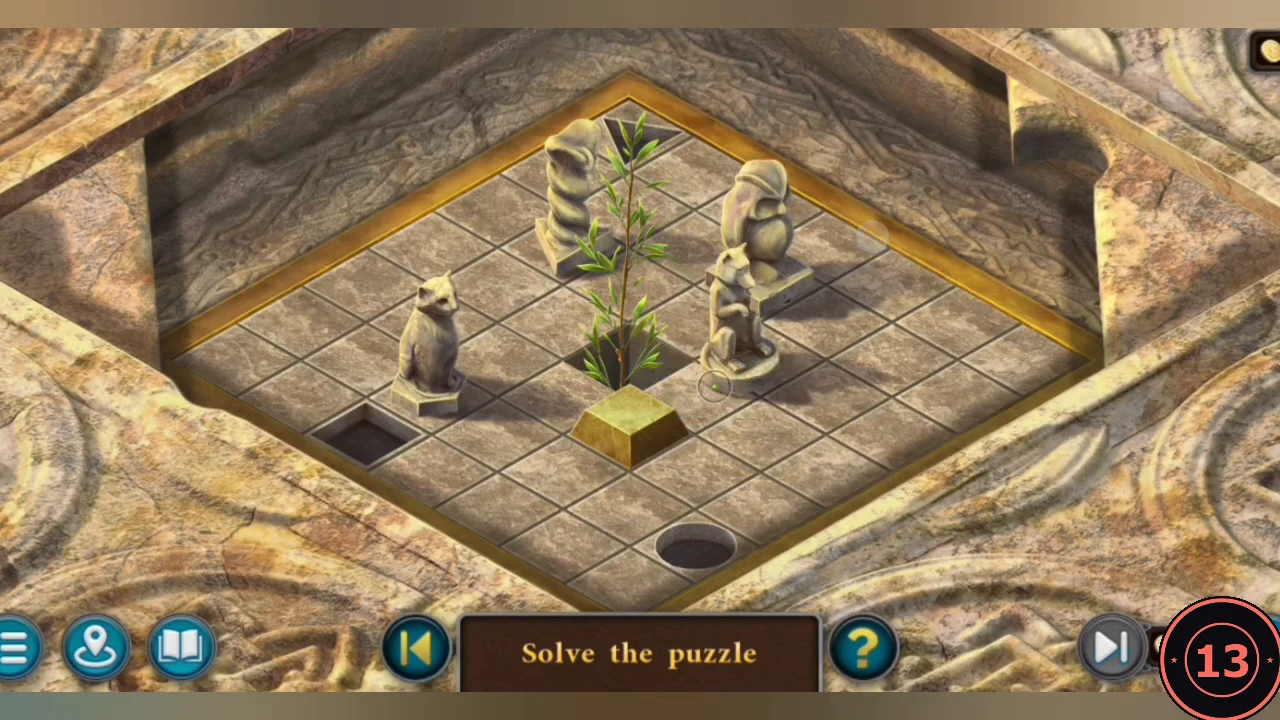
The prize chest sits under a blue force field on a stump pedestal. The dolmen on the right needs a special runestone.
- Collect the four TOTEM FIGURINES: on the lower-left ledge by the yellow flag, among the rocks at the stream source, at the base of the dolmen and on the rim of the pedestal. Crown 8/8 is in the stream foreground (achievement Jeweler).
- Put the four figurines into the perimeter sockets of the floor grid by the stump; the board sinks and rises as a puzzle.
- Each figurine slides in a straight line until a wall, the sapling or another figurine stops it; holes of other shapes do not stop it. Targets: SNAKE on the triangle hole in the back (top) corner, OWL on the square hole at the left, CAT on the pentagon hole under the owl's starting spot, MEERKAT on the round hole at the front. Directions are as seen on screen. Observed solution: 1. Meerkat up-right to the back-right wall. 2. Owl down-left until it stops next to the sapling; this uncovers the pentagon hole. 3. Cat up-right to the back-right wall. 4. Cat down-right until it stops beside the meerkat. 5. Cat down-left into the pentagon hole. 6. Owl up-left behind the sapling. 7. Snake down-left to the front-left wall. 8. Snake down-right to the front corner. 9. Meerkat down-right to the right corner. 10. Meerkat down-left onto the round hole beside the snake. 11. Snake up-left to the left corner. 12. Owl down-left onto the square hole. 13. Snake up-right along the back-left wall onto the triangle hole. The sapling glows and a compartment opens: take the GOBLET.
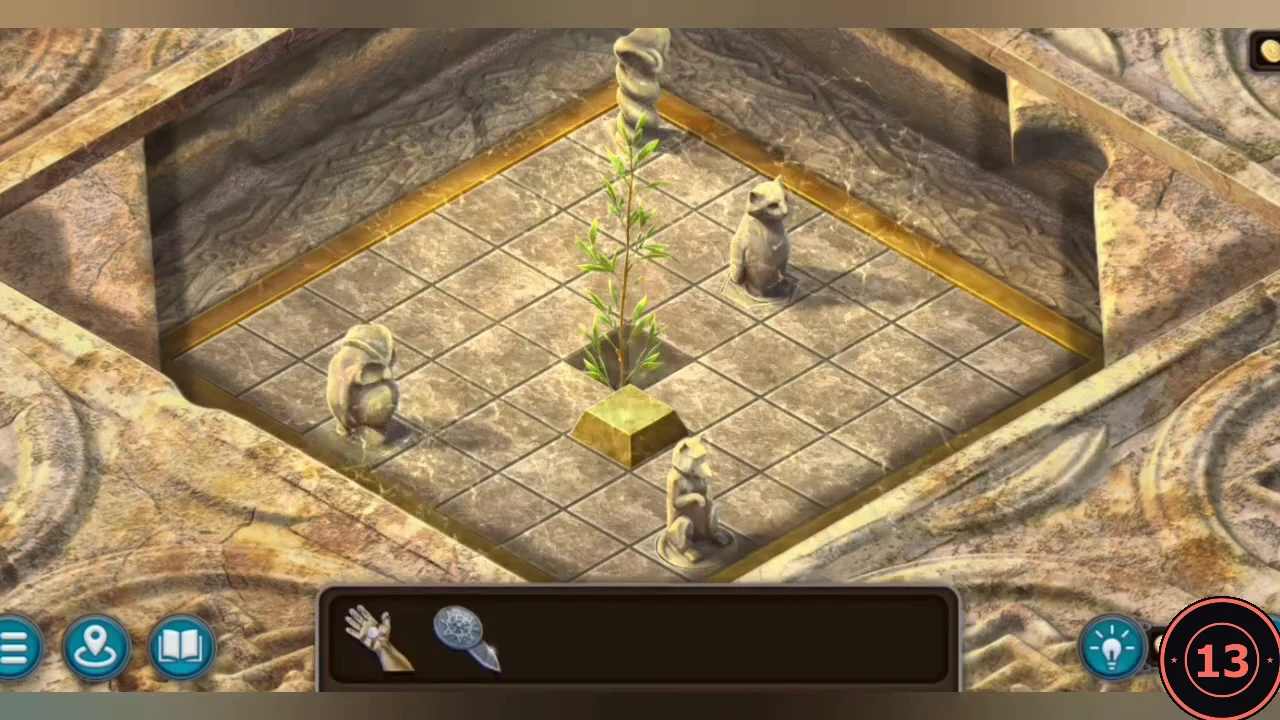
Every figurine on its own hole.
PUZZLE
Tree of Victory and the Root Disc
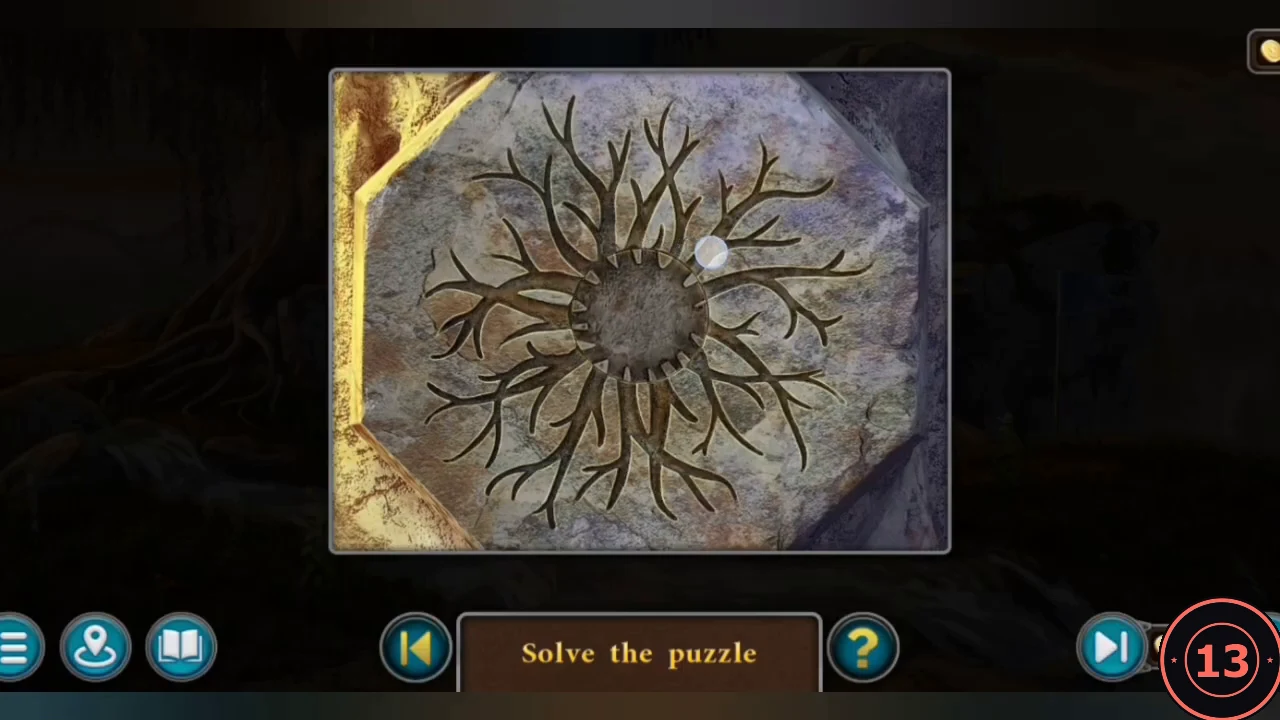
Water the sapling to grow the Tree of Victory.
- Fill the GOBLET at the stream source and water the sapling on the grid. It grows into the Tree of Victory, which greets the players. Take the KEY (round medallion) from the tree. Task complete: Time until sunset. Morph 44/47 is near the tree on the left.
- Put the KEY into the centre of the carved root disc on the stump pedestal. The root channels are split into rotating rings: turn them until every root runs unbroken from the centre to its tips (see the solved image below). The disc glows blue. Task complete: Final trial.
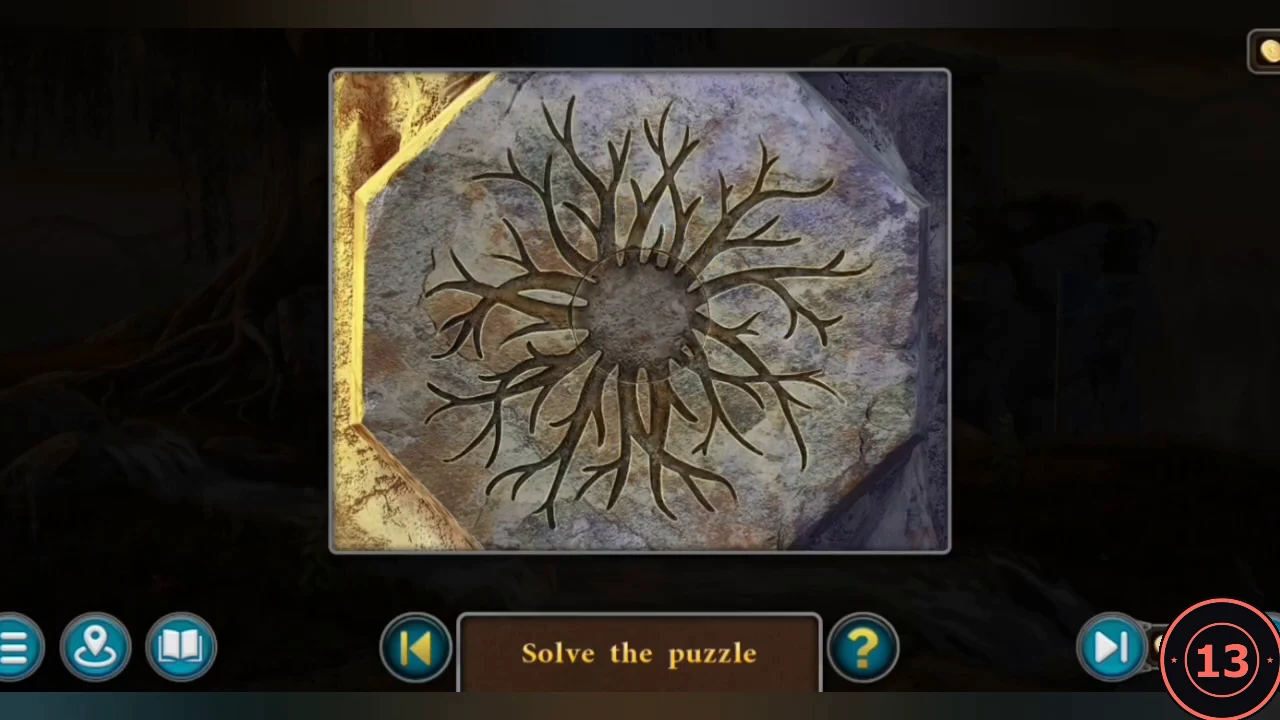
Solved: every root runs unbroken.
ENDING
The Prize
The final cutscenes can be skipped.
- Mini touches the prize, but the orc rival takes Kaira hostage and demands the chest; the Tree spirit declares the result. In the epilogue Mrs. Shepard tells the children that more stories depend on the readers' feedback. After the epilogue the game shows the summit and a CONGRATULATIONS window: "The chapter's plot is complete. You can continue looking for Morphing Objects and Collectibles in locations or simply explore the area." It shows the chapter's collectible counts and the buttons CONTINUE and MAIN MENU. Choose CONTINUE to stay at the summit and collect anything still missing (see the next section); The reference playthrough chose CONTINUE.
COLLECTIBLES
Chapter 3 Remaining Collectibles
In the reference playthrough these were collected after the story ended, using the map for fast travel.
- Greylmar Harbor Square: Ship 4/7 in the bottom-right corner by the crates and Morph 45/47 on the moored ship's hull right of centre. Ship deck: Morph 46/47 low in the centre by the hatch steps. Hobbling's Grotto (underground market): Ship 5/7 in the bottom-left foreground. Mountain foothill: Ship 6/7 in the right-centre grass.
- Bridge and gate scene: Morph 47/47 on the upper-left rock above the waterfall. All 47 morphing objects unlock the 20-level Bonus Game in EXTRAS (achievement Master of Details).
- Gorge: Ship 7/7 lower right-centre among the bones (achievement Mariner; a new EXTRAS puzzle). Alchemist's chamber: Manuscript 12/12 Tree of Victory on the gold pile (achievement Historian; another EXTRAS puzzle). All Chapter 3 morphing objects and collectibles are found.