Chapters, Collectibles and Extras
Lost Lands 11 has three chapters, four kinds of collectibles and an Extras menu that rewards completed collections. This walkthrough marks every collectible at the point where it is picked up.
- On the title screen choose Play to open Chapter Selection. Chapter 1, Anomalous Event, is available first. Chapter 2, The Trials of the Big City (labelled Bonus), and Chapter 3, Mountain of Challenges, are listed on the same screen. If a chapter card says Coming soon, that chapter has not been released in your version yet. Each chapter card counts that chapter's morphing objects and collection items: 15 of each in Chapter 1, 17 in Chapter 2 and 15 in Chapter 3.
- Collections: every chapter hides two sets of collection items. Chapter 1 has 8 Handprints and 7 Footprints, Chapter 2 has 8 Lutes and 9 Flutes, and Chapter 3 has 7 Ships and 8 Crowns. Completing a collection earns an achievement and unlocks a new puzzle in Extras.
- Manuscripts: 12 manuscripts are spread across the game. Collecting all of them earns an achievement and unlocks an additional puzzle in Extras.
- Morphing objects: 47 objects constantly change shape. Tap each one when you spot it. Finding all 47 earns an achievement and unlocks the Bonus Game in Extras.
The Foreman's Office
Cassandra, a specialist in magical crimes, arrives at the Stronghold tower construction site. New task: The Foreman.
- Find Handprint 1/8 at the right edge of the room.
- Tap the tipped barrel in the left foreground to collect Manuscript 1/12, Project The Stronghold.
- Tap the winch mechanism on the left and take the CANDLES.
- Zoom into the desk on the right and place the CANDLES in the candelabrum. Cassandra's magic is too weak to light them, so pick up one candle, hold it to the smouldering pipe on the desk and use it to light the rest.
- A small box appears on the desk. Read the PORTAL WELL note beside it: dropping a Mana Elixir and a Phoenix Feather into the well activates the portal. Take the FRAGMENT from the crumpled paper.
Leaf Mosaic Box
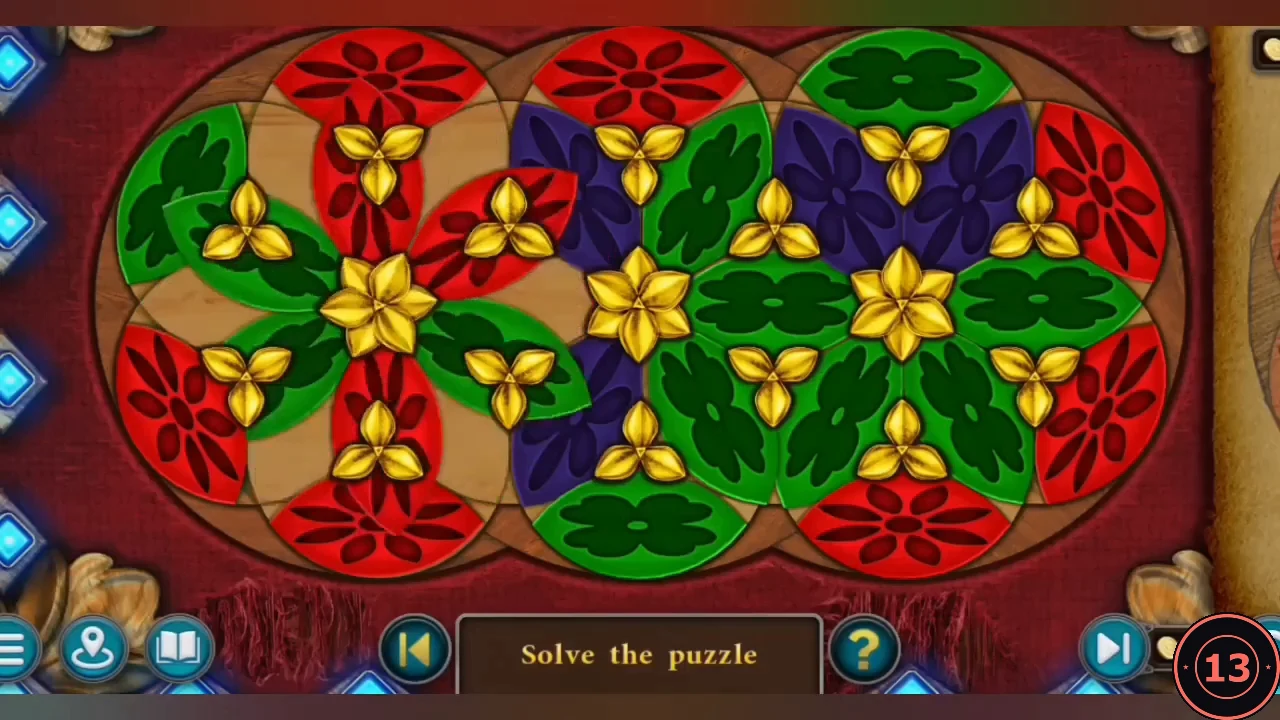
Tap the small box on the foreman's desk. The game first shows the finished pattern on parchment, then mixes the pieces.
- Memorize the target pattern: a purple band runs along the middle row between the three gold stars, green leaves surround the stars and red petals fill the outer ring.
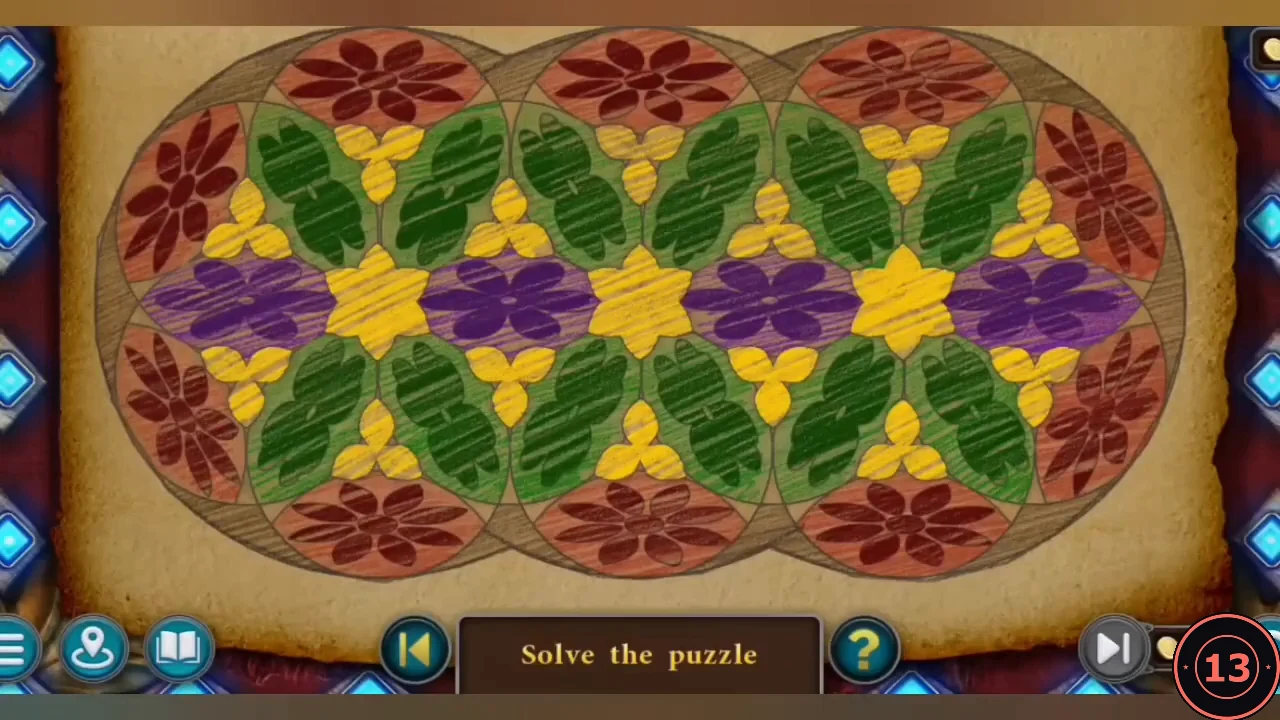
The target pattern the game shows before mixing the pieces. - Tap the gold centres to rotate the ring of pieces around them. Restore the purple band first, then the green leaves, then the red outer petals. Your starting layout may be mixed differently, so aim for the target pattern rather than copying moves.
- The red box opens. Take the FEATHER, POWDER and SNOWFLAKE.
The Cargo Platform
Dudi the Hammer, the dwarf foreman, joins Cassandra. New task: Portal Well. The crane can lower a cargo platform into the well.
- Talk to Dudi when he arrives; he suggests using the cargo platform to reach the bottom of the well.
- Morph 1/47: the book on the upper-left scaffolding.
- Tap the barrel on the left to take the SAW and CROWBAR.
- Zoom into the crates to the right of the barrels. Use the CROWBAR to open the top crate and take the HANDLE and a METAL BUNCH.
- The crane on the left has two separate controls. First zoom into the winch on the upper level of the wooden crane scaffold and attach the HANDLE to its gear wheel.
- Now zoom into the large gear wheel at the base of the crane. The mechanism rotates the crane but has no lever, so insert the CROWBAR. Dudi helps push, and the crane swings the cargo platform over the well.
- Go back to the upper winch and turn the HANDLE to lower the platform to the rim of the well.
- Dudi warns that it is dark below. Take a lit CANDLE from the candelabrum on the desk and place it on the hanging platform, then ride the platform down.
Repairing the Well Wall
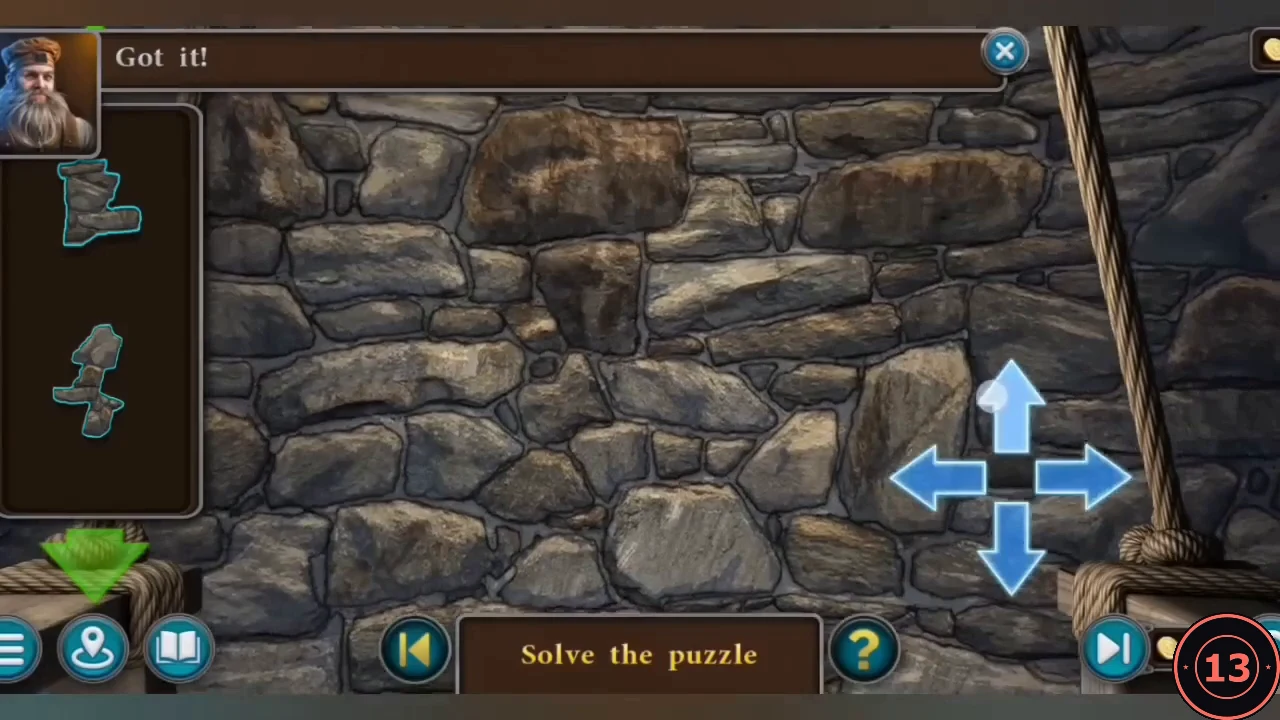
Parts of the well lining have collapsed. Dudi moves the platform while Cassandra fills the gaps with stone sections. This is a long placement puzzle, so the guide describes the method rather than every move.
- Use the arrow pad at the bottom right to move the platform along the wall. The tray on the left holds loose stone sections.
- Drag a section from the tray into a dark gap with the same outline. A wrong choice is refused with "This section doesn't fit in here"; new sections appear in the tray as you use them up. Some gaps contain small items: take the SHIELD and two more FRAGMENTS when they appear.
- Look down the well beside the candle and take another FRAGMENT.
Torn Drawing
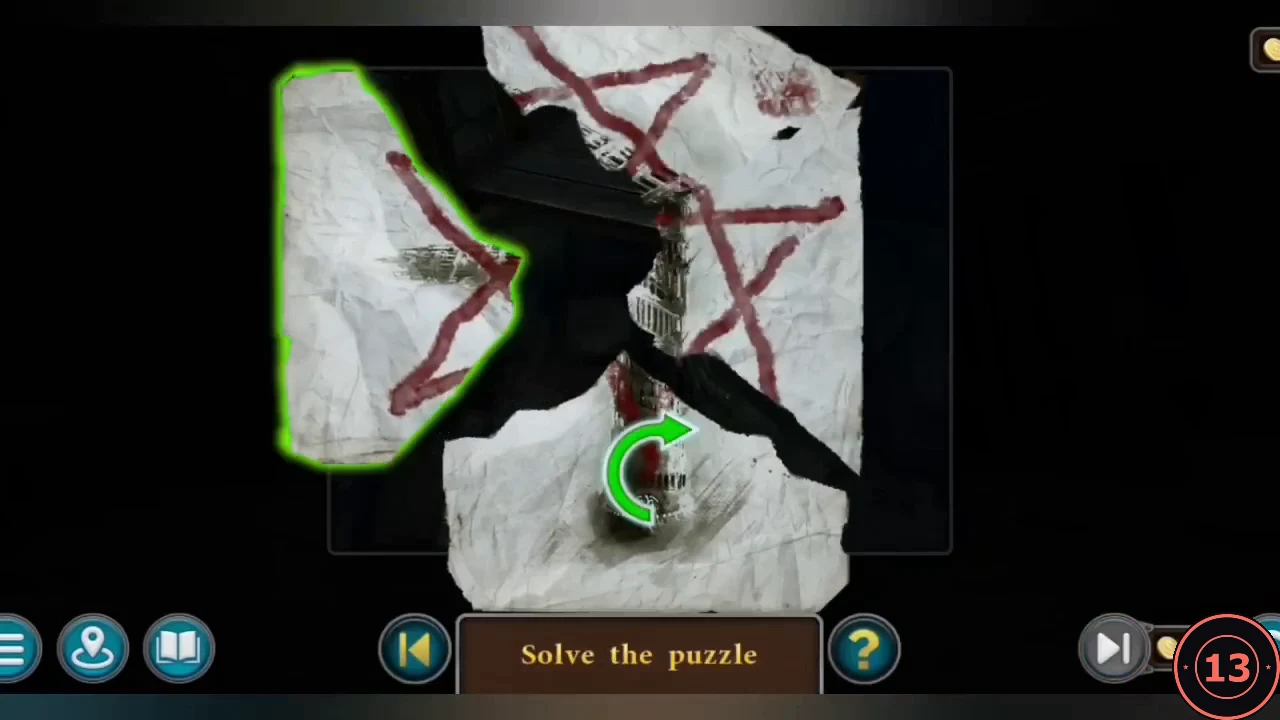
Combine the paper fragments into a picture.
- Use the FRAGMENTS on the torn paper. Rotate each piece with the green arrow and fit it into place until the picture is complete: an inverted pentagram above the tower.
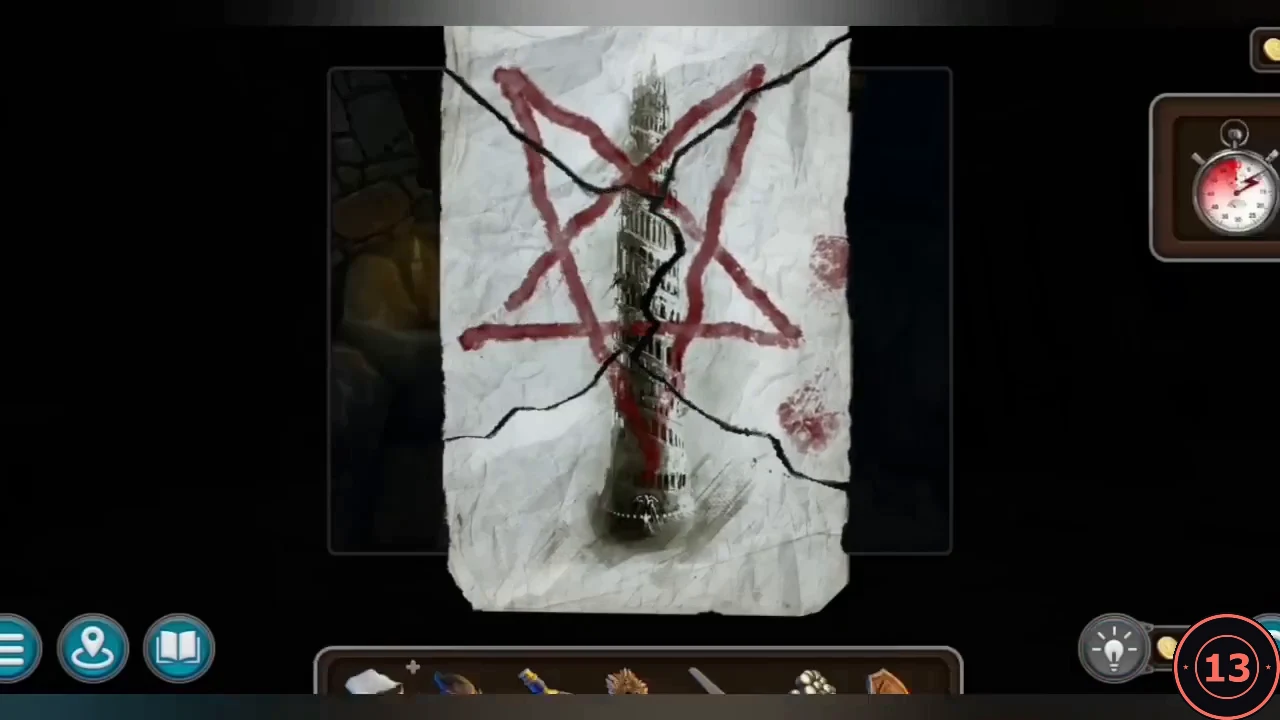
The completed picture: an inverted pentagram above the tower. - Take the completed DRAWING. Cassandra realises that someone has cursed the well. Place the DRAWING on the floor beside the candle, pick up the lit CANDLE and set the drawing on fire. When it has burned, ask Dudi to pull you back up.
Portal Well and the Upper Floor
Activate the portal well, then follow the trail of the missing dwarves.
- At the well rim, use the POWDER and then the FEATHER on the water. A column of water lifts Cassandra and Dudi to the upper floor.
- Dudi explains that two dwarves vanished here, leaving footprints and a boot. New task: Missing Artifact. Zoom into the boot by the footprints and take the COINS.
- Zoom into the fallen beam with the brass fittings and take the ANCHOR.
- The hatch to the Chamber of Balance is blocked by a fallen beam. Use the SAW on it. A clamp and chain remain, and the ladder below needs a hook to be pulled up.
- Collect Footprint 1/7 on the floor at the lower left, by the stone steps, and Morph 2/47 at the right edge of the room (it glows purple).
- Return to the beam with the brass fittings. A clamp holds the CANDELABRUM in place: use the COINS like a screwdriver to undo it, then take the CANDELABRUM. Zoom into the sawn beam over the hatch and use the COINS again to undo the bracket on the chain. Fit the CANDELABRUM to the chain as a hook and tighten it with the COINS. Lower the hook, catch the ladder and pull it up, then climb down.
Chamber of Balance
A pillar device with four balance platforms stands in the centre of this chamber.
- Collect Morph 3/47 on the left shelf.
- The small window is too high to reach. Move the ladder from the entrance hatch to the right wall below the window, climb up and zoom in: only a child could have escaped through it. Take the LOCKPICKS from the debris, then move the ladder back to the entrance hatch so you can leave the chamber later.
- Take the four figurines from the balance platforms: SUN, FIRE, FEATHER and MOON.
- Read the book on the pillar lectern to collect Manuscript 2/12. The pillar page also shows four coloured symbols needed later (red = circle, blue = pentagon, green = triangle, yellow = star). New task: Pillar of Balance.
- Go down to the lower hall. Open the chest on the right, near the cart wheel, with the LOCKPICKS and take the second METAL BUNCH.
- Climb the stairs to the ornate vine gate and place both METAL BUNCHES in the empty grape slots.
Helmet and Bull Gate
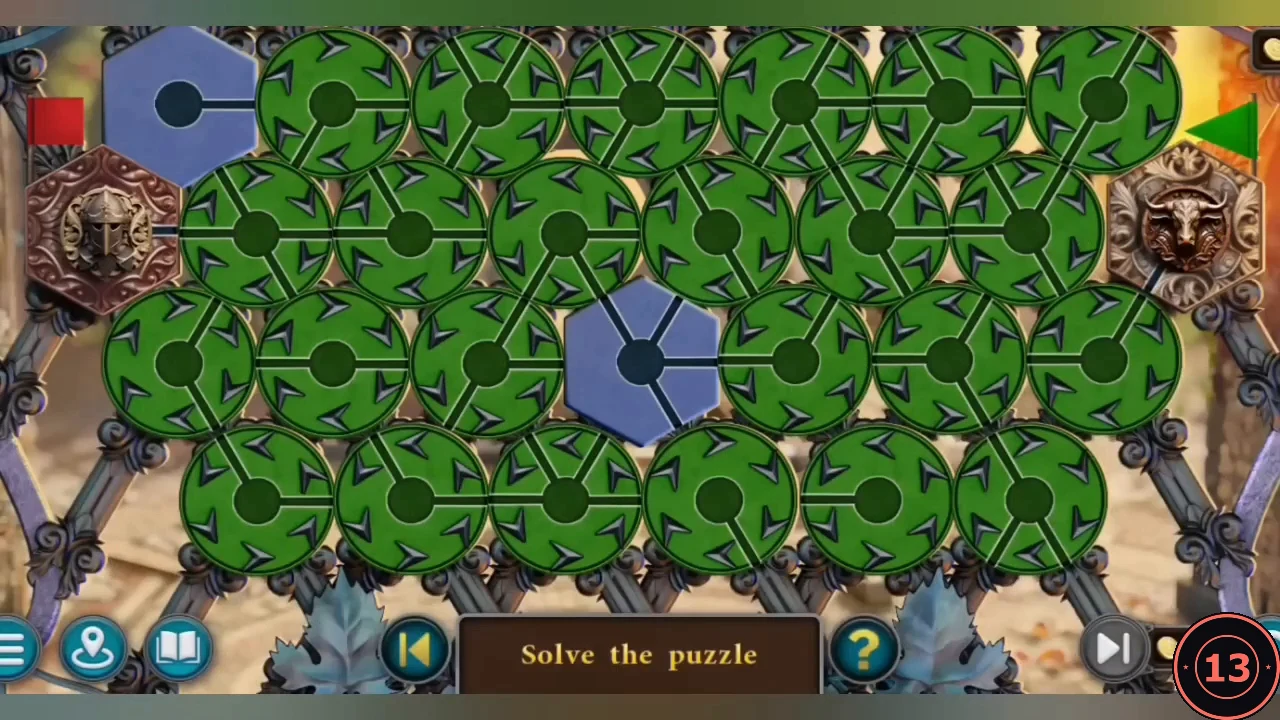
Guide the helmet token from its plaque by the red flag on the left to the bull plaque by the green flag on the right. The helmet moves one disc at a time to a neighbouring disc, and the bull token moves on its own after each of your moves, so follow the list below exactly.
- Move the helmet in these directions, one disc per move: 1. right, 2. up-right, 3. down-right, 4. up-left, 5. down-left, 6. down-left, 7. right, 8. down-right, 9. up-right, 10. up-right.
- Continue: 11. down-right (onto the blue centre tile), 12. right, 13. up-left, 14. up-right, 15. down-right, 16. up-right, 17. down-right, 18. down-right, 19. up-right. The helmet reaches the bull plaque and the gate opens.CODER, UR, DR, UL, DL, DL, R, DR, UR, UR, DR, R, UL, UR, DR, UR, DR, DR, UR
The Terrace and the Balcony
Beyond the vine gate are a glass-domed terrace and a balcony with a lift.
- On the terrace, collect Morph 4/47 in the debris at the bottom left and Footprint 2/7 right of centre.
- Zoom into the rubble right of centre and take the SWORD.
- Note the garden table with a sprayer and blue flowers; it is used later.
- On the balcony, the lift gear needs its teeth secured, so you cannot use it yet. Look at the stone block on the right pedestal: it is scratched with X, triangle, X, circle. Remember this for later.
Reliquary Door: Opposite Pairs
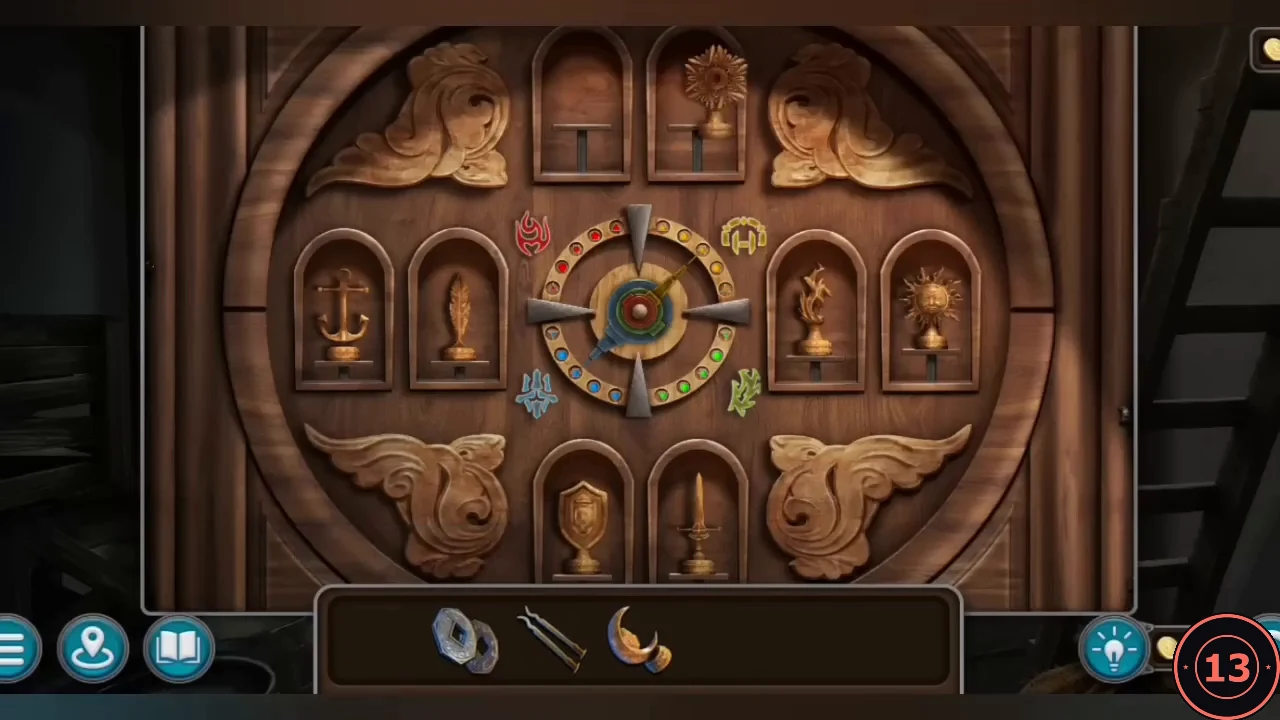
Return to the Chamber of Balance. The round door with the bird relief on the left wall has eight figurine niches.
- Place the ANCHOR, SUN, FIRE, FEATHER, SWORD, MOON, SNOWFLAKE and SHIELD figurines in the niches.
- Swap figurines so that opposite symbols face each other: Sun and Moon at the top, Snowflake and Fire on the left, Feather and Anchor on the right, Shield and Sword at the bottom.
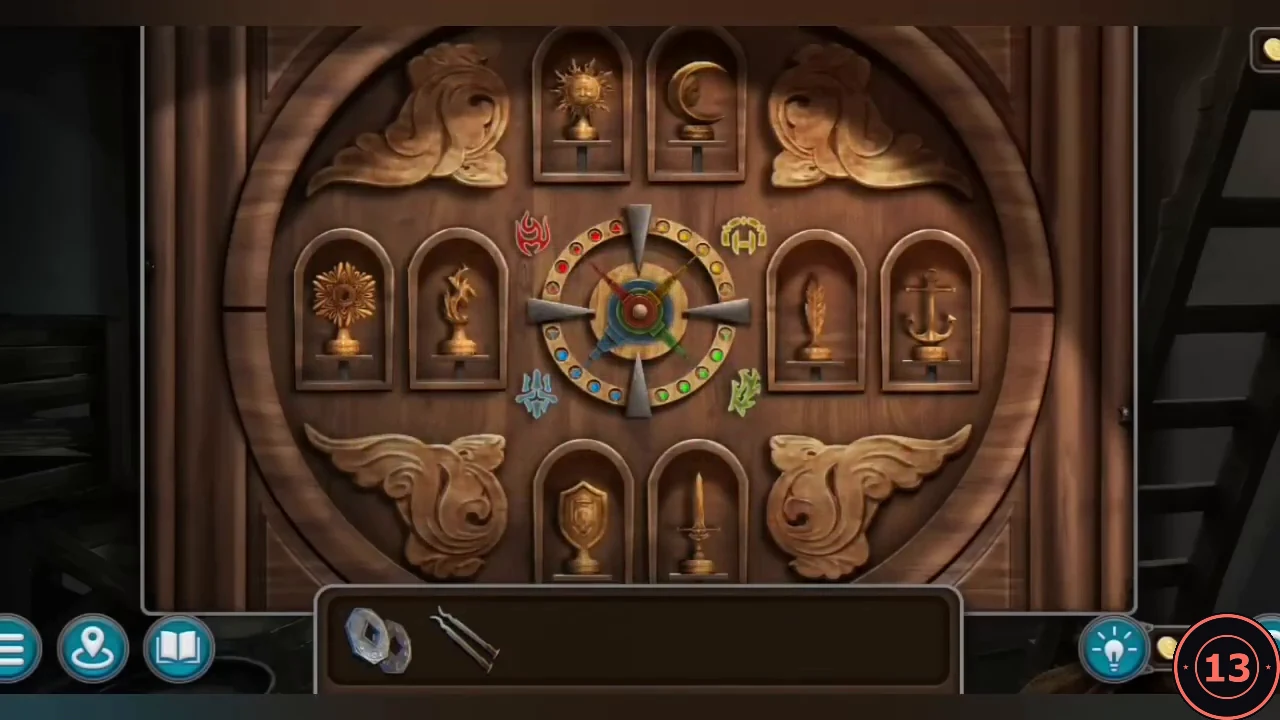
Opposite pairs in place: Sun/Moon, Snowflake/Fire, Feather/Anchor, Shield/Sword.
Reliquary Door: Arrow Dial
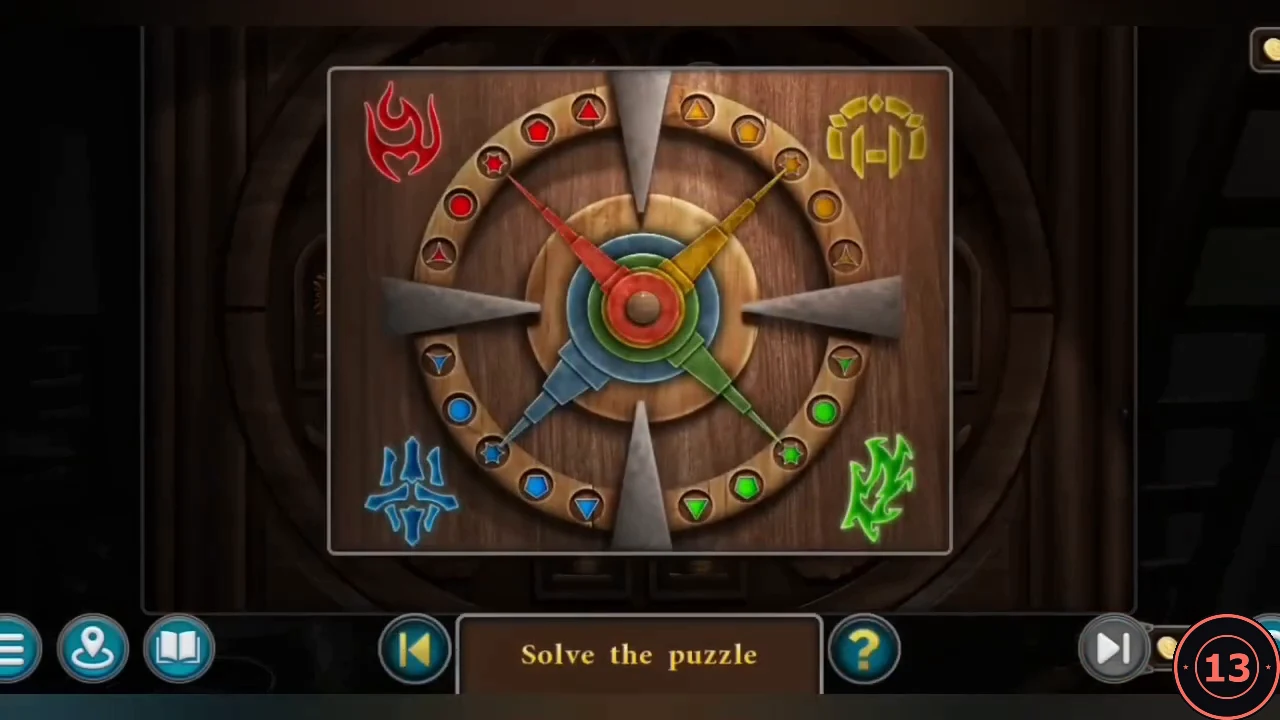
The second lock asks you to point each arrow at the correct symbol, using a hint you have already seen.
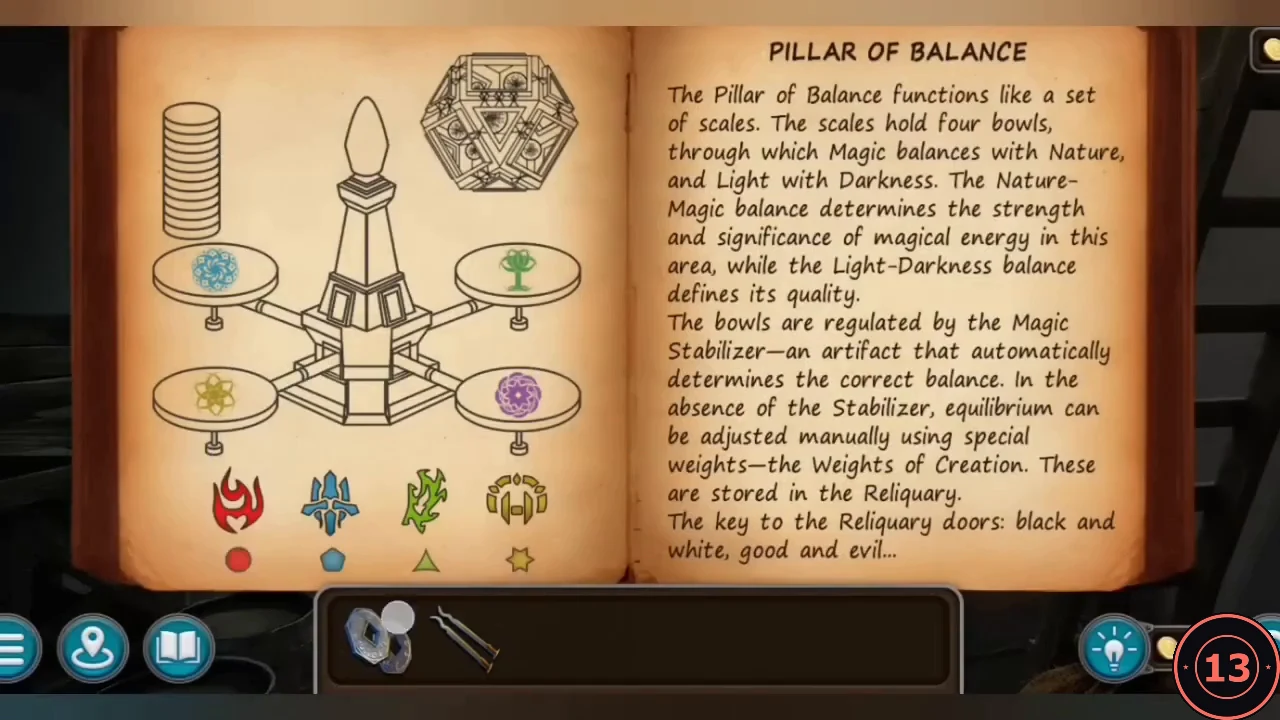
- The hint is the page in the pillar book: red points to the circle, blue to the pentagon, green to the triangle and yellow to the star. Turn each coloured arrow to its symbol.
Weights of the Creation
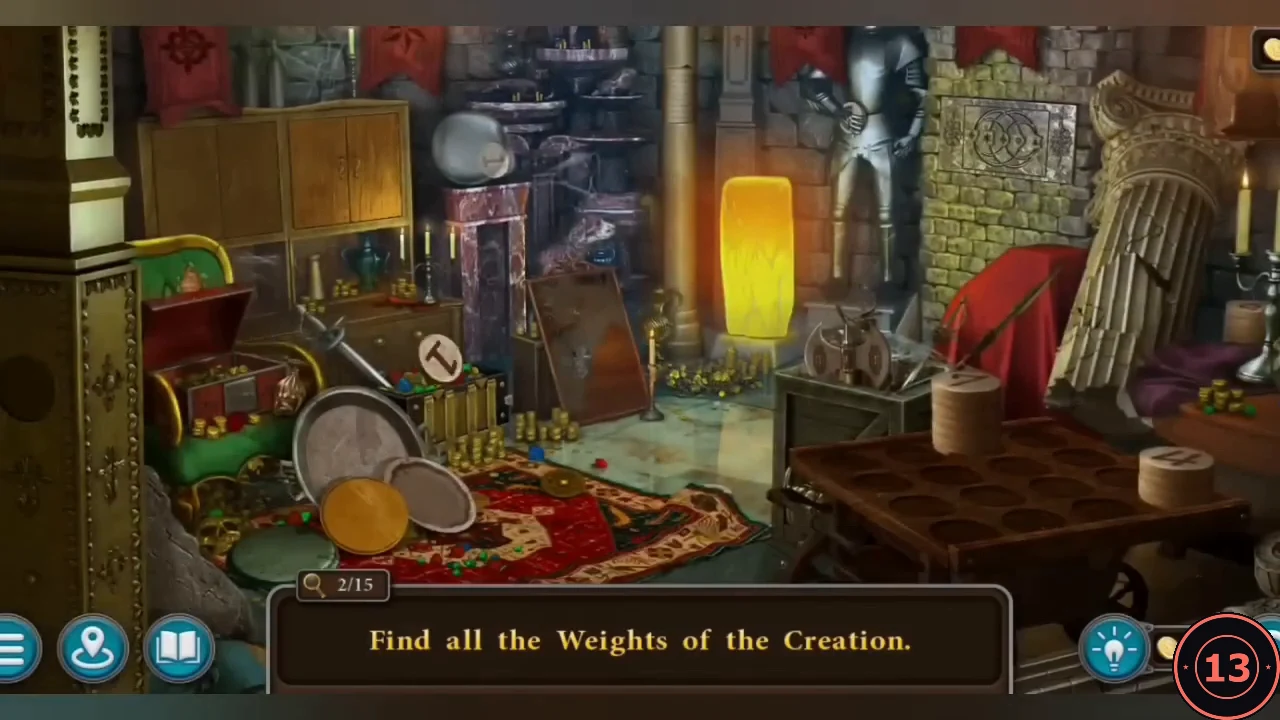
Inside the reliquary, find all 15 Weights of the Creation.
- Collect 14 weights around the room: in the open chest, on the floor by the pillar, on the armchair armrest and cushion, on the rug by the platter, on the middle shelf, behind the cracked mirror, on the floor by the lantern, on top of the far-left shelving, on the wall shelf, near the pillar and mirror, and in the left cabinet.