Pumpkin Face Mask Shop
Chapter 3 opens inside the Pumpkin Face mask shop ("Horror Shop" Costume on the map). The first task is to barricade the door.
- Zoom in on the glass display case. Read the receipt: the shop sold 47 masks to Blackwood students last night. Take the Nerf Blaster and the Laughter Card (yellow mask card). The glass of the case is too dirty to see through. In the shop itself, tap the Pumpkin Pins on the window ledge behind the two jack-o'-lanterns, left of the "25 days" board.
- Go to the Ghost Hunter arcade cabinet in the back storage area ("Defeat 3 ghosts, get the prize"). Mount the Nerf Blaster and shoot the three ghosts. Take the prizes: the Billiard Ball "3" and a pink jersey cloth.
- Back at the display case, put the jersey cloth on the dirty glass. It is still too dirty, so spray it with the Window Cleaner from Chapter 2 and wipe the glass clean. A hidden-object scene opens inside the case.
Mask Display Case
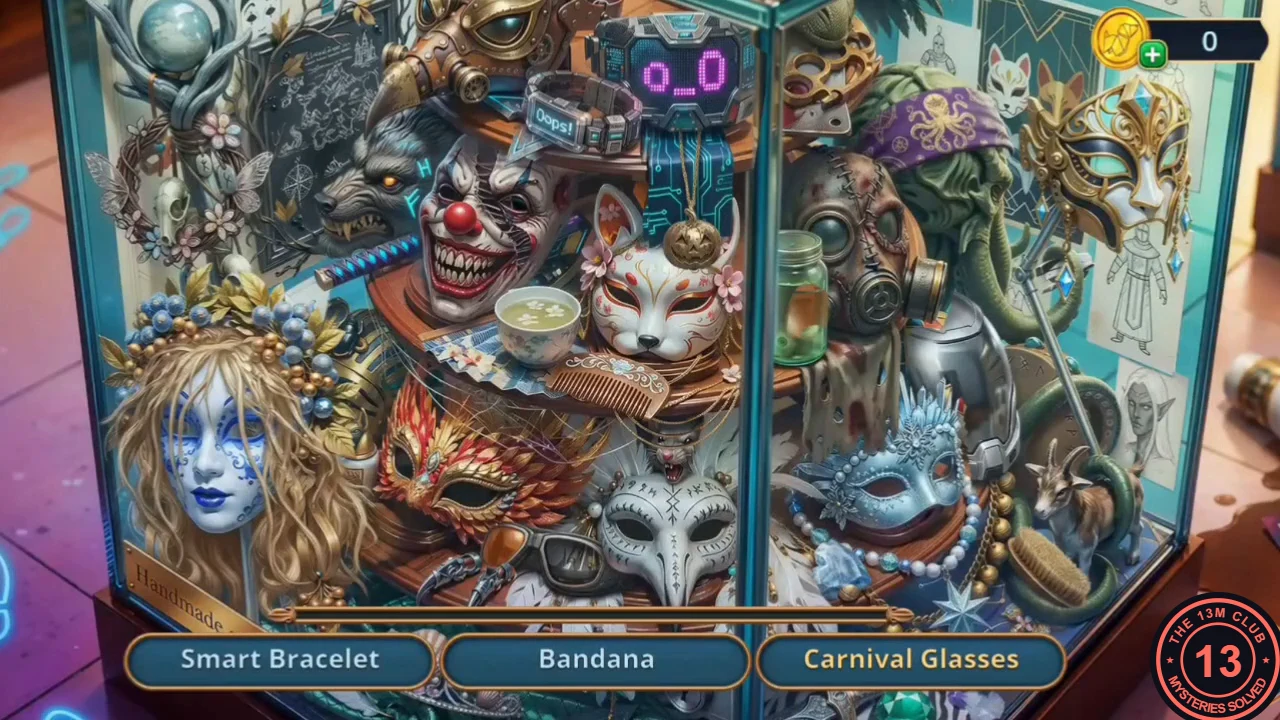
A list hidden-object scene inside the cleaned display case.
- Find the listed items, which included Smart Bracelet, Bandana, Carnival Glasses, Rat, Fairy Wreath, Space Helmet, Clown Mask, Heart, Night Fairy, Wig, Pumpkin Pendant and Map. You receive the Bow.
Black Cat Shoebox and Bat Padlock
Two small locks on the shop counter lead to the back storage room.
- On the right of the counter, a shoebox holds a black cat statue beside sparking wires in a puddle. Tie the Bow around the cat's neck. The cat moves aside; take the Brush. Also tap the Pumpkin Pins in this close-up, in the wicker ball behind the cat at the top right.
- Zoom in on the orange pumpkin bag: its bat padlock has lost its head. Tap the flyer under the teal feathers to find the bat head; it completes the Clasp (2/2) with the half from Chapter 2. Tap the Pumpkin Pins on the flyers below the bag, at the lower right.
- Put the Clasp on the bat padlock. The bag opens; take the Yellow Raincoat.
- Lay the Yellow Raincoat over the sparking puddle in the shoebox. Then go through to the back storage room (Mask Warehouse).
Mask Card Wheel
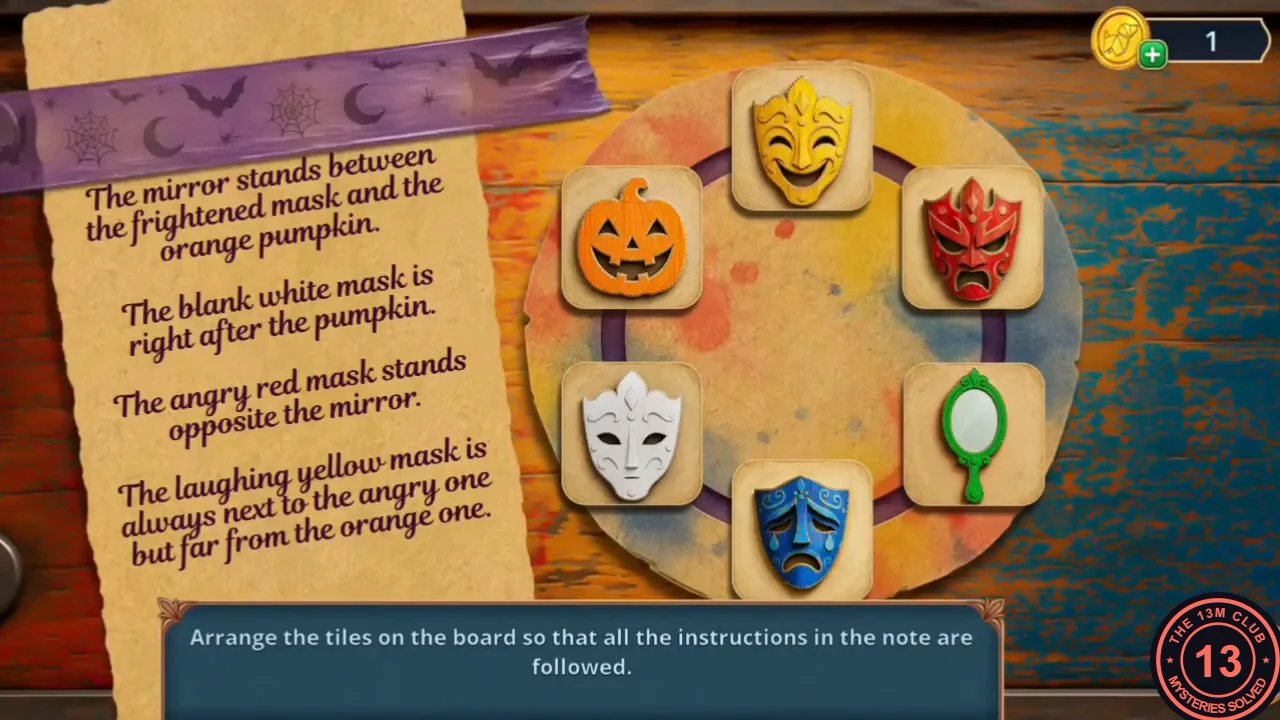
A cabinet in the Mask Warehouse has a circular card wheel under red, yellow and blue masks.
- Place the Laughter Card in the card wheel of the shelf cabinet. Some cards are still missing.
- At the pop-up book table, read the note ("The Bride - NOT FOR SALE"), take the Suitcases (1/2), then work the pop-up haunted house to get the Anger Card. Take the Mannequin Head lying beside the book. Also tap the purple Pumpkin Pin on the pop-up haunted house, among the tombstones right of the house. Back in the warehouse view, tap the purple and yellow Pumpkin Pins at the foot of the tower of stacked jack-o'-lantern gift boxes, on its left side.
- Put the Mannequin Head on the mannequin next to the HALLOWEEN poster. It still needs more parts.
- Sweep the broken glass off the storage table with the Brush. Take the Fear Card. Tap the Pumpkin Pins hanging on the jack-o'-lantern garland at the top left.
- Put the Anger Card and the Fear Card in the wheel. Puzzle: "Arrange the tiles on the board so that all the instructions in the note are followed." Tap two tiles to swap them. The note says: the mirror sits between the frightened (blue) mask and the orange pumpkin; the blank white mask comes right after the pumpkin; the angry (red) mask is opposite the mirror; the laughing (yellow) mask is next to the angry one but far from the pumpkin.
- Solution, going round the wheel clockwise from the top: white mask, pumpkin (upper right), mirror (lower right), blue frightened mask (bottom), yellow laughing mask (lower left), red angry mask (upper left).
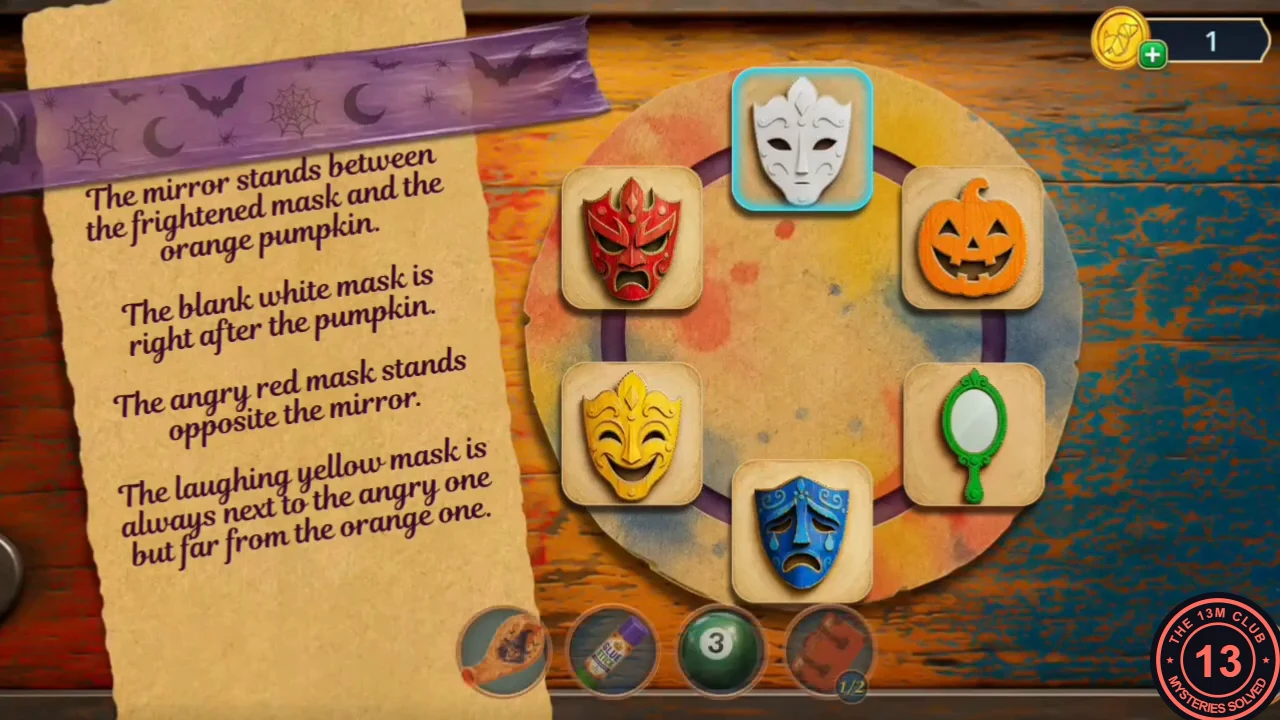
The solved wheel, clockwise from the top: white, pumpkin, mirror, blue, yellow, red. - The cabinet opens: take the second suitcase, completing the Suitcases (2/2), and the Cardboard Jack-o'-Lantern.
Shop Door Barricade
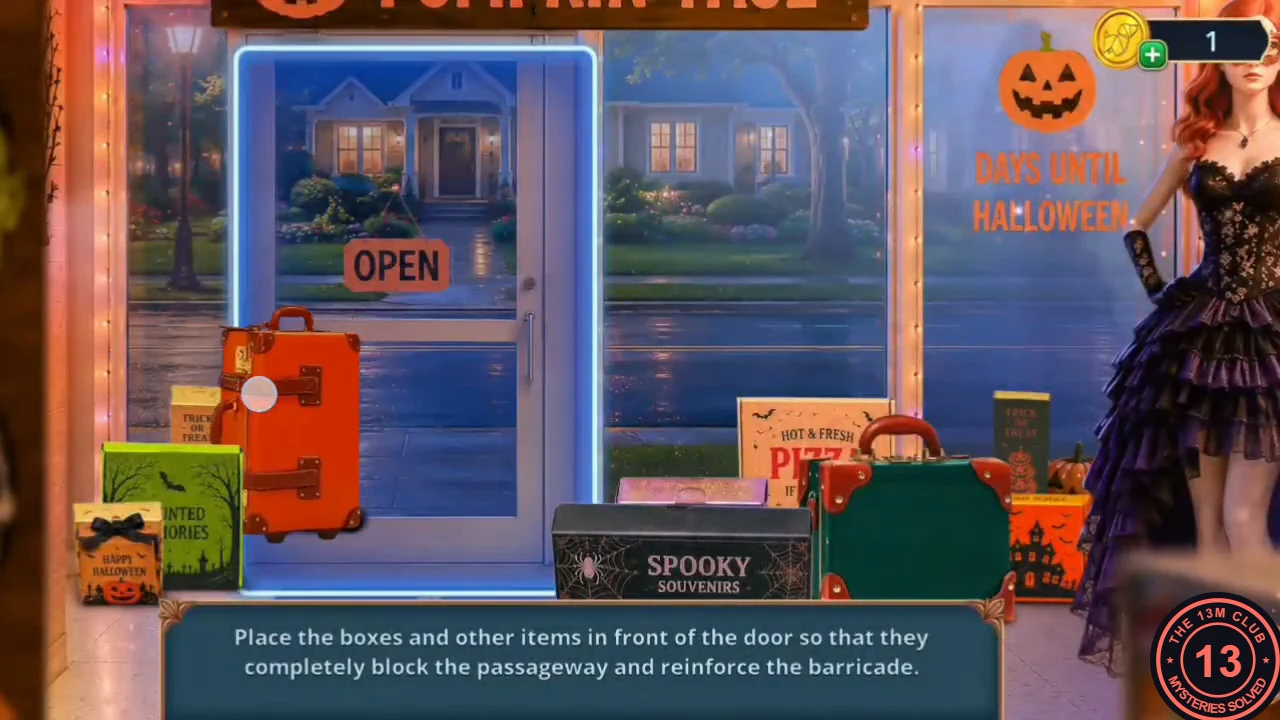
The front door of the shop has to be blocked.
- At the shop door, the barricade puzzle opens: "Place the boxes and other items in front of the door so that they completely block the passageway and reinforce the barricade." Drag the Suitcases and the boxes (pizza box, spooky box, bone box, haunted-house box) into the door frame until the outline is completely filled and nothing sticks out. Larger pieces go at the bottom.
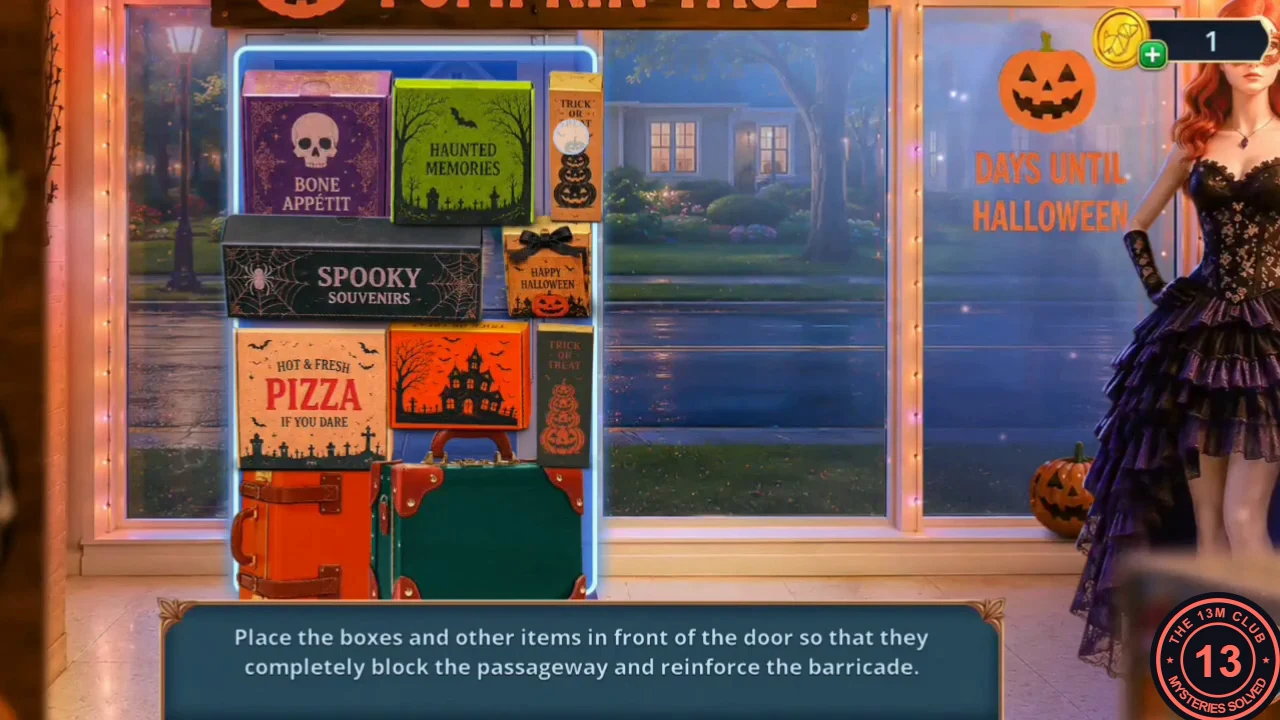
One finished barricade in the example game, with the two suitcases at the bottom and nothing sticking out of the outline. - Noah argues with Ryan. Choice: "We're not looking for someone to blame - we're looking for a way to stop Jack." (60 coins, +2) or the free "Ryan's right. Let's check out the store. Get lost, Noah." This guide takes the free answer. New task: "Find clues about Jack in the shop".
Arcade Club
A curtain behind the Ghost Hunter cabinet hides the Arcade Club.
- Pick up the Staff of Death (golden Grim Reaper keychain) on the floor by the barricaded door. Hook it on the cord of the red curtain at the Ghost Hunter cabinet. The curtain drops; open the purple STORAGE sliding door to enter the Arcade Club. Tap the purple Pumpkin Pin on the small wooden counter right of the last arcade cabinet (behind the pool table), in front of the paper cup and the small glowing jack-o'-lantern, left of the purple door.
- On the shelf by the purple RFID door (teddy bear, two vampire figurines), read the flyer and take the Plastic Flashlight Casing. Tap the Pumpkin Pins on the shelf right of the teddy bear's head.
- Put the Billiard Ball "3" in the rack on the pool table. One ball is still missing.
- In the Mask Warehouse, place the Cardboard Jack-o'-Lantern in the pop-up house ("Who would fit in here?"). The Jack figure rises; take the Staple Remover.
- Open the taped cardboard box under the mannequin with the Staple Remover. Take the WD-40, the Plague Doctor Mask and the Red Billiard Ball.
- Put the Red Billiard Ball (number 7) in the pool table rack. The rack now reads 4-2-7-3 and a note slides out: take the Code (4273).
Arcade Toy Shelf
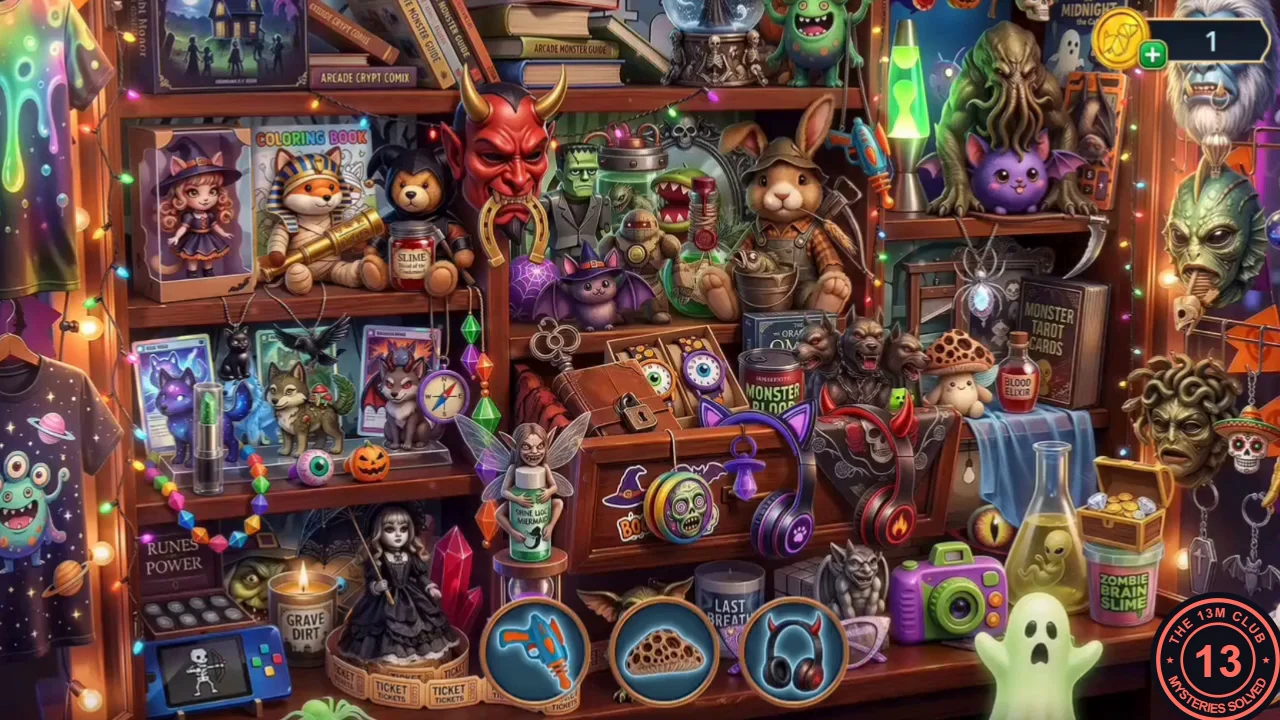
A code lock guards the toy shelf at the upper right of the arcade.
- Use the Code on the lock on the wooden post right of the claw machine and dial 4-2-7-3. A hidden-object scene opens: find the items pictured at the bottom (they included a gothic doll medallion and an umbrella). You receive the Vampire Stake.
- Drive the Vampire Stake into the right-hand vampire figurine (the one holding a heart) on the shelf by the RFID door. It crumbles; take the Light Bulb and the Needle.
- Open the Plastic Flashlight Casing in your inventory and add the Light Bulb. It still needs a power source.
RFID Door Gears
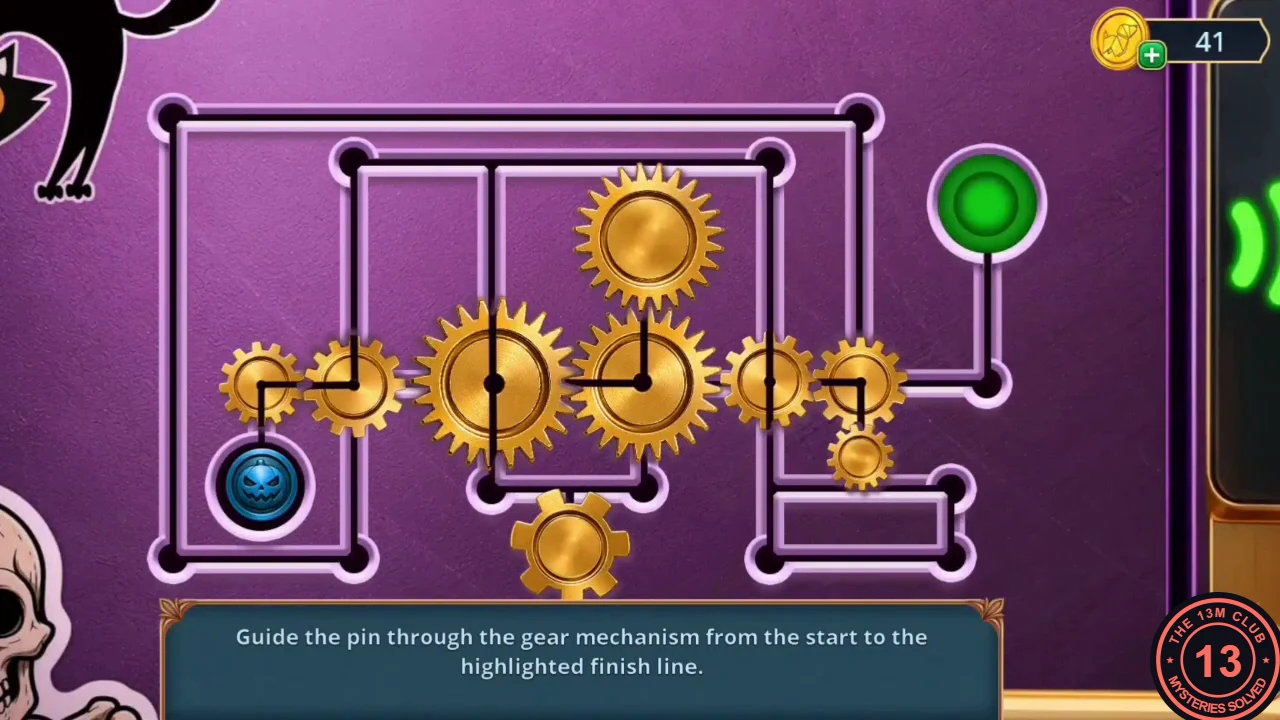
The purple RFID door needs a card, and a raccoon sits on the Table Hockey.
- Put the Balloon (from Chapter 2) on the air nozzle of the Table Hockey. It inflates into a witch balloon and scares the raccoon away (achievement "Unexpected Guest"). Take the Electronic Card from the rink.
- Use the Electronic Card on the RFID reader. Puzzle: "Guide the pin through the gear mechanism from the start to the highlighted finish line." Tap gears to rotate them so their channels line up into one path from the pin's start to the green finish line, then let the pin travel. A few trial rotations are enough, so no fixed sequence is given.
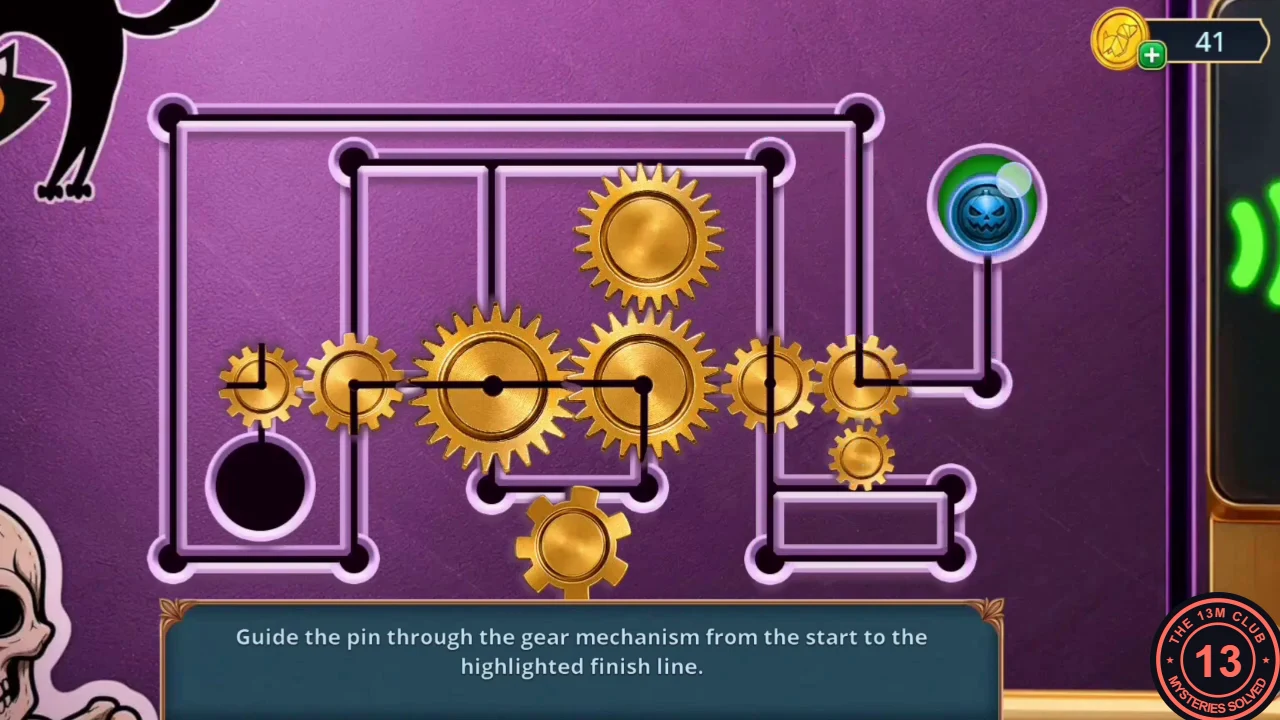
The pin has reached the finish in the example game. The gear channels show one working alignment.
Staff Room
The staff room has a boarded EXIT door filled with green smog, a desk safe, two lockers and a ceiling hatch.
- Tap the Pumpkin Pins on the seat of the bar stool under the old TV, right of the EXIT door. Take the Hose (red coil) by the desk. The safe dial needs a hint for now.
- Wear the Plague Doctor Mask at the EXIT door to get through the green smog. Tap the Pumpkin Pin hanging on the wall right of the door, above the TOXIN bottle. Take the Stethoscope. The door's boards are nailed shut.
- Use the Stethoscope on the desk safe. It opens; take the Plastic Skulls (1/2) and the Battery.
- Add the Battery to the flashlight casing to make the Flashlight. Shine it into the dark ceiling hatch and take the Key.
Noah's Locker Symbols
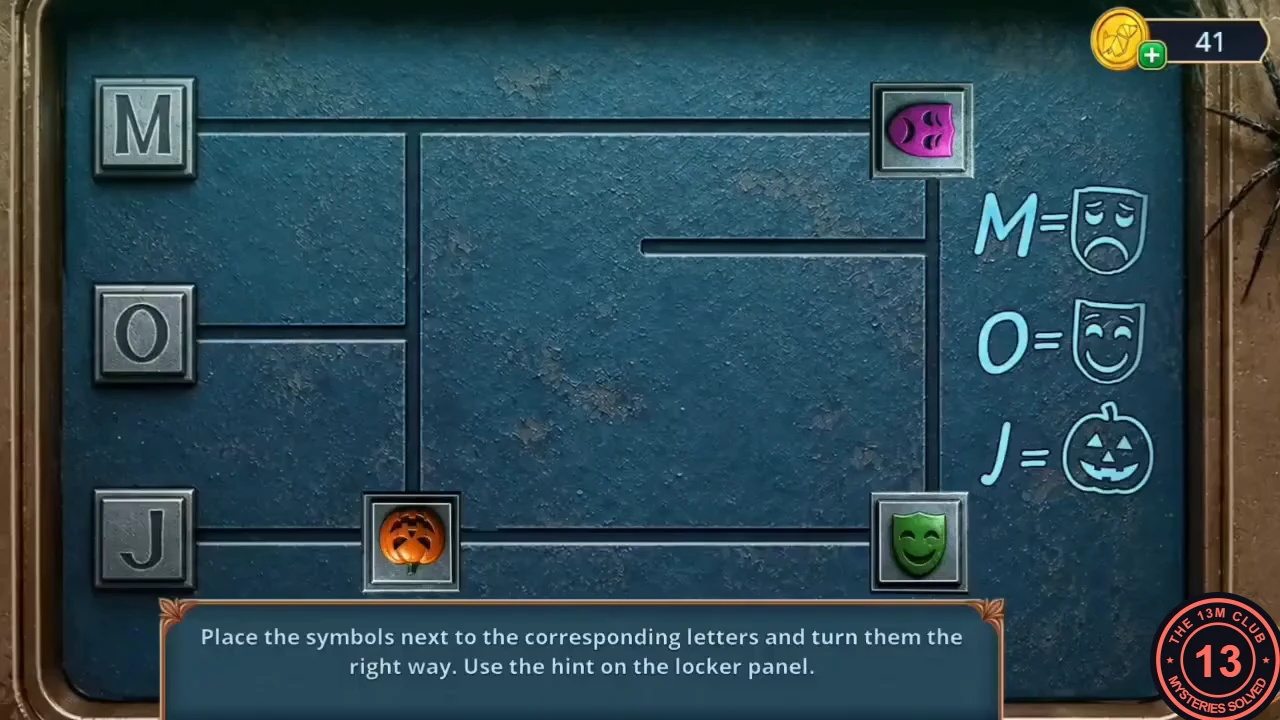
Noah's blue locker has a sliding-symbol panel.
- Use the Key on Noah's blue locker. Puzzle: "Place the symbols next to the corresponding letters and turn them the right way. Use the hint on the locker panel." The hint pairs M with the sad mask, O with the happy mask and J with the jack-o'-lantern.
- Slide the purple sad mask to M, the green happy mask to O and the orange pumpkin to J along the grooves, and tap each one until it stands upright. The panel then reads MASKS / OBEY / JACK.
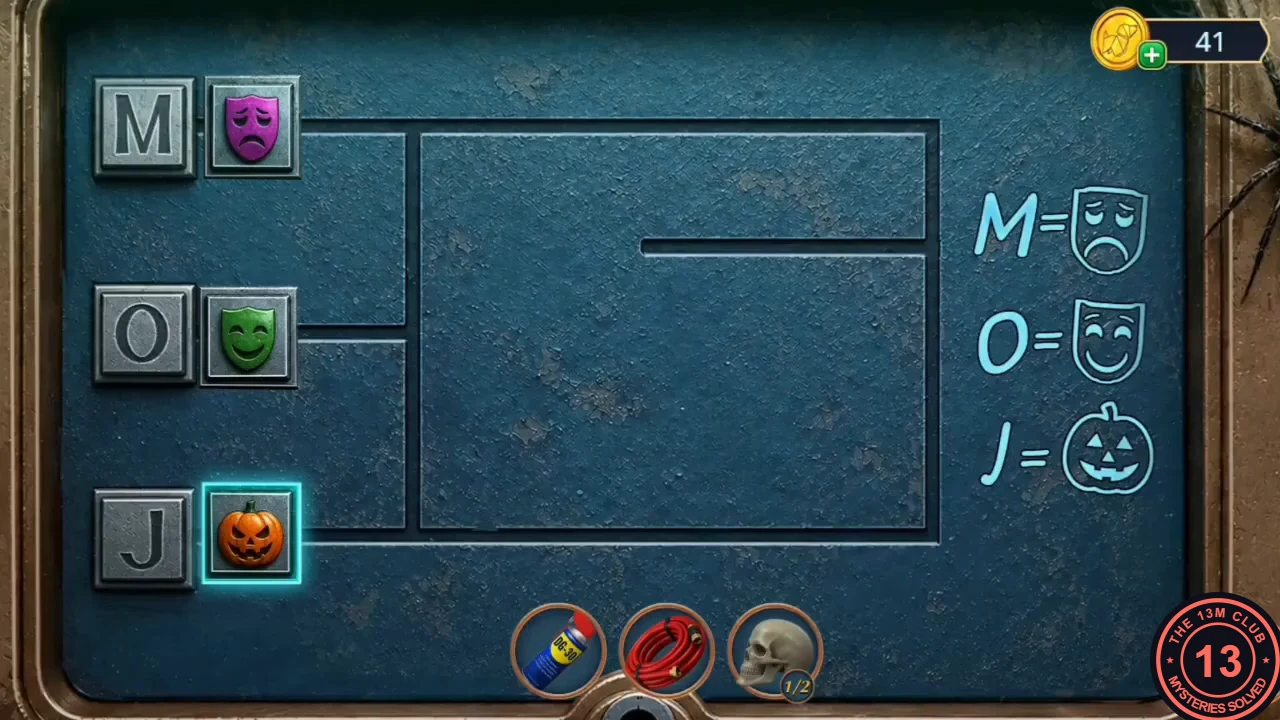
All three symbols next to their letters and standing upright. - Take the Web Sticker from the locker and read Noah's shift note. Ryan accuses Noah. Choice: "He's guilty, but right now, we need him alive to save the rest of us, Ryan." (60 coins, +2) or the free "Ryan, not now. Let's look at the books, then we'll deal with Noah." This guide takes the free answer.
Toy Shelf Combinations
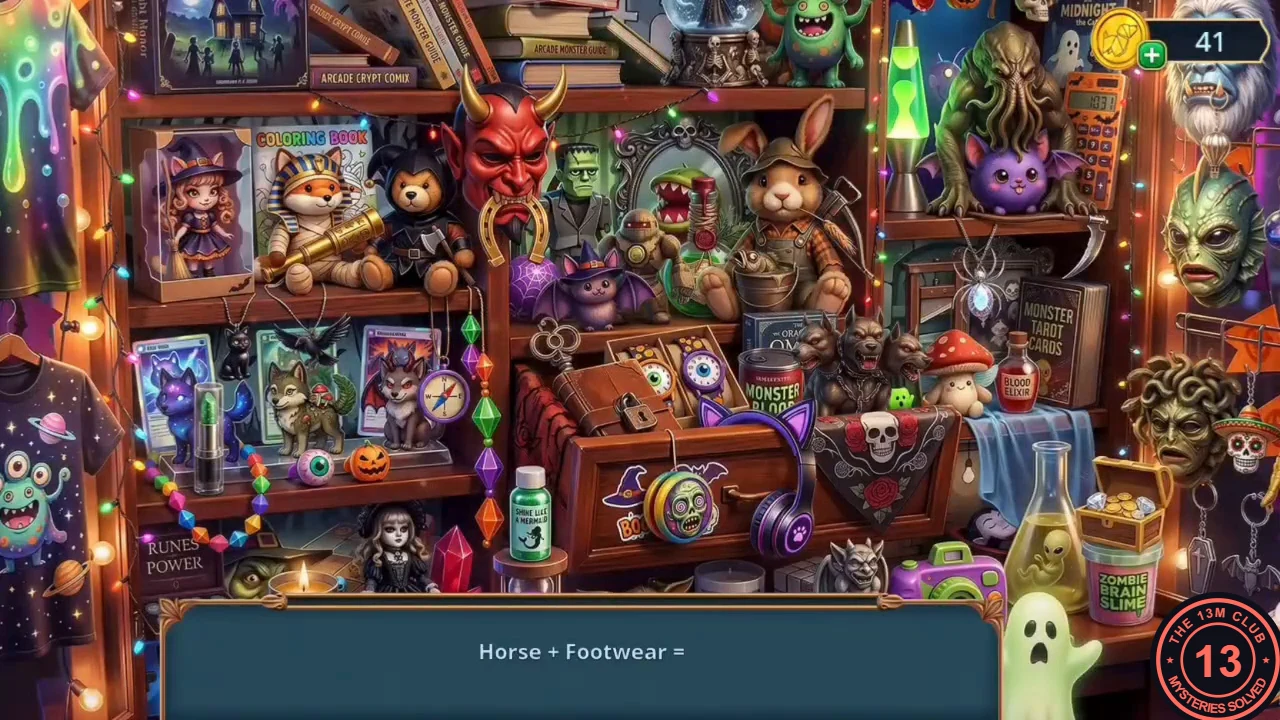
The arcade toy shelf sparkles again.
- In the Arcade Club, put the Web Sticker on the spider-web spot of the arcade control panel by the pool table. A drawer slides out: take the Banknote. Take the Faded Poster near the claw machine. Also tap the Pumpkin Pins on this control panel, at its top right beside the coloured buttons.
- Tap the sparkling toy shelf (upper right) to open a combination scene. Each line reads "A + B ="; find the one object the two parts make. There are twelve lines, in this order: Horse + Footwear = the gold horseshoe under the red devil mask; Death + Blade = the scythe; Pipe + Stars = the gold telescope held by the mummy cat; Dog + Hell = the three-headed dog figure beside the MONSTER BLOOD can; Map + X = the treasure map; Basket + Balloon = the hot-air balloon; Herbs + Bottle = the herb bottle; Stone + Wings = the small stone gargoyle at the bottom, by the camera; Bow + Arrow = the crossbow between the scarecrow rabbit and the green lava lamp; Witch + Stick = the broom held by the boxed witch doll at the top left; Arrows + Magnet = the compass hanging beside the vampire-wolf card; Lips + Color = the green lipstick in front of the purple wolf card. You receive the Handle.
Mannequin Pose
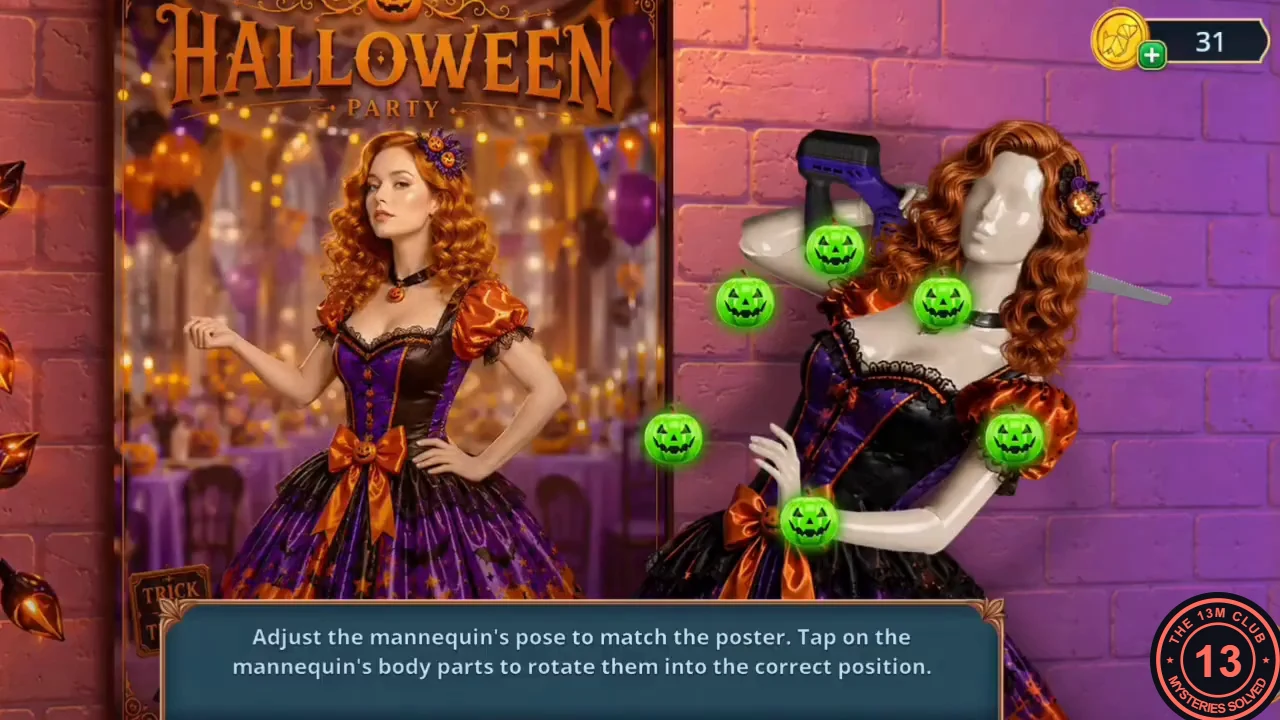
The mannequin in the Mask Warehouse can be dressed and posed.
- Fit the Handle onto the Table Hockey rod. Take the Wig that is released.
- In the Mask Warehouse, put the Wig on the mannequin. Puzzle: "Adjust the mannequin's pose to match the poster. Tap on the mannequin's body parts to rotate them into the correct position." Compare each limb with the woman on the HALLOWEEN poster and keep tapping that part. The green pumpkins mark the joints you can turn (the one you tapped turns yellow) and stay visible the whole time; the puzzle ends as soon as the pose matches: head upright, the arm on the right side of the screen on the hip, and the arm on the left bent upward at the elbow.
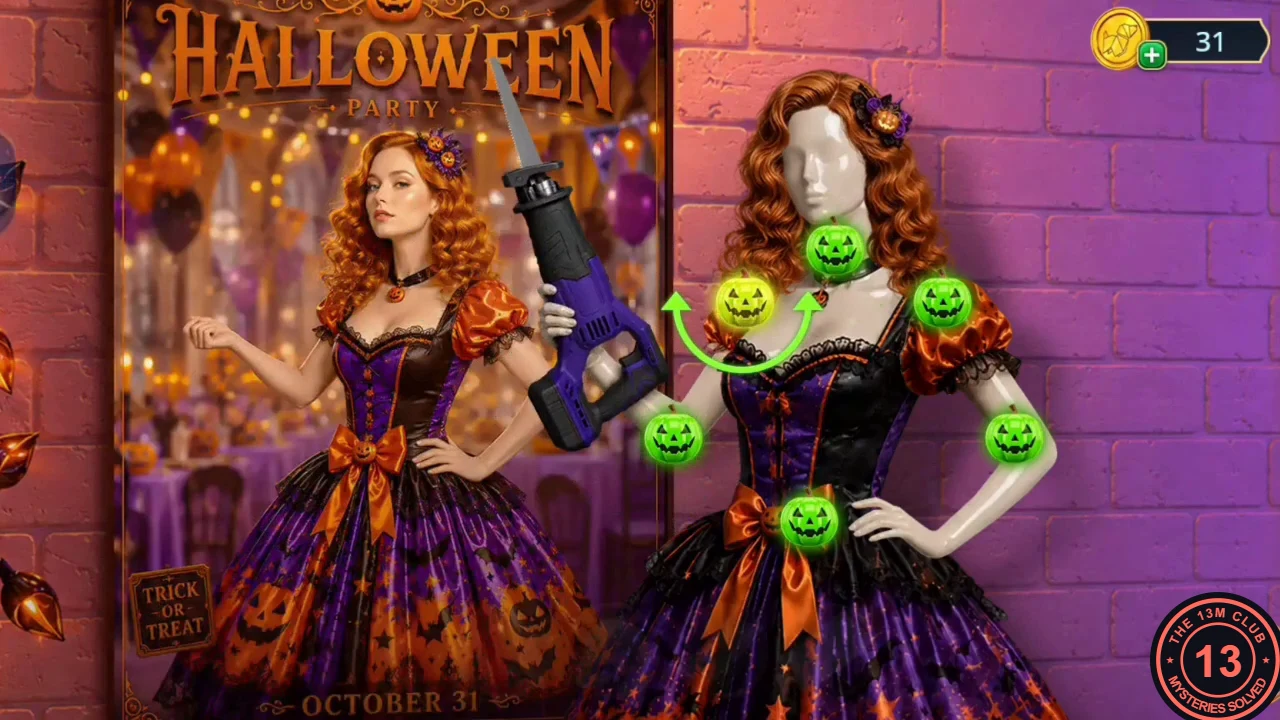
The finished pose in the example game. The green markers stay visible even when the pose is right. - Take the Jigsaw from the mannequin's hand. Cut the moon-shaped wooden block on the storage glass table with it and take the Crescent Figurine.
- Put the Crescent Figurine on the empty middle stand of the shelf cabinet (between the star and the sun). Take the D20 Dice and the Mint Air Freshener.
Out of the Shop
Sam's locker in the Staff Room holds the tool for the nailed EXIT door.
- In the Staff Room, spray the spider on Sam's locker with the Mint Air Freshener. Take the Backpack and the Snake-Shaped Cane Top.
- Pry the planks off the EXIT door with the Snake-Shaped Cane Top and go out.
- A masked student blocks the hedge path. Choice: "Get scared" (free), "Ask Ryan for help" (30 coins, +2) or "Distract the student" (60 coins, +6). This guide takes the free Get scared. You reach the Dormitory Courtyard; new task: "Put out the fire".