The Costume Ball: Campus Entrance
Casey and Ryan arrive at the university Halloween party. You can decline the optional tutorial. The entrance gate needs a Photo Zone Ticket.
- Open the carriage on the left. Take the Battery from the creepy doll and the Clothes Hanger (1/2) from behind it.
- Open the ticket turnstile at the right of the stairs. Take the purple Party Popper and the Bottle.
- Open the photo standee. Take the Knife Handle, attach it to the blade stuck in the frame and take the Carving Knife.
- Open the witch by the door. Carve the pumpkin with the Carving Knife and take the green mesh Bag.
- Return to the carriage doll and use the Bag on the pile of sawdust to sift out the Photo Zone Ticket.
- Insert the Photo Zone Ticket into the turnstile slot. The light turns green, the gate opens and the photo-area hidden-object scene starts.
Photo Area Prop Shop
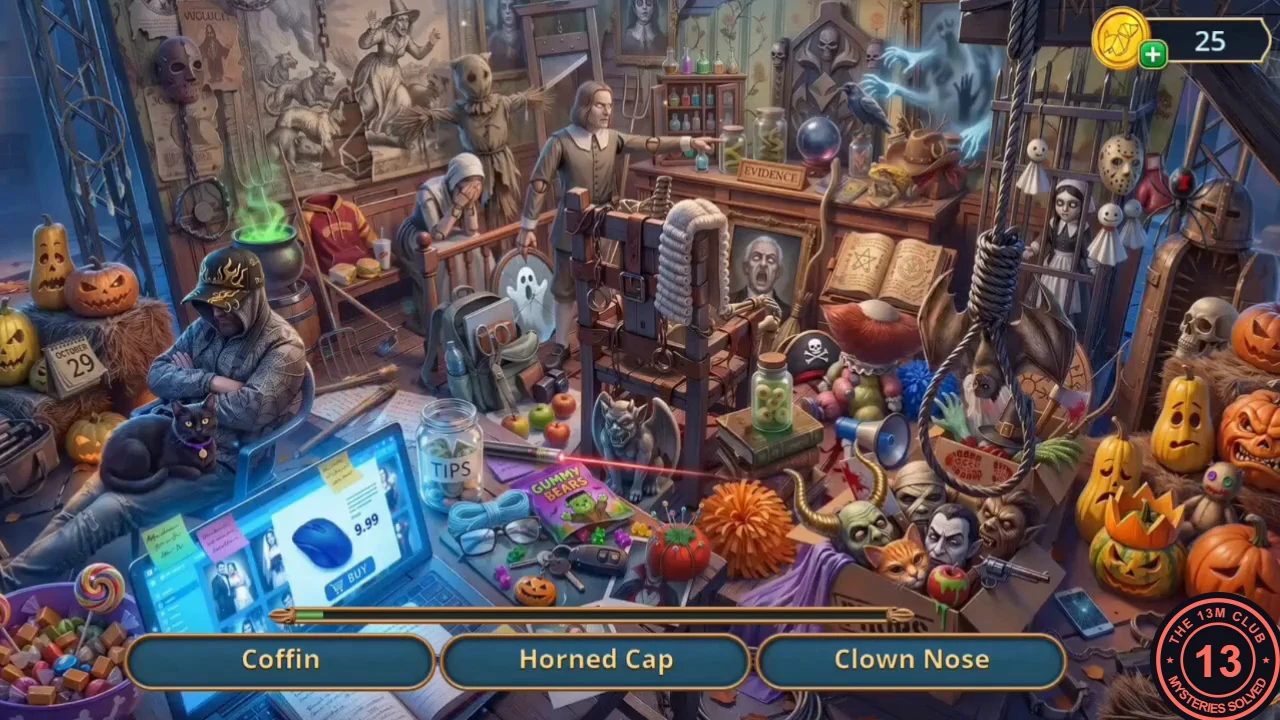
Find the items named in the bottom bar. New names replace found ones, three at a time.
- Find the items as they appear. The Toy Horse, Skeleton, Raven and Spider need only a tap. Horned Cap: tap the black cap worn by the hooded man on the left; horns pop out of it and it is collected. Clown Nose: tap the red-haired clown doll, seen from behind, beside the open spellbook; it turns round and you collect its nose.
- Dreamcatcher: tapping it first says it won't catch anything. Tap the star on the open spellbook below it to drive the blue spirit into it, then collect the Dreamcatcher.
- Coffin: tapping the small wooden coffin on the wall above the red hoodie (left of the scarecrow) says you need something sharp. Take the scissors from the grey-green backpack beside the ghost sign and use them on the coffin to collect it. Voodoo Doll: drag the red tomato from the box under the hanging noose onto the voodoo doll sitting among the pumpkins on the right, then collect the doll. Rat: tap the rat by the INVENTORY box. Footprint: tap the footprint by the hanging noose. 31: tap the flip calendar beside the black cat until it shows 31.
- When the last item is found, take the ID Bracelet reward.
Party Hall
The ID Bracelet gets you into the decorated party hall. Your task is to take a photo in the photo booth.
- Give the ID Bracelet to the witch at the door to enter the party.
- Choice with Ryan: Agree to the idea (free, +2 decision points) or Wave him off (0 points). This guide takes Agree to the idea.
- Open the punch cauldron on the left and take the Halloween Candle, then tap the orange and purple Pumpkin Pins on the plate of sweets at the top right of this close-up, behind the water bowl. Casey notes that the mortar here will later need plaster, water and something to mix it with.
- Open the candle table beside the student with the pumpkin head. Place the Halloween Candle in the empty holder. In this close-up, tap the small purple Pumpkin Pin lying between the two candle holders. The candles light the board and reveal the Long Nail. Take it.
- Open the photo booth. Use the Long Nail to open the tied sack, then open the TAKE YOUR PHOTOS tray and take the Hair Dryer.
- Open the confetti-covered DJ table and blow the confetti away with the Hair Dryer. A riddle hidden-object scene starts.
DJ Table Riddles
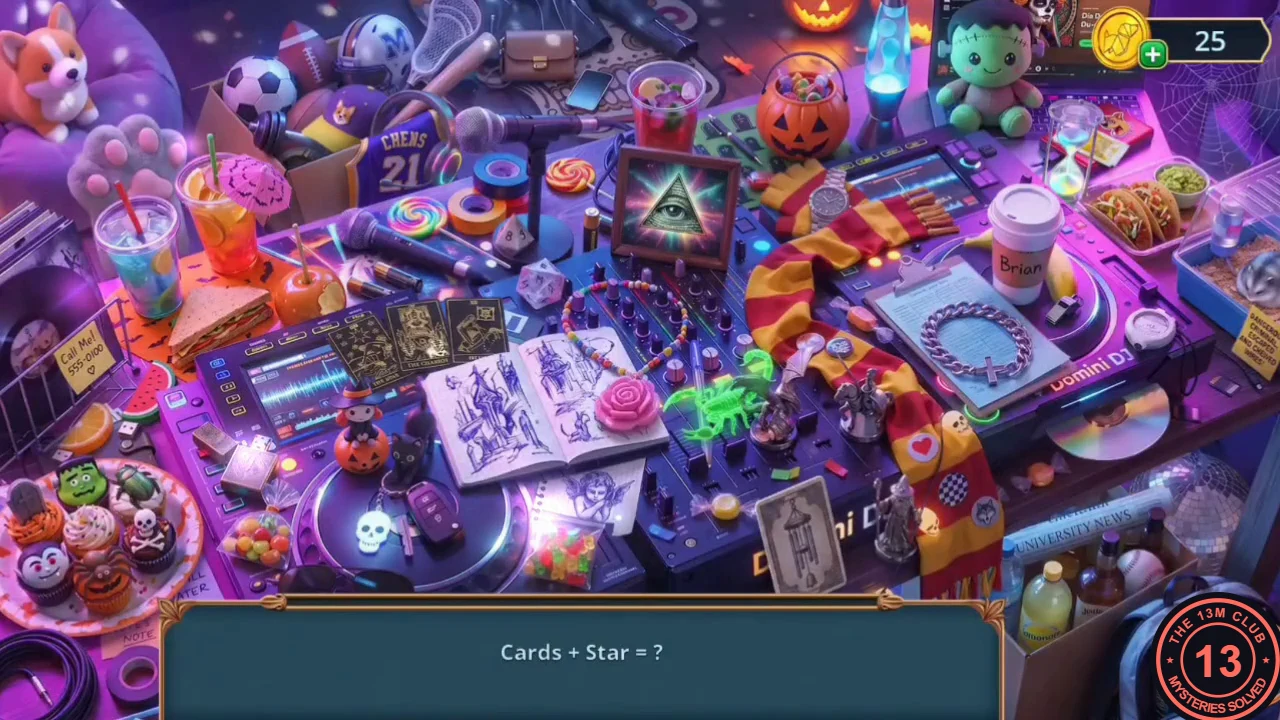
Each prompt combines two words. Tap the one object that matches both, for example a scorpion for Sting + Zodiac Sign.
- Solve the prompts as they appear: Cards + Star = the set of three tarot cards on the mixer beside the open sketchbook; Angel + Heart = the cupid sketch on the notepad page under the bag of gummy bears; Pyramid + Eye = the eye-in-triangle card; Beetle + Sun = the scarab; Disc + Music = the vinyl record; Listen + Talk = the walkie-talkie; Time + Hand = the wristwatch; Cocktail + Decoration = the cocktail umbrella; Ball + Glitter = the disco ball; Melody + Wind = the wind chimes; Sting + Zodiac Sign = the scorpion; Sand + Clock = the hourglass.
- The last prompt is a staff silhouette. Tap the Witch's Staff on the table to finish the scene and collect it.
Secret Door and Student Lounge
The tied-up student's winch needs a handle. Behind it is a green student lounge with the parts the photo booth needs.
- Open the winch by the pumpkin-head student and insert the Witch's Staff as a crank. Turn it to loosen the ropes. A secret door opens to the student lounge.
- In the lounge, tap the purple and orange Pumpkin Pins on the right-hand sofa, beside the orange and yellow cushions. Open the trophy cabinet. Take the orange Rubber Ball and the Photo Paper.
- Open the red cabinet sealed with a vampire sticker. Melt the sticker off with the Hair Dryer, open the cabinet and take the Handkerchief. The cabinet is a fuse panel for later.
- Open the hot lamp in the cobwebs. Use the Handkerchief to unscrew the Light Bulb.
- Go back to the photo booth. Screw the Light Bulb into the top socket and insert the Photo Paper into the INSERT PHOTO PAPER slot.
Photo Booth Fragments
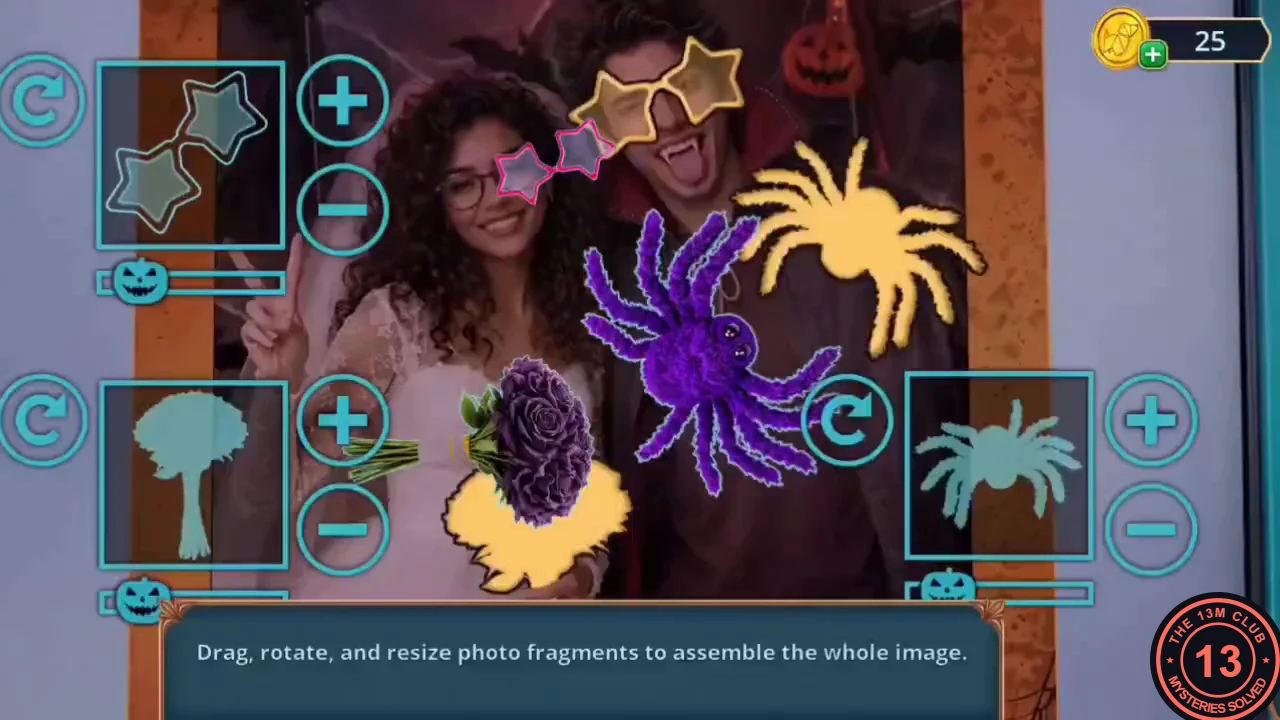
Drag, rotate and resize the photo fragments to assemble the whole image. Each side panel shows a fragment's outline with a rotate button and a +/- size control.
- There are three fragments: the pink star glasses, the purple rose bouquet and the purple spider. Each has its own side panel. Drag each fragment onto its yellow outline in the photo, then turn it with the rotate button and resize it with + / - until it matches the outline.
- When every fragment fits, the booth prints a strip of three photos. Solving in one try counts toward a mini-game achievement.
Panic at the Party and the Fuse Panel
A zombie-costumed student attacks a werewolf student during the party, and Ryan texts you to meet him in the library.
- Choice during the attack: Freeze with fear (free), Ask Ryan for help (30 coins, +2 decision points) or Rush to save the student (60 coins, +6 decision points). This guide takes the free Freeze with fear.
- Place the Party Popper on the buffet table and pop it. Take the Fuse from the confetti.
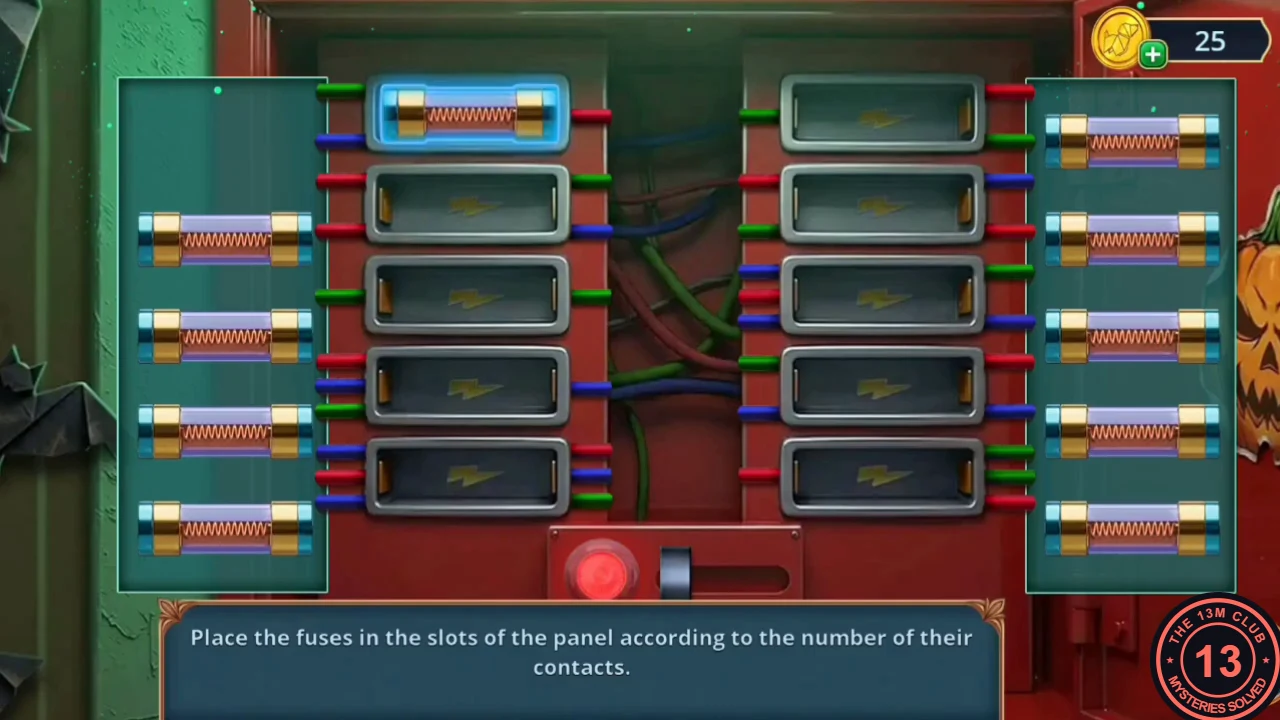
- Return to the lounge and open the red fuse cabinet. Place each fuse in the slot whose number of wire contacts matches the number of contact bands on the fuse. When all ten slots are filled correctly, the light turns green and the way to the reception hall opens.
Reception Hall
A hall with turnstiles and glowing footprints. Here you build a launcher from a chest expander.
- Also tap the purple Pumpkin Pin on the green backpack at the foot of the reception desk. Open the turnstile with the disco light. Insert the Battery into its base, switch it on and take the Disco Ball.
- Open the toothy chest beside the skull. Take the 3D Pen and the Expander Base under it.
- Open the red post box between the yellow and green lockers. Scare off the bat with the Disco Ball, then take the Long Tweezers and the Hairspray.
- Open the reception window. Use the Long Tweezers on the plastic pocket on the window glass to pull out the notices. Read them: they mention a mask shop at the south gate and a veil on the founder's statue. Take the Expander Handle left in the pocket. Tap the Pumpkin Pins (a purple one and an orange one) lying on the window sill above the "Blackwood University" carving.
- In inventory, attach the Expander Handle and the Rubber Ball to the Expander Base to build the loaded chest expander.
The Mascot Slingshot and the Cobweb Door
In the lounge, the corgi mascot stands between two tripods.
- Open the mascot and stretch the chest expander between the tripods to make a slingshot. Fire the ball to knock down the lighter (Sleight of the Fingers achievement). Take the Lighter. Then tap the Pumpkin Pins (orange and purple) among the leaves on the floor at the foot of the left slingshot leg, under the "Blackwood University" banner.
- Open the cobweb-covered doorway. Spray the Hairspray at the web and ignite it with the Lighter. The web burns away, revealing the stairs to the hallway.
Hallway, Main Alley and the Library
Go up to the walking gallery hallway and outside to the library, where Ryan waits with Noah.
- In the hallway (the Walking Gallery), tap the orange and purple Pumpkin Pins on the seat of the olive armchair with the red cushion at the front centre. Open the costume rack. Read the sticky note about the new mask shop by the south gate and take the Skeleton Bone.
- Outside, open the closed coffee truck. Take the Broken Vinyl Record from the shutter and the Gravestone of "D. Miller". The thorny library window is blocked for now.
- Enter the library to meet Ryan and the student Noah. Choice: Sympathize with Noah (60 coins, +2 decision points) or Rush him (free). This guide takes the free Rush him.
- In the library, tap the purple and yellow Pumpkin Pins on the long reading table at the front, left of the stacked books. Open the book vending machine and take the Gravestone of "Casey H.".
- Open the bookcase and take the Lecture Notes.
Wolf Statue and Costume Room
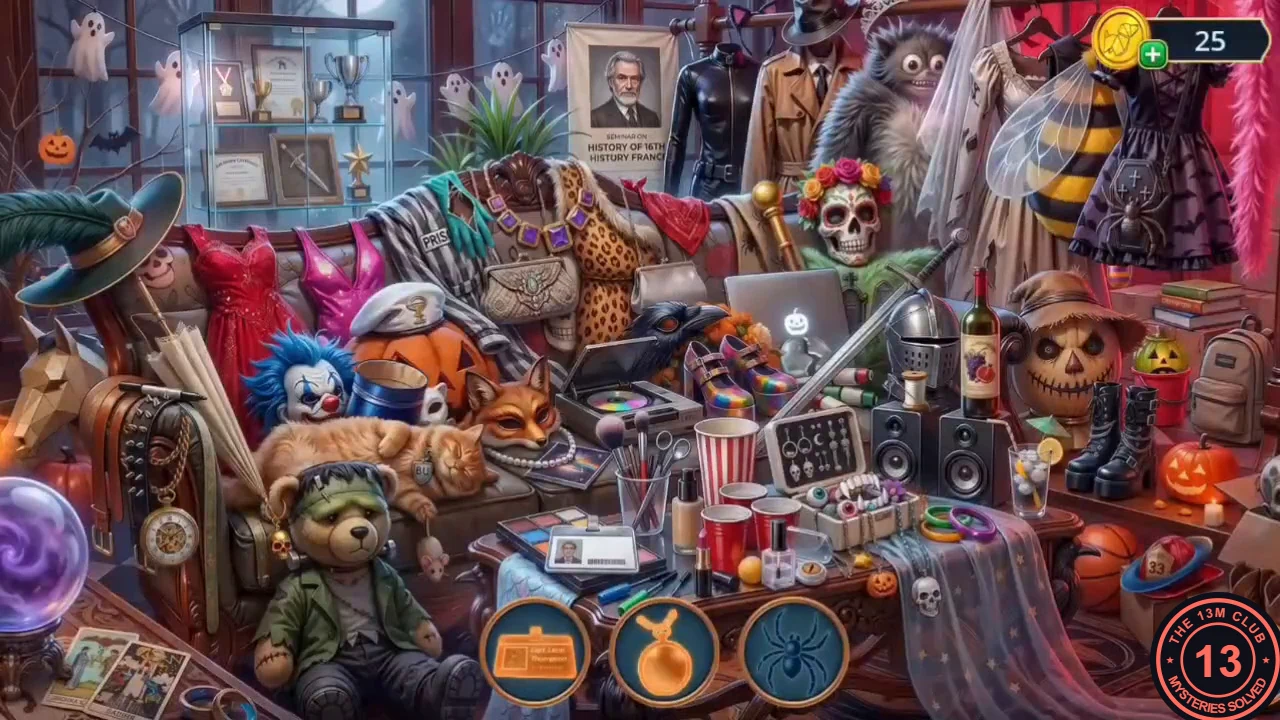
Back in the walking gallery, the cracked howling-wolf statue is hidden in icy mist. The costume rack opens a silhouette hidden-object scene.
- Open the wolf statue and clear the mist with the Hair Dryer. Take the purple Crystal Shard (1/2) from the base. The cracked statue needs repair later.
- Open the costume rack to start the silhouette scene. Find the items shown as silhouettes at the bottom. New silhouettes replace found ones.
- Orange-highlighted silhouettes need an extra action. Pocket watch: tapping the watch that hangs on the studded belt of the armchair on the left says it has no glass. Drag the round watch glass from beside the laptop (next to the sword) onto the watch; Casey can't find glue and wants a substitute. Take the clear nail polish from in front of the red cups, use it on the watch glass by the laptop, then drag the glass onto the watch again. The repaired watch is collected. The student ID on the makeup palette is unfinished ("Let's finish the writing"): write on it with the pen to collect it.
- Keep finding silhouettes (plume, top hat, bowler hat, spider on the bee costume, microphone, wastebasket and others) until the scene ends. Take the Golden Chain reward.
Ghost Lamp
The ghost-sheet wall lamp in the walking gallery has no pull chain.
- Open the ghost lamp, attach the Golden Chain and pull it. The lamp glows and shows a key inside the shade. Take the Kiosk Key.