Chapter 1 bonus: the Wagon of Horrors
To open this optional location, choose "I agree. Let's it check it out." when Emily mentions the horror house in Chapter 1. In the Google Play game a gold DELUXE badge on that line marks this location as paid Deluxe content, so expect to need the Deluxe upgrade; the purchase screen itself was not seen. These steps follow the separate free-to-play app, which shows the line with no badge. The map tile is named Horror Room. Some steps use items from the main route, so play them alongside it, and finish before you answer YES to the warning at the Chapter 1 safe.
- From Circus Grounds, take the new route to the Wagon of Horrors. The task Examine the horror house begins, and Thomas says there is something under the rug that looks like a hiding place.
- Open the rug and take the three items hidden there: Monkey Token, Bident and Mannequin Hand.
- Open the clown chest and use the Bident on its lock. The lid opens: take the Clothespin (the red clip) from inside.
- Later, in the Toy Shop, open the blue table with the jack-in-the-box. Fit the Clothespin to its drawer as a handle and pull it open, then take the Toxin.
- Back in the Horror Room, open the clown chest and pour the Toxin on the roots at its left. They wither to reveal the Silver Toy Soldier and the Mannequin Sketch.
- Open the figure seated by the door. Lay the Mannequin Sketch on his lap and put the Mannequin Hand on his knee, then fix the hand with the Adhesive Resin from your tray. His fist opens: take the Token and the Token Mold.
- After you have put the Lid on the backstage campfire pot in the main route, open the campfire. Put the Token Mold on the hot stones and add the Silver Toy Soldier so it melts into the mold, then lay the Handkerchief over it and take the finished token. Your token stack is now complete at 3/3.
- Return to the Horror Room, open the clown medallion ("Tokens are required to start") and insert your tokens to start the rail puzzle.
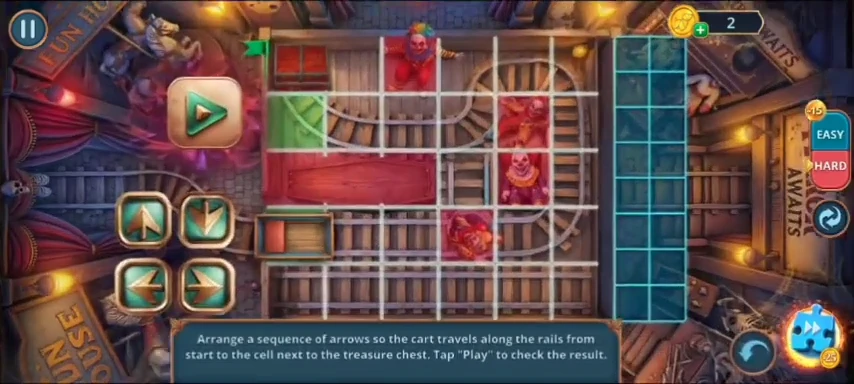
- Solve the rail puzzle. Build a list of arrows in the right-hand column, then tap Play; the cart must stop in the cell directly below the treasure chest and must not cross a red clown or coffin cell. One working list is right, down, right, right, right, up, right, up, up, up, left, left, down, left, left, left.
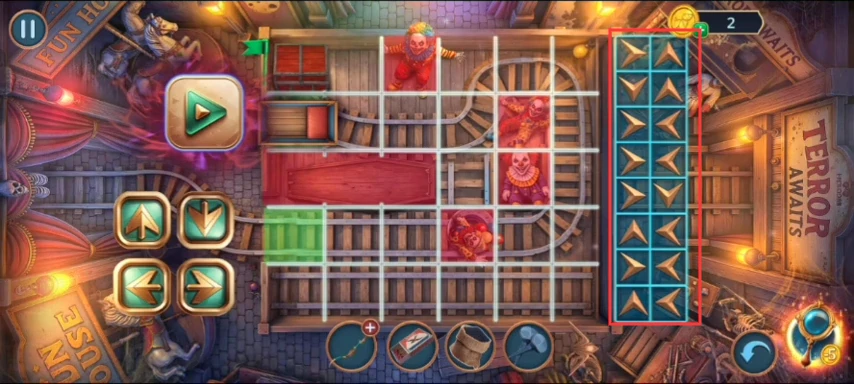
The arrow column, outlined, holding the working list from this step. - Take the Heart Amulet, open the Circus box and fit the amulet into the heart-shaped recess in its lid. The box opens: read Grimas's three notes: "I only had to play the right tune...", "I led them where laughter turns to whispers..." and "I did it because I had no choice. I was forced...". Task Examine the horror room completes and gives the achievement Crippling Reality. Thomas now understands someone forced Grimas but needs more evidence.
Chapter 2 bonus: Music Teacher's House
To open this optional location, choose "Then let's go to him right now!" when Emily suggests her music teacher in Chapter 2. In the Google Play game a gold DELUXE badge on that line marks this location as paid Deluxe content, so expect to need the Deluxe upgrade; the purchase screen itself was not seen. These steps follow the separate free-to-play app, which shows the line with no badge. The map tile is named Music Teacher's House. Task: Learn about hypnosis from the teacher. The teacher agrees to talk only if you help him play a song.
- Enter the house. The teacher says "Help me play a song, and I'll tell you what you want." Open the round plate beside the blue chair and take the Piano Keys.
- Open the piano and put the Piano Keys on its keyboard. Take the Figurine Part from the shelf on the right.
- Open the statue and golden chest and fit the Figurine Part to the statue. A floor drawer opens below: take the Bookmark.
- Open the wardrobe and slide the Bookmark into the crack between its doors. They open: take the Threads from the shelf.
- Use the map to go to City Square, open the Newspaper box, and use the Threads on the loose books inside to tie them into a stack. Take the stack and go back to the Teacher's House.
- Open the plate beside the blue chair again and slide the books under the chair. Take the Oiler.
- Open the golden chest and use the Oiler on its key. The lid opens. Take the Note Amulet.
- Open the red bag at the wardrobe and fit the Note Amulet in its clasp. The bag opens: take the hammer from inside.
- Use the map to go to Constable's Street, open the red toolbox with the vise by the flowerpot, and use the hammer on the vise. Take the Ring.
- Back in the Teacher's House, open the plate beside the blue chair and fit the Ring. The plate opens: take the Music Sheets.
- Open the piano and place the Music Sheets on its stand to start the score puzzle.
Teacher's score
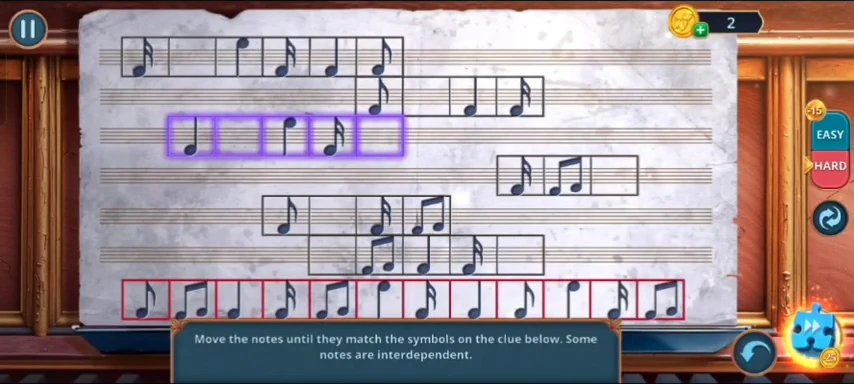
Prompt: Move the notes until they match the symbols on the clue below. Some notes are interdependent. Rows of notes sit in frames and slide left and right; the bottom red strip is the clue. Moving one frame also moves others.
- Slide the frames until, reading along the staff, the notes above line up with the red clue strip. The solved strip is pictured below, and the puzzle closes when all notes match.
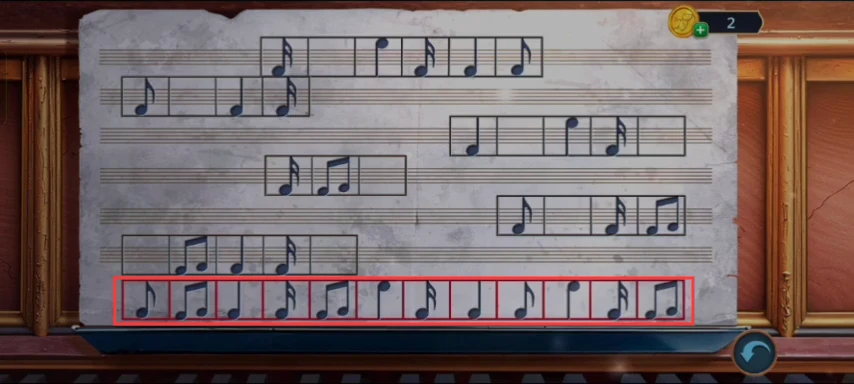
Solved: the notes above match the outlined red clue strip. - Listen to the teacher: "There is such a thing as hypnotic music" and "To hypnotize a crowd, one instrument isn't enough. You need a powerful amplifier." The task completes and awards the achievement Valuable Information.
Chapter 3 bonus: the Mayor's Office
To open this optional location, choose "Let's go. If the mayor was covering something up, we'll find out what." when Emily suggests checking his office in Chapter 3. In the Google Play game a gold DELUXE badge on that line marks this location as paid Deluxe content, so expect to need the Deluxe upgrade; the purchase screen itself was not seen. These steps follow the separate free-to-play app, which shows the line with no badge. The map tile is named Mayor's Office, and it is separate from the Clerk Office with the safe. Task: Find out if the mayor is involved in the kidnappings. The visits run alongside the main route, because the Toy Spear is used in the Clerk Office and the Photo comes from there. Finish before you answer YES at the Clerk Office safe.
- Enter the Mayor's Office. Thomas notes there is a case over there that may hide something valuable. Open the blue coat and take the Owl's Eye from its lapel.
- Take the Insecticide from the open papers lying on the rug by the hat.
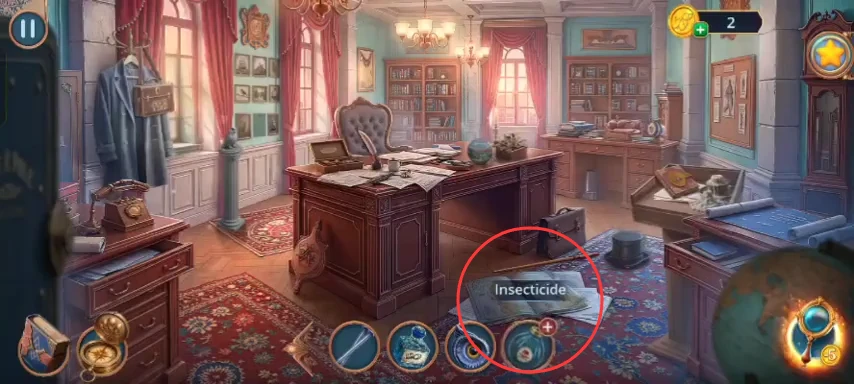
The Insecticide lies on the open papers on the rug, by the hat. - Open the owl statue by the deer painting and put the Owl's Eye in its empty socket. The pedestal opens. Take the Sprayer Nozzle.
- Open the Insecticide from your tray and fit the Sprayer Nozzle to make the Insecticide Spray.
- Open the fish bowl and the red flytrap box on the desk and spray the flytrap. It closes up. Take the Lighter it was guarding.
- Open the desk tray with the red book and use the Lighter on the candle wax. Take the Toy Spear that the melted wax frees.
- Later in the main route, in the Clerk Office, open the statue on the desk beside the globe and put the Toy Spear in its hand. The statue swings aside. Take the Photo from the base.
- Return to the Mayor's Office. Open the wall by the owl and hang the Photo on the empty spot. Take the Fang Pendant from the niche behind the deer painting.
- Open the fish bowl and use the Fang Pendant as a hook to lift the green bottle out of the water. Take the Pattern from it.
- Open the blue coat and use the Pattern on the pocket. Take the Wax Chalk from the pocket.
- Open the desk tray and rub the Wax Chalk on the red book's clasp. The book opens to reveal the Case Key. Take it.
- Open the case on the coat and turn the Case Key in its keyhole to start the maze.
The mayor's case maze
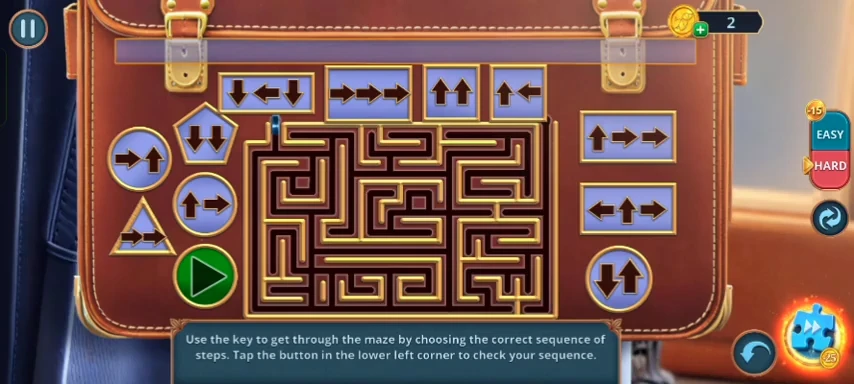
Prompt: Use the key to get through the maze by choosing the correct sequence of steps. Tap the button in the lower left corner to check your sequence. Each plate holds a short run of arrows, and the plates you tap add to the strip at the top.
- Tap the plates in this order: down-left-down, right-right-right, right-right (triangle), up-left, up-right-right, up-right (circle), up-up. Then tap the green Play button.
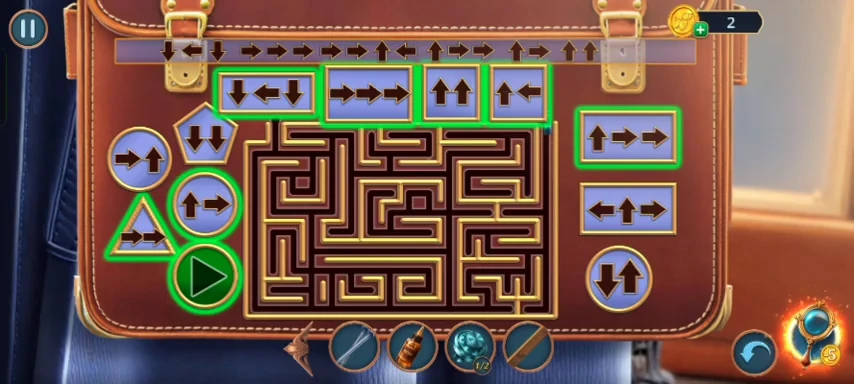
Solved: the plates in the listed order, ringed in green. - Read the Charitable Donation for Municipal Needs. The task completes with the achievement Town Hall Shadow, and Thomas concludes the circus donated to the city in return for not being inspected.
Chapter 4 bonus: Flemus' Tent
To open this optional location, choose "You're right. If there's even the smallest clue there, we'll find it." when George says traces must remain in Flemus's tent in Chapter 4. In the Google Play game a gold DELUXE badge on that line marks this location as paid Deluxe content, so expect to need the Deluxe upgrade; the purchase screen itself was not seen. These steps follow the separate free-to-play app, which shows the line with no badge. The map tile is named Flemus' Tent. Completing it awards the achievement Liberation (Help Flemus) and frees Flemus. Finish before you answer YES to the warning at the workshop shelf.
- Enter Flemus' Tent from the yard. Flemus sits entranced on the bed: "It's Flemus! We need to help him immediately!"
- Later in the main Chapter 4 route, use the map to return to the tent. Open the doll on the bed and take Flemus' Shoe from its lap.
- Read Flemus's diary in the same view ("Today, he forced me to take the stage again...") and take the Umbrella Handle from beside the doll.
- Open the brazier table and use the Umbrella Handle to hook the Umbrella Spoke from beside the fire.
- Open the chest by the bed. Insert the Umbrella Spoke into its padlock, then strike the spoke with Flemus' Shoe. The chest opens: take the Crucible and the purple cylinder from inside.
- Use the map to go to the courtyard table with the gramophone. Fit the purple cylinder and take the Lens Mold and the Drawer Amulet from the drawer that opens.
- Back in the tent, open the doll cabinet and fit the Drawer Amulet. Take the Bottle from the drawer.
- Open the brazier table. Set the Crucible over the fire and put the Bottle in it, then place the Lens Mold on the table. The melted glass pours into the mold: take the Lens.
- Use the map to go to the Circus Director's Office, open the desk with the letter and the empty magnifier frame, and fit the lens. Take the Magnifying Glass.
- In Flemus' Tent, open the poster wall and use the Magnifying Glass on it to start the symbol search.
Flemus's poster search
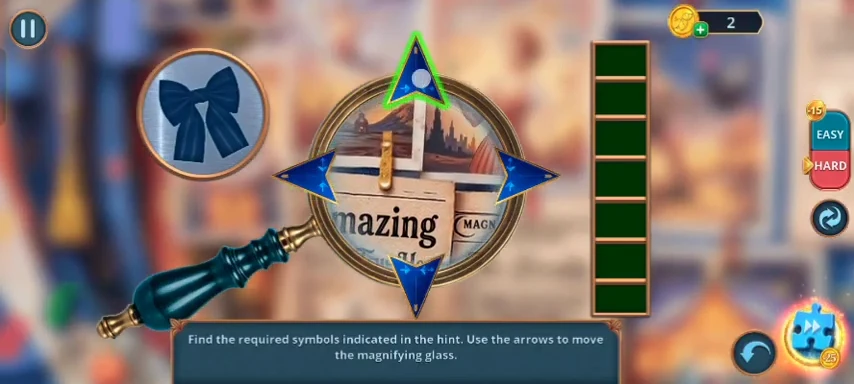
Prompt: Find the required symbols indicated in the hint. Use the arrows to move the magnifying glass.
- The round panel on the left shows the symbol to find. Use the four arrows to move the glass across the posters until that symbol appears in the lens, then tap it. The bar on the right fills with each find. Hints can include a bow, a coin, a dagger, a heart, a key and a curved hook, and the order may vary.
- Read the ticket "What lulls the eye can also bring it back." Take the Anti-Hypnosis Pendulum and use it on Flemus. He wakes and thanks you: "Now I'll help you stop him." The achievement Liberation completes.
Circus Tickets: Chapter 1
Tickets sit in room views and close-ups, and tapping one shows a banner with your count out of 140. The count rises by more than one per ticket, and unevenly, so do not expect it to match this list. The hexagon on a map tile, such as 1/2, appears to show how many of that location's Extras you have found, and it disappears once the location is complete. Tapping a ticket can show its banner late, after a line of dialogue or a change of view, so trust these entries over where the banner first appeared. Where an entry names only a room, scan the whole view, including the edges. Collect them before you answer YES to the chapter-end warning, which locks earlier locations. Circus Grounds has one entry here even though its hexagon can read out of 2. What that second count stands for was not established, but following this list reached 140/140, so it is not a known missing ticket.
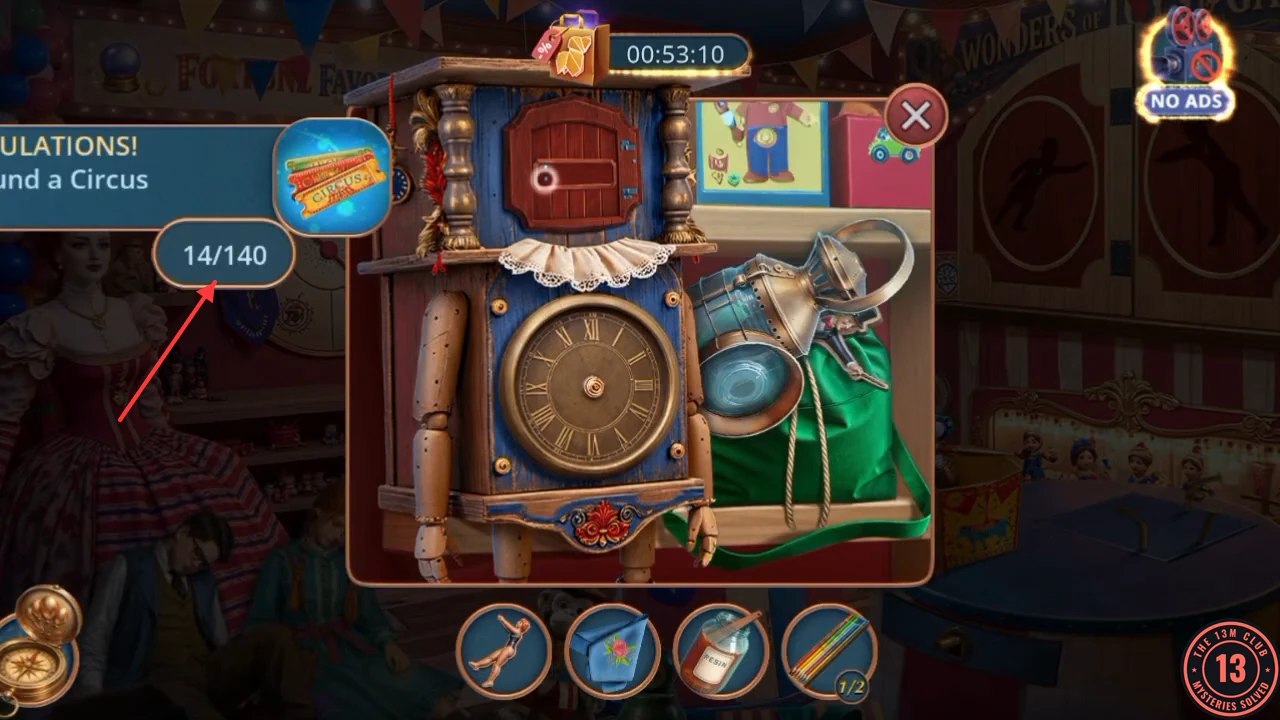
- Circus Grounds, the clown close-up: on his sign.
- Inside the Tent, the crates with the purple elephant.
- Inside the Tent: check the frying-pan close-up on the table and the room around it.
- Shooting Gallery Square, the main room view.
- Shooting Gallery Square, the grate under the striped cart once the cart has moved.
- Toy Shop, the main room view: on the shelf below the large round dial, before you open the clock shelf.
- Toy Shop, the model station close-up.
- Circus Backstage, the main room view.
- Circus Backstage, the tree-root close-up beside the striped pillar.
- Clown's Trailer, the main room view.
- Clown's Trailer, the desk close-up.
Circus Tickets: Chapter 2
Tickets sit in room views and close-ups, and tapping one shows a banner with your count out of 140. The count rises by more than one per ticket, and unevenly, so do not expect it to match this list. The hexagon on a map tile, such as 1/2, appears to show how many of that location's Extras you have found, and it disappears once the location is complete. Tapping a ticket can show its banner late, after a line of dialogue or a change of view, so trust these entries over where the banner first appeared. Where an entry names only a room, scan the whole view, including the edges. Collect them before you answer YES to the chapter-end warning, which locks earlier locations.
- Near Emily's House, by the path on the lawn edge.
- Near Emily's House, the flowerbed close-up.
- City Square, on the Newspaper box beside the water pump.
- City Square, inside the Newspaper box.
- Constable's Street, the main room view.
- Archive, the main room view.
- Archive, the police dog's mat close-up, once the dog has gone.
- Warehouse yard, the main view: on the wooden crate with the padlock beside the DANGER ZONE sign, before you open the sparking wires.
- Warehouse yard, the tractor close-up.
- Inside the Warehouse, the main room view.
- Inside the Warehouse, the suitcase close-up.
- Basement, the main room view.
- Basement, the red cage close-up.
Circus Tickets: Chapter 3
Tickets sit in room views and close-ups, and tapping one shows a banner with your count out of 140. The count rises by more than one per ticket, and unevenly, so do not expect it to match this list. The hexagon on a map tile, such as 1/2, appears to show how many of that location's Extras you have found, and it disappears once the location is complete. Tapping a ticket can show its banner late, after a line of dialogue or a change of view, so trust these entries over where the banner first appeared. Where an entry names only a room, scan the whole view, including the edges. Collect them before you answer YES to the chapter-end warning, which locks earlier locations.
- Near Emily's House (the Chapter 3 street), the main view: at the small gargoyle fountain on the left, before you open its close-up.
- Pharmacy (the Chemist's Shop), the main room view: in the front recess of the right-hand counter, beside the SALE display, before you open anything.
- Pharmacy (the Chemist's Shop), the sink close-up.
- Laboratory, the main room view, on the workbench with the vise.
- Laboratory, the stove close-up: on the brick wall at the upper left.
- Near Emily's House (the Chapter 3 street), the tree-root close-up.
- City Hall's Park, the main view.
- City Hall's Park, the sundial close-up.
- City Hall, the main room view, at the counter on the left by the tall stool, before you open the six-drawer desk.
- City Hall, the statue close-up.
- Assembly Hall, the main room view.
- Assembly Hall, the clock shelf with the Minutes of the Meeting.
- Clerk Office, the main room view.
- Clerk Office, the window flower close-up.
Circus Tickets: Chapter 4
Tickets sit in room views and close-ups, and tapping one shows a banner with your count out of 140. The count rises by more than one per ticket, and unevenly, so do not expect it to match this list. The hexagon on a map tile, such as 1/2, appears to show how many of that location's Extras you have found, and it disappears once the location is complete. Tapping a ticket can show its banner late, after a line of dialogue or a change of view, so trust these entries over where the banner first appeared. Where an entry names only a room, scan the whole view, including the edges. Collect them before you answer YES to the chapter-end warning, which locks earlier locations.
- Circus Grounds, the golden frog by the fortune teller's booth.
- Circus Grounds, the carousel control box.
- Big Top, the main view.
- Big Top, the rope and net close-up.
- Underground corridor, the main view.
- Underground corridor, the costume rail.
- Organ room, the main view: at the red cage, by its front wheel, before you open the keyboard close-up.
- Organ room, the boiler close-up: behind the flywheels, above the coal box.
- Director's yard, the main view: around the stool and tent at the right, before you open the checkers set.
- Director's yard, the checkers set close-up: leaning between the green mug and the copper pitcher at the top left, beside the red case. You do not need to open the case for this ticket.
- Circus Director's Office, the main room view.
- Circus Director's Office, the desk close-up: the red and gold ticket among the green leaves on top of the right-hand stack of books. Its banner may appear late, behind a line of dialogue.
- Circus Workshop, the main room view, on the table with the blue vise.
- Circus Workshop, the close-up of the dressing table with the jack-in-the-box and spider.
Gymnast's Tent: the Circus Tickets reward
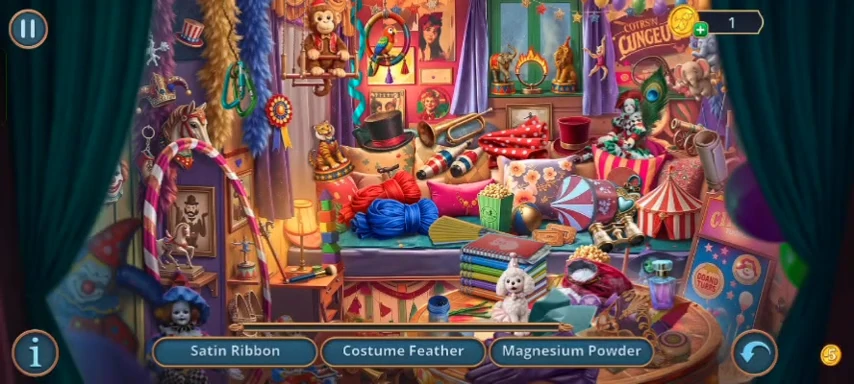
The in-game tutorial says: "Collect all the Circus Tickets to unlock an additional Hidden-Object Puzzle in the Extra Menu!" With all tickets collected, a Hidden Objects panel reading Circus Tickets 140/140, Gymnast's Tent, with a Play button, appears right after the end credits. If it does not appear, look for the scene in the Extra Menu the tutorial mentions, though that menu itself could not be checked.
- Open the panel and tap Play. Three names show at a time; each find brings the next. Find Satin Ribbon, Costume Feather, Magnesium Powder, Rolled Canvases, Hairpins, Miniature Locket, Carabiners, Gymnastic Hoop, Polka-Dot Fabric, Makeup Brush and Perfume Bottle.
- Tap the stack of papers left on the table and read the three notes in order: "I hide where I'm least expected...", "Smoke works faster when there's light and music nearby..." and "If I stop, they'll come for her...". They are the last content documented for this scene.
Achievements seen in play
A banner at the upper left announces each achievement, with its condition. This list holds every banner seen in the two recordings used for this guide; the achievement menu itself was not seen, so it may hold others. HOP is the game's word for a hidden-object puzzle.
- Quick finds. Instant Reaction: find 3 hidden objects in 3 seconds. Flawless Grab: find 5 hidden objects in 5 seconds. Before you tap anything in a scene, use its solution in this guide to locate the first three or five objects you can see, then tap them in one quick run.
- Clean search. Pinpoint Accuracy: no wrong selections in a HOP. Tap only objects you are sure of, and follow the scene's solution here, including any step an object needs first.
- Timed searches. Beam of Truth: finish a HOP in one minute. Series of Discoveries: finish 3 HOPs in a row in one minute each. Web of Clues: finish 5 HOPs in a row in one minute each. Read each scene's solution before you open it, and keep every scene under a minute from the first one of your run. Tracker (finish a HOP in two minutes) and Cold Calculation (finish a HOP in three minutes) did not come from a quick finish in the four recordings checked for this: both came later, each at the end of a single scene. Two of those recordings show an on-screen countdown that can time a scene. By that countdown, scenes of about 72 and 92 seconds earned Tracker and one of about 107 seconds earned Cold Calculation, while scenes under a minute earned neither. To try for them, earn the run achievements first, because one recording shows a slow scene followed by Series of Discoveries only three scenes later. Then take a little over a minute on a later scene and finish it within two minutes, and repeat on later scenes until both banners have appeared. This is not a proven rule: which one came first differed between recordings, and scenes of about 105 and 126 seconds earned nothing in a run that had not yet shown Cold Calculation.
- Timed puzzles. Instant Solution: complete a mini-game in one minute. Lightning Mode: complete 3 mini-games in one minute each. Its banner does not say in a row. Read the puzzle's solution here before you open it.
- Object counts. Seeker: find 20 objects. Vault of Knowledge: find 40 objects. Both came during Chapter 1 from normal play.
- Main story, awarded as you follow the route. Chapter 1: The Show Begins! (get inside the Circus), Secrets of Hypnosis (read the note), Total Pro (lift the hypnosis), Celebration for All (chase away the crow). Chapter 2: Invisible (sneak in a cloak), Here Is the Proof (find a clue on the envelope), Well-Fed Policeman (feed the dog), Dangerous Weapon (find a smoke sample). Chapter 3: Voice of the People (read the newspaper), Chemistry of Truth (find the chemical formula), Laboratory Analysis (analyze the composition), The Veil (assemble a smoke bomb). Chapter 4: Distorted Reality (visit the Hall of Mirrors), Edge of Explosion (stop the gas leak), Loud Argument (fire the cannon), Little Lady (dress the monkey).
- Bonus locations, seen only in the free-to-play recording. Crippling Reality comes with the Examine the horror room task in the Wagon of Horrors. Valuable Information (learn about hypnosis from a teacher) comes at the Music Teacher's House. Town Hall Shadow (find out if the mayor is involved in the kidnappings) comes in the Mayor's Office. Liberation (help Flemus) comes in Flemus' Tent. Each location's section above gives the steps.