Old Shelter: tube, logs, harness and the sink
Search the Old Shelter for carabiners, logs and the safety harness, make a pump from the rubber bulb and clear the hotel washbasin.
- Zoom in on the desk. Take the CARABINERS (1/2) lying on the newspaper about the Edelweiss winter route.
- Zoom in on the floor by the chest. Collect the EDELWEISS BROOCH left of the fallen candelabra. Use the SCRAPER on the hardened wax over the coiled tube, then the WRENCH on the candelabra, and take the TUBE. Take the log leaning on the right of the chest: LOGS (2/3).
- Open the RUBBER BULB in the inventory and add the TUBE.
- Zoom in on the squirrel display case (it needs chalk later). Take the dark log propped beside the squirrel: LOGS (3/3). Behind it is the SAFETY HARNESS (red "+" item); it still needs two carabiners and spikes.
- In the Hotel Hall use the RUBBER BULB on the washbasin to pump out the dirty water (achievement THE HOTEL'S TOP HELPER). Take a MIRROR SHARD (2/4), the GLUE and the TRAIN MODEL.
- At the High Cliff place the TRAIN MODEL on the diorama track to open a hidden-object scene.
High Cliff diorama list
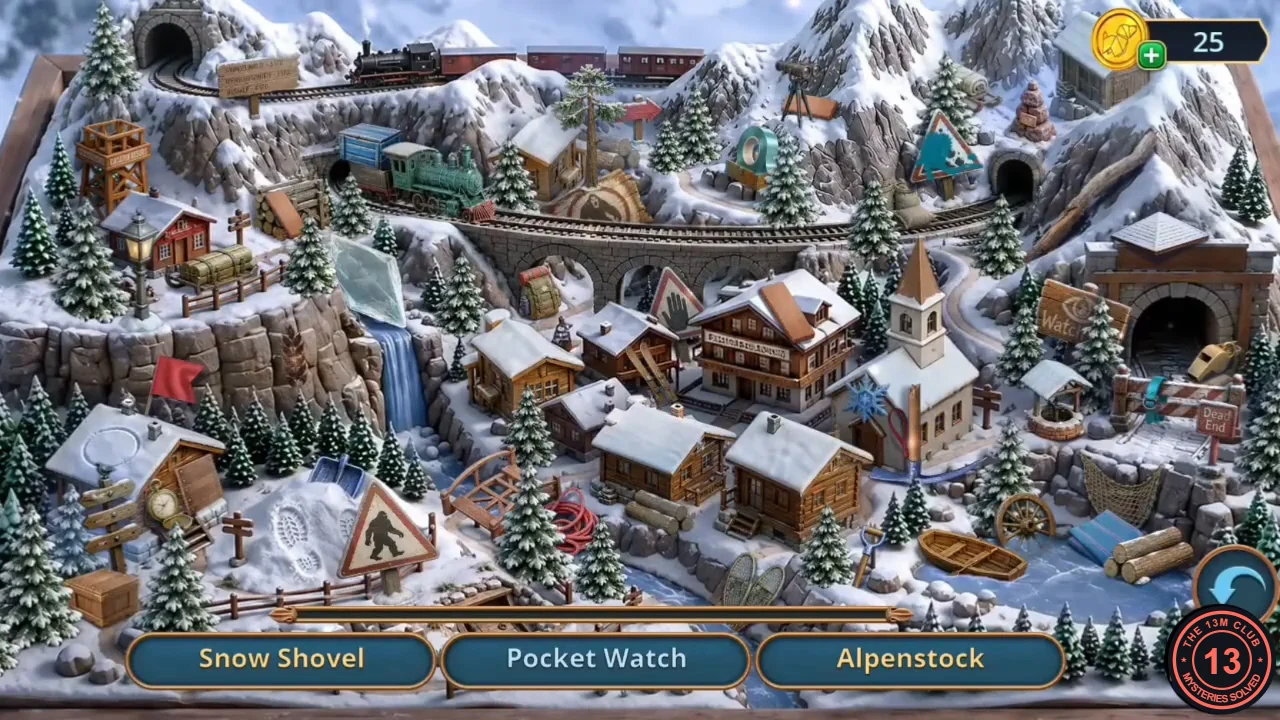
A list scene showing three names at a time. Two entries are interactive: Snow Shovel (the blade lies behind the Yeti sign; drag the wooden handle from beside the small footbridge onto it) and Bridge (the footbridge is three planks short; drag the plank bundle from the upper-left terrace onto it).
- Find: Snow Shovel, Alpenstock (by the stone viaduct), Bridge, Mountain Avalanche (upper central peak), Pocket Watch (cabin wall, lower left), Watch Tower (upper-left ridge), Backpack (by the house beside the waterfall), Flag (left cliff terrace), Small Pine (near the top-centre tent), Whistle (right tunnel mouth), Lantern (lamp post by the red cabin) and Stone Cairn (upper-right slope). Reward: WOODWORKING TOOL SET.
- At the Abandoned Train Station use the WOODWORKING TOOL SET on the wooden block on the ticket-window shelf and take the WOODEN DOORMAN BUTTERFLY (bow tie).
- In the Hotel Hall put the WOODEN DOORMAN BUTTERFLY on the doorman mannequin's collar. The cloche lifts to reveal a tray puzzle.
Doorman's tray
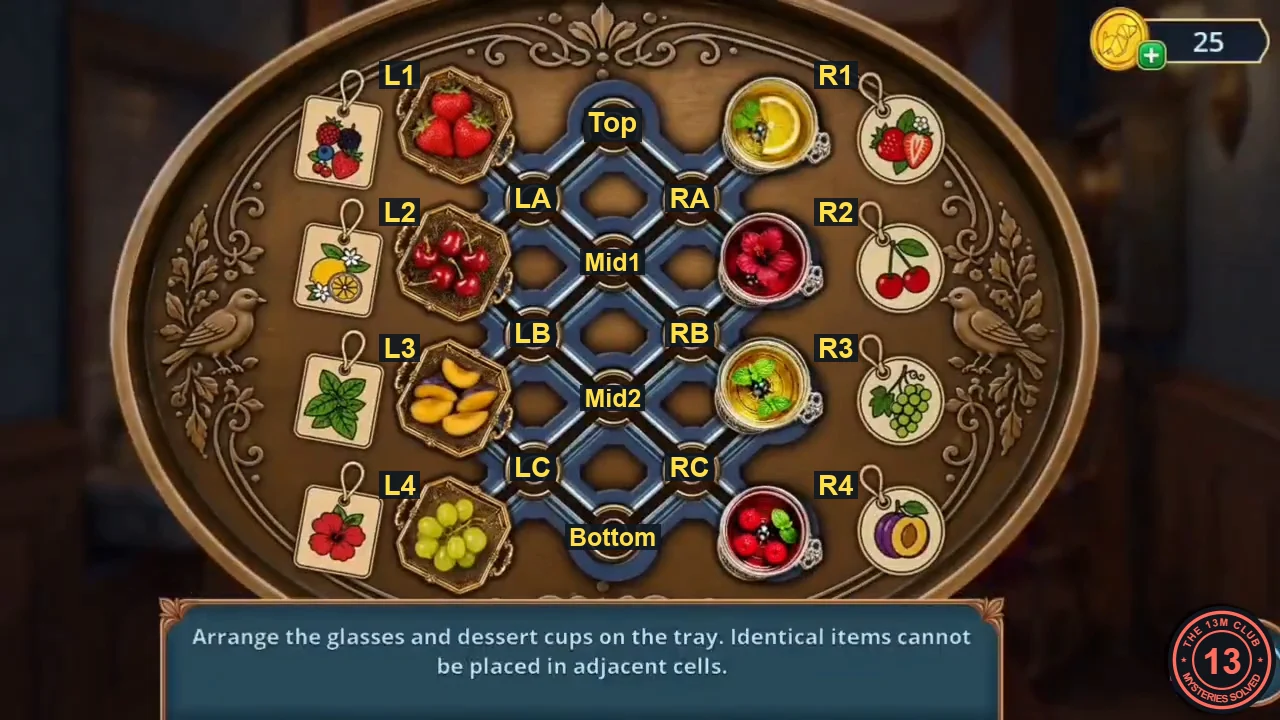
Rule: "Arrange the glasses and dessert cups on the tray. Identical items cannot be placed in adjacent cells." Four pockets run down each side. The dessert cups start on the left (top to bottom: strawberry, cherries, plum, grapes) and the drinks on the right (lemon, hibiscus, mint, berries). The tags beside the pockets show the goal. Drinks go to the left pockets, top to bottom: mixed berries, lemon, mint, hibiscus. Desserts go to the right pockets: strawberry, cherries, grapes, plum. Node names used below: left pockets L1–L4 and right pockets R1–R4, numbered from top to bottom. The centre column has four nodes: Top, Mid1, Mid2 and Bottom. Each side has an inner column of three nodes between the pockets and the centre: LA, LB, LC on the left and RA, RB, RC on the right, top to bottom. The overview image above labels every node. Tap a piece, then tap a highlighted empty node next to it; each tap moves it one node along the lines. Every arrow below is one such tap. The pockets themselves are part of the network. You can park a piece in an empty pocket on the wrong side for a while, as our example does.
- Moves 1–6, which also finish hibiscus (L4) and mint (L3): 1. Grapes L4 → LC → Mid2 → LB → Mid1 → LA. 2. Hibiscus R2 → RB → Mid2 → RC → Bottom. 3. Lemon R1 → RA → R2 → RB → Mid2 → RC. 4. Plum L3 → LB → Mid1 → RA → Top. 5. Hibiscus Bottom → LC → L4. 6. Mint R3 → RB → Mid2 → LC → L3.
- Moves 7–13: 7. Lemon RC → Bottom → LC. 8. Berries R4 → RC → Bottom. 9. Plum Top → RA → R2. 10. Grapes LA → Top → RA. 11. Plum R2 → RB → R3. 12. Grapes RA → R2. 13. Cherries L2 → LA → Top → RA → R1.
- Moves 14–20 finish the tray: 14. Lemon LC → Mid2 → LB → L2. 15. Berries Bottom → LC. 16. Plum R3 → RC → R4. 17. Grapes R2 → RB → R3. 18. Cherries R1 → RA → R2. 19. Strawberry L1 → LA → Top → RA → R1. 20. Berries LC → Mid2 → LB → Mid1 → LA → L1. Every piece now sits beside its tag, and the puzzle solves. In general, use the empty centre and the empty pockets as parking spaces. Fill the bottom pockets first, then work upwards.
- Take the EMPTY VIAL and the STONE EAGLE TOTEM from the doorman's tray and hand.
- At the Mountain Pass place the STONE EAGLE TOTEM on the empty pedestal in the bear-carving niche (achievement AERIAL SUPPORT). Take a MIRROR SHARD (3/4) and the RAILWAY WEIGHT.
- Near the Old Shelter repair the broken ladder with the LOGS (3/3) and the RAILWAY WEIGHT, then climb to the attic to open a hidden-object scene.
Attic group search
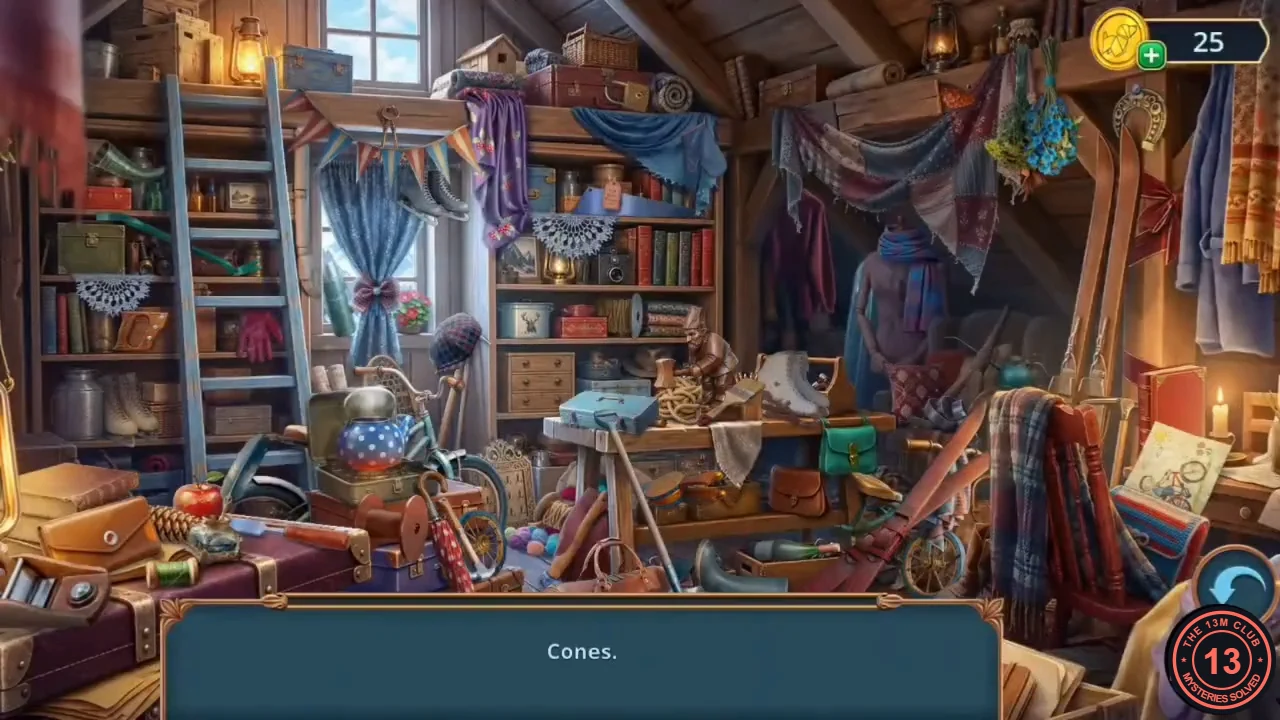
The bottom bar names one category at a time; find every instance. One pair of skates is rusty and must be oiled before it counts.
- Find the Cones (hanging plants upper right, by the suitcase and red apple lower left, by the candle right), Ropes (by the bicycle wheel, by the bicycle and crate, on the window shelf), Skates (by the curtain upper left, on the workbench right of the small carved figure, by the brown suitcase) and Bicycles (by the globe on the left, lower right, by the candle). The skates on the workbench are rusty ("They need to be freed of rust before they can be of any use."): tap the small teal oilcan with the long spout to the right of the hanging dark coat; it oils the skates, and they can then be collected. Reward: CHESS KNIGHT.
- In the Old Shelter zoom in on the portrait with the built-in thermometer. Tap the cork in the tube to take the CORK; a small figurine drops out: DEFECTIVE METAL FIGURINE.
- Zoom in on the desk map board. Put the GLUE on the broken knob mount of the drawer and attach the CHESS KNIGHT as the knob. Take the STAPLE REMOVER.
- At the Abandoned Train Station use the STAPLE REMOVER on the wooden box on the ticket-window ledge. Take the NEEDLE WITH THREAD, the EMPTY ROLLER (red "+" item) and a MIRROR SHARD (4/4) from the box.
- At the High Cliff place the four MIRROR SHARDS in the octagonal lens device to start the landscape puzzle.
Two landscapes
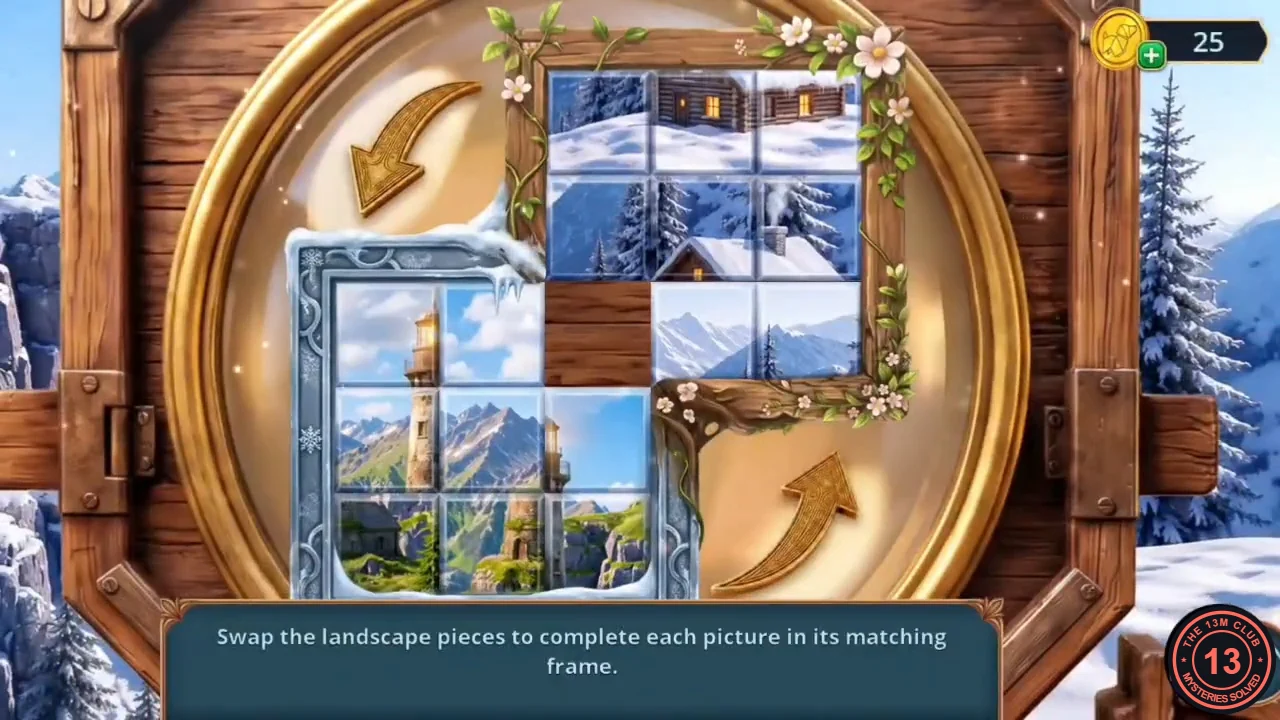
Rule: "Swap the landscape pieces to complete each picture in its matching frame." Two 3×3 frames overlap in one shared cell: the snowy silver frame at lower left (winter cabin) and the flowered wooden frame at upper right (summer lighthouse). Sixteen picture tiles and one empty slot.
- Slide tiles next to the empty slot into it. Build the winter cabin in the silver frame and the lighthouse and mountains in the flowered frame; the empty slot ends on the shared cell. This is a long sliding puzzle, so the guide gives the approach rather than every move: finish the corner of each frame farthest from the shared cell first, then work towards it, and use the shared cell as the route for moving tiles between the two frames. The solved image shows both finished pictures.
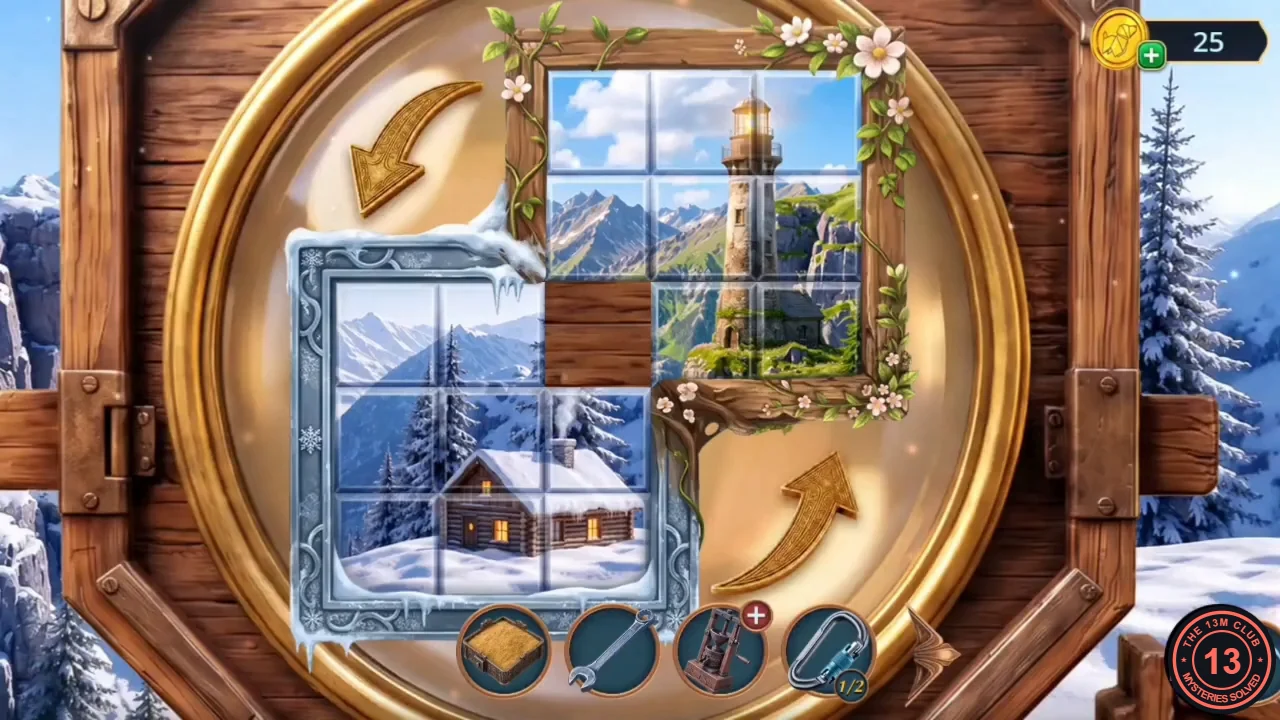
Solved: both landscapes complete, with the empty slot on the cell the two frames share. - Take the BROKEN TOKEN from the lens device's lower compartment.
- In the locomotive cab zoom in on the workbench burner and fill its three slots with the DEFECTIVE METAL FIGURINE, the MOLD WITH SAND and the BROKEN TOKEN. The figurine is melted and cast: take the CARETAKER TOKEN.
- In the Old Shelter put the CARETAKER TOKEN in the round socket on the left of the chest with the five-wheel lock. Read Leonard's inspector card and take the BALL OF YARN and the gold rod.
- Heinrich recognises Leonard as the Council man who offered a "safer route". Decision: "Ask why Leonard wanted to lead the group off the planned route." (60 coins, 2 points) or "Ask if he's sure he recognized him." (free, 0).
- In the Hotel Hall put the BALL OF YARN in the sewing basket by the kerosene tank to start the scarf puzzle.
Scarf yarn path
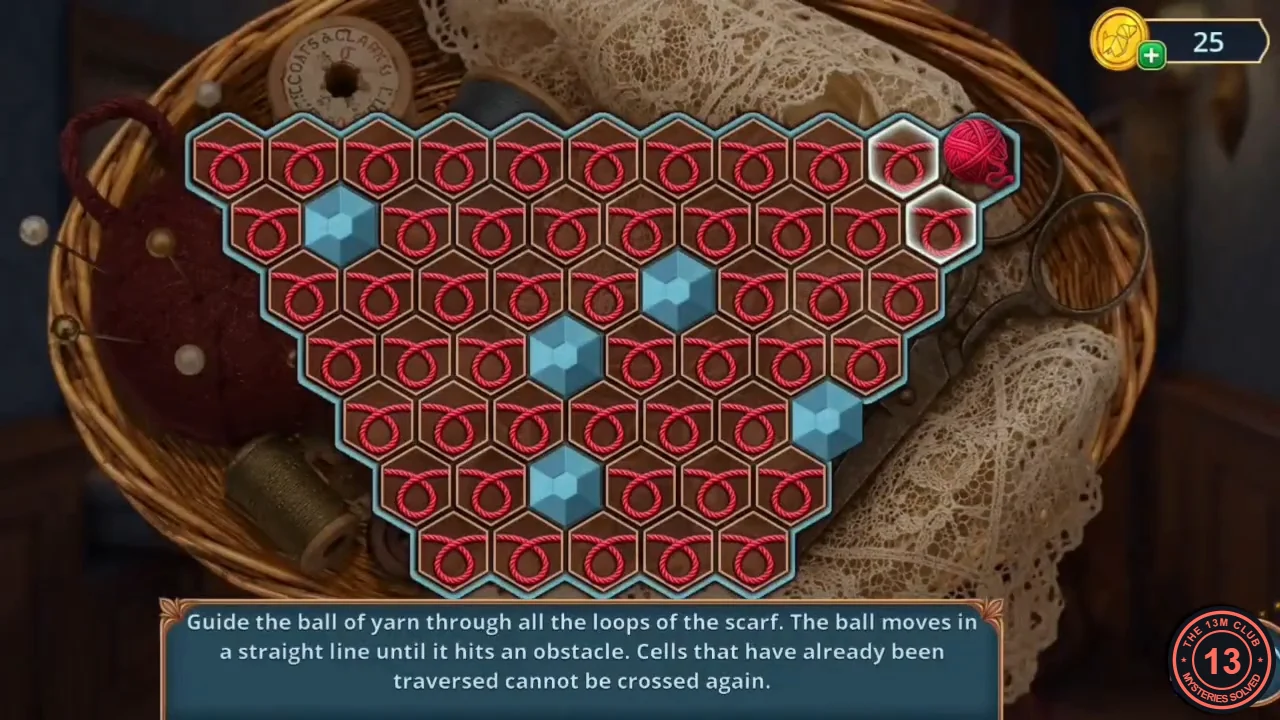
Rule: "Guide the ball of yarn through all the loops of the scarf. The ball moves in a straight line until it hits an obstacle. Cells that have already been traversed cannot be crossed again." The board is an upside-down triangle of hexagonal cells (rows of 11, 10, 9, 8, 7, 6 and 5 from the top). The ball starts in the top-right cell; blue crystals block row 2 cell 2, row 3 cell 6, row 4 cell 4, row 5 cell 7 and row 6 cell 3 (counted from the left).
- Make these 21 moves: down-left, left, down-left, right, down-right, down-left, up-left, left, down-right, left, up-left (to the top-left cell), right (along the top row), down-left, left, up-right, left, down-left, down-right, up-right, up-left, right.CODESW W SW E SE SW NW W SE W NW E SW W NE W SW SE NE NW E
- Take the THIN SCARF from the sewing basket.
- At the Mountain Pass zoom in on the blue metal stove and sweep the shards out of the upper compartment with the THIN SCARF. A sheet of ice still blocks it (it needs fire later). Take the SUNFLOWER SEEDS that drop out.
- Open the MANUAL PRESS and put the EMPTY VIAL and the SUNFLOWER SEEDS in its two slots: SUNFLOWER OIL.
- Near the Old Shelter zoom in on the screw press left of the RAGS bin and oil its rusted screw with the SUNFLOWER OIL. The press panel becomes a token puzzle.
Press token knight moves
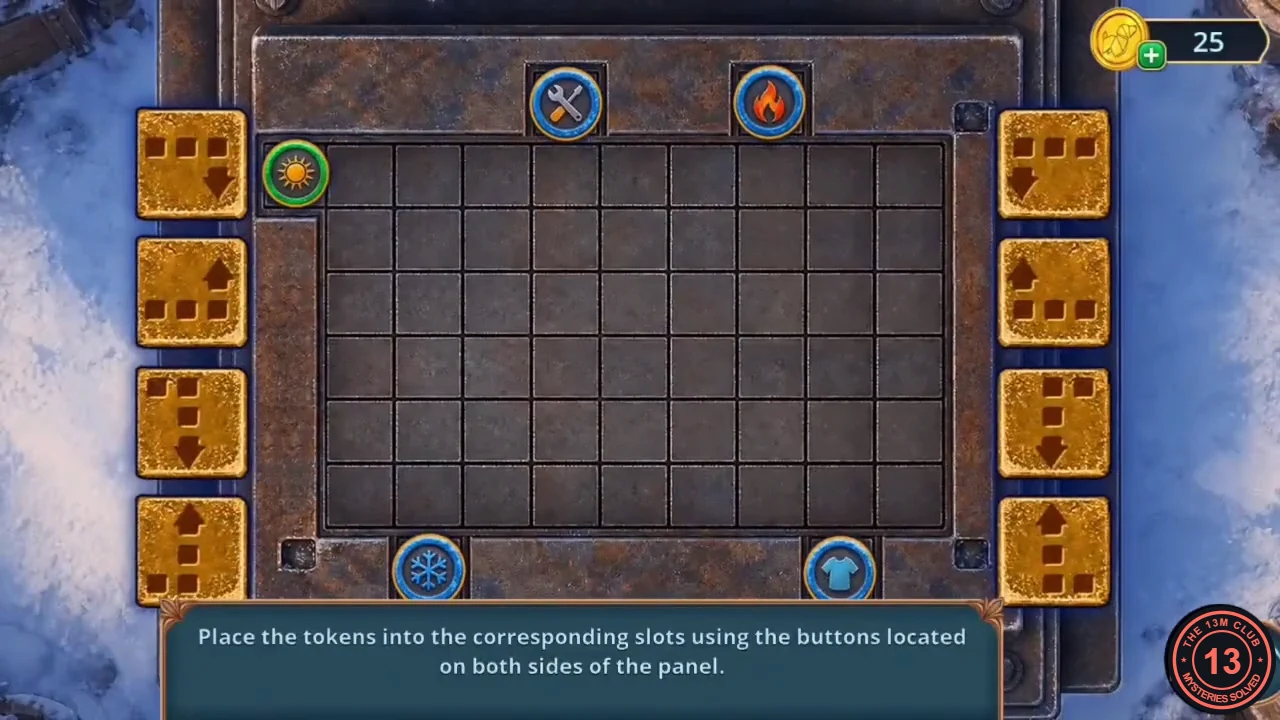
Rule: "Place the tokens into the corresponding slots using the buttons located on both sides of the panel." Each of the eight gold buttons moves the current token in an L-shape like a chess knight. Left buttons (top to bottom): 2 right + 1 down, 2 right + 1 up, 1 right + 2 down, 1 right + 2 up. Right buttons are the same moves to the left. Slots: sun → snowflake, gear → tools, water drop → fire, trousers → shirt.
- Press (L = left column, R = right column, numbered from the top): Sun: L1, R3, L1, R3. Gear: L3, L2, L4. Water drop: L1, L2, L1, L4. Trousers: L1, L1, L1, L2, R3, L3.CODESun L1 R3 L1 R3 · Gear L3 L2 L4 · Drop L1 L2 L1 L4 · Trousers L1 L1 L1 L2 R3 L3
- The press lifts: tap the folded rags and take the CURVED CORKSCREW.
- At the Bridge use the CURVED CORKSCREW on the bung of the water barrel under the cabin window. Take the CHALK POWDER and the SHINY RUBY from the niche behind it. Keep the corkscrew.
- At the Mountain Pass zoom in on the round stone dial by the bear statue and put the SHINY RUBY in the empty socket to start the animal-track puzzle.
Animal tracks
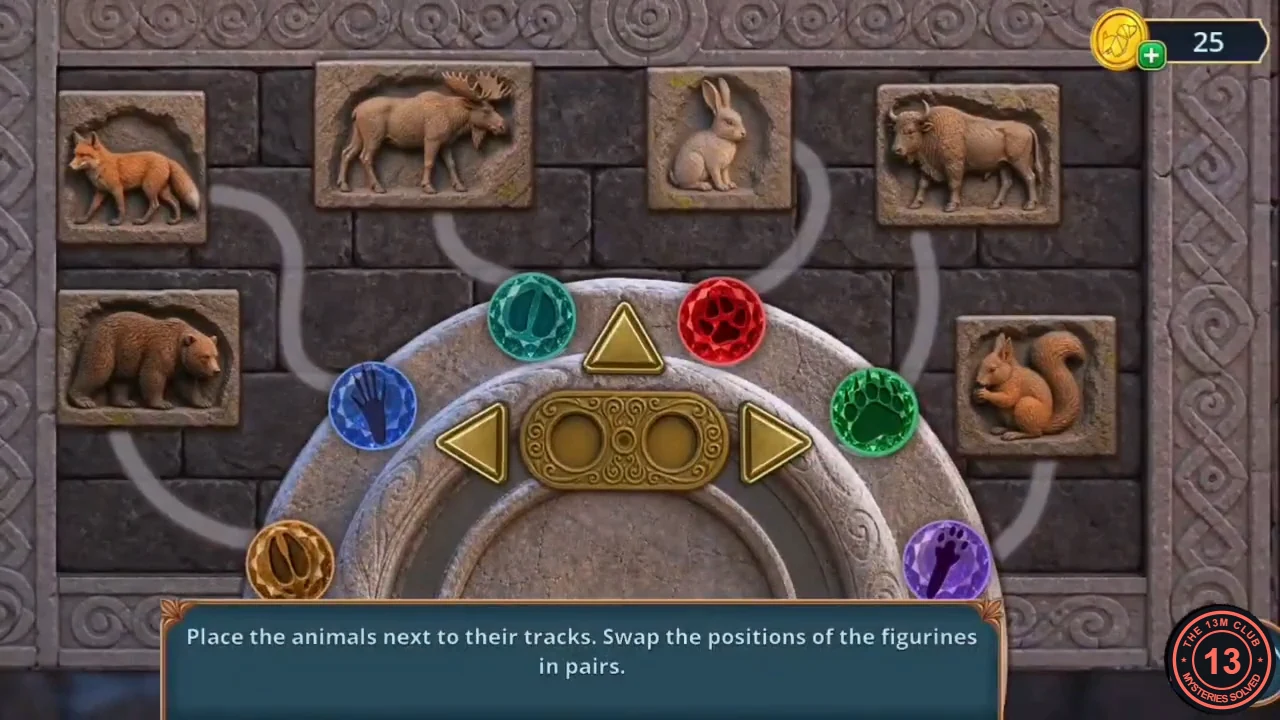
Rule: "Place the animals next to their tracks. Swap the positions of the figurines in pairs." Six gem tracks sit on six positions, P1 (bottom left) to P6 (bottom right). The gold selector covers two neighbouring positions; the arrows move it and the up button swaps the two gems under it.
- Arrange the gems as: P1 green (bear), P2 red (fox), P3 orange (moose), P4 purple (rabbit), P5 teal (bison), P6 blue (squirrel). From the start layout one shortest order of neighbour swaps is P2-P3, P3-P4, P4-P5, P5-P6, P2-P3, P3-P4, P4-P5, P1-P2, P2-P3, P1-P2.CODEP1 green, P2 red, P3 orange, P4 purple, P5 teal, P6 blue
- Take the DRY SMOKE COMPOUND (red "+" item) from the dial compartment and the BELT that appears at the blue stove.
- In the locomotive cab zoom in on the leaking steam pipe beside the firebox. Push the CORK into the hole in the pipe first, then wrap the BELT around it; the steam stops and a red SHUTTER BUTTON appears at the top of the pipe. Take it. The pin below the firebox needs a handle (later).
- At the High Cliff install the SHUTTER BUTTON on the old camera on the cart and take the SWITCH TOGGLE. Collect the EDELWEISS BROOCH on the cart cloth right of the red toolbox in the same zoom.
- In the Hotel Hall install the SWITCH TOGGLE on the wall plate left of the dark doorway. The light comes on and the doorway opens a hidden-object scene.