Hotel Courtyard and Pump Room
Leonard has deliberately disabled the courtyard equipment. Water has to reach the hotel before it burns down.
- At the burning hotel Heinrich is by the boiler. Decision: "Freeze in fear" (free, 0), "Ask Michael to help Heinrich" (30 coins, 3 points) or "Ask Heinrich if he's alright" (60 coins, 6 points). You arrive in the Hotel Courtyard.
- Zoom in on the collapsed beams in front of the hotel door. Open the small box with the Edelweiss emblem lock using the EDELWEISS MEDALLION and take the TAILOR'S SEAM RIPPER.
- Zoom in on the EQUIPMENT door on the right; its roller has been ripped out. Take the LIFTING STRAPS (2/2) from the door sill.
- In the Ice Cave zoom in on the green backpack frozen in the ice and cut it open with the TAILOR'S SEAM RIPPER: WOODEN SPOOL.
- Back at the EQUIPMENT door fit the WOODEN SPOOL at the bottom as the new roller. The door opens onto the Hotel Pump Room, where someone has deliberately taken everything apart.
- Zoom in on the generator on the left and take the HEAVY FIGURINE (a bear statuette) at the lower right. The wire panel needs a conductive part later.
- Zoom in on the murky floor pool and tap the pitchfork leaning at its upper-left edge. It fishes out the VALVE SET (1/3), and the pitchfork head goes to your inventory as a "+" item.
- Zoom in on the pump on the right. Pour the SAWDUST into the oily pit and take the HAND WINCH. Collect the EDELWEISS BROOCH on the left side of this close-up.
- In the Hotel Courtyard zoom in on the collapsed beams again. Put the LIFTING STRAPS (2/2) on the leaning beam and the HAND WINCH below it to start the crane puzzle.
Furniture crane
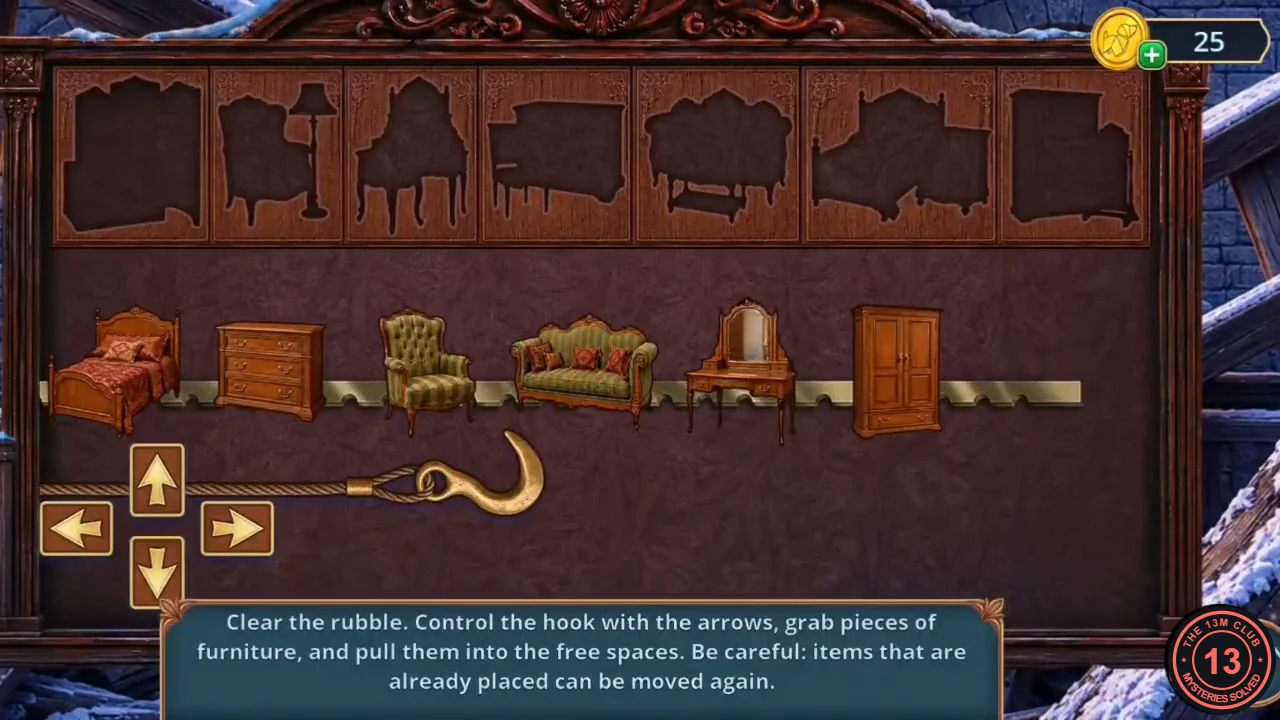
Rule: "Clear the rubble. Control the hook with the arrows, grab pieces of furniture, and pull them into the free spaces. Be careful: items that are already placed can be moved again." There are seven shelf compartments with silhouettes at the top and a notched rail carrying furniture in the middle. The hook's ↑ ← → ↓ buttons are at the bottom left. With the hook under the bare rail, ↑ catches the rail, ← drags it left, ↓ releases it and → moves the hook back right. With a piece directly above the hook and below its compartment, ↑ lifts it in.
- Wave 1 brings the large pieces (bed, chest of drawers, armchair, sofa, dressing table, wardrobe, and a folding screen that enters from the left). Wave 2 brings the small ones (trunk, floor lamp, stool, green chair, coffee table, nightstand, standing mirror). Fill the compartments from left to right: 1 folding screen + trunk; 2 armchair + floor lamp; 3 dressing table + stool; 4 chest of drawers + green chair; 5 sofa + coffee table; 6 bed + nightstand; 7 wardrobe + standing mirror.
Burning Lobby: collect the valves
The hotel is on fire. Enter the Burning Lobby and collect all three valve sets for the pump room.
- Michael warns that it is still dangerous inside. Decision: "Trust Michael." (60 coins, 2 points) or "Go alone." (free, 0).
- Enter the hotel door to reach the Burning Lobby: reception desk on the left, a burning staircase blocked by a fallen chandelier in the centre and a cage lift on the right.
- Zoom in on the reception desk. Take the VALVE SET (2/3) from the open drawer and collect the EDELWEISS BROOCH to its right in the same drawer. Take the WOODEN WOODPECKER TOY.
- Zoom in on the cage-lift grate and take the SMALL BOLT lying on the floor behind it.
- At the Steep Cliff zoom in on the tree hollow and put the WOODEN WOODPECKER TOY on the trunk. It pecks out the VALVE SET (3/3).
- In the Hotel Pump Room zoom in on the wall pipe board and insert the VALVE SETS to start the valve puzzle.
Valve swap
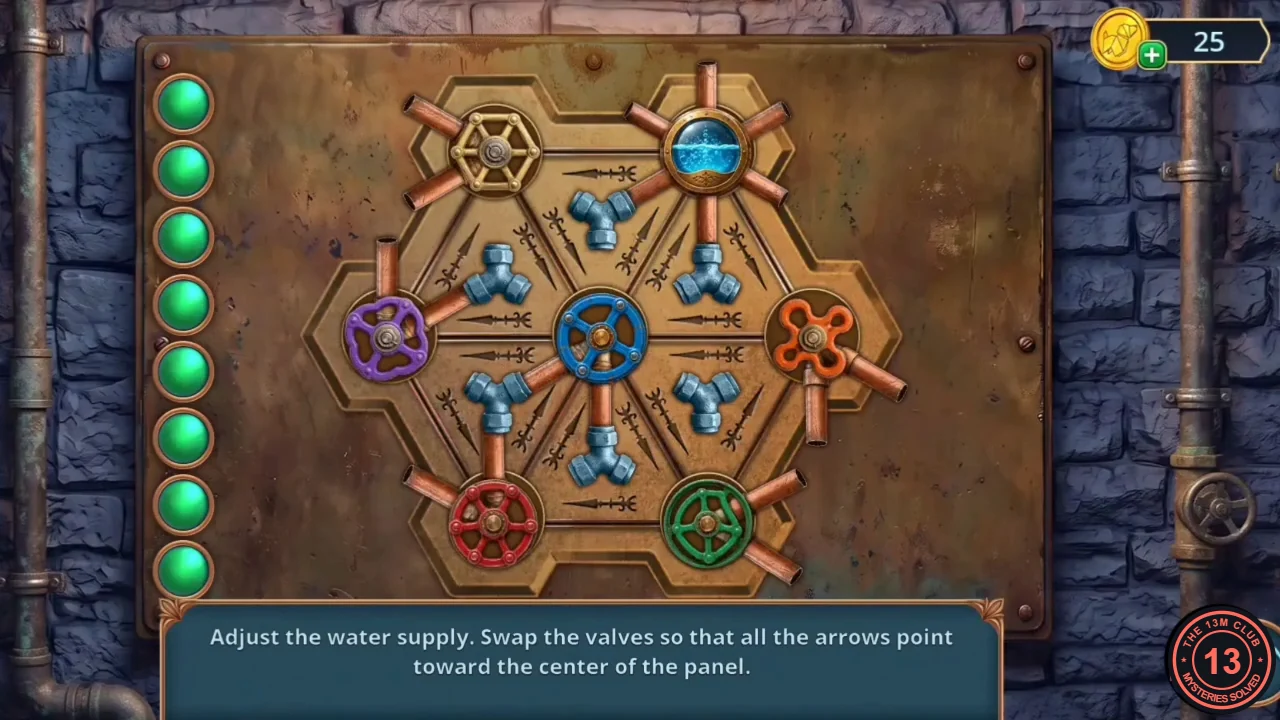
Rule: "Adjust the water supply. Swap the valves so that all the arrows point toward the center of the panel." Seven valves sit in a hexagon: top-left, top-right, left, centre, right, bottom-left and bottom-right. Tap two valves to swap them. The eight green lights on the left count your moves: one goes out with each swap. Start: top-left gold hex wheel, top-right water gauge (glass dome), left purple, centre blue, right orange, bottom-left red, bottom-right green.
- Swap in this order: bottom-left ↔ bottom-right, left ↔ bottom-left, centre ↔ right, top-left ↔ centre, centre ↔ top-right, top-right ↔ right. Final layout: top-left orange, top-right blue, left green, centre water gauge, right gold hex wheel, bottom-left purple, bottom-right red.CODEBL↔BR, L↔BL, C↔R, TL↔C, C↔TR, TR↔R
- Take the GEAR from the open pipe board.
Hotel Roof: reach Clara
The sprinklers now put out the fire on the lobby staircase.
- In the Burning Lobby zoom in on the wall winch left of the staircase and put the GEAR in its empty socket. The winch raises the fallen chandelier and the staircase is clear.
- Go up to the Hotel Roof. Clara is trapped behind the green-shuttered window on the right.
- Zoom in on the chimney and take the TAPE at the lower right. Leave the saw blade stuck in the brickwork for now.
- Zoom in on Clara's window and take the BROKEN JACK (a "+" item) from the sill.
- Stick the TAPE across the hot glass in an X, then strike it with the HEAVY FIGURINE. The crack puzzle starts.
Glass crack pattern
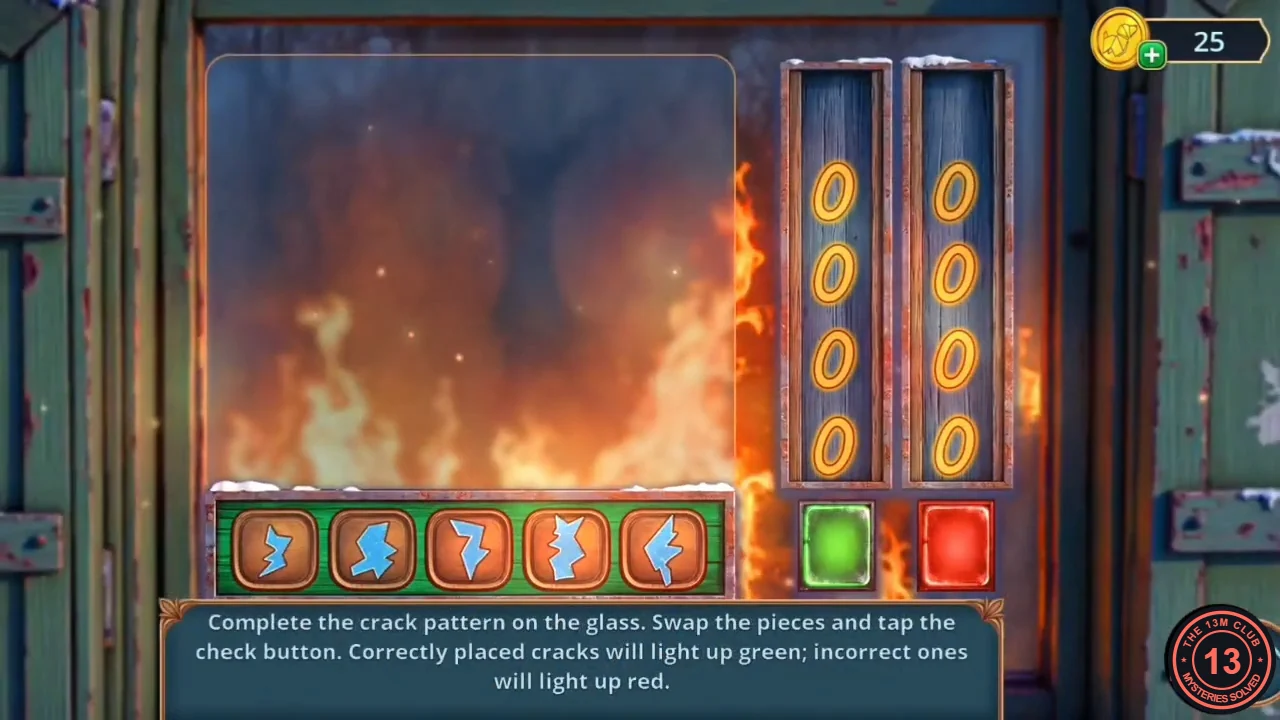
Rule: "Complete the crack pattern on the glass. Swap the pieces and tap the check button. Correctly placed cracks will light up green; incorrect ones will light up red." Five crack pieces lie on the tray. From left to right they are A, a thin zigzag bolt; B, a broad jagged blob; C, a "7"-shaped hook; D, a tall spiky column; and E, a "<" arrowhead.
- Place the pieces in the row from left to right as B, A, D, C, E and tap the check button. All five light up green. If the tray order differs in your game, keep the green pieces and swap the red ones.CODEB A D C E
- Clara is freed and thanks you. You receive the CHLORINE TABLET.
Drain the pool and free the pigeon
Drain the pump-room pool, shatter the ice crystal in the cave and reach the pigeon in its loft on the hotel roof.
- In the Hotel Pump Room zoom in on the floor pool and drop in the CHLORINE TABLET. The pool foams and drains: take the TUNING FORK by the drain grate.
- In the Ice Cave zoom in on the big ice crystal at the lower right with a wooden handle frozen inside. Strike it with the TUNING FORK; the crystal shatters. Take the PITCHFORK HANDLE.
- On the Hotel Roof zoom in on the pigeon loft left of the window and tap the pigeon. It lands in the straw and a hidden-object scene opens.
Pigeon loft
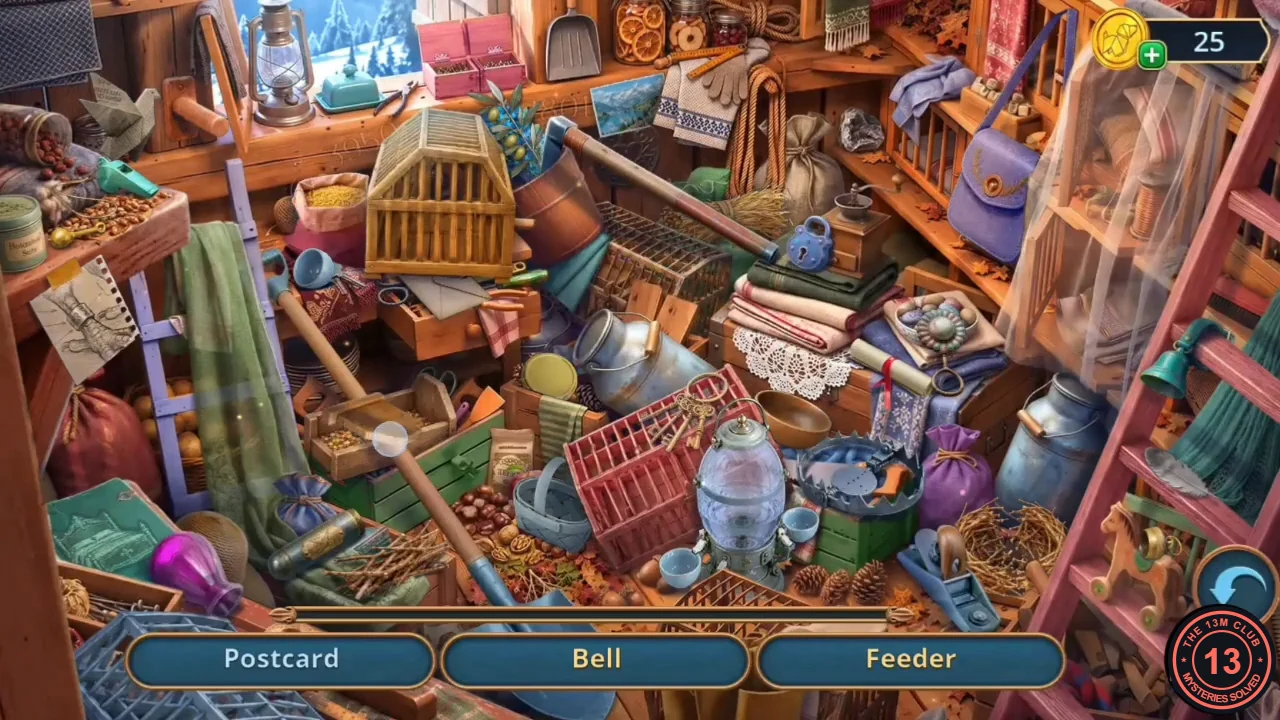
The list shows three names at a time, 12 objects in all: Postcard, Bell, Feeder, Water Dispenser, Perch, Small Basket, Dove Feather, Nest, Whistle, Mail Tube, Sack of Grain and Bird Ring. Four of them must be assembled before they can be collected: Feeder, Water Dispenser, Nest and Mail Tube. The rest, including the Bell, are ordinary pickups.
- Feeder: tap the loose wooden board beside the seed tray on the green crate (left centre), then tap the finished feeder. Water Dispenser: tap the small blue cup near the milk can at the upper left so it goes under the tap of the glass dispenser at the bottom centre, then tap the dispenser.
- Nest: tap the bundle of twigs on the nut pile at the lower left centre (next to the blue mail tube); it flies into the empty nest at the lower right by the ladder, then tap the nest. Mail Tube: tap the brass end cap on the ladder rung right of the milk can; it closes the open tube at the lower left by the purple vase, then tap the tube.
- Find the plain objects as they appear: Bell, Postcard, Dove Feather, Small Basket, Whistle, Perch, Sack of Grain and Bird Ring. Reward: RESCUED PIGEON.
Pocket mirror and lock pick
Send the rescued pigeon for the pocket mirror, use it to light the ice tunnel and open the lift grate with the lock pick you find there.
- At the Frozen Waterfall zoom in on the ice grotto at the top of the falls, where a small gold object is lodged among the icicles. Send the RESCUED PIGEON; it brings down the POCKET MIRROR (achievement).
- In the Ice Cave a light beam falls on the frozen pool in front of the stone tunnel. Zoom in and use the POCKET MIRROR to reflect the beam into the tunnel, then tap the lit tunnel: LOCK PICK. Collect the EDELWEISS BROOCH at the bottom-left corner of the same close-up.
- In the Burning Lobby zoom in on the cage-lift grate and open its lock with the LOCK PICK. The lift is packed with luggage and a hidden-object scene opens.
Luggage lift silhouettes
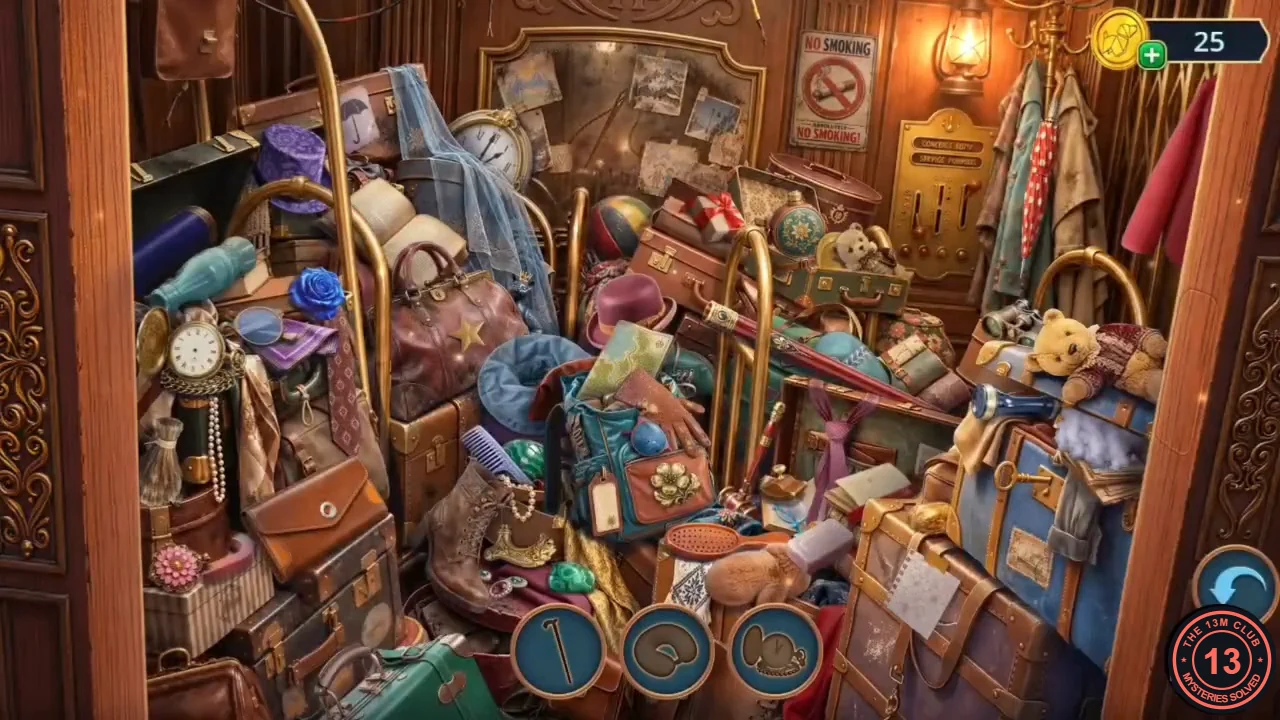
Three silhouette slots at the bottom show the next objects, 12 in all. Brown-filled silhouettes need an extra step first and turn blue once it is done.
- Pocket Watch (far left on its chain): tap the loose round watch glass on the brown trunk at the lower right, then the watch. Walking Cane (red cane across the centre): tap its end to fit the gold handle, then the cane. Luggage Tag: the blank tag on the teal backpack moves to the strap loop of the brown bag at the left behind the pearl necklace; tap it there.
- Neck Pillow (flat blue pillow, centre left): tap the lilac stuffing poking out of the blue trunk under the teddy bear, then the pillow. Hairbrush (red, lower centre, empty head): tap the shaving brush at the far left under the pocket-watch spot, then the hairbrush.
- Find the plain objects as they appear: Handbag (brown doctor's bag with a gold star, upper left centre), Umbrella (red polka-dot, on the coat rack at the upper right), Binoculars (beside the teddy bear's head), Top Hat (purple, upper left), Round Flask (ornate tin with strap, upper centre right), Leather Glove (on the teal backpack) and Flashlight (blue, by the teddy bear). Reward: PUMP.