The briefcase in the hangar
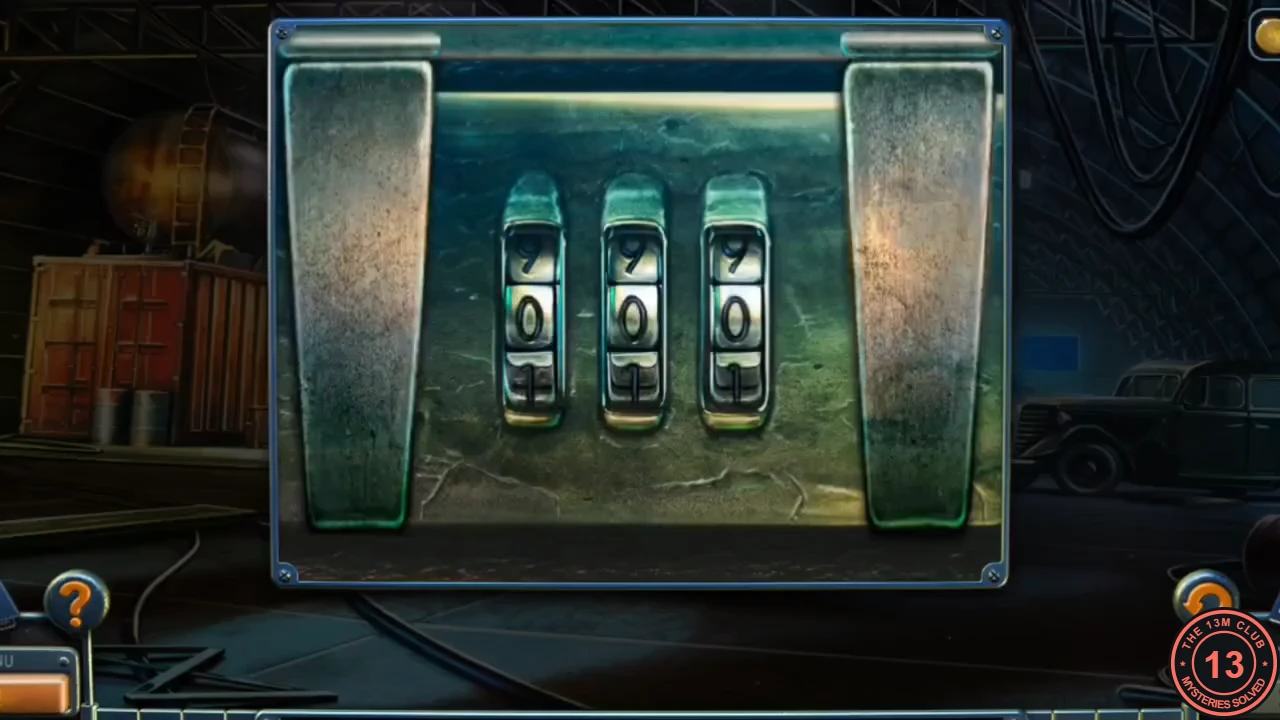
Chapter 8 starts in the hangar. A plank under the black car carries a number, and the briefcase on the floor has three number wheels.
- Tap under the front wheel of the black car. Laura finds a plank with the number 629 on it.
- Look at the briefcase on the hangar floor. Turn the three wheels to 6, 2, 9. The briefcase opens.
- Inside are photos of the kidnapped children. Arrows are drawn on one photo. Note them: left, right, left, left, right, centre. They show the way through the container yard.
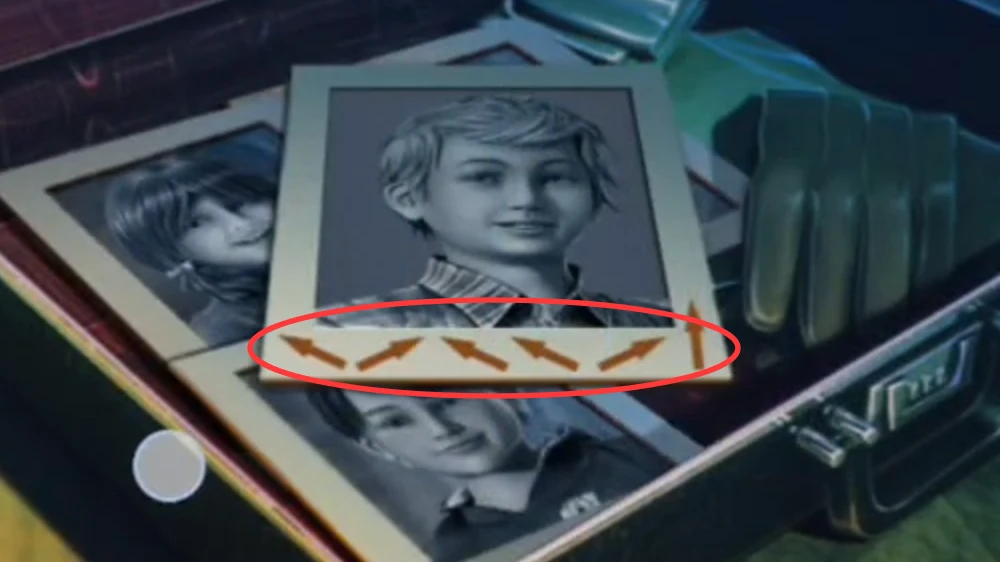
The arrows on the boy's photo give the route.
The container maze
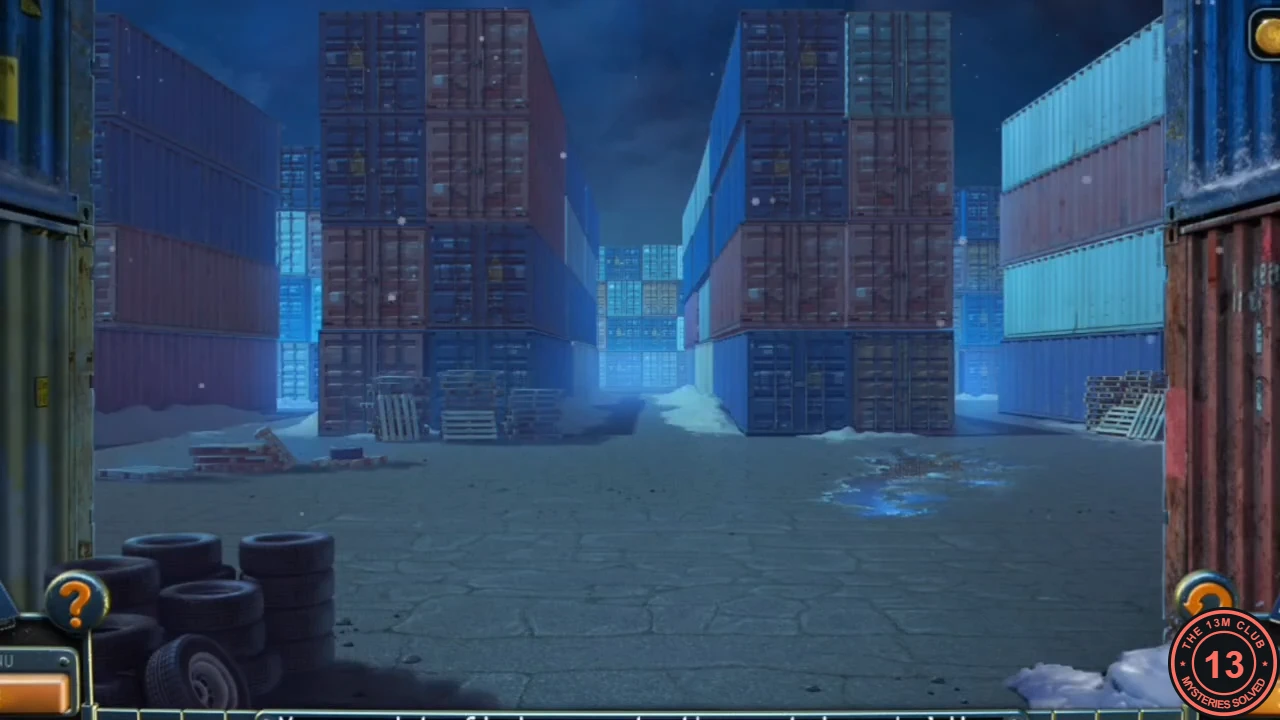
The children are held somewhere among the stacked containers at the port. The arrows from the briefcase photo give the route through the container yard.
- Walk down to the port. Look at the trailer door: its stand holds two cubes and one mount is empty. Laura says another cube belongs there. You will find it later in this chapter.
- From the port, go right into the container yard. Follow the arrows: go left, right, left, left, right, then straight ahead (centre). You reach the yard where the children are locked in a container.
The guard dog in the children's yard
The children call for help from a locked container. A dog guards it, so Laura needs to lure the dog to its doghouse and chain it up.
- Take the KNIFE with the red handle at the lower left and the round MOSAIC PIECE lying on the dumpster.
- Tap the dog. Laura says she must lure it to the doghouse on the right and chain it up. Note the empty bowl in front of the doghouse.
The rail car in the abandoned station
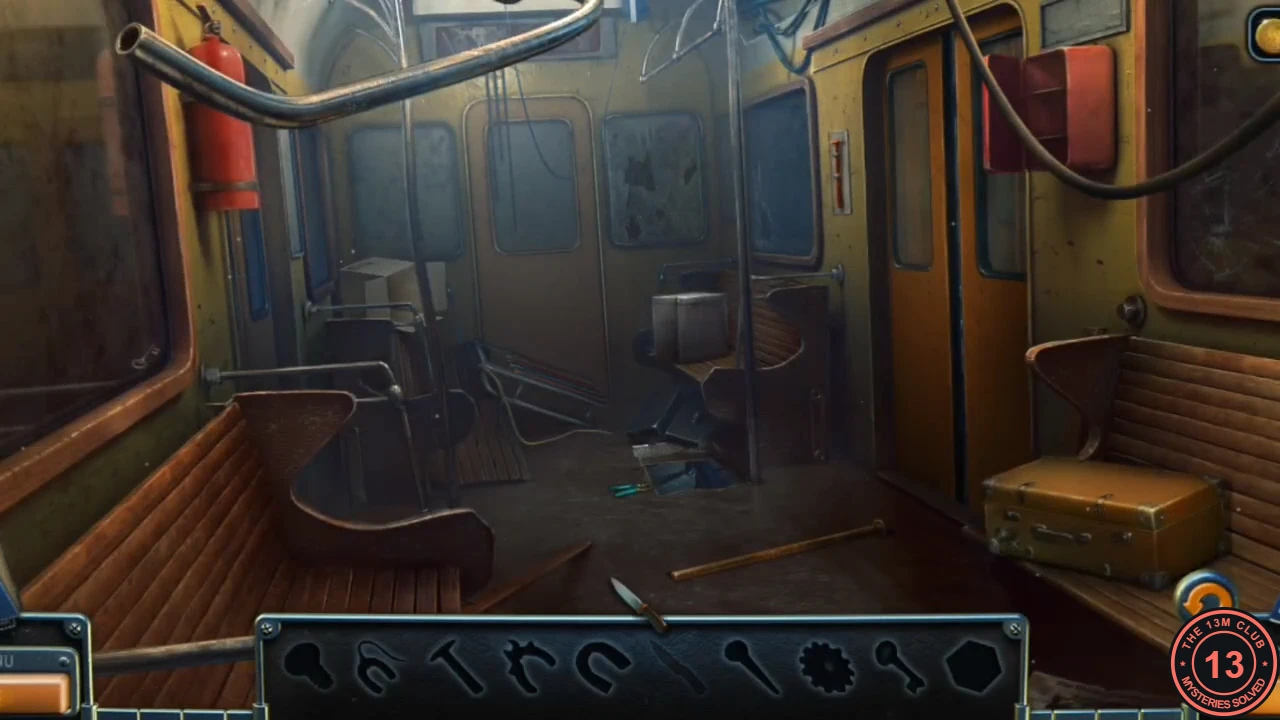
This is an interactive hidden-object scene. The bar at the bottom shows silhouettes of 10 objects: bolt, rope with magnet, hammer, pliers, magnet, knife, pipe, gear, key and the CUBE. Some of them must be built or freed first.
- Use the map to go to the abandoned station. Use the red-handled KNIFE on the rail-car door to pry it open, then go inside.
- Take the KNIFE from the left seat by the backrest and the PIPE from the floor in the middle.
- Look at the left bench. Take the GEAR. The sled on it is tied with a rope; Laura needs to cut the rope off first.
- The sliding door on the centre right is jammed. Wedge the PIPE into it to force it open, then take the MAGNET from the bar behind it.
- Back on the left bench, put the MAGNET on the rope and cut the rope with the KNIFE. You get the ROPE WITH MAGNET.
- Look at the grate in the seat box on the floor. Lower the ROPE WITH MAGNET through the grate to fish out the BOLT. The pliers lie there in two halves: join them with the BOLT to make the PLIERS.
- On the yellow wall, a metal plate holds a hammer. Use the PLIERS on the plate to free the HAMMER.
- Zoom into the window and break the pane with the HAMMER. Take the KEY.
- Look at the suitcase on the right seat. Use the KEY, then insert the GEAR. The suitcase opens: take the CUBE.
The floor mosaic in the station
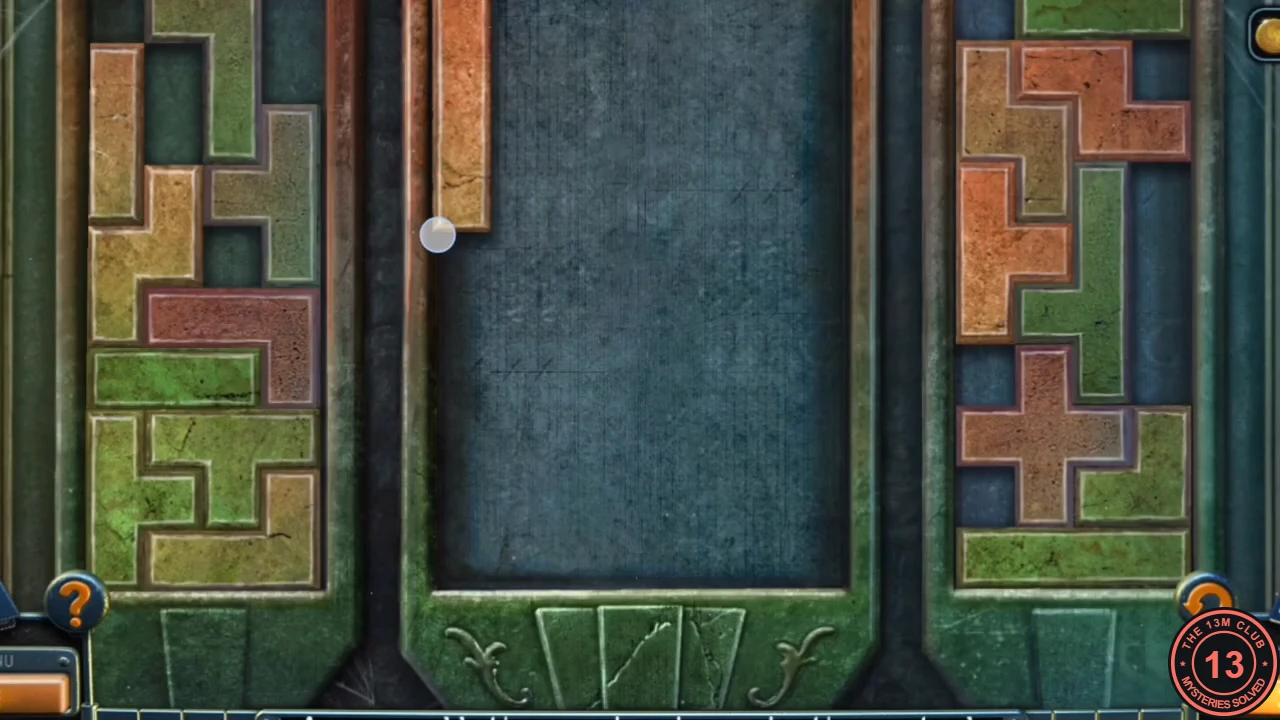
The round mosaic in the middle of the station floor is missing its centre piece. Once it is in place, the mosaic becomes a shape-fitting puzzle.
- Look at the round mosaic in the middle of the station floor and put the MOSAIC PIECE in the centre.
- Drag the green and orange pieces from the side trays into the blue frame until the frame is completely filled. Use the solved picture as a guide. The floor opens: take the COIN.
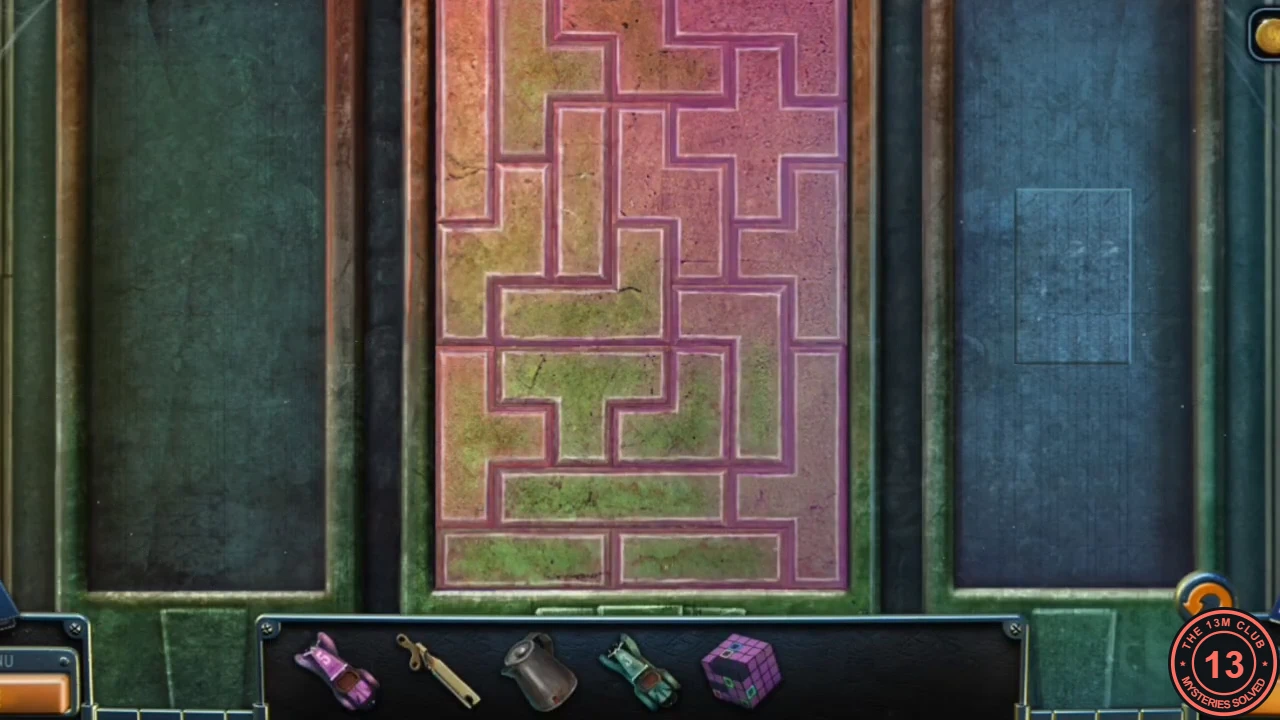
Solved floor mosaic (use it as the target layout).
The trailer at the port
The CUBE completes the stand on the trailer door. Inside, Laura heats water for later and finds a second coin.
- Use the map to go back to the port. Look at the trailer door and put the CUBE in the empty mount on the left. The cubes light up and the door opens. No further input was shown in the recording.
- Open the bathroom door at the back right. Put the EMPTY KETTLE in the sink to get the KETTLE WITH WATER.
- Lift the lid of the toilet tank and take the COIN.
- Look at the hotplate on the desk on the right. Put the KETTLE WITH WATER on it and press the button. You get the KETTLE WITH HOT WATER.
- Tap the red curtain at the back to open it.
The dining area behind the curtain
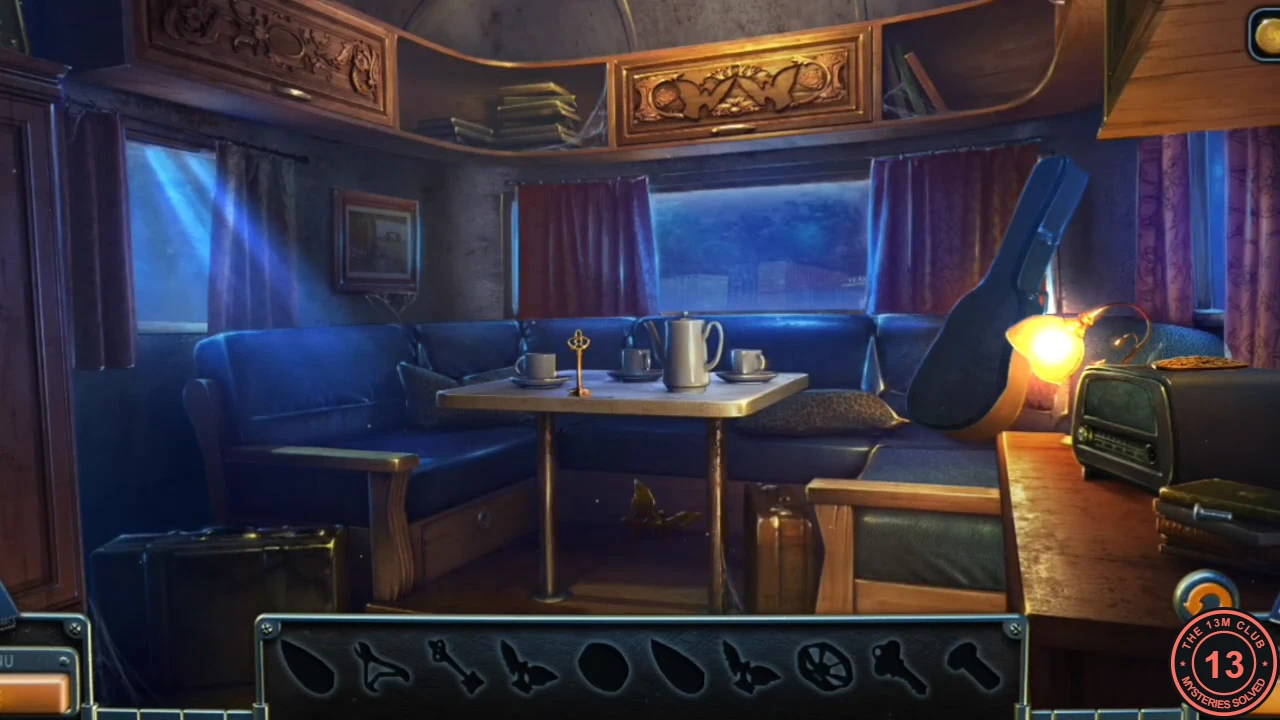
This is another interactive hidden-object scene. The bar shows 10 silhouettes: two lock pieces, wire cutters, a key, two doves, a button, a small key, a screw and the VALVE.
- Take the gold KEY standing on the table, the SCREW on the right sideboard beside the radio and the DOVE on the floor under the table.
- Open the drawer under the bench (front, below the table) with the KEY. Take the BUTTON. The wire cutters lie in two halves: fix them with the SCREW to get the WIRE CUTTERS.
- The guitar case leaning on the right is locked. Look at the radio on the right sideboard: take the carved LOCK PIECE on top, then put the BUTTON on the radio. The lid opens: take the small KEY.
- Open the guitar case with the small KEY. There is a lock piece inside the guitar: cut the strings with the WIRE CUTTERS and take the LOCK PIECE.
- The carved cupboard at the upper left is locked with a two-part key. Insert both LOCK PIECES. The cupboard opens: take the DOVE from the shelf.
- The carved panel above the window has two dove outlines. Put both DOVES there. It opens: take the VALVE (red wheel).
Dog food, a chain and a frozen toy car
With the valve and the can opener, Laura can gather what she needs to deal with the dog. The hot water frees the third toy car.
- In the front room of the trailer, open the fridge on the left. Use the CAN OPENER on the tin can to get the DOG FOOD.
- Walk down to the port. Put the VALVE on the faucet of the yellow tank on the pallet (centre front) and turn it. Take the BARREL.
- Go left to the hangar. Laura sees something on top of the orange container but can't jump up there. Put the BARREL in front of the container, then look at the top of the container under the tank and take the TIRE JACK.
- Return to the port. Use the TIRE JACK on the trailer wheel on the right to lift the trailer, then take the CHAIN.
- Use the map to go to the children's yard. Put the DOG FOOD in the empty bowl in front of the doghouse. When the dog comes to eat, put the CHAIN on it.
- Something hangs from the wire above the yard. Tap the snowball pile at the lower left by the dumpster to throw a snowball and knock it down. Take the HANDLE.
- The green container door, where the children are, is locked. Look at the tyre stack in the centre: a toy car is frozen in ice. Pour the KETTLE WITH HOT WATER on it and take the CAR.
Toy cars by the port gate
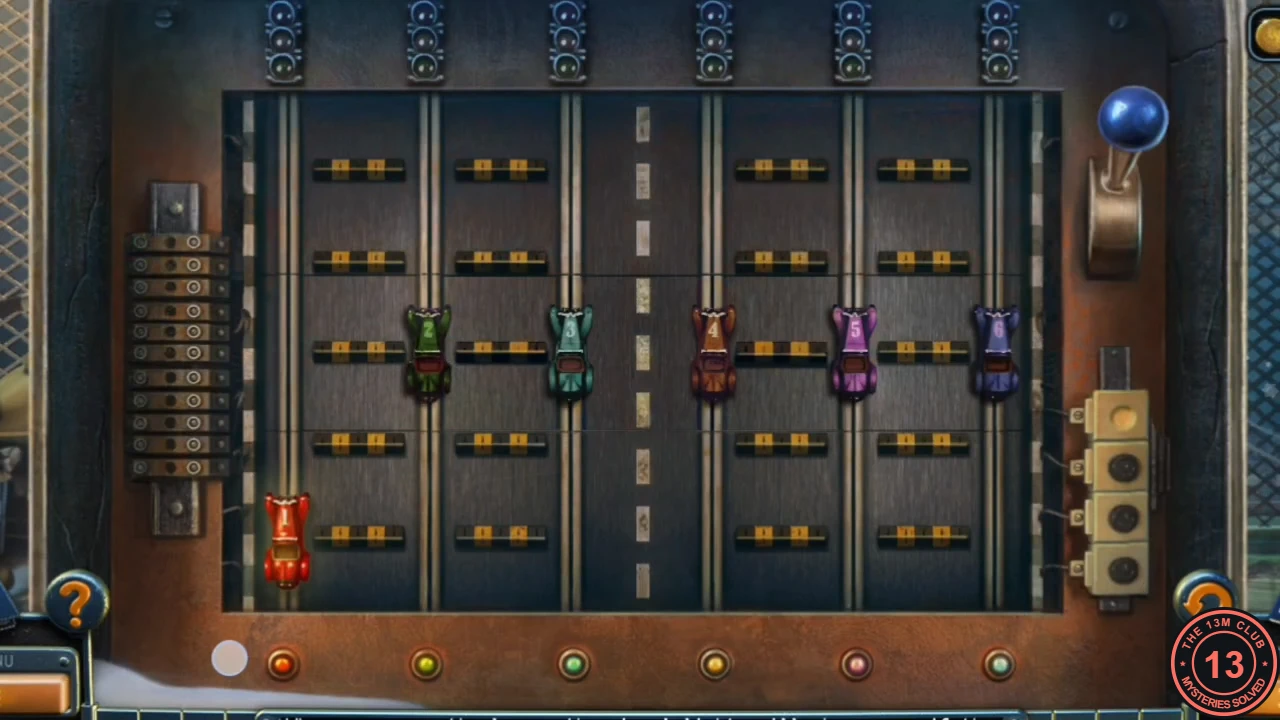
A box on a post beside the port gate holds six coloured lanes. Three toy cars are missing.
- Use the map to go outside the port, by the crane truck. Open the lid of the box on the post to the left of the gate. Put the three CARS in the empty lane slots.
- Drag each car along its lane. Counting rows from 1 at the top to 5 at the bottom, set the lanes from left to right: red row 5, green row 4, teal row 1, orange row 5, magenta row 1, blue row 4. Pull the lever with the blue knob to the right. The lanes turn green: take the COIN.
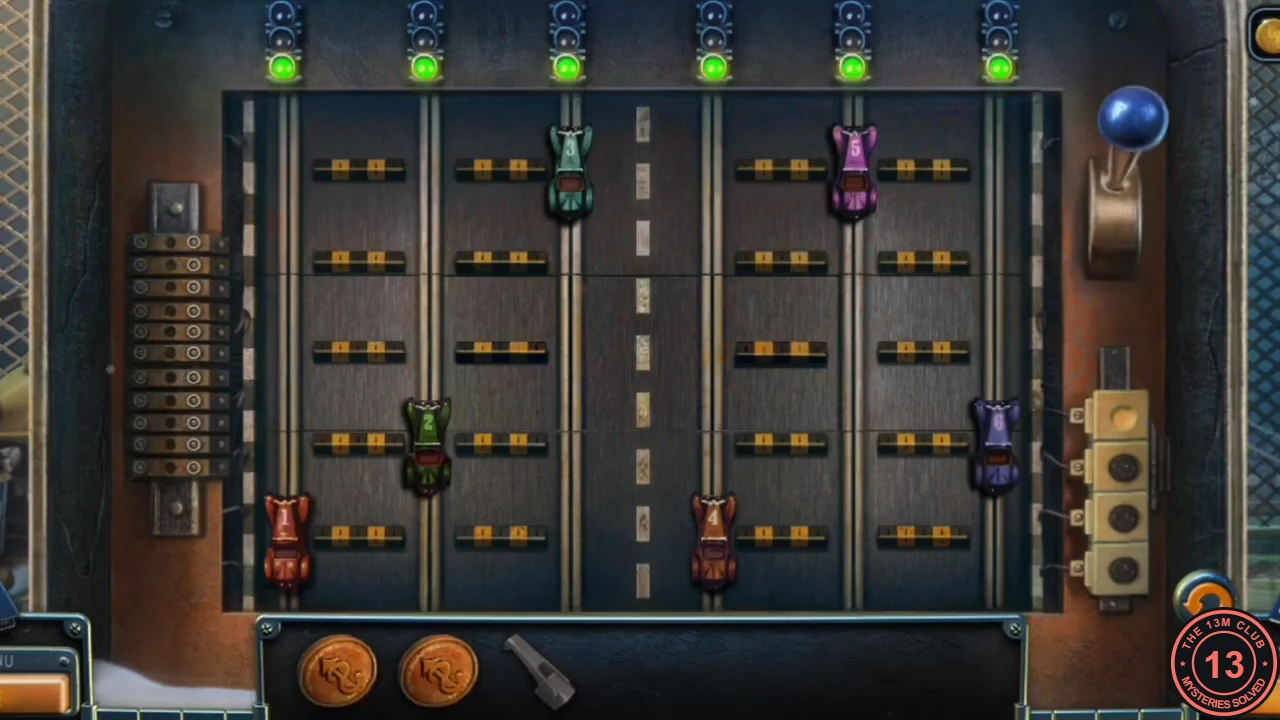
Solved toy-car box: all six lanes green.
The trailer roof hatch
The hatch in the trailer ceiling is missing a handle.
- Use the map to go back to the trailer front room. Look at the hatch in the ceiling and put the HANDLE on it. Turn both handles to open the hatch, then take the blue VALVE from the roof.
Ship's-wheel cupboard
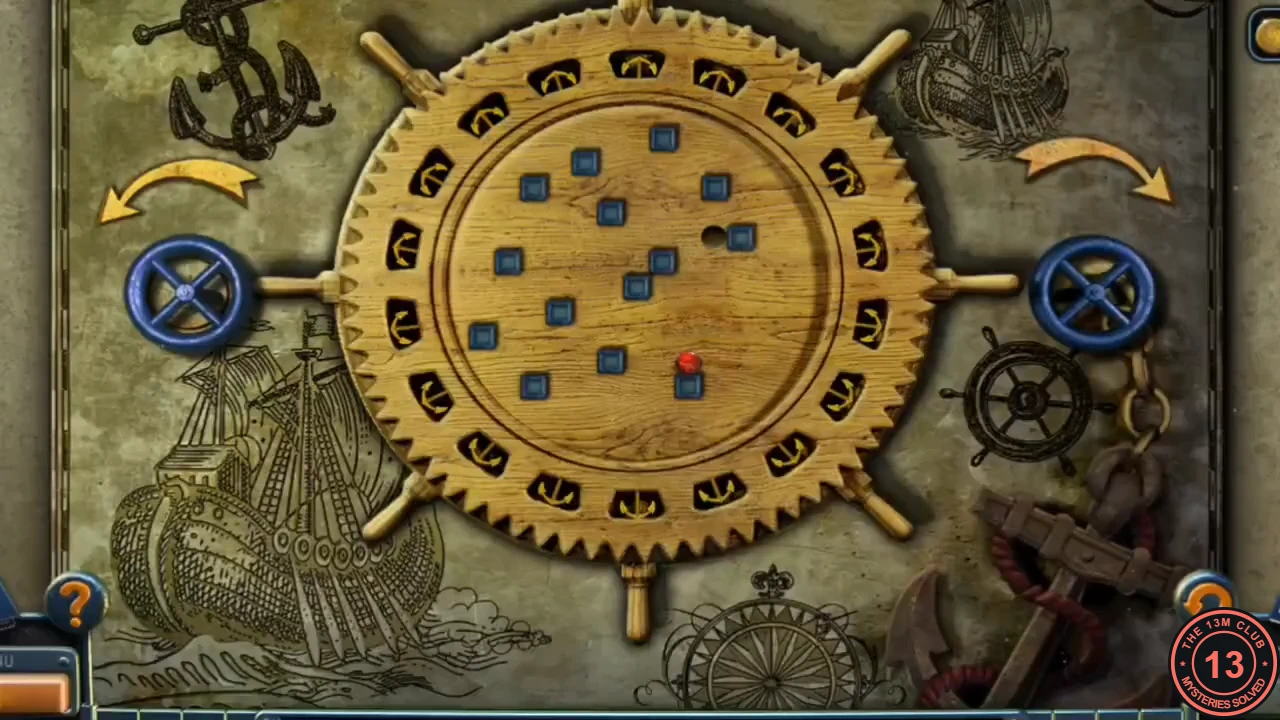
The white cupboard on the upper right wall of the trailer front room has a gold ship's-wheel lock. With the VALVE in place, it becomes a rotating disc with blue blocks, a red piece and a dark hole. Roll the red piece into the hole.
- Look at the white cupboard on the upper right and put the VALVE on it.
- The left handwheel turns the disc a quarter turn anticlockwise and the right handwheel a quarter turn clockwise. After each turn, the red piece slides down until it hits a block. Press the handwheels in this order: left, left, right, left, right, right, right, right, left. The red piece drops into the hole and the cupboard opens. Take the COIN.
Coin star box
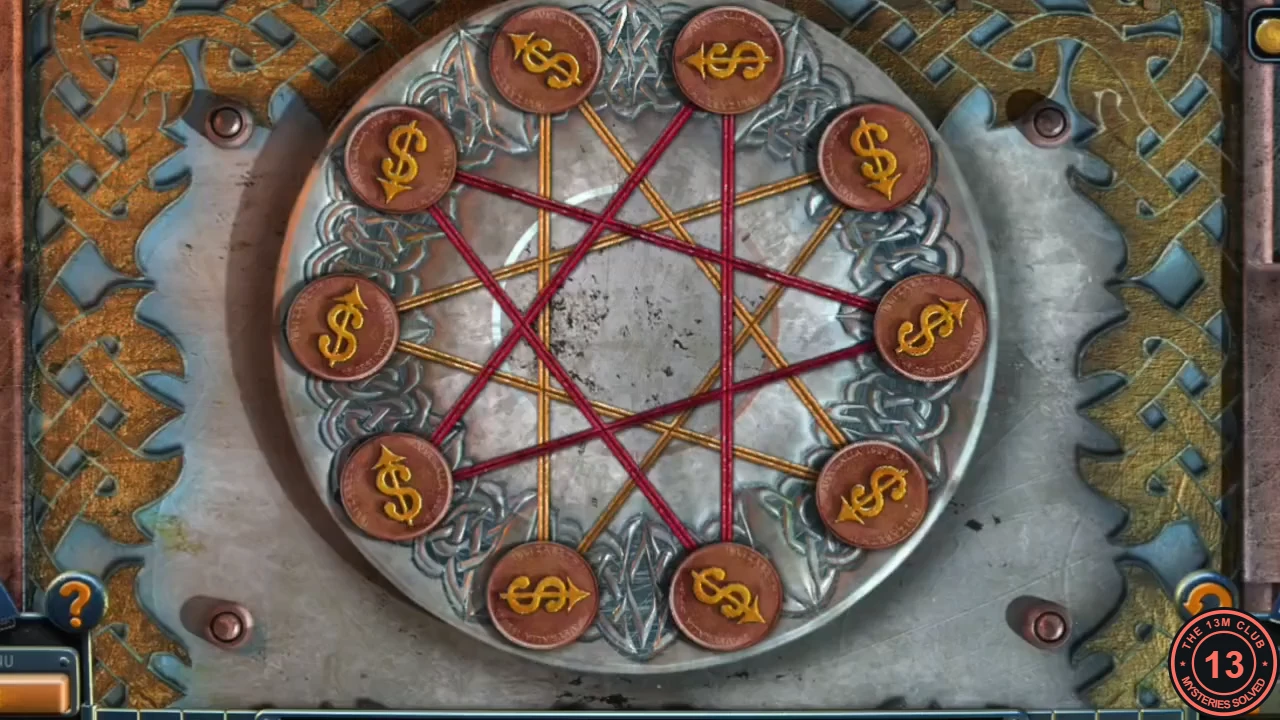
The small ornate box on the hangar floor, beside the orange container, has four empty coin slots. With all four COINS in place, ten coins sit on the points of a star. Each coin has a dollar sign with an arrow.
- Use the map to go to the hangar. Look at the small box on the floor beside the orange container and put the four COINS in it.
- Tap a coin: the coins joined to it by a line light up. Tap one of them to swap the two coins. The goal is to make every arrow point to the centre of the star.
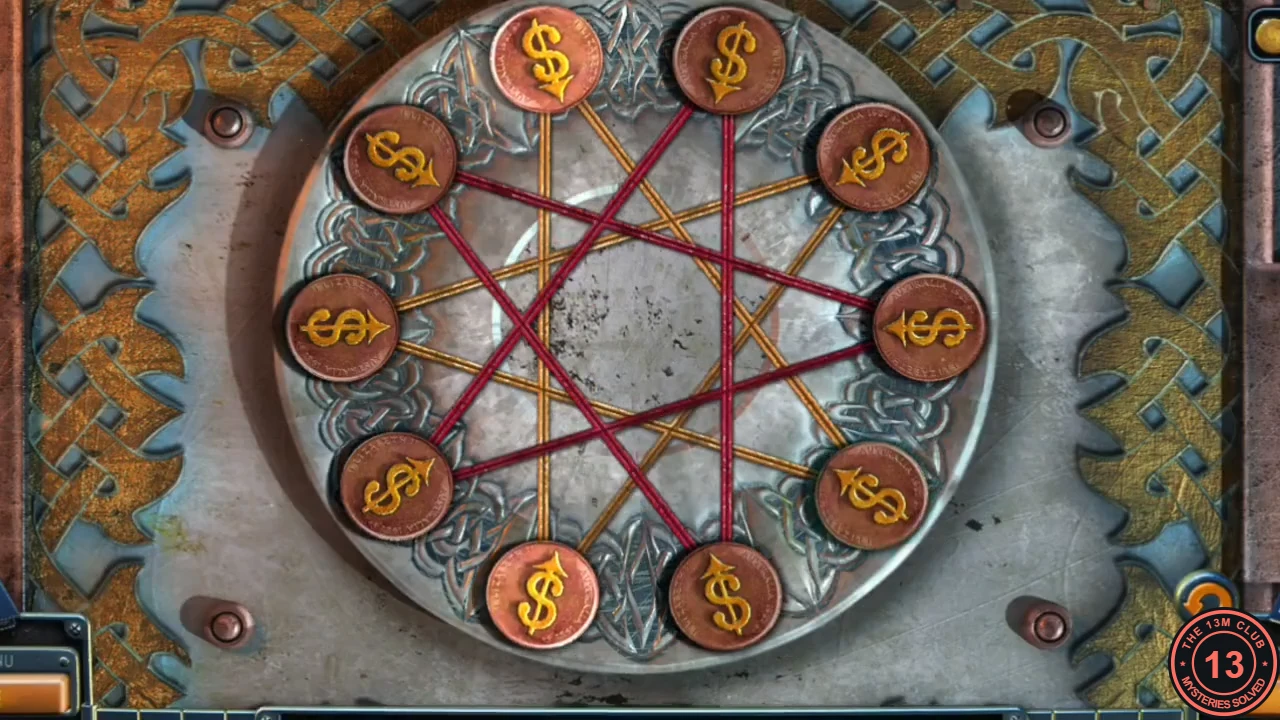
Target state: every coin's arrow points to the centre. - Name the coin spots like a clock: 1, 2, 3, 4 and 5 down the right side, then 7, 8, 9, 10 and 11 up the left side. In the recorded game these swaps solved it: 10 with 5, 1 with 5, 3 with 8, 3 with 10, 5 with 10, 3 with 10, 2 with 9, 2 with 7, 11 with 4, 2 with 9, 11 with 7, 2 with 7, 11 with 7. The box opens: take the KEY. This example only works if your coins start exactly as in the recording; otherwise use the rule in the step above.
Freeing the children
The KEY opens the container where the children are locked up.
- Use the map to go to the children's yard. Look at the green container door and use the KEY on its lock. The ending cutscene plays: the children are saved and the mafiosi are arrested.
- A message congratulates you on completing the main game and says you can now play the bonus chapter. Choose Bonus Chapter in the main menu to start it.