Lift shaft and storage corridor
Laura lands on top of an old lift cage deep underground. Find a way down into the storage corridor and open the mesh gate.
- Open the bottle close-up and break the bottle on the stone to get a BROKEN BOTTLE.
- Use the BROKEN BOTTLE on the rope hanging in the shaft to cut a LASSO.
- Throw the LASSO to pull the CROWBAR within reach, then use the CROWBAR on the floor grate and climb down.
- In the storage corridor take the PICK from the board on the left wall and the COGWHEEL from the floor. Search the straw crate to find the SYDNEY OPERA HOUSE FIGURINE.
- Put the COGWHEEL on the wall mechanism beside the mesh gate and turn the crank. The gate opens.
Cavern bridge and tunnel gate
Beyond the gate a rail bridge crosses a cavern, but one section is turned away and its mechanism is jammed.
- Take the MODEL SHIP from the round dial on the cart on the right.
- Use the PICK on the stone jammed in the gear mechanism. The bridge section swings into place.
- Cross to the barred tunnel gate. Search the sand pile with the weight stand on the left and take the SCREWDRIVER. Several weights are visible, but you cannot finish the stand yet.
- Back in the storage corridor, note the torn diagram on the left wall. It cannot be restored yet; Laura collects its missing scraps over later chapters.
- Use the SCREWDRIVER on the screws of the caged lamp to get a FIGURINE.
- Move the straw aside in the second crate to uncover a painted box, then open it.
Painted box circles
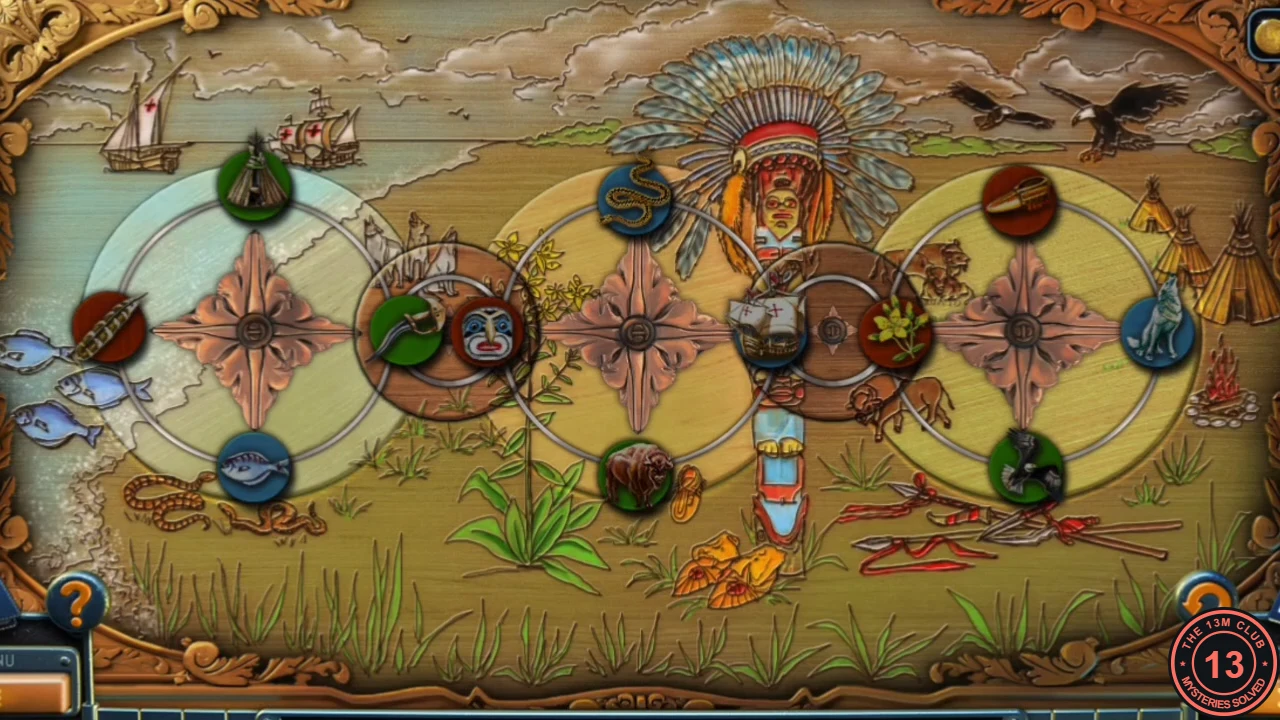
The lid shows a picture surrounded by rotating circles. One token is missing, and the tokens must match the pictures painted beside them.
- Place the MODEL SHIP in the empty slot of the small right-hand circle.
- Rotate the circles until every token sits next to the matching painted picture. The solved arrangement: left circle - ship at top, fish on the left, snake at the bottom; small left circle - wolf and flower; middle circle - canoe at the top, moccasin at the bottom; small right circle - mask and tomahawk; right circle - bison at the top, eagle on the right, tepee at the bottom.
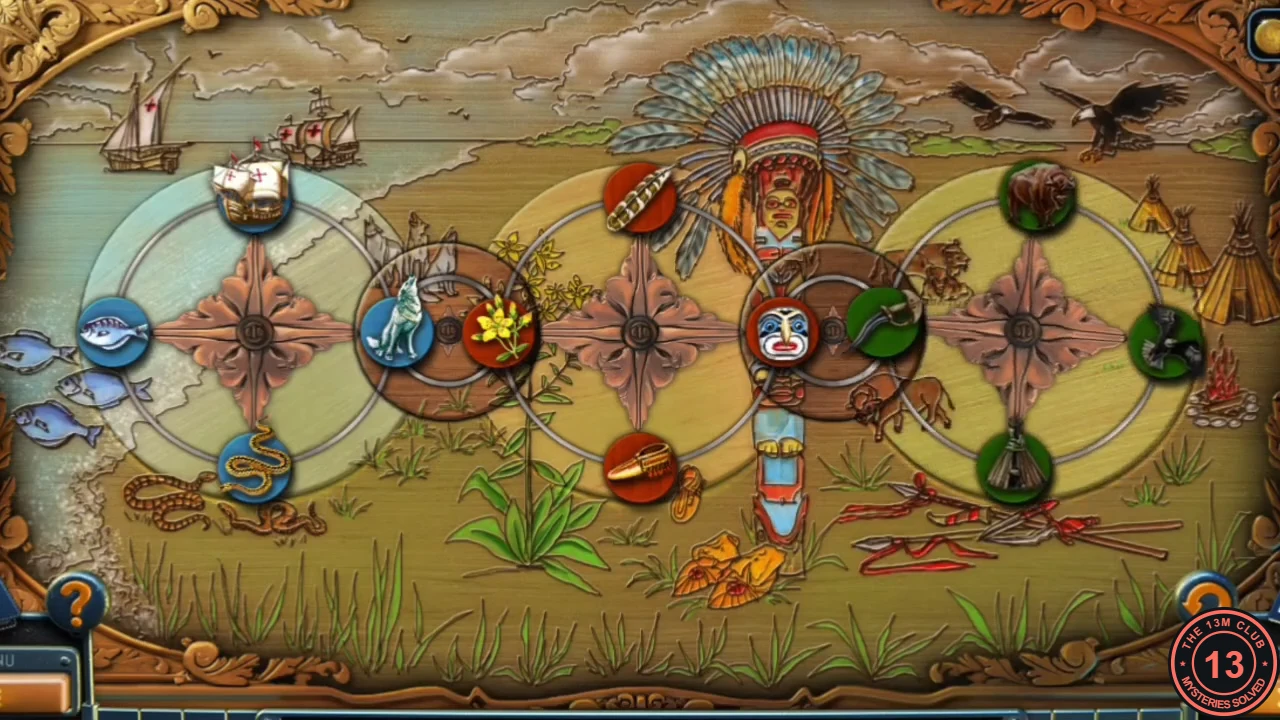
Solved circles: each token sits beside its painted picture. - Take the SIGNET RING and the KNIFE HANDLE from the opened box.
Knife, glove and spotlight
Assemble a knife, use it to find insulation for the spotlight wires, and look for the first collection item.
- At the tunnel gate, fit the KNIFE HANDLE onto the blade stuck in the post to get a KNIFE.
- On the bridge, cut open the tied sack with the KNIFE and take the RUBBER GLOVE. The knife stays in your inventory.
- Collection item: on the same bridge scene, tap the small dark suitcase behind the sacks at the bottom centre. This is the first of the game's collection objects.
- At the tunnel gate, use the RUBBER GLOVE on the bare wires to connect the spotlight. It lights the hole in the wall; look through and take the FIGURINE lying on the floor behind it.
- Place both FIGURINES on the ornaments of the gate panel to start the crafting puzzle.
Craftsmen's gate
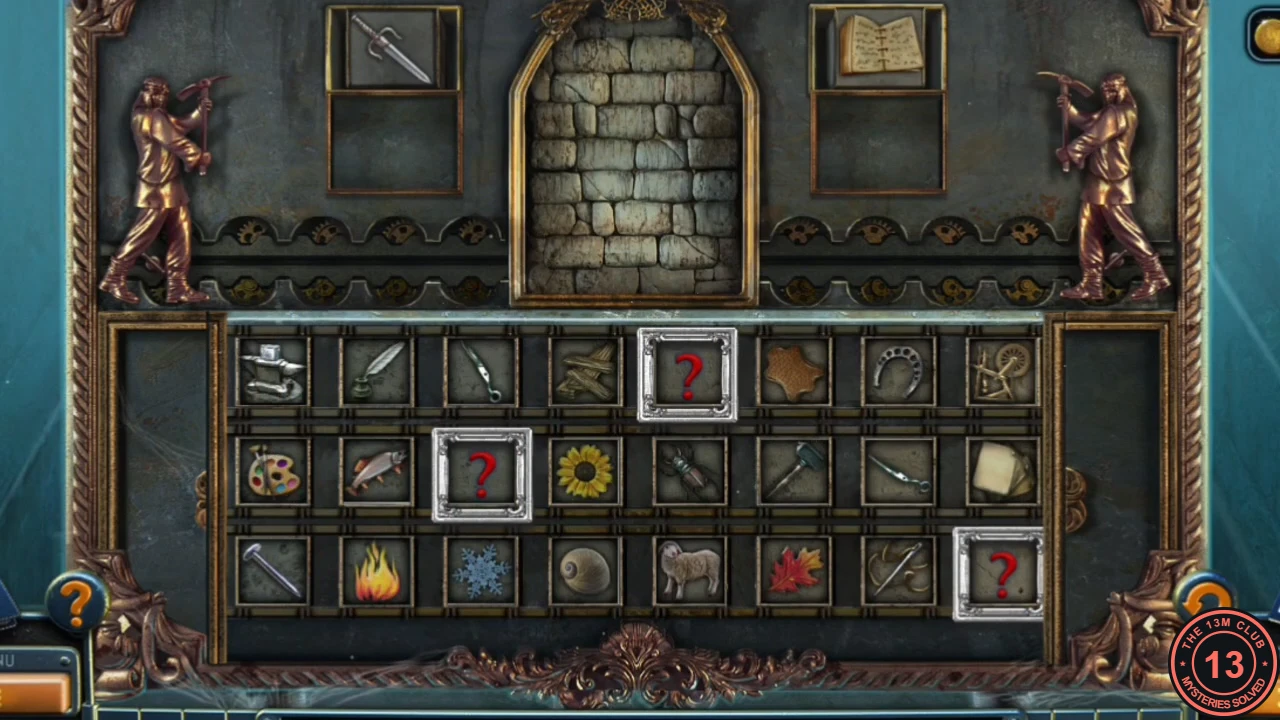
Two alcoves each show an object that has to be made. Select three tiles from the 3 x 8 grid that together make it; each finished object fills one of the empty question-mark tiles and is needed for later recipes.
- Left alcove, in order: SWORD = anvil + hammer + fire; SCISSORS = small blade tool + curved blade + nail; PICTURE FRAME = planks + hammer + nail.
- Right alcove: BOOK = quill + paper + needle and thread; CLOTH ROLL = spinning wheel + scissors + sheep; LEATHER BOOT = leather hide + scissors + needle and thread; SHIRT = cloth roll + scissors + needle and thread.
- Finish the left alcove with the PAINTING = cloth roll + palette + picture frame. The statues break the wall to reveal a round slot.
The vault and Lucas
The signet ring opens the way into a bank vault, where Laura finally meets the man who has been expecting her.
- Put the SIGNET RING in the round slot. Laura climbs through into the vault.
- Talk to Lucas, the man in the vault study. He asks for a sample of the strange swamp liquid from the museum and gives you an EMPTY BEAKER.
- Go through the left door of the vault hall into the study. Take the PAPER from the chair, use the KNIFE on the red cushion to find the STATUE OF LIBERTY FIGURINE, and take the PAPERCLIP beside the typewriter. The file on the desk is only background.
- Return through the vault hall to the dark underground hub. Move the rocks at the debris chute on the bottom right to get the GREAT WALL OF CHINA FIGURINE and a SIEVE.
- At the tunnel gate, set the loose weights into the tray. One is missing; use the SIEVE on the sand to find it, then take the complete set of WEIGHTS.
- In the vault hall, place the WEIGHTS on the scales held by the hooded statue beside the wooden doors.
Statue's scales
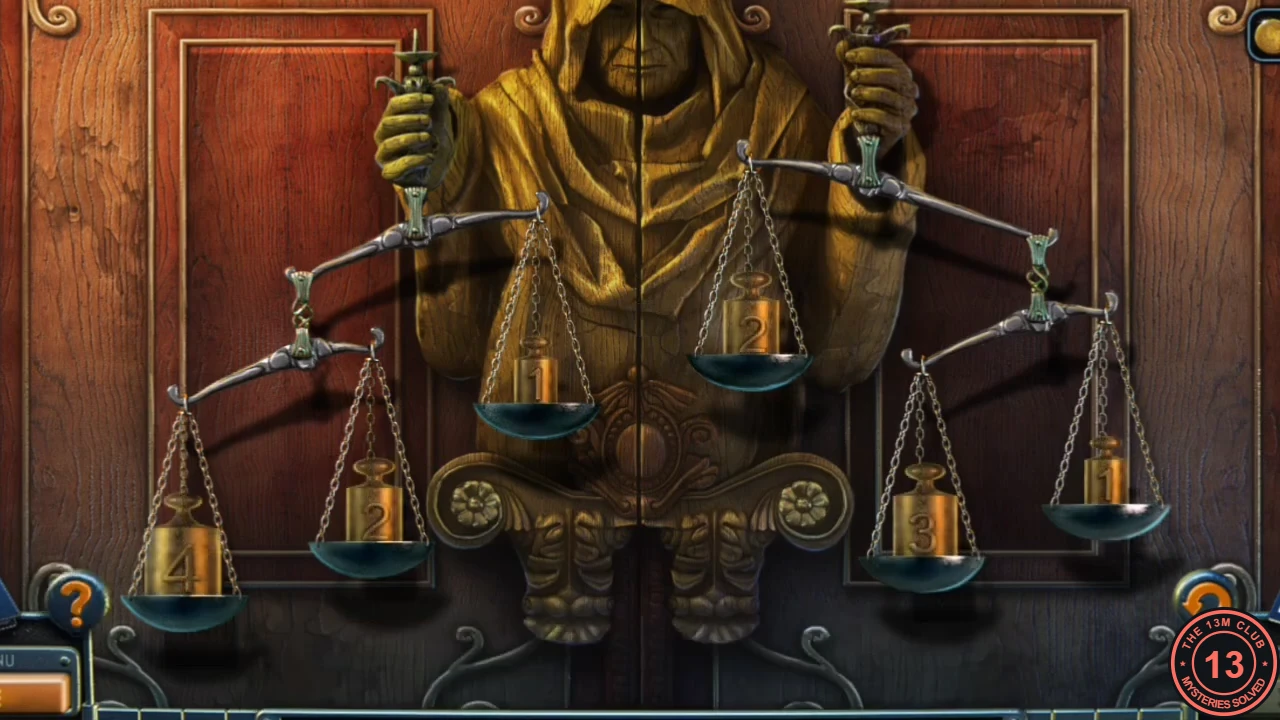
The statue holds a two-level balance: an outer pan on each side and an inner pan on each side. Every beam must hang level.
- Swap the weights between pans until all beams are level. Starting layout in the recording: left outer pans 4 and 2, left inner 1, right inner 2, right outer 3 and 1.
- Solved layout: left outer pans 1 and 2, left inner pan 3, right inner pan 4, right outer pans 1 and 2. The doors open.
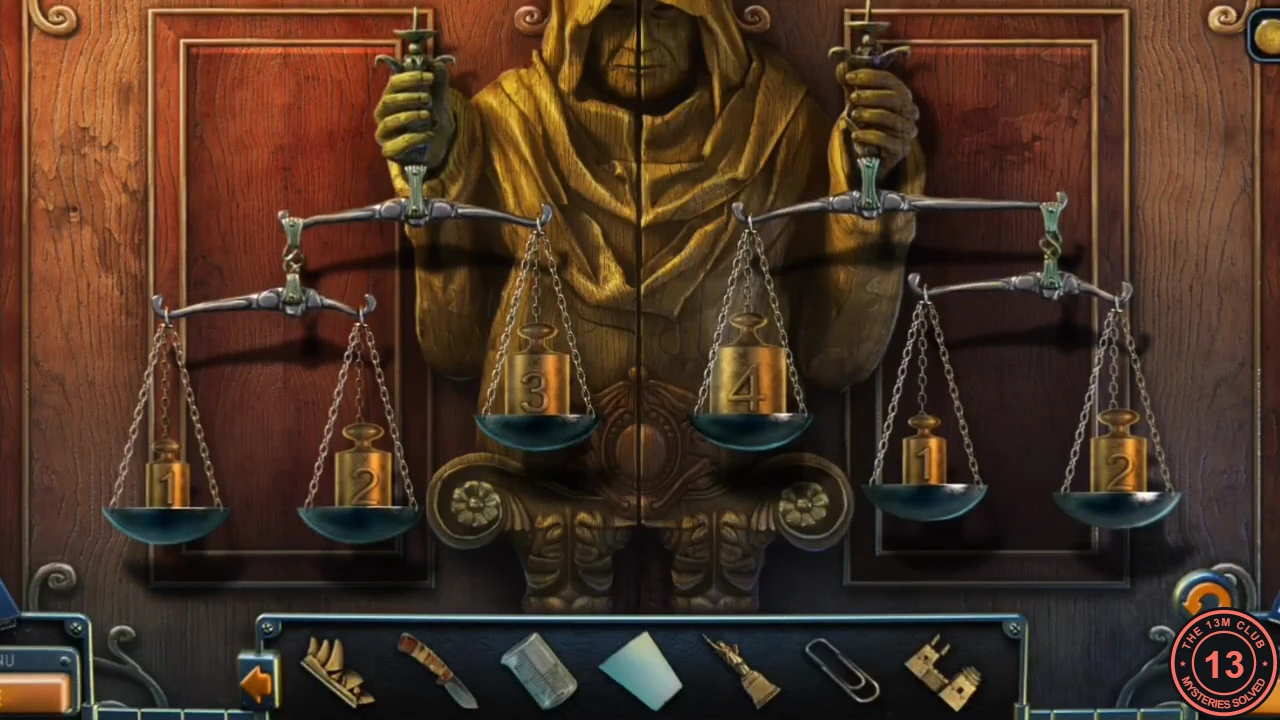
Solved scales: every beam hangs level.
The bar cabinet
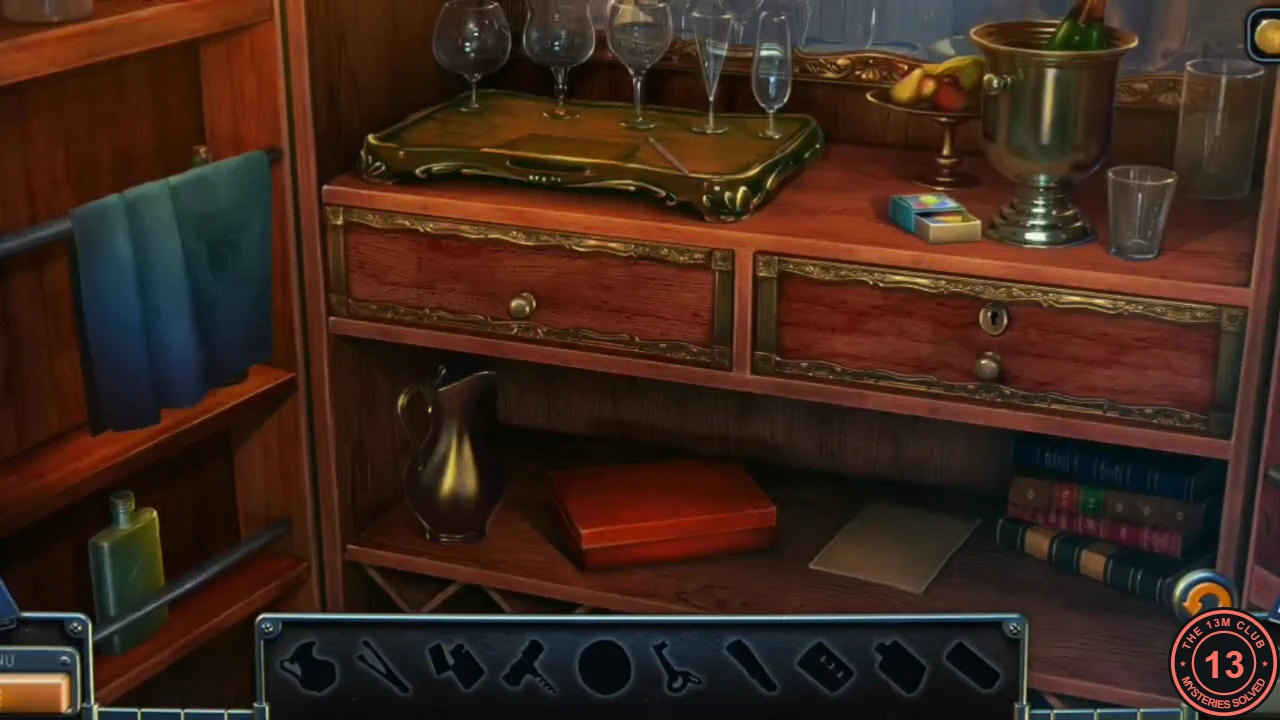
This is an interactive hidden-object scene. The bar shows ten silhouettes: a pitcher, tweezers, a lighter, a corkscrew, a round part (the final reward), a key, a green crayon, a measuring beaker, a hip-flask and a rolled diagram.
- Open the red cigar box on the lower shelf and take the LIGHTER. Take the PITCHER from the same shelf and the HIP-FLASK from the narrow shelf on the left.
- Scroll up and take the KEY from the top-left shelf above the towel. Use it on the locked right-hand drawer, then take the TWEEZERS and the CORKSCREW from the cutlery tray.
- Open the green bottle behind the pipe on the lower-left shelf with the CORKSCREW, then pull out the rolled DIAGRAM with the TWEEZERS.
- Zoom into the champagne bucket: a beaker is frozen in the ice. Pour the HIP-FLASK over the ice and light it with the LIGHTER, then take the MEASURING BEAKER. Take the GREEN CRAYON from the crayon box next to the bucket.
- Rub the GREEN CRAYON over the blank notepad on the lower shelf. The rubbing reads "Tap on each glass in the right order" and numbers the drawn glasses.
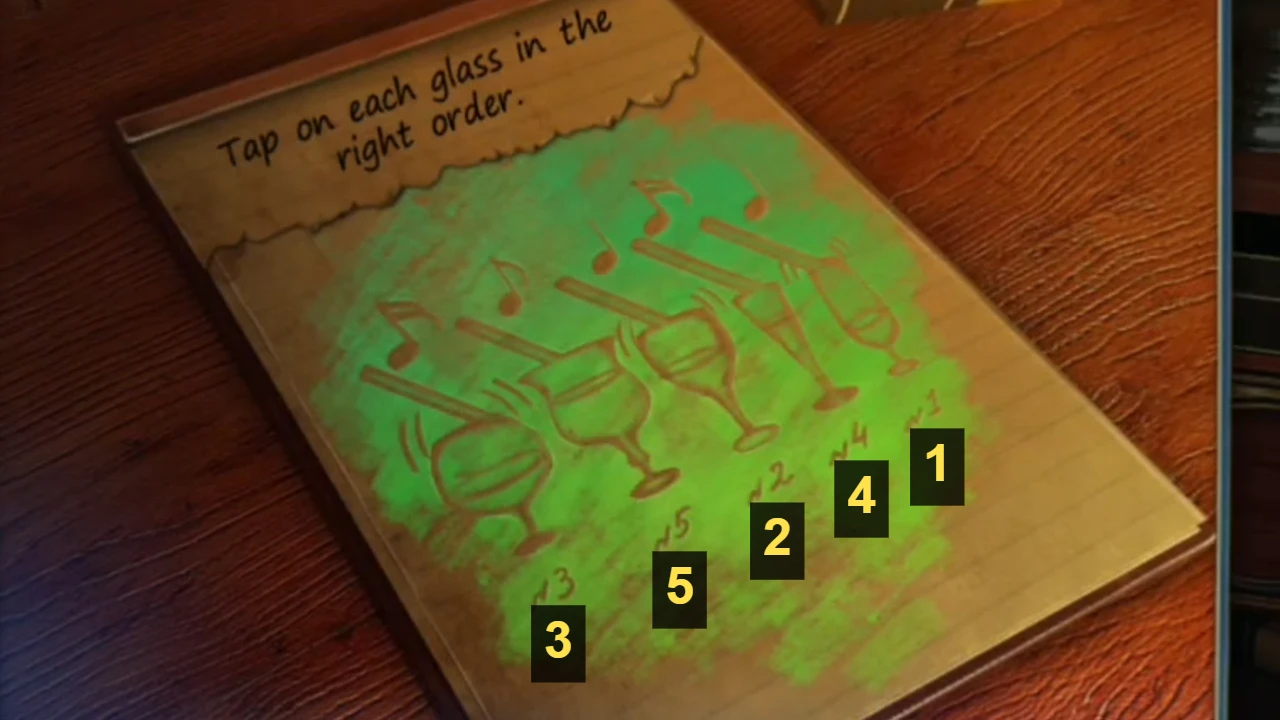
Crayon rubbing (numbers marked): from left to right the glasses are numbered 3, 5, 2, 4, 1. Tap them in order from No1 to No5. - Tap the tray of glasses on top of the cabinet and add the DIAGRAM and the MEASURING BEAKER to start the glass puzzle.
Musical glasses
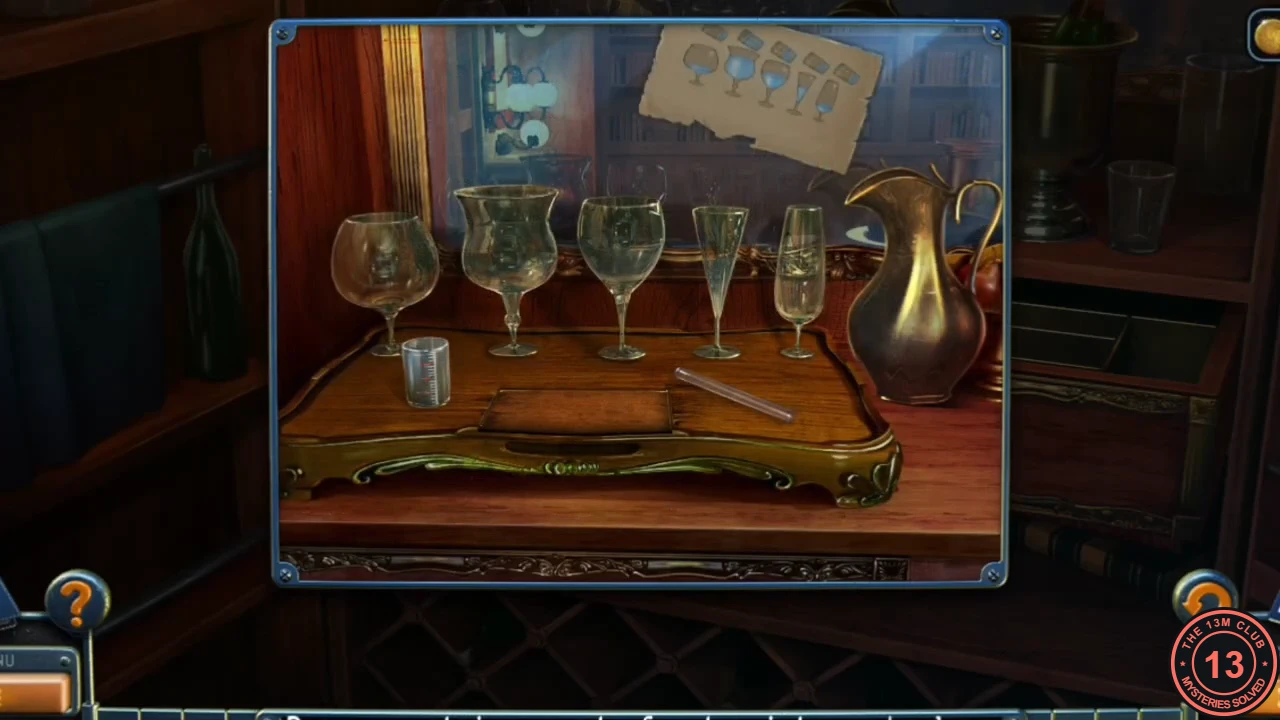
The diagram above the tray shows the water level for each of the five glasses. Tapping the pitcher adds one measure to the beaker; tapping the beaker pours everything in it into the glass you choose. A tick appears under a glass on the diagram when its level is right.
- Counting glasses from left to right, pour: glass 1 (wide snifter) - 1 measure; glass 2 (large tulip) - 3 measures; glass 3 (wine glass) - 2 measures; glass 4 (narrow flute) - 1 measure; glass 5 (tall glass) - 1 measure. Fill the beaker with the stated number of measures before each pour.
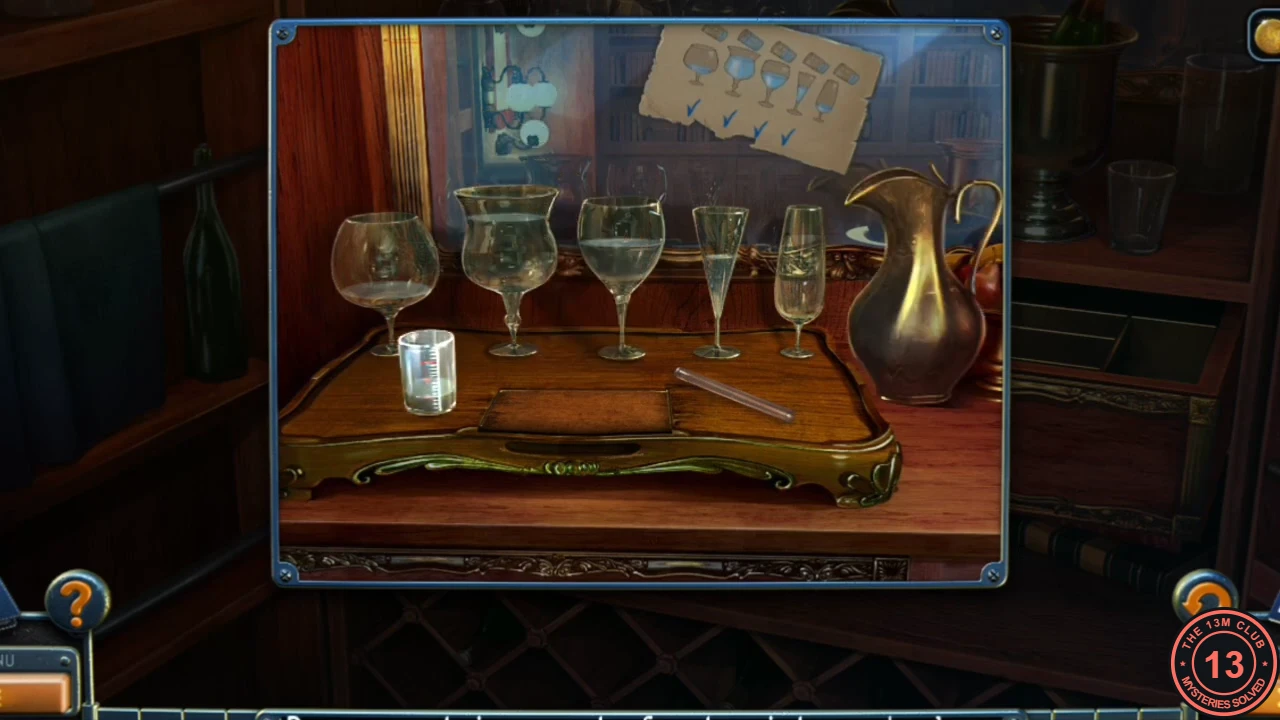
All five glasses filled correctly: the diagram shows five ticks. - Pick up the striker lying on the tray and tap glass 5 with it. The striker drops back onto the tray after each note, so pick it up again for every glass: glass 5, glass 3, glass 1, glass 4, glass 2. A compartment in the tray opens; take the PART.CODE5-3-1-4-2
The swamp liquid
The round part repairs the freight lift that connects the underground with the museum.
- Go back through the hub, tunnel and bridge to the corridor with the caged lift. Put the PART in the round recess of the panel on the right, then press the wall switch and ride the lift up.
- In the dinosaur hall, zoom into the green puddle behind the tape and use the EMPTY BEAKER on it to get the BEAKER OF LIQUID.
- Ride the lift back down and return to Lucas. Give him the BEAKER OF LIQUID. He sends you after a gangster who faked his disappearance and is hiding on a boat under the Brooklyn Bridge, and gives you a PUNCHED CARD.
- In the underground hub, insert the PUNCHED CARD in the console. Open the door of the rail car and press the controls to ride to the Brooklyn Bridge.
Brooklyn Bridge pier
A locked gate blocks the path to the boats. Its gear lock is missing two cogwheels.
- Take the CANE from the bench. The newspaper there reports that Lucas Bishop woke from a ten-year coma.
- Use the PAPERCLIP on the padlock of the truck. Take the HOOK from the crate inside and the COGWHEEL from the top of the crate's combination lock. The combination lock itself stays closed for now.
- Open the telephone booth and take the second COGWHEEL from the shelf.
- Put both COGWHEELS on the gate's gear lock. The gears turn and the bolts slide back; walk through to end the chapter.