Clinic Escape
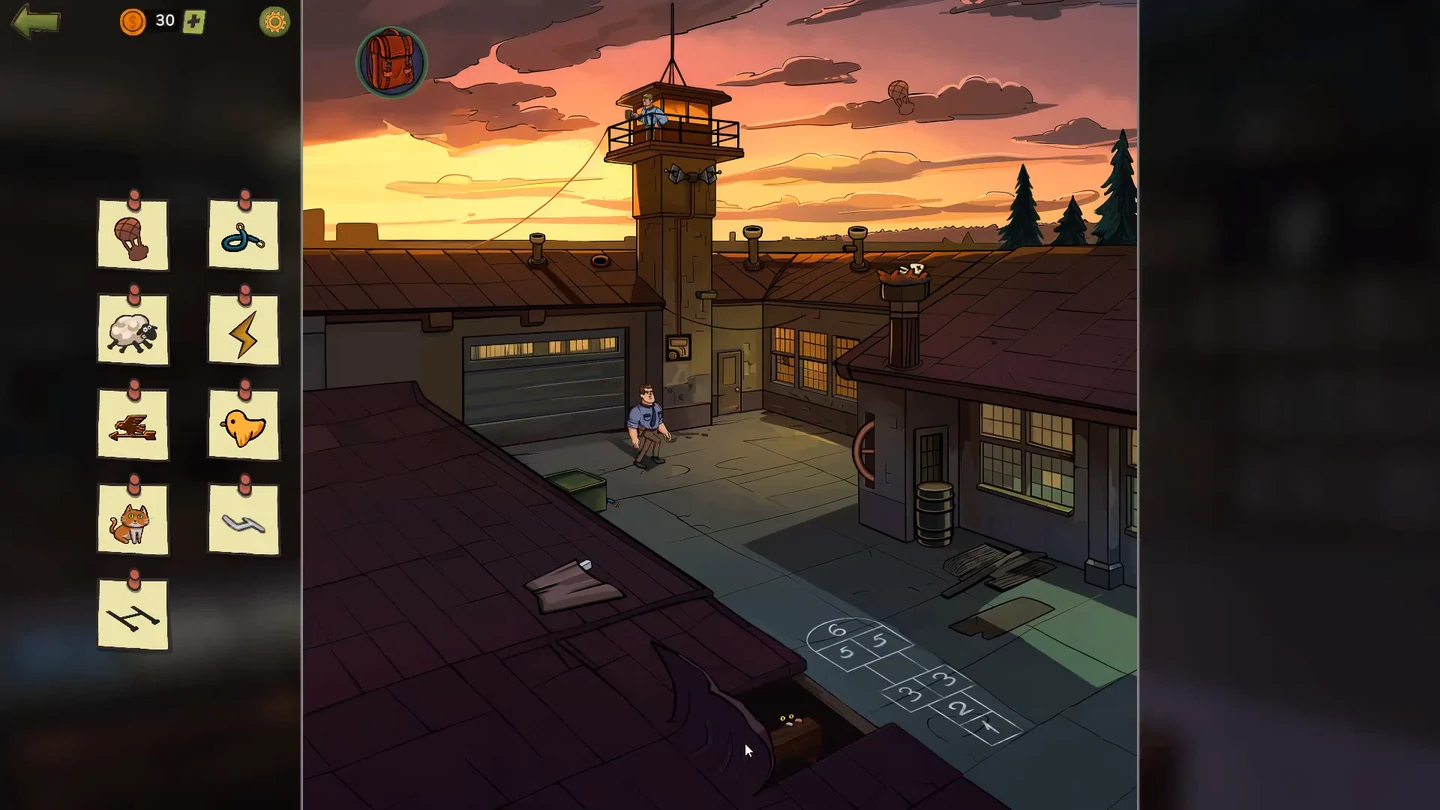
Disguised as Linda, Margaret slips into the courtyard at dusk. Only act while the guards are looking away. Find: hot-air balloon, blue wire, sheep, lightning bolt, weather vane, yellow bird, cat, the number 4 and the H shape.
- Tap the balloon shape in the clouds at the upper right. Swipe the blue wire out from behind the green box on the left and keep it. Tap the watchtower; when the guard at the top looks away, drag the sleeping pills from the backpack into his mug and tap the sheep in his dream. A gold key falls to the ground.
- When the guard on the ground is not looking, pour the oil from the backpack onto his path; he slips, is knocked out and you can tap the yellow bird. Swipe the metal drum above the hopscotch aside, unlock the energy-room door with the gold key and take the lightning bolt. Turn the valve above the hopscotch until the weather vane on the tower faces the right way, then tap it.
- Swipe the roof piece left three times and drag the fishbone from the nest to the eyes under the roof for the cat. Swipe the chalk from under the roof piece at the lower right and write the missing 4 between the 5 and the 3 of the hopscotch. For the H, use the vent pipes on the roof above the garage. Drag the pipe with a short side spout from the roof to the right of the watchtower into the right-hand hole on the garage roof, with its spout pointing left, and keep the plain pipe standing in the left-hand hole. Their shadows join into an H on the yard; tap it.
- Tap the open doorway right of the watchtower, the important clue. Inside it is dark: drag the flashlight from the backpack around to find the symbols on the walls. Count the bones, the pickaxes and the funnels and set the three-digit lock to those counts: 4, 5, 7.CODE457
City Square
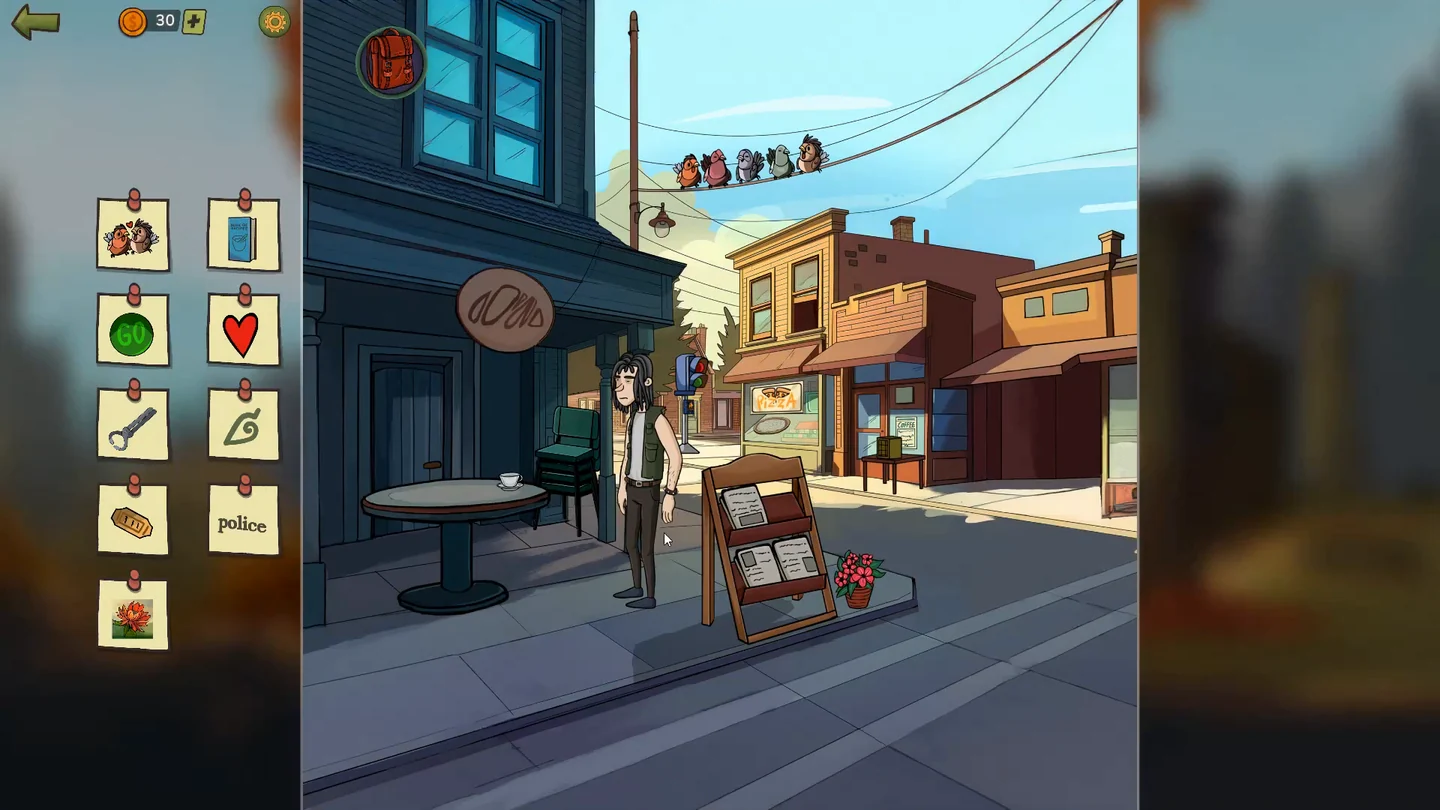
Find: lovebirds, blue book, green light, red heart, metal tool, leaf symbol, ticket, the word POLICE and the lotus flower.
- Swipe the brown bird on the wires left three times until it sits next to the orange bird, then tap the pair of lovebirds to collect them. Swipe the café's upstairs window open and give the old woman the red flowers by the newspaper stand; tap the heart. Swipe up the left window of the pizza place and tap the metal tool behind it, a pair of pliers, to collect it; they also go into the backpack and are needed in Professor Wilson's house. Swipe down its upper-right window and tap the leaf to collect it. Drag a green chair from the stack next to the table; when the man sits, swipe the ticket out of his pocket, then tap the ticket to collect it. Swipe the lower-right newspaper up, tap it three times and tap POLICE at its lower right.
- Tap the pizza sign in the shop window. Cut the pizza into 11 pieces with four cuts: make every cut cross all the others inside the pizza, with no three cuts meeting at the same point. Take the blue book.
- Tap the traffic light. The blue wire in its panel is broken: tap its two screws to remove them, fit the blue wire from the backpack in its place and put both screws back. Take the green light.
- Tap the green box on the shop table. Each transparent card shows only some of the nine squares of a picture. Drop the cards into the frame one at a time; a later card covers only the squares it has paint on. Keep adding cards until every square fits one picture: a large red-orange lotus in the centre, sky in the top corners and green leaves and stem along the bottom. Take the red flower.
- With the list complete, tap Margaret's father, the important clue, and explain the swap.
Professor Wilson's Front Yard
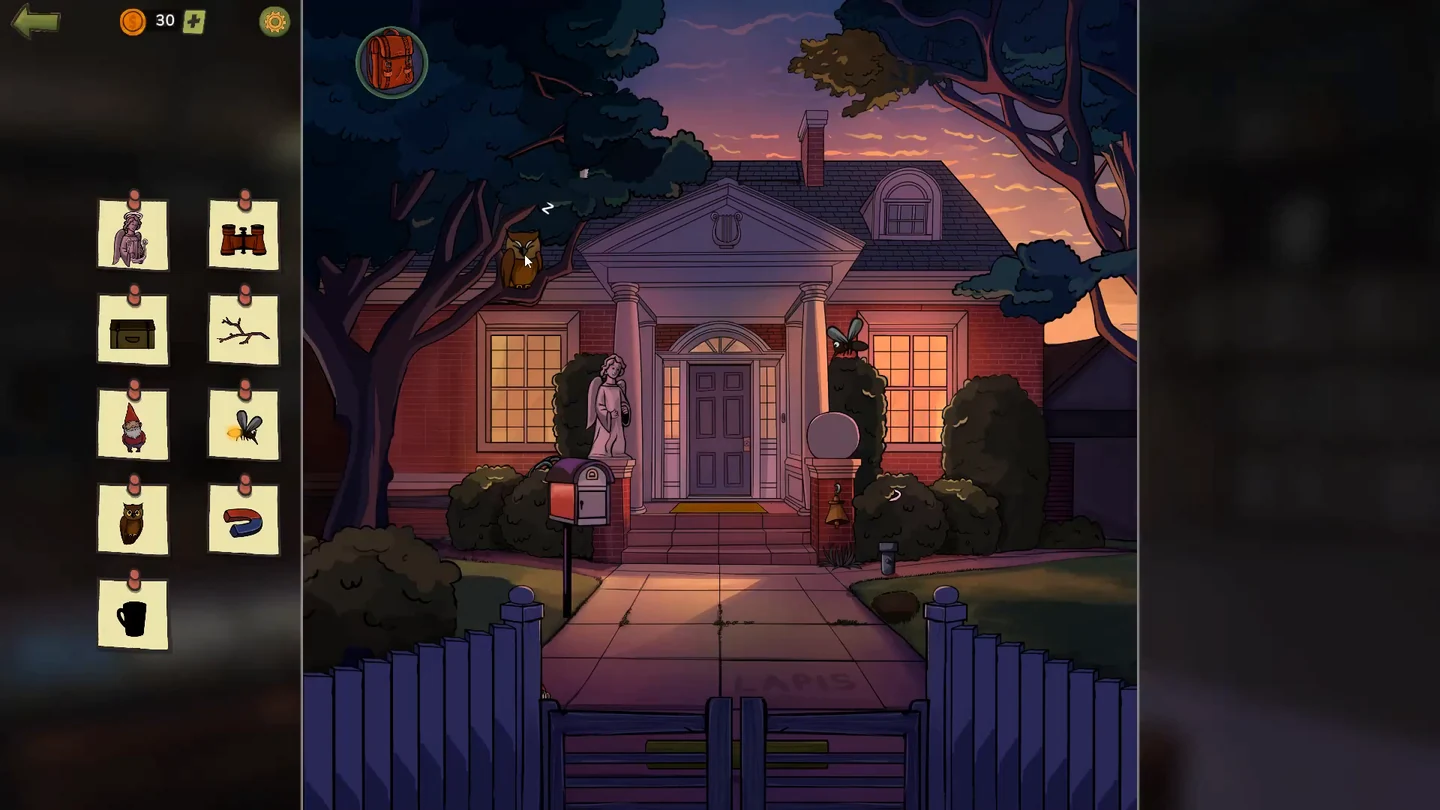
Find: angel statue, binoculars, green box, branch, garden gnome, firefly, owl, magnet and the mug silhouette.
- Swipe the halo out of the right-hand bush, then put it and the harp from above the door on the angel statue and tap the finished angel to collect it. Swipe the garden hose from behind the right bush, attach it to the pipe on the left of the house, fit the valve from the backpack and turn it to wash the dirt away; swipe the binocular half on the path aside, swipe the attic window open for the other half and join the two halves, then tap the binoculars to collect them. Drag the stone ball from the right pillar onto the path tile marked LAPIS, and take the green box from the compartment that opens on the roof.
- Swipe the leaves at the upper right down three times to expose the branch, then tap the branch to collect it. Swipe the green plank behind the wooden gate aside, open the gate and pull out the gnome. Tap the firefly's tail near the right window to light it, then take it. Tap the sleeping owl on the left tree until it wakes, then tap the awake owl to collect it. Swipe the branch at the upper left down, saw through the mailbox post, swipe the envelope inside down twice and take the magnet; keep it. Tap the mug silhouette when its owner walks past a window.
- Margaret overhears Wilson and Stanley leaving and realises she was set up. The important clue is the yellow rug in front of the door: swipe it towards the upper left and drag the key found under it to the door. This brings up the door's ring lock. Turn the three rings until their dark segments line up as an upside-down Y (one arm pointing straight up, two pointing down to the left and right), then drag the matching three-armed metal shape, the first one in the top row of shapes, into the centre.
Wilson's Living Room
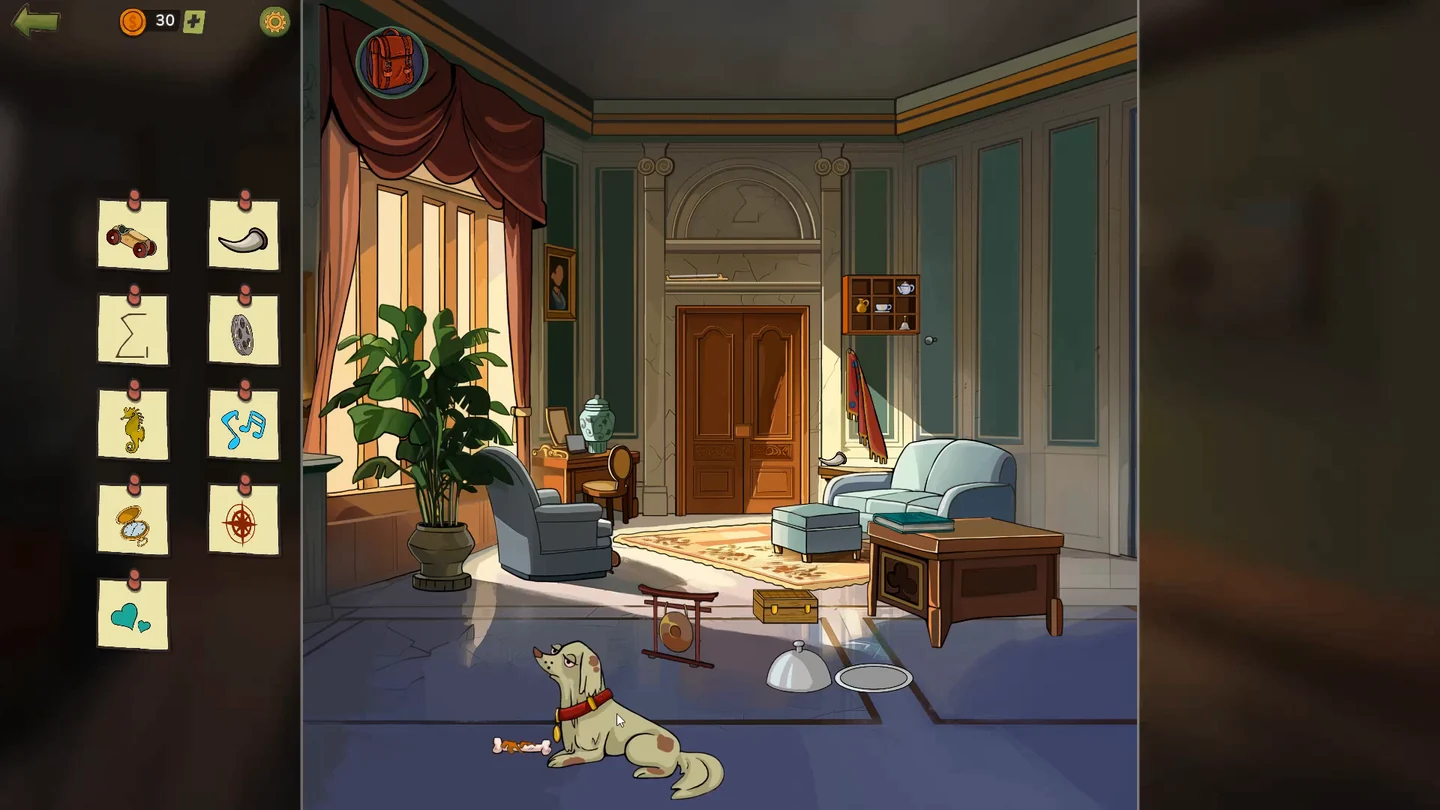
Find: toy car, horn, E symbol, film reel, seahorse, music notes, pocket watch, compass symbol and hearts.
- Take the horn on the side table right of the double doors and keep it. Tap the E on the arch above the doors. Swipe the club symbol from behind the grey armchair, put it in the slot on the right-hand side table and press it; the portrait falls and reveals the film reel, so tap the reel to collect it. Swipe the red flag up and tap the seahorse. Swipe the ottoman up twice for the violin and add the bow from above the doors, then tap the blue music notes that appear.
- Knock the green vase off the dressing table and sweep the dust with the paintbrush from the backpack, then tap the pocket watch to collect it. Undo the curtain tie, then tap the compass symbol to collect it. Swipe the steel food cover at the lower right aside and give the bone to the dog, then tap the hearts that appear.
- Tap the wooden box on the floor and play peg solitaire: jump a checker over its neighbour into an empty hole to remove it, until only one is left. Work from one end of the board towards the other so you do not strand single checkers. Take the toy car.
- Tap the lock on the double doors, the important clue. The 3×3 cupboard right of the doors holds dishes in four cells: a teapot top right, a jug middle left, a cup in the centre and a bell bottom right. Press the matching keys 3, 4, 5 and 9.CODE3, 4, 5, 9
Antiquities Room
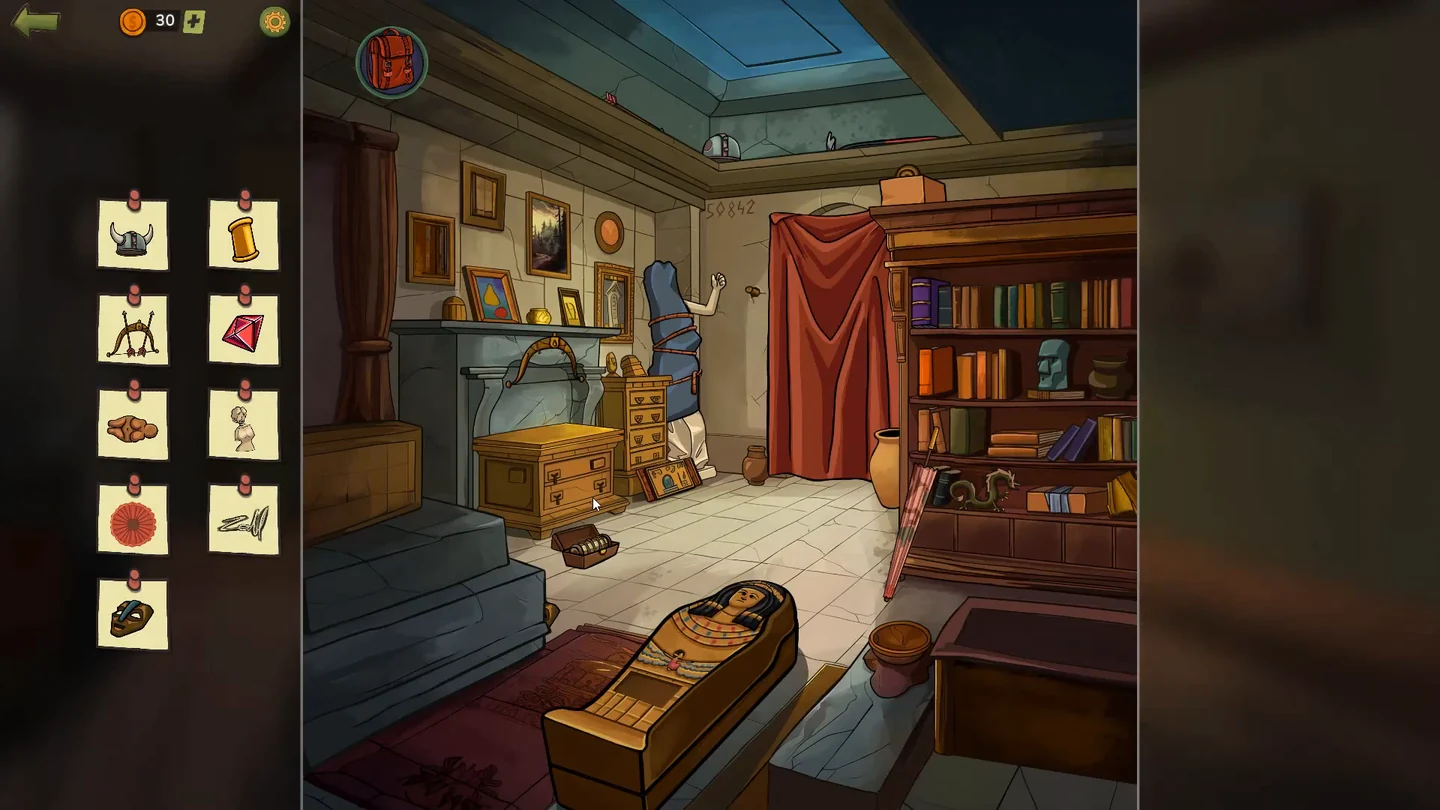
Find: Viking helmet, gold bangle, bow with arrows, ruby, brown statue, armless statue, red flower, signature and a wooden mask.
- Optional: the cryptex on the floor opens with 50842, painted high on the wall, but holds only a note. Put the horn from the backpack on the helmet hanging from the ceiling, tap the brown pot left of the curtain a couple of times until it gives the second horn, drag that horn onto the helmet too and tap the finished helmet. Drag the crowbar from the ceiling to the sarcophagus, lift the mummy's left arm, unwrap the bandage and take the gold bangle. Add the arrow from the ceiling and the arrow in the sarcophagus to the bow on the stone table, then tap the bow with its two arrows.CODE50842
- On the gold chest, tap the upper-right rectangular button, then the square button on its other side, and swipe the lid down, then tap the ruby to collect it. Swipe the orange box on the bookcase aside, hook the lever onto the wall and turn it to drop the brown statue, then tap the statue to collect it. Swipe the rope off the covered statue three times, pull the cover down and give it the light-brown pot from behind the bookcase; once the statue drops its vase, tap the armless statue. Open the pink parasol, tilt it and tap the red flower. Swipe the stone slab on the left for the wooden mask. Tap the forest painting and drag the pliers from the City Square out of the backpack onto its two bottom nails to pull them out; tap the signature.
- Pull back the red curtain to reveal the Egyptian door, the important clue. The book on the shelf says: water flows and fire burns bright, yet the heart of beauty is harder than stone. On the door press four symbols: the wavy water symbol at the top centre, the flame symbol at the bottom left, the heart symbol on the right, and finally the stone symbol at the bottom right. The door flashes and swings open.
Secret Basement Laboratory
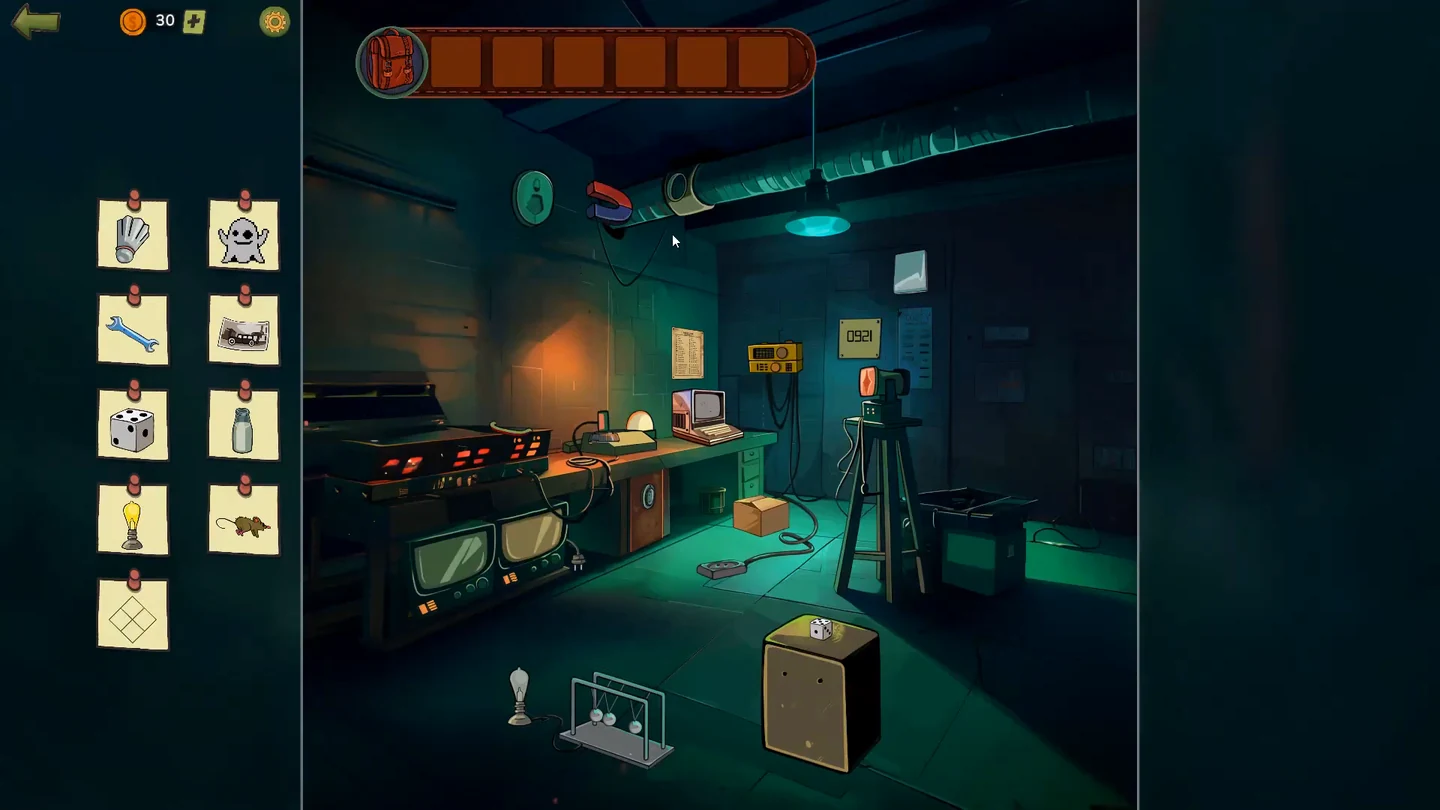
Wilson and Stanley have their own portal laser. Find: shuttlecock, pixel ghost, wrench, car photo, die, milk bottle, light bulb, rat and the four squares.
- Drag the magnet from the backpack onto the round metal panel on the wall beside the pipe and take the shuttlecock behind it. Separately, swipe down the ceiling pipe with the hole in it so the rat drops out, then tap it.
- Read the CODE sign on the wall: it is hung upside down, so turn it over in your head and read 1260. Dial 1, 2, 6, 0 on the safe under the table, swipe the contents aside and take the car photo.CODE1260
- Plug the monitor under the table into the extension socket, tap it and press its last two buttons: a four-square design appears on the screen. Tap the design to collect it. Tap the cardboard box and turn the phone upside down to tip out the wrench, then tap the wrench to collect it. Swipe the die on the fridge six times until it matches its card, then tap the die to collect it. Move the handle from the machine left of the table onto the fridge, open it and take the milk; hang the metal ball from the fridge on the pendulum on the left and swing it to light the bulb, then take the bulb.
- Tap the yellow machine beside the computer to hear Morse beeps and decode them with the Morse chart on the wall. Type the password GAME on the computer and tap the pixel ghost.CODEGAME
- The important clue is the laser and the yellow meteorite piece. Drag the glass plate on the wall above the laser into the beam on the floor so it bounces onto the yellow stone. An orange portal opens and Part 3 ends.