Margaret's Kitchen
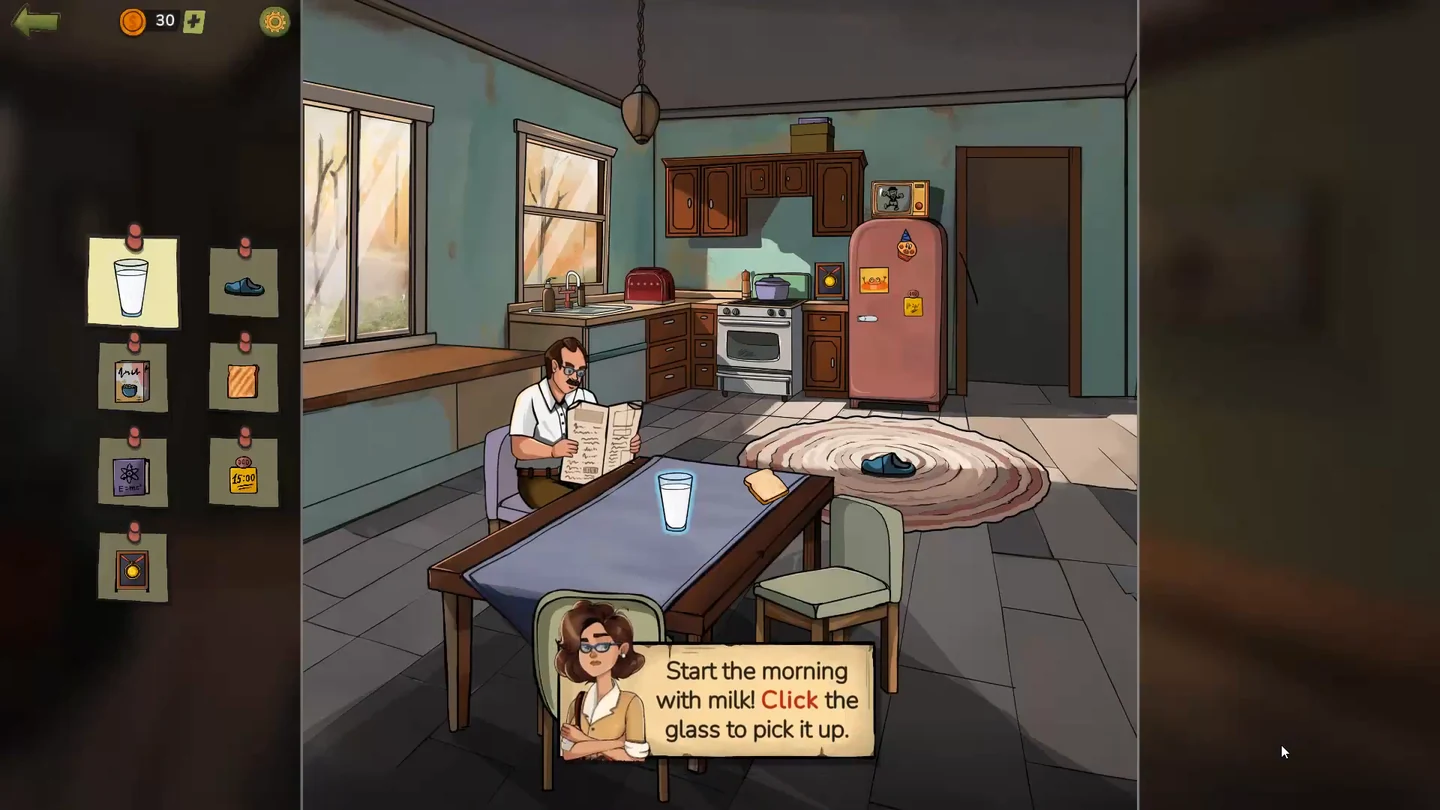
The opening scene doubles as a tutorial: each prompt shows one way to collect an item from the list on the left.
- Tap the glass of milk on the table and the blue slippers on the rug.
- Open the upper kitchen cabinet to take the cereal, then drag the slice of bread into the red toaster and tap the toast when it pops up.
- Swipe the box on the shelf to the left and take the book behind it. Tap the fridge for a close-up and take the 15:00 sticker.
- Take the last item, the framed gold medal hanging beside the fridge. When the list is complete, the hint book asks for an important clue: Margaret's father reminds her not to forget her backpack, so tap the backpack to take it. It holds every item you carry from now on.
Classroom
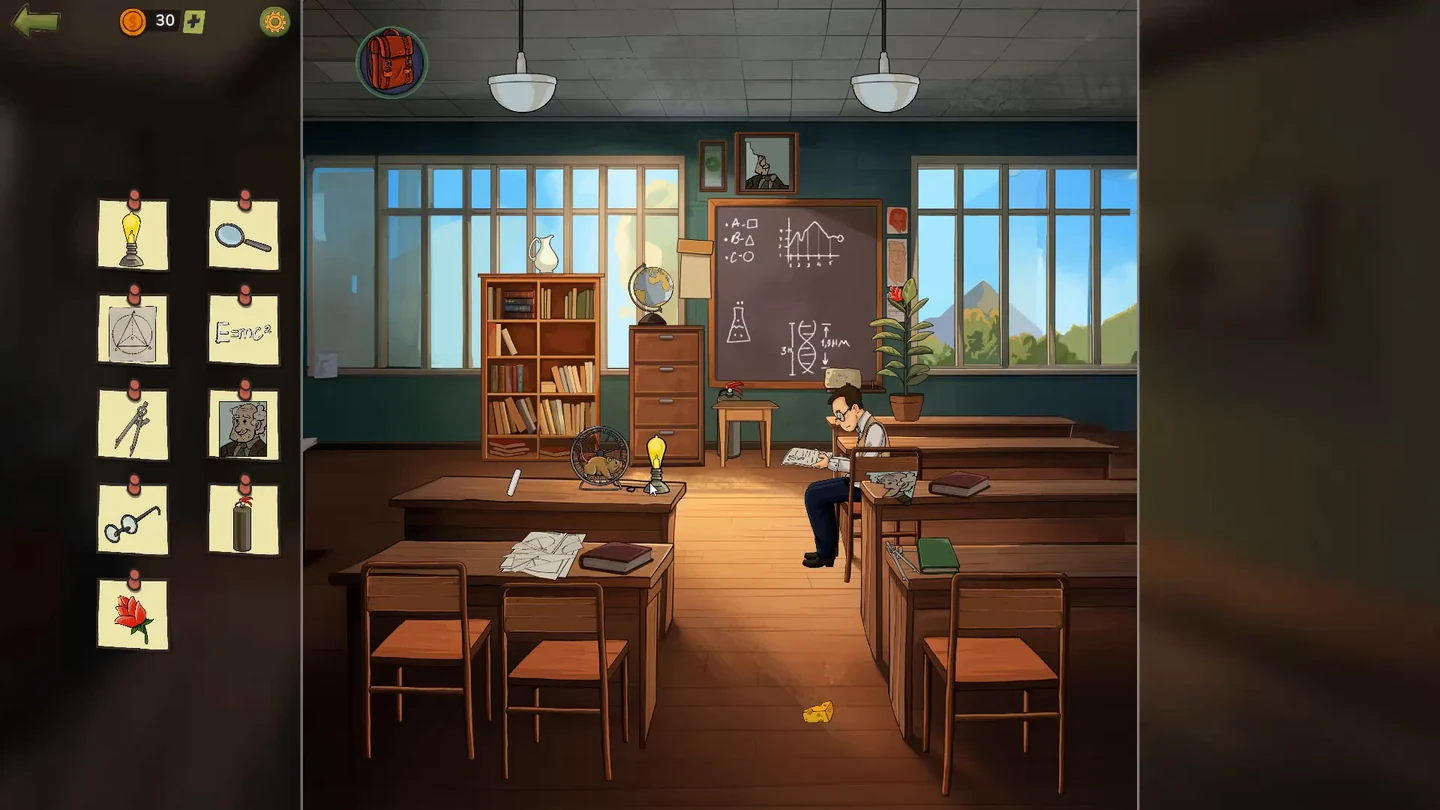
Find: lit light bulb, magnifying glass, the E=mc² formula, drawing compass, portrait, eyeglasses, fire extinguisher, rose and the geometry drawing. Several items are hidden behind small actions.
- Drag the hamster on the floor into the hamster wheel on the front-left desk; the running hamster lights the bulb, so tap it. Open the drawer near the blackboard for the magnifying glass. Take the drawing compass from the back-right desk and the red rose from the potted plant on the right.
- Drag the missing portrait piece from the middle-right desk, near the male student, onto the empty frame above the board, then take the completed portrait. Tap the student to make him turn round and take his eyeglasses. Swipe the small stool under the blackboard to the right and take the fire extinguisher; it goes into the backpack and is needed at the next location.
- Take the small white piece of chalk lying on the front-left desk, just left of the hamster wheel, and drag it to Professor Linden. He takes it and writes E=mc² on the blackboard: tap the formula.
- Tap the torn papers on the back-left desk. Drag and rotate the pieces until they form a circle with a triangle drawn inside it, then tap the finished drawing to collect it. With the list complete, tap the smoke outside the window, the important clue: something has crashed near the town.
Meteorite Crash Site
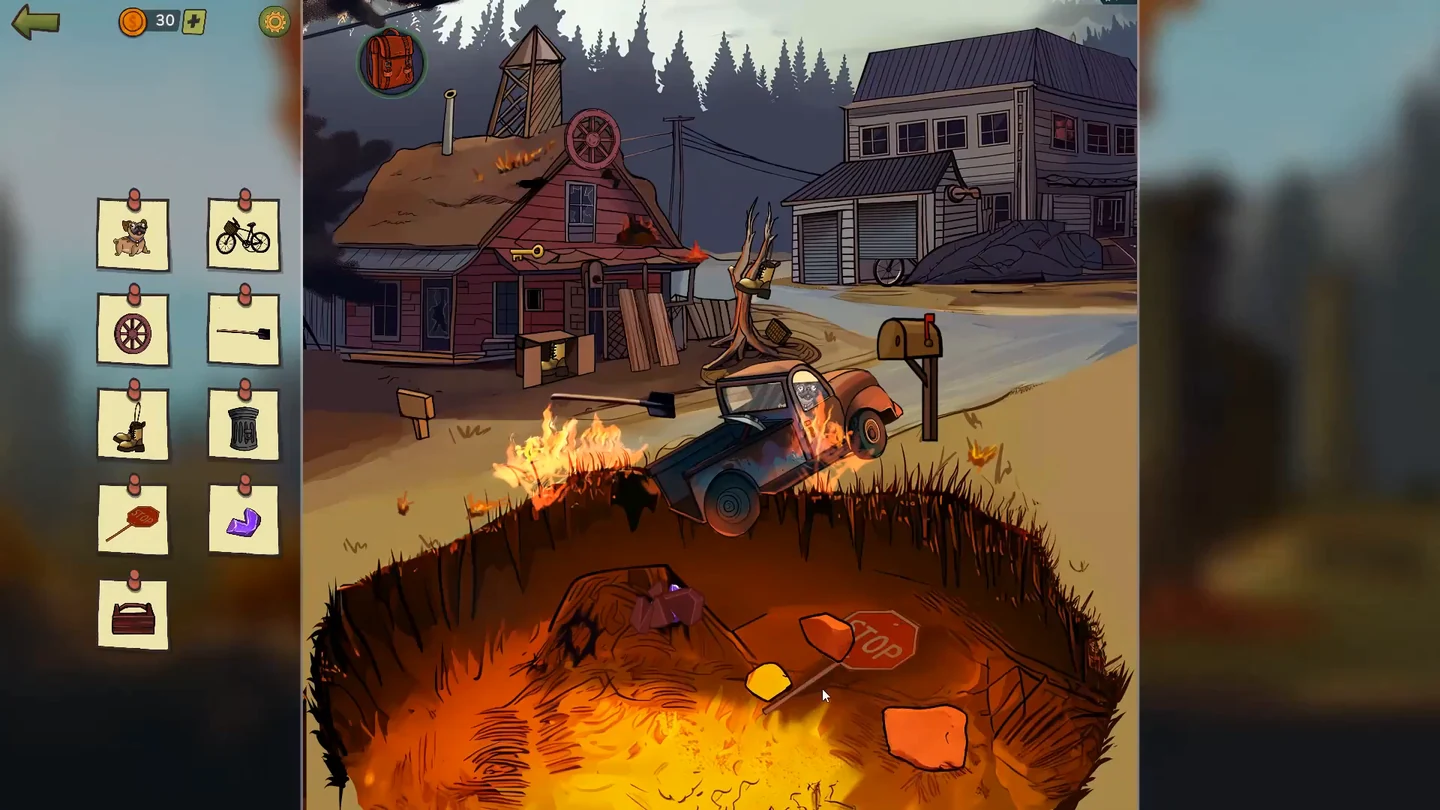
Find: dog, bicycle, wheel, shovel, boots, trash can, stop sign, purple meteorite piece and toolbox.
- Swipe the three rocks on the right side of the crater outwards and take the stop sign. Take the pickaxe lying on the pickup truck and drag it onto the mound on the left side of the crater; the rubble breaks away and reveals the purple meteorite piece. Tap the piece to put it in the backpack, as it is needed in the Dormitory.
- Open the backpack and drag the fire extinguisher onto the burning pickup truck. Take the gold key from the porch roof of the red house and drag it to the truck door to unlock it, then tap the dog to rescue it. Swipe up the right garage door of the building on the right, pull the bicycle out, add the basket from beside the dead tree and take the bicycle.
- Take the wooden wheel on the roof of the red house and the shovel by the cardboard box. Drag the yellow boot from the cardboard box onto the boot hanging in the dead tree to make a pair, then tap the matching pair to collect it. Swipe up the left garage door for the trash can, and swipe the three planks leaning on the red house aside for the toolbox. When the list is complete, tap Special Agent Stanley, who arrives in a black car.
Police Station
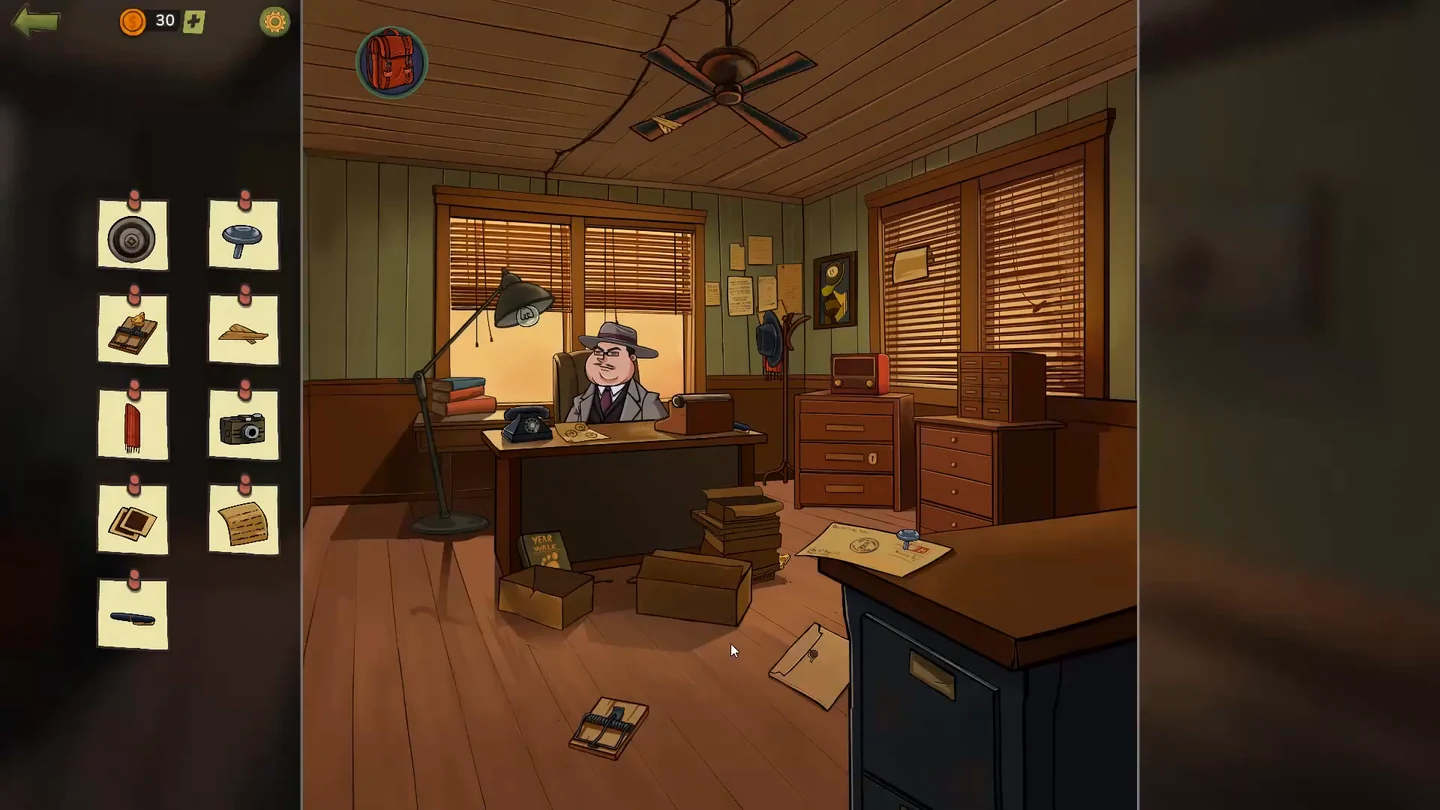
After Stanley's questioning, find: radio part, push pin, mousetrap with cheese, tape, red scarf, camera, Polaroids, typed paper and blue pen. Most of them need a small action first.
- Take the push pin from the letter on the filing cabinet at the lower right. Drag the cheese from behind the stack of cardboard boxes onto the mousetrap on the floor and take the baited trap. Tap the black hat on the hat stand so it falls, and take the red scarf. Open the envelope on the floor and swipe up to take the Polaroids.
- Open the bottom drawer of the dresser and the large box beside the cardboard boxes to find the two halves of a pair of scissors; join them, then cut the ceiling fan's cable to stop it and take the tape from its blade. Take the key from the filing-cabinet drawer and use it on the locked second drawer of the dresser for the camera.
- Drag the sheet of paper caught in the blinds on the right onto the typewriter on Stanley's desk and swipe the typewriter to the left; Stanley types on it and the paper drops onto the boxes, so take it. Then take the blue pen behind the typewriter; keep it, as it is needed at the laboratory gate.
- Tap the radio on top of the three-drawer dresser in the corner. Swipe to turn it round, tap all four knobs to remove them, then swipe the loosened back cover away and take the round radio part.
- On the wall behind the desk, above the radio, slide the framed picture aside to uncover a wall safe. Read the note on the desk: it shows 30, 50, 90 above a dial. Turn the safe dial to 30, then 50, then 90, and tap the file inside.CODE30-50-90
Dormitory
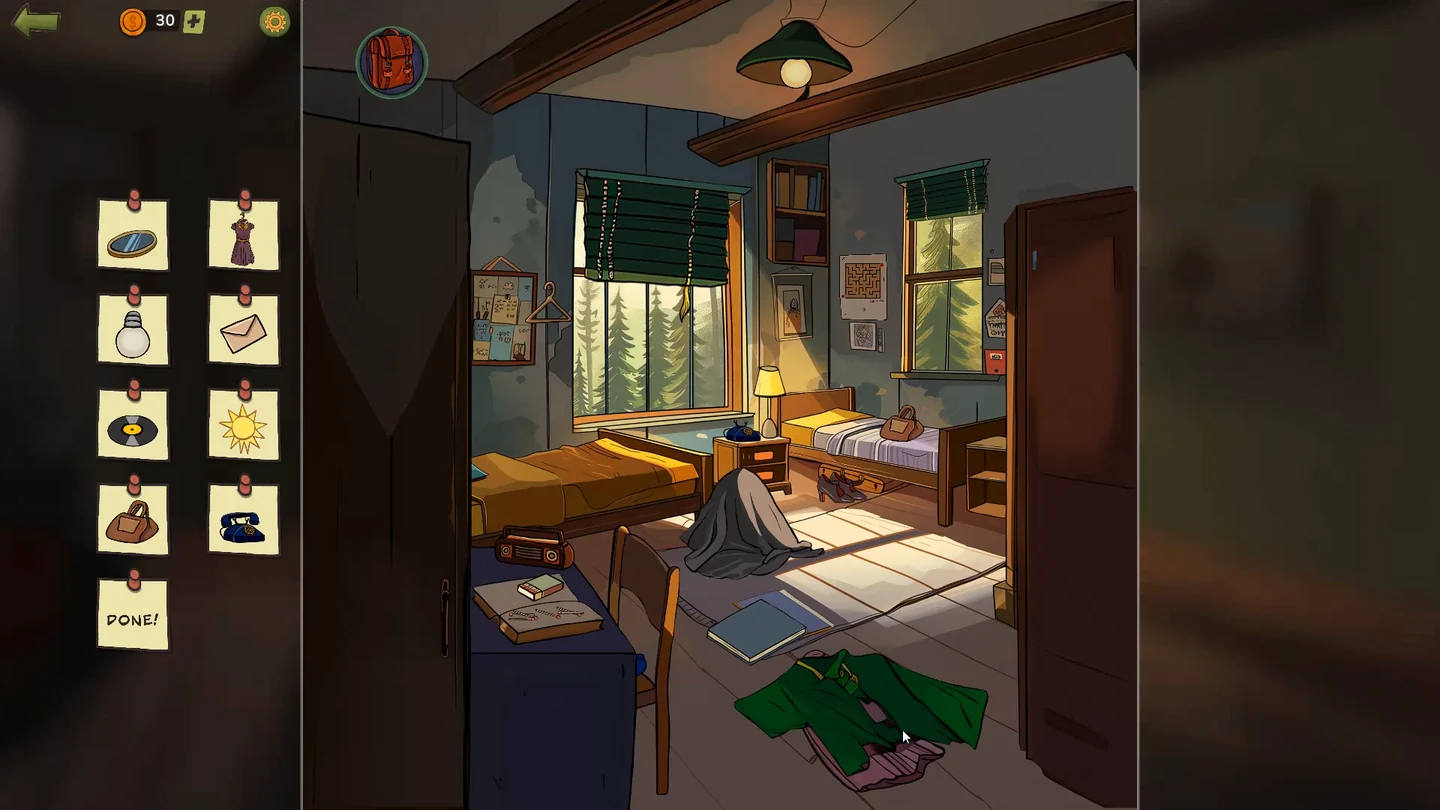
Find: round mirror, dress on a hanger, light bulb, envelope, vinyl record, sun, brown bag, telephone and the DONE! card (the matchstick puzzle).
- Swipe the two books on the floor aside to uncover the round mirror, then tap the mirror to collect it. Tap the green shirt on the floor twice to fold it, swipe it away and drag the dress underneath onto the hanger by the window, then take it. Unscrew the ceiling bulb with two curved swipes, then tap the loose bulb to collect it; it goes into the backpack and is needed in the Experiment Room. Take the brown bag from the right-hand bed.
- Swipe the black shoes by the right bed aside, pull out the suitcase from under the bed and swipe it open for the vinyl record. Swipe the chair away from the bedside table, then drag the telephone receiver you find onto the phone to complete it and tap the completed telephone to collect it. Raise the green window blind, then tap the sun that appears in the window.
- Solve the Labyrinth poster: tap the arrows to steer the red line through the maze until it joins the two red dots, then take the envelope behind the poster.
- Open the notebook on the desk showing 6 + 4 = 4. Move the lower-left matchstick of the 6 to the top of the last 4, making 5 + 4 = 9, then tap DONE!CODE5+4=9
- Tap the green optical device in the middle of the room, the important clue. Drag the violet lens above the blue lens, then open the backpack and place the purple meteorite piece on the device's base. The lamp shines through the meteorite and opens a small portal.
Secret Laboratory Gate
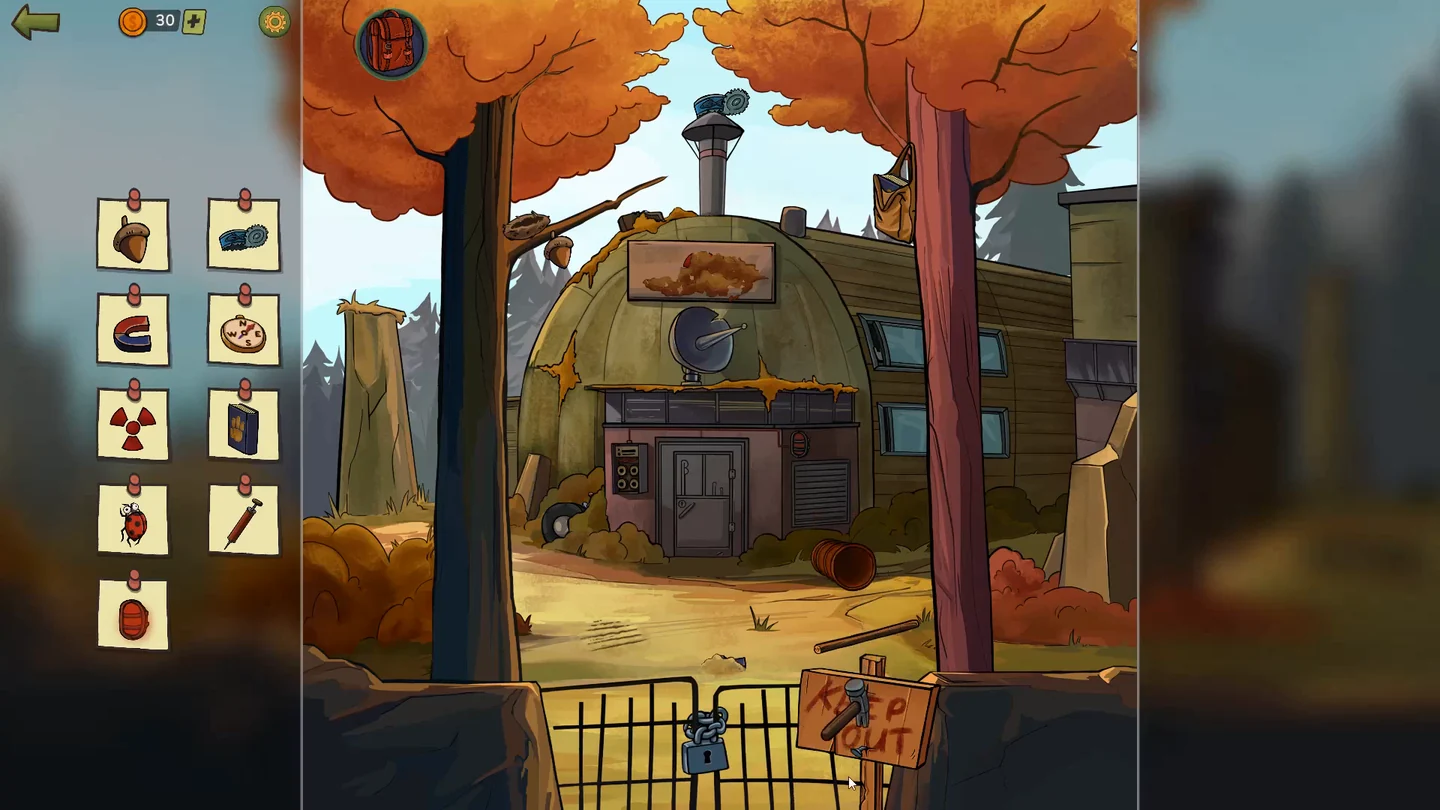
Find: acorn, sardine can, magnet, compass, red radiation sign, blue book, ladybug, air pump and the red light (the gate puzzle).
- Take the acorn from the branch of the left tree and the sardine can on top of the lab's exhaust pipe. Swipe the blue magnet half out of the small mound and the red half from behind the lower lab window, then join them and tap the assembled magnet to collect it. Swipe the upper window to find a rake head, fit it to the stick on the ground and rake the scratches to uncover the compass, then tap the compass to collect it.
- Rub the dirty sign above the satellite dish clean until the red radiation symbol shows, then tap the symbol to collect it. Swipe the blue book out of the satchel on the right tree, then tap the book to collect it. Tap the orange barrel twice to tip it over, drag the hammer behind it onto the two nails of the KEEP OUT sign and take the ladybug behind it. The tyre at the left of the building hides the pump: swipe the tyre to the left first, then swipe the red air pump to the left out of the bushes and tap it to collect it.
- Tap the mechanism left of the door. Drag from each coloured dot to its matching dot so that every pair is connected and the lines fill the grid without crossing. Then take the red light beside the door.
- The guard refuses entry but hands Margaret a sheet of paper. Tap the paper, open the backpack and drag the blue pen onto it to write the note for the scientists.
Roadside Cafe
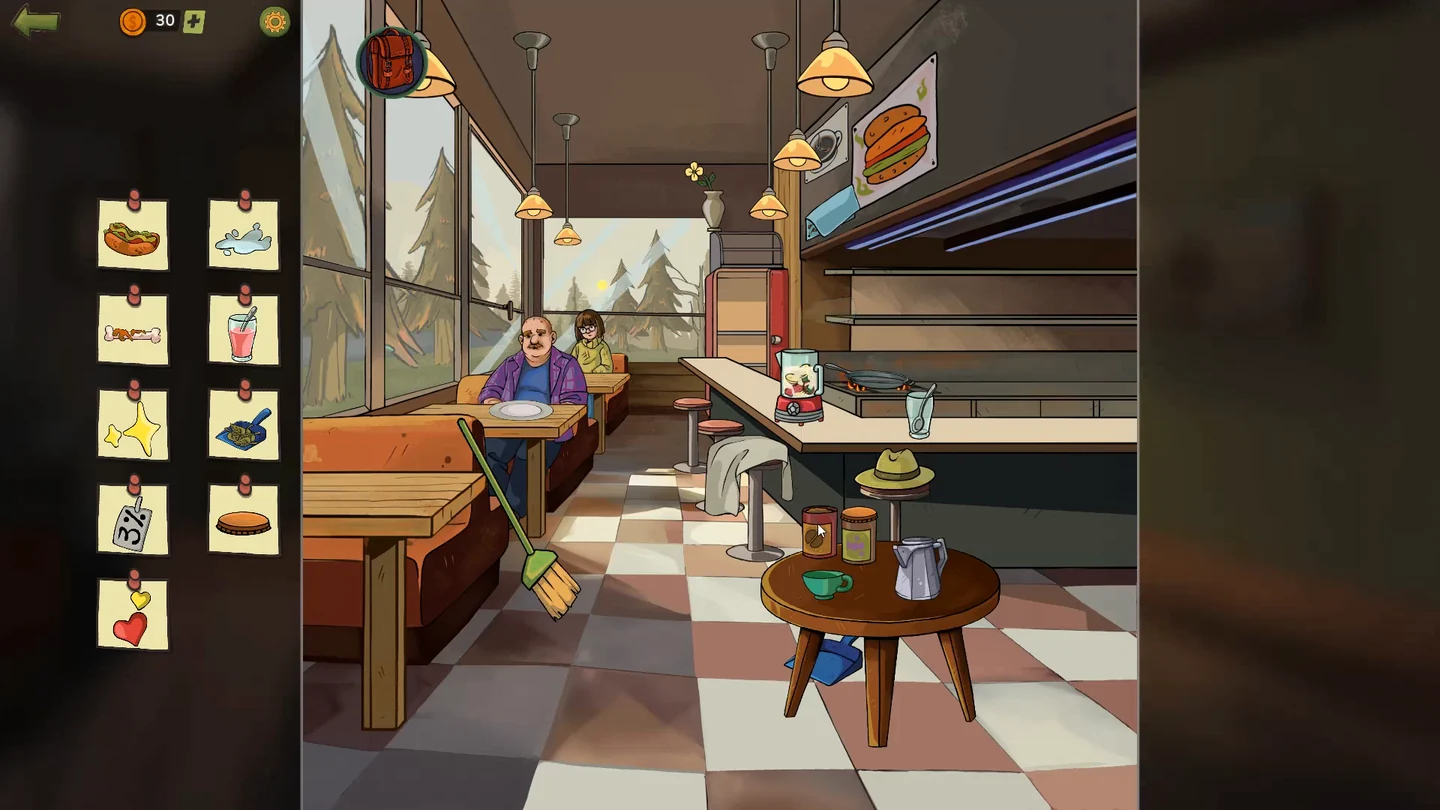
Find: hot dog, puddle, bone, pink smoothie, sparkles, dustpan of leaves, tag, burger and hearts.
- Swipe the light-blue poster next to the hamburger poster up twice for the hot dog. Swipe the cloth off the stool by the blender and take the bone. Shake your device: the small flower vase standing high up on top of the tall red cabinet beside the pillar topples off and leaves a puddle on the floor by the stools. Tap the puddle to collect it. Open the red fridge, drag the milk into the blender, switch it on, pour it into the empty glass and take the pink smoothie.
- Tap the frying pan and drag the raw patty into it. Build the burger on the board in this order: ketchup on the bottom bun, cheese, patty, tomato, lettuce, top bun. When the burger reaches the man in the purple jacket, tap the hearts above his head.
- Drag the coffee jar, then the silver pitcher of hot water on the right, to the green cup on the table and give the coffee to the woman at the back; tap the sparkles above her. Open the window left of the man in the purple jacket so leaves blow in, swipe the dustpan into the middle and sweep the leaves into it with the broom, then tap the filled dustpan to collect it. Swipe the hat on the stool up, then use the magnifying glass from the backpack on the tiny tag and tap the numbered tag it reveals to collect it. Take the brown jar lid from the table and keep it for the lab.
- Tap Dr. Adam Wilson, the man in the light-grey coat, to talk. He offers Margaret a job at his laboratory.
Laboratory Office
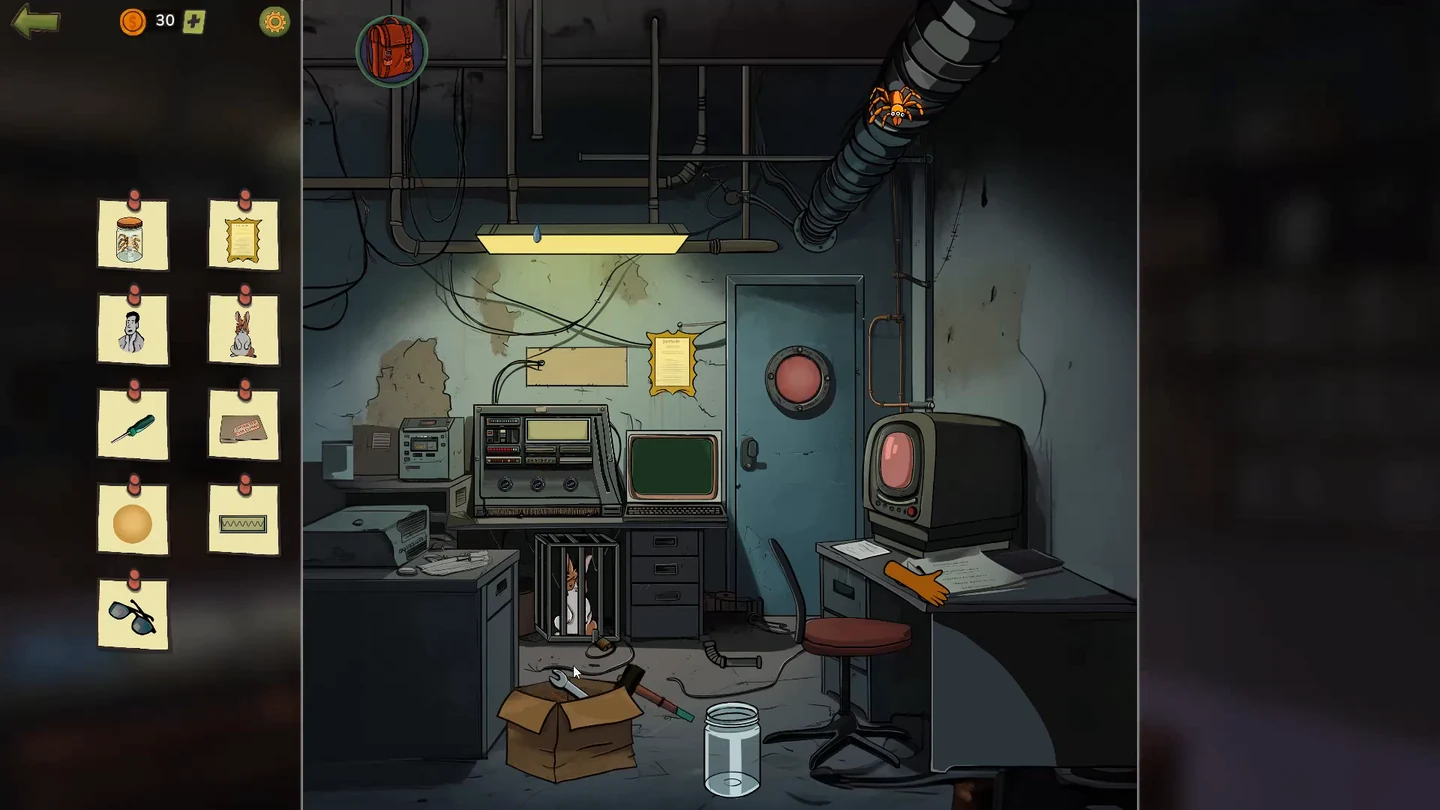
Find: spider in a jar, framed certificate, old photo, rabbit, screwdriver, classified folder, yellow light, the waveform and sunglasses.
- Take the framed certificate above the green-screen computer. Drag the orange spider from the pipe at the upper right into the glass jar on the floor, then add the jar lid from the backpack and take the jar. Press the red button on the right-hand monitor three times: a black-and-white portrait appears on the screen. Tap the portrait on the monitor to collect it.
- Swipe the chair at the right desk aside, open its second drawer and use the key on the padlock of the cage under the back desk to take the rabbit. Open the left desk drawer for the green screwdriver and keep it. Open the third drawer of the back desk for the classified folder. The sheet of paper lying on the right desk, in front of its monitor, gives the computer login: Login wilson, Password 1913. Swipe the orange glove down for the sunglasses, and tap the round door window when it flashes yellow to take the yellow light.
- First fix the leak: drag the loose pipe piece from the floor into the gap in the pipes at the upper left, swipe the wrench out of the cardboard box and use it on the misaligned pipe. Then tap the machine beside the green-screen computer and turn its three dials until the white line lies exactly on the green wave; take the wave bar.
- Use the computer: log in with wilson / 1913, choose 3 (Enter Commands) and type color red, then cls, then open door. The commands list (option 2) explains that open door only works on an empty red screen.CODEwilson / 1913
Experiment Room
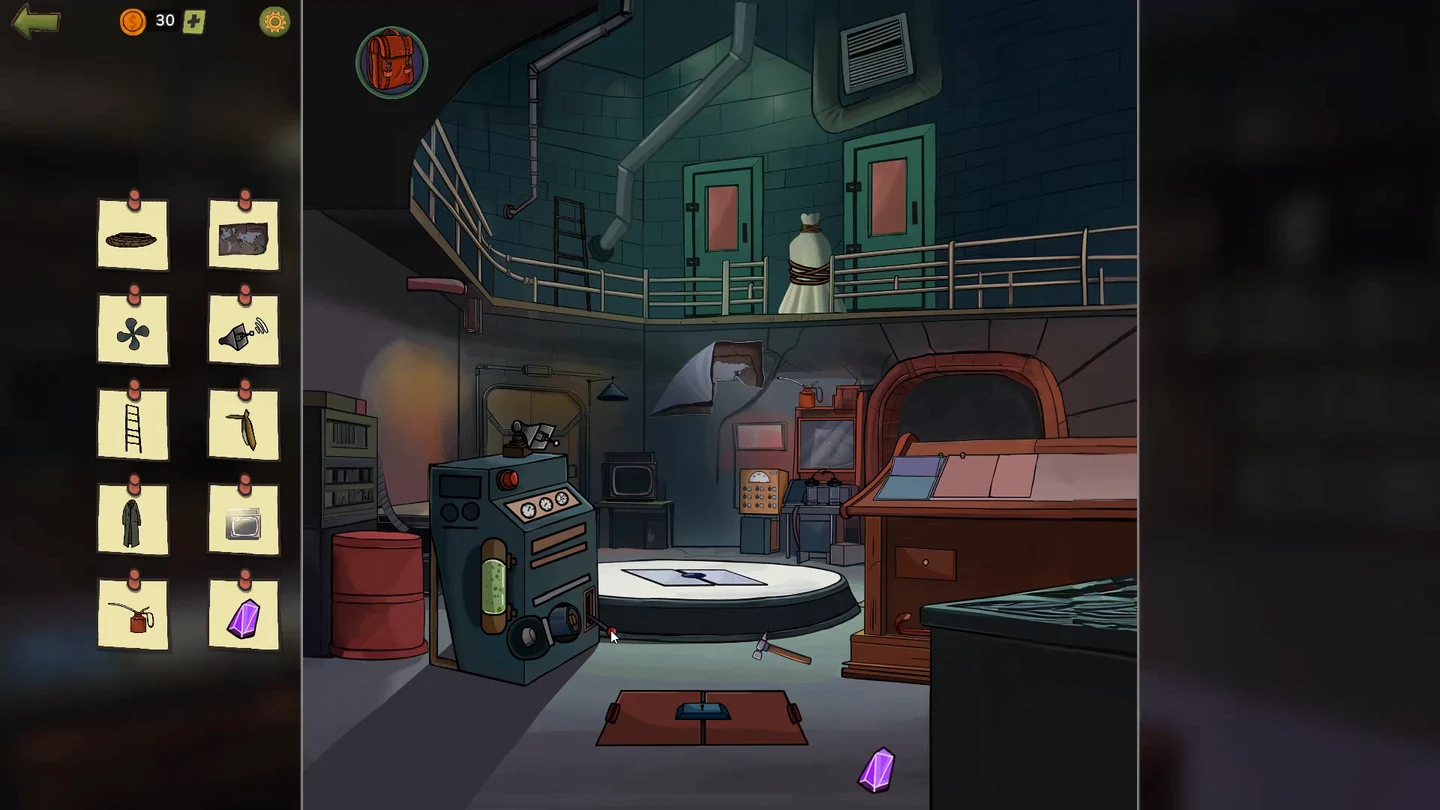
Find: rope, world map, propeller, transmitter, ladder, banana peel, trench coat, lit television, oil can and purple crystal.
- Take the purple crystal at the lower right, the red oil can above the glass box and the ladder by the pipe. Swipe the notebook pages on the right-hand podium down twice for a key and unlock the red floor hatch for the rope. Unfold the world map below the middle door, smash the glass box beside it with the hammer from the floor and add the missing piece to complete the map, then tap the finished map to collect it. Drag the crowbar from the podium onto the vent at the upper right and take the propeller.
- Open the podium drawer for scissors and cut the two ropes round the bundle in white cloth to get a green battery. Pull the lever on the blue machine to eject its old battery, insert the green one, press the red button and take the transmitter. Open the middle green door for the trench coat. In the right green door, swipe the contents up twice for a hacksaw, cut the pipe beside the middle door, swipe the banana peel down out of the cut pipe and tap it. Fit the light bulb from the backpack into the lamp above the television and take the lit television.
- Place the purple crystal in the glass cylinder on the central platform.
- Tap the brown switch box. Set the laser brightness to 100 lm: switch on 25 (top left), 7, 13, 30 and 25 (middle right). 25 + 7 + 13 + 30 + 25 = 100. When the panel light turns green, a portal opens; tap it to send Margaret through.CODE25+7+13+30+25
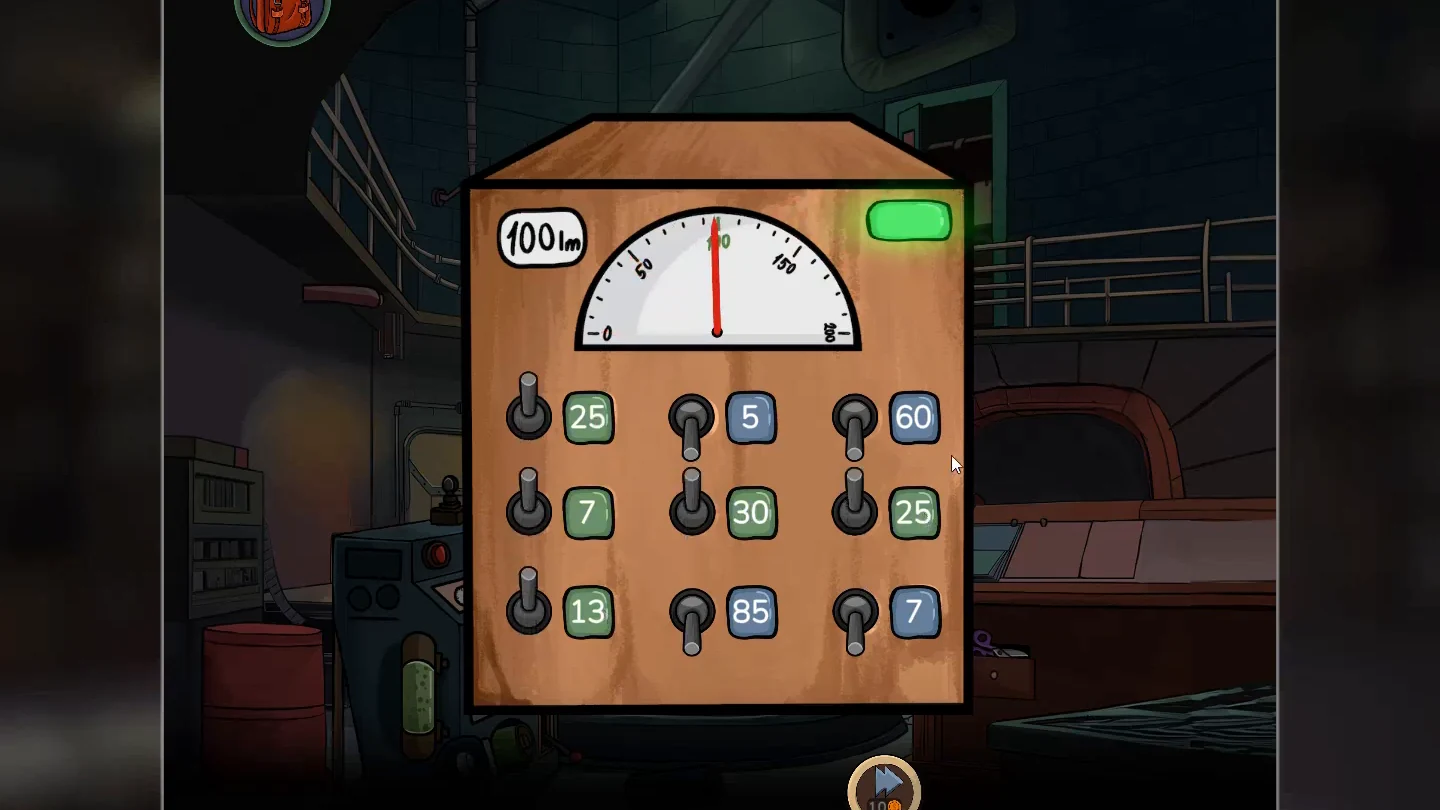
Completed panel: the five green switches add up to 100 lm and the light turns green.