Main Square
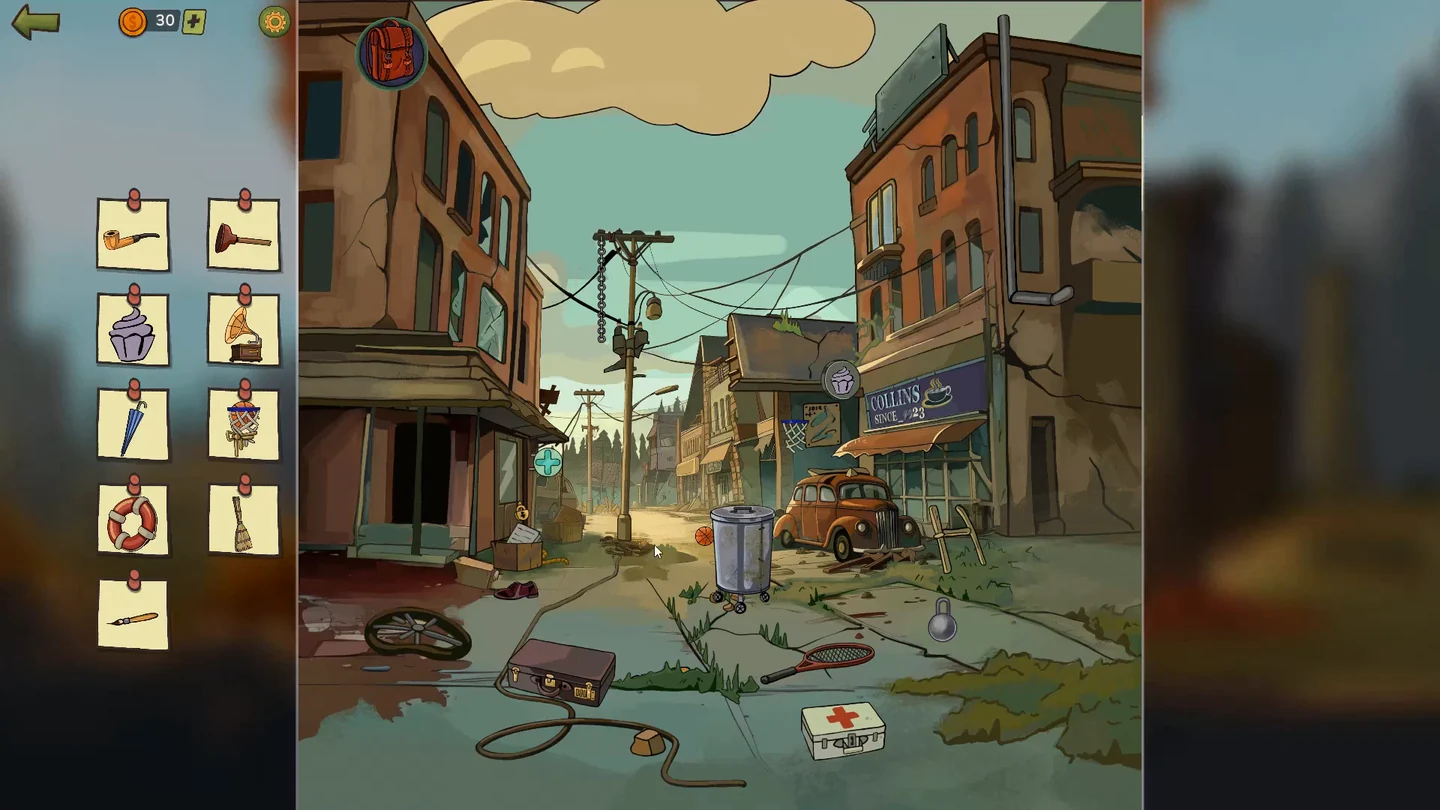
Seb suggests finding allergy medicine. Find: yellow pipe, plunger, cupcake logo, phonograph, umbrella, basketball net, life ring, broom and paintbrush.
- Tap the purple cupcake on the cafe's round sign. Tap the window of the building on the right for the phonograph. Open the red car's hood for the life ring. Swipe up the grass by the suitcase at the lower left for the paintbrush and keep it for Hero Hall. Drag the metal ball at the lower right onto the chain of the street post and swing it right to break the pharmacy window for the umbrella.
- Drag the rock near the hose into the middle of the pebbles and tilt the device so the bin rolls into it and falls over; take the plunger. Swipe the paper box in front of the pharmacy aside, hang the rope from it on the hoop above the red car and drop the basketball beside the car into it, then tap the ball in the net to collect it. Tap the drone when it flies across the sky to stop it and take the broom it carries.
- Open Michael Collins's suitcase. The cafe sign reads COLLINS SINCE ..23, and the lock opens with 1923. Take the yellow pipe inside.CODE1923
- The drone drops a silver key, the important clue. Drag it to the medicine kit lying in the street, then drag the gold key from the kit to the lock of the pharmacy door.
Pharmacy
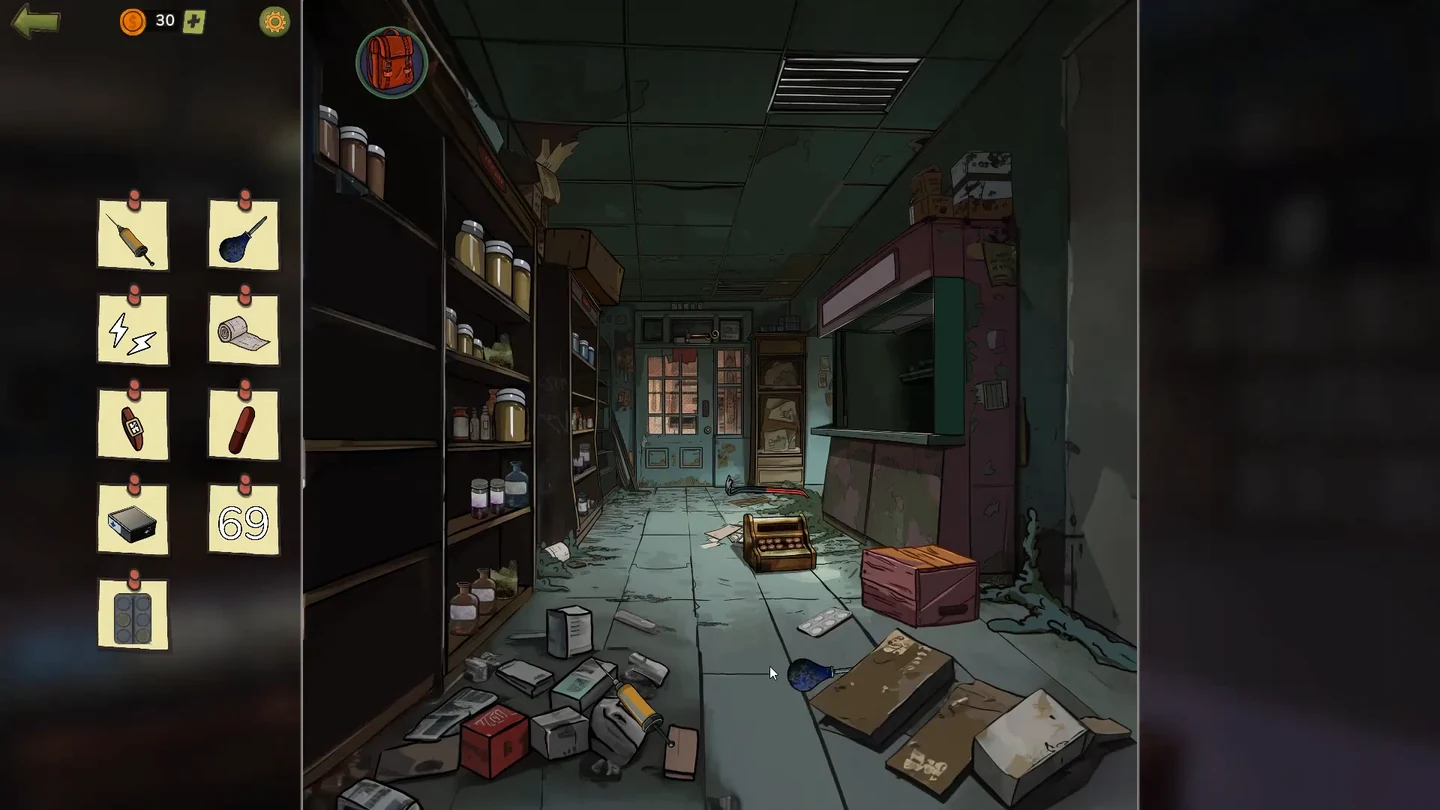
Find: injector, dropper, sound waves, bandage, wristwatch, red pill, medicine kit, the 69 card and the blister pack.
- Take the injector among the boxes at the lower left. Swipe the dropper out from under the cardboard box at the lower right and keep it for the Robo Lab. Swipe the bandage out of the moss between the two left shelves, unroll it and tap the unrolled bandage to collect it. Swipe five pills out of the jar on the middle shelf on the left and take the red pill. Swipe down the cardboard box on top of the shelf by the door, open it, pull out the medicine kit and tap the kit on the floor to collect it.
- Tap the blister pack on the floor by the wooden box, press out the lower-left and middle-right pockets, swipe the pack aside and take it. Swipe up the wooden box on the right, hang the bell inside on the hook above the back door and open the door; tap the sound waves.
- Tap the cash register on the floor. Enter 20 + 5 and pull the lever: the display shows 025. Enter − 2 and pull the lever: 023. Enter × 3 and pull the lever: 069. Take the 69.CODE25 → 23 → 69
- Drag the crowbar above the cash register to the grate in the ceiling and take the wristwatch from the skeleton arm inside.
- Tap the counter. The recipe reads A → C → X → O. Drag the blue A bottle (top shelf), the white C bottle (lower shelf, right), the large pink jar with a small x at its base (lower shelf, left) and the small O bottle (top shelf) into the mortar, grind with the pestle, pour the mortar into the empty bottle on the left, add the cork and tap the bottle to drink the medicine.
Pub Party
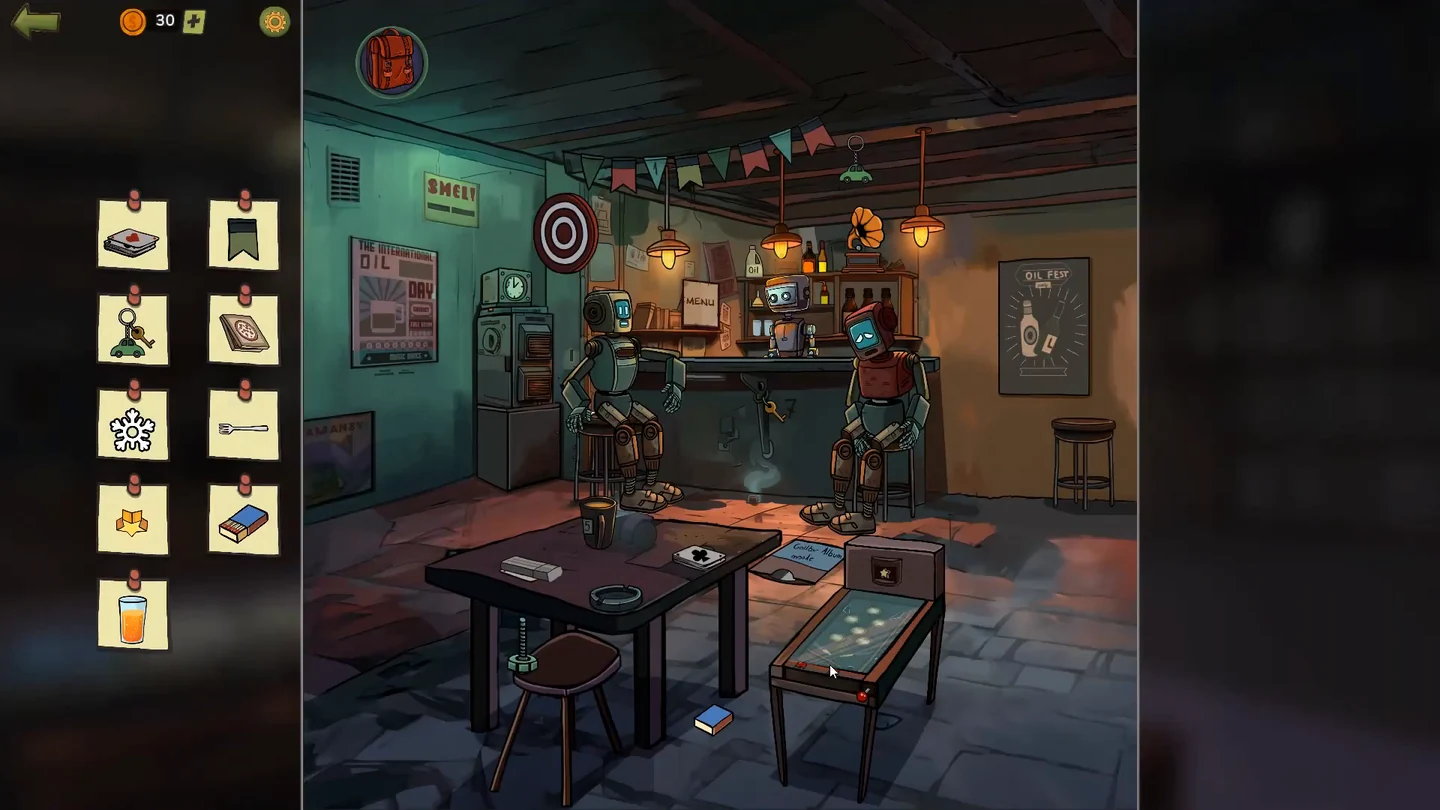
Find: playing cards, car keychain, green flag, pizza box, snowflake, fork, star, matchbox and the orange cocktail.
- Tap the pinball table and pull the red launcher at its lower right back, then release it. Use the two red buttons to work the flippers and keep the ball in play until all six bumpers have been hit; tap the star that lights up.
- Tap the dartboard behind the left robot. Margaret needs to work out which numbers to aim at; the three numbers are hidden around the pub: 1 on a pennant in the bunting, 5 on the mug on the front table and 7 painted on the bar. Drag each dart to the number and release it to hit 1, 5 and 7. Each dart lands a little below where you release it, so aim slightly high. Take the pizza box behind the board.CODE1, 5, 7
- Swipe the white remote on the table up, add the card under it to the deck and tap the completed deck to collect it. Drag the key from under the counter onto the keychain at the right end of the bunting, then tap the repaired keychain to collect it. Tap the green fourth pennant. Open the fridge behind the left robot and put the cold pack on the overheating robot for the snowflake. Swipe the record out of its sleeve in front of the right robot and put it on the phonograph behind the bartender; take the fork when the left robot gets up to dance. Tap the matchbox between the table and the pinball table twice.
- The bar menu shows the orange cocktail costs two nuts. Give the bartender the green nut from the backpack, then swipe the second nut at the lower right up three times to free it and give it to him too. Take the cocktail.
- Tap the bartender to play the stick game: eight sticks in a row, each turn you take one stick or two sticks that are next to each other, then press TAKE. Whoever takes the last stick wins. A reliable plan: on your first turn take the two middle sticks, leaving two separate groups of three. After that, whatever the robot takes from one group, take the same from the matching place in the other group.
Hero Hall
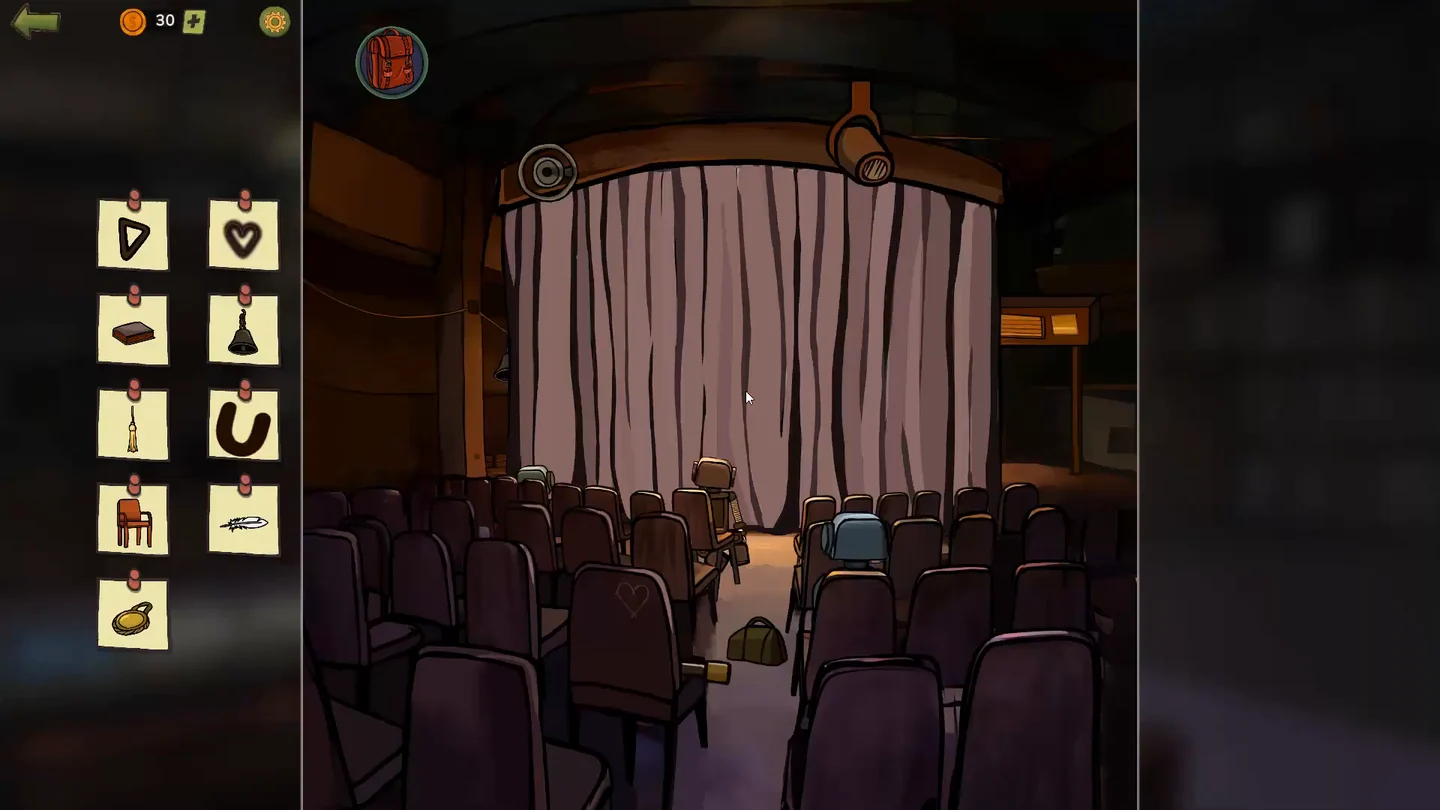
Doug honours Margaret on stage. Find: triangle, heart, book, bell, tassel, the letter U, chair, feather and the gold medal.
- The curtain is closed. Swipe the handle off the seat with the heart on its back twice, fit it to the pulley wheel at the upper left and turn the wheel anticlockwise until the curtain is fully raised.
- Swipe the spotlight left for the triangle and tap the heart carved in a seat back. Tap the yellow robot so it stands, swipe its chair aside and take the book. Take the bell on the line at the left of the stage and the tassel between the two stage lights. Dip the paintbrush from the backpack in the paint bucket right of the stage door, paint the U outline above it and tap the painted U to collect it. Fit the chair legs from the podium and from above the door to the orange chair, then tap the completed chair to collect it.
- Swipe the piano lid up and play from the sheet music (the red arrow marks the first note). First line: E E F G G F E D C C D E E D D. Second line: E E F G G F E D C C D E D C C. Take the feather that appears.CODEEEFGGFEDCCDEEDD EEFGGFEDCCDEDCC
- Tap the round platform above the piano. Each hole is numbered 1 to 5, and the ballet poster behind Doug shows the dancers' colours from left to right. Place the figures: purple in 1, blue in 2, green in 3, red in 4, yellow in 5. Take the gold medal.CODE1 purple, 2 blue, 3 green, 4 red, 5 yellow
- When Margaret asks to go home, Doug refuses. Take the bolt cutters Seb is holding and drag them onto the cable that holds the stage light above Doug, the important clue. The light drops and Margaret escapes.
Corridor and Alley
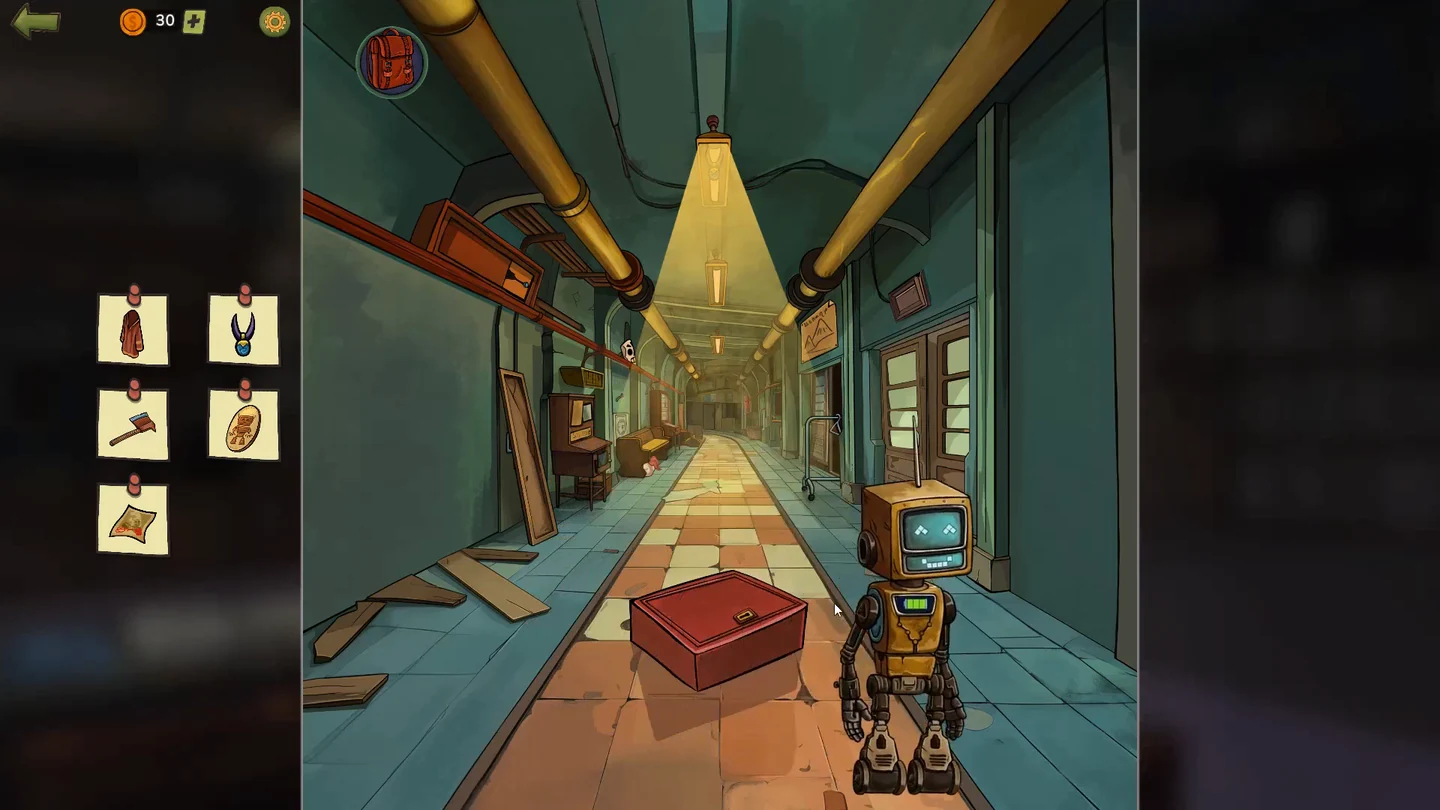
Seb goes to find a car. Corridor list: red shirt, blue necklace, axe, robot token and autograph. Alley list: broken mirror, woman's portrait, boomerang and walkie-talkie.
- Swipe the clothes rack on the right left three times for the red shirt. Swipe the plank on the left aside and push the fuse switch up to turn off the ceiling lamp, then take the blue necklace from it. Swipe the orange case at the upper left aside for a key, unlock the red box, swipe the hose out three times and take the axe. Tap the token dispenser on the left and turn its crank clockwise until a gold token drops into the outlet on the right of the machine. Its card is not checked yet: tap the token in the outlet to collect it. Tap the door on the right twice, drag the wig from under the bench onto the robot that appears and take its autograph.
- In the alley, swipe the window of the right-hand building up for the broken mirror. Swipe the cart in the middle up and then right, and take the woman's portrait on the yellow poster. Tap the film reel at the lower left and tap the boomerang landing on the boy's head in the first picture. Swipe the lower clothesline right and the upper one left for the walkie-talkie on the bird's nest.
- Tap the generator in front of the right-hand door. Use the rotate and exchange buttons until each circle holds only its own symbol, matching the corner marks: orange triangles top left, green squares top right, blue diamonds bottom left, pink hourglasses bottom right. Finish one circle, then move to a neighbouring one; symbols cannot jump diagonally.
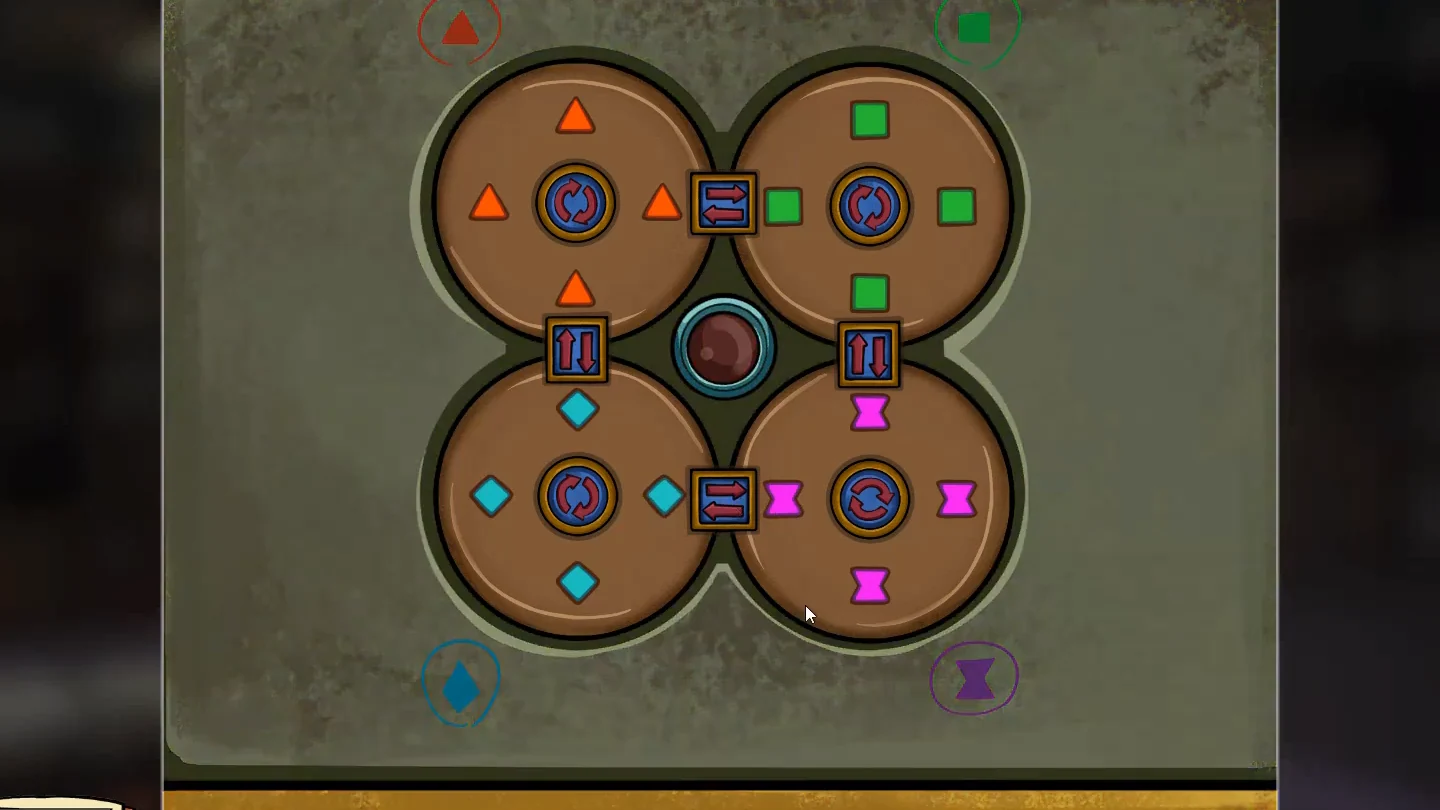
Solved generator lock: each dial holds only the symbol shown in its corner. - Drag the key from the blue door of the right-hand building to the keyhole of the brown door on the left. The door swings open and a blue-handled tool lies on its threshold: drag it straight onto the wire fence at the end of the alley to cut through.
Robo Lab
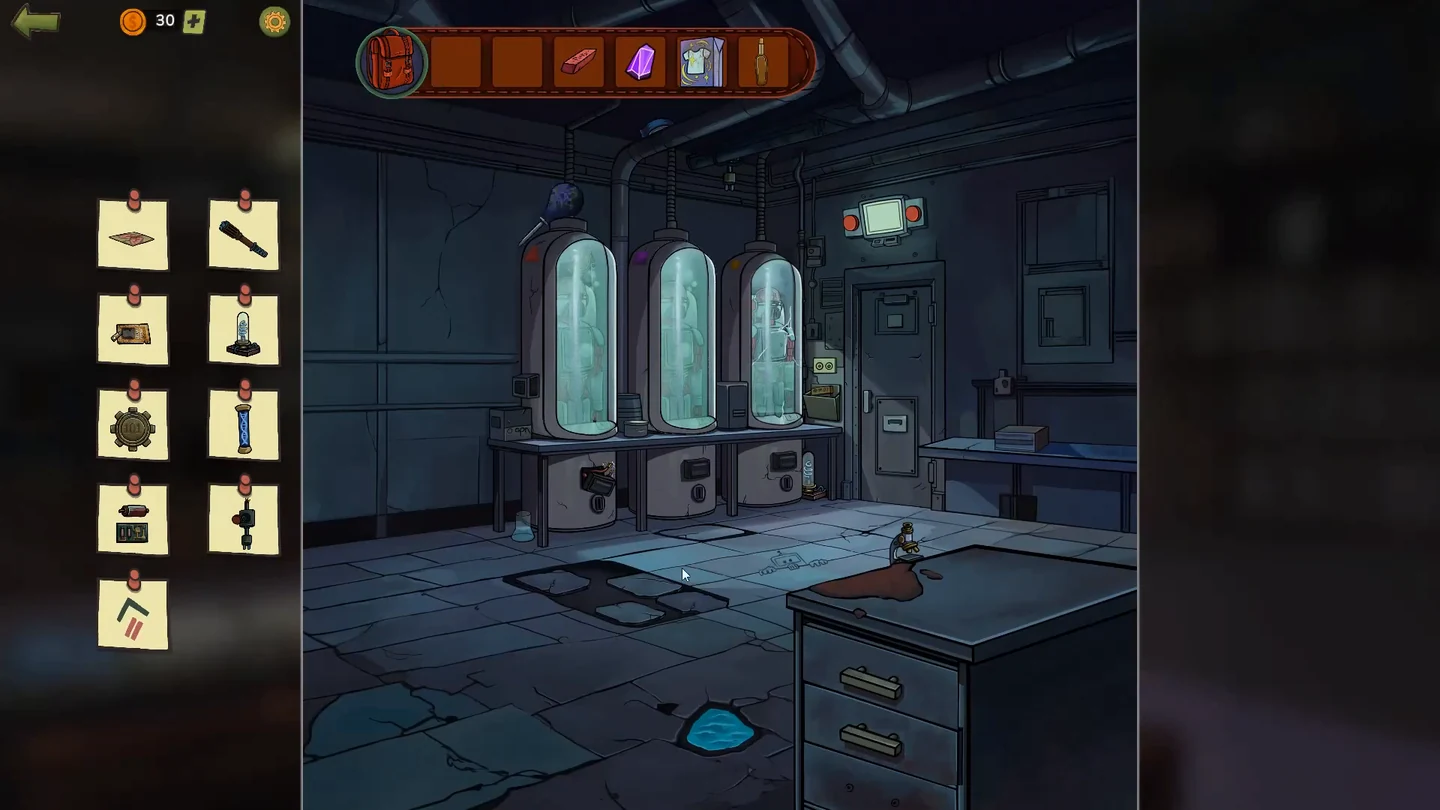
Find: lung picture, electric baton, ID card, light bulb, gear, DNA strand, microchip, broken switch and the screen symbol.
- Swipe the loose floor tiles in the right column up and in the left column down, then join the two picture halves for the lung picture. Open the second drawer of the lower-right table for the electric baton and keep it. Use the dropper from the backpack on the puddle and take the ID card. Take the light bulb right of the third chamber and swipe the broken switch down from the pipes. Tap the right red button under the screen above the door twice and the left one four times, then tap the symbol.
- Chamber 1: drag the blue tape from above the pipe onto the broken wires at its base, put the chip with an orange triangle from the table's first drawer into its slot, swipe the door open and take the gear. Chamber 3: drag the microscope from the floor behind the table onto its door and take the microchip behind the robot.
- Chamber 2: take the chip with a purple square from the olive-green wall holder to the right of the third chamber, put it into chamber 2's slot and tap the device above it. Each of the three tubes has a green band at a different height and a ball that sinks unless you keep tapping the tube's button. Tap the middle ball all the way to the top first; while it slowly sinks towards its green band, raise the left ball into its band, then keep tapping the first two to hold them there while you bring the right ball up into its band. With all three in place, swipe the door open, tap the robot's chest and take the DNA strand.
- Tap the keypad on the door, the important clue. The three switches on top each move the tiles of their column and the three switches on the right each move the tiles of their row. Use them until the tiles read 1 2 3 / 4 5 6 / 7 8 9; the small grid at the lower right shows the target.
Virology Lab
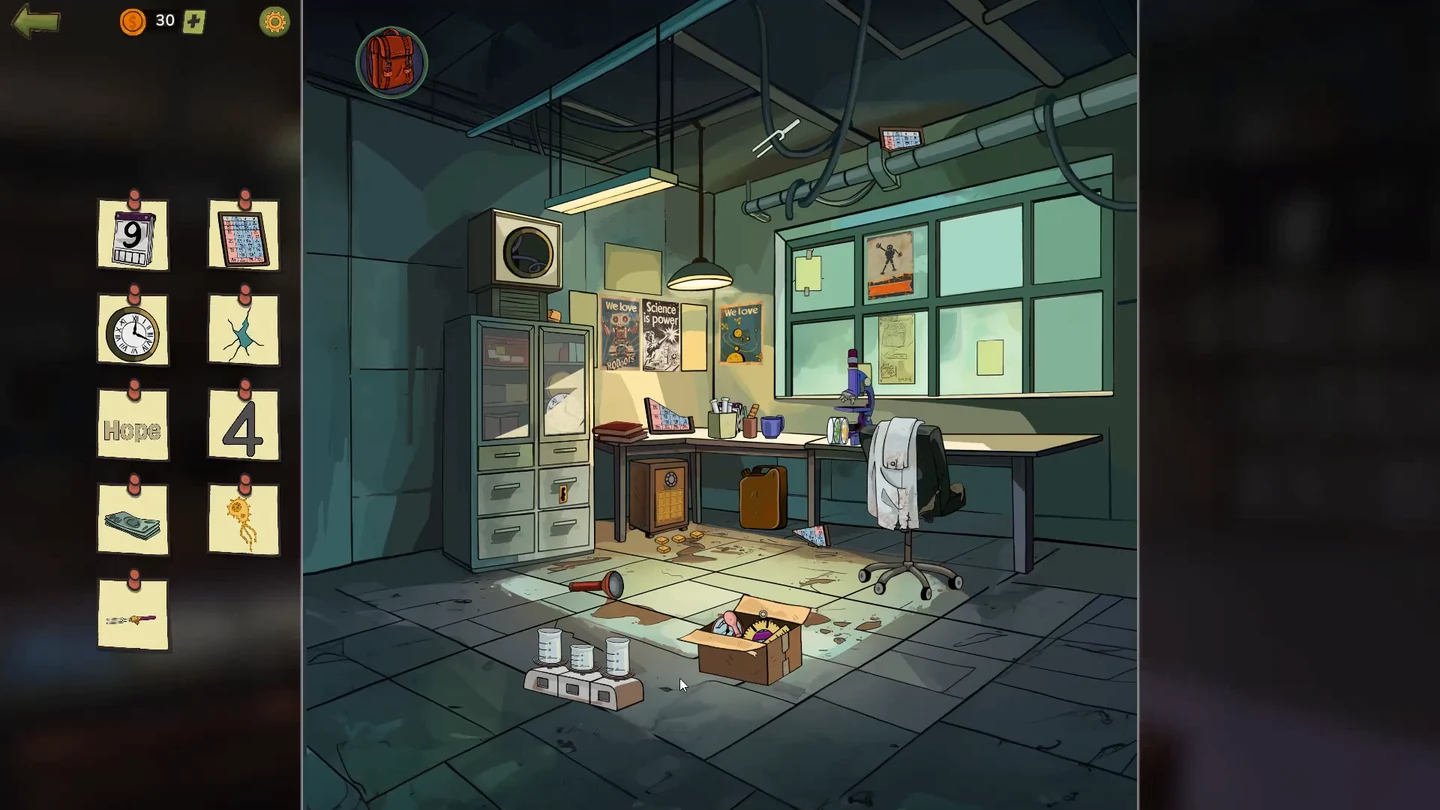
Find: calendar, chart, wall clock, crack, the word Hope, the number 4, cash, yellow bacteria and prongs.
- Tap the scales at the lower left. The vessels hold 5, 3 and 8 units, and only the 8 starts full. Pour 8→5, 5→3, 3→8, 5→3, 8→5, 5→3, 3→8. The 5 and the 8 vessels now hold 4 units each; tap the 4.
- Swipe the items in the middle of the desk aside three times for the calendar. Add the two chart pieces (under the table and above the pipe at the upper right) to the chart on the left of the table, then tap the finished chart to collect it. Open the cabinet and hang the clock on the round mark above it, then tap the hung clock to collect it. Swipe down the paper taped to the window to expose the crack, then tap the crack to collect it. Swipe the cardboard box on the floor up five times to empty it, pull the prong piece down from the ceiling cable, add the pink handle from the box and the tape from above the cabinet, and take the prongs.
- Open the top-left drawer of the left cabinet for a slide and put the slide with brown specimens under the microscope. Swipe the side arrows up and the bottom arrows left to move the slide until the yellow bacteria come into view, then tap it.
- Tap the robot poster on the window and rub the scribbles on its orange banner with the pink eraser from the backpack. Tap the word Hope.
- Open the wall safe and fill the 4×4 grid with the A, C, G and T tiles so that every sequence on the sticky notes around it appears. The finished grid, row by row: A T A T / A G C T / C A G C / G G T A. Take the cash.
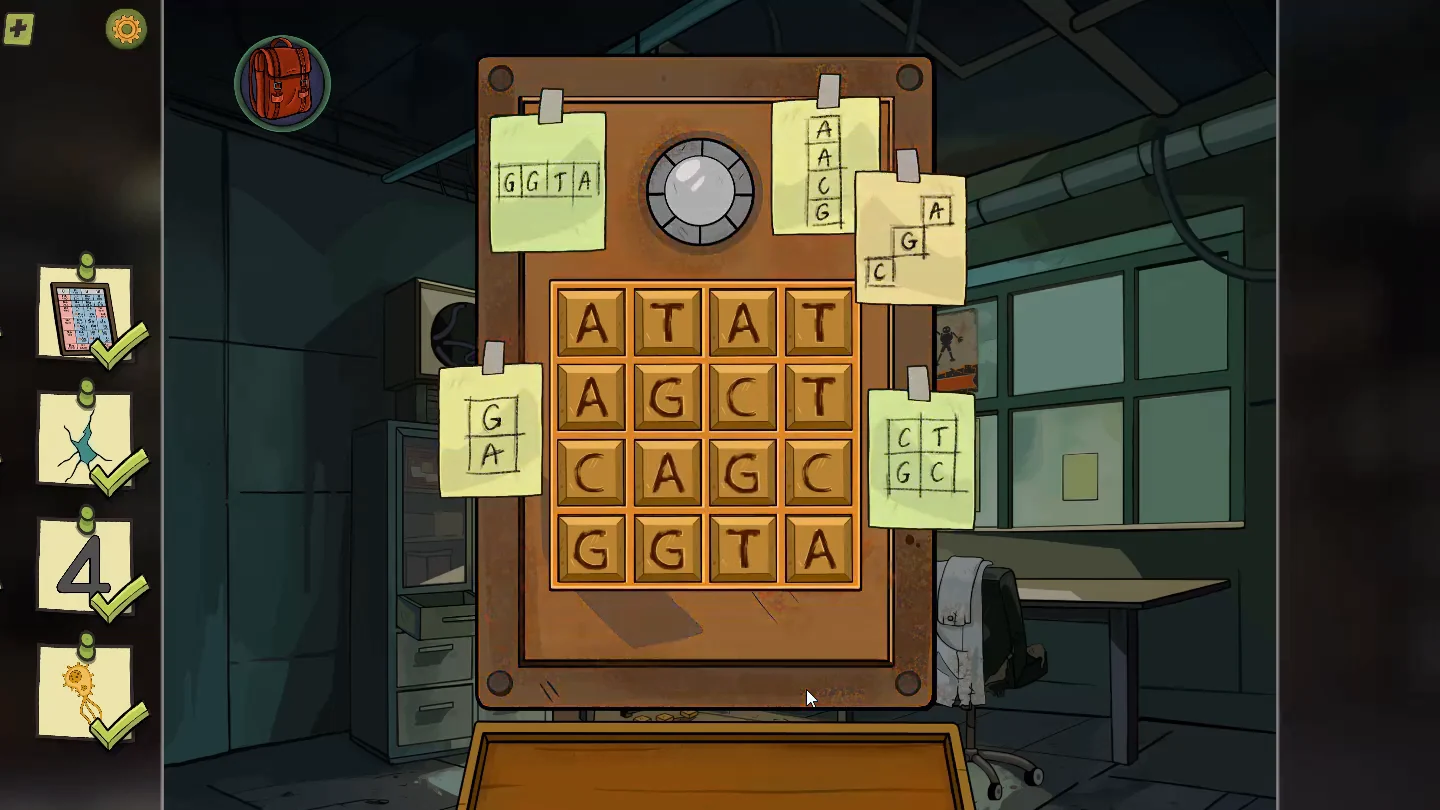
The finished grid in the wall safe: ATAT, AGCT, CAGC, GGTA. - A gold key falls from the lab coat, the important clue. Use it on the cabinet drawer and read the brown folder: research showing the virus came from the robots' creators.
Geoffrey's Basement
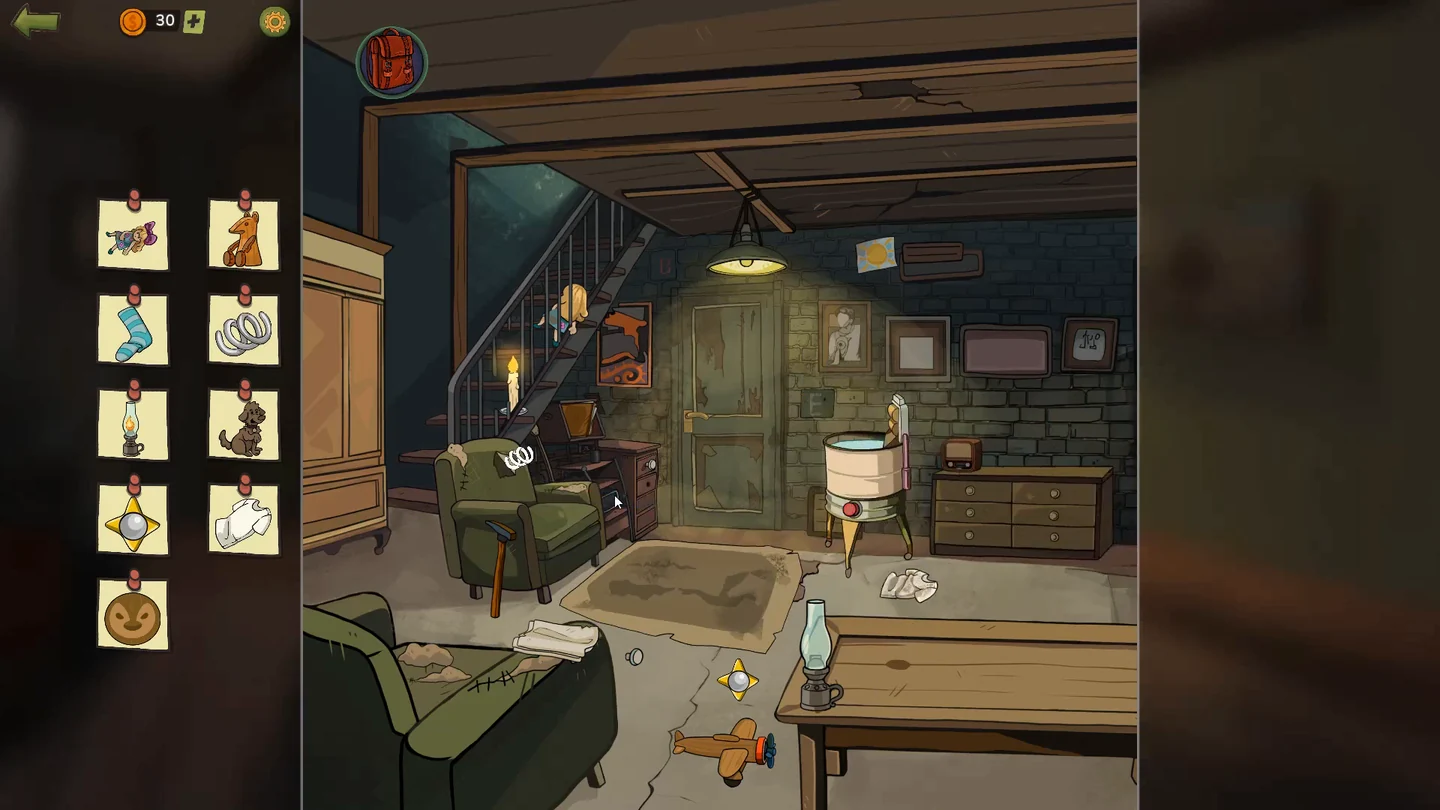
Seb hides Margaret in his late owner's basement. Find: doll, wooden mouse, sock, spring, lantern, toy dog, metal ball, white shirt and penguin face.
- Swipe the doll off the stairs, swipe the rug up twice for a pink bow and add it to the doll, then tap the doll to collect it. Swipe the sun drawing above the washing machine down and tap the letters S, E and B on the wall to reveal the wooden mouse, then tap the mouse to collect it. Swipe the green chair's cushion aside for the sock, and cut its stitched backrest with the knife from the table for the spring. Remove the lantern cover. Drag the paper from the green couch to the candle and, without letting go, keep holding it and carry it on to the lantern in one continuous drag to light it. Replace the cover, then tap the lit lantern to collect it.
- Put the shirt on the floor into the washing machine, add the detergent, press the red button and tap the machine; it throws the clean shirt out onto the floor, so tap the shirt there to collect it. Fit the grey drawer knob from beside the couch to the side-table drawer, open it, wind the music box's key and tap the penguin when it faces you. Tap the maze on the floor. It is steered by physically tilting your phone or tablet: tilt the device in small steps along the walls to roll the ball into the yellow star without dropping it into another hole, then tap the ball to collect it.
- Swipe the photo album on the shelf by the stairs, open it, slide the lower photo right and the upper photo down, and take the toy dog.
- The portrait right of the door shows 106, the important clue. Tap the door handle and enter 106.CODE106
Prison Cell
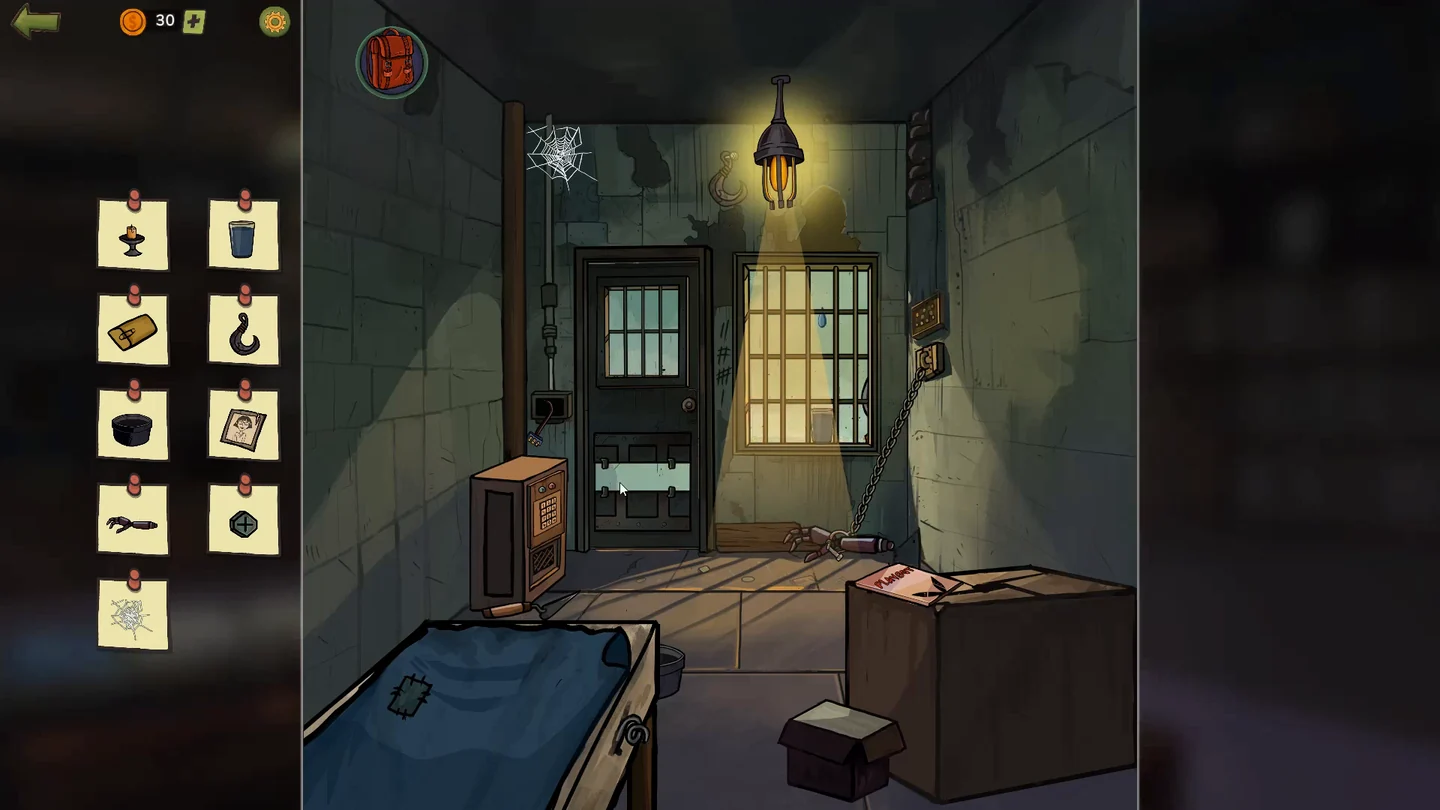
Find: candle, glass of water, envelope, hook, pan, girl's picture, robot arm, screw head and spider web.
- Take the hook left of the ceiling light and the spider web in the upper-left corner. Swipe the pan out from behind the bed and swipe the blue blanket twice for the girl's picture. Put the glass from the small box at the lower right in the gap of the window bars where water drips and take it when full. Swipe the metal panel at the upper right down and dig the rocks with the trowel by the left-hand box. Swipe the envelope that appears left into view, then tap it to collect it.
- Swipe the plank on the door aside to uncover the hole. Take the pink Playbot magazine lying on the large cardboard box at the lower right. When the guard robot walks past the hole, drag the magazine to it; he swaps it for a key, which he passes through the hole. As he walks past the hole on another round, tap the screw head on him to take it. Use the key on the handcuff holding the robot arm and take the arm.
- The tally marks right of the door give the code. Tap the box left of the door and enter 2, 4, 5, 1, then take the candle.CODE2451
- When Doug comes in, plug the electric baton into the socket on the right to charge it, then drag it onto Doug. Take the purple stone he drops and put it in the beam of the ceiling light; step through the portal that opens.