The shore, the archive and the dock
On a Greek coast, Kate lies lifeless: her soul has been taken to the underworld. Your task is to bring it back. This episode has 12 morphing objects, six lightning bolts and six tridents. The bonus tokens are horseshoes, hourglasses and coins.
- On the shore, move the green bush on the wall by Kate's head and tap the lightning bolt behind it (bolt 1 of 6), then tap the morphing monument on the hilltop in the distance (morphing object 1 of 12). Take the olives from the large tree left of the statue.
- Take the path on the left up to the archive. Tap the morphing symbols at the bottom of the wall hanging behind the lit statue (morphing object 2 of 12) and the trident in the hole in the floor (trident 1 of 6). Take the boards from the floor by the scroll shelves. Put the olives in the press on the left, then tap the bottle and the press to collect oil.
- Oil the bolt on the lid of the well on the shore, open it and turn the handle to raise the bucket. Take the jigsaw (a fret saw) and the disk fragment.
- Tap the boat in the water to go to the dock. Tap the trident leaning on a column on the left (trident 2 of 6) and the morphing anchor above the awning (morphing object 3 of 12). On the small boat on the right, take the disk fragment and a fragment of the labyrinth.
- Lay the boards on the scaffold by the big ship on the left. Move the board sets onto the middle rails so they form a path with no gaps or overlaps; there are two layers. On the deck, take the disk fragment at the lower left and the hammer from the large box at the lower right.
- Put the three disk fragments on the box under the awning on the left of the dock. Press the arrow to see the boards on top, then rearrange the twelve toothed boards until their edges fit the template. Take the handle and the sign.
- On the shore, break open the wooden box under the awning behind Kate with the hammer and take the head of the hydra and the fishing net. At the dock, fish the floating oars out with the net and put them in the boat to sail to the island.
The landing, the garden and the bull gate
The island landing has a temple entrance on the right, a stone harp and a gate under a bull's head.
- At the landing, tap the morphing symbol on the walkway towards the stone gate (morphing object 4 of 12) and the lightning bolt on the pillar beside the stone harp (bolt 2 of 6).
- Take the path on the left to the garden. Tap the morphing red flower on the bush on the right (morphing object 5 of 12) and the trident among the tools on the left (trident 3 of 6). Take the part of the pedestal from the scarecrow's shoulder.
- Open the door under the awning at the top left of the garden and put the sign at the bottom. The sign shows two symbols with a number each. Lift boards on the top tables; each lifted board hides its symbols. Lift the right combination so the hidden count of each symbol equals its number on the sign. Inside, take the watering can and the garden shears.
- At the landing, cut the vines over the temple entrance on the right with the shears. Take the second fragment of the labyrinth and the head of the hydra.
- Put both labyrinth fragments in the stone gate under the bull's head and go through.
Escaping the Minotaur
Pulling the lever opens the labyrinth doors and releases the Minotaur. A timer runs; if it reaches zero you are sent back to the start. Item spots can vary, so search every room. The route below is one working route.
- Pull the lever. In the middle room, take the board. In the right room, lay the board across to reach the side area and take the lever from the lion head on the right. Fit the lever on the left of the left room to open another door.
- Lift the wall hangings to find a secret button and press it; take the rope from the secret room. Go down the steps beyond, tie the rope to the broken chain and pull the lever to raise the gate.
- In the next courtyard, five Greek letters are carved over the closed gate on the right (γ ο μ φ ς in the checked game). Tap the same letters on the bricks and the floor in that order to open the gate. Search the room behind it for the sword fragment, cut the vines in the other gateway with it and climb the stairs out.
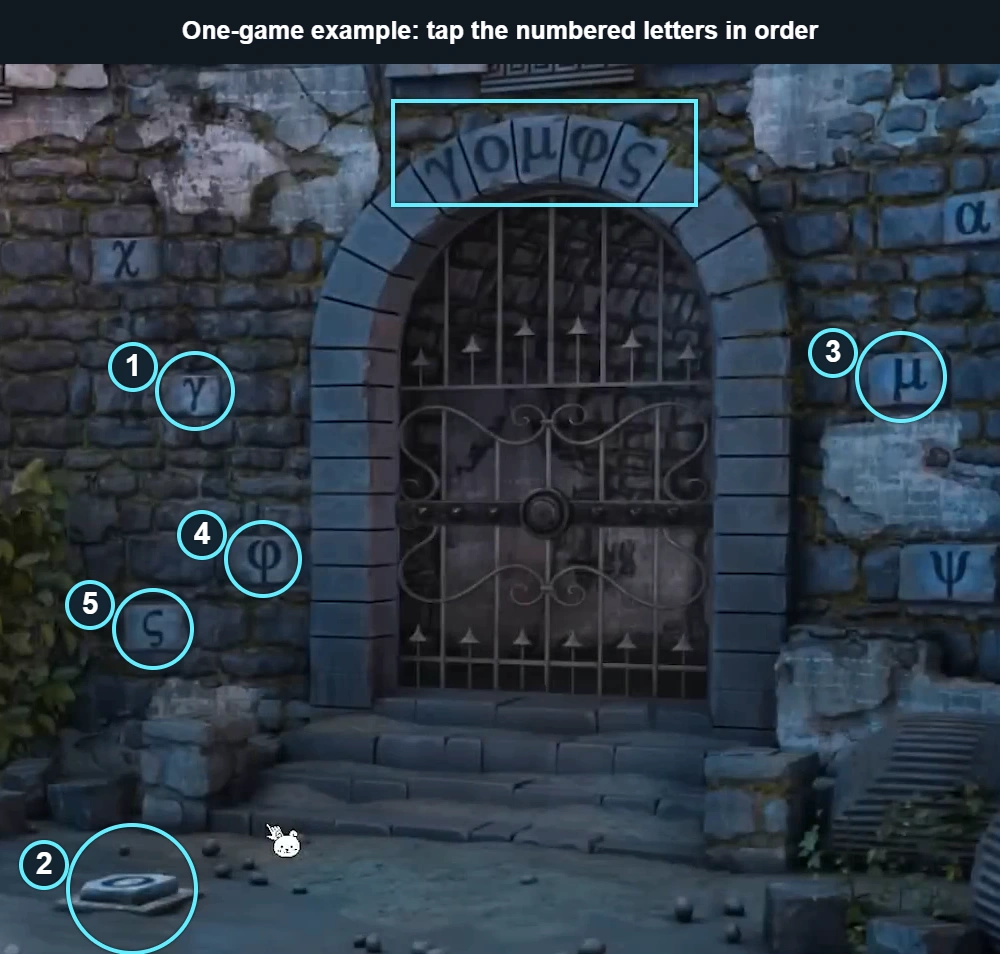
Episode 5: one-game example. Read the gate, then tap 1 gamma, 2 omicron on the floor, 3 mu, 4 phi and 5 final sigma.
The ruins, the harp and the pedestal
The ruins hold Zeus's fallen statue, a well and a tall pillar with a nest. Four pedestal parts restore the statue base on the shore.
- In the ruins, tap the morphing star on the stones right of the bottom of the steps (morphing object 6 of 12). Take the pedestal part from the bottom of the broken pillar left of the steps and the string from the bottom right. The fallen statue of Zeus on the far left is the lightning-bolt star spot.
- At the landing, string the stone harp. A panel opens; take the medallion and the ladder.
- In the ruins, lower the ladder into the well on the right and climb down. Tap the trident on the left (trident 4 of 6) and take the pedestal part and the bird figurine.
- In the garden, set the bird figurine in the middle of the bird bath at the lower right. A secret passage opens. Look at the mural (a tree grows when watered) and take the head of the hydra and the pegs.
- In the ruins, push the pegs into the holes of the tall pillar on the right and hammer them in. Climb to the nest on top and take the last pedestal part and the cross-shaped key.
- On the shore, add the four pedestal parts to the base of the statue. Each side has four buttons that push tiles of that side's colour onto the board. Push tiles until every coloured space is covered by a tile of its colour (tiles hide the marks, so memorise the layout first; reset if needed). Finish before the timer runs out for a star. Take the scroll.
The hydra sphere, the zodiac door and Charon
Three hydra heads open a sphere in the archive; its bas-relief opens the round door to the River Styx.
- In the archive, fit the handle to the mechanism in the floor hole and lower the sphere from the ceiling. Attach the three hydra heads and take the bas-relief.
- In the ruins, put the bas-relief on the round doorway at the top of the steps. Use the arrows to move the eleven zodiac signs around the web until each sits in a slot of its own colour. Go down to the River Styx. For this lengthy arrangement, use shared junctions to transfer a sign between loops: bring it to a junction, rotate the receiving loop, then restore the first loop if that disturbed a correct sign. Work toward the least accessible coloured slots first, checking all signs carried by each arrow.
- Talk to Charon: he needs two golden branches from the tree in Persephone's garden. Break the chain on the pillar left of him with the hammer and take the hook. Take the crystal from the rocks by the statue on the right, tap the morphing boot on the rocks left of that statue (morphing object 7 of 12), and fill the watering can with red water from the river.
- In the garden passage, water the shoot in the middle with the red water. A golden tree grows; cut the golden branches with the jigsaw. Give them to Charon. Before crossing, take the torch from the fallen arch on the right bank.
- Ride to the far end of the river. At the gates of the underworld, add the scroll and use the row and column arrows to shift the gems until the grid matches the scroll. This lengthy row-and-column puzzle is best handled in small groups. Choose a distinctive group on the scroll, align its gems in their columns, then shift their row into place. Count temporary shifts so you can reverse them after transferring another gem. Recheck the intersections of every row and column you move; completing one row does not lock it.
The underworld path and the skull temple
A path of lava leads to a small temple with an altar of skulls and to Cerberus's courtyard.
- On the path, tap the lightning bolt on the pointed rocks right of centre (bolt 3 of 6) and the morphing pile of stones on the left (morphing object 8 of 12). Light the hole at the lower right with the torch and take the silver and the trowel.
- Open the temple door at the top left with the cross-shaped key. Inside, tap the morphing carving on top of the column right of the skulls (morphing object 9 of 12) and the trident on a leg of the central stand (trident 5 of 6).
- Back on the path, take the shield from the skeleton between the rocks and knock off its helmet with the hammer.
- Put the medallion in the small pedestal at the end of the path. Tap a column to rotate its chips down; where there is a gap, tap a chip beside it to slide it across. Make every row match the colour of the fixed chip on the left. A walkway forms to the courtyard.
- In the courtyard, tap the lightning bolt on the top of the wall on the right (bolt 4 of 6) and the morphing urn by the green gate (morphing object 10 of 12). Take the pincers from the pointed rock on the right. On the path, pull the key out of the crack at the bottom with the pincers.
- At the Styx, scrub the dusty mosaic on the fallen arch with the brush on the helmet. Count the shields, birds and fountains on it. In the skull temple, open the picture to the right of the altar and tap the shield, the bird and the fountain buttons that many times each. Take the mirror. The mosaic counts can differ between games; count your own cleaned clue.
- Unlock the cabinets on the right of the skull temple with the key. Take the detail and the recipe for a sedative for Cerberus (melissa, chamomile, valerian root and a fresh fish, boiled together).
Sedating Cerberus and meeting Hades
The sedative ingredients are spread across the coast and the island.
- Pull the detail and the melissa from the crevice left of the stone bridge at the landing with the pincers. Take the chamomile from the top left of the broken box behind Kate on the shore, the fish from the basket at the dock, and dig up the valerian root in the scarecrow's field with the trowel. Add all four to the recipe.
- In the skull temple, light the fire under the pot with the torch, add the ingredients and take the sedating fish. In the courtyard, give it to Cerberus; when he sleeps, take the key from his collar.
- Unlock the large doors at the end of the courtyard. Tapping an empty square pushes the seals next to it one square away, if nothing blocks them. Push all ten seals into the two holes without trapping any in corners (reset if needed). Enter the throne room.
- Talk to Hades: he will free Kate's soul if you return his astronomical clock. Tap the lightning bolt on the low wall right of the throne steps (bolt 5 of 6) and the morphing flame pattern on the wall left of the steps (morphing object 11 of 12). Pull down the chandelier with the hook and take the skull.
- Put the skull in the open slot of the skull altar. The centre button turns the paths in the middle so pairs of tokens can swap. Move each of the eight tokens next to the card it belongs to (the seven deadly sins and Hades). Take the spear and the dagger. Use the pictured associations below to identify the target before moving a token. Turn the centre until a path joins a token to the position you need, then swap those two tokens. If they cannot be joined directly, transfer through a third position and restore that temporary position afterwards. Plan these short transfers instead of a full move list.
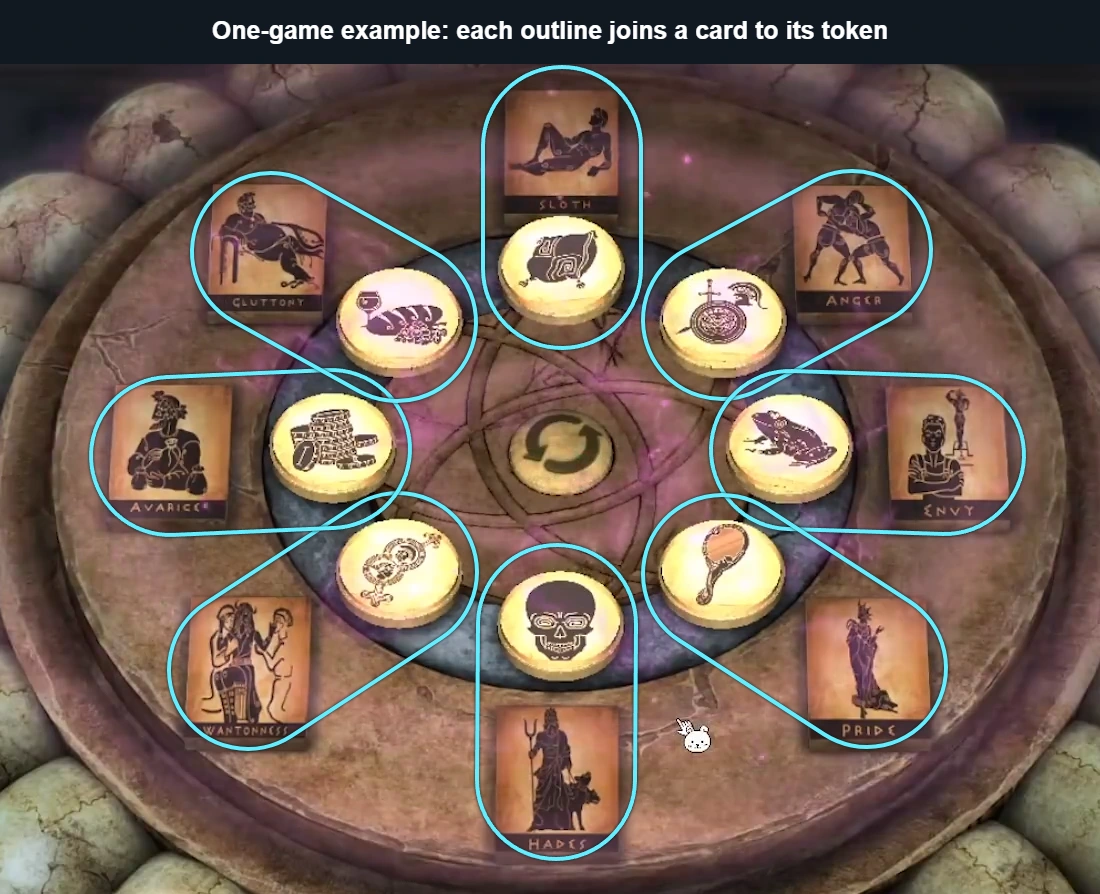
Episode 5: each outlined pair shows which token belongs beside that card. Use the central paths to exchange tokens. - At the Styx, lever open the grate with the spear. Take the watch detail and tap the lightning bolt drawn on the back wall (bolt 6 of 6).
- At the dock, open the shells in the fish basket with the dagger and take the pearl. In the ruins, smoke the bees off the hive in the tree left of the steps with the torch, then cut the crystal free with the dagger.
- In the throne room, set the pearl in the crown of the Medusa head on the left. Take the crystal and the part of the mosaic. In the skull temple, fit the part into the round mosaic on the back wall and take the watch detail and the bellows.
- With all six lightning bolts, open the chest at Zeus's fallen statue in the ruins and take the star.
The green gate and the Well of Souls
Three crystals open the green gate in Cerberus's courtyard.
- Put the three crystals on the green gate. A sheet shows six mythical creatures. Turn the central disc and slide the two half-discs until their pieces join into one complete creature outline; each finished creature is ticked off. Find all six (they can differ). Go through to the Well of Souls.
- Kate's soul floats in the green water. Tap the morphing statue by the steps at the top centre (morphing object 12 of 12). Lay the shield across the gap to the alcove at the top right, take the mirror and tap the trident just behind the box (trident 6 of 6). Take the mold from the left of the bell under the small arch.
- In the archive, put the bellows at the bottom of the forge and work them. Put the mold on top and the silver in the crucible; break the cooled mold with the hammer and take the silver sandal.
- At the landing, fit the sandal to the foot of Achilles on the back wall inside the temple entrance. Tap the small circles to rotate their segments and restore the picture. Turn one circle at a time and watch which pieces now line up with their neighbours; pieces at the rim carry the plate's edge pattern, which shows where they belong. One checked game needed 49 of the 100 moves, so there is room to experiment. Finish within 100 moves for a star. Take the spider and the watch detail.
- With all 12 morphing objects, open the statue on the right of the River Styx for a star. With all six tridents, open the statue of Poseidon at the dock for another.
The spider, the sapphire and the telescope
Hades's clock needs six watch details. The two mirrors light up a clue on the courtyard wall.
- Put one mirror on the frame on the small pedestal at the lower left of the courtyard and the other on the frame near the gates at the back right. Their light picks out a round panel high on the wall at the top left; look at its pattern.
- In the throne room, put the spider in the spider-shaped slot right of the throne steps. Tap balls on the two outer rings to move them within their quarter until the chains copy the pattern on the courtyard panel. Take the lens and the lever. The chain clue can differ between games; follow your own illuminated courtyard panel.
- In the Well of Souls, fit the lever left of the bell and lift it. Take the sapphire and the button.
- In the throne room, place the sapphire at the top right of the panel on the far left wall. Drag the other sapphires on the left and right edges to bounce the beam down the board into the large crystal at the bottom left. Take the watch detail. The starting arrangement can differ. Work back from the bottom-left receiver, adjusting the lowest useful sapphire first, then connect that route to the incoming beam.
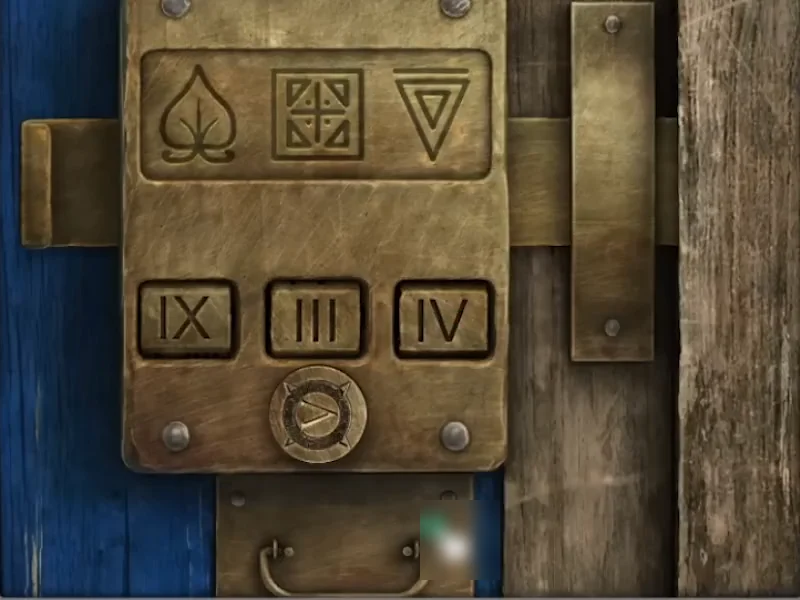
- In the archive, fit the lens to the telescope. Switch on combinations of the coloured lenses: each symbol of the blue door lock appears with a number for one combination. In one game green showed the leaf with 9, green with blue the triangle with 4, and blue with yellow the square with 3.
- On the shore, fit the button to the lock on the blue door and set the plates under the leaf, square and triangle to those numbers (IX, III, IV in one game). Inside, take the bas-relief and the watch detail; the potter's wheel and the oven are for later.
- In the throne room, fit the bas-relief to the front of the desk left of the throne steps and take the detail.
- In the Well of Souls alcove, put the three details on the box. Slide the balls around the two loops and use the middle slider to swap two balls at a time between them until every red ball is on the left loop and every blue ball on the right. Take the watch detail and the pedal. Use the approach rather than a long move list: turn the left loop until two unwanted blue balls face the middle slider and the right loop until unwanted red balls face it. Transfer that pair, then rotate the newly correct balls away from the transfer point before setting up the next exchange. Save a mixed final pair until you can make a useful exchange on both sides.
Horseshoes, hourglasses and coins
Optional: three stars. Do these before the soul amphora reaches Kate, or return with Collect more stars.
- Horseshoes: on the small roof over the blue door on the shore, on the anvil at the far left of the archive, in the round pot left of centre at the dock (open the lid), behind a loose stone in the low wall left of the island temple entrance, and behind the red curtain above the mural in the garden passage.
- Hourglasses: in the small round hole on the front of Charon's boat, among the pots below the picture right of the skull altar, behind the bottom middle cabinet door in the skull temple, by the foot of the large statue on the left of Cerberus's courtyard, and on the balcony at the top of the steps of the left building in the Well of Souls.
- Coins: press the three sunken bricks right of the garden shed door, move the large leaf at the lower left of the pillar nest in the ruins, open the skeleton skull's mouth on the underworld path, lift the gold brick left of the fish basket at the dock, and move the paper on the throne room floor at the lower right.
- Horseshoe mini-game: at Hephaestus in the archive, place a horseshoe. Move each sun, moon and star chip to its matching far-side emblem, landing only on cells with its own symbol. Leaving a cell changes it through the cycle star to sun, sun to moon, moon to star. Use this to lay the next chip's path: let the star create sun cells, the sun create moon cells, and the moon restore star cells. Before advancing, check that the next chip can reach the new path and that no chip has lost its only exit. Use this method through all five rounds to earn the star.
- Hourglass mini-game: at Thanatos in the Well of Souls, place an hourglass. The directional buttons move the Greek letters together; the turning control in the centre rotates letters caught in its central area while the others stay outside it. Bring just the letters that need repositioning onto that wheel, turn them into the required relative order, then move the group toward the black target letters. Check the whole group after each turn: placing one letter does not finish the others. Work through five rounds for the star, using these short alignments rather than a full move list.
- Coin mini-game: at Ares in Cerberus's courtyard, place a coin. There are three blue stones. Drag them along the passages; the coloured symbol tiles operate matching raised barriers. A stone resting on an operating tile holds the matching barriers down, and moving it away lets them rise again. Use two stones as helpers: hold a passage open, move another stone through, then hand off to a matching tile on the far side before releasing the helper. Trace a route to the round recess and keep a way for your helpers to reach the next switches. Finish the maze in each of five rounds for the star.
The trail of clues and the timed room
Optional: worth one star. A chain of clues leads to the secret room.
- Open the panel on the low wall behind the bell in the Well of Souls (a cow and an eye). Look into the eye of the bull's head over the landing gate, then tap the lava on the left of the underworld path to see an amphora. In the skull temple, knock over the large amphora on the right to see the next mark. In the archive, look in the basket of grapes on the floor at the left and take the convoluted clue.
- At the bell arch in the Well of Souls, place the convoluted clue. Tap the four parts of each pillar to change their line patterns until both pillars copy the clue. A doorway opens on the left. The line clue can differ between games; match your own paper.
- Each of the three pedestals has a timed puzzle. On the left, compare each large branch symbol with the three small pieces needed to make it. Start with an unmistakable feature such as a fork or a sun ray, swap that piece onto its branch, then fill the other two parts without duplicating a feature. In the middle, fit all blocks into the frame: place awkward large shapes against the edges first, and avoid leaving a gap narrower than any unused piece. On the right, use the middle row as a transfer lane: bring a misplaced block into it, slide it to the column with its matching design, and move it into that section. Keep a vacancy available for the next transfer and protect completed sections. These are approaches rather than full move lists; complete each within its displayed time limit, then take the star.
Hades's clock and Kate's soul
Returning Kate's soul ends the episode.
- In the archive, put the six watch details in the clock under the telescope and take Hades's watch. Give it to Hades; he gives you clay to make an amphora for the soul.
- In the pottery behind the blue door, fit the pedal to the potter's wheel and put the clay on it. Fire the shaped amphora in the oven with the tongs and take it.
- Scoop Kate's soul from the green water in the Well of Souls with the amphora. On the shore, place the soul amphora by Kate. She wakes up and you receive the completion star.