EPISODE 3
The village gates, the lake and the Jarl
A monster has driven the villagers away from a Scandinavian village. Maxim sends you to the Jarl, who needs a celestial ax forged from meteorite metal and enchanted by a witch. This episode has 13 morphing objects, six monster-head emblems and seven goat figurines. The bonus tokens are lighthouses, pouches of powder and hexagonal tokens.
- At the closed village gates, tap the monster head on the blue shield at the top left of the building (monster head 1 of 6) and the morphing seahorse at the top right (morphing object 1 of 13). Read the notice board on the right; note the two flowers carved along its top.
- Take the path right of the gate building to the lake. Tap the morphing symbol on the fence post at the lower left (morphing object 2 of 13) and the monster head on the shield of the building on the right (monster head 2 of 6).
- Enter the empty forge on the right of the lake. Tap the goat figurine on the floor right of the hearth (goat 1 of 7) and the morphing horseshoe on the wheel on the right wall (morphing object 3 of 13).
- Go through the blue door of the great hall across the lake and talk to the Jarl. He explains the celestial ax and gives you the bird emblem. Tap the goat figurine on the floor left of the fire pit (goat 2 of 7) and take the runes from the silver bowl left of the throne (runes 1 of 8). The right side of the hall is too dark to search yet.
CAMP
The camp and the gate crown
A camp lies along the path at the far left of the gate building.
- At the camp, tap the goat figurine on the table on the far right (goat 3 of 7) and the morphing carving on the tent on the right (morphing object 4 of 13). Light the torch stick on the right in the fire to get a burning torch. Take the stick from the half-chopped tree behind the tents and the knife stuck in the barrel on the right.
- Cut the stitching on the front of the large tent with the knife and open the box inside. Move the amulet along the grooves from the bottom left to the top right; passing a round knob turns the junctions next to it, opening new paths. Take the pike pole and the bowstring.
- Put the bird emblem in the centre of the village gates. Drag the four chains left and right to carry the jewels over gaps and drop each one into the matching shape in the crown. Line up the gaps below a jewel before releasing it, and watch the other jewels on the same chain: moving that chain can release them too. The gates open when all five jewels are in place.
VILLAGE
The village and the banquet hall flowers
Inside the gates are the village houses, a banquet hall on the right and, later, the tannery and the map house.
- In the village, tap the red monster head on the front of the house on the right (monster head 3 of 6) and the morphing basket in front of the house on the left (morphing object 5 of 13). Reach into the grate in the mound at the top centre with the pike pole and take the pincers.
- Open the large door on the right into the banquet hall. Tap the goat figurine on the table on the left (goat 4 of 7) and the morphing carving at the top of the right pillar (morphing object 6 of 13).
- At the lake, scrape the moss off the rock left of the boat dock with the knife. It shows a longship carving with two flowers marked.
- In the banquet hall, open the two carved flower pillars. Press two flowers on each pillar, the two marked on the moss rock on one and the two circled on the notice board on the other; a pressed flower darkens. In the checked game, on the pillar with the blue, red star, yellow, green clover and white flowers you press the red star and the green clover (circled in red and green on the moss rock), and on the pillar with the rose, blue, orange, purple and lower orange flowers the rose and the five-petal flower at the bottom (circled on the notice board). A drawer opens; take the key.
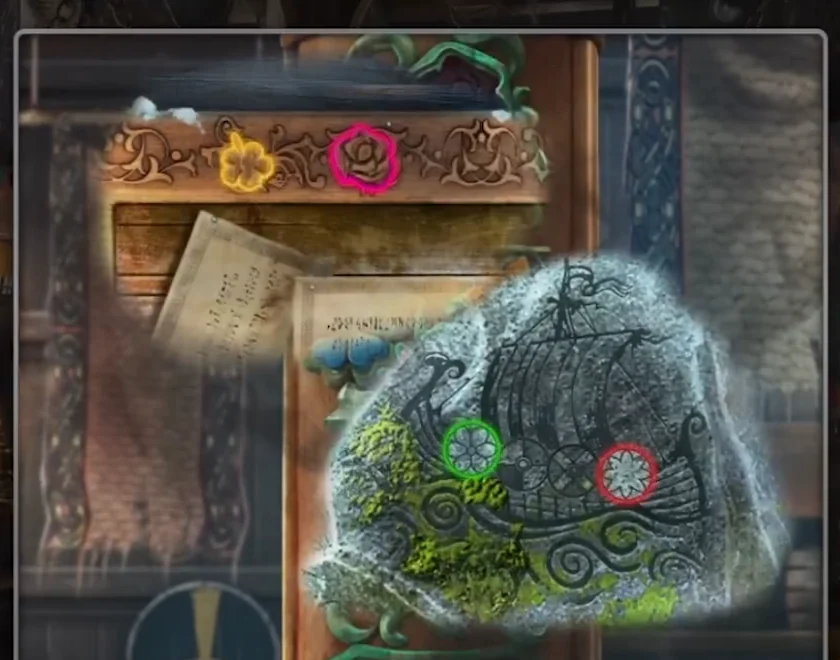
Episode 3: flower clues from one game. Use the flowers marked in your own clues. - Try the handle of the cabinet above the banquet hall fire; it breaks, so pry the doors open with the knife. Three armoured figures are mixed up. Move the pieces between the stands, using the two empty platforms, until each knight is rebuilt from matching head, torso, legs and base; a piece can only go on top of a lower piece. Take the runes (2 of 8). Take the plate from the table on the left.
GREAT HALL
The cart chest, the shutters and the dragon relief
A floating bucket on the lake holds the handle for the great hall shutters.
- At the gates, cut the ropes on the red cloth in the back of the cart at the lower left and open the chest with the key. Take the cauldron and the mosaic pieces.
- At the lake, hook the floating bucket with the pike pole, pull it in and take the handle.
- In the great hall, fit the handle to the window shutters on the far left and open them. Tap the morphing symbol on the round shield on the floor on the right (morphing object 7 of 13) and take the key from the top of the large chest on the right.
- Put the plate on the dragon carving above the chest. The dragon arrangement can differ between games; use the picture on your own plate. Move the carved dragon parts on the left until they copy that picture. Take the runes (3 of 8) and the handsaw.
- At the lake, unlock the box in the small boat with the key. Take the ax and the mosaic pieces.
- In the village, break the frozen hoop on the large barrel on the left with the ax and take the bundle. Cut it open with the knife and take the runes (4 of 8) and the crayons.
SHIPWRECK
The shipwreck and the magic rune
Chopping down the half-cut tree at the camp makes a bridge to the shipwreck shore.
- At the camp, chop down the half-cut tree with the ax and cross to the shipwreck. Melt the ice block at the lower left with the burning torch and take the mosaic piece. Take the skull from the grass right of the large wreck. Tap the morphing rock in the water right of the wreck (morphing object 8 of 13).
- Tap the goat figurine lying under the wood below the bow of the large ship (goat 5 of 7).
- Break a hole in the deck of the large ship with the ax and climb into the hold, a find-by-silhouette scene. Take the antler from the barrel on the left and the lighter from the floor on the right, and light the two lanterns on the back wall. Fix the antler on the deer head to get a detail and take the chip beside it. Lift the bear-skin claw for pincers. Put the detail in the map on the cabinet on the far right for a key, cut the lower doors open with the pincers and take the bird and the ruby. Put the bird on the bird-cage lock for a chip and the ruby on the gem box for another chip. Unlock the chained strongbox, insert the three chips and take the rune stone.
- Look at the torn sail hanging over the wreck: it shows a triangle of six runes. At the gates, open the rock beside the flame on the right and tap the yellow triangles to rotate runes until the triangle matches the sail. Take the pliers.
TANNERY
The skull door, the tannery and the chains
The door of the far building in the village has a skull-shaped lock.
- In the village, put the skull on the door of the building in the distance. Two wheels of eight symbols turn, and the small centre wheel swaps symbols between them. Move every emblem next to its matching picture on the board around the wheels. The door opens into the tannery.
- In the tannery, tap the monster head on the green cloth on the left wall (monster head 4 of 6) and the morphing animal skull on the back wall (morphing object 9 of 13), and take the runes from the table at the bottom right (runes 5 of 8). The shelf at the back left is the goat-figurine star spot; the trapdoor and the cabinet on the left need items later.
- In the great hall, open the ring holding the bow on the pillar left of the throne with the pliers. Take the bow and arrows and fit the bowstring to them.
- In the tannery, open the top of the cabinet on the left. Pulling a chain lengthens it and moves some of the others. Pull until all chains hang at the same, longest length. Take the chip from the box that opens.
- At the shipwreck, put the chip in the stone monument on the right and press the green button. Swap pairs of hexagonal tiles to rebuild the picture of the longship; after each swap, misplaced tiles shuffle among themselves. When the picture is complete, stepping stones rise to the witch's island.