EPISODE 7
The stone circle and the druid's hut
In the Irish countryside a leprechaun has made off with a pot of gold. To get it back you must catch him and meet his demands. This episode has 12 morphing objects, six horseshoes and six pictures of a glass of green ale. The bonus tokens are druid staffs, helmets and hearts.
- At the stone circle, tap the morphing signpost by the track on the left above the bicycle (morphing object 1 of 12) and take the relief piece from the ground in the middle of the circle. Open the gate of the field behind the circle and tap the horseshoe on the fence to its left (horseshoe 1 of 6).
- Follow the track on the left to the druid's hut by the river. Talk to the druid: he gives you a list of four plants for a remedy (rosehip, sunflower, mycena and gooseberry). Tap the green-ale picture on the hut wall (green ale 1 of 6) and the morphing plant on the rocks at the lower left (morphing object 2 of 12).
- Enter the hut. Tap the green-ale picture on the book on the small table at the lower right (green ale 2 of 6) and the morphing glove on the mantelpiece (morphing object 3 of 12). Take the relief piece from the silver pot in the fireplace (note the scratches on the back wall) and the candle from the round table. Rub the candle on the stuck zip of the cushion on the green chair, open it and take the dragonfly emblem.
- Put the dragonfly on the cage on the crate left of the chair. Move the large selection square around the board and tap it to rotate the four tiles inside it clockwise. Bring every tile onto a background square with the same symbol. Take the relief piece and the gloves. Work on a corner symbol first, rotating a two-by-two group until the needed tile reaches that corner. Move the selection square to carry the next tile along the edge. Before each rotation, check all four tiles it will move; use the unsolved middle to manoeuvre and restore any edge tile temporarily displaced. This is an approach for the lengthy rearrangement rather than a full move list.
- Outside, put the three relief pieces on the carved tree stump behind the druid. The starting layout can differ. Jump a counter over a neighbour into an empty square to remove the jumped counter, as in peg solitaire, until only one counter is left. Take the knife and cut the mycena from the stump on the right of the druid. Plan a possible final jump first. Clear the outer counters toward the middle while keeping a neighbouring pair available; an isolated counter with no possible landing square cannot be removed.
MEADOW AND CLIFF
The plants, the meadow and the cliff top
Ivy blocks the steps on the right of the stone circle.
- At the stone circle, pick the rosehips by the bicycle's wheel. Pull the ivy off the steps on the right with the gloves, cut it with the knife and climb to the meadow.
- In the meadow, tap the morphing insect on a plant at the lower right below the sunflowers (morphing object 4 of 12). Open the low stone wall with a face and tap the horseshoe behind the leaves at the lower left (horseshoe 2 of 6). Pick a sunflower and take the gooseberry from the bush above the sunflowers. Add the four plants to the list.
- Take the path at the top left of the meadow to the cliff top. Tap the morphing boat silhouette in the sea by the cliff (morphing object 5 of 12).
- Give the plants to the druid. He explains that a leprechaun must be lured to the place of power and that the fairy in the meadow tree may help, gives you a lever and leaves. In the hut, pull down the yellow banner left of the cage, fit the lever into the socket behind it and pull it. Take the grappling hook from the opened panel.
CASTLE
The castle, the constellation chest and the gate
The grappling hook gets you across the river to a ruined castle.
- Throw the grappling hook at the tree overhanging the far side of the river and cross to the castle. Tap the horseshoe on the ground right of the wooden box (horseshoe 3 of 6) and the morphing symbol on the broken wall at the top (morphing object 6 of 12). Look through the broken doorway of the round tower at the top of the steps and take the brush and a disc.
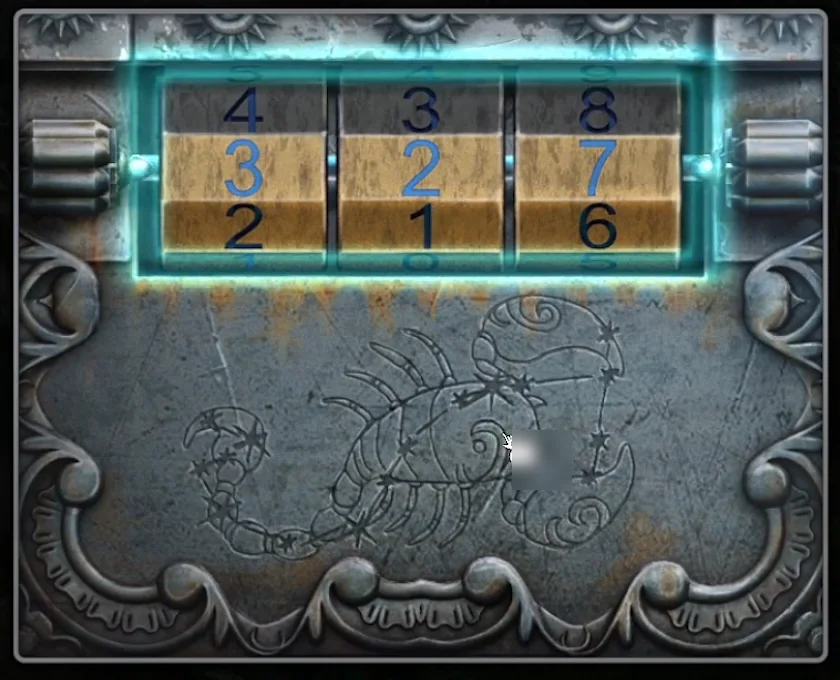
- In the druid's hut, brush the back wall of the fireplace. Count the stars in each of its three groups, from top to bottom. Enter those three counts on the wheels of the druid's chest by the river: 3, 2, 7 in the pictured game. Take the second disc and the pliers. Move the bowl of nuts on the blanket by the chest: the blanket shows three animals.
- Put both discs on the large gate on the left of the castle and go through to the town.
- In the town, tap the morphing barrel in the grass by the stacked bricks on the right (morphing object 7 of 12). Take the tile from the ground left of the barrels on the left of the street and the nails from the right-hand barrel.
- At the stone circle, cut a length of wire from the bicycle's front wheel with the pliers and bend it into a hook. On the cliff top, open the yellow car's window lock with the hook and take the can of anti-corrosion lubricant. At the castle, spray the rusty mechanism of the gate below the steps, turn the handle and take the magnet and the rake.
TOWN
The pub, the fox and the stencil sign
The town has a pub, a shoe workshop behind a red door and a sign board with a feather slot.
- In the town, rake the key off the sign above the door on the far left and unlock the pub. Tap the morphing symbol on the red and yellow picture on the back wall (morphing object 9 of 12) and the horseshoe on the right wall by the stars (horseshoe 4 of 6). Take the sausage from the small green plate on the bar.
- Unlock the red door at the far end of the street with the magnet: it is the shoe workshop. Tap the green-ale picture on a book on the big shelves on the left (green ale 3 of 6) and the morphing brush on the small shelf above the sewing machine (morphing object 8 of 12). The drawer of the workbench loses its knob when you pull it.
- In the meadow, put the sausage by the fox hole on the left. When the fox comes out, take the feather behind the hole and the plate from inside it (plate 1 of 4).
- Put the feather in the slot of the sign board under the small roof on the right of the town. Lay each stencil from the sides onto the board where its holes match the symbols underneath, until every stencil is placed. Place the large stencils first, starting at the corners and edges where few positions fit, then fill the remaining gaps with the small ones. Finish within the two-minute timer for a star. Take the butterfly.
FAIRY TREE
The fairy, the stone face and the bicycle bag
The fairy lives high in the meadow tree.
- In the meadow, hang the butterfly on the mobile left of the tree; steps appear. Climb in and talk to the fairy: she wants a real human tooth. Tap the morphing round window (morphing object 10 of 12) and the horseshoe above the doorway on the left (horseshoe 5 of 6). Take the hat from the shelf right of the door.
- In the pub, put the hat on the leprechaun carving on the pillar right of the bar. Take the corkscrew and a flower (flower 1 of 3). In the shoe workshop, open the knobless drawer with the corkscrew and take the sapphire and a plate (plate 2 of 4).
- In the meadow, put the sapphire in the empty eye of the stone face. Slide the six bars left and right (each carries a stone at both ends) until each of the 12 columns holds exactly one stone. Take the eagle relief and a flower (flower 2 of 3).
- At the stone circle, put the eagle relief on the bicycle bag. Take a pattern fragment and the spanner, and unbolt the front wheel. In the town, fit the wheel to the broken float cart, push it aside and open the sack under it: take the tongs and a second pattern fragment. In the shoe workshop, fish the saw out of the hole in the floor with the tongs.
- By the river, saw away the root of the old stump on the right and take the shaped key and the screwdriver.
PUB AND CLIFF
The storeroom barrel and the flowers and butterflies
The shaped key opens the door on the right wall of the pub.
- In the pub, unlock the door on the right with the shaped key. In the dark storeroom, take the shovel handle from under the blue switch box. Open the end of the barrel on the right: turn its two rings to form animal outlines and tap the three animals shown on the druid's blanket. Take the third flower and the third pattern fragment. The animal clue can differ between games; use the animals on your own blanket.
- On the cliff top, put the three flowers on the shield of the statue. Tapping a flower moves the butterflies on the green lines connected to it towards or away from it. Make the number of butterflies touching each flower equal its number; a flower's number lights up when it is right. Finish in no more than 15 moves for a star. In the checked game the board started as in the picture below (compare the butterflies with your board), and four taps solved it: the 1 flower just right of the clover-shaped hole at the top, the right-hand 1 flower in the bottom row, the 2 flower at the right edge, then the lower 1 flower at the left edge. If your board starts differently, look for a flower with too many butterflies whose neighbours have too few, tap it, and check which numbers light up before the next tap. Take the gasoline and the metal insert.
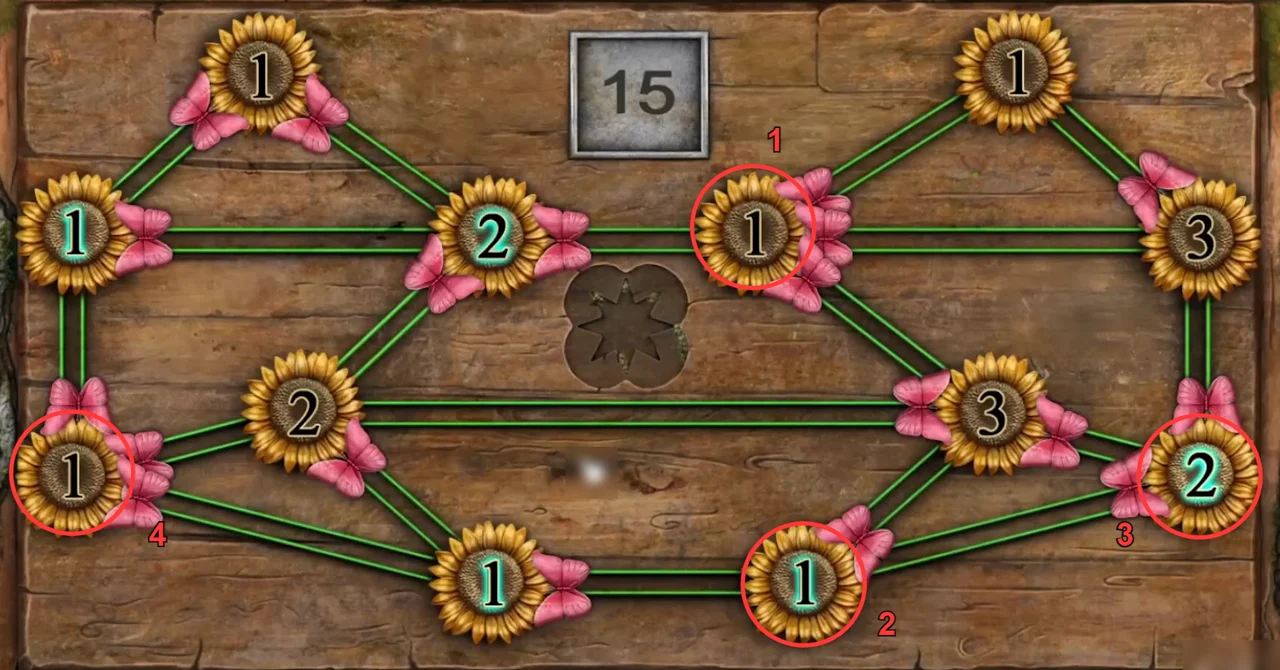
Episode 7: the starting board in one checked game; tap the circled flowers in the numbered order. - In the storeroom, fit the metal insert into the trapdoor. Slide the curved wire patterns around the circle until none of them overlap. Take the stakes. The starting arrangement can differ. Begin with the widest wire shapes and give them the largest clear arcs; fit the narrower patterns into the spaces left between them. Recheck both ends of a shape whenever you move it.
- In the shoe workshop, put the three pattern fragments on the wooden box on the small table. The numbered buttons operate pushers from the board edges. Move all four green chips onto the marked squares in the middle. Take the hammer. Plan the final inward push onto a central mark first, then use a perpendicular pusher to line that chip up. Watch every chip in the affected line, including those already on targets. Work in short horizontal-and-vertical transfers instead of a fixed move list.
- At the castle, break the wooden box on the left with the hammer and take the tap. Hammer the stakes into the wall on the right below the obelisk and climb up. At the obelisk, take the shovel blade and a plate (plate 3 of 4), and pull a tooth from the skull with the pliers. Assemble the shovel from the blade, the handle and the nails from the town barrels, fixing it with the hammer.
STONE CIRCLE
Trapping the leprechaun
The druid's plan: dig a pit in the stone circle, hide it and bait it.
- Give the tooth to the fairy; she gives you an enchanted shilling. Cut down the grass mat hanging on the right of her room with the knife.
- Dig a pit in the middle of the stone circle with the shovel, cover it with the mat and put the shilling on top. The leprechaun falls in. He will return the gold only for five shoes or other pieces of footwear, a smoking pipe and a bottle of whiskey. Take the plate beside the pit (plate 4 of 4).
- Cut open the string bag at the lower left of the druid's hut scene with the knife and take the carrot. Feed it to the ram in the field behind the stone circle; it drops the boot it was chewing (shoe 1 of 5).