The secret bunker and the laboratory
Behind the door is a wartime bunker. Its rooms are marked with large letters A to H.
- In room A, tap the medal on the red flag on the floor (medal 2 of 6) and the morphing bell on the bench at the lower right (morphing object 5 of 12). Take a bracket from the floor by the left bench (bracket 5 of 6) and the medallion beside the skeleton. The skeleton's coat is labelled Klein and his locket holds a woman's photo; his case has a code lock.
- Connect the wires to the light switch of the door on the right and enter room B, the old laboratory. Tap the morphing shape in the wires right of the tall cabinet (morphing object 6 of 12) and the syringe on a yellow note on the wall (syringe 3 of 6). Move the curtain on the left and take the medallion from the shirt pocket. Take a bracket from the floor by the white machine (bracket 6 of 6) and the cassette tape from the workbench.
- Put both medallions on the tall cabinet at the back left. Move the middle arm up and down, grab up to two plugs from either column and rotate the arm to carry them across. Plug every plug into the socket with the same symbol. Grabbing two plugs at once saves moves, so plan each trip to carry a pair across. Finish before the move counter at the lower left runs out for a star (it started at 55 in the checked game). Take the hammer.
- In the cave, fix the six brackets to the wall left of the vehicle with the hammer and climb to the platform. Tap the syringe under the snow at the lower right (syringe 4 of 6). Take the battery from the ground and the key from the large switch box at the far end.
- In room A, unlock the blue panel on the door left of the skeleton. Slide the coloured switches along the grid lines (the white circles are fixed) until each row matches the colour of its dial on the left: yellow, blue and red. Enter room C. Use empty circles as temporary parking and work around the fixed white circles. Clear a junction before bringing a switch through it, then move that switch along its destination row. Keep an open junction until the last misplaced colour has crossed; this is a routing approach rather than every move.
The monitoring room and Annette
Room C watches the sealed monster chamber; strange sounds come from behind its big doors.
- In room C, tap the morphing string on the arm of the left chair (morphing object 7 of 12) and the medal on the jacket on the right chair (medal 3 of 6). Take the screwdriver from the blue control station, the handle and the kettle from the table on the left wall and the crowbar from the filing cabinet on the right.
- In room A, lever up the grate in the floor behind the right door with the crowbar. Take a fuse (fuse 1 of 4) and the second handle. Fit both handles to the panel of the door on the far left. Rotate the board with the two buttons so the red plus slider slides into the central red slot, using the blue sliders as stops. Enter room D.
- Talk to Annette, who is hiding in room D. Tap the morphing object on the floor by the fan (morphing object 8 of 12) and the medal on the photo above the pillow (medal 4 of 6). Take the fuse from the desk at the far end (fuse 2 of 4). Move the covers on the top bunk and read the album: one photo shows Johanna and carries a date (22 October in one game).
- Open the green cabinet left of the beds. The four wheels take the date under Johanna's photo, day then month: 2210 in one game. Take the dagger.
- Unscrew the panel of the white machine in room B and take the fuse (fuse 3 of 4), and unscrew the side of the switch box on the cave platform for the last fuse (fuse 4 of 4). In room C, put the four fuses in the control panel; the machine starts but its screen breaks. Take the screen from the desk in room D, pry out the broken one with the dagger and fit the new one. Press the only working button below it to open the next door.
The kitchen, the tea and the UV flashlight
Room E is the kitchen; the letter is behind the poster on the left wall.
- In the kitchen, tap the morphing pot in the open cupboard right of the oven (morphing object 9 of 12) and the syringe on the picture by the pipe on the back wall (syringe 5 of 6). Unscrew the small vent on the left wall, stop the fan with the crowbar and take the panel. Open the large vent over the middle of the kitchen and take the valve handle. Take the oil can from the shelves on the back right and the magnet from the handle of the metal door.
- Put the kettle in the sink, fit the valve handle to the tap and fill it. Boil it on the free ring of the hob and pour the tea. Give the tea to Annette in room D; she gives you her broken UV flashlight.
- In room B, oil the screw of the lamp above the table and take the UV bulb. Open the flashlight, replace the broken bulb with the UV bulb and swap in the battery. Take the UV flashlight.
- In the kitchen, shine the UV flashlight into the large vent and crawl in. In the vents, tap the far end of a shaft to go straight on or the dark gap in a side wall to turn; the round arrow button at the bottom right steps back. Route: from the first chamber (a rag on the floor) go Right; in the next shaft (a broken grille leaning on the left) go Straight; in the lit chamber (wooden sticks on the floor) go Left; in the shaft with a slatted panel on the left wall go Straight; where steps rise ahead and a slatted panel hangs open on the right, go Right, into the gap behind the panel; in the shaft with black hoses bursting through the right wall go Straight. Tap the grille at the end (red lights and the room beyond) to drop into room F. Wrong turns: Right in the second shaft ends at a barred grille, and Right in the shaft with the slatted panel on the left leads to a pale chamber and then a red, fleshy wall; step back from either.
The flooded room, the pipes and the rocket hall
The missing crew lie cocooned in slime across the green water of room F.
- On entering room F, shine the UV flashlight on the creature, then press the red wall button to turn on the lights. Tap the morphing pipe sticking out of the water on the left wall (morphing object 10 of 12) and the medal on top of the large pump at the lower right (medal 5 of 6). Take the small key and the chain from the blue cabinet on the left. Take the hose from the red fire cabinet in the shed, attach it to the yellow pump and press the button to drain the water. Take the valve handle from the ground on the right.
- Unlock the side of the table in room B with the small key and take the handcuff. Combine the magnet, the chain and the handcuff. In room F, fish the floating box out of the water with the chain magnet and add the panel to it. Press the eight buttons in the order that lights every figure on the right; a wrong press resets the lights, so work it out by trial. Take the pattern.
- Put the valve handle on the door next to the cocooned people. Tap a coloured pipe button to highlight its track and press the arrow to move the pieces on that track one step clockwise. Bring all five pipe pieces into the slots of the same shape. The coloured tracks are loops that cross each other; a piece standing where two tracks meet can be moved on by either colour, so use those crossings to pass pieces from one loop to another. Finish before the timer runs out for a star. Enter the rocket launch hall, room H.
- In room H, tap the morphing shape on the right wall (morphing object 11 of 12). Take the voice recorder and a wing from the skeleton on the left, open the red box below the stairs (it needs two gears), and take the key-turn valve from the red pipes on the right. Open the control-room door at the top of the stairs with the valve. Inside, tap the syringe on the first-aid box on the desk (syringe 6 of 6) and take the rivet and the launch key; the launch key does not work yet.
Dr Klein's file and the pressure plan
The skeleton in room A is Felix Klein, the scientist in the album photos.
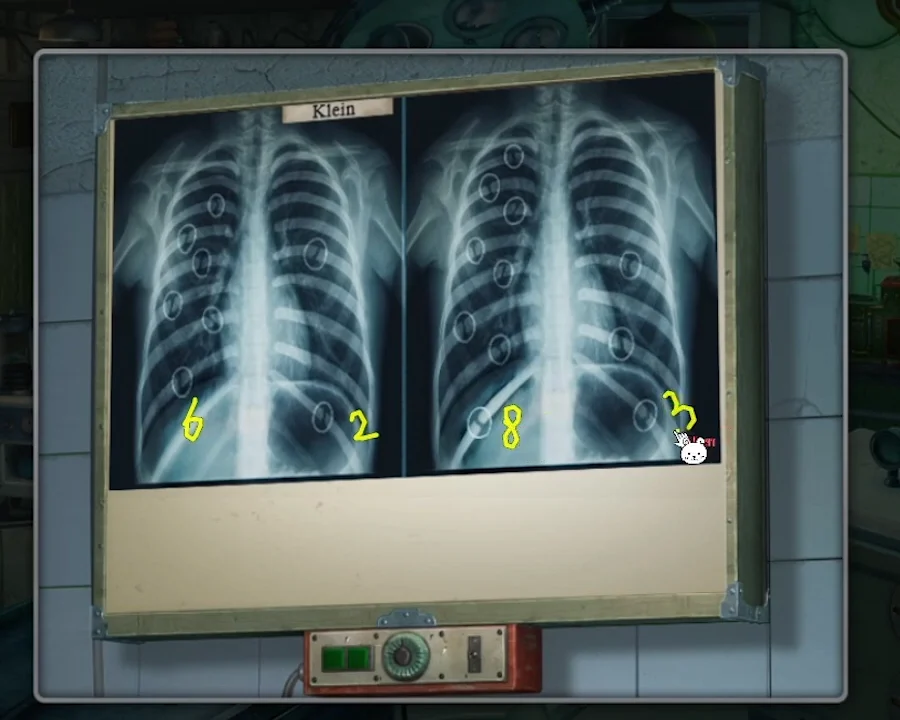
- Put the pattern on the filing cabinet in room C. Open the drawer with Klein Felix's folder and take the X-ray. Put it in the viewing box on the wall of room B. Count the marked ribs separately in the four vertical groups, reading from left to right. The example gives 6, 2, 8, 3. The yellow digits in the image are added totals to help you count; they are not numbers revealed by tapping the picture.
- Set the lock of the case held by Klein's skeleton in room A to the X-ray numbers, left to right (6283 in one game). Take the pressure plan and the second wing.
- Put both wings on the big doors in room C. Press the blue arrows to rotate the three components around each triangle until every component sits in its place, matching the small parts printed beside the top and bottom positions. Enter room G, the monster's chamber. Start with a component whose target is clear in the small printed references. Rotate its triangle until it reaches the shared transfer position, then rotate the neighbouring triangle to carry it onward. Check the other two components moved each time and restore a completed group after using it for a transfer.
- In room G, tap the medal on the flag right of the chamber (medal 6 of 6) and the morphing wire on the bird cage at the top right (morphing object 12 of 12). Take the saw and a rivet from the small cage left of the chamber, the mop from the box on the left and a gear from the red box on the right. The red gas cylinder by the chamber is broken.
- Saw through the bracket holding the red gas tanks in room A and take a cylinder; fit it in place of the broken one in room G. Mop the floating diagram out of the water in room F. Open the small cabinet right of the table in room B with the two rivets and take the second diagram: together they form the circuit diagram.
Trapping the monster
The diagram shows eight valve handle positions, one per lettered room.
- Visit each lettered room and set the handle of its large pipe to the position drawn for that letter on the diagram (A under the floor grate on the right of room A, E in the kitchen). Your diagram may differ from ours.
- In room F, put the pressure plan on the boiler at the back left. Flip the five switches below the gauges (each switch moves more than one needle) until every gauge reads the value on the plan. In room C, watch the monitor: the creature returns to its chamber and the gas puts it to sleep. In room G, take the key from the sleeping monster. The target readings can differ. Note which needles each switch moves and by how much, then compare the current readings with your own plan. Use combinations that correct the largest mismatch together, checking every affected gauge instead of fixing one needle in isolation.
- Unlock the metal cell door on the left wall of room G. Slide the three rows left and right so the four shaped blocks drop through into the slots of the same shape at the bottom. Inside the cell, take the gear, the ladder, the soldering iron and the charcoal from the sack.
The recording and the antidote
Dr Klein's taped notes explain the slime and how to make an antidote.
- Cut the speaker out of the box on the far wall of room F with the dagger. In room C, open the cassette player on the right-hand table, add the tape and the speaker, and solder the wires with the soldering iron. Play the German tape and record it with the voice recorder. Play the recording on the living-module computer: it translates Klein's notes about the slime and his antidote.
- In room B, take the antidote preparation instructions from the table, the test tube and acetic acid from the tall cabinet and the copper sulfate and red phosphorus from the small cabinet.
- In room H, fit the two gears to the red cabinet below the stairs and oil them. In the control room, take the container, then turn the launch key: the silo cover opens. Lower the ladder into the silo, unscrew the hatch and fill the container with hydrazine. In room F, scrape anabiotic slime into the test tube with the dagger.
- In the kitchen, turn the four oven knobs to point the same way as the handles of the four cups on the table (in one game: left, down-left, up-right, up-left). Heat the charcoal in the oven and put the hot charcoal on the ice at the bottom of the freezer door. Inside is David, the last survivor; he gives you his alcohol burner.
- Take a bone from the small cage in room G and grind it in the grinder on the kitchen counter. Add all the ingredients to the instructions to get the reagents. On the room B workbench, put the crushed bone, acetic acid and the slime in the flask, fit the condensing tube from the desk and heat it with the alcohol burner. Pour the result, the red phosphorus and the copper sulfate into the funnel of the device on the left, add the hydrazine on top and press the red button. Take the antidote.
- Give the antidote to the cocooned people in room F; they slowly wake. Take the cross. The whole crew gathers in the rocket hall.
- Put the cross on the green cabinet left of the big doors in room C. Slide the grey blocks to make a path, move the green token down onto the charging spot at the lower left, then make a new path and move it to the end at the top right. Take the signal flare.
Collection stars, tokens and mini-games
Optional: six stars. Firing the flare ends the episode, so do this first or use Collect more stars.
- With all 12 morphing objects, tap the snowman on the helipad in the yard for a star. With all six medals, tap the sign on the left wall of room A. With all six syringes, tap the wall left of the kitchen door in room D.
- Ship figures: through the small opening left of the shed doors, in the bucket under the lower right foot of the shed workbench, on top of the tall cabinet by the flag in room B, inside the spotlight on the cave platform rail, and under the broken floor tile right of the kitchen oven. Mascarons: behind the small wooden sign above the left door of room A, under a small box in the back corner of room C, on Annette's backpack in room D, from the panel at the lower left of the control desk in room H (set the four hall levers so all its lights turn green) and from the chamber in room G (hold its large round button until the three lights go out). Vials: on the right of the living-module table, in the test-tube rack of room B, on the lower right shelf in room D, in the rack on the left kitchen shelf, and in the hole by the walkway in room F after draining it. The four control-room lever settings can differ; use the panel's green-light feedback in your own game.
- Ship figure mini-game: on the table in the living module, place a ship figure. Connect the numbered islands with bridges so each island has as many bridges as its number; bridges cannot cross. Bridges run horizontally or vertically to the next island in that direction; they cannot pass through an island. One or two parallel bridges may join a pair. Start with islands that have few neighbours: a high number there forces double bridges. Count a double bridge as two at each end, and keep all islands connected rather than completing a separate isolated group. Finish five rounds for the star.
- Mascaron mini-game: in the tent in the cave, place a mascaron. Turn the crystals so the laser travels from the start to the end point, using every crystal. Work from the endpoint backward to find which nearby crystal can send a beam into it, then connect the start toward that route. Adjust one crystal at a time and follow the whole beam after every turn; a shortcut that skips a crystal will not finish the level. Complete five rounds for the star.
- Vial mini-game: place a vial in the large cabinet left of the room B workbench. The red button transfers liquid from the middle cylinder to the left cylinder until the receiving cylinder reaches its internal stop or the source is empty. The two circular-arrow buttons exchange the left/middle and middle/right cylinders, including their contents and different internal limits. Read those limits against the graduations; the outer glass height is not the usable capacity. Plan a remainder: if the receiver has room for two divisions and the source holds three, transferring leaves one in the source. Exchange cylinders to combine that remainder with another amount. Do not try to stop a pour by hand. Finish with the liquid in the left position exactly at the red line. Use this approach through five rounds for the star; check the levels and limits again when the round changes.
The lettered switches and the spy's office
Optional: worth one star. The switch panel in the control room has eight sliders, A to H, each set from 1 to 4. Each lettered room shows its letter on the walls between one and four times; count them in your own game (one kitchen letter hides behind the poster).
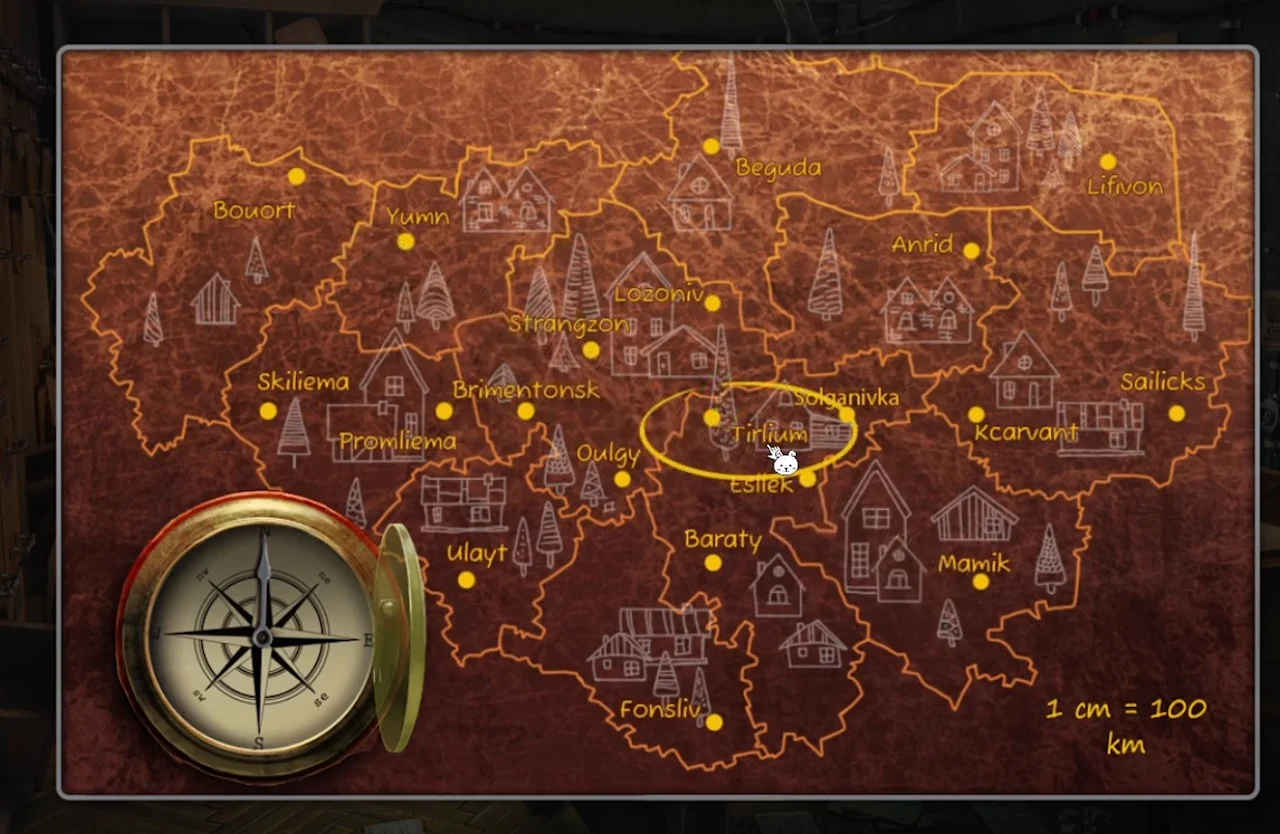
- Count the letters on the walls of rooms A to H and set each slider on the control-room panel to its room's count. A hidden door opens in the rocket hall; enter the secret room.
- Find items by their silhouettes. Take the eagle from the desk and the key from under the papers below it. Put the eagle on the drawer front: rotate the three four-part circles and use the buttons between them to swap pieces until every instrument picture is complete in its matching colour. Use a disc rotation to bring the needed fragment beside a transfer button, swap it across, then rotate it away to make room for the next fragment. Check the instrument drawing as well as the background colour before treating a disc as finished. Take the folding knife and the gasoline, and refill the lighter on the desk. Open the clock's glass front, wind it with the key and collect the hand that falls out. Take the code cylinder from the green arcade machine and the ruler from the floor, and the compass from the red folder on the shelves. Melt the red wax seal of the box on the right cabinet with the lighter and read the paper inside.
- Put the compass, its needle and the ruler on the map on the desk. Lay the ruler from the starting town on the note, turn it to the direction on the note and measure the distance using 1 cm = 100 km. In one game: Yumn, east-south-east, 8 cm, which lands on Tirlium. Type the town name on the code machine with the code cylinder fitted to get a four-digit code (5767 in one game). Cut open the portrait with the knife and enter the code on the safe behind it. Take the token.
- Put the token in the arcade machine. Fire rockets at the planes and torpedoes at the submarines as they cross in front of you; hit five of each. Take the star. Aim ahead of each moving target so it meets the projectile; firing directly at its current position can miss by the time the rocket or torpedo arrives. Watch one lane at a time and time the next shot from the target's direction and speed.
The rescue flare
This ends the episode.
- In the rocket hall, fire the signal flare up through the hole in the ceiling. A helicopter arrives to rescue everyone and you receive the completion star.