The professor's house and the front door
The show visits the abandoned house of a professor who built mechanical dolls. Your goal is to bring his last doll to life. There are 12 morphing objects, six pairs of glasses and six clocks or watches to collect. The bonus tokens are theatre masks, gramophone records and five phone numbers for the red phone box.
- In front of the house, tap the morphing circle above the front door (morphing object 1 of 12) and the glasses on the head of the statue on the right (glasses 1 of 6). Open the broken wall right of the statue and take the piano key from its base.
- Take the tweezers from the right pillar of the overgrown side gate. Open the figure in the top hat near the door, lift the hat and turn the key on its head: its eye shines a blue circle of light on the ground. Pick the loose bricks inside the circle with the tweezers and take the door key.
- Unlock the front door. Using the single empty space, slide the coloured chips around the three gear rings until every chip sits in a slot of its own colour (the green chips go in the green slots at the lower left and right). The door opens into the hall.
The hall, the kitchen and the suit of armour
The jukebox under the stairs is the record mini-game. Coloured Roman numerals appear around the house; they are the secret-room switches.
- In the hall, tap the morphing finial on the stair rail at the top left (morphing object 2 of 12) and take the book from the piano on the right.
- Go through the doorway on the far left to the kitchen. Tap the morphing spatula on the wall right of the pans (morphing object 3 of 12) and the clock on the table on the right behind a pot (clock 1 of 6). Take the mop beside the sink and look into the gap right of the refrigerator for the bottle of oil.
- In the hall, oil the rusty hand of the suit of armour and take the key it was holding. Unlock the double doors at the back.
The professor's office and the piano
The professor's will explains that his doll lies in the glass capsule, waiting for a heart.
- In the office, tap the glasses on the right side of the desk (glasses 2 of 6). Open the blue curtain behind the desk and tap the morphing moon in the left picture (morphing object 4 of 12). Take the paints from the desk, read the will and take the piano key under it. Open the curtain on the left: the doll lies in a glass capsule. Take the piano key from the pipes beside it.
- In the hall, knock down the object on the lamp beside the upper door on the right with the mop and take the last piano key.
- Fit the four keys to the piano. Each key toggles the cells marked on it: a dark cell lights and a lit cell goes dark. Patterns from different keys can overlap, so pressing two keys that affect the same cell cancels that cell. Choose a combination that lights every symbol while leaving every blank dark. Compare the few remaining wrong cells with the key patterns before changing another key. Repeat for all three patterns, which can differ between games. Take the bulb and the hammer.
- Outside, knock the garden shears out of the hands of the statue on the left with the hammer. Cut back the plants on the side gate with the shears and go through to the courtyard.
The courtyard, the post box and the painting
The courtyard holds a coloured sundial, an easel, a gazebo and a stone animal on each path.
- In the courtyard, tap the morphing leaf at the base of the sundial (morphing object 5 of 12) and the glasses on the face in the portrait on the easel (glasses 3 of 6). Take the palette from the stool and the picture from the sundial. In the gazebo on the hill, take the book from the bench and look at the stained-glass panel of red, green and blue panes on the right.
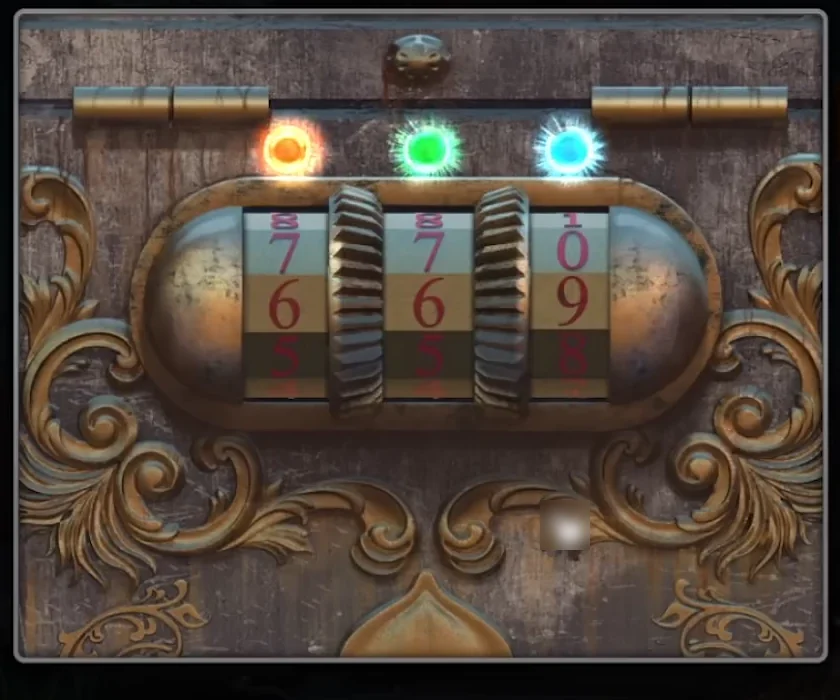
- At the post box right of the front door, set the three wheels to the number of red, green and blue panes in the gazebo window. In one game that was 6, 6, 9. Read the signed note (the name can differ between games) about the gems and the fisherman and take the brush.
- In the hall, hang the picture in the empty frame right of the stairs, then add the palette, the paints and the brush. Dip the brush into a colour and tap an area to fill it, copying the small coloured jester picture collected from the sundial and displayed beside this puzzle. Mix two paints for colours you lack (for example blue and yellow for green). Take the ball from the panel that opens.
- In the courtyard, put the ball on the machine beside the missing steps on the right. Roll each sphere to find the eyes and the mouth that complete the face in the middle; when a face is right, a new one appears. Complete all six faces (they vary). The steps rise and lead down to the dock.
The fisherman, the mask door and the workshop
The fisherman made a deal with the professor: rare gems in exchange for an assistant doll.
- At the dock, talk to the fisherman; he gives you the doll scheme. Tap the pocket watch on his belt (clock 2 of 6) and the morphing tree on the island above him (morphing object 6 of 12). Cut open the sack by the barrels on the right with the shears and take the mask.
- In the office, put the mask on the door right of the desk. Slide the six strips up and down to line up their gaps so one connector at a time can pass from the left to its key on the right; moving one strip also moves others. When a path is clear, press the button on the left to send the connector. Collect all four keys. The workshop opens.
- In the workshop, tap the morphing hook on the chain right of centre (morphing object 7 of 12) and the clock on the floor left of the tall cabinet (clock 3 of 6). Take the ladder from the right of the big machine, and the hacksaw blade and the rope from the machine's end.
- Knock the peg out of the tall cabinet on the left with the hammer and take the legs, the screwdriver and the nippers. Open the gate below the red IX on the left wall and take the fuse.
The lamp, the sundial and the office clock
A beam from the courtyard lamp makes the sundial point at the time for the office clock.
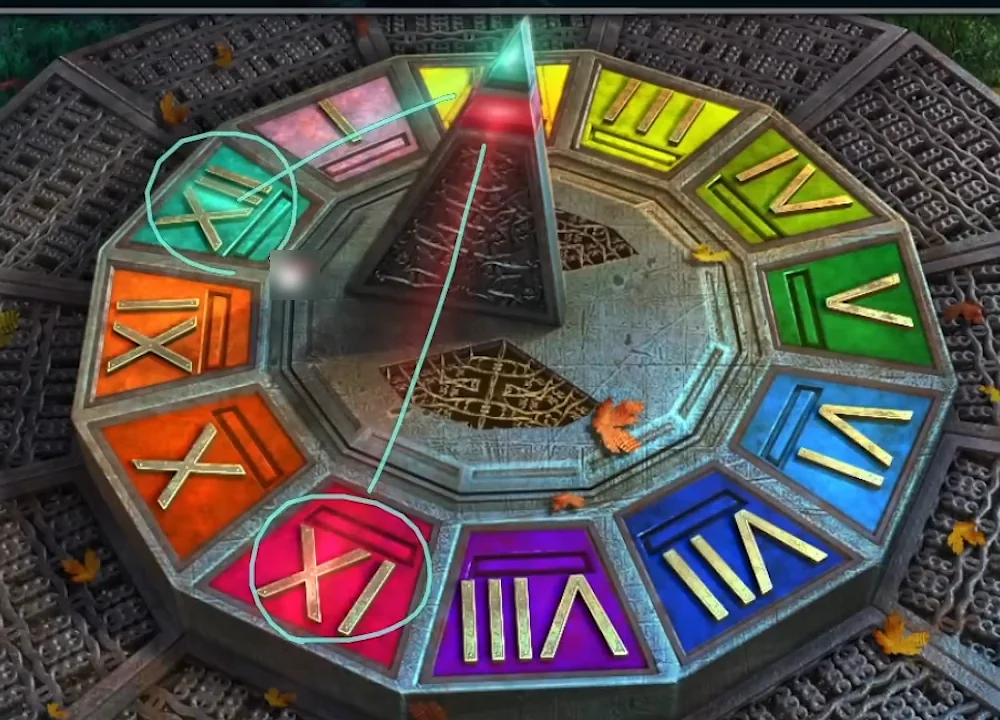
- In the courtyard, set the ladder against the tall lamp above the sundial. Open the lamp cover with the screwdriver, fit the bulb and flip the switch. Look at the sundial: a red and a blue beam from the gnomon each pick out a numeral for the office clock (read the numerals from the centre outwards). In the checked game the red beam fell on IX and the blue beam on XII.
- In the office, open the clock on the wall behind the desk and point its hands at the two numerals from the sundial. In the checked game the hour hand went on IX (red beam) and the minute hand on XII (blue beam), which is 9:00. Take the fuse and the belt.
- In the workshop, put both fuses in the fuse box on the right pillar. A dial toggles itself and its immediate neighbours above, below, left and right; diagonal dials are unaffected. Make every dial glow yellow. For this lengthy puzzle, work row by row: after choosing the top-row taps, tap directly below each dark dial to fix the row above. Do not touch the completed rows again. If the bottom row is not all lit, restart with a different top-row choice and repeat, keeping track of that choice instead of tapping at random. The lights come on and the warehouse at the back opens.
The warehouse, the hacksaw and the cemetery
The warehouse is full of broken dolls. Its coloured curtains are the code for the box at the dock.
- In the warehouse, tap the glasses on the portrait (glasses 4 of 6) and the morphing symbol on a box behind the table at the lower left (morphing object 8 of 12). Take the gas cylinder near the middle and the crowbar between two hooks at the top left. Hang three sacks on the chain hook by the portrait: one on the left, one from the wooden chest you break open, and one from under the tray at the lower right. A cover lifts from a hole in the floor. Note the symbols on the four curtains around the room: green, red, blue, yellow from left to right.
- At the dock, take the hacksaw frame from the boxes in the nets left of the fisherman. Set the four dials on the large box to the colours and symbols of the curtains in the same order and take the clamp and the part of the frame. Assemble the hacksaw from the frame, the frame part and the blade.
- Saw through the padlock on the gate at the far left of the front of the house and enter the cemetery. Tap the watch on the hand in front of the large crypt (clock 4 of 6) and the morphing cross on a small gravestone on the left (morphing object 9 of 12). Take the decorative gear from the lower right by the crypt door; poisonous insects block the door.
- Take the candle and the detail from the tilted grave on the left, then lever its lid up with the crowbar and take the torso. Take the joker card from the picture on the jester's gravestone right of the crypt.
- In the hall, open the cabinet left of the office door with the decorative gear. Press a colour on the left to move the gears on the track of that colour one step anticlockwise; move each of the five gears into the dark slot of its shape. Take the hips and the handle, and tap the clock on the top right shelf (clock 5 of 6). This is a lengthy rearrangement, so use the approach rather than a fixed move list: follow a needed gear to an intersection shared by two coloured tracks, then use the other track to carry it toward its shaped slot. Before rotating, check every gear on that track. Keep a spare intersection available, and restore any correctly placed gear displaced during a transfer.
The frozen head and the greenhouse
The doll scheme lists six parts: head, torso, hips, legs and both hands.
- In the kitchen, fit the handle to the refrigerator. Take the cheese and the inkwell, then open the ice box and take the head in ice.
- At the cemetery, give the cheese to the crow on the grave on the left and take its key.
- In the courtyard, open the cabinet beside the greenhouse door. Unscrew the valve handle with the screwdriver and cut the blue hose with the shears. Unlock the greenhouse.
- In the greenhouse, tap the morphing flower on the tall plant on the left (morphing object 10 of 12) and the glasses in the plants at the top left (glasses 5 of 6). Take the shovel on the left, the sprayer from the chemicals table on the right, and the cauldron from the plant pot on the right of the walkway (tip out the plant and soil). Cut the wire on the floor hatch with the nippers and take the wand; three valves are missing from the pipes inside.
- Fill the cauldron with water at the dock. In the kitchen, connect the gas cylinder to the stove pipe on the right, open its valve and light the hob with the candle. Put the cauldron on the hob and drop in the frozen head; take the head when the ice melts.
Assembling the assistant doll
The two hands are the last parts the scheme needs.
- At the cemetery, dig around the arm sticking out of the ground with the shovel and take the left hand.
- In front of the house, fit the valve handle to the pipe of the pool below the statue and drain it. Move the stones at the bottom and take the wrench. In the warehouse, unscrew the right hand from the broken doll on the table with the wrench.
- Open the doll scheme and add the head, torso, hips, legs, left hand and right hand to tick every box. Take the parts of the doll.
- In the workshop, fit the belt to the machinery and pull the handle to start it. Open the doors to its left with the detail and put the parts of the doll on the conveyor. Three dolls come out mixed up: move parts between the magnets (two spare magnets help; nothing can go under the feet) until each doll has its own matching head, body, hips and legs. Take the assistant doll.