The courtyard, the kite and the street
A Chinese town is about to celebrate a festival, but its lanterns are missing, its fireworks are unfinished and the Monkey King has stolen the music cylinder. You need five festival lanterns, the fireworks and the cylinder. This episode has 13 morphing objects, eight coins and five jade dragons. The bonus tokens are little houses, symbols and symbols of fire.
- In the courtyard, tap the morphing birdhouse in the red tree on the far left (morphing object 1 of 13). Lift the collapsed head of the dragon model right of the steps back onto its pole and tap the coin in its eye (coin 1 of 8). Move the leaves on the ground behind the dragon for a symbol of fire, then tap the stone with the string tied to it to bring the kite down.
- Go through the doorway on the right of the courtyard to the street and talk to the cook: she needs a fresh carp and a recipe for a festive dish. Note the shape of her pendant; a triangle is only one possible example. From the table behind her take the knife and the stone pineapple, and tap the coin in the small bowl at the top right (coin 2 of 8). Tap the morphing flowers by the building with red doors (morphing object 2 of 13).
- On the street, take the red festival lantern hanging from the roof on the right (lantern 1 of 5) and the broom leaning on a roof post. Pull the small red tassel by the post to open a curtain: note the design on the window. Put the washboard in the barrel at the lower right and take the brush beside it; open the small pot right of the barrel for a little house token.
- Back in the courtyard, cut the ropes on the fallen kite with the knife and take the key. On the street, take the pitchfork beside the red doors of the blue building and clear the hay on the left to uncover a chest. Unlock it: the arrows move both ring panels at once (a blocked panel stays put). Bring both silver balls onto their target holes at the same time. Take the bamboo and the lever. The starting layout can differ. Use an edge or obstruction to hold one panel still while the other catches up; then move both together into alignment with their target holes. Plan the last shared move first, rather than repeatedly undoing one ball while fixing the other.
The bamboo door, the lake and the beach ruins
The round door on the left of the courtyard leads to a lake with a waterfall, and steps on the right climb to a beach with ruins and two heron statues.
- Put the bamboo in the round door on the left of the courtyard. Drag the bamboo sticks out through the holes in the rim one by one, removing first the sticks that nothing else crosses. Go through to the lake. The stick arrangement can differ; follow which stick lies on top at each crossing in your own door.
- At the lake, tap the morphing post by the steps on the right (morphing object 3 of 13). Open the third step on the right twice for a house token. Take the signet ring from under the bush with red flowers by the steps and tap the jade dragon in the leaves at the lower left of that bush (jade dragon 1 of 5).
- Climb the steps to the beach ruins. Tap the morphing tree below the left heron's head (morphing object 4 of 13) and take the stone plate by the end of the low wall on the left. Scrub the mossy column in the sand on the left with the brush: a line pattern appears.
- On the street, put the signet on the door of the large building with the blue roof. Swap neighbouring tiles until the grooves join into one continuous line in the shape of the pattern on the column. The library opens. The starting tiles can differ; use your own column pattern and join the most distinctive bends first.
The library, the heron and the scientist
The library holds the scientist's notes and, later, the carp recipe.
- In the library, tap the coin under the green cloth on the floor left of the steps (coin 3 of 8), the morphing bag on the floor on the right (morphing object 5 of 13) and the symbol on the left wall below the animal-tree board. Fit the lever to the mechanism on the right wall and turn it to lower the chandelier; take the heron figure.
- At the ruins, put the heron in the panel of the broken arch in the middle. Take the feather and the dirty fabric. In the library, put the feather in the book on the stand by the window, read the note about the scientist and take the book figurine.
- On the street, put the book figurine on the red doors of the building on the left. Each of the four tiles shows animals; find the same group of animals on a branch of the tree board on the library wall and use the number beside that branch. In one game the code was 7206. Go in.
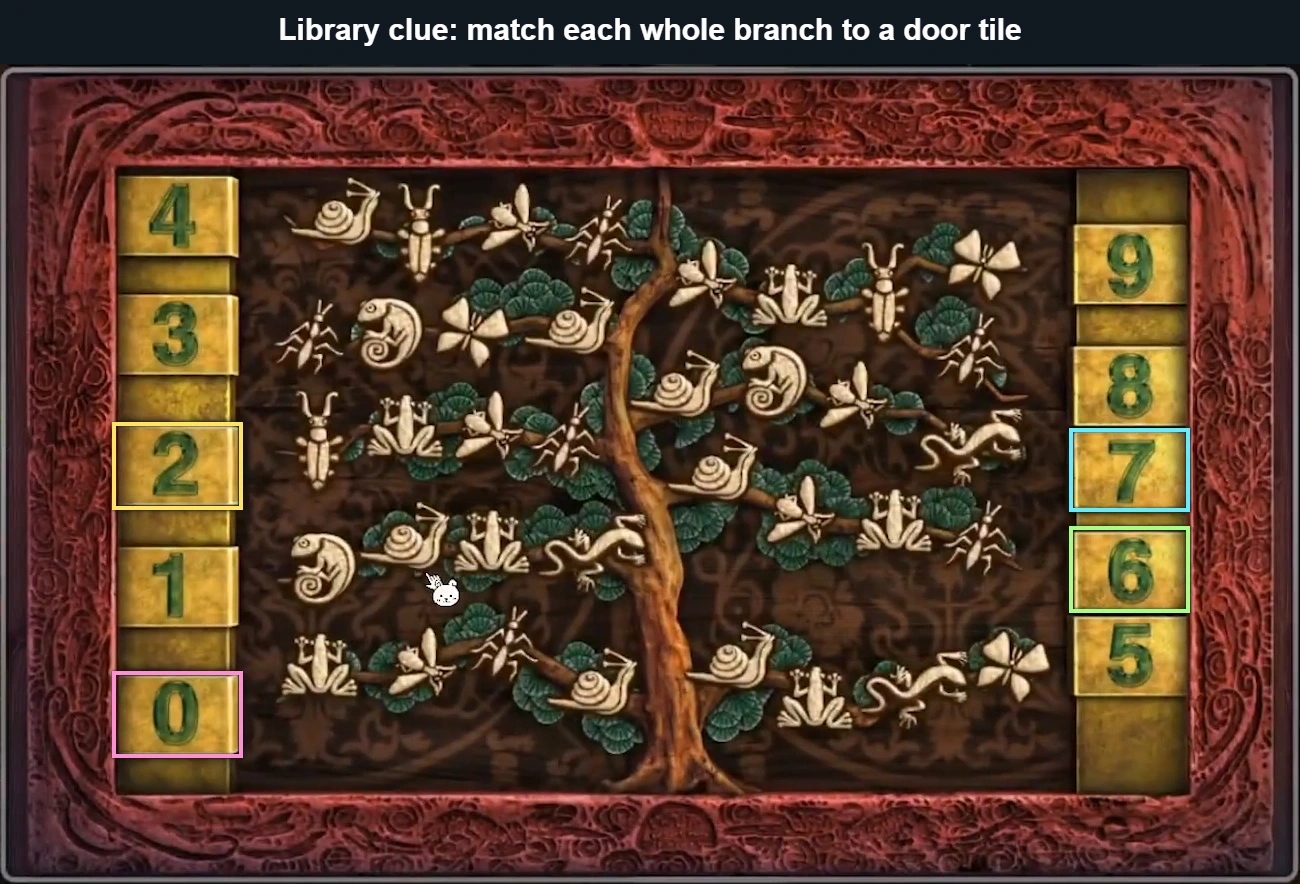
Episode 6: compare the complete animal group on each branch with the door tiles. Coloured outlines identify the four matching branches in this example. 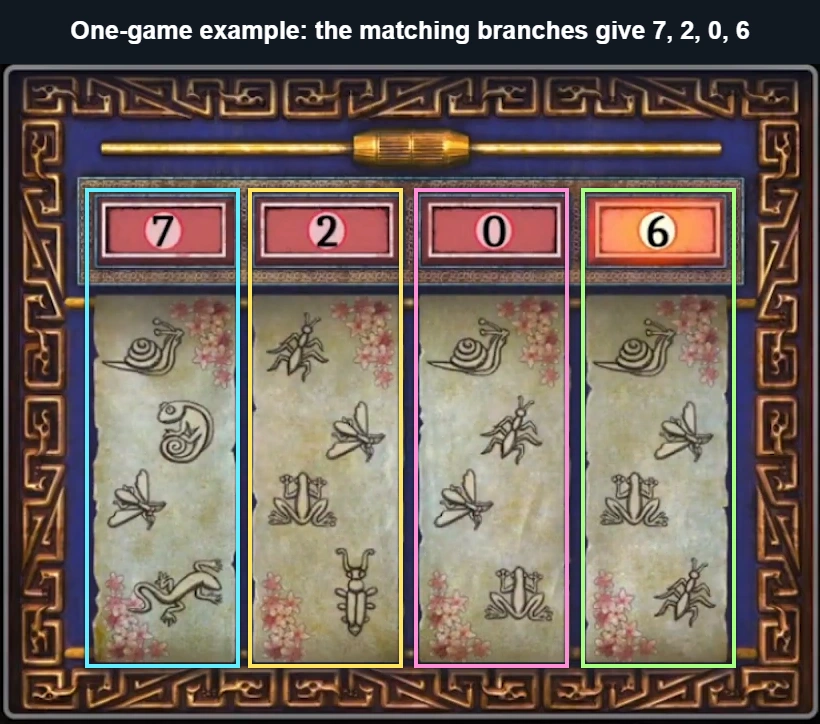
Episode 6: the same colours link these door tiles to the library branches. One-game answer: 7206. - Talk to the scientist: he gives you his list of firework components (saltpeter in the proportions 2, 4, 5, 6 and 7, a box, wicks and nine firework tubes). Note his pendant. Tap the jade dragon on the top shelf to his left (jade dragon 2 of 5) and the morphing bottle on the high shelf right of the bed (morphing object 6 of 13), and move the books on the top right shelf for a symbol.
- Knock the metal carrot off the small shelf right of the scientist with the broom, then sweep under the bed for the dragon head. Take the handle from the left of the mantelpiece and the screwdriver from under the chair. Open the red curtain behind the scientist and look at the picture of coloured lotuses.
The carrot door, the kitchen and the library ladder
The door on the right of the street has a carrot-shaped slot.
- Put the metal carrot in the slot of the door on the right of the street. Tap a carrot to start; the squares in the direction it points light up. Tap one of the lit carrots next, and keep going so that every carrot is used and the last move lands on the grater. Enter the kitchen. The layout can differ. Plan back from the grater to a carrot that points toward it, leaving that carrot for last. Before selecting another carrot, check where its arrow can send you and avoid consuming the only link to an unused corner or isolated row.
- In the kitchen, take the lantern hanging from the rack above the worktop on the left (lantern 2 of 5), tap the morphing jug on the ledge of the small window on the right (morphing object 7 of 13), tap the house token seen through the window at the top left, and the coin on the shelf under the teapot on the right (coin 4 of 8). Take the wheel from the top left of the stove and the sieve from the workbench at the lower left.
- In the library, straighten the broken ladder at the back, fit the wheel and the bolt from the floor and tighten them with the screwdriver. Climb to the top left shelf and take the cross key and the Amber carp Xihu recipe from between the books. From the shelf to the right take the phoenix head, and move the books on the middle shelf to see four symbols.
- At the ruins, sift the sand left of the central pool with the sieve to find gems, then fit them into the dragon pendant lying there and take the dragon.
The temple courtyard, the fountain and the broken-roof temple
The cross key opens the doors at the top of the courtyard steps. A man there explains that the Monkey King has stolen the melody cylinder.
- Unlock the large doors at the top of the courtyard steps and climb to the two temples. Talk to the man: he gives you the winding key. Note the shape of his pendant; a diamond is only one possible example. Take the lantern from the ground in front of him (lantern 3 of 5) and the firework tubes on the lower steps on the right. Tap the morphing stone turtle by the bushes on the left (morphing object 8 of 13) and the jade dragon in the rocks left of the dragon fountain (jade dragon 3 of 5). Look into the small hole in the fence right of the fountain for a symbol.
- Open the lock on the door of the right-hand temple. Turn the four reels until they show the four symbols you found behind the books in the library. Go in. The symbols can differ between games; copy your own library clue.
- In the broken-roof temple, tap the morphing pot by the stairs on the left (morphing object 9 of 13). Lift the red board on the middle step of the structure on the right for a symbol of fire. Take the axe from the floor and the bag of saltpeter from the cart.
- At the dragon fountain, unscrew the cover of the panel on the front of the pool with the screwdriver and put in the dragon. Rotate pipe sections to join the tail on the left to the head on the right (not every section is needed). Solve all four boards. Take the stone banana from the water.
- At the lake, put the stone banana in the bowl of the left monkey statue on the path and the stone pineapple in the right one. A panel opens in the path. Rearrange the gears so that all of them engage and the chain of gears links both ends of the mechanism. The bridge lowers to the swamp. For this lengthy arrangement, start at one powered end and build toward the other. Match gear sizes to the space: a large gear reaches farther, while small gears fit tight gaps. Keep neighbouring teeth touching without overlapping, and reserve enough space for the last connection instead of filling the middle first.
The panda, the boat and the trunk
A panda guards the boat in the swamp; the abandoned house holds fishing gear.
- In the swamp, tap the jade dragon on the ground left of the small stone table (jade dragon 4 of 5), the morphing chimney on the house (morphing object 10 of 13) and the symbol of fire between the planks of the walkway on the right. The panda growls at you. Take the carrot from the kitchen workbench and give it to the panda, then take the chip from the boat under its branch.
- Break the door of the abandoned house open with the axe and take the fishing rod, the boards and the hook. At the lake, fish in the water on the left to catch a carp.
- In the broken-roof temple, lay the boards on the broken stairs on the left and climb up. Put the phoenix head and the dragon head on the blue trunk. Rotate the two outer rings and slide tiles in and out at the sides until the outer tiles match the symbols on the blue inner ring. Work round the ring one symbol at a time: turn the outer rings to bring the tile you need to a side opening, slide it across, turn the ring to the place it belongs and slide it back in. Finish within the time limit (6 minutes) for a star. Take the bolts.
- In the swamp, slide the rowlock spike on the boat to the left, fix it with the bolts and attach the oar. Row to the temple across the water: the monkey den.
The well, the anchor box and the monkey disk
The monkey den has a round stone platform, a well and a raccoon under the veranda.
- In the monkey den, tap the coin on the side of the tree at the top left (coin 5 of 8) and the morphing fruit on the round platform on the right (morphing object 11 of 13). At the well, take the oil lantern from the ground, hang the hook on the rim and tie on the rope to raise the bucket; take the mallet and the glass lotus.
- Light up the hole in the tree on the left with the oil lantern and take the anchor figurine; tap the symbol on the rock right of the tree.
- In the abandoned house in the swamp, put the anchor on the box. The layout can differ. The sun and moon pieces travel along the lines and stop at turns or blockers; use the two small blockers to create stops where you need them. Plan each final approach to the matching symbol, then position a blocker to make that approach possible. Keep the other piece out of the required corridor. Bring the moon to the moon slot and the sun to the sun slot, then take the matches and the disk.
- In the monkey den, take the lantern from the top of the steps of the round platform (lantern 4 of 5) and move the darker stone on a lower step for a house token. Put the disk on the face in the middle. Slide the seven monkey heads along the lines and turn the yellow rings until the heads match the diagram at the lower right. The target diagram can differ between games, so copy your own. Place the heads that are already on the correct line first, then use the rings to carry the others onto the lines they need. Finish within 30 moves for a star. Four monkey statues rise; take the ruby and the chopsticks.
- The raccoon under the veranda is hungry. Take the chicken leg from the table on the left of the kitchen and give it to the raccoon. Take the firework tubes and the second chip.
- At the two temples, pull the ruby from the crack at the top of the stone steps on the lower right with the chopsticks.
The yin-yang door and the incense temple
The left-hand temple at the top of the steps is sealed with a yin-yang lock.
- Put both chips on the yin-yang door of the left temple. Join each pair of related pictures, black-on-white to white-on-black. Paths cannot share an ordinary cell; bridge pieces allow one path to pass over another on a different level. Route the pairs with the fewest available exits first, reserving a bridge for pairs that must cross. Check that each remaining endpoint still has an open way to its partner. Enter the incense temple.
- Tap the morphing symbol on the pillar left of the altar (morphing object 12 of 13), the coin on the altar table (coin 6 of 8), and look inside the large hanging bell on the left for a symbol of fire. Note the four banners: each shows a face with hands in a different position.
- Put the collected glass lotus on the table on the right with the four already there, making five flowers. Their required colour order can differ between games. Swap lotuses in pairs until they match your own picture behind the scientist's curtain. Take the soap and the ruby.
- In the monkey den, tap the four monkey statues on the platform to change their hand positions until each copies one of the banners in the incense temple. The monkey temple opens. The banner poses can differ between games; copy your own banners.
- Inside, the Monkey King wants a gift before he will talk. Tap the coin hanging on a string on the right (coin 7 of 8) and the morphing object on the floor by the pineapple at the foot of the left red pillar (morphing object 13 of 13). Tap the five yellow banners in the order of their Chinese numerals, 1 to 5, for a symbol. From the table below the king take the ruby and a small key.