The waterfall cave
A snake hides in the hollow tree beside the temple. The waterfall hides a cave with the clues for the temple door.
- At the temple entrance, tap the morphing symbol on the base of the statue left of the steps (morphing object 10 of 12) and take the pungi from the tree growing right of the temple door (pungi 5 of 5). Move the moss on the wall at the top right, above the two jars, for worm 3 of 5.
- Break open the wooden box left of the waterfall with the pick and take the crucible and the torch. Use the knife on the crack in the stone floor for a key.
- Put the decoration on the harness of the animal statue left of the steps. The waterfall parts; enter the cave behind it.
- In the cave, take the worm from the ground on the far left (worm 4 of 5) and the ladder on the right, and tap the morphing vine at the top left (morphing object 11 of 12). Take the sieve from the left barrel, break the right barrel with the pick and take the brush, then take the four coloured bowls from below the wall drawing at the back.
Pigments and the cave painting
The coloured powders in the village street become paints for the animal drawings in the cave.
- In the village street, open the pots of coloured powder. Take the small animal figure from the white powder, put the sieve in the bowl at the top left and tap the white powder to sift out the other figures (three animal figurines in total). Fill the four bowls from the coloured powders to get pigments.
- Open the pigments in the inventory, add the oil and mix with the brush to make paints.
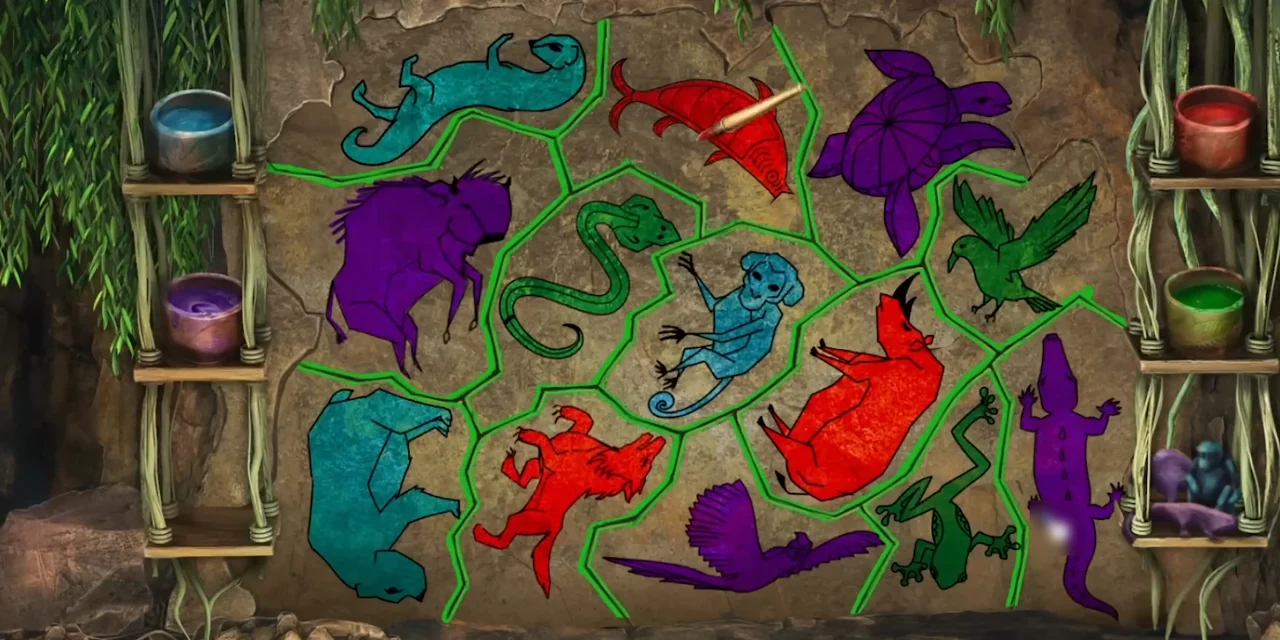
- In the cave, put the paints on the shelves and the figurines below the drawing. Dip the brush in one of the four paints and tap an animal to paint it; you can repaint an animal at any time. First paint the three animals shown by the figurines in the figurines' colours. Then paint the others so that no two neighbouring animals share a colour. The line between two painted neighbours turns green when their colours differ and red when they are the same. A green line only shows that this pair differs, not that either colour is final, and a red line means one of the two needs another colour. If an unpainted animal already borders all four colours, repaint one of its neighbours (not a figurine animal) to free a colour for it. When every animal is painted and no line is red, the wall breaks open; take the emerald.
- In the island building, set the ladder against the centre and climb to the upper area. Take the bas-relief. The carved stand here is the pungi mini-game.
The casket, the ruby eyes and the temple door
A burning torch scares off the snake. The animal statues use their ruby eyes as a code.
- On the jungle path, put the flask under the red flowers on the right and cut a flower with the knife to collect the juice.
- In the forge, open the chicken cage with the key from the temple floor and take an egg. Then take the black pepper from the top centre spice drawer.
- Light the torch on the fire under the fisherman's pot.
- At the temple entrance, wave the burning torch at the dark hollow in the tree on the right to chase off the snake. Move the leaves and sticks and take the second amulet and the second ruby.
- Open the casket in the inventory and attach both amulets. Tap a claw to grab or release the ball in front of it; each tap turns the ring of balls by one place. Trap every ball in a claw of the same colour. A trapped ball stays still while the rest of the ring turns, so fill the claws one at a time: tap a free claw when a ball of its colour is in front of it, and tap a claw again to release a ball of the wrong colour. Finish before the timer runs out to win a star. Take the bracer.
- Go through the cave to the back exit and look at the second animal statue. Put both rubies in its eye sockets, then tap the large ruby on its harness. Watch the eyes flash and write the sequence down, noting each flash as the eye on the left or the right of your screen. In one game it was L L R R L L R: left, left, right, right, left, left, right as seen on screen.
- At the temple entrance, tap the eyes of the statue left of the steps in the sequence you wrote down, again using the eye on the left or the right of your screen (L L R R L L R in one game). Doors open on the temple front; move the bushes to reveal the door puzzle.
- The arrow buttons turn the loops of coloured chips or push chips in and out of the short side tracks. Put every coloured chip into a hole of the same colour; holes without colour must stay empty. The temple door opens.
The solvent, the arms statue and the lotus wheel
The temple holds a giant cow statue, a many-armed statue and a round lotus mechanism behind a red curtain.
- Inside the temple, open the small gold box at the top of the steps by the cow statue's leg. Take the purple berries and tap the cow figurine inside (cow 4 of 6). Tap the morphing tile at the top right (morphing object 12 of 12).
- Open the solvent recipe and add the flask of juice, the egg, the black pepper and finally the purple berries. Take the solvent.
- Move the purple sheet hanging on the left wall at the top of the square column and take dolphin 4 of 5 from the hole behind it.
- At the temple entrance, tap the small musician statue on the broken stones in the middle of the ground (musician 5 of 6).
- In the cave, pour the solvent on the dirty carving on the left wall and clean it with the brush. It shows a girl with many arms in a particular pose. Tap the musician statuette to its right (musician 6 of 6).
- In the temple, tap the arms of the many-armed statue on the left to move them until they copy the pose in the cave carving. Take the bas-relief.
- Put the bracer on the arm of the statue above the small gold box.
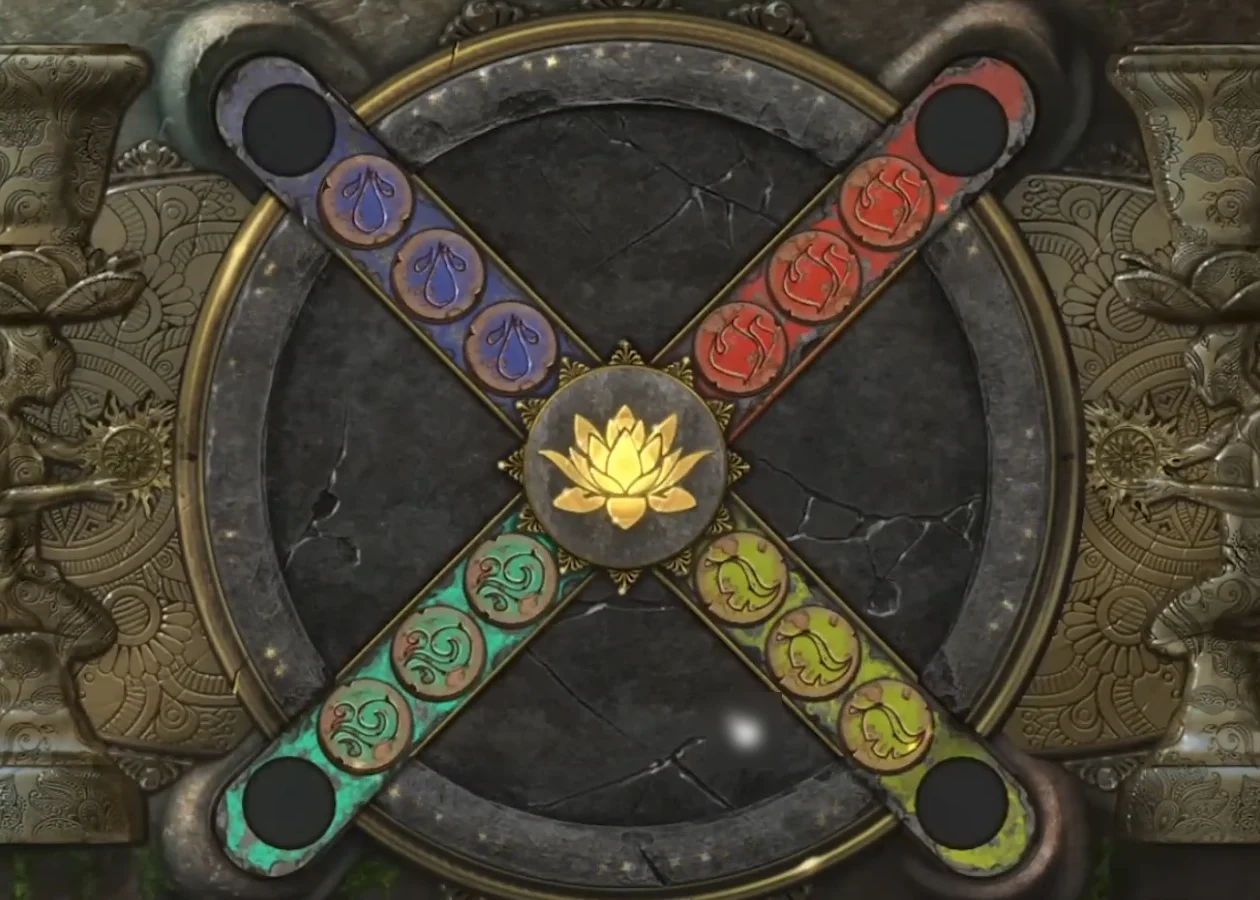
- Move the large red curtain to the right of the many-armed statue and add both bas-reliefs to the round mechanism. Move a disc to the outer end of its arm, turn the centre, and move discs between arms until each arm holds only its own colour (see the picture). Look at the picture that appears: it marks a stone in the cave. Take the mold.
- In the cave, break the marked rock with the pick and take the gold.
The animal heads and the secret room
Optional: worth one star. The three animal heads on the cave wall are a counting lock. The cushions you have seen give the numbers, which can differ between games.
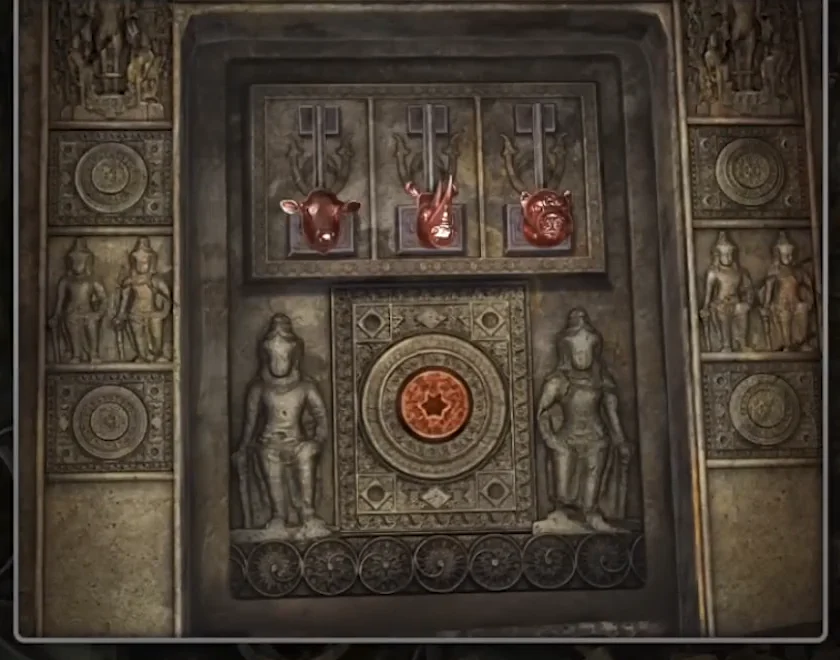
- Use the counts from your own cushions: the cows on the bed cushion in the house, the rhinos on the green cushion in the island building and the tigers on the pillow in the house cabinet. On the cave wall, pull the cow, rhino and tiger heads down that many times each. Then press the round button in the middle of the door below the heads; the wall opens into the secret room. In one game the counts were cow 3, rhino 2 and tiger 1; in another the cushions showed two cows and three tigers.
- In the secret room, find items by their silhouettes. Take the lever from the ground on the left by the purple plant. From the small table with candles take the candle, the green cloth and the key. Put the lever in the slot on the wall left of the glass case and pull it down.
- On the blanket in the centre, take the dried meat from the plate and open the fallen cage with the key to get the circle token. Move the metal hoop on the right, stretch the green cloth over it and drip candle wax on it to make a sieve. Give the meat to the crab in the water to get the triangle token, then scoop the mosaic pieces out of the water with the sieve.
- Place the mosaic pieces on the top left of the candle table. Swap pairs of pieces until all seven flowers are complete and each matches the pattern around its circle. Take the square token.
- Put the square, circle and triangle tokens in the lock of the glass case and take the star.
The golden lotus and the elephant figurine
Melt the gold in the forge, cast a golden lotus and light up the temple. Taking the elephant figurine ends the episode, so collect any remaining stars first (see the next two sections). You can also choose Collect more stars on the results screen and carry on afterwards.
- In the forge, open the metal door at the bottom of the stone furnace, put in the dry manure and light it with the burning torch. Work the bellows until the fire roars. Put the crucible on the shelf at the top and add the gold, then take the molten gold.
- On the workbench at the back, place the mold, close it and pour in the molten gold. Cool it with the ladle of water and take the golden lotus. Open it in the inventory and set the emerald in it.
- In the temple, put the lotus in the dish of the small many-armed figure, then add the lens. Beams of light cross the room and the centre of the floor opens to reveal the elephant figurine. When you take it, you also get the episode-completion star.
Collection stars and the last collectibles
Each completed set earns a star only after you tap its special spot. Use the list below for anything you missed.
- Cow figurines 5 and 6: tap the cow picture on the jar on the top shelf of the opened glass-tube cabinet in the forge, and the cow figurine on the flower pot to the left of the village water pool.
- With all 12 morphing objects, go to the jungle path and tap the three monkey statues at the bottom left to take a star.
- With all six musicians, take the star in the island building in the middle of the lake.
- With all six cow figurines, tap the cow statue beside the bridge on the bridge path for a star.
- Worm 5 of 5: at the bottom of the well, tap the stones of the wall in the order shown by the groups of scratched lines, from one line to seven lines. A stone falls out; take the worm.
- Dolphin 5 of 5: look into the bamboo tube at the front of the fisherman's hut roof.
Dolphins, pungi and worms
Each mini-game has five levels. Every token you place unlocks one level, so you can play as you collect. Clearing all five levels of a mini-game gives a star. The skip button costs coins.
- Dolphin mini-game: place a dolphin figurine in the slot of the carved box on the left side of the fisherman's hut. Move the ball piece around the board; it carries the tiles attached to its arrows. Collect the loose blue and green tiles and fit them into the pattern outlined in the middle of the board.
- Pungi mini-game: in the upper area of the island building, place a pungi on the stand. Drag the yellow pyramids onto the board; the blue crystals stay where they are. Every piece has small dark holes on some of its sides. A ray forms when two holes face each other along a straight line of hexagons, joining a crystal to a pyramid or two pyramids to each other. A crystal lights up only when all its holes have rays, and the level ends only when every hole on every piece, pyramids included, is connected. Start with the crystals: for each of their holes, place a pyramid in line with it that has a hole on the side facing the crystal. Then link the pyramids' remaining holes to each other. Check for dark holes without a ray and move pyramids until none are left.
- Worm mini-game: at the pool in front of the temple entrance, place a worm on the box by the water. Throw pebbles into squares to push the water lilies and the fish, and guide the fish to the marked squares at the bottom.