The witch, the satchel and the hide ropes
The witch will only share her enchantment if you bring her a new fur cape and make the ax from meteorite metal.
- Cross to the witch's island and talk to her. Tap the morphing jug on the table on the far right (morphing object 10 of 13). Draw the curtain behind her, tap the monster head in the small dish at the top right of the table (monster head 5 of 6), and look into the cooking pot over the fire: a runic symbol shows in the water.
- Open the flap of the satchel hanging from the right pillar. The rune can differ between games, so use the symbol in your cooking pot. The four green buttons rotate the glyph petals; turn them until the four parts in the centre combine into that symbol. Take the mosaic pieces and the rod from the small pouch.
- Take the large horn (antler) from the bench left of the satchel; the rune stones on the table on the right are the powder mini-game. Look at the rope stretched across the ceiling: its knots are tied in groups.
- In the tannery, open the animal hide on the back wall. Each of its four ropes has a different number of knots (3, 4, 2 and 1 from left to right in one game). Pull the ropes in the order of the knot groups on the witch's ceiling rope, read from left to right, choosing each time the rope with that many knots. In one game the groups were 2, 4, 1, 4, 3, 1, 2. Take the gear.
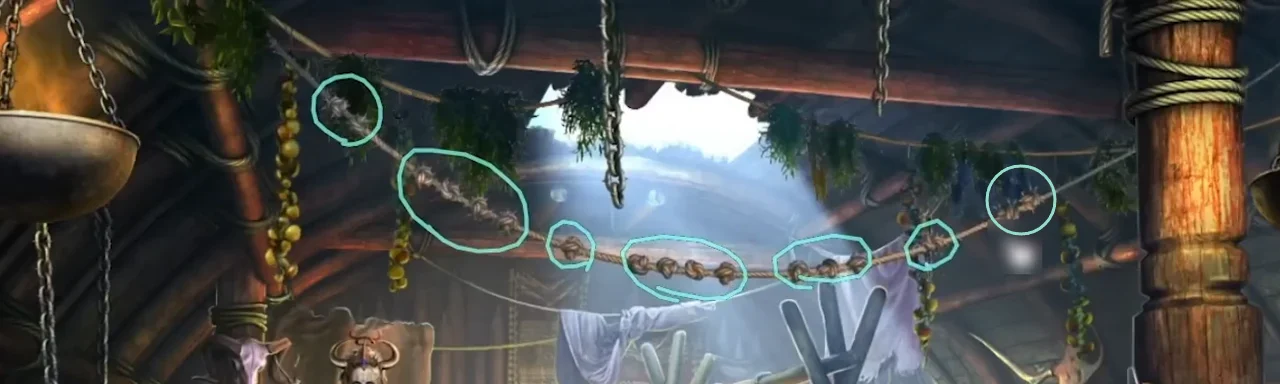
Episode 3: one game's knot sequence. Read your own ceiling rope from left to right. - Put the rod on the bottom of the cabinet on the left of the tannery. The arrows move the red gems along their lines, two lines at a time; bring all four gems into the dark marked places in the middle. Take the fur cape.
- At the gates, lift the small broken cart near the centre with the stick and take the mosaic piece.
The deer statue and the witch's skull
The deer statue at the camp is a timed sliding-block puzzle worth a star.
- At the camp, fit the large horn to the deer statue on the left. Slide the blocks to bring the deer-head block from the left to its slot on the right. The blue squares never move. Slide the green blocks that stand in the deer head's way into free spaces beside its path, then move the deer head on towards the slot. Finish within the one-minute timer for a star. A hoof lifts; take the gem from under it.
- In the witch's hut, set the gem in the eye socket of the skull on the table behind the witch. The board layout and starting position can differ; plan around your own obstacles. Tap an arrow beside the snake's head to extend it in that direction until a grey stone, the edge or its own body blocks it. Fill every empty hexagon; the grey stones stay in place. Before each tap, trace where the head will stop and check which turns will still be open there. Work through narrow passages before closing them off, and avoid dividing the remaining empty cells into separate areas. Restart if the head is trapped with empty cells left. Take the runes (6 of 8) and the key.
- Unlock the bird cage on the right of the hut. The bird will not part with anything yet. In the banquet hall, cut a piece from the hanging meat with the knife and give it to the bird. Take the gold feather.
The map house, the tubes and the stars
The building on the left of the village is the cartographer's map house.
- Put the gold feather on the round emblem of the door on the left of the village. Swap the seven hexagons in pairs until every touching edge shows the same rune. The map house opens.
- Inside, tap the goat figurine on the shelf on the left near the green shield (goat 6 of 7) and the morphing shape on the paper map hanging over the right-hand table (morphing object 11 of 13). Take the ladder from the floor.
- At the shipwreck, set the ladder at the bow so you can reach the figurehead; a seabird sits on it. Take a fish from the small boat at the lake and give it to the bird. Take the mug from the figurehead's mouth.
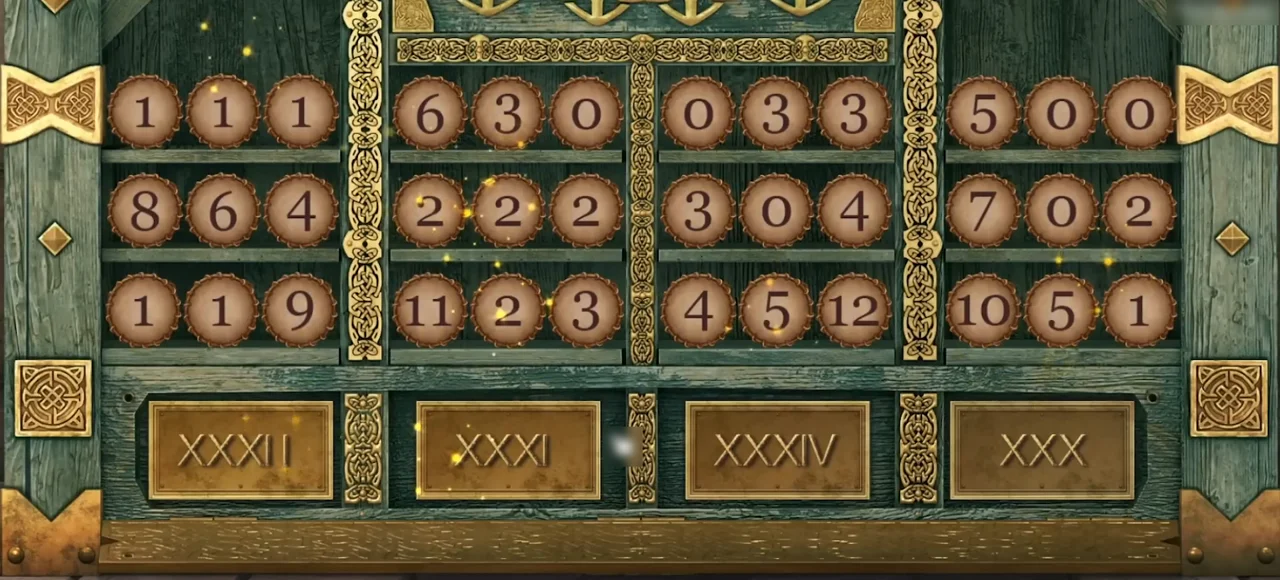
- In the map house, cut open the panel at the bottom of the bench at the back with the knife. Swap tubes in pairs until the numbers on the tubes of each group add up to the Roman numeral below it. In the checked game the numerals were XXXII = 32, XXXI = 31, XXXIV = 34 and XXX = 30. Take the book Forging the Celestial Axe and the mosaic piece. The book asks for meteorite metal, the rune stone and a branch of the sacred Viking tree.
- Look at the large map on the right wall: a star constellation is drawn on its right side. The constellation can differ between games. In the banquet hall, open the round box with star markings on the table on the right. Turn its three rings until the stars and lines form the constellation on your own map; the clue shows only part of the finished picture. Take the mosaic piece.
The eagle chest, the paintings and the sacred hall
Seven mosaic pieces open the large chest in the great hall, which holds the meteorite metal.
- In the great hall, put the seven mosaic pieces on the large chest on the right. The eagle arrangement can differ between games. Move the purple discs around the rim so the light beams between them cross all nine gold eagles on your board. Take the runes (7 of 8), the painting and the meteorite metal.
- In the map house, hang the painting in the empty space on the back wall. Find the ten details that are the same in both paintings and tap them. The matching details can differ between games, so compare your own pictures, working across them a small area at a time. Take the wick and the runes (8 of 8).
- At the lake, put the eight runes on the door of the building on the left. Jump an emerald over a neighbouring emerald to remove it; the brass pegs cannot move. Keep jumping until only one emerald is left. The sacred hall opens.
- In the sacred hall, tap the monster head on the wall right of the statue (monster head 6 of 6) and the morphing symbol on the arch left of the statue (morphing object 12 of 13). Take the ring from one of the four ritual bowls on the floor.
- Go through the doorway on the right to the sacred tree. Tap the morphing hook on the left wall above the green tapestry (morphing object 13 of 13) and the goat figurine on the floor below the tapestry (goat 7 of 7). Take the basket from the base of the withered tree.
- Back in the sacred hall, tap the table on the left to take the morphing-object star.
The star segments and the territory map
A lever from the tannery cellar lifts the wall hanging in the banquet hall.
- Unlock the trapdoor in the tannery floor with the ring and take the lever from the cellar.
- In the banquet hall, fit the lever to the wall hanging on the left and pull it to lift the hanging, then place the mug in the slot behind it. Tap the arrow-shaped segment sets on the right and in the middle to drop their coloured segments into the star frame, and turn the frame with the arrows at the top. Fill the star so every pair of touching segments has the same colour. The segments arrive in a fixed order, so before each drop turn the frame until the free space where the next colour fits faces the arrow you are about to tap. Finish within the move counter (30 moves) for a star. Take the anvil and look at the map of coloured territories that appears.
- In the map house, put the crayons on the desk map on the left. The territory clue can differ between games, so copy your own map from the banquet hall; the picture here is one completed example. Pick a crayon and tap the territories that have that colour in your clue. Check every territory before moving on. When the map is complete, a rune appears; remember it for the ritual.
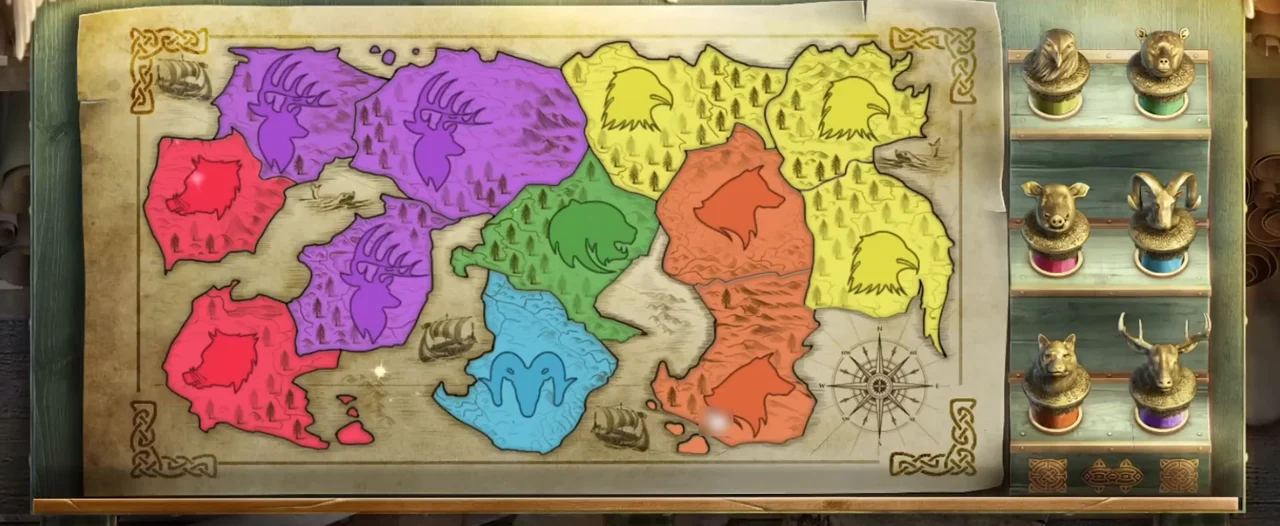
Episode 3: a completed territory map from one game. Copy your own banquet-hall clue.
Forging the celestial ax
You now have the meteorite metal and the rune stone. The handle must come from the sacred tree.
- In the forge, put the anvil in the cabinet left of the hearth. Slide the seven rods of symbol blocks left and right until each symbol in the bottom row has the same symbol directly above it. Take the pincers.
- At the shipwreck, set the basket by the scillas in the grass on the right and dig them up with the trowel. At the sacred tree, plant the scillas at its base; the tree revives. Cut the branch on the left with the handsaw.
- In the map house, lift the planks under the candles on the floor at the left with the pincers and take the decoration.
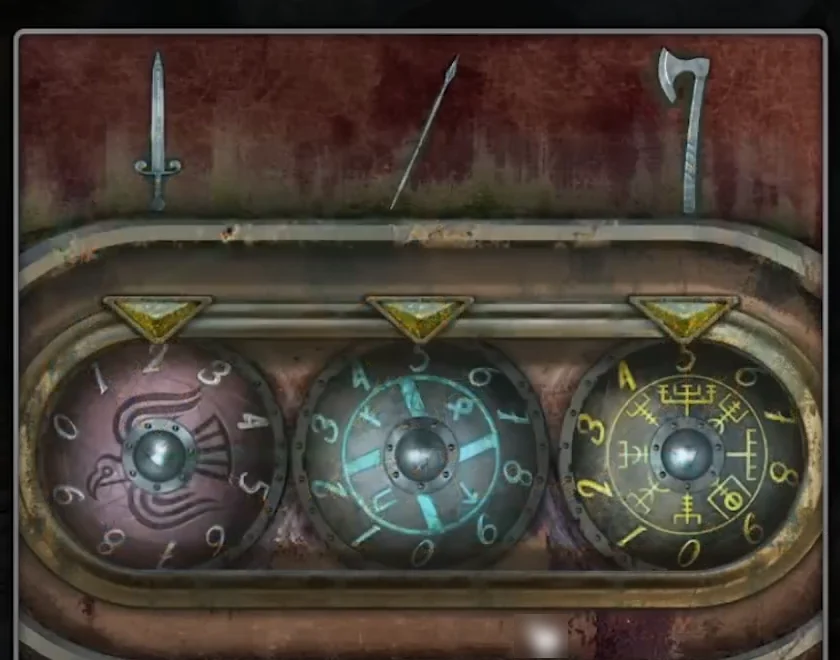
- In the village, put the decoration on the circle on the front of the saddle stand. Look at the battle tapestry in the sacred tree room and count its swords, spears and axes separately. The numbers can differ between games. Set each shield wheel to the total for the weapon shown above it: sword, spear, then axe. In one game the totals were 2, 5 and 5. Take the hammer.
- In the forge, replace the broken gear at the back right with your gear and pull the lever on the left to lift the heavy weight. Take the lavender from under it.
- Put a log on the chopping block on the left and split it with the ax for firewood. Load the firewood into the bottom of the hearth and pump the bellows. Put the meteorite metal in the crucible at the top; when it melts, lift out the liquid metal with the pincers. Close the mold on the anvil first, then pour the liquid metal through its opening. Use the pincers to take the filled mold and cool it in the water barrel. Collect the blank and place it on the anvil.
- Carve the branch into a handle with the knife. Set the rune stone on the head of the ax, add the handle and hammer it home. Take the celestial ax.
The ritual of fearlessness
The witch's ritual needs three feathers (eagle, raven and goose), red wine, rowan berries and aromatic herbs in the four ritual bowls, plus thirteen lavender candles.
- Give the fur cape to the witch; she hands over the ritual of fearlessness. Take the aromatic herbs from the open satchel and the black feather from the bird cage.
- Take the berries from the table on the left of the banquet hall.
- With all six monster heads, open the ship model on the table in the map house and take the star. With all seven goat figurines, open the shelf at the back left of the tannery and take that star.
- Take the wine from the shelf in the tannery cellar and the feather from the ink pot beside the ship model in the map house.
- At the sacred tree, shoot down the feather on the high branch with the bow and arrows and pick it up from under the tree.
- In the sacred hall, fill the four ritual bowls on the floor, from left to right: berries, aromatic herbs, wine and the three feathers. Then place the celestial ax in the large dish in front of the statue. The witch notices that one of the thirteen lavender candles is missing.
- Scoop fat from the barrel on the left of the tannery. In the village, cut wax from the honeycomb buckets with the knife. At the camp fire, hang the cauldron and add the wax, the fat and the lavender, then stir with the ladle and take the candle wax.
- Take the candle mold from the cabinet left of the forge hearth. Put the wick in the mold first, pour in the wax, and open the mold to take the lavender candle.
- In the sacred hall, place the candle on the base of the statue. A rune panel appears. The rune can differ between games; tap the top and bottom halves until they form the rune revealed by your coloured territory map. The candles light, the witch chants and the ax becomes the ax of fearlessness. Take it.
Lighthouses, powder and tokens
Optional: three stars. Collect five of each token for the mini-games. Do this before you hand the ax to the Jarl, or use Collect more stars afterwards.
- Lighthouses: tap the green brick right of the gate building, open the skin-topped drum left of the silver bowl in the great hall, take the one on the high shelf at the far left of the tannery, the one at the top left of the witch's hut, and the one on the banquet hall table at the top left of the star box.
- Powder: the pouch in the small hole high in the chopped tree at the camp, the pouch hanging from the line of hides above the tannery trapdoor, the pouch on top of the bench at the back of the map house, the pouch in the roots of the sacred tree, and the odd-coloured scale on the figurehead's neck at the shipwreck.
- Tokens: open the round dock post marked with an X at the lake, the small green square on the base of the big anvil in the forge, the cloth on the goat shelf in the tannery, the head of the ax held by the sacred hall statue, and the leaves in the middle of the village.
- Lighthouse mini-game: on the bench in front of the forge at the lake, place a lighthouse. Swipe or drag across the board to move the ships together along one of the four grid directions. A short move shifts each unblocked ship one square; a ship facing an island or the edge stays put while the others move. Use those obstacles to change the spacing between the ships, then bring each ship into the berth marked by pillars of its own colour. A ship already in its berth can move out again, so check all three before each move and plan the final approach for the whole fleet. Use this approach across the five levels; the guide does not list every move. Complete all five for the star.
- Powder mini-game: on the table of rune stones in the witch's hut, place a pouch of powder. Tap pairs of stones with the same marking to clear them until no symbols are left.
- Token mini-game: climb the ladder on the back wall of the map house to the mezzanine and put a token in the large cabinet. Turn the stones to lead the light beam from one end of the board to the other, using every stone.
The cabinet passage and the boat tunnel
Optional: worth one star. The empty cabinet on the left wall of the sacred tree room has four open doors. Four hidden switches close them.
- Tap the antler of the deer head on the right wall of the great hall, turn the blank sign on the fence at the left of the lake, move the odd-coloured stone on top of the forge hearth, and tap the darker stone in the wall right of the cabinet in the sacred tree room. When all four cabinet doors are closed, pull the lever on its left side and enter the passage.
- Steer the boat with the left and right arrows to dodge the rocks until you reach the end of the tunnel, then take the star.
The ax of fearlessness
Handing the ax to the Jarl ends the episode.
- Give the ax of fearlessness to the Jarl in the great hall to finish the episode and take the completion star.