The town, the saloon and the stagecoach
The show moves to Arizona to look for an Indian treasure trove. A cowboy locked in the town jail promises to lead you there if you free him; the sheriff with the jail key is drinking in the saloon. Morphing objects in this episode sit one per location, 12 in all. The six collection items are wanted posters and six more are snake emblems.
- In the main street, talk to the cowboy at the barred jail window on the right. Tap the morphing circle in the upper window on the side of the jail (morphing object 1 of 12).
- Open the notice board on the right. Take the scrap of drawing from the rail at the lower left and tap the wanted poster on the left (wanted poster 1 of 6). Note the three playing cards on the saloon sign; they are the suitcase code later.
- Enter the saloon on the left. Talk to the sheriff at the bar; he wants a drink. Tap the morphing candlestick on the right of the fireplace (morphing object 2 of 12). The man at the table on the right runs the mug mini-game (see Bonus mini-games).
- Open the framed drawing behind the bar, add the scrap to complete it and take the pebble from the bottom right. Tap the small wanted poster at the top left of the drawing (wanted poster 2 of 6).
- Open the cash register behind the bar and take the pack of cigarettes. Note the bird symbol on the bottle to the left (a clue for the secret room).
- Outside, talk to the stagecoach driver at the end of the street and give him the cigarettes. He drives you to the post office.
Post office, train and Indian village
The post office, the abandoned train and the Indian village open up from here. Travel with the map button once a location is unlocked.
- At the post office, tap the morphing gravestone by the bend in the rails at the upper left (morphing object 3 of 12). Go inside, note the calendar and the ink for sale at the window, and take the ladder on the left.
- Go to the train at the top right. Tap the snake on one of the broken boxes at the lower right (snake 1 of 6) and the morphing bush near the last car (morphing object 4 of 12). The plaque of bird symbols on the last car is the secret room; the engine cab and front need items later.
- Take the path on the left to the Indian village. Talk to the man by the fire: he gives you his sleeping potion recipe (ground peanuts, cactus flower, cave mushroom and red apple, boiled and poured into a container). Tap the snake on his necklace (snake 2 of 6) and the morphing wheel on the teepee at the back left (morphing object 5 of 12).
- Enter the large tent. Tap the morphing fruit hanging on the line at the top left (morphing object 6 of 12) and the snake on the vase on the left (snake 3 of 6), pull the tomahawk out of the totem on the right, and take the mug from the top of the box on the left (mug 1 of 5).
The farm, the river bank and the cave
A path at the top left of the post office leads to an old farm. The river bank lies past the farmhouse.
- At the farm, tap the wanted poster on the box at the lower left (wanted poster 3 of 6) and the morphing barrel in front of the farmhouse, right of the porch (morphing object 7 of 12). Look in the barn on the left and take the handle from the barrow.
- Follow the path right of the farmhouse to the river bank. Tap the snake on the tall stone across the river (snake 4 of 6) and the morphing beaver lodge on the rock in the river (morphing object 8 of 12). The small tent on the right holds the morphing-object star later.
- Cut the vines over the cave entrance on the right with the tomahawk and go in. Tap the morphing square stone left of the central altar (morphing object 9 of 12) and the snake painted on the right wall (snake 5 of 6). Cut a glowing mushroom with the tomahawk.
- At the farm, set the ladder against the front of the barn and open the hatch in the roof. Take the lasso from the box on the left and the detail from the floor on the right.
- In the Indian village, cut the flowering part of the cactus right of the fire with the tomahawk, then throw the lasso over the red apple in the tree above the fire.
- Back in town, fit the handle to the well on the left and raise the bucket.
- At the river, lasso the box floating beside the big rock, open it and take the model of the house. Fill the bucket from the river.
- At the post office, pour the water into the trough by the horse. The horse steps forward and moves the wagon; take the boot from the ground where the wagon stood.
- At the farm, put the house model on the right of the model town on the table. Fifteen pieces are out of place: pick up each one and drop it where it belongs (animals in the pens, barrels, carts, the windmill and so on) until the counter reads 15/15. Take the pipe.
The chained box, the casket and the clock
The chained box under the windmill and the broken boxes by the train hold the next tools.
- In town, open the large chained box under the windmill, left of the jail. Use the detail from the barn on the lock, turn the wheel on the right and take the handsaw and the detail with an Indian head.
- At the post office, cut the rope on the back of the covered wagon with the tomahawk and lift the cover. Take the pendulum and the decoration, and note the bird symbol on one of the boxes.
- In the saloon, hang the pendulum on the cuckoo clock on the left wall. The top opens; take the figured key.
- At the train, break open the broken boxes on the ground with the tomahawk. Take the stencil and the casket.
- Open the casket in the inventory and add the decoration. Each gem moves only in the directions of its coloured arrows and can push other gems. Slide all four gems into the hollows of the same shape at the sides of the board. The arrows under each gem show the only directions it can move, so place the most restricted gem first and use the others to push it or block its way; reset if a gem gets stuck against a wall. Finish within the time limit (about two minutes) for a star, then take the key.
- In the train engine cab, saw the shovel free with the handsaw and take it.
- In the large tent, cut open the small patch on the fabric on the left with the tomahawk and take the figurine. Note the column of four blue faces painted on the fabric; it is the totem clue.
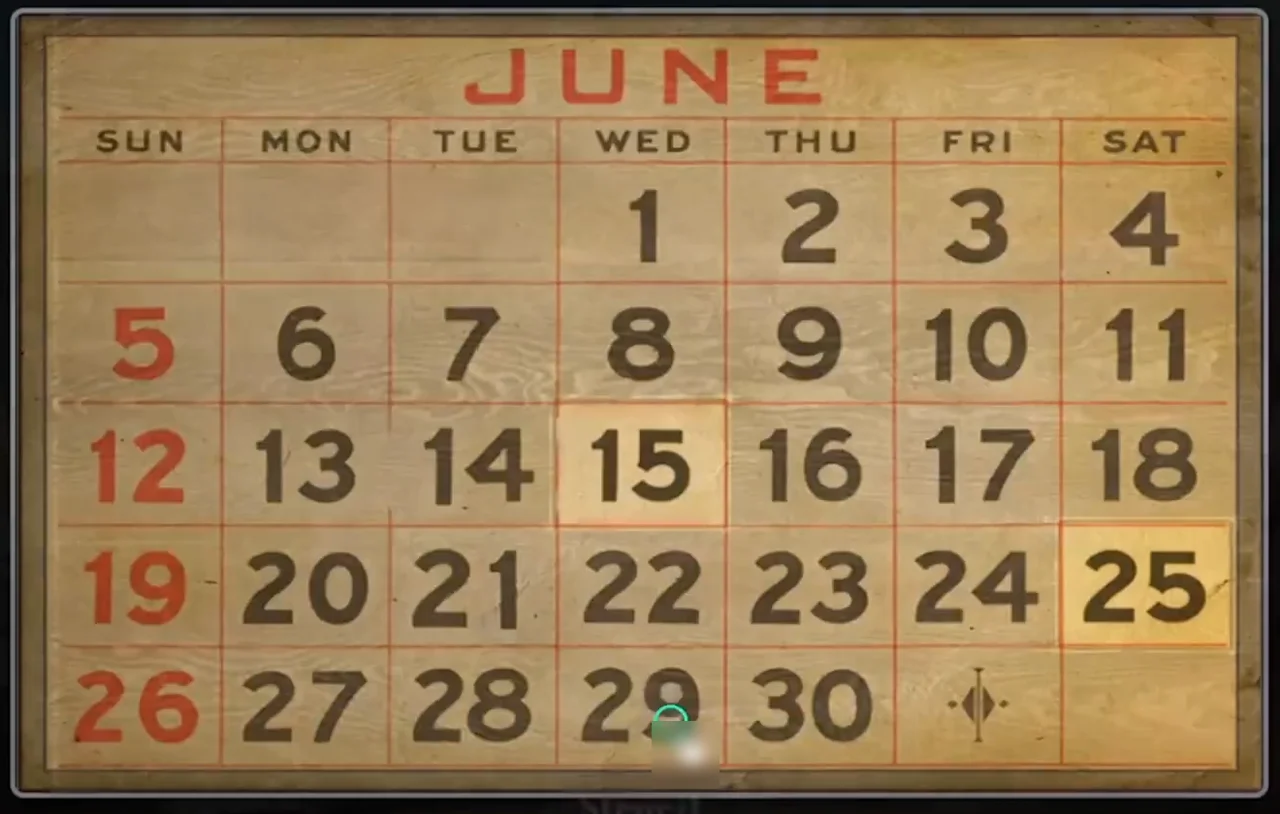
- Inside the post office, lay the stencil over the calendar. It leaves two numbers showing, the hour and the minutes for the clock (15 and 25 in the checked game).
- Open the glass of the clock outside the post office, on the left, and set it to the time from the calendar. In the checked game that was 15:25: hour hand on 3, minute hand on 5. The clock opens; take the handle.
Cash register, suitcase and boots
The cash register pays for the ink, and the suitcase lock uses the cards on the saloon sign.
- In the saloon, fit the handle to the side of the cash register and turn it. Take the drum and the banknote from the drawer.
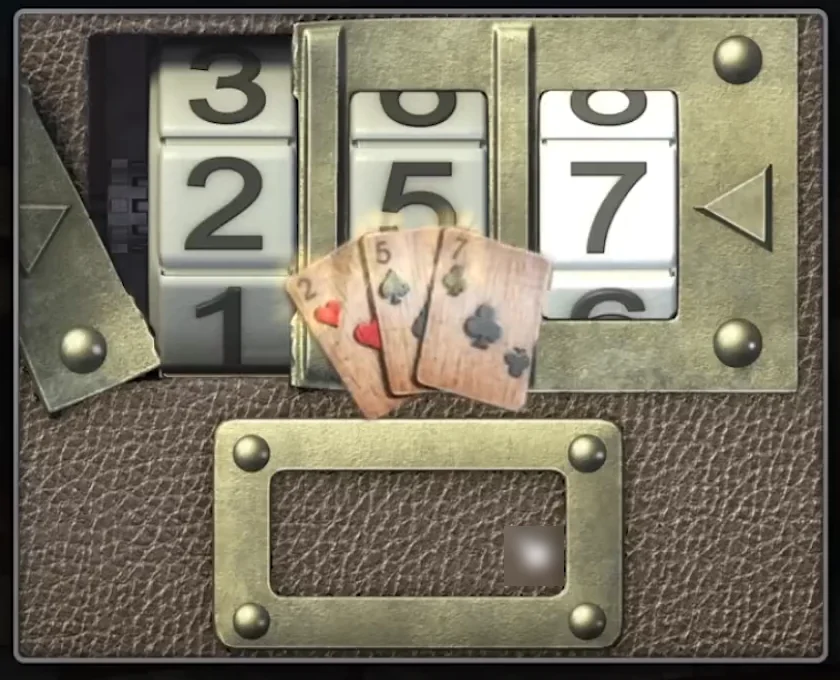
- At the post office, open the suitcase on the left of the porch and repair its lock with the drum. Set the three wheels to the values of the three playing cards on the saloon sign, left to right (2, 5, 7 in the checked game). Take the totem (totem 1 of 8).
- Inside the post office, hand the banknote through the teller's window and take the bottle of ink.
- At the farm, unlock the farmhouse door with the key from the casket and go in. Tap the snake on the jar on the top left shelf (snake 6 of 6) and the morphing tree outside the window (morphing object 10 of 12).
- Put the boot with the others on the shelves on the left. Swap boots two at a time until every pair stands together with matching designs. Take the round detail and the oiler.
The coal barrow, the card chest and the picture box
The wheelbarrow of coal in the street and the wooden chest in the saloon both hide puzzles.
- In the street, shovel the coal out of the wheelbarrow and take the pincers. A box with a hook-shaped slot is left in the barrow.
- In the Indian village, put the figurine on the horse's saddlebag at the back left. It opens; take the totem (totem 2 of 8).
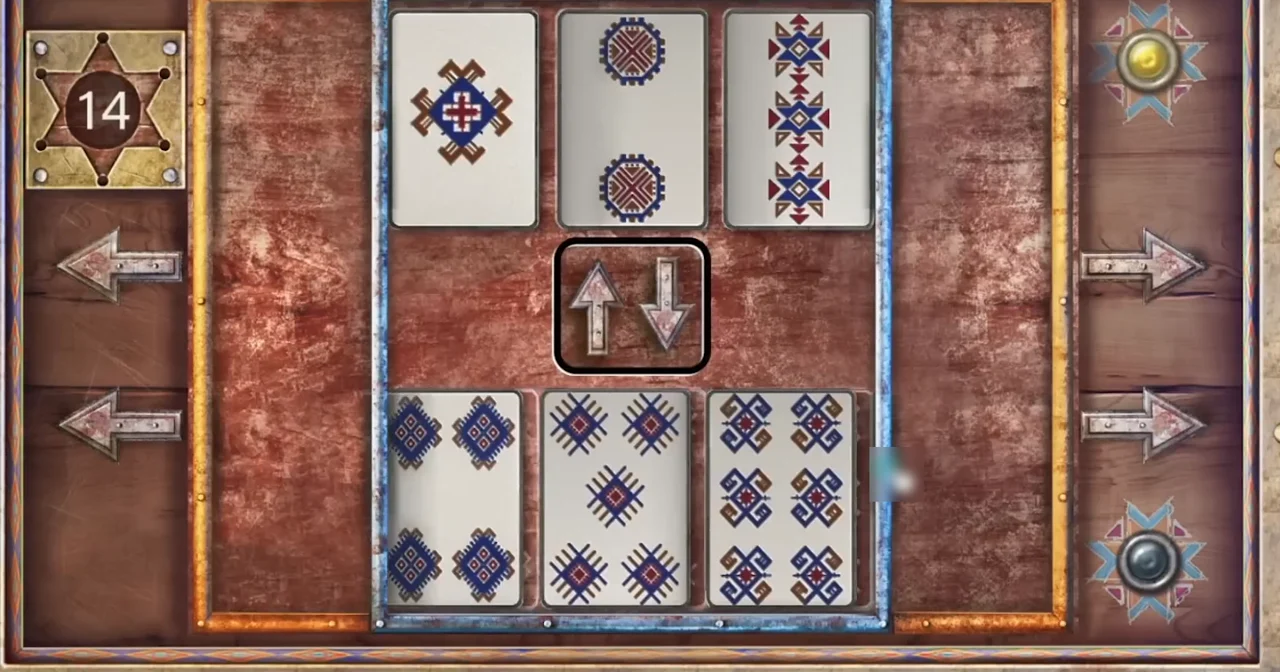
- In the saloon, put the detail with the Indian head on the large wooden chest on the right. The arrows slide the top and bottom rows of cards left and right, and the middle button swaps the three middle cards between the rows. Put the cards in order by the number of patterns: 1, 2, 3 in the top row and 4, 5, 6 in the bottom row. Finish within 48 moves for a star. A lamp lights as soon as the top row reads 1, 2, 3 and stays lit, so complete the top row first; after that it does not matter if those cards move again while you build 4, 5, 6 in the bottom row. Tap the star in the chest to take it, then take the roach (feather headdress) and the hook.
- Put the hook into the slot of the box in the wheelbarrow. Tap the large circles to turn the three picture pieces around each one, and turn them until the picture of the cowboys is complete. Take the token.
The engine code word and the sleeping potion
The front of the engine is a letter lock. The sign at the left of the train is written in a pigpen-style code that the two letter grids on the lock explain.
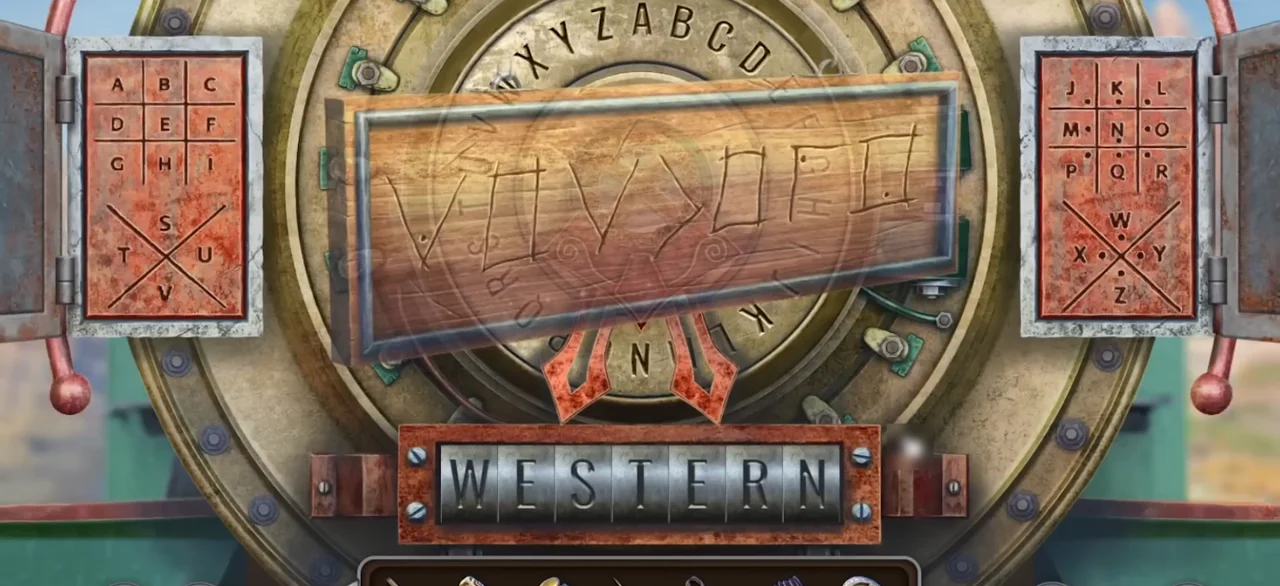
- At the train, look at the sign on the left of the engine: it is scratched with seven code symbols. Put the round detail on the front of the engine. Each symbol is the shape of the cell around a letter in the grids on the left and right of the lock (a dot marks the second letter in the same cell). Decode the sign and turn the pointer to each letter in turn. In one game the word was WESTERN; if your sign differs, decode it the same way. Take the flask and the totem (totem 3 of 8).
- In the saloon, take the peanuts from the bar to the right of the sheriff. In the farmhouse, put them in the grinder on the table and take the ground peanuts from its drawer.
- Open the recipe and add the ground peanuts, the cactus flower, the cave mushroom and the red apple to get the ingredients. In the village, drop the ingredients into the pot on the fire, then fill the flask from the pot.
- In the saloon, pour the sleeping potion into the sheriff's glass. When he falls asleep, take the key from his belt.
The jail, the newspaper code and the safe
The numbers for the jail safe come from a stamped puzzle. The values change from game to game, so work them out from your own stamp.
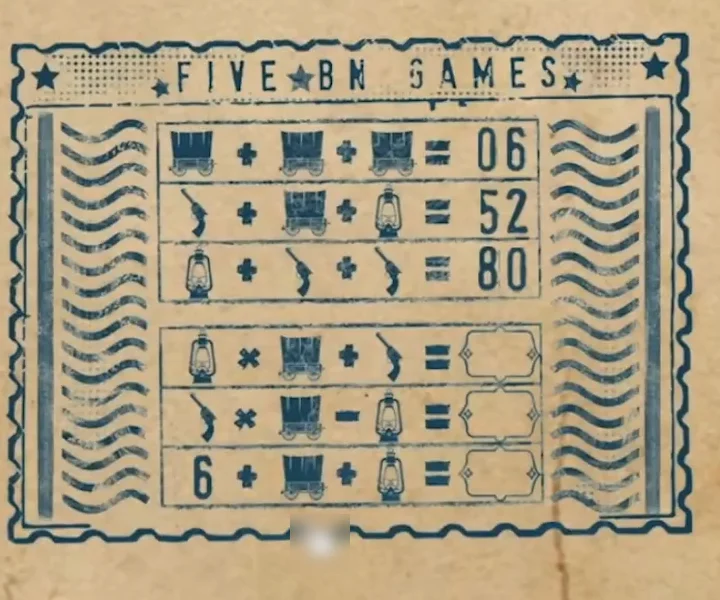
- Unlock the jail door with the key and go in. Tap the morphing hat on the hat stand (morphing object 11 of 12). On the desk, open the newspaper and tap the wanted poster on the right page (wanted poster 4 of 6).
- Pour the ink onto the ink pad on the desk, ink the stamp and press it onto the paper. The stamp shows three equations made of pictures with their answers, and three more equations with empty answers. Work out what each picture is worth from the top three (for example, if three wagons make 72, one wagon is 24), then calculate the three missing answers.
- Open the green safe at the back. Enter your three answers, one per row, and pull the handle. Take the decoration and the dynamite.
- Unlock the chain on the spear on the jail floor with the figured key and take the spear. Take the token with a fish from the stove on the left.
The mannequin, the hill totem and the bow
The chief's costume in the large tent is missing three ritual items.
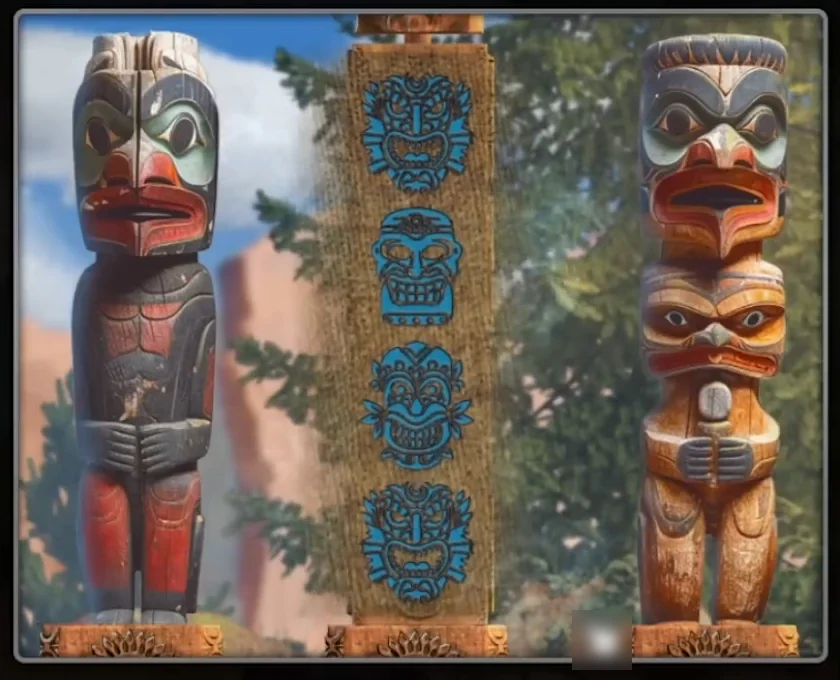
- In the large tent, dress the seated mannequin on the right with the roach, the pipe and the spear. Take the sun.
- Outside, open the totem up the hill on the right and put the sun at its base. Tap the four sections to turn them until they show the four faces painted in blue on the tent fabric, in the same order from top to bottom. The faces can differ between games, so copy the ones on your own tent. Take the quiver.
- In the cave, place the dynamite on the loose rocks on the left wall.
- In the train engine cab, try the round firebox door, oil it with the oiler, open it and take the oval detail.
- Use the oval detail on the store door next to the saloon. Take the second pebble and the matches from the counter.
- In the cave, light the dynamite with the matches. When the rocks are blown away, look into the hole and take the arc (the bow limb).
- At the river, open the small box under the bush by the water with the fish token and take the fishing line. In the inventory, string the arc with the fishing line and add the quiver to make the bow.
- In the village, put the bow into the wagon on the left of the scene. Tap to shoot arrows at the 14 targets; lead the moving ones. Arrows are unlimited. When all are hit, take the head.
Animal heads, scarecrow and marbles
A fire in the saloon fireplace reveals the order of the animal heads.
- In the saloon, light the fireplace with the matches. Animal shapes appear in the flames on the back wall.
- Open the animal heads on the wall right of the fireplace and add the head to the empty mount. Swap heads in pairs until they stand in the same positions as the animals drawn in the flames. The positions can differ between games, so follow the animals in your own fire. Take the token and the handle.
- At the farm, put both pebbles on the box on the scarecrow. The discs start pale. Tapping a disc switches it and its neighbours between pale and dark; make every disc dark (the game calls this "active"). Take the deer figure.
- At the post office, put both tokens on the large box on the left. Take the brush, open the small box at the top left for a totem (totem 4 of 8) and tap the crumpled wanted poster at the lower left of the box (wanted poster 5 of 6).
- In the jail, fit the handle to the desk drawer and take the second deer. Note the bird symbol inside the drawer.
- In the farmhouse, put both deer on the cabinet above the bed. The arrow buttons tilt the board left or right and the marbles roll as it turns. Group the four marbles into a 2 x 2 block, as drawn on the left. Take the gun.
The gun rack and the cell door
The framed drawing behind the saloon bar shows which guns to raise.
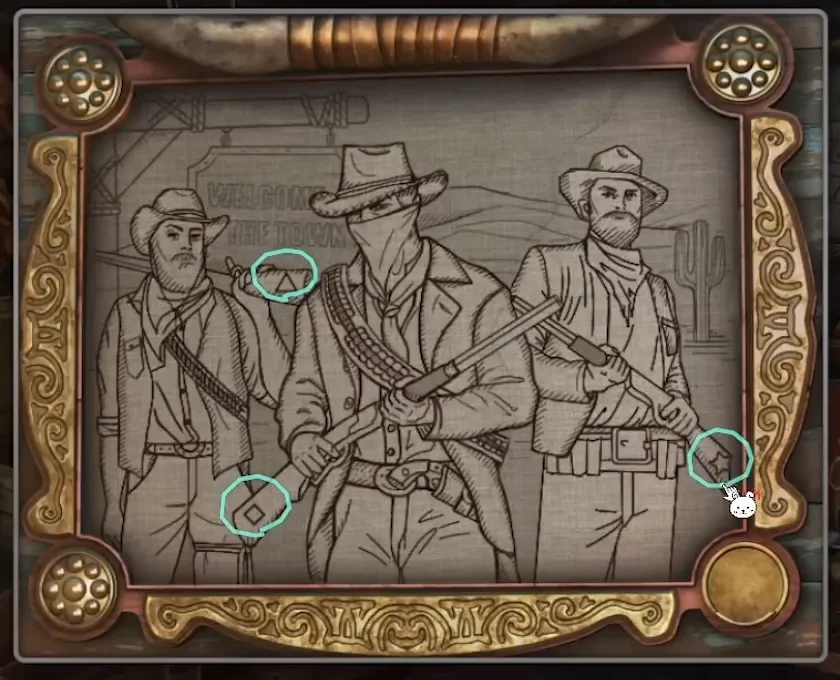
- Put the gun in the empty slot of the gun rack above the jail desk. Look at the framed drawing behind the saloon bar that you completed with the scrap: each of the three cowboys holds a gun with a symbol on its stock. The symbols can differ between games, so use the ones in your own drawing. Activate the three guns in the rack with those symbols. Take the bas-relief.
- Put the bas-relief into the lock of the cell door. Rotate the discs until half circles on neighbouring discs meet to form full circles around the balls without overlapping them; complete all seven. The cowboy goes to fetch his boat.