The Old Lady's Living Room
Travis lives in half of a suburban house. His elderly neighbour has the key to the adjacent corridor, but she will only hand it over after you help her clean up and find her lost glasses. New tasks: 'Infiltrate Travis' home' and 'Help the old lady'.
- Talk to the old lady in the armchair. She refuses to give you the corridor key until you help with her chores.
- Several items in this house come in sets: SPROUT (10), BALLS OF YARN (5) and THREADS (5). Pick them up whenever you see them; the steps below say where each one is.
- Go through the left exit to the old lady's bedroom. Take SPROUT 1 from the rug in front of the armchair and SPROUT 2 from the armchair seat. The louvred door needs a key and the carved elephant cabinet is missing a tusk.
Tidying the Bedroom
A cat is lying on the bed and hisses when you try to take anything there.
- Drag the PILLOW from the floor by the elephant cabinet onto the armchair, then drag the blue-green CLOTH from the floor onto the armchair. The cat jumps off the bed and leaves.
- Zoom into the bed: take BALLS OF YARN 1, pull back the blanket and take SPROUT 3.
- Zoom into the lower drawer under the dresser by the bed. Take SPROUT 4 from the floor in front, open the drawer and take THREADS 1, BALLS OF YARN 2 and SPROUT 5. Open the small box inside to get the ornate KEY. Close the drawer and take THREADS 2 from the fabric underneath.
- Zoom into the dresser and open the small wooden JEWELRY BOX with the ornate KEY. Take the TUSK from inside, then drag the scattered jewellery (lace ribbon, blue brooch, bead chain and small jewels) into the box until it closes.
- Put the TUSK on the elephant cabinet. The doors open: take THREADS 3. The shelf blocks a secret door, but its bolts must be unscrewed later.
- Take the PUSH BROOM leaning against the wall at the far right of the bedroom, beside the window curtain. Drag the plaid BLANKET from the left armchair onto the bed.
- Return to the living room and talk to the old lady. She asks you to find her glasses in the closet and gives you the CELLAR KEY.
The Pantry: 15 Coloured Cubes
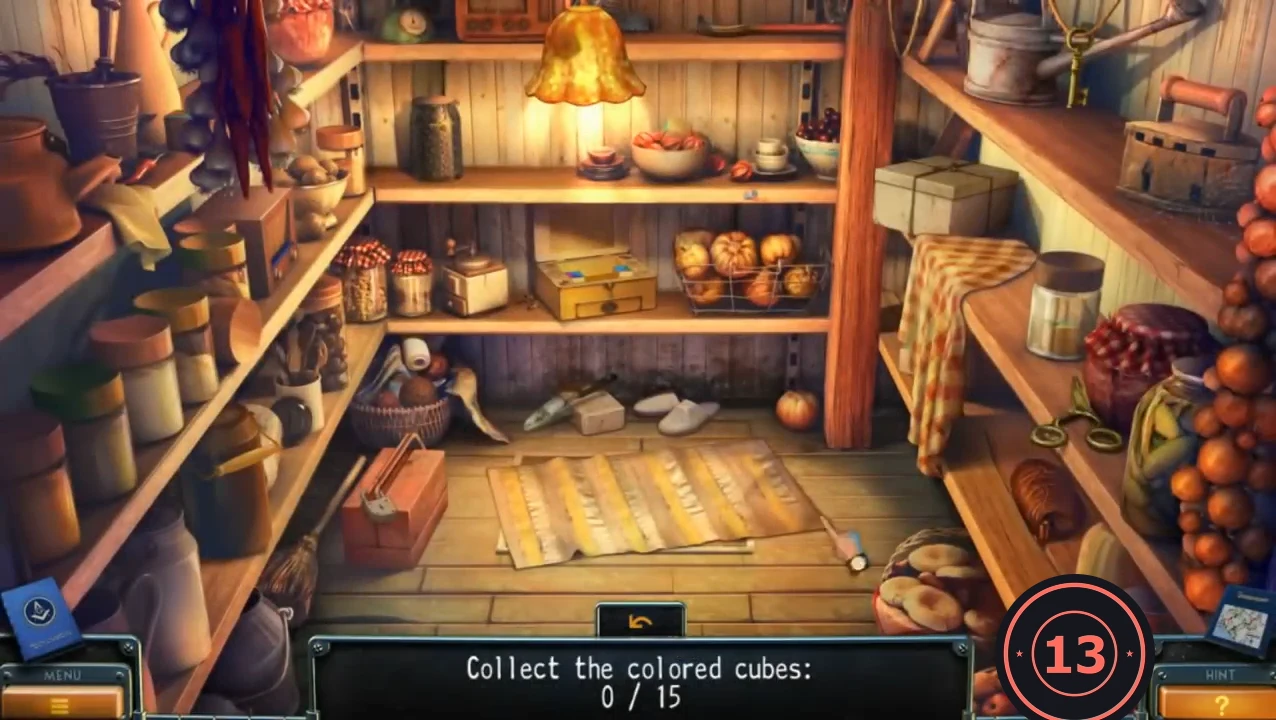
Inside the closet you must 'Collect the colored cubes: 0/15'. The cube counter replaces the inventory bar here; tools you find are dragged from the scene onto other objects.
- Open the bedroom's louvred door with the CELLAR KEY to enter the pantry. The wooden cat box on the left wall needs coloured cubes.
- Cube 1 lies on the floor by the white slippers. Cube 2 is in the fruit bowl on the top shelf right of the lamp.
- Take the HOOKED STICK hanging at the top right by the watering can and use it on the wicker basket on the back-left floor shelf. Cube 3 is behind the yarn ball at the top right of the basket; cube 4 is at the bottom under the sack.
- Cube 5 is in the cardboard box on the upper right shelf (open the flap).
- Roll the rug to the right to reveal a stuck manhole cover. Cut the rope at the top right (by the watering can) with the SCISSORS from the rug; a small KEY drops. Open the red toolbox at the lower left with it and take cube 6.
- Cube 7 is behind the big teal jug on the lower-left shelf. Cube 8 is among the tins on the middle-left shelf (orange tin with a yellow lid). Cube 9: move the jar of dark beans on the top back shelf, left of the lamp.
- On the upper right-wall shelf, slide the checkered tea towel aside for cube 10, then take the lid off the glass jar beside it for cube 11.
- Drag the HOOKED STICK from the top shelf onto the stuck manhole cover to lever it open. Below is a cellar pit with a bucket on a rope and a winch without a crank.
- Click the hanging lamp shade on the top back shelf for cube 12. Drag the CHISEL from the floor by the basket onto the ribbed case on the lower right shelf, then strike it with the MALLET from the floor; take cube 13.
- In the cellar pit, take cube 14 from the dark ledge at the upper left. Take the WINCH CRANK HANDLE from the same ledge, fit it to the winch and raise the bucket; take cube 15 from the bucket.
Cat Box Edge-Matching Puzzle
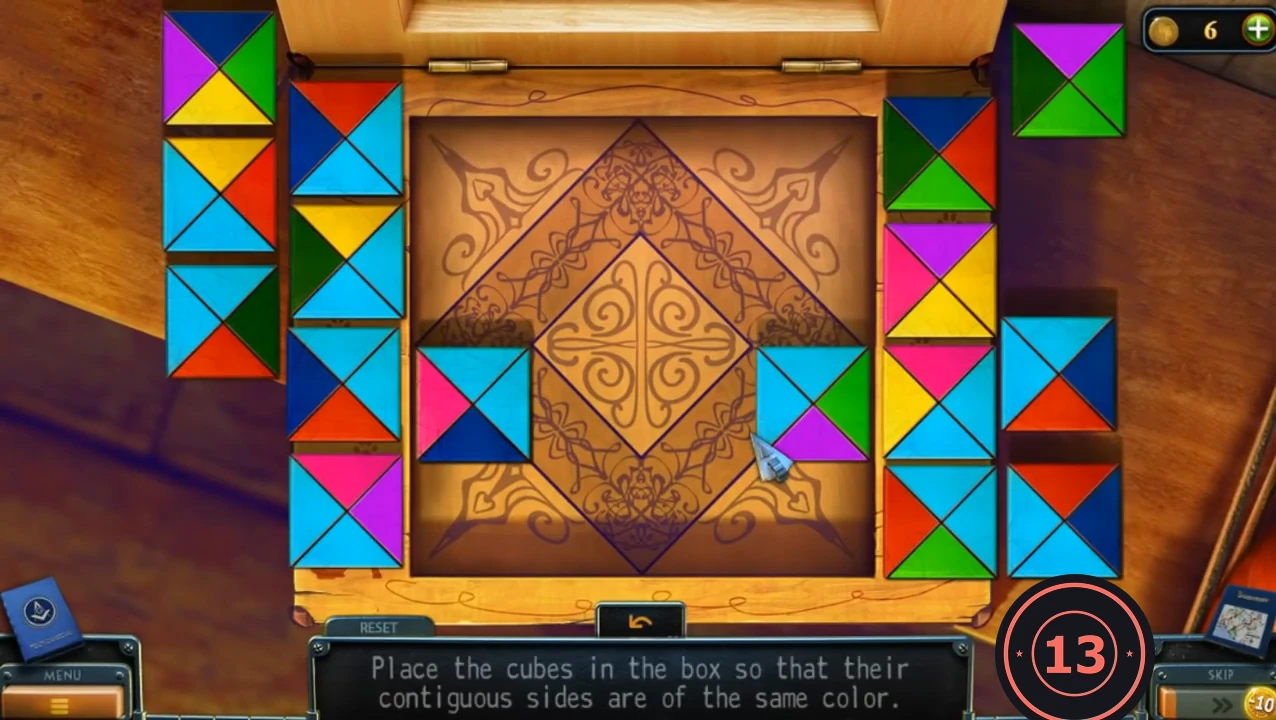
Goal: "Place the cubes in the box so that their contiguous sides are of the same color." Two cubes are already in place; RESET and SKIP are available.
- Zoom into the cat box on the left wall to start the puzzle with all 15 cubes.
- Fill the 4 x 4 box so that every pair of touching triangles has the same colour. The finished picture is a dark-blue and red diamond in the centre on a light-blue field, with coloured corners. Each cube is listed by row (from the top) and column (from the left) as top / right / bottom / left triangle colours. Row 1: C1 purple/yellow/yellow/pink; C2 pink/light blue/light blue/yellow; C3 pink/purple/light blue/light blue; C4 dark blue/green/yellow/purple. Row 2: C1 yellow/light blue/light blue/dark green; C2 light blue/dark blue/red/light blue; C3 light blue/light blue/red/dark blue; C4 yellow/red/light blue/light blue. Row 3: C1 light blue/light blue/dark blue/pink; C2 red/dark blue/light blue/light blue; C3 red/light blue/light blue/dark blue; C4 light blue/green/purple/light blue. Row 4: C1 dark blue/red/green/dark green; C2 light blue/light blue/green/red; C3 light blue/dark green/red/light blue; C4 purple/green/green/dark green.
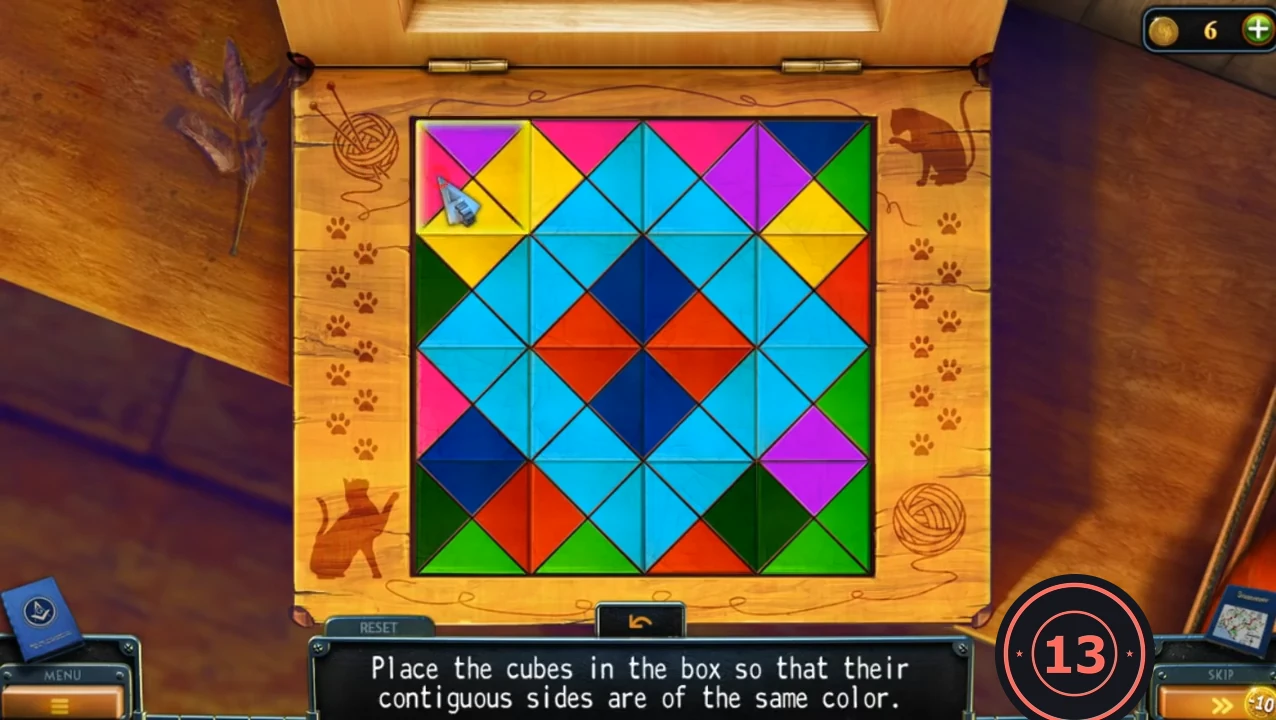
The finished box. Compare it with the cube list in step 2 if a colour edge does not match. - Take the GLASSES from the drawer that opens under the cat box. Go back to the living room and give the GLASSES to the old lady.
Planters, Yarn and Threads
Help the old lady: replant the sprouts and put the balls of yarn and threads back in her wall cupboard. She rewards you with the ADJACENT CORRIDOR KEY.
- In the living room, take SPROUT 6 and 7 and BALLS OF YARN 3 from the planter close-up (right-centre foreground), SPROUT 8 from the floor at the lower left, and BALLS OF YARN 4 by the sofa and coffee table.
- Take the SCOOP (long-handled dustpan) from the floor at the lower left by the big potted plant and place it at the planters.
- Open the small wall cupboard behind the old lady's chair: take the BRUSH from the top shelf. The top shelf is for threads and the lower shelf for balls of yarn.
- Sweep the scattered soil at the planters with the BRUSH. Take the BAG OF SOIL from the floor at the lower left by the potted plant, cut it with the KNIFE and pour it into the empty planter.
- Zoom into the left sofa: take SPROUTS 9 and 10 and BALLS OF YARN 5, then lift the seat cushion for THREADS 4.
- Plant the SPROUTS in the new soil and water them with the WATERING CAN standing by the planters. Take THREADS 5 from the planter close-up.
- Put the BALLS OF YARN on the lower shelf and the THREADS on the top shelf of the wall cupboard. Talk to the old lady: she gives you the ADJACENT CORRIDOR KEY.
Secret Door to Travis' Bedroom
Find the hidden door behind the bedroom wallpaper and follow the brick corridor to Travis' bedroom.
- In the bedroom, use the KNIFE on the bolts inside the elephant cabinet to take the shelf down.
- Cut the wallpaper with the KNIFE to reveal the hidden door and open it with the ADJACENT CORRIDOR KEY.
- In the brick corridor, clear the planks, bottle and sack piled in front of the far door and go through to Travis' bedroom.
Travis' Bedroom and Hallway
Collect the evacuation plan, the CHIP, the CAMERA and the film tank in Travis' bedroom and hallway. The wall sketches of dials here are hints for a safe.
- Zoom into the bed and take the EMERGENCY EVACUATION PLAN, the MANUAL ON PHOTOGRAPHY and a PHOTO.
- Zoom into the blue vase lamp on the bedside table. Pry the button on its side with the KNIFE and take the CHIP.
- Take the CAMERA hanging by the door at the far right. The film can only be taken out in a dark room. Three wall sketches of dials in this room are safe hints.
- Lift the hook latch at the top right of the far-right door and go into the hallway. Take the KEY from the red scarf on the coat rack.
- Cut the tape on the big parcel on the right table with the KNIFE. Take the TANK FOR A PHOTOGRAPHIC FILM and the PHOTO PAPER.
Dark Room Refrigerator
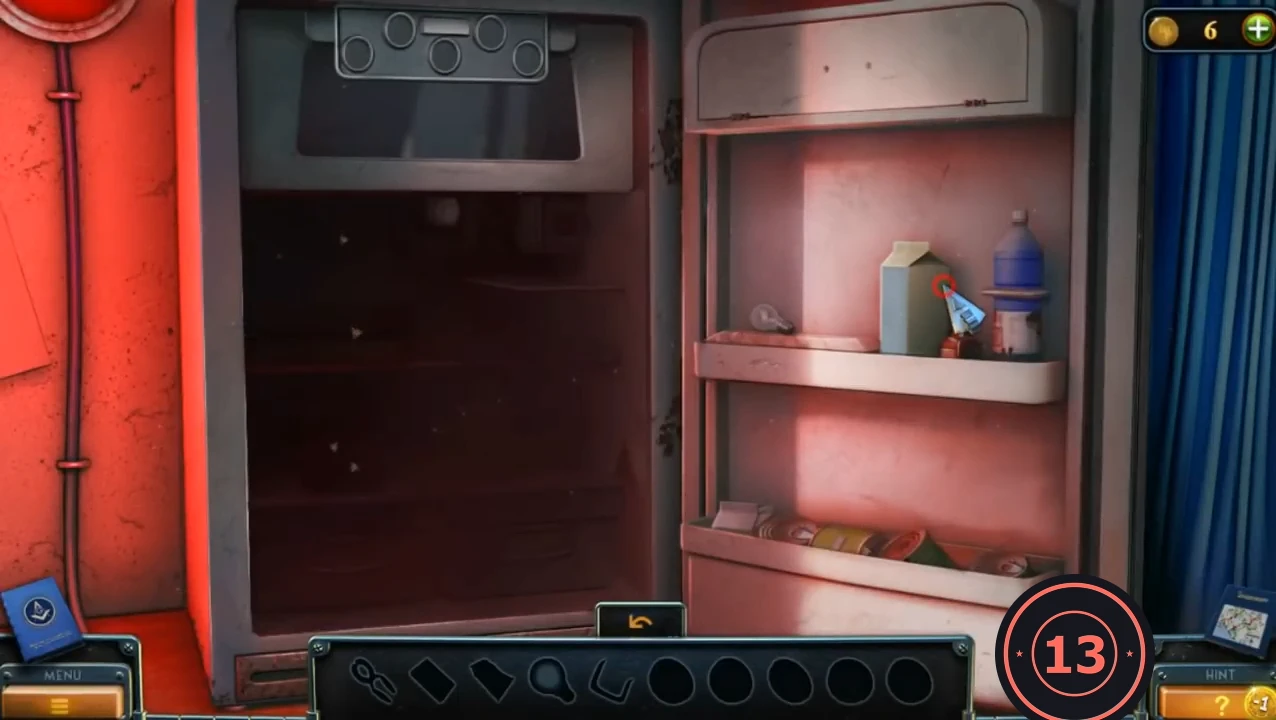
Enter the red-lit dark room from the hallway. The open refrigerator is a separate scene with its own item bar.
- Take the BULB from the upper door shelf left of the milk carton and screw it into the dark upper compartment. Take the triangle BUTTON from the floor of that compartment; the bees in the nest must be driven away.
- Tear the flap of the top cereal box for a PIECE OF CARDBOARD and take the round BUTTON under the box.
- Take the METAL BRACKET from the top of the door's upper compartment lid and fit it as a handle on the white door compartment. Take the MATCHES and the PLIERS.
- Put the PIECE OF CARDBOARD under the bee nest and light it with the MATCHES. When the bees leave, turn the thermostat dial on the right.
- Open the crisper drawer at the lower left. Twist open the red jar with the PLIERS for the star BUTTON. Open the pizza box for another BUTTON and take the last BUTTON from the shelf in front of the boxes.
- Place the five BUTTONS in the freezer panel. Press them by number of corners: CIRCLE, LINE (minus), TRIANGLE, SQUARE, STAR.
- Take the SODIUM SULPHATE SOLUTION and the BENZOL from the freezer.
Travis' Office and the Chip Cabinet
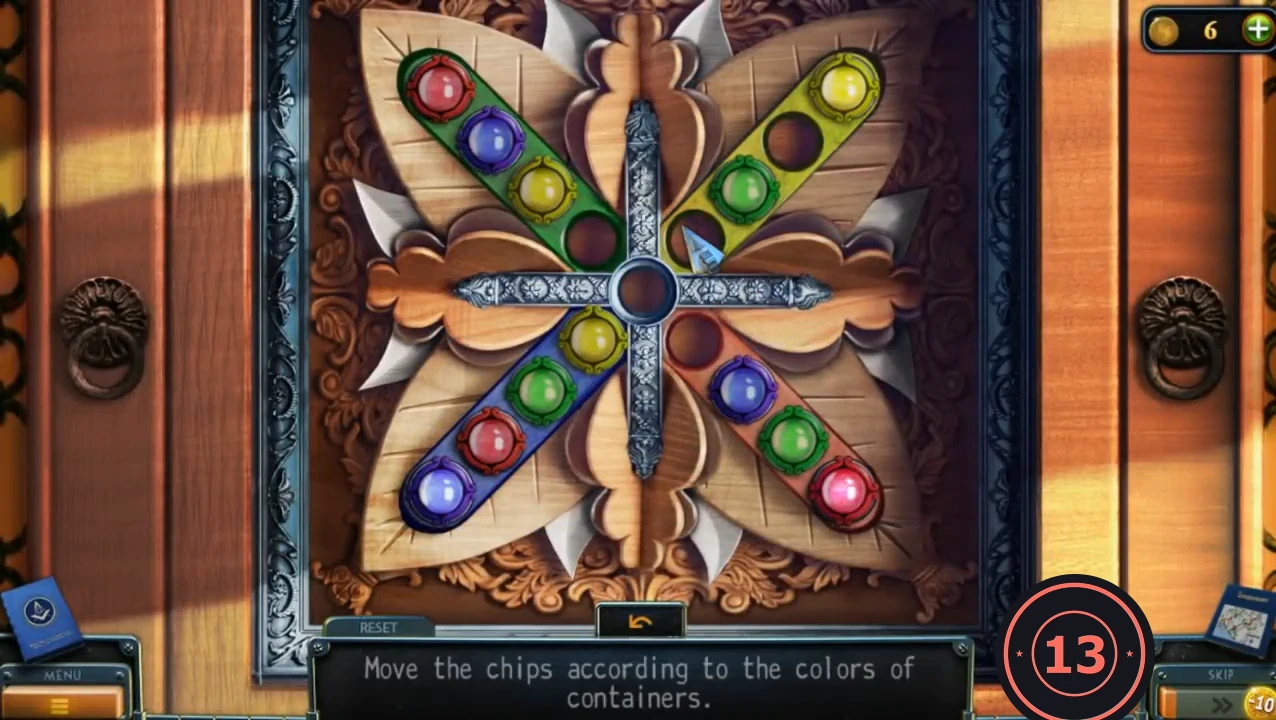
Set up the dark room and the office light table, mix the DEVELOPING SOLUTION and solve the chip board in the bedroom cabinet for the gold KEY.
- In the dark room, place the MANUAL ON PHOTOGRAPHY at the enlarger and the PHOTO PAPER on the counter. Put the TANK FOR A PHOTOGRAPHIC FILM beside the camera close-up.
- Go from Travis' bedroom into his office. On the light table, place the EVACUATION PLAN and the PHOTO. Clear the papers off the cork board on the left wall, take another PHOTO and note the dial drawing behind them. Place this PHOTO on the light table too.
- On the workbench, unscrew the metal flask and pour in the SODIUM SULPHATE SOLUTION and the BENZOL to make DEVELOPING SOLUTION. The safe needs a key.
- In Travis' bedroom, open the cabinet left of the bed with the coat-rack KEY and place the CHIP on the carved board.
- Click a chip to select it, then click an empty hole. The chip travels there along its leaf and through the centre hole, but only through empty holes. Number the holes like this: blue leaf (bottom left) 1 at the outer tip to 4 next to the centre; centre hole 5; red leaf (bottom right) 6 next to the centre to 9 at the tip; yellow leaf (top right) 10 next to the centre to 13 at the tip; green leaf (top left) 14 next to the centre to 17 at the tip. The start is blue 1, red 2, green 3, yellow 4; empty 6, blue 7, green 8, red 9; empty 10, green 11, empty 12, yellow 13; empty 14, yellow 15, blue 16, red 17. Make these moves (from > to): 11>6, 15>12, 4>11, 16>10, 17>4, 6>17, 4>16, 3>15, 2>14, 7>2, 10>3, 8>10, 14>8, 15>4, 16>7, 4>16, 10>15. Every leaf now holds its own three colours and the board slides away.CODE11>6, 15>12, 4>11, 16>10, 17>4, 6>17, 4>16, 3>15, 2>14, 7>2, 10>3, 8>10, 14>8, 15>4, 16>7, 4>16, 10>15
- Take the gold KEY from the shelf behind the board.
Developing the Film
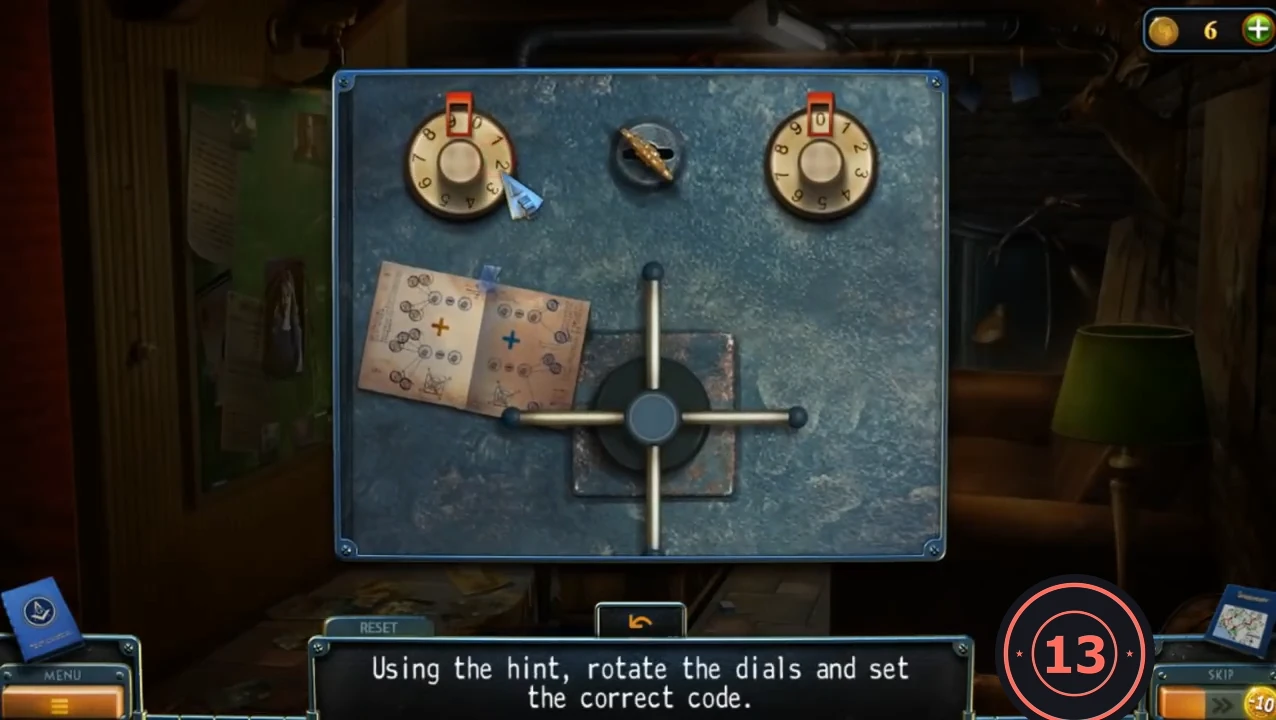
Develop the film from Travis' camera. You need the FIXING SOLUTION from the office safe (code 9 and 5), and the finished photo, laid under the evacuation plan, points to the southern pumping station.
- At the camera in the dark room, place the DEVELOPING SOLUTION, open the camera back and take out the film. Wind the film onto the reel in the tank, close it and pour in the developer.
- Put the tank on the enlarger counter, take the film strip out and insert it into the enlarger head. Cut the PHOTO PAPER packet with the KNIFE so a sheet lies on the baseboard. The tray still needs fixing solution.
- In the office, open the safe with the gold KEY. A hint booklet appears beside the two dials. Turn the LEFT dial until 9 shows in the red window at its top and the RIGHT dial until 5 shows, then turn the cross handle.CODE9-5
- Read Travis' notebook in the safe and take the FIXING SOLUTION.
- Pour the FIXING SOLUTION into the tray, press the enlarger button to expose the paper and lift the sheet into the tray with the TONGS lying right of the tray.
- In the sink, drop the photo into the rinse tray and hang it on the drying line with the tongs. Take the PHOTO.
- Put the developed PHOTO on the office light table and drag the EVACUATION PLAN over it. It matches the southern pumping station.