Institute Yard
Laura arrives at the institute where Travis works. Your task is 'Find Travis' office'. The worker in the yellow hazmat suit cannot be disturbed.
- Zoom into the barrel at the front right of the van: 'This is a barrel of acid.' You will come back to it later.
- Zoom into the round lock on the side of the van: 'I need a key.'
- Open the green biohazard crate in the lower left foreground and take the TIN SNIPS and the CHEMICAL PROTECTION KIT.
- Zoom into the bench on the left, open the lunch box and take the HAM. Laura hears a dog barking and wishes for sleeping pills.
Fountain Square
Pick up the WINDOW HANDLE and the KEY from the wallet in the fountain square. The fountain nozzle and the blocked back alley have to wait for now.
- Go forward to the fountain square. Zoom into the fountain basin: the nozzle cannot be twisted off by hand yet. Take the WINDOW HANDLE lying in the water at the lower left of the basin.
- Zoom into the boards leaning on the left side of the square. Move the boards aside, open the WALLET and take the KEY.
- Take the passage on the left to the back alley. The crates under the rope net block the way to the back yard, and the ladder can only be lowered from above.
Institute Lobby
Enter the building through the door to the right of the fountain.
- Zoom into the small chest of drawers by the fireplace: the top has a figurine-shaped recess. You need a figurine for it.
- Zoom into the reception window and take the PACKING TAPE. Something is flashing under the counter, out of reach.
- Open the red first-aid box on the wall to the right of the reception window and take the SLEEPING PILLS.
- Go up to the window at the top of the staircase. Fit the WINDOW HANDLE, open the window and pull the latch outside to lower the ladder into the back alley.
- Combine the HAM with the SLEEPING PILLS in the inventory to get the HAM WITH SLEEPING PILLS.
Van Lock
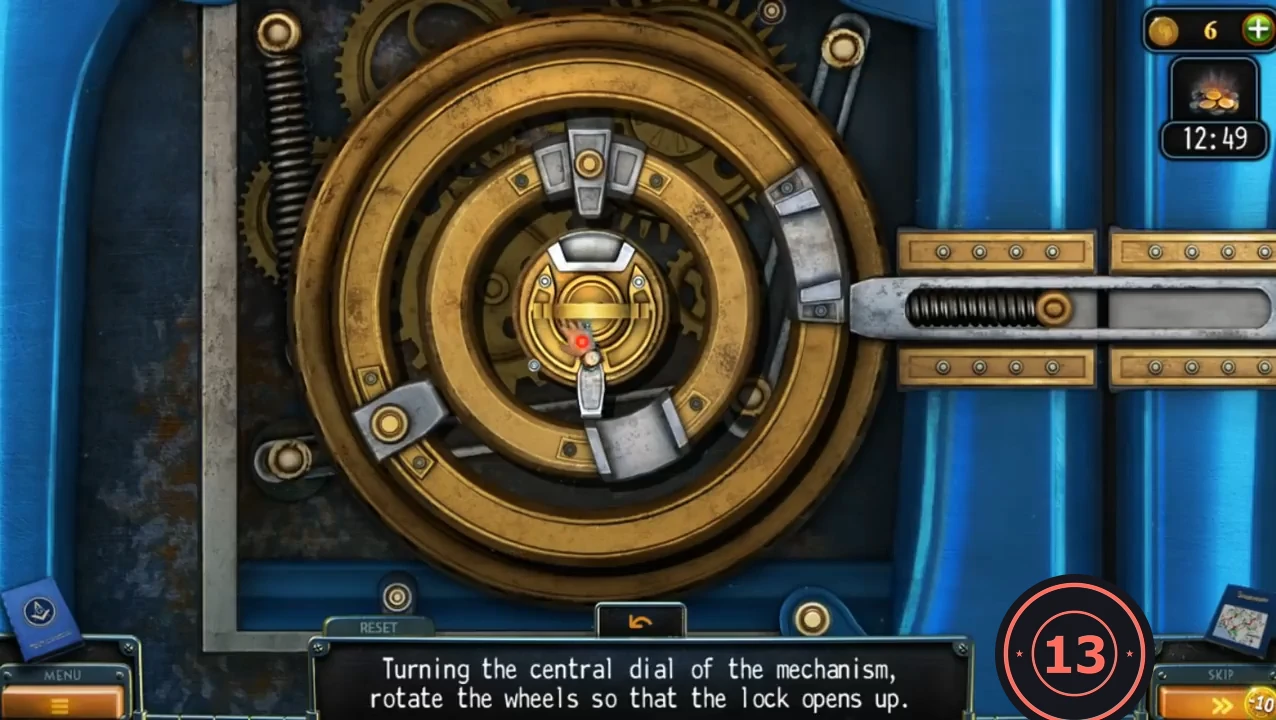
Goal: "Turning the central dial of the mechanism, rotate the wheels so that the lock opens up." You only drag the central dial. Its pointer pushes the middle ring by that ring's catch, and the middle ring's catch can push the outer ring. Each ring has a silver gap block. The lock opens when the outer gap, the middle gap and the dial's U-slot all line up at 3 o'clock in front of the bolt. RESET and SKIP are available.
- Return to the yard and use the KEY from the wallet on the round lock on the side of the van.
- Drag the dial's pointer against the catches to turn the rings. First set the outer ring so its silver gap block sits at 3 o'clock, in front of the bolt. Then turn the middle ring until its gap block also sits at 3 o'clock; approach so that its catch does not drag the outer ring along. Finally turn the dial on its own until its U-shaped slot faces right, with the pointer at 9 o'clock. At that point the catches sit together on the left, around 8 to 10 o'clock, and the bolt slides through the channel.CODEOuter gap at 3 o'clock, middle gap at 3 o'clock, dial slot facing right (pointer at 9 o'clock).
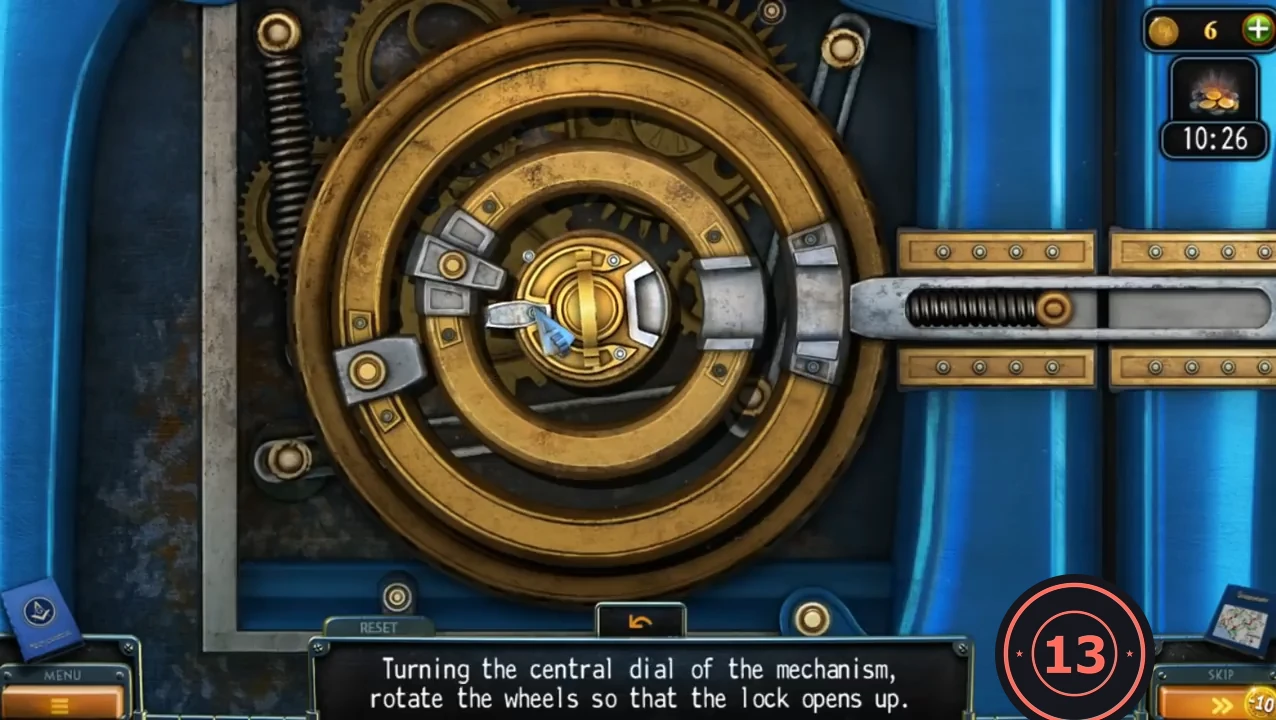
Target state just before the bolt slides: both gap blocks and the U-slot at 3 o'clock, pointer at 9 o'clock, catches together on the left.
Inside the Van
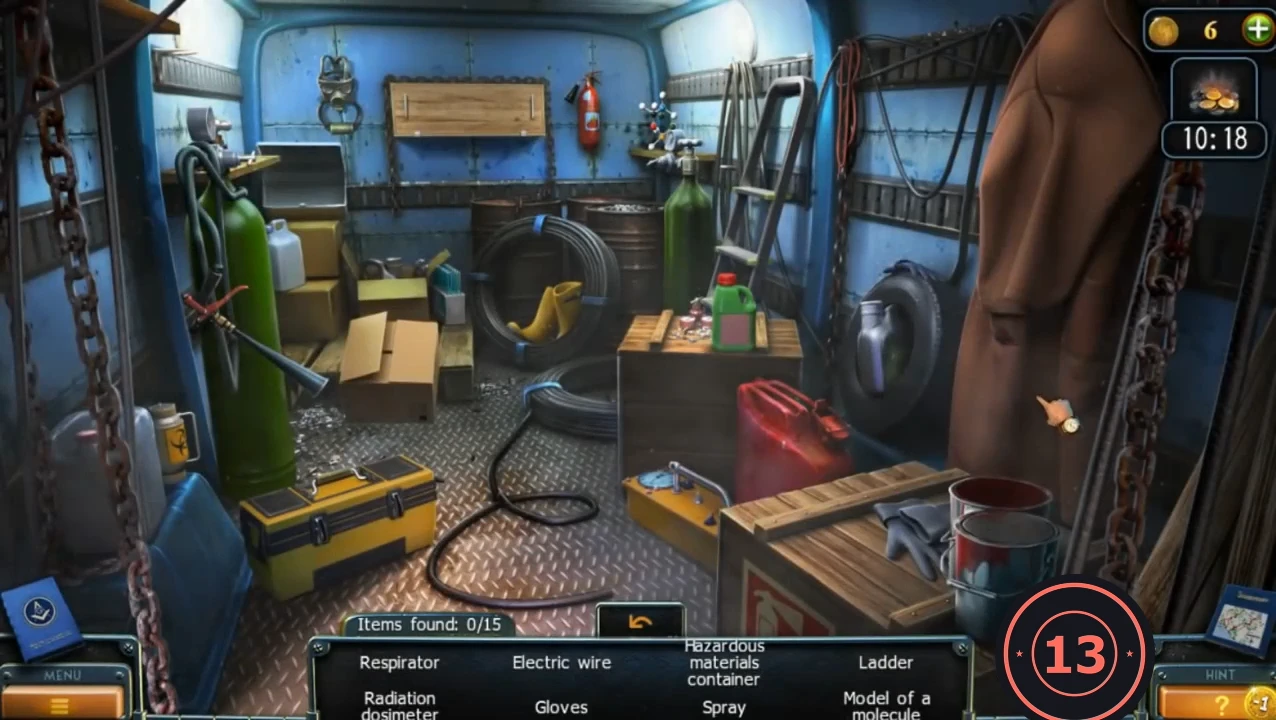
A hidden-object scene inside the van: find 15 items. The list shows eight names at a time and new names appear as you find items. Names in RED need an action first: the Helmet is hidden behind the coat and the Hammer is inside the closed toolbox. The locations below are from the recorded run; finishing a search scene in under two minutes earns the Supersonic achievement.
- Left side: take the SPRAY, the black spray gun with a red handle hanging on the tall green gas cylinder at the left, and the HAZARDOUS MATERIALS CONTAINER, the small yellow canister with a biohazard sign on the floor at the far left by the cylinder base. (Clicking the cylinder knocks it over; no listed item in the recorded run depended on this.)
- Open the containers: click the cardboard box behind the green cylinder to open its flaps, the wooden box on the back wall (top centre) to open its lid, and the yellow toolbox at the lower left to open it. Take the TEST TUBES and the SPRAY CAN from the cardboard box and the HAMMER from the toolbox.
- Back wall and right side: the MODEL OF A MOLECULE sits on the small ledge right of the red fire extinguisher; the LADDER is the small aluminium stepladder leaning against the back wall right of the upright green cylinder; the BOOTS are the yellow rubber boots stuck in the black tyre; the DETERGENT is the green jug with a red cap on the dark table in the middle; the RADIATION DOSIMETER is the small yellow device with a dial on the floor in front of the red petrol can; the GLOVES lie on the wooden crate at the lower right, beside the bucket.
- Click the long brown coat hanging on the right: it drops to the floor and reveals a yellow HELMET (hard hat) in the top-right corner. Take it, then take the ELECTRIC WIRE, the black cable hanging from the hook on the right wall. Finally take the LEVER, the red lever inside the opened wooden box on the back wall, and the RESPIRATOR, the gas mask hanging on the back wall left of that box. The scene ends with the last item and the LEVER goes to your inventory.
Back Alley and the Dog
Lift the crates with the rooftop hoist, cut the gate padlock and put the guard dog to sleep to reach the back yard.
- In the back alley, climb the lowered ladder on the right to the rooftop hoist. Fit the LEVER on the winch.
- Lower the hoist hook, attach it to the net over the crates and crank the winch to lift the crates.
- Cut the padlock on the gate with the TIN SNIPS.
- Throw the HAM WITH SLEEPING PILLS to the dog. When it falls asleep, go through the arch to the back yard.
Back Yard
Collect tools in the back yard, lower the fire-escape ladder and take the HOSE. The green door needs a key card you do not have yet.
- Open the pink toolbox in the left foreground and take the ADJUSTABLE WRENCH. Its lower drawer is locked.
- Zoom into the desk under the porch on the right and take the KNIFE, the POKER and the WOODEN FIGURINE.
- Zoom into the brick wall by the fire escape and take the PIPE CLAMP. Note the hose on the wall.
- Go back to the institute yard. Look in the black bag next to the lunch box on the bench and take the small KEY.
- Open the toolbox's lower drawer in the back yard with the KEY and take the FISHING ROD.
- Use the FISHING ROD on the bracket of the fire-escape ladder to lower it. The green door by the fire escape has a card reader: 'Key card is required there.'
- Cut the hose on the brick wall with the KNIFE to get the HOSE.
Mosaic Square
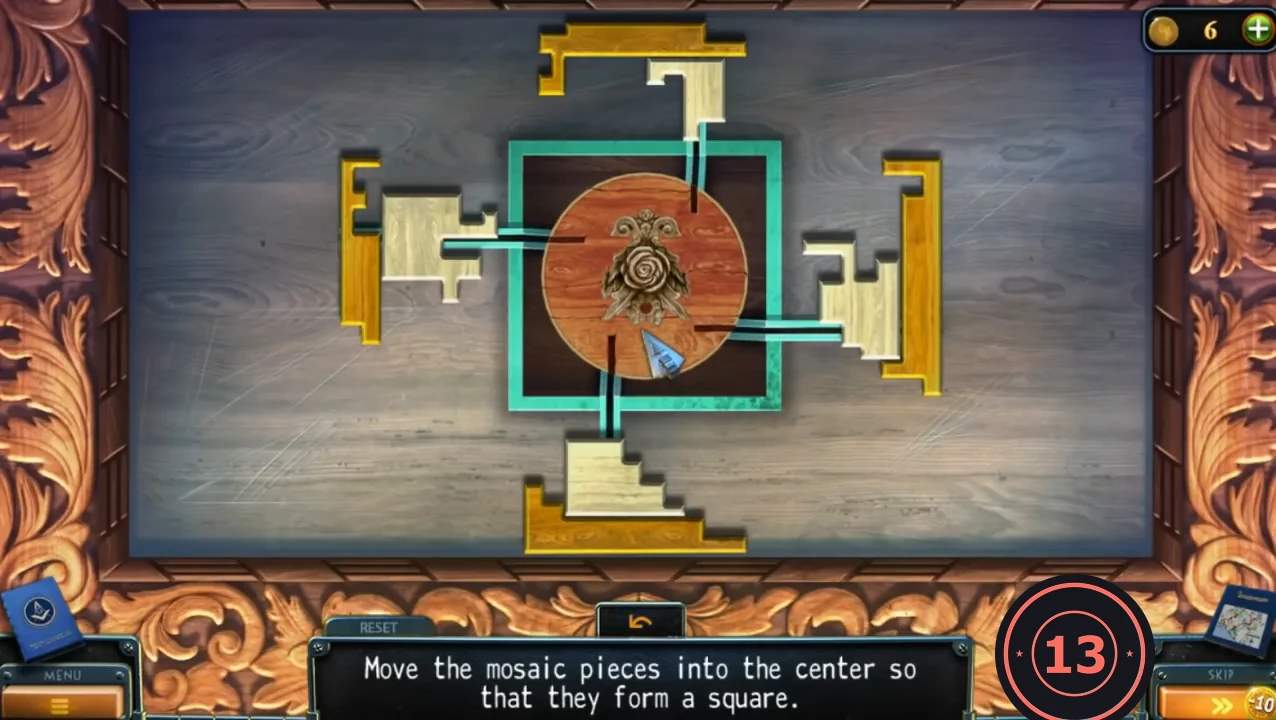
Goal: "Move the mosaic pieces into the center so that they form a square." Clicking a piece slides it along its rail into the central frame. There are four light inner pieces (left, right, top and bottom of the disc) and four gold frame pieces further out on the same sides. Build the light square first, then the gold frame around it.
- Return to the lobby and place the WOODEN FIGURINE in the recess on top of the small chest of drawers.
- Click the four light inner pieces first: left, right, top, then bottom. Together they form a light square over the disc. Then click the four gold frame pieces: top, right, left, then bottom. They wrap around the square as a gold border, and the puzzle glows as it is solved.CODEInner: left, right, top, bottom. Gold frame: top, right, left, bottom.
- Take the GLASS CONTAINER from the open drawer.
Mirror, Acid and the Hidden Button
Build a mirror on a stick to find the hidden door button under the reception counter, then draw ACID from the barrel to get through the counter and reach Travis' office.
- At the fountain, unscrew the NOZZLE with the ADJUSTABLE WRENCH.
- In the yard, break the side mirror off the front of the van with the POKER to get the MIRROR.
- Combine the POKER, the MIRROR and the PACKING TAPE to make the MIRROR ATTACHED TO THE POKER.
- Look under the reception counter with the MIRROR ATTACHED TO THE POKER: a button opens the door, but the counter blocks the way.
- At the acid barrel, place the GLASS CONTAINER, the HOSE, the PIPE CLAMP and the NOZZLE, then put on the CHEMICAL PROTECTION KIT. Attach the hose to the barrel tap, fasten the clamp, set the container under the hose and turn the red crank. Take the ACID.
- Pour the ACID on the reception counter, then push the MIRROR ATTACHED TO THE POKER through and press the button. Go through the opened door to Travis' office.