The Hall of Statues
Look around the hall of statues and pick up the HINT PAPER. Note the basalt door and the bird-skull stone panel; both are opened later.
- Look around the hall. The green flask on the brazier in the centre is too hot to take. Pick up the HINT PAPER at the foot of the brazier: Sun statue with scales, Mars statue with a bow, Moon statue with a book, Jupiter statue with a green branch.
- Note the basalt door at the back (four empty bowls) and the carved bird-skull stone panel ('The key seems to be special').
- MEDALLION 5/10: top-left corner of the hall, on the dark rock wall among the vines.
The Order Room
Block the door, find Melissa and collect the SABRE, the LEAD ARROWHEADS and the BASALT ARROW. The diary in the cell shows four symbols for a later lock.
- Go through the glowing doorway on the left. A woman shouts to block the door: slide the CANE through the door's bolt brackets. Hank finds his sister Melissa. New task: 'Open the door to the basalt hall'.
- Take the SABRE from the bearskin rug in the foreground and the LEAD ARROWHEADS from the wall trophies above the bed.
- The stag head over the fireplace has an arrow in its neck. Knock it down with the SABRE to get the BASALT ARROW.
- MEDALLION 6/10: on the floor at the foot of the bed, just left of the polar-bear rug's head.
- Use the SABRE through the bars of the cell on the left to reach the diary. It shows four symbols (Mars, Jupiter, Sun, Moon); you get the NOTE WITH A HINT.
The Study
Search the study for the IRON BAR, the BASALT BOOK, the INSTRUCTIONS and the KEY from the stone hand, plus bowls for the smelting mould.
- Go through the arch on the right into the study. Open the desk's top-right drawer for an IRON BAR, and the lower drawer for BOWLS 1/3.
- Zoom into the left end of the desk. Take the INSTRUCTIONS (new task 'Find and activate the stone') and the BASALT BOOK. Pry the KEY from the stone hand with the KNIFE.
- The carved cabinet on the right has a round lid with an empty holder ('There was some kind of a sign here'). MEDALLION 7/10: lower left corner of the study, by the floor left of the desk.
- Back in the Order room, take BOWLS 2/3 (yellow bowl on the low table at the lower left). In the study, lift the dark red cloth on the floor, open the leather satchel and take the HAMMER and the ARCHAEOLOGY TROWEL.
Statue Offerings and the Number Grid
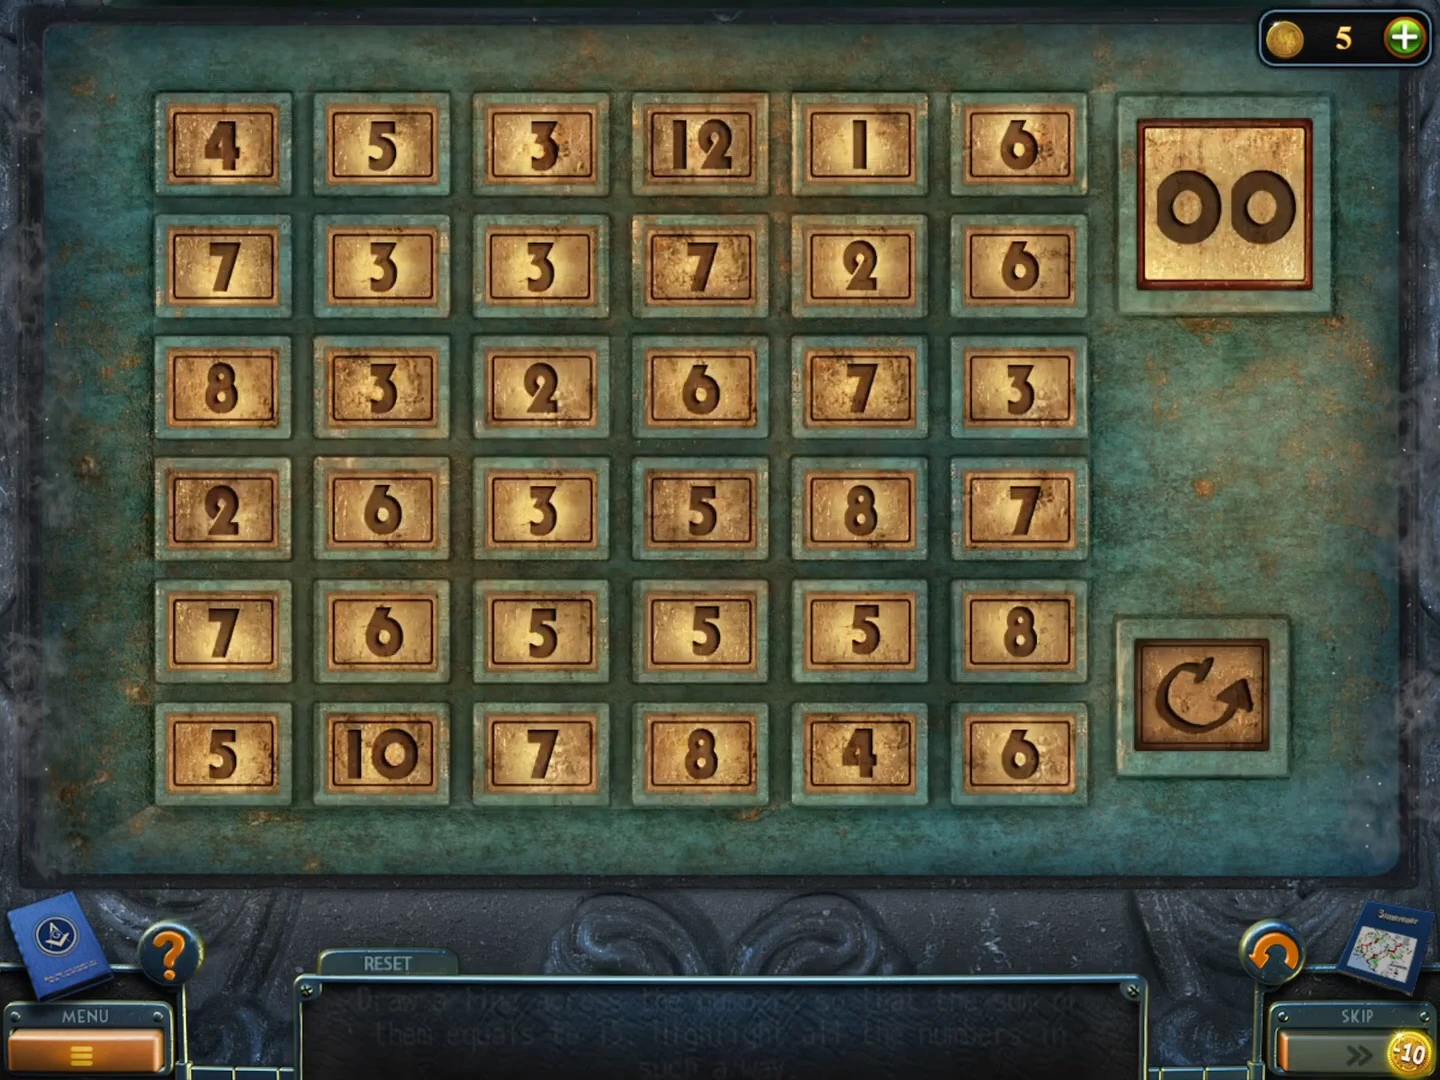
Give two basalt offerings to the statues, then solve the number grid on the bird-skull panel by grouping tiles that add up to 15.
- In the hall of statues, put the BASALT BOOK into the open hands of the robed statue at the left front, beside the glowing doorway.
- Put the BASALT ARROW onto the bow of the archer statue at the back right.
- Insert the KEY from the stone hand into the carved bird-skull stone panel. A number grid appears: select connected tiles that add up to exactly 15; each group locks green.
- Grid (row 1 = top): 4 5 3 12 1 6 / 7 3 3 7 2 6 / 8 3 2 6 7 3 / 2 6 3 5 8 7 / 7 6 5 5 5 8 / 5 10 7 8 4 6. Groups (row, column): R6C1+R6C2; R5C2+R5C1+R4C1; R2C1+R3C1; R1C1+R1C2+R1C3+R2C3; R2C2+R3C2+R4C2+R4C3; R3C3+R3C4+R2C4; R1C4+R1C5+R2C5; R1C6+R2C6+R3C6; R3C5+R4C5; R4C4+R5C3+R5C4; R6C3+R6C4; R6C5+R6C6+R5C5; R4C6+R5C6.
The Treasure Cave
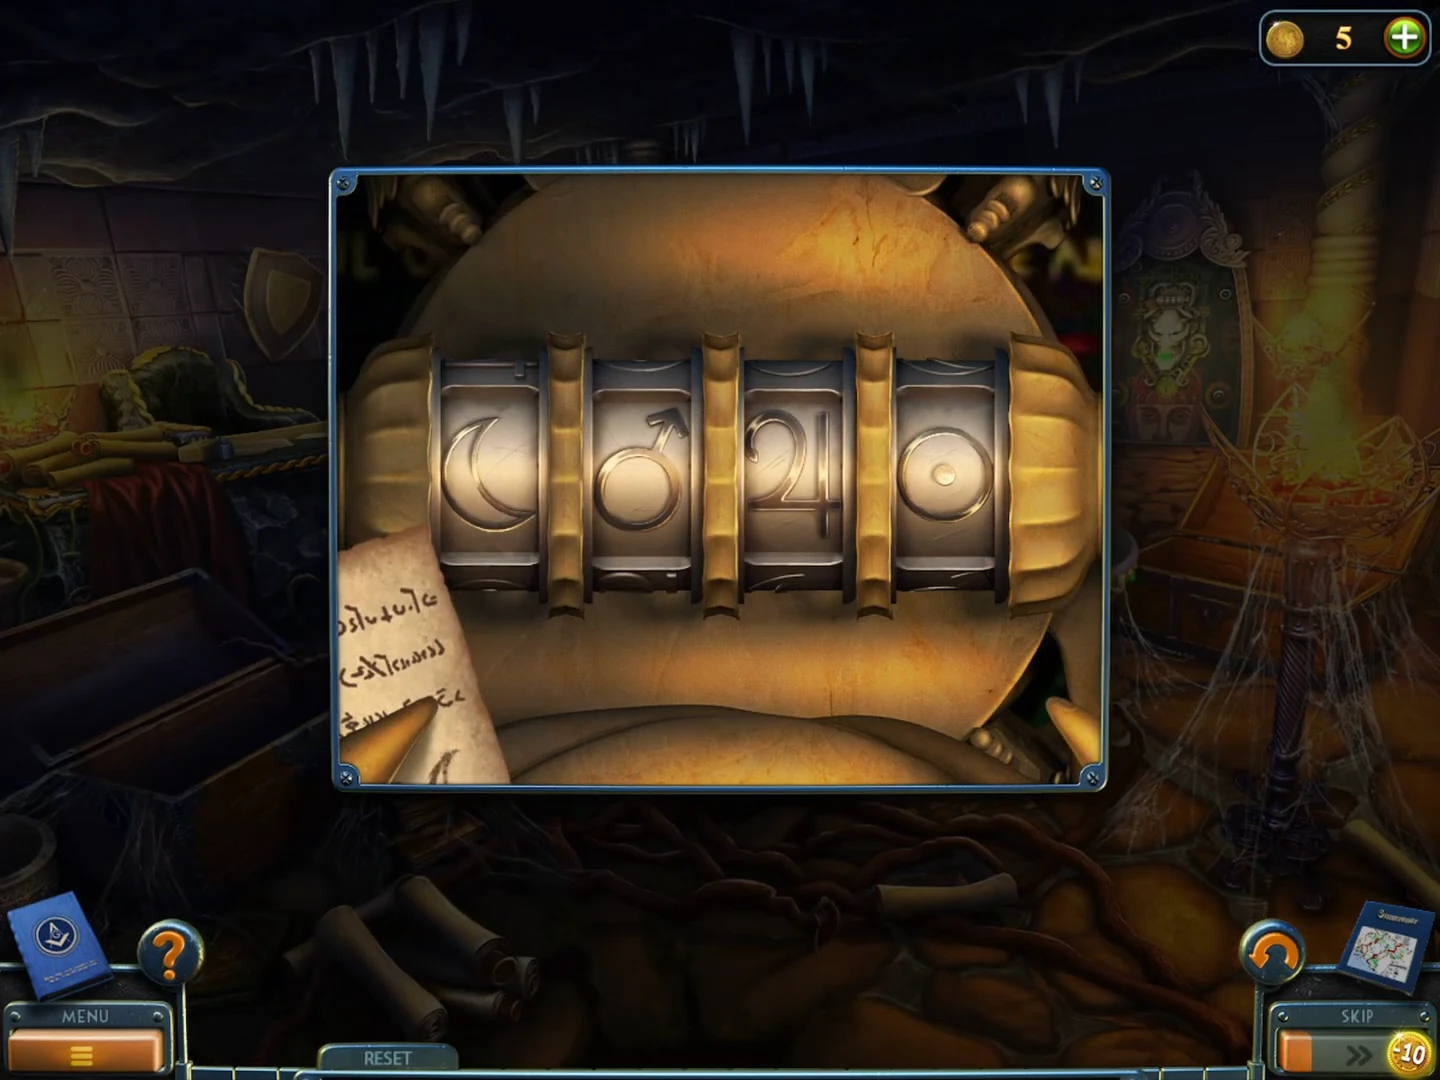
Collect coins, a gem and smelting supplies in the treasure cave, get LIQUID FIRE and open the skull mechanism with the four symbols from the diary.
- Enter the treasure cave. Take the GOLDEN COINS from the big ornate bowl in the centre. MEDALLION 8/10: lower left, near the open chest.
- Zoom into the green gems on the rim of the big bowl. The HAMMER alone will not work: first place the ARCHAEOLOGY TROWEL against a gem, then strike the trowel with the HAMMER to knock out the AZURMALACHITE.
- On the workbench by the left wall take the BASALT SCALES, the HINT FOR METAL SMELTING and the SULFUR. Take the PINCERS from the rock next to the big bowl. The smelting furnace needs more bowls.
- In the hall of statues, put the BASALT SCALES into the open hand of the robed statue (the Sun statue). Use the PINCERS on the hot green flask on the brazier to get the FLASK WITH LIQUID FIRE.
- Pour the LIQUID FIRE into the mouth of the green skull mechanism on the treasure cave's right wall. Set the four symbol dials to MARS, JUPITER, SUN, MOON (the diary order; Jupiter looks like a 4).CODEMars - Jupiter - Sun - Moon
The Alchemy Lab
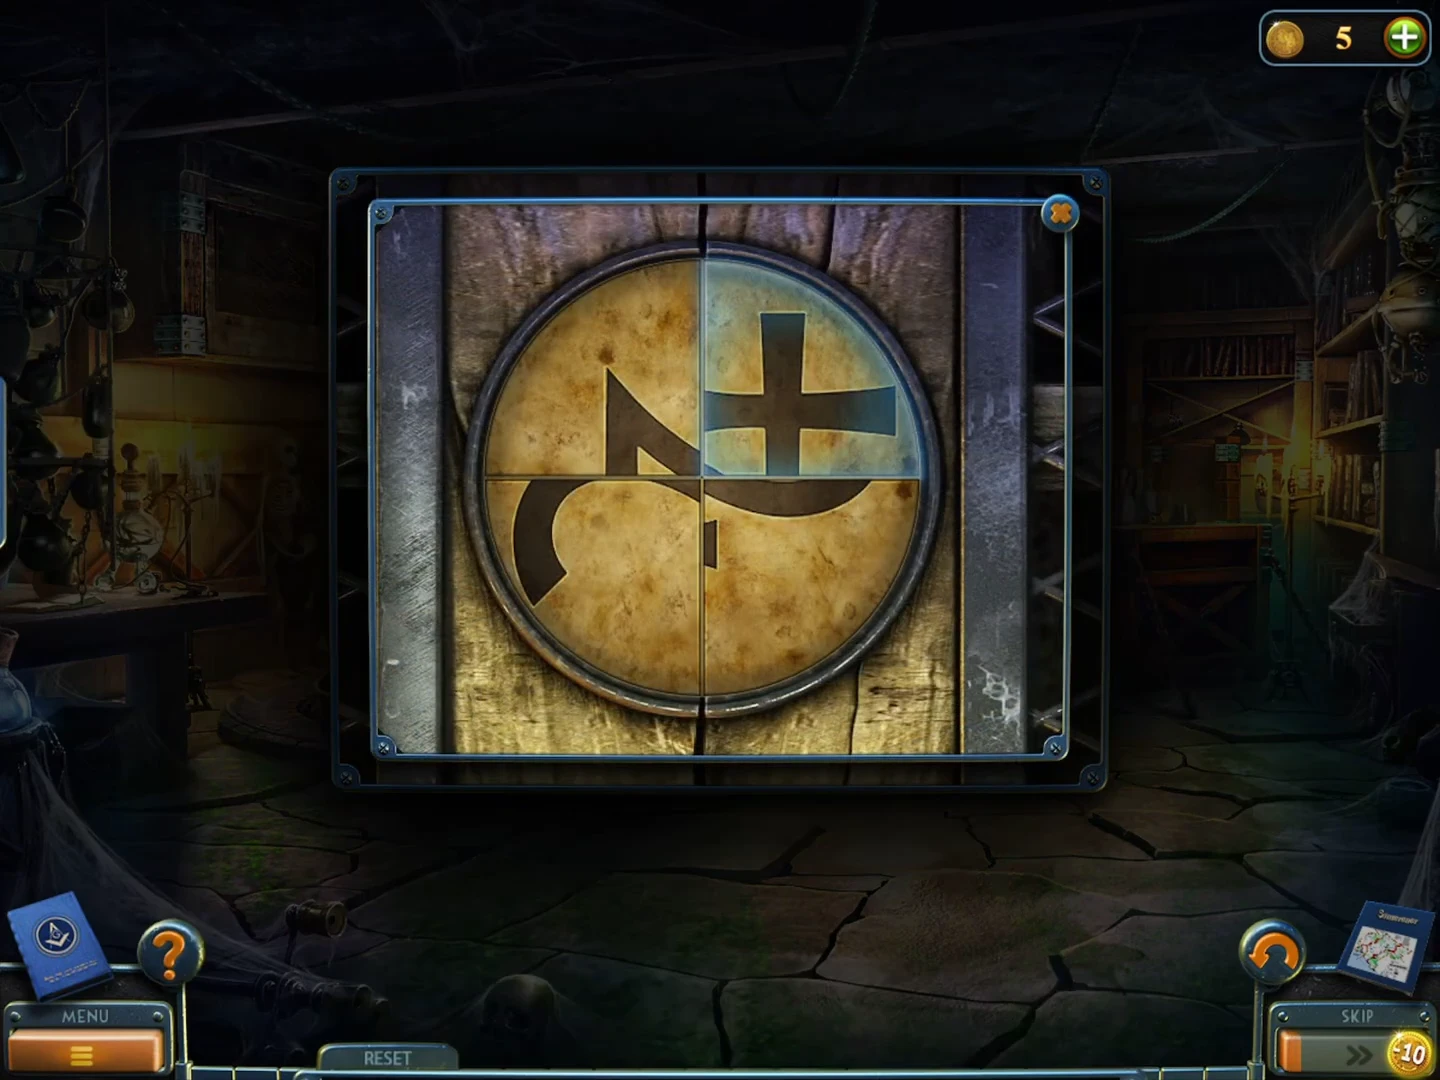
Open the cabinet latch and read the apparatus instructions. The search of the lab shelves follows in the next section.
- On the right-hand workbench take the TABLET WITH A SCHEME, the SILVER SPOON and the BASALT SCROLL. MEDALLION 9/10: on the front of that workbench, lower right.
- Zoom into the wire-mesh cabinet at the upper left; its round latch is a quarter-tile puzzle.
- The round latch is cut into four quarters, each carrying part of a symbol. Click one quarter (it glows blue), then click another to swap them; a quarter that changes position also turns to match its new place. From the starting position make four swaps: top left with top right; bottom left with top right; top left with bottom right; and top left with top right again. The pieces now form the Jupiter symbol (a figure like a 2 joined to a cross at the lower right) and the latch glows. If your quarters start differently, keep swapping until the curved hook sits across the top and the cross sits at the lower right. Open the cabinet and take the COPPER POWDER and the small blue bottle of ARSENIC.
- Read the INSTRUCTIONS at the tiered apparatus. Left bowls (top to bottom): Lead, Arsenic, Oak bark. Right bowls: Sulfur, Copper, Grape alcohol. Gemstone socket: oval on the top tier. Put the SULFUR in the upper right bowl, COPPER POWDER in the middle right and ARSENIC in the middle left.
Alchemy Lab Shelves
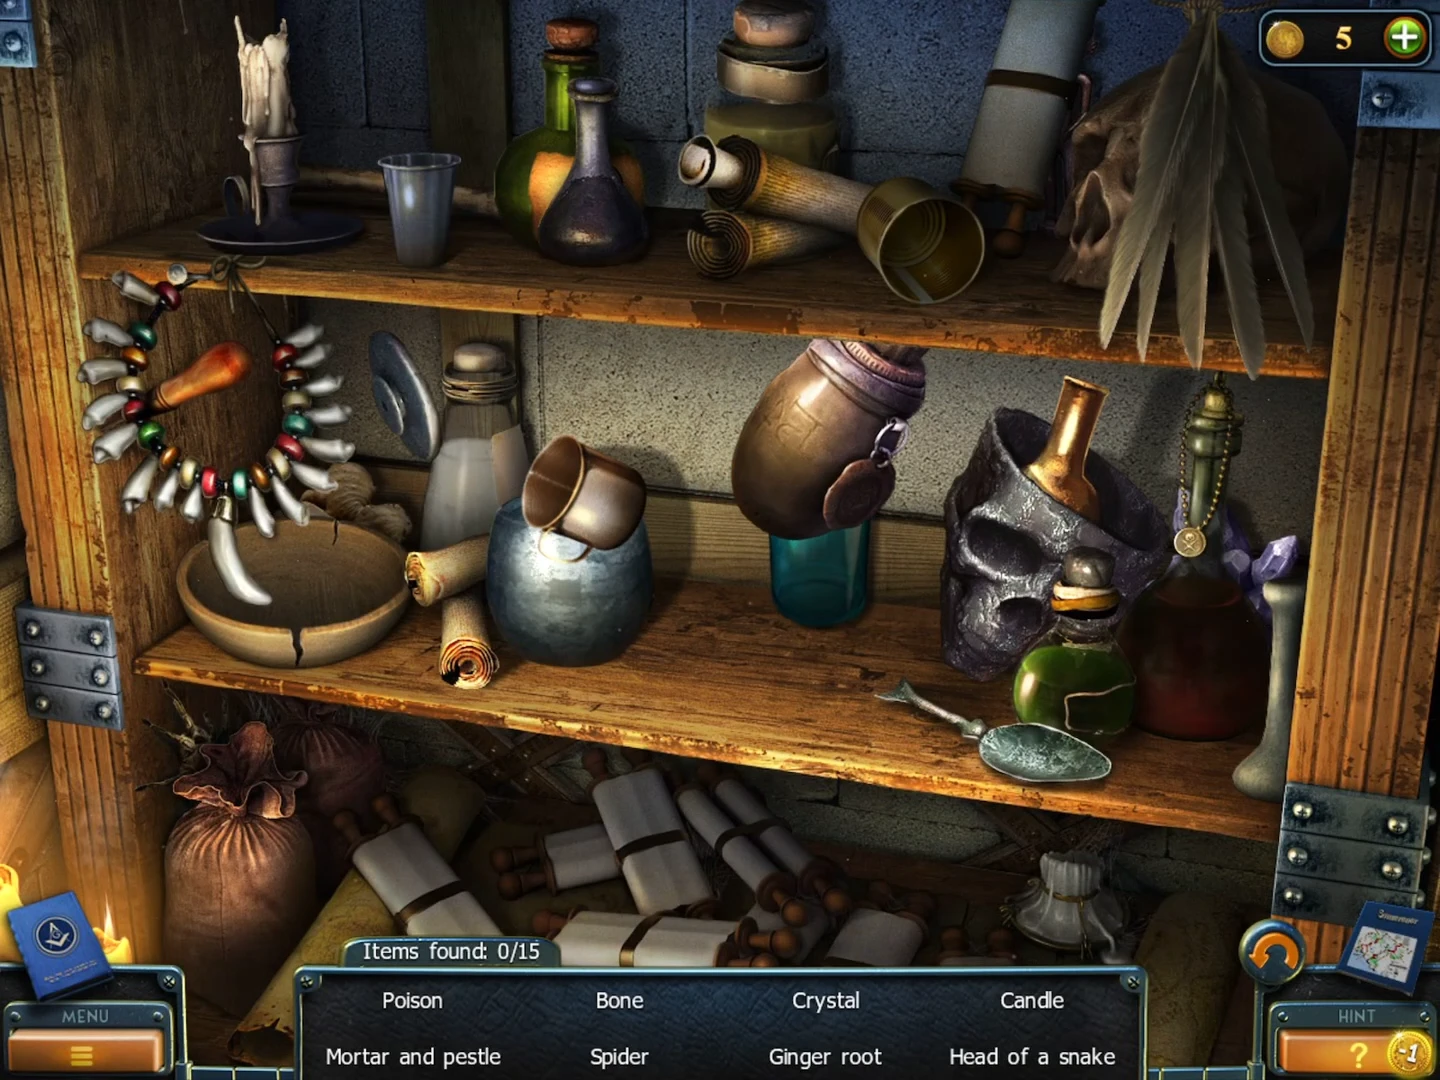
A hidden-object scene on the lab shelves: find the 15 items in the list. Some need a small action first, such as lifting a pot or using a found awl. The reward is the BASALT SKULL, which the bonus chapter needs later.
- Open the hidden-object shelves in the lab and collect all 15 items. Lift the tin pot for the BLUE MUSHROOM; move the black jar for the POISON; take the CANDLE, BONE, HEAD OF A SNAKE and FIGURINE OF A MAN from the top shelf; take the tooth NECKLACE from the left post (it reveals an awl); MEASURING SPOON; take the silver skull (it stays in your inventory as the BASALT SKULL) and the CRYSTAL behind it; put the pestle into the wooden bowl for the MORTAR AND PESTLE; GINGER ROOT behind it; RAVEN FEATHERS; use the awl on the skull's eye for the RUBY; SPIDER on the sack.
The Planet Cabinet and the Gemstone
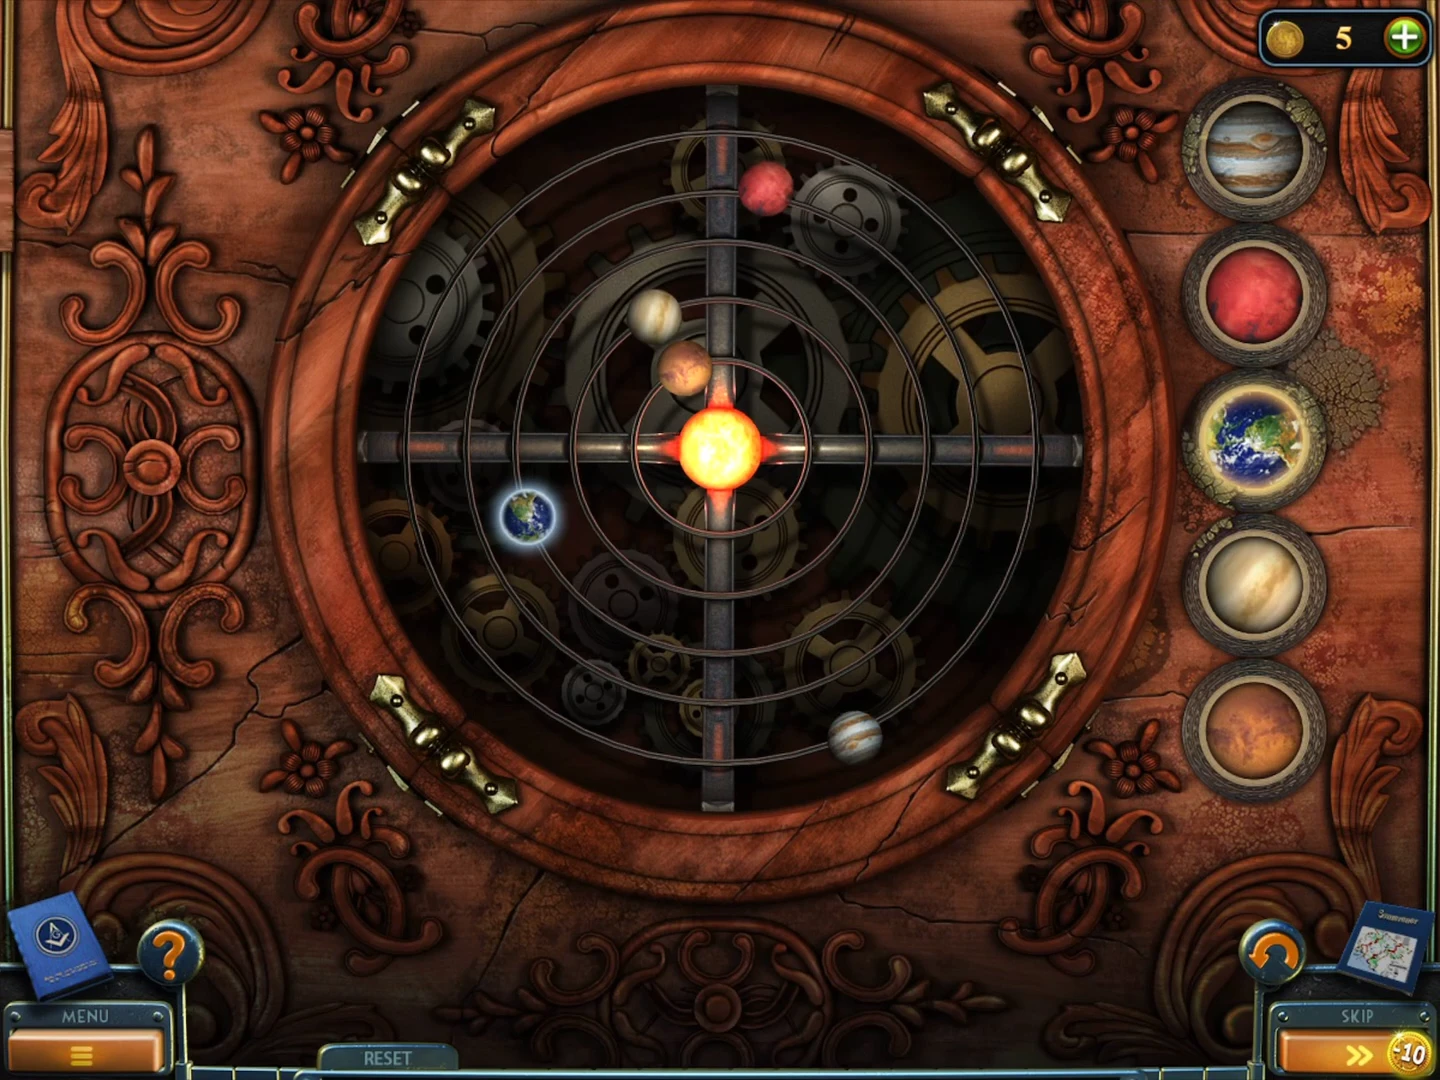
Finish the statue offerings and line up the planets in the study cabinet to win the GEMSTONE for the alchemy apparatus.
- In the hall of statues, put the BASALT SKULL into the raised hand of the bird-headed statue and the BASALT SCROLL into the robed statue holding the scales. Their eyes glow red.
- In the study, put the TABLET WITH A SCHEME into the holder on the planet cabinet's lid. A solar-system puzzle starts: line up all planets with the Sun toward the upper right, as on the tablet.
- Click a planet button on the right to select that planet (it gets a glowing ring in the window), then drag the planet around its orbit. Every planet on an inner orbit turns with it, faster; planets on outer orbits stay put. So work from the outside in. Select Jupiter (top button) and drag it to the upper right, on the diagonal between the top and right arms of the cross (half past one). Select Mars (second button) and drag it onto the same diagonal, then Earth (third button). Do the same with Venus and then Mercury (fourth and fifth buttons) if either is still off the line. When all five planets form one straight line from the Sun to the upper right, as on the tablet, the planets glow and the cabinet opens. Take the GEMSTONE.
- At the apparatus in the alchemy lab, put the GEMSTONE into the oval socket on the top tier, the OAK BARK into the lower left bowl and the LEAD ARROWHEADS into the upper left bowl. Only the grape alcohol is missing.
The Shop Basement
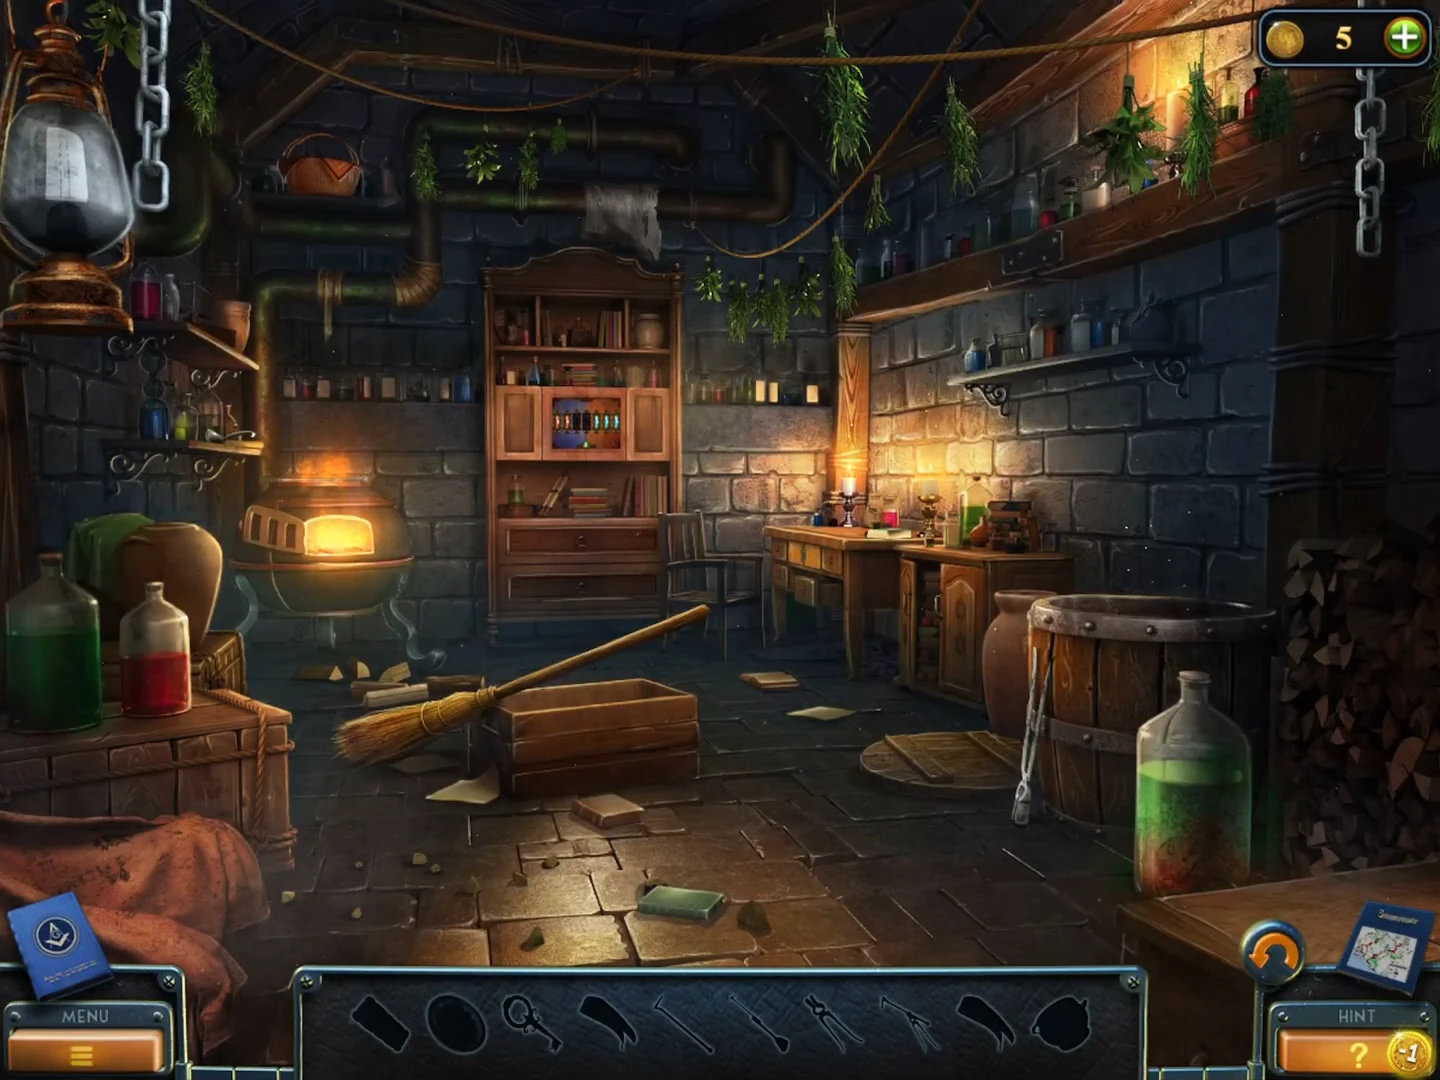
Get the shop key, then search the basement. Here the inventory bar is replaced by a silhouette list of the items you can find and use in this room.
- Use the map to travel to the occult shop. Give the AZURMALACHITE to the shopkeeper in exchange for a KEY.
- In the back room open the hanging wire-mesh cabinet with the KEY: take BOWLS 3/3 and the TIN STATUETTE. Go down through the floor opening beside the standing mirror.
- On the right-hand desk take the red PIN beside the scissors. Take the KEY from the crate under the broom and open the desk drawer with it, then cut the cloth with the scissors to get a STRIP OF FABRIC.
- Take the TONGS from the rim of the water barrel. Lift the poker out of the furnace with the TONGS, then cool the HOT POKER in the water barrel to get a POKER.
Basement Chip Panel and the Grape Alcohol
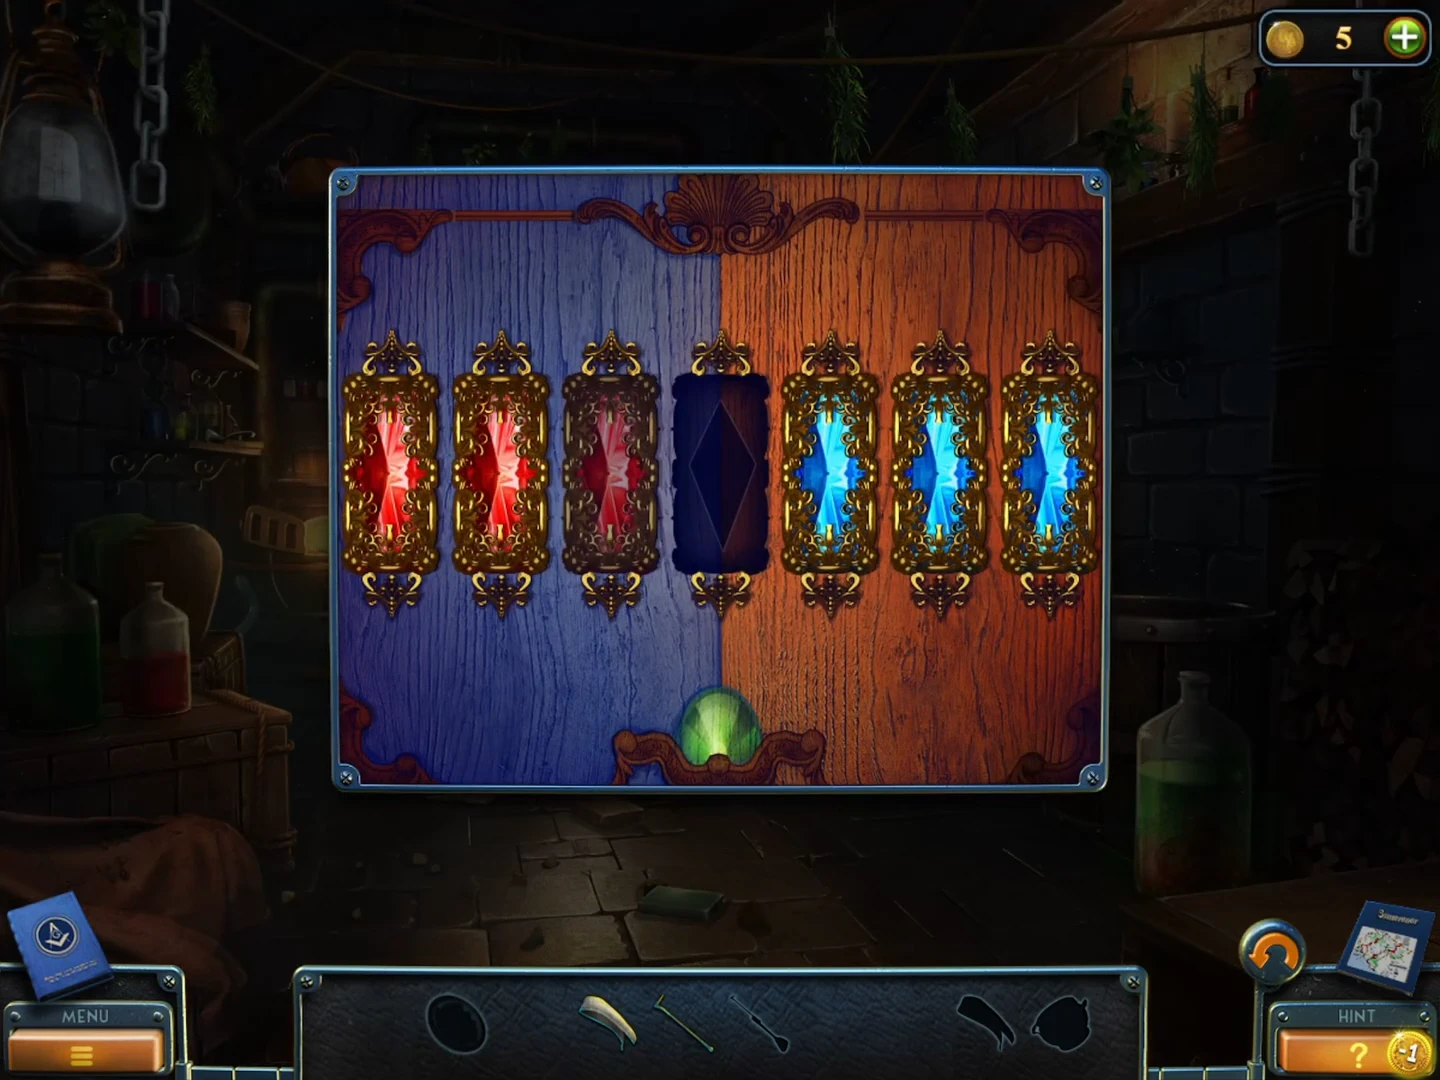
The coloured tile panel at the back of the basement is a swap puzzle: the three red and three blue chips must change sides. The opened panel holds the ADHESIVE GRANULES you need to make glue, build a long broom and reach the GRAPE ALCOHOL.
- Insert the PIN into the coloured tile panel at the back of the basement. Swap the chips: click a chip to slide it into the next empty slot or jump it over one chip. Starting from R R R _ B B B, click slots 3, 5, 6, 4, 2, 1, 3, 5, 7, 6, 4, 2, 3, 5, 4 (counting from the left).CODE3-5-6-4-2-1-3-5-7-6-4-2-3-5-4
- Take the ADHESIVE GRANULES from the hidden shelf and the LARGE POT WITH WATER floating in the barrel. Put the pot on the furnace, add the granules, stir with the ladle and dip the STRIP OF FABRIC to get a STRIP OF FABRIC WITH GLUE.
- Lay the POKER along the broom in the crate and bind them with the STRIP OF FABRIC WITH GLUE. Use the extended broom on the high ceiling spot at the upper left to bring down the GRAPE ALCOHOL.
The Red Stone and the Basalt Door
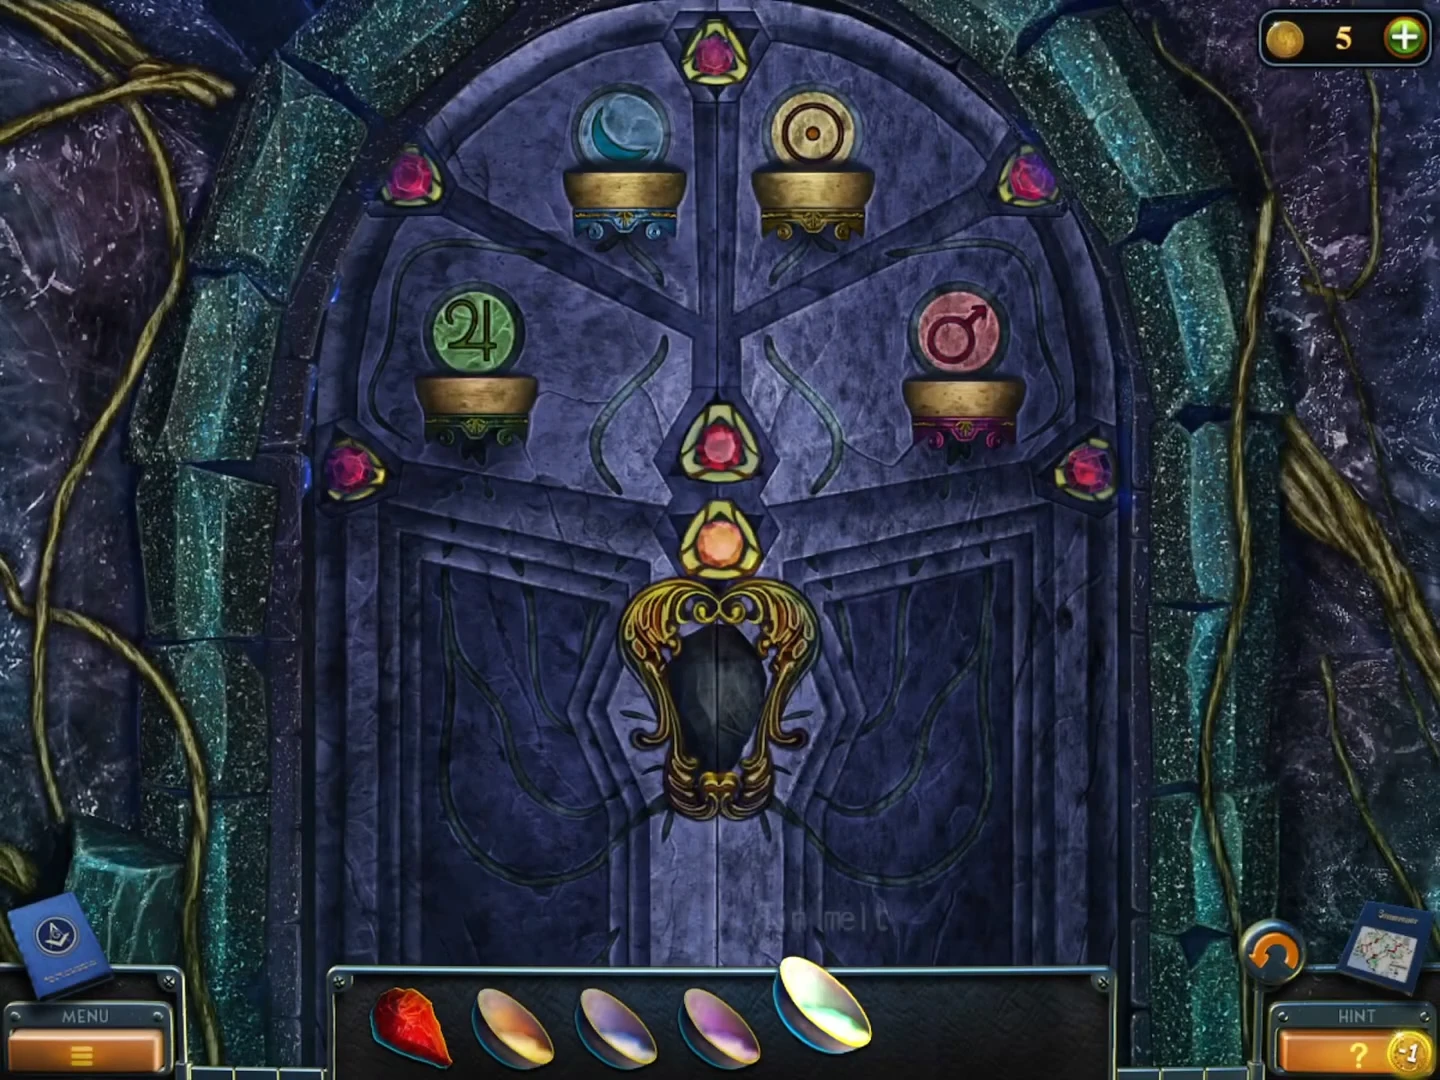
Make the RED STONE, melt four metals in the treasure cave and fill the basalt door's bowls by their planet symbols.
- At the apparatus, put the GRAPE ALCOHOL into the lower right bowl and pour the LIQUID FIRE into the top. Take the glowing RED STONE.
- At the smelting furnace in the treasure cave, put the three BOWLS into the hollows of the stone mould.
- Following the HINT FOR METAL SMELTING, melt each metal: put it in the crucible and pour LIQUID FIRE on it, then take the melt from the mould. GOLDEN COINS give GOLD MELT, SILVER SPOON gives SILVER MELT, IRON BAR gives IRON MELT and TIN STATUETTE gives TIN MELT.
- At the basalt door pour TIN MELT into the Jupiter bowl (left), IRON MELT into Mars (right), SILVER MELT into Moon (top left) and GOLD MELT into Sun (top right). Put the RED STONE into the centre socket.CODEJupiter=tin, Mars=iron, Moon=silver, Sun=gold
The Crystal Cave Chest
Find the last medallion piece, join THREE medallion pieces into one MEDALLION, pick up the final collectible and open the crystal cave chest to end the bonus chapter.
- Lift the cloak of the skeleton on the steps to take the PART OF A MEDALLION. In the scene that follows, Melissa sees that it matches her medallion and Hank's: the THREE medallions are parts of one whole, and she suggests connecting them. The pieces are kept together in your inventory as PART OF A MEDALLION.
- MEDALLION 10/10: on the dark rock at the left edge of the crystal cave, halfway up, below the green crystal. This completes the set and earns the Collector achievement.
- The three pieces then fit together in the inventory assembly view and become the MEDALLION (in the recording this happens right after the collectible above). Put the MEDALLION into the round lock on the front of the chest to open it and watch the final scene.