Travis' Office
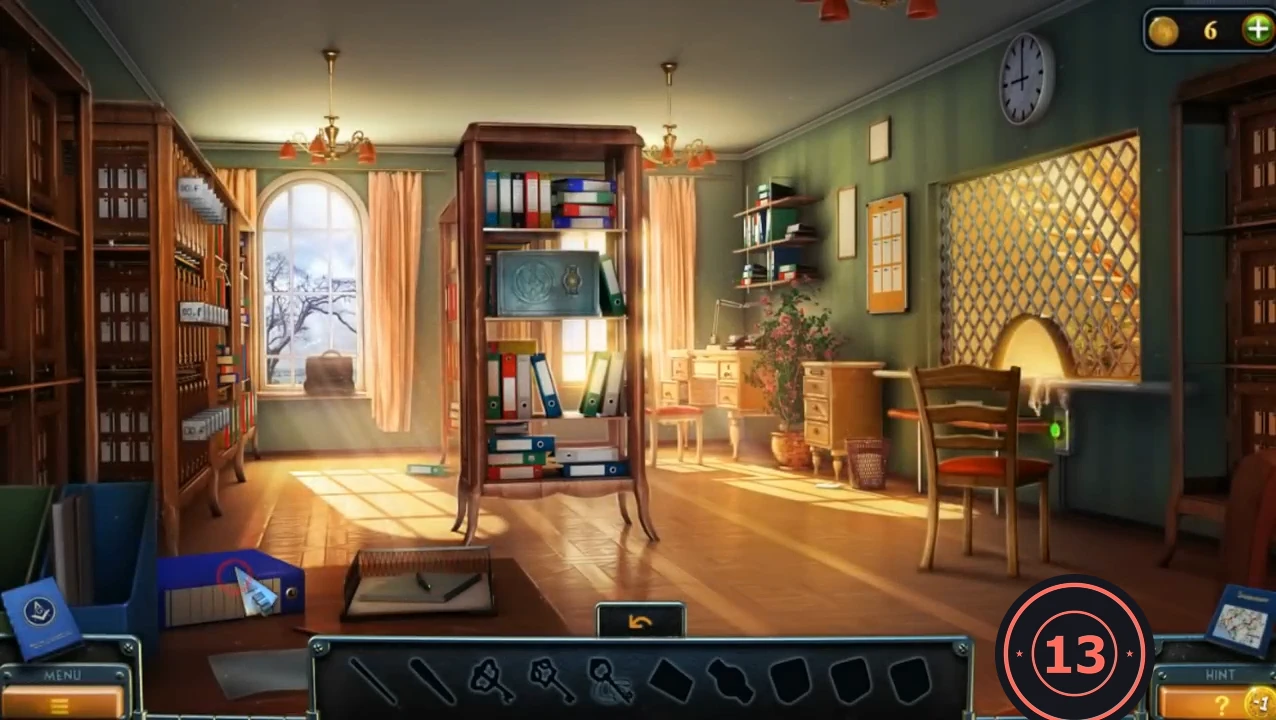
The office is an interactive search scene: the item bar shows silhouettes of the objects you can find here. The key-card cabinet in the centre needs the right slot; the keypad panel is missing three buttons.
- Zoom into the desk on the right and take the gold SAFE KEY and the SPONGE WITH INK.
- Zoom into the desk drawer with four numbered buttons and take the RULER from the top.
- Zoom into the small chest of drawers on the left. Take the PAPER KNIFE lying on top. The upper drawer is jammed.
- Open the paper box on the desk with the PAPER KNIFE and take the BUTTON. Place it in the empty slot of the keypad panel.
- Open the doctor's bag on the left window sill with the SAFE KEY and take the BUTTON.
- Rub the SPONGE WITH INK on the window glass above the bag to reveal the numbers 2143.
- On the desk drawer press buttons 2, 1, 4, 3. Take KEY 1 from the drawer.CODE2-1-4-3
- Push the RULER into the gap of the jammed upper drawer of the small chest. Take the NOTEBOOK and BUTTON 5. The notebook says the universal access card is 01_f_20.
Keypad Sums
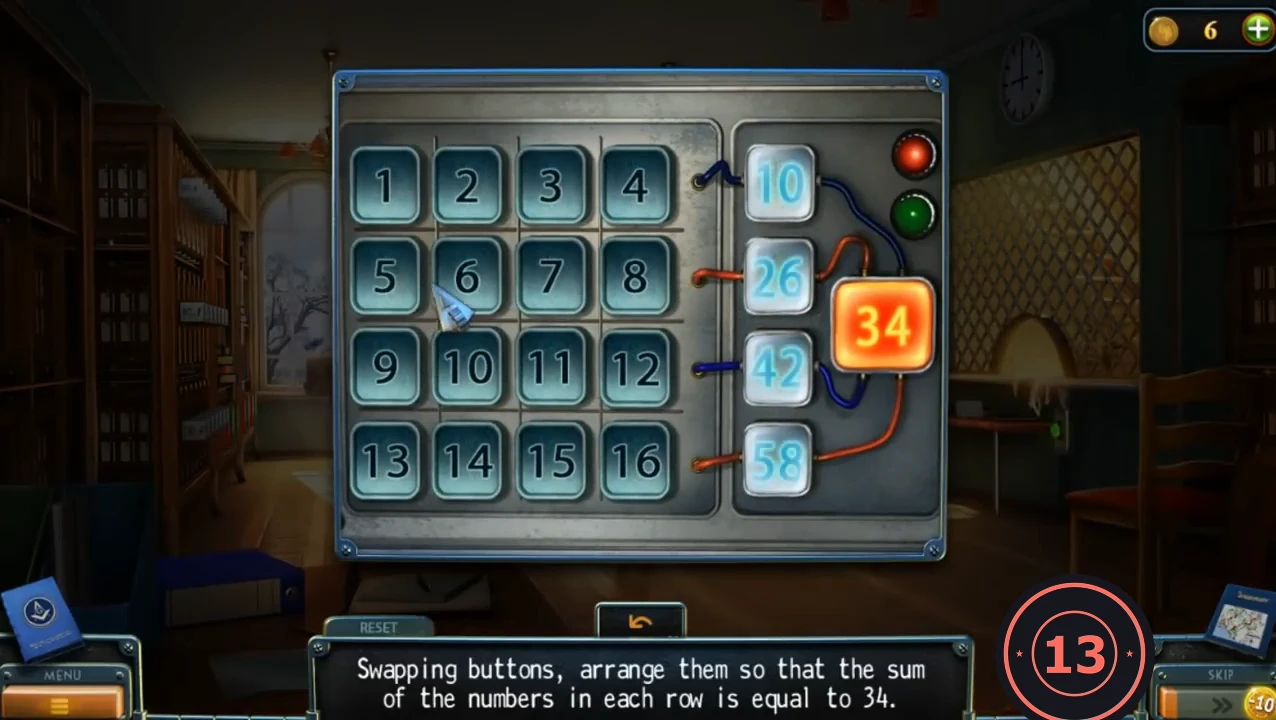
Goal: "Swapping buttons, arrange them so that the sum of the numbers in each row is equal to 34." Only the rows are checked.
- Place the two remaining BUTTONS in the keypad panel.
- Swap buttons until the rows read 13-10-5-6, 3-12-11-8, 9-14-7-4 and 1-2-15-16. Each row then adds up to 34.CODE13 10 5 6 / 3 12 11 8 / 9 14 7 4 / 1 2 15 16
- Take KEY 2 from the compartment.
The Key Card and the Lab
Take the KEY CARD from the key-card cabinet and use it on the green door in the back yard.
- In the key-card cabinet, pull out the panel to the right of 01_f (cards 01_f_20 to 01_f_25). Insert KEY 1 and KEY 2 in its two locks and take the KEY CARD.
- Return to the back yard and use the KEY CARD on the card reader of the green door. Laura confronts the masked figure in the lab.
Travis' Laboratory
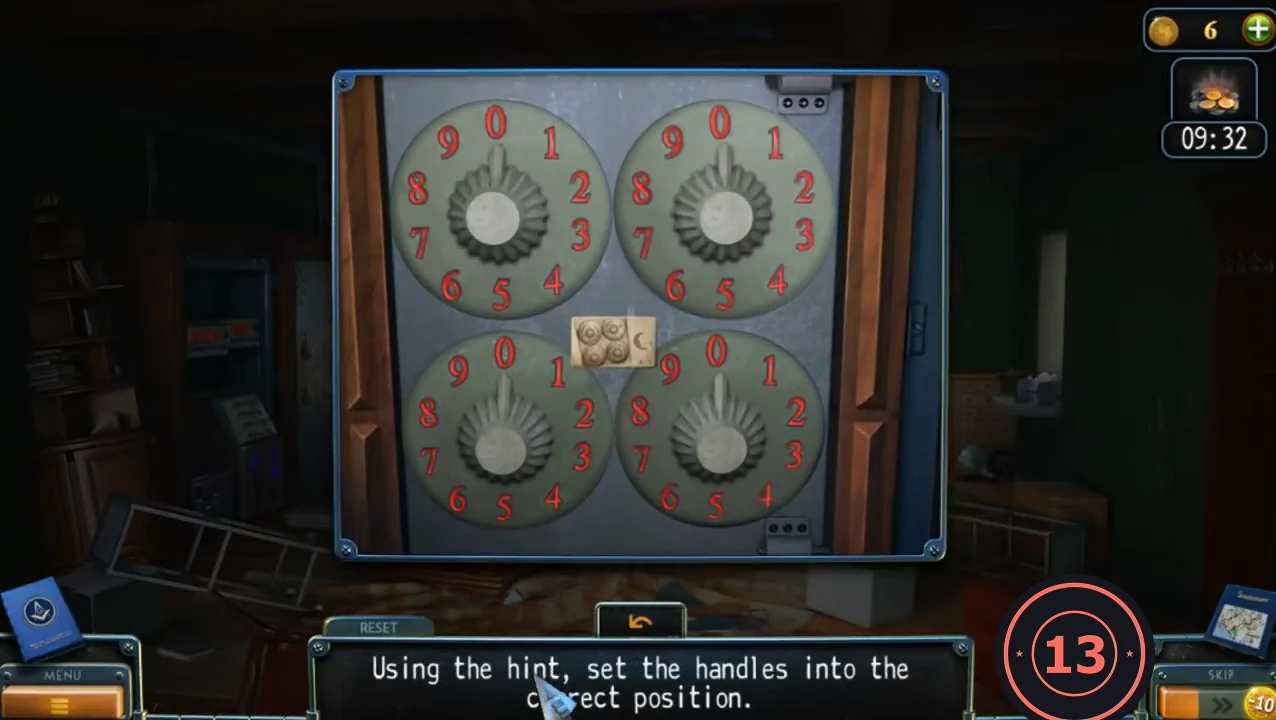
Search Travis' laboratory, open the wall safe with the hint note and try the analyser. Set the safe handles to 8, 5, 1 and 9.
- Zoom into the window on the left and take the HANDLE OF A KNIFE SWITCH. The lab door needs a key.
- Open the desk drawer with the KNIFE. Read Travis' diary and take the NOTE WITH A HINT.
- Place the NOTE WITH A HINT on the wall safe. A moon counts 4 and a star 1. Set the handles to 8 (top left), 5 (top right), 1 (bottom left) and 9 (bottom right).CODE8-5-1-9
- Take the TUBE from the safe and place it in the glass cube of the analyser on the right wall. The screen stays blank; new task 'Repair the device'.
- Zoom into the torn hose at the top left of the analyser and take the KEY lying below the tear.
- Open the lab door with the KEY and go up to the attic.
Attic and Roof
Gather boards, a burner and kerosene in the attic and on the roof, then break into the shed and climb down into the pumping station hall.
- Open the round box on the crate at the left and take the HAY, the PLATE and the BOWL OF KEROSENE. The aquarium on the right needs something for the socket under its wave disk.
- Go up the stairs on the left to the roof. Take the NAIL REMOVER from the roof floor.
- Zoom into the broken boards over the hole in the left foreground: a rope ties them down ("I need to cut the rope."). Cut the rope at its knot with the KNIFE, then take the SMALL BOARDS and the LARGE BOARDS.
- At the tar boiler on the right, take the EMPTY BURNER.
- Pull the nail from the metal sheet in front of the green shed with the NAIL REMOVER and fold the sheet back.
- Cut the rope tied at the shed door with the KNIFE, then lower the ROPE through the opening to pull the deadbolt.
- Combine the EMPTY BURNER with the BOWL OF KEROSENE to get the BURNER WITH KEROSENE.
- In the shed, heat the padlock of the trapdoor with the BURNER WITH KEROSENE and break it off with the NAIL REMOVER. Climb down into the pumping station hall.
Pumping Station Hall
The double door is chained and a piece of wire is missing in the debris. One corner is still dark, but you can already pick up the boards there.
- Zoom into the debris at the centre left: 'A piece of wire is missing.'
- Zoom into the dark corner ('It's dark. I need to turn on the light.'). Even in the dark you can collect the SMALL BOARDS and the LARGE BOARDS from the rubble. Something else is hidden in the corner; you will come back once there is light.
- Use the HANDLE OF A KNIFE SWITCH on the electrical panel to the right of the double door to open the wire puzzle.
Electrical Panel Wires
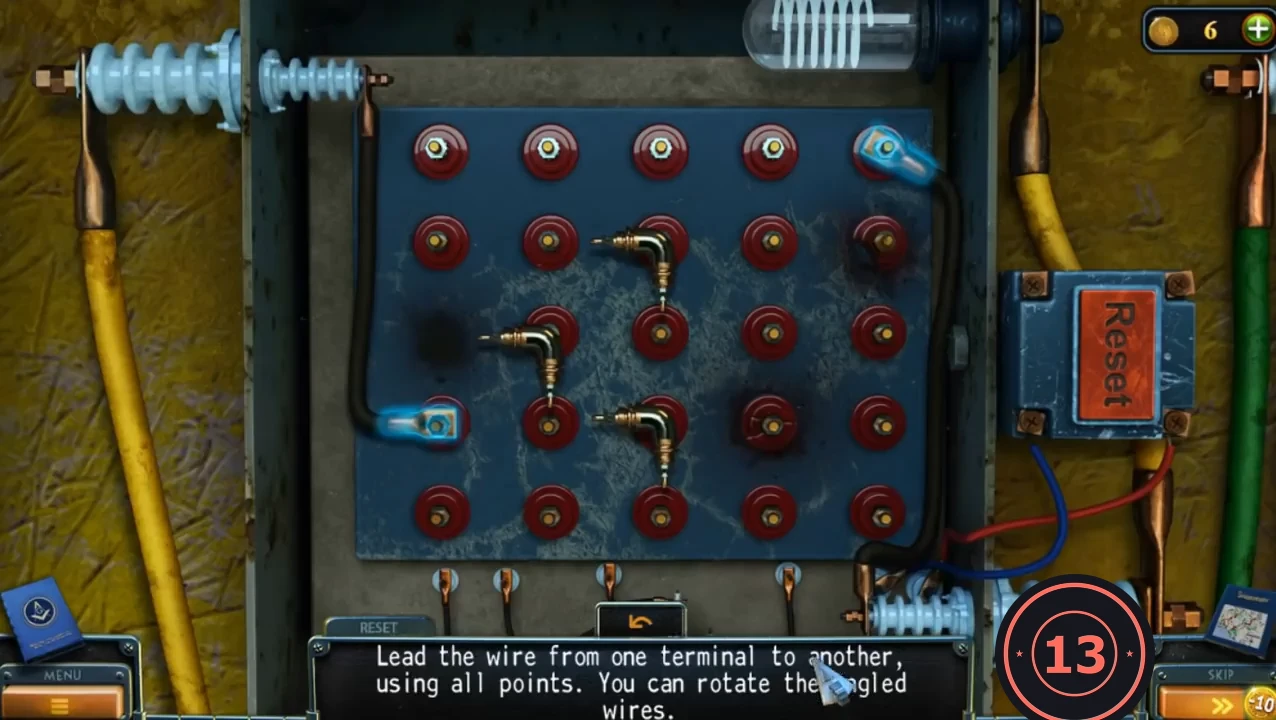
Goal: "Lead the wire from one terminal to another, using all points. You can rotate the angled wires." Each board is a 5 x 5 grid of posts, with a few posts missing or burnt out. Starting at the glowing terminal, draw the wire post to post until it reaches the other terminal and passes through every remaining post. Click an angled (elbow) wire to rotate it so that it bends the way your path does. The lamp above the board lights when the board is solved, and the next board (yellow, then green, then red) appears. Below, rows are counted from the top (R1-R5) and columns from the left (C1-C5).
- Yellow board (start terminal R4C1, end terminal R1C5; posts R3C1, R2C5 and R4C4 are not used): R4C1 > R5C1 > R5C2 > R4C2 > R4C3 > R5C3 > R5C4 > R5C5 > R4C5 > R3C5 > R3C4 > R2C4 > R2C3 > R3C3 > R3C2 > R2C2 > R2C1 > R1C1 > R1C2 > R1C3 > R1C4 > R1C5. Elbows: R2C3 joins down and right, R3C2 joins up and right, R4C3 joins left and down. Green board (start R2C1, end R5C5; post R1C3 is missing): R2C1 > R1C1 > R1C2 > R2C2 > R2C3 > R2C4 > R1C4 > R1C5 > R2C5 > R3C5 > R4C5 > R4C4 > R3C4 > R3C3 > R4C3 > R4C2 > R3C2 > R3C1 > R4C1 > R5C1 > R5C2 > R5C3 > R5C4 > R5C5. Elbows: R2C2 joins up and right, R3C3 joins right and down, R4C4 joins right and up. Red board (start R3C1, end R4C5; burnt post R4C4 is not used): R3C1 > R3C2 > R2C2 > R2C1 > R1C1 > R1C2 > R1C3 > R2C3 > R2C4 > R1C4 > R1C5 > R2C5 > R3C5 > R3C4 > R3C3 > R4C3 > R4C2 > R4C1 > R5C1 > R5C2 > R5C3 > R5C4 > R5C5 > R4C5. Elbows: R2C2 joins left and down, R2C4 joins left and up, R3C3 joins right and down.CODEYellow: R4C1-R5C1-R5C2-R4C2-R4C3-R5C3-R5C4-R5C5-R4C5-R3C5-R3C4-R2C4-R2C3-R3C3-R3C2-R2C2-R2C1-R1C1...R1C5. Green: R2C1-R1C1-R1C2-R2C2-R2C3-R2C4-R1C4-R1C5-R2C5-R3C5-R4C5-R4C4-R3C4-R3C3-R4C3-R4C2-R3C2-R3C1-R4C1-R5C1...R5C5. Red: R3C1-R3C2-R2C2-R2C1-R1C1-R1C2-R1C3-R2C3-R2C4-R1C4-R1C5-R2C5-R3C5-R3C4-R3C3-R4C3-R4C2-R4C1-R5C1...R5C5-R4C5.
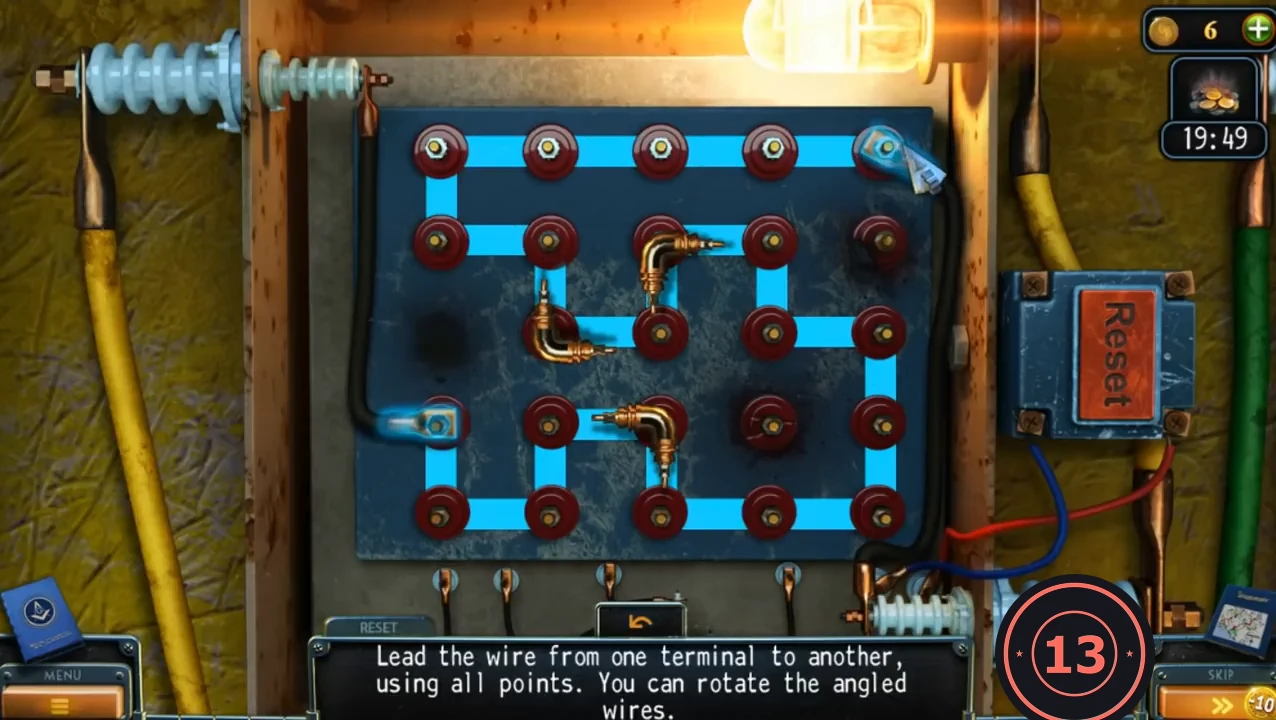
Yellow board solved: the lamp lights when the wire passes every working post from R4C1 to R1C5. 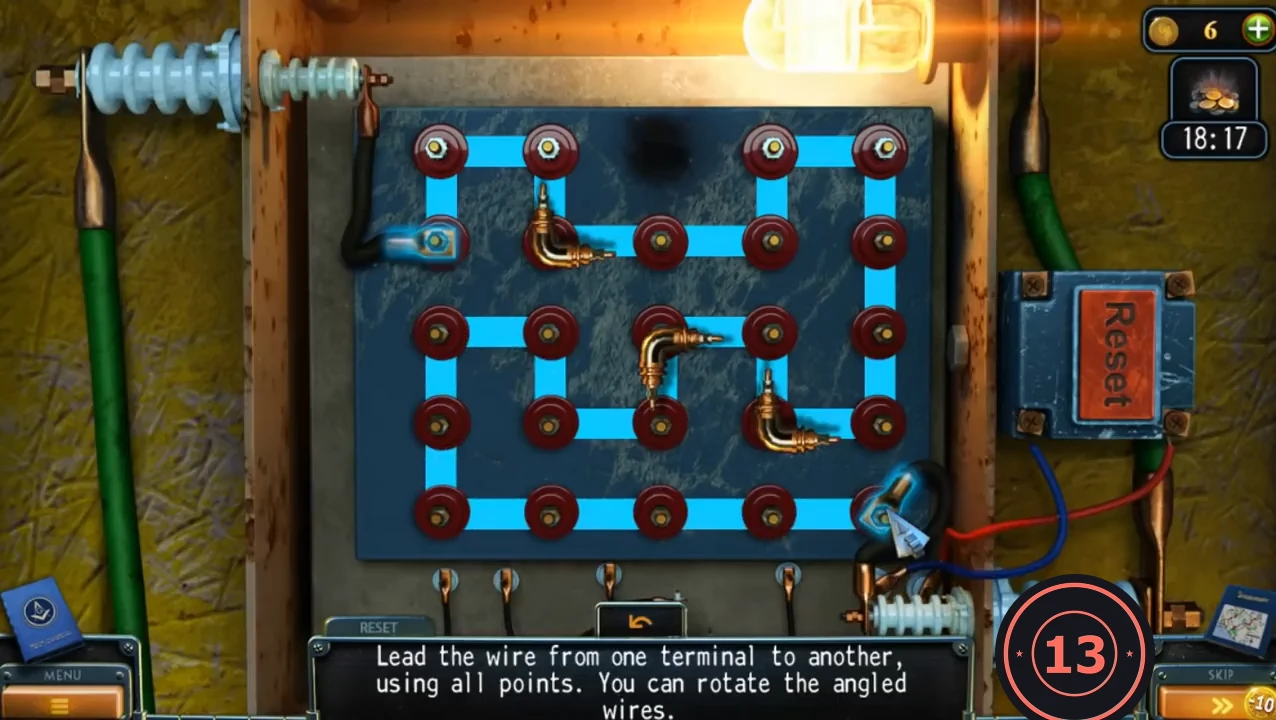
Green board solved: from R2C1 to R5C5, skipping the missing post R1C3. 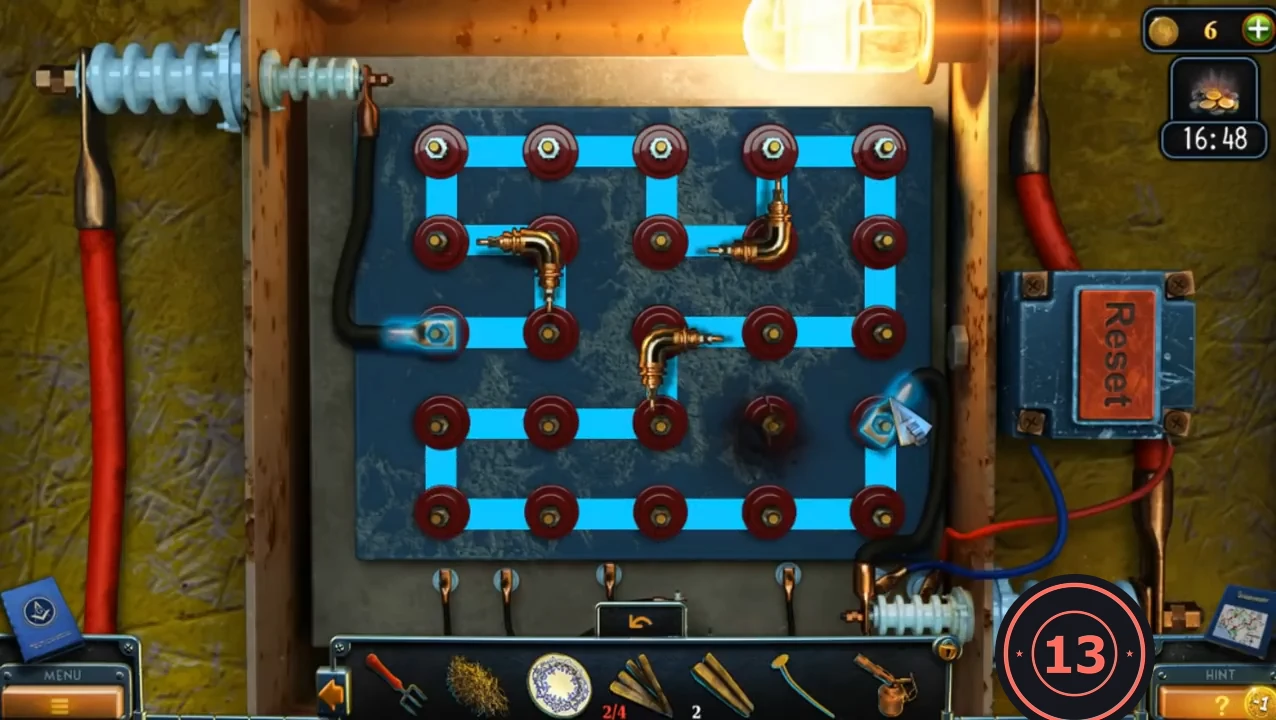
Red board solved: from R3C1 to R4C5, skipping the burnt post R4C4.
Tar for the Analyser
Heat the tar boiler on the roof to make TAR, repair the analyser hose and run the test that identifies the virus.
- In the attic, take the BALUSTER and two more SMALL BOARDS from the broken balustrade at the bottom of the left stairs.
- On the roof, place the SMALL BOARDS and LARGE BOARDS under the tar boiler and light them with the BURNER WITH KEROSENE.
- Put the PLATE on the ground at the left of the boiler and dip the BALUSTER in the tar to get the TAR-STAINED BALUSTER.
- Use the ladle hanging on the right of the boiler to fill the plate and take the TAR.
- Back in the lab, apply the TAR to the hole in the analyser hose.
- Turn the red valve wheel to pump the air out, pour the test tube onto the dish, place the dish on the lift and press the red button. The analyser identifies the Zinga virus.
- Take the CABLE from the analyser and strip its ends with the KNIFE.
Aquarium Slide Puzzle and the Exit
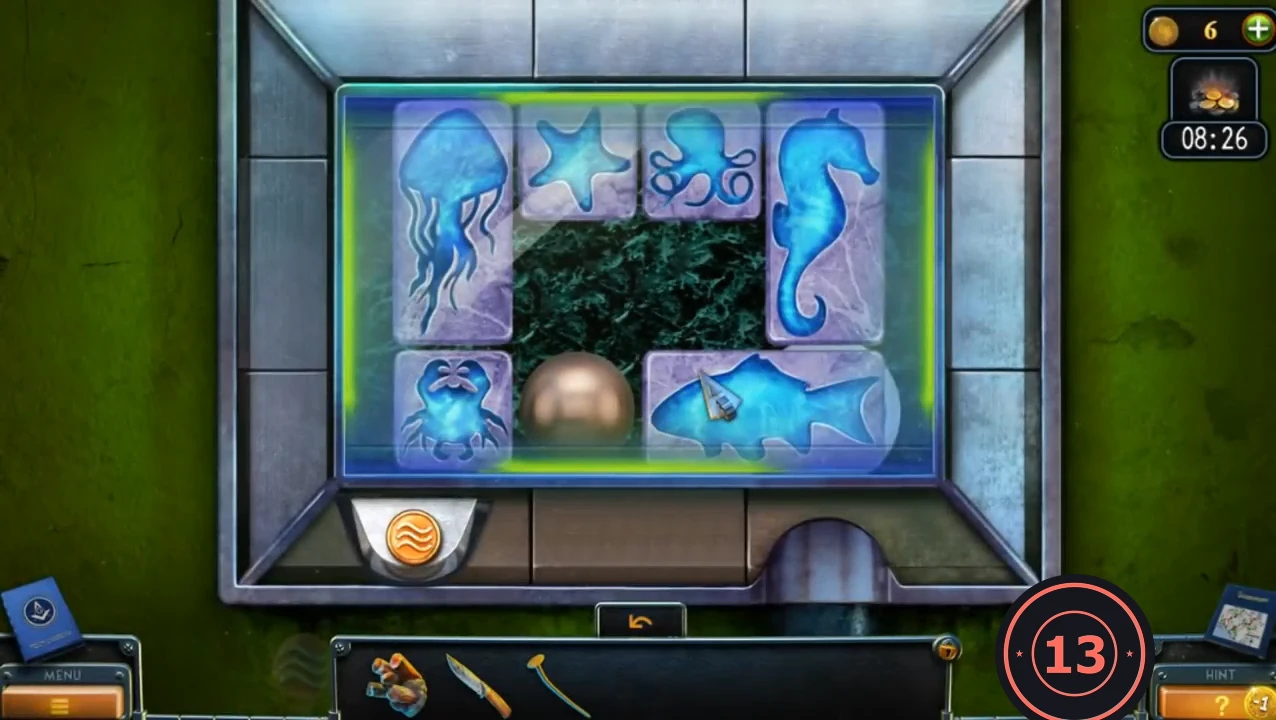
Goal: "Moving the blocks around, get the gem to a hole in the bottom right corner." The tank is a 4 x 3 frame. It holds a tall jellyfish, a tall seahorse, a wide fish, small star, octopus and crab tiles, and the gem. The four arrow buttons on the frame (up, down, left, right) tilt the tank, and every block slides as far as it can in that direction. RESET and SKIP are available.
- In the pumping hall, fit the CABLE between the broken wire ends in the debris. The dark corner lights up.
- Push the TAR-STAINED BALUSTER into the gap in the lit corner; the TRINKET sticks to the tar.
- In the attic, place the TRINKET in the round socket at the bottom of the aquarium to start the slide puzzle.
- Start position: jellyfish down the left column; star and octopus in the top middle; seahorse down the right column; crab, gem and fish along the bottom; two empty squares in the middle. Press the frame arrows in this order (U = up, D = down, L = left, R = right): U, L, D, R, U, R, D, L, U, R, D, R, U, L, D, R, U, L, D, R, D, R, U, L, D. The gem ends in the bottom-right corner over the hole and the tank opens.CODEU-L-D-R-U-R-D-L-U-R-D-R-U-L-D-R-U-L-D-R-D-R-U-L-D
- Take the KEY from the opened tank.
- In the pumping hall, open the padlock on the chained double door with the KEY and go outside. A worker tells Laura and Will that Travis bought half of a house in the suburbs.